# Data & Privacy Extensions
# Magento 2 Antispam Extension
### Installation and User Guide for Magento 2 Antispam Extension
**Table of Contents**
1. [*Installation* ](#bkmrk-installation)
- *Installation via app/code*
- *Installation via Composer*
2. [*Configuration Settings for Antispam Extension*](#bkmrk-configuration-settin)
- *General Settings*
- *Rate Limiter*
3. [*Frontend*](#bkmrk-frontend)
- *Invalid Search*
- *Rate Limiter*
### Installation [](#bkmrk-)
- **Installation via app/code:** Upload the content of the module to your root folder. This will not overwrite the existing Magento folder or files, only the new contents will be added. After the successful upload of the package, run below commands on Magento 2 root directory.
```php
php bin/magento setup:upgrade
php bin/magento setup:di:compile
php bin/magento setup:static-content:deploy
```
- **Installation via Composer:** Please follow the guide provided in the below link to complete the installation via composer.
[https://docs.scommerce-mage.com/magento-2-extensions/installation-via-composer/installation-via-composer](https://docs.scommerce-mage.com/magento-2-extensions/installation-via-composer/installation-via-composer)
### Configuration Settings for Antispam [](#bkmrk--1)
Go to **Admin > Stores > Configuration > Scommerce Configuration > Antispam Catalog Search**
#### General Settings [](#bkmrk--3)
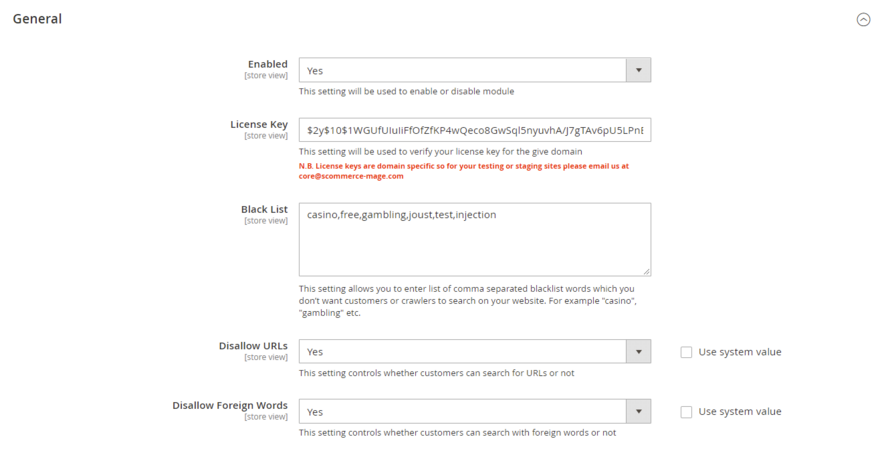
- **Enabled –** Select "Yes" or "No" to enable or disable the module.
- **License Key –** Please add the license for the extension which is provided in the order confirmation email. Please note license keys are site URL specific. If you require license keys for dev/staging sites then please email us at .
- **Black List –** You can blacklist certain keywords from the search of your website. Enter omma separated blacklist words which you don't want customers or crawlers to search on your website. For example "casino", "gambling" etc.
- **Disallow URLs–** Select "no" to enter URL's in your website's search and "yes" to allow.
- **Disallow Foreign Words–** Use this setting to define whether users can enter Foreign words in the search or not.
[](https://docs.scommerce-mage.com/uploads/images/gallery/2025-05/PZmimage.png)
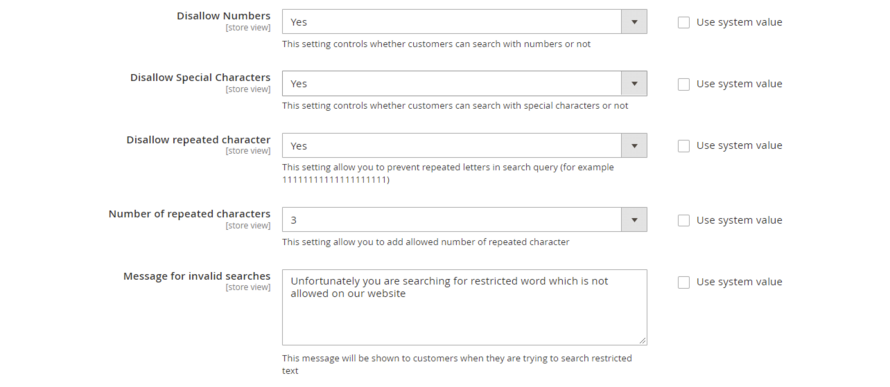
- **Disallow Numbers–** Select "no" to allow customers to search with numbers and "yes" to disallow.
- **Disallow Special Characters–** Select "no" to allow customers to search with special characters and "yes" to disallow.
- **Disallow repeated character–** Select "no" to allow customers to search with repeated characters and "yes" to disallow. It prevents repeated letters in the search query.
- **Number of repeated characters -** Enter the maximum allowed number of repeated characters
- **Message for invalid searches–** Enter the message to be displayed when an invalid search is made by the customer.
[](https://docs.scommerce-mage.com/uploads/images/gallery/2025-05/Dglimage-1.png)
#### Rate Limiter [](#bkmrk--3)
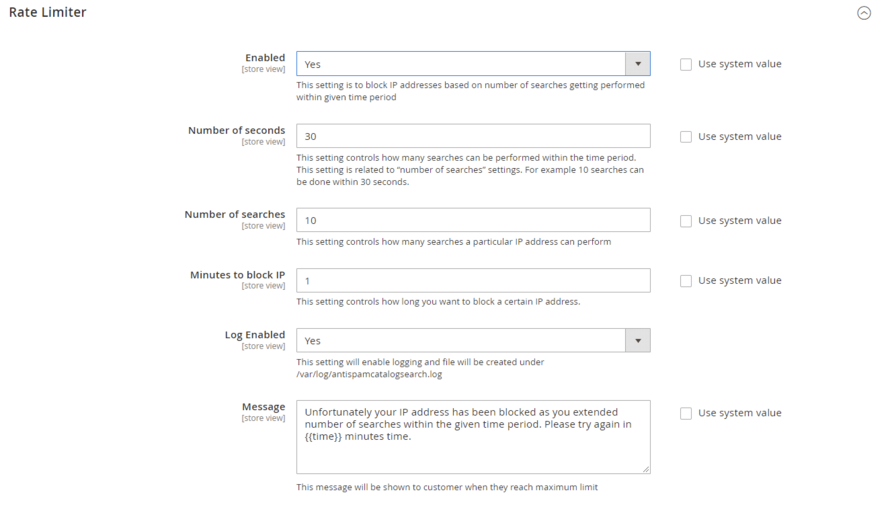
- **Enabled–** Select "yes" to block Ip address of the customers based on the number of searches performed in a specific time.
- **Number of seconds–** Enter the time limit under which a user can make specific searches. If the number of searches exceeds this time limit then their IP will be temprorily blocked.
- **Number of searches–** Enter the number of searches allowed for a user under the time restraint entered in the above setting.
- **Minutes to block IP–** Define the Ip block time for users.
- **Log Enabled–** Select "yes" to create logs under /var/log/antispamcatalogsearch.log
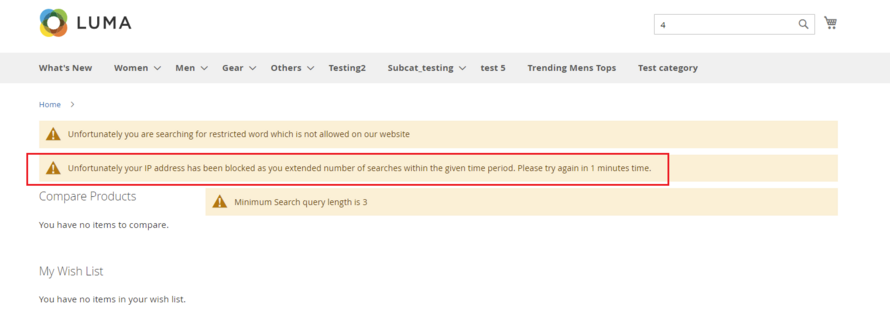
- **Message–** Enter the message to be displayed when the IP of an user is blocked.
[](https://docs.scommerce-mage.com/uploads/images/gallery/2025-05/8RDimage-2.png)
### Frontend
#### Invalid Search
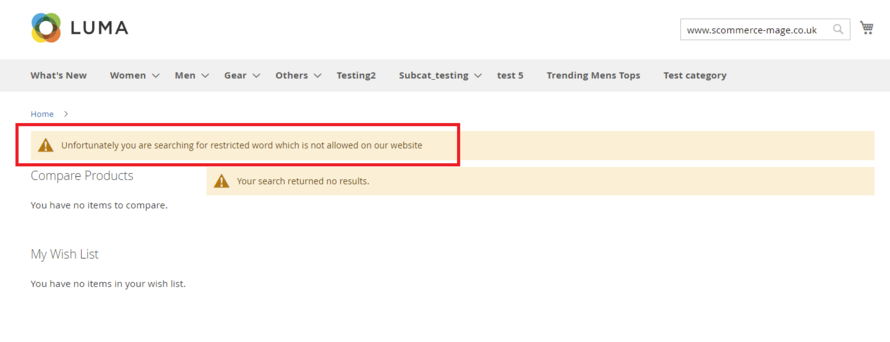
When an user searches with diallowed character then the warning message appears on the frontend as shown below:-
[](https://docs.scommerce-mage.com/uploads/images/gallery/2025-05/pHBimage-3.png)
#### Rate Limiter
When an user exceeds the search limit then the IP block message appears as shown below:-
[](https://docs.scommerce-mage.com/uploads/images/gallery/2025-05/0D3image-4.png)
If you have a question related to this extension please check out our [**FAQ Section**](https://www.scommerce-mage.com/magento-2-antispam-catalog-search.html#customfaq) first. If you can't find the answer you are looking for then please contact [**support@scommerce-mage.com**](mailto:core@scommerce-mage.com)**.**
# Magento 2 Not On The High Street Integration
### Installation and User Guide for Magento 2 Noths Integration Extension
**Table of Contents**
1. [*Installation* ](#bkmrk-installation)
- *Installation via app/code*
- *Installation via Composer*
2. [*Configuration Settings for Noths Integration* ](#bkmrk-configuration-settin)
- *General Settings*
- *Integration Settings*
3. [*Noths Order(s) View from Back-end* ](#bkmrk-noths-order%28s%29-view-)
- *Noths Order Import*
- *Noths Order Details on Order View Page*
- *Noths Order Logs*
### Installation [](#bkmrk-)
- **Installation via app/code:** Upload the content of the module to your root folder. This will not overwrite the existing Magento folder or files, only the new contents will be added. After the successful upload of the package, run below commands on Magento 2 root directory.
```php
php bin/magento setup:upgrade
php bin/magento setup:di:compile
php bin/magento setup:static-content:deploy
```
- **Installation via Composer:** Please follow the guide provided in the below link to complete the installation via composer.
[https://docs.scommerce-mage.com/magento-2-extensions/installation-via-composer/installation-via-composer](https://docs.scommerce-mage.com/magento-2-extensions/installation-via-composer/installation-via-composer)
### Configuration Settings for Noths Integration [](#bkmrk--1)
Go to **Admin > Stores > Configuration > Scommerce Configuration > Noths**
#### General Settings
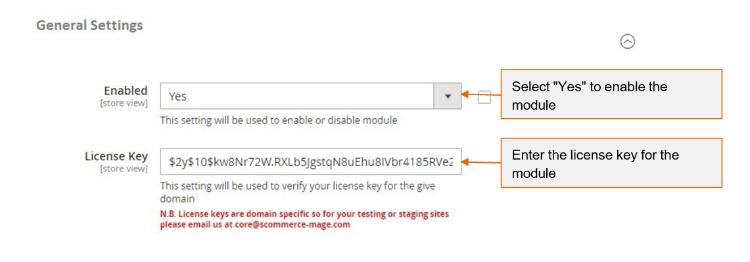
- **Enabled -** Select "Yes" or "No" to enable or disable the module.
- **License Key -** Please add the license for the extension which is provided in the order confirmation email. Please note license keys are site URL specific. If you require license keys for dev/staging sites then please email us at .
[](https://docs.scommerce-mage.com/uploads/images/gallery/2025-05/BWbimage.jpg)
#### Integration Settings [](#bkmrk--3)
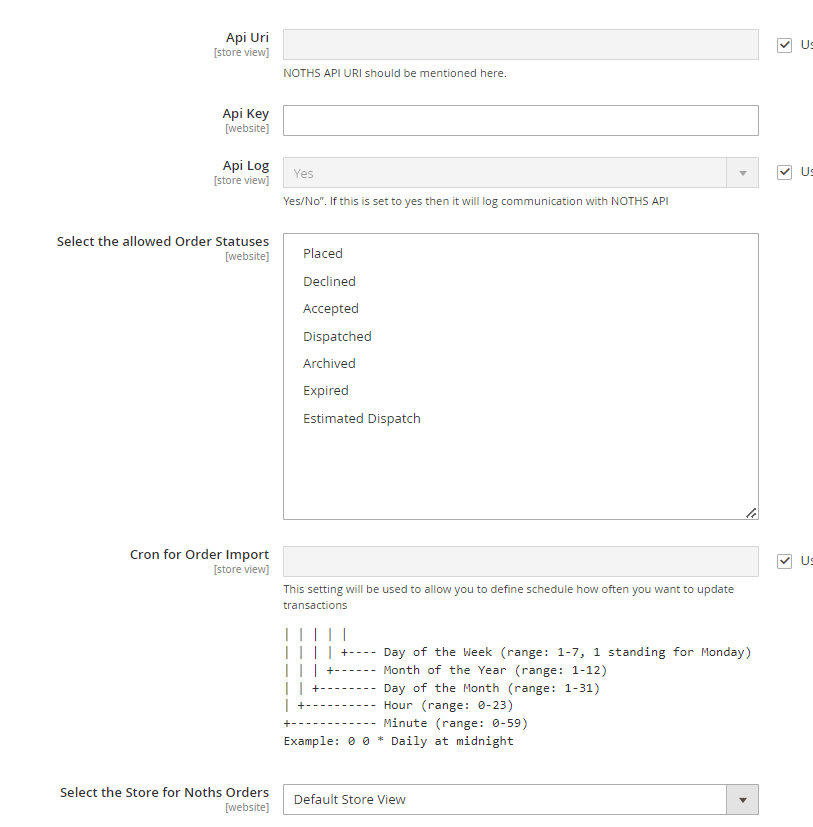
- **API Uri -** NOTHS API URI should be mentioned here.
- **API Key -** Please enter API Key
- **API Log -** Select "Yes" to enable the API Log. If set to "Yes" then it will log communication with Noths API.
- **Select the allowed order statuses -** Please select order status which will be imported from Noths
- **Cron for Order Import -** Please add define schedule how often you want to update transactions
- **Select the store for NOTHS Orders -** Please select the store for Noths orders.
[](https://docs.scommerce-mage.com/uploads/images/gallery/2025-05/2r3image-5.png)
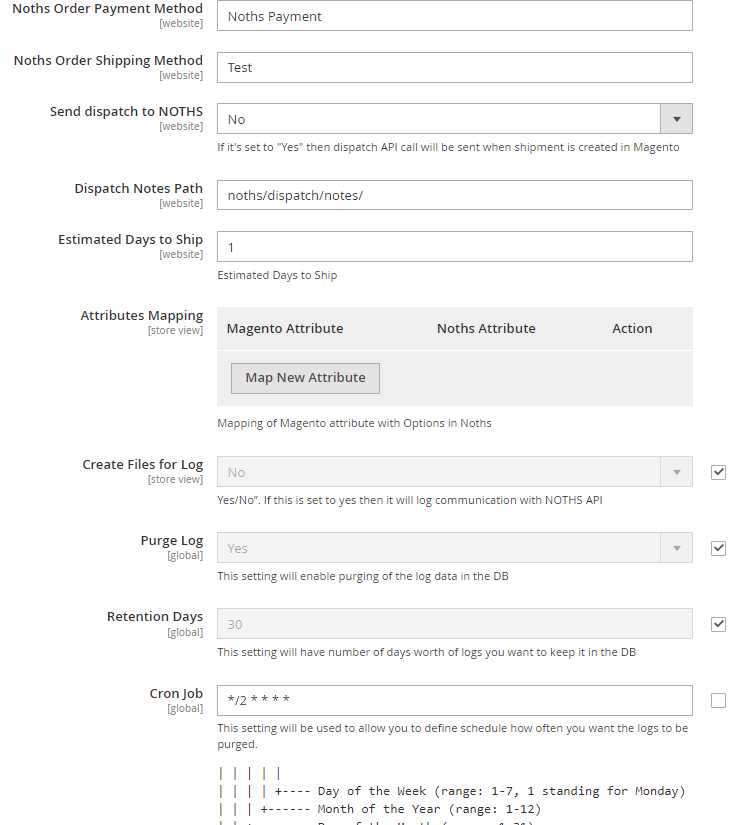
- **Noths Order Payment Method -** Please add the payment method which will be used to import orders from Noths.
- **Noths Order Shipping Method -** Please add the shipping method which will be used to import orders from Noths.
- **Send dispatch to NOTHS -** Select Yes/No. If this is set to yes then dispatch API call will be sent when shipment is created in Magento.
- **Dispatch Notes Path -** Please add the dispatch notes path in media/noths/dispatchnote/\[order number\].pdf
- **Estimated Days to ship -** Please add the days for estimated days to ship.
- **Attributes Mapping -** Please add the mapping of Magento attribute with options in Noths.
- **Create Files for Log -** Select Yes/No". If this is set to yes then it will log communication with NOTHS API
- **Purge Log -** Please enable purging of the log data in the DB.
- **Retention Data -** Please add number of days worth of logs you want to keep it in the DB.
- **Cron Job -** Please add define schedule how often you want the logs to be purged.
[](https://docs.scommerce-mage.com/uploads/images/gallery/2025-05/eHSimage-6.png)
### Noths Order(s) View from Back-end [](#bkmrk--6)
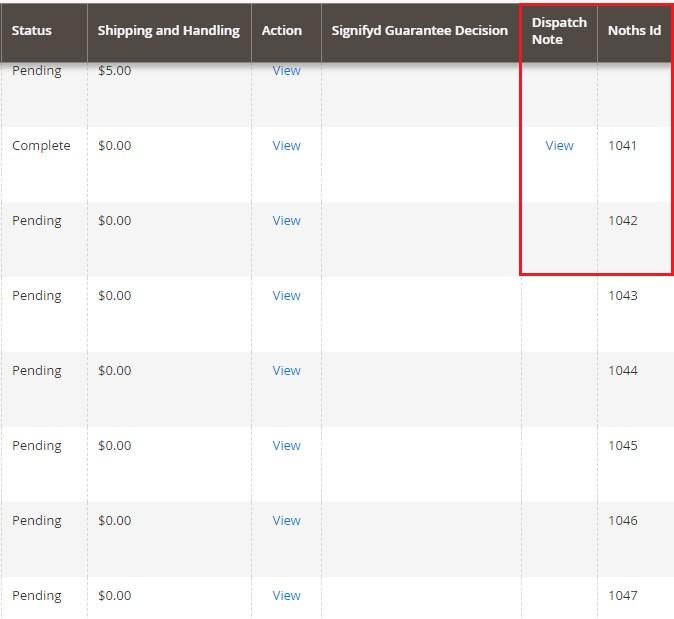
- **Noths Order Import -** You can view imported Noths order(s) from **Admin > Sales> Orders.** This grid will have "Dispatch Note " and "Noths Id".
[](https://docs.scommerce-mage.com/uploads/images/gallery/2025-05/Vipimage-1.jpg)
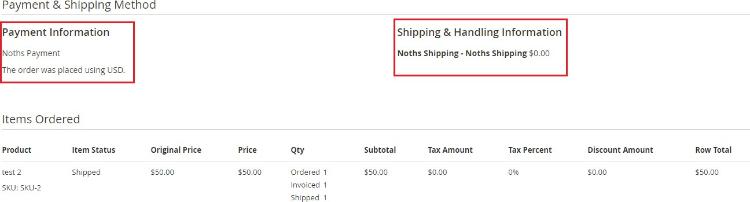
- **Noths Order Details on Order View Page -** You can view Noths order details at **Admin > Sales > Select Order > View.**
**[](https://docs.scommerce-mage.com/uploads/images/gallery/2025-05/iu4y774.jpg)**
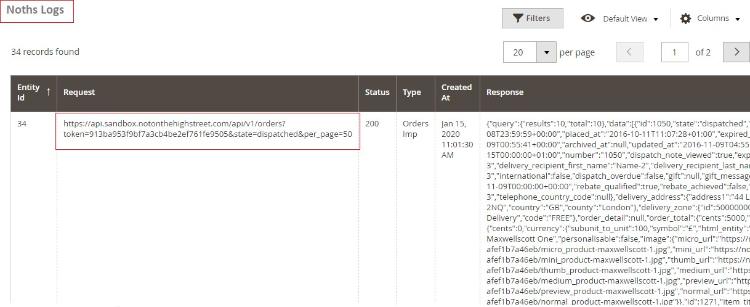
- **Noths Order Logs -** To view Noths Logs go to **Admin > Scommerce Noths > Order Logs.** This log will have Entity Id, Request, Status, Type, Created At, and Response.
[](https://docs.scommerce-mage.com/uploads/images/gallery/2025-05/BNXimage-2.jpg)
If you have a question related to this extension please check out our [**FAQ Section** ](https://www.scommerce-mage.com/magento-2-noths-integration.html#customfaq)first. If you can't find the answer you are looking for then please contact [**support@scommerce-mage.com**](mailto:core@scommerce-mage.com)**.**
# Magento 2 GDPR Compliance: Anonymisation of order data
### Installation and User Guide for Magento 2 GDPR Compliance: Anonymisation of Transaction Data Extension
**Table of Contents**
1. [*Installation* ](#bkmrk-installation)
- *Installation via app/code*
- *Installation via Composer*
2. [*Configuration Settings for GDPR* ](#bkmrk-configuration-settin)
- *General Settings*
- *Order and Quote Anonymisation Settings*
- *Privacy Settings*
3. [*Configuration Settings for Cookie Popup* ](#bkmrk-configuration-settin-1)
- *General Settings*
- *Popup Styling*
- *Additional Tabs*
4. [*Admin Configuration for Manage Cookie Choices* ](#bkmrk-admin-configuration-)
- *Manage Choice List*
- *Add New Cookie Choice*
5. *[Customers Details in Privacy Policy Consent](#bkmrk-customers-details-in)*
6. *[Anonymize Orders from Admin Section](#bkmrk-anonymize-orders-fro)*
7. *[Newsletter Subscription](#bkmrk-newsletter-subscript)*
8. [*Enable / Disable Tracking Without GTM*](#bkmrk-enable-%2F-disable-tra)
- *Using Module*
- *Manually Adding Code*
9. [*Integrate Cookies with GTM Pro Tracking* ](https://docs.scommerce-mage.com/magento-2-gdpr-compliance-anonymisation-of-order-data.md#integrate-cookies-with-gtm-pro-tracking)
10. [*Front-end Site View* ](#bkmrk-front-end-site-view)
- *Front-end Site View - Integrate Cookies with GTM Pro Tracking*
- *Cookie Pop-up- Cookie Accept*
- *Cookie Pop-up- Cookie Accept for different store views*
- *Cookie Preferences*
- *Check the Value of the Accepted Cookies on the Front-end*
- *Visibility of "Accept All" Button on the Cookie Popup*
- *Newsletter Subscription*
- *Privacy Policy Checkbox on Registration and Checkout Page*
- *Delete Account from My Account Section*
### Installation [](#bkmrk-)
- **Installation via app/code:** Upload the content of the module to your root folder. This will not overwrite the existing Magento folder or files, only the new contents will be added. After the successful upload of the package, run below commands on Magento 2 root directory.
```php
php bin/magento setup:upgrade
php bin/magento setup:di:compile
php bin/magento setup:static-content:deploy
```
- **Installation via Composer:** Please follow the guide provided in the below link to complete the installation via composer.
[https://docs.scommerce-mage.com/magento-2-extensions/installation-via-composer/installation-via-composer](https://docs.scommerce-mage.com/magento-2-extensions/installation-via-composer/installation-via-composer)
### Configuration Settings for GDPR [](#bkmrk--1)
Go to **Admin > Stores > Configuration > Scommerce Configuration > GDPR**
#### General Settings [](#bkmrk--2)
- **Enabled -** Select "Yes" or "No" to enable or disable the module.
- **License Key -** Please add the license for the extension which is provided in the order confirmation email. Please note license keys are site URL specific. If you require license keys for dev/staging sites then please email us at .
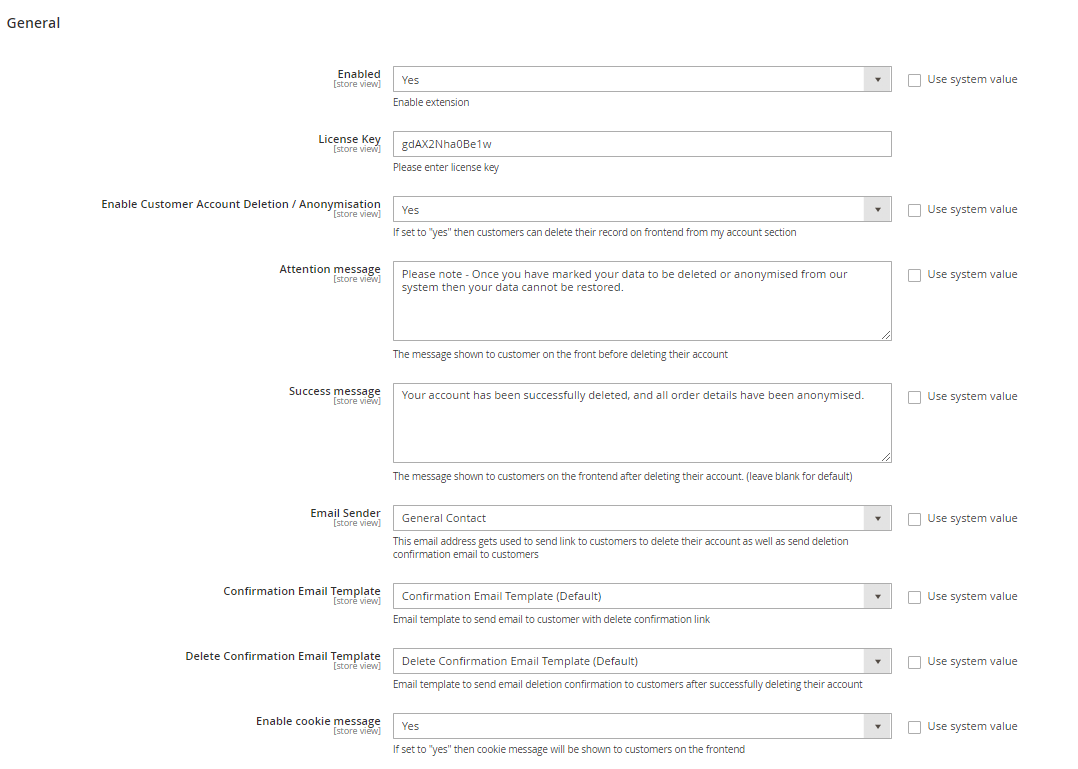
- **Enable Customer Account Deletion/ Anonymisation -** Set to "Yes" if you want to delete record on the frontend from my account.
- **Attention Message -** The message shown to customers on the frontend before deleting the account.
- **Success Message -** The message shown to customers on the frontend after deleting the account.
- **Email Sender -** Select email sender. The email address used to send the link to the customer to delete their account and confirmation email about deletion. It also sends customer data to administrator just before deleting.
- **Confirmation Email Template -** Select confirmation email template.
- **Delete Confirmation Email Template -** Select template for delete confirmation email.
- **Enable Cookie Message** - This allow you to enable or disable the module.
[](https://docs.scommerce-mage.com/uploads/images/gallery/2025-06/image-2025-06-10t151317-120.png)
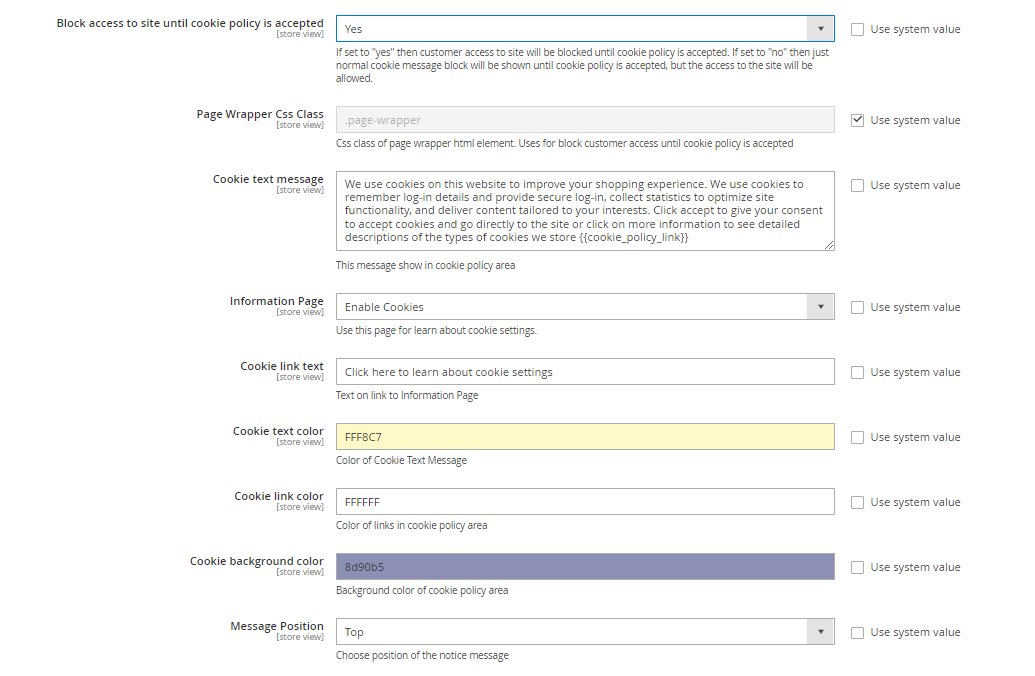
- **Block access to site until cookie policy is accepted -** If set to "Yes" then customer access to site will be blocked until cookie policy is accepted. If set to "No" then just normal cookie message block will be shown until cookie policy is accepted, but the access to the site will be allowed.
- **Page Wrapper Css Class - Add** the page wrapper Css class.
- **Cookie text message -** Enter cookie text message, if you want to display message in cookie policy area.
- **Information Page -** Use this page to learn about cookie settings.
- **Cookie link text -** Text on link to information page.
- **Cookie text color -** Color of cookie text message.
- **Cookie link color -** Cookie of link in cookie policy area.
- **Cookie background color -** Background color of cookie policy area.
- **Message Position -** Select position "Top/Bottom" of the cookie notification message.
[](https://docs.scommerce-mage.com/uploads/images/gallery/2025-06/image-2025-06-10t151620-605.png)
### Order and Quote Anonymisation Settings [](#bkmrk--5)
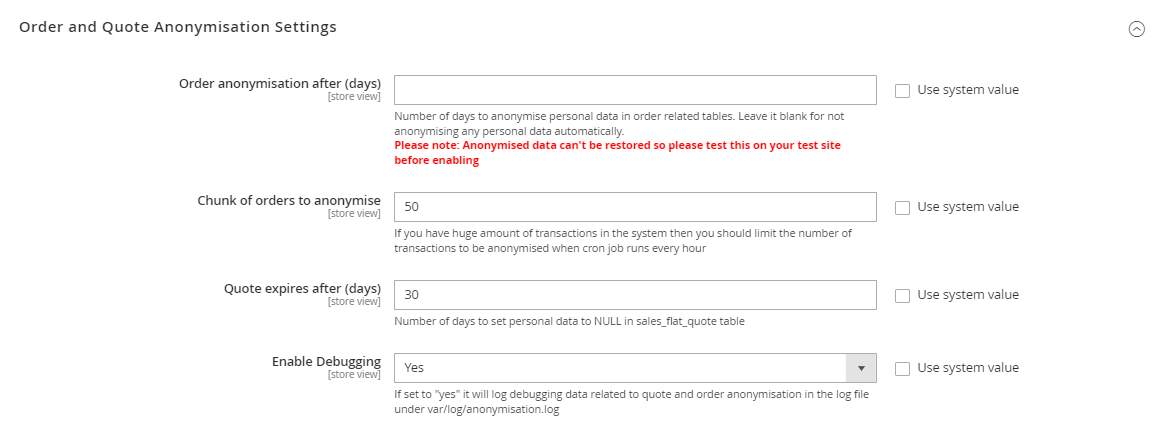
- **Order anonymisation after (days) -** Enter the number of days to anonymize personal data in order related tables. Leave it blank, if you don't want to anonymize any personal data automatically.
- **Chunk of order to anonymize -** If you have a huge amount of transactions in the system, then you should limit the number of transactions to be anonymized when the cron job runs every hour.
- **Quote expires after (days) -** Enter number of days to set personal data to NULL in sales\_flat\_quote table.
- **Enable Debugging -** If set to "Yes" it will log debugging data related to quote and order anonymisation in the log file under var/log/anonymisation log.
[](https://docs.scommerce-mage.com/uploads/images/gallery/2025-06/image-2025-06-10t151732-655.png)
### Privacy Settings [](#bkmrk--7)
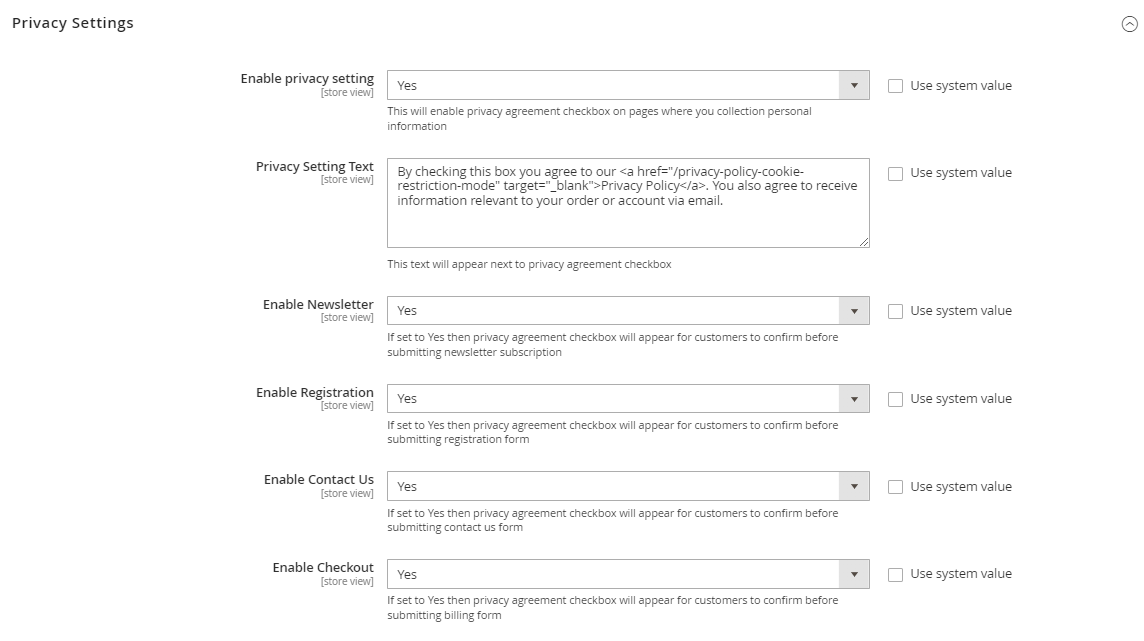
- **Enable Privacy Setting -** This will enable privacy agreement checkbox on pages where you collect personal data.
- **Privacy Setting Text -** This text will appear next to privacy agreement checkbox.
- **Enable Newsletter -** If set to "Yes" then privacy agreement checkbox will appear for the customers to confirm before submitting the newsletter subscription.
- **Enable Registration -** If set to "Yes" then privacy agreement checkbox will appear for the customers to confirm before submitting the registration form.
- **Enable Contact us -** If set to "Yes" then privacy agreement checkbox will appear for customers to confirm before submitting the contact us form.
- **Enable Checkout -** If set to "Yes" then privacy agreement checkbox will appear for customers to confirm before submitting the billing form.
[](https://docs.scommerce-mage.com/uploads/images/gallery/2025-06/image-2025-06-10t151827-865.png)
### Configuration Settings for Cookie Popup [](#bkmrk--9)
Go to **Admin > Stores > Configuration > Scommerce Configuration > Cookie Popup**
#### General Settings [](#bkmrk--10)
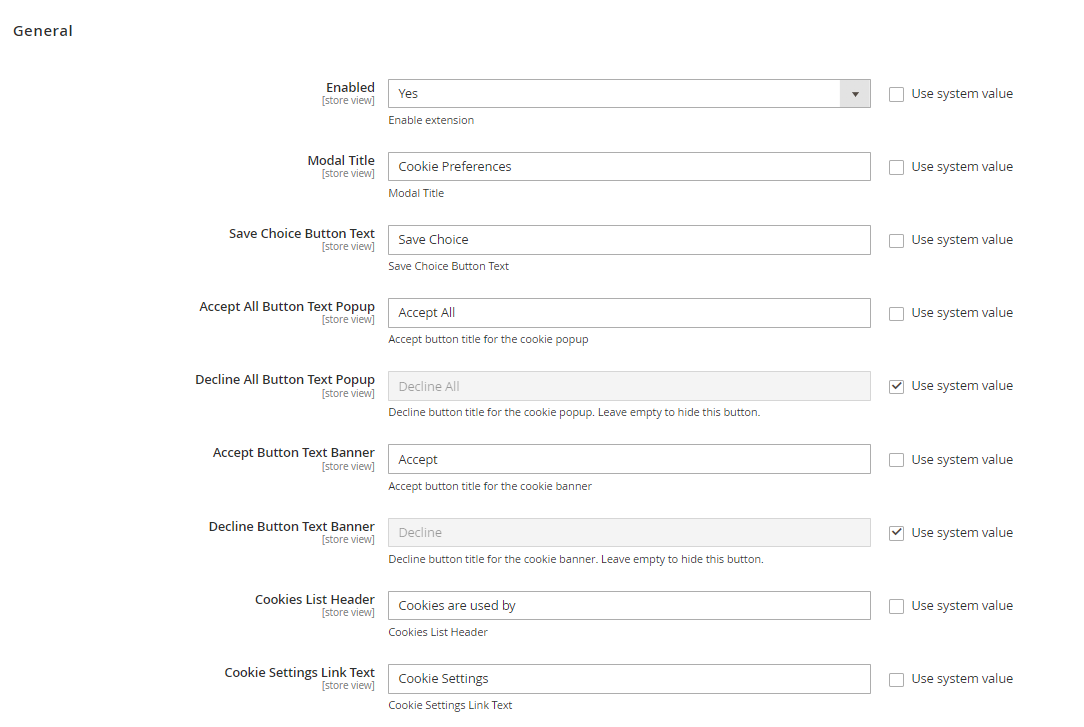
- **Enabled -** Select "Yes" or **"**No**"** to enable or disable the module.
- **Modal Title -** Enter name of the modal title, this will be shown on the frontend cookie popup modal. We've set modal title as "Cookie preferences".
- **Save Choice Button Text -** Enter the title of the save choice button. Click on this button will save the cookies choice. Whatever the current cookie choice is there it will save that choice.
- **Accept All Button Text Popup-** Enter title for cookie popup accept all button.
- **Decline All Button Text Popup-** Enter title for cookie popup Decline all button. Leave the field empty to hide this button in the cookie popup.
- **Accept Button Text banner-** Enter title for cookie banner accept button.
- **Decline Button Text banner-** Enter title for cookie banner Decline button. Leave the field empty to hide this button in the cookie popup.
- **Cookies List Header -** Title of the block for the "Used by" list. Cookies name will be shown under this cookies list header. You can see "Used by" list on the frontend Cookie popup.
- **Cookie Settings Link Text -** This link will be shown on the frontend cookies message to show Cookie Popup Settings. Click on this link will open Cookie popup.
[](https://docs.scommerce-mage.com/uploads/images/gallery/2025-06/image-2025-06-10t151928-390.png)
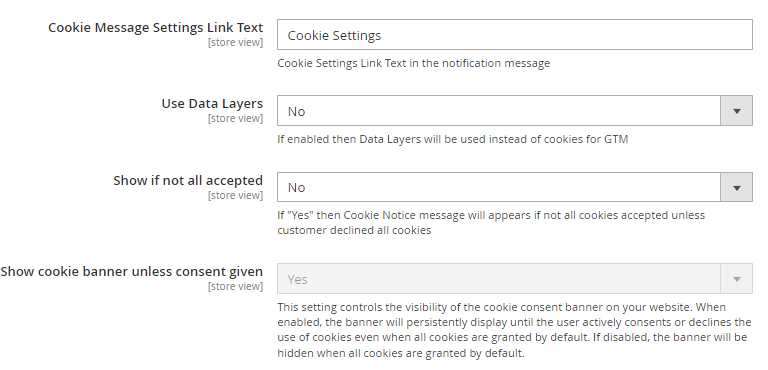
- **Cookie Message Settings Link Text -** Please add the cookie message link text
- **Use Data Layers -** Select "Yes/No". If set to "Yes" then Data Layers will be used, instead of cookies for GTM. If set to "No", then it won't add Data Layers.
- **Show if not all accepted -** Select "Yes/No". If set to "Yes" then Cookie notice message will appear if not all cookie accepted.
- **Show cookie banner unless consent given -** Select Yes/No. If set to "Yes" then it controls the visibility of the cookie consent banner on your website. When enabled, the banner will persistently display until the user actively consents or declines the use of cookies even when all cookies are granted by default. If disabled, the banner will be hidden when all cookies are granted by default.
[](https://docs.scommerce-mage.com/uploads/images/gallery/2025-06/image-2025-06-10t152025-799.png)
### Popup Styling [](#bkmrk--13)
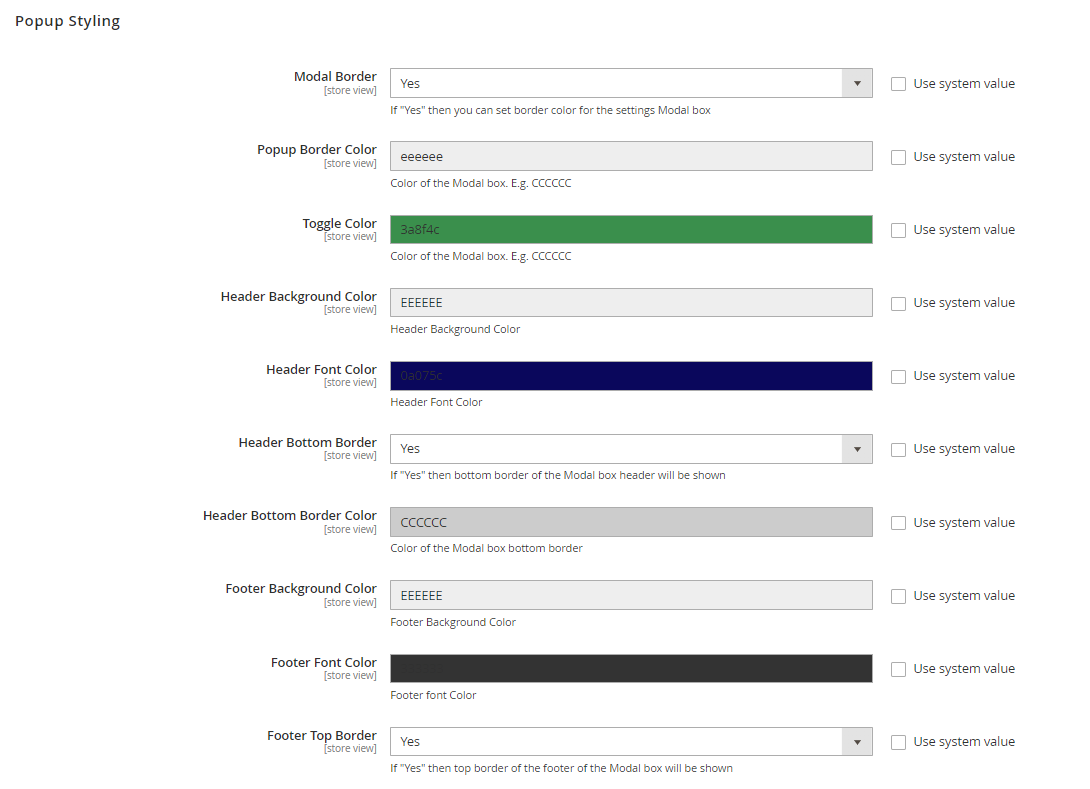
- **Modal Border -** Select "Yes", if you want to set modal border. If "Yes" then you can set border color for the settings Modal box.
- **Popup Border Color -** Enter popup border color. We've set the popup border color white, which you can see in the screenshot.
- **Toggle Color -** Enter Toggle color. We've set the toggle color. which you can see in the screenshot.
- **Header Background Color -** Enter header background color. Background color of the Modal box title.
- **Header Font Color -** Enter header font color.
- **Header Bottom Border -** Select "Yes", if you want to set the bottom border. If "Yes" then bottom border of the Modal box header will be shown.
- **Header Bottom Border Color -** Enter header bottom color. We've set the red header bottom border.
- **Footer Background Color -** Enter footer background color.
- **Footer Font Color -** Enter footer font color.
- **Footer Top Border -** Select "Yes", if you want to set footer top border. If "Yes" then top border of the footer of the Modal Box will be shown.
[](https://docs.scommerce-mage.com/uploads/images/gallery/2025-06/image-2025-06-10t152104-515.png)
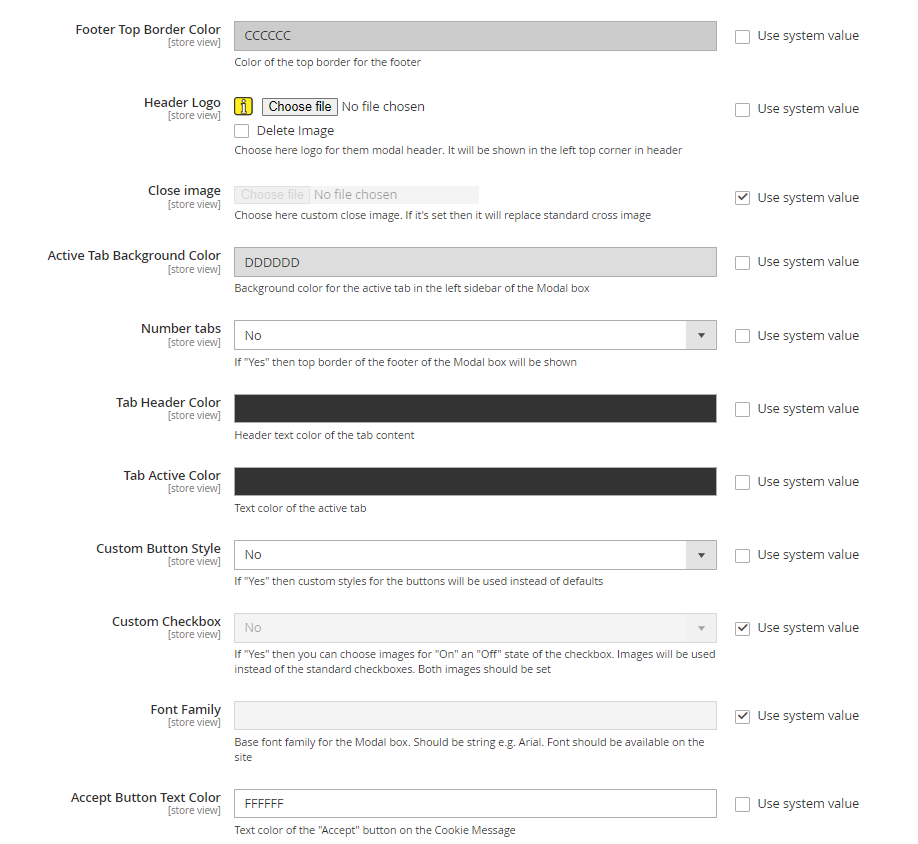
- **Footer Top Border Color -** Enter footer top border color.
- **Header Logo -** Choose logo for the modal header. It will be shown in the left top corner in header.
- **Close Image -** Upload close image.
- **Active Tab Background Color -** It will highlight the selected choice text.
- **Number Tabs -** Select "Yes", if you want number tabs on cookie modal.
- **Tab Header Color -** Enter tab header color.
- **Tab Active Color -** Enter active tab color.
- **Custom Button Style -** Select "Yes", if you want to style button.
- **Custom Checkbox -** Select "Yes", if you want to show cookie choice button.
- **Font Family -** Enter base font family for the Modal Box. Should be string e.g. Arial. Font should be available on the site.
- **Accept Button Text Color -** Enter text color of the "Accept" button on the Cookie Message
[](https://docs.scommerce-mage.com/uploads/images/gallery/2025-06/image-2025-06-10t152212-896.png)
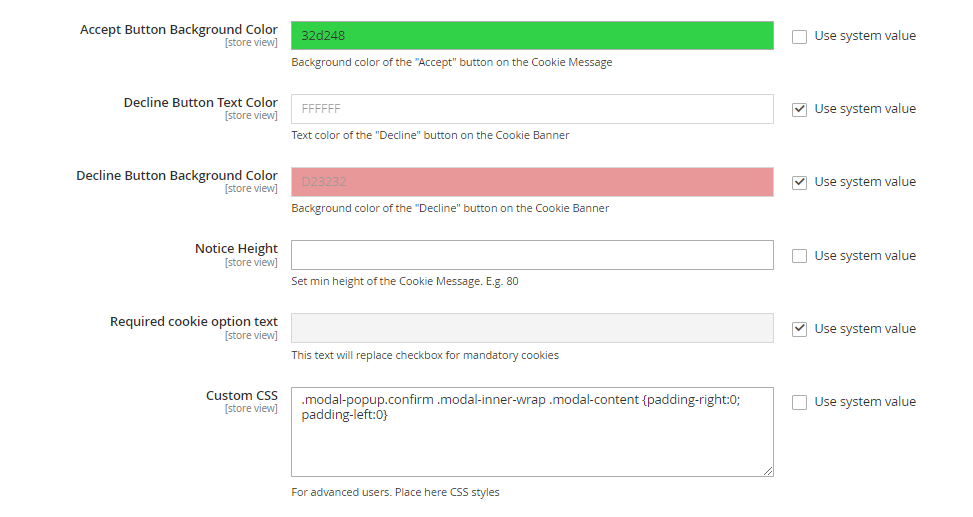
- **Accept Button Background Color -** Enter Background color of the "Accept" button on the Cookie Message.
- **Decline Button Text Color -** Enter text color of the "Decline" button on the Cookie Message.
- **Decline Button Background Color -** Enter Background color of the "Decline" button on the Cookie Message.
- **Notice Height -** Set min height of the Cookie Message. E.g. 80
- **Required cookie option text -** Set to "Always Active", this text will replace checkbox for mandatory cookies
- **Custom CSS -** Provide CSS code for custom style.
[](https://docs.scommerce-mage.com/uploads/images/gallery/2025-06/image-2025-06-10t152250-618.png)
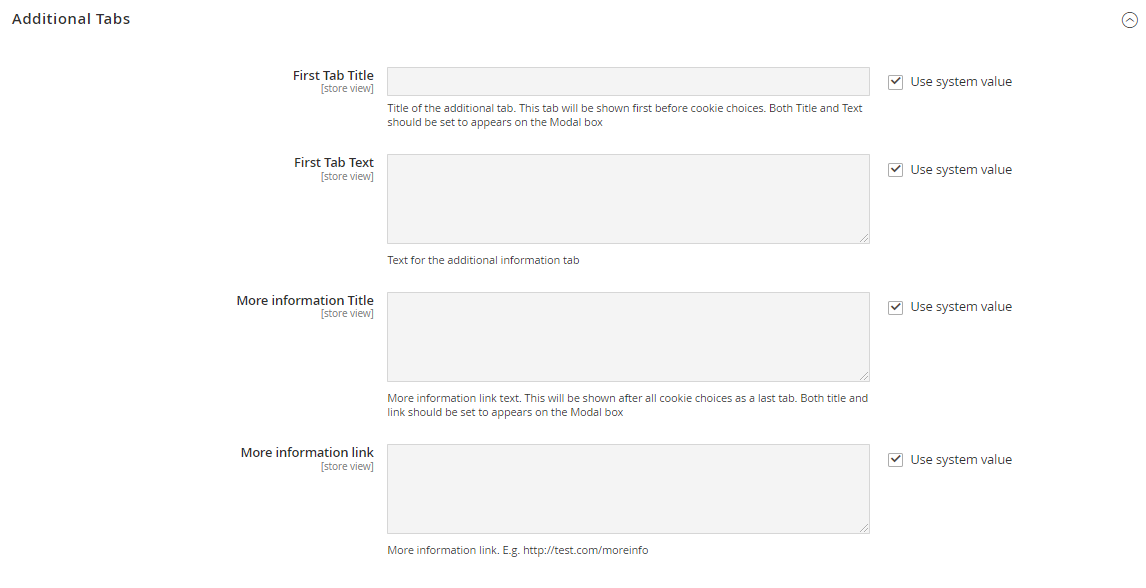
### Additional Tabs [](#bkmrk--17)
- **First Tab Title -** Provide title of the first tab you want to display on the frontend cookie pop up. This tab will be shown first before cookie choices. Both Title and Text should be set to appears on the Modal box
- **First Tab Text -** Enter first tab text. The text will be shown on the Modal box on click of first tab. We've set first tab as "Your Privacy ".
- **More Information Title -** Provide more information title. This will be shown after all cookie choices as a last tab. Both title and link should be set to appears on the Modal box
- **More Information Link -** Provide link where you want to redirect it. Click on this link will redirect you to Information page.
[](https://docs.scommerce-mage.com/uploads/images/gallery/2025-06/image-2025-06-10t152322-225.png)
### Admin Configuration for Manage Cookie Choices [](#bkmrk--19)
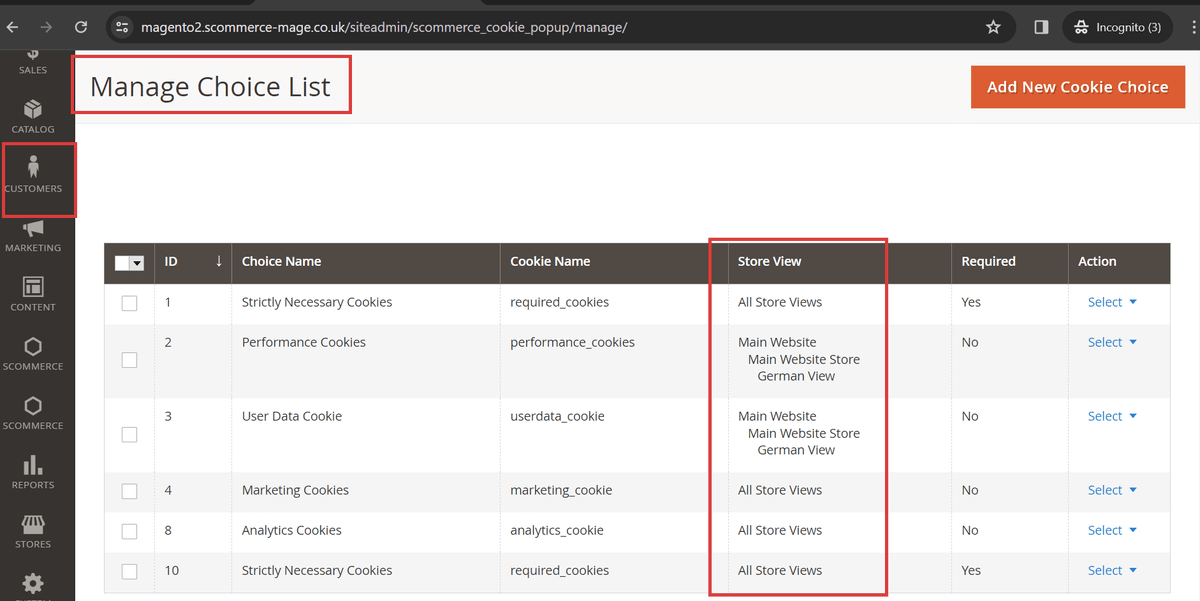
- **Manage Choice List -** To create and manage cookie choices, go to **Admin**
- **Customers > Manage Cookie Choices > Manage Choice List**. If you need to make some modifications in the cookie choices information, you should click "Edit" in the Action column. The grid includes the following columns: -
- Cookies can be created for specific store views and these cookies are only available in that particular store view.
[](https://docs.scommerce-mage.com/uploads/images/gallery/2025-06/bJYimage-55-1.png)
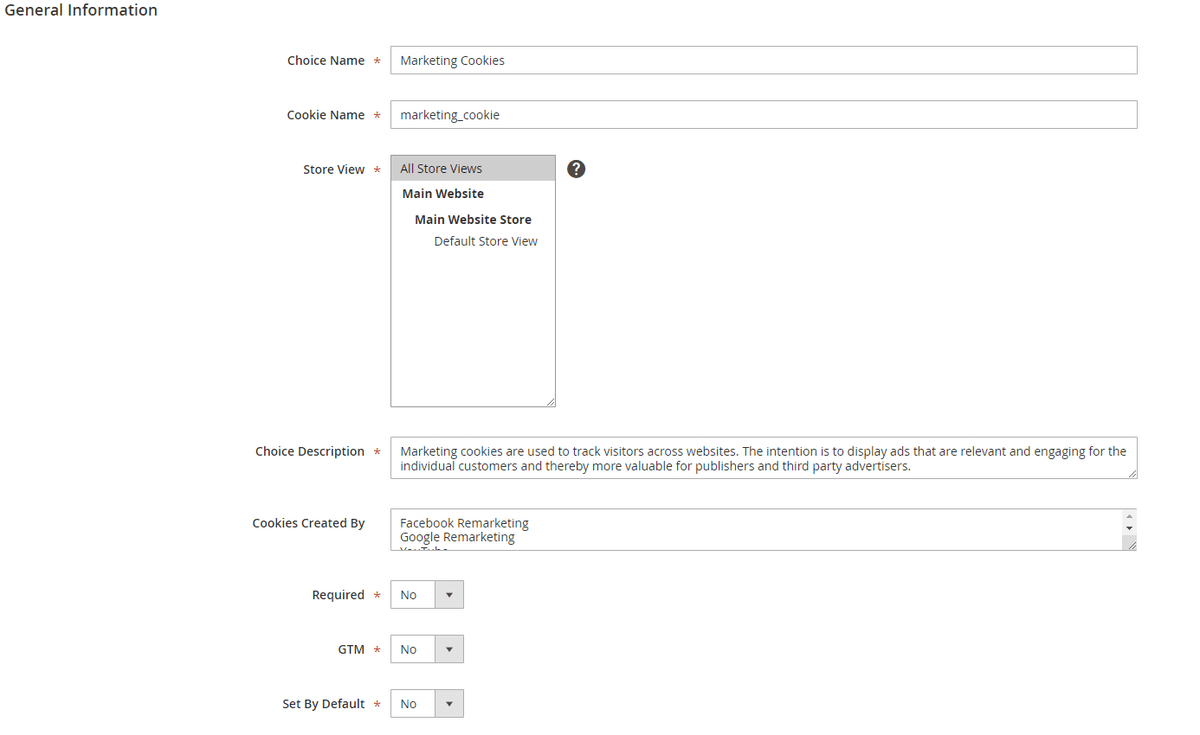
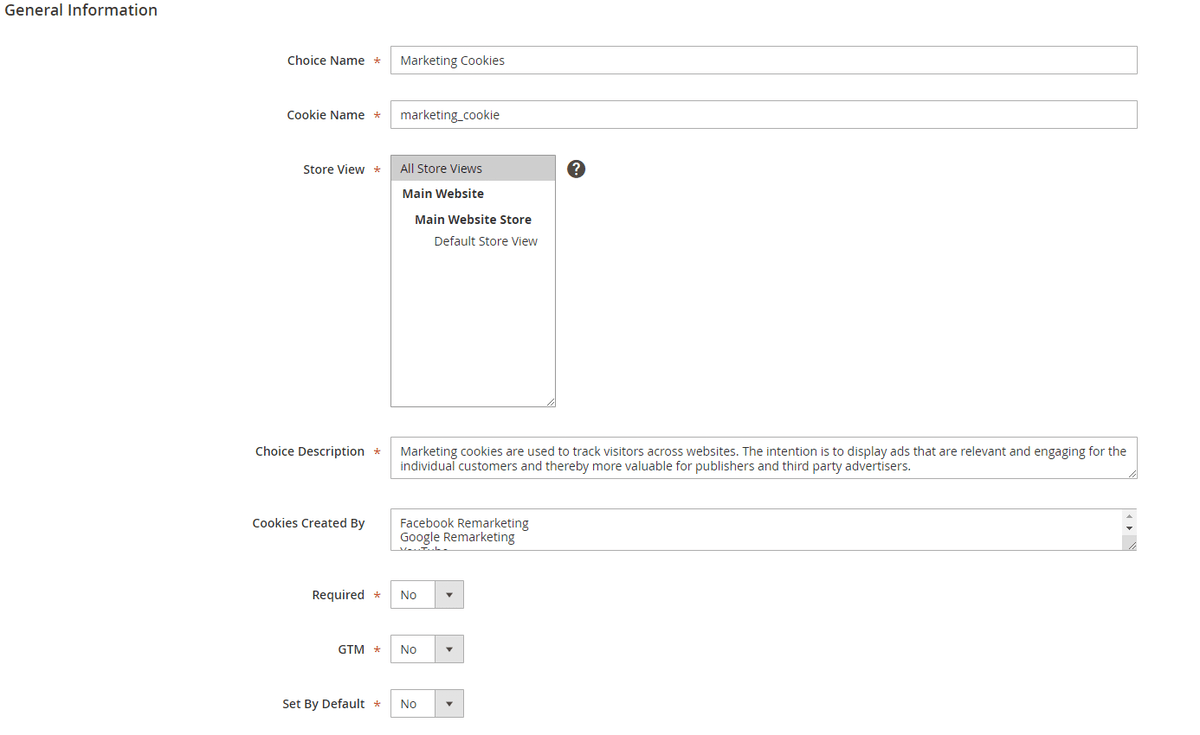
- **Add New Cookie Choice -** To create a new cookie choice, click on the "Add New Cookie Choice" button from **Admin > Customers > Manage Cookie Choices > Manage Choice List > Add New Cookie Choice**, it redirects on "New Choice" page, by providing all the below configuration details you can create the cookie choice.
- **Choice Name -** Enter the choice name. This is the text which represents the type of the cookie you are using under it.
- **Cookie Name -** Define the cookie name. Cookie name will be used to enable/disable your relevant trackings. To explore more about Cookies, please check the [Privacy and Cookie Policy ](http://magento2.scommerce-mage.co.uk/privacy-policy-cookie-restriction-mode/)section.
- **Store View -** Select store view.
- **Choice Description -** Add the choice description. This description will appear on the cookie pop up when user clicks on the cookie choice name.
- **Cookies Created By -** Add the created by details. This is just an information which will appear on the cookie pop up under "Cookies are user by" section.
- **Required -** Select "Yes" to make cookie essential, else select "No". If set to "Yes" then the cookie choice will always be selected and you can't turn "Off" it.
- **GTM-** Set this to "Yes" if you want to control GTM using this cookie. GTM will only be enabled when this cookie is accepted.
- **Set by Default -** Select default status "Yes" or "No". If set to "Yes" then by default the cookie choice will be selected.
[](https://docs.scommerce-mage.com/uploads/images/gallery/2025-06/BzEimage-56-1.png)
### Customers Details in Privacy Policy Consent [](#bkmrk--21)
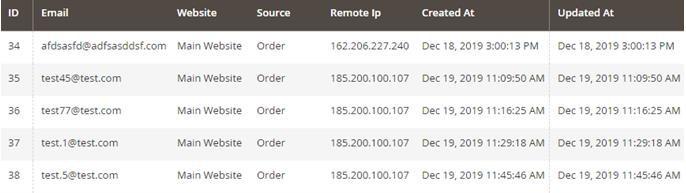
When customers check the privacy policy agreement checkbox in the process of registration then it saves the details of the customers in backend privacy policy consents at **Admin > Customers > Privacy Policy Consent.**
### Privacy Policy Consent
[](https://docs.scommerce-mage.com/uploads/images/gallery/2025-06/HVcimage-73.jpg)
### Anonymize Orders from Admin Section [](#bkmrk--22)
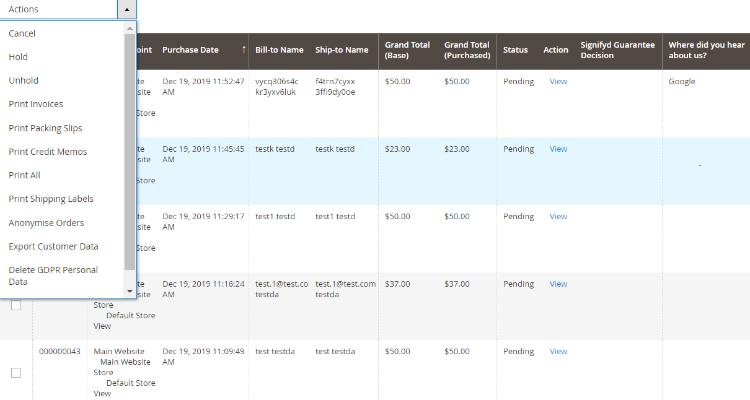
When you select action "Anonymise order" from **Admin > Sales > Orders > Actions > Anonymise Order > Click on Submit button**, then it anonymise customers data, which can't be reversed. Before "Submit" it asks for confirmation and displays a message popup says "Are you sure you want to anonymise selected transaction data because of this action can't be reversed?".
[](https://docs.scommerce-mage.com/uploads/images/gallery/2025-06/5EPimage-73.jpg)
### Newsletter Subscription [](#bkmrk--23)
To see newsletter subscription records go to **Admin > Marketing > Newsletter Subscription.**
**[](https://docs.scommerce-mage.com/uploads/images/gallery/2025-06/OCNimage-74.jpg)**
### Enable / Disable Tracking Without GTM [](#bkmrk--24)
### Note:- *Only implement this step if you are not using both our* [*GTM*](https://www.scommerce-mage.com/magento-2-ga4-google-tag-manager.html) *and* [*GDPR*](https://www.scommerce-mage.com/magento-2-gdpr.html) *modules. If you are using both modules then you can set up consent mode v2 using the following guide:-*
{% content-ref url="../analytics-and-tracking-extensions/magento-2-consent-modes-setup-guide.md" %} [magento-2-consent-modes-setup-guide.md](https://docs.scommerce-mage.com/analytics-and-tracking-extensions/magento-2-consent-modes-setup-guide.md) {% endcontent-ref %}
#### Using Module
You can enable or disable GTM tracking using cookies. We have provided an additional check in cookie setup which confirms whether GTM should be checked alongwith the cookie or not. when this check is enabled if the customer doesent accept the cookie then this tracking won't fire. If multiple cookies have the same option enabled then if any one of the cookie is accepted GTM will fire on the store.
Go to Customers>Manage Cookie Choices then create a new cookie or edit the existing one and set GTM to 'Yes'.
[](https://docs.scommerce-mage.com/uploads/images/gallery/2025-06/zidimage-57-1.png)
#### Manually Adding Code
This section will cover Enabling or Disabling tracking without using Google Tag Manager. You can do that by including tracking function in your code, let us learn how. If you are using any of our tracking extensions or any other third party extension and you don't want to send information to Google then you need to check for the cookie name e.g. "statistics\_cookie" and this will be set to 1 for "accept" and 0 for "decline", based on cookie value it will enable or disable the tracking.
In case you are using a third party extension then you need to add the code given below. This code needs to be added where your tracking has been implemented.
**Here is the function which will force your tracking not to run unless the cookie has been accepted by the customer from cookie notification message.**
**e.g.** You can add name of your GDPR cookie, here for our GDPR extension the name of cookie key is "statistics\_cookie", which we have been using in below code.
```php
/**
Check if has cookie with accepted cookie policy
*
@return bool
*/
protected function hasCookie()
{
/**
* @var \Magento\Framework\Stdlib\CookieManagerInterface
*/
$cookie = (string)$this->_cookieManager->getCookie('statistics_cookie'); if ($cookie=="0"
{ return false;
}
else{
return true;
}
}
```
### **Integrate Cookies with GTM Pro Tracking**
### Note:- Only implement this step if you are not using both our [*GTM*](https://www.scommerce-mage.com/magento-2-ga4-google-tag-manager.html) and [*GDPR*](https://www.scommerce-mage.com/magento-2-gdpr.html) modules. If you are using both modules then you can set up consent mode v2 using the following guide:-
{% content-ref url="../analytics-and-tracking-extensions/magento-2-consent-modes-setup-guide.md" %} [magento-2-consent-modes-setup-guide.md](https://docs.scommerce-mage.com/analytics-and-tracking-extensions/magento-2-consent-modes-setup-guide.md) {% endcontent-ref %}
You can integrate cookies with GTM Pro by following the below steps in GTM:-
**Step 1 -** The very first step is to create your cookie from the admin panel. To do that please refer to the 4th Part in this guide. The key thing to remember is the name of the cookie that you create in this step.
[](https://docs.scommerce-mage.com/uploads/images/gallery/2025-06/84jimage-58-1.png)
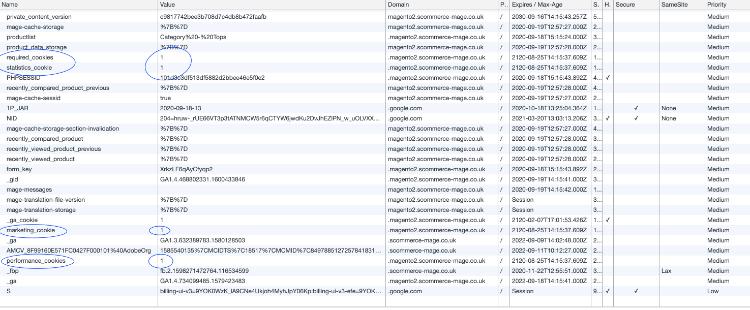
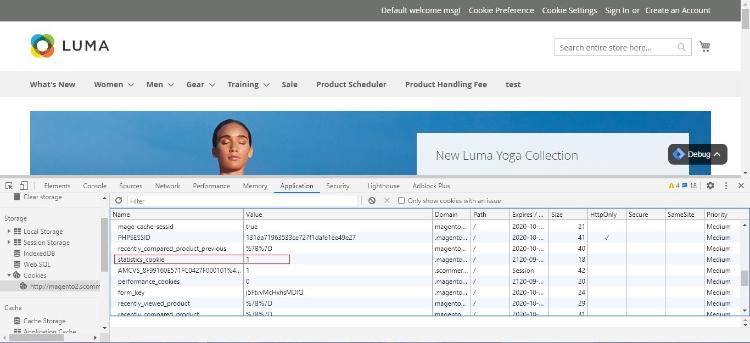
**Step 2 -** The next step is to verify whether your cookie is working properly. Go on your website and accept or decline the cookie you have created in the begining. Now navigate to the Page inspector of your browser. Next go into application and then on the left navigation go to storage>cookies and then click on your website. A list of cookies will appear before you as you can see in the image. Now suppose you created a cookie named "Statistics\_cookie" in the first step and have accepted it on the website then the value of this cookie will appear as 1. Vice versa if you have declined this cookie then the value will be 0.
[](https://docs.scommerce-mage.com/uploads/images/gallery/2025-06/k89image-75.jpg)
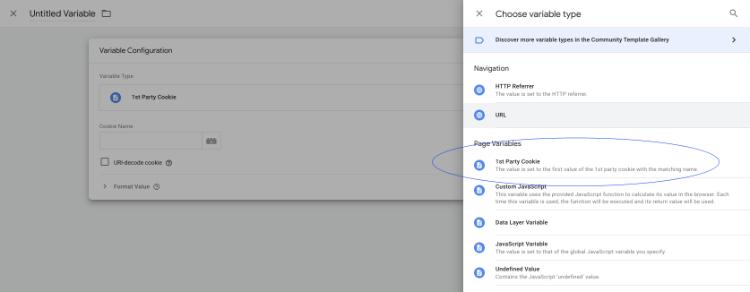
**Step 3 -** Open google tag manager, go into variables section and Create a new variable named "**statistics\_cookie**", variable type should be **1st-Party cookie** and give the name of the cookie as "**statistics\_cookie**". Keep in mind the name of the cookie should be exactly same as you have created in the admin panel. For instance, we created a cookie named "Statistics\_cookie" so we have a variable named exactly same.
[](https://docs.scommerce-mage.com/uploads/images/gallery/2025-06/LYnimage-76.jpg)
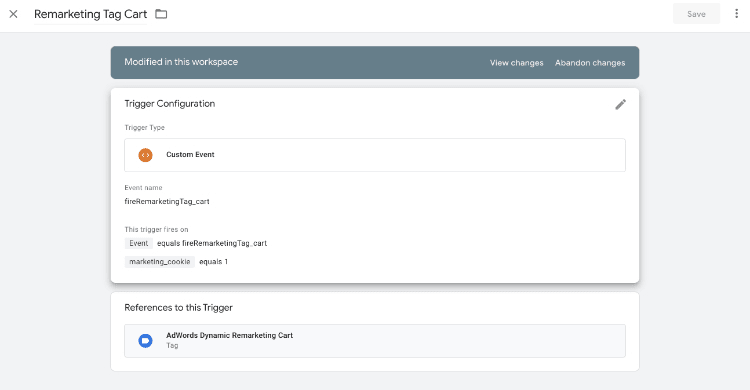
**Step 4 -** Now navigate to triggers in GTM and select a trigger and add a custom event as follows: -
- From first drop-down- select variable name created in Step 1 i.e. "**statistics\_cookie**"
- From second drop-down- select equals
- Third Input box- put value 1
[](https://docs.scommerce-mage.com/uploads/images/gallery/2025-06/sJoimage-59-1.png)
**Step 5-** Associate the trigger created in Step 4 with any of the existing tags and that tag will only fire when customer accepts the cookie on your website.
### Front-end Site View [](#bkmrk--25)
#### Front-end Site View - Integrate Cookies with GTM Pro Tracking [](#bkmrk--26)
Let us see how it works on the front-end.
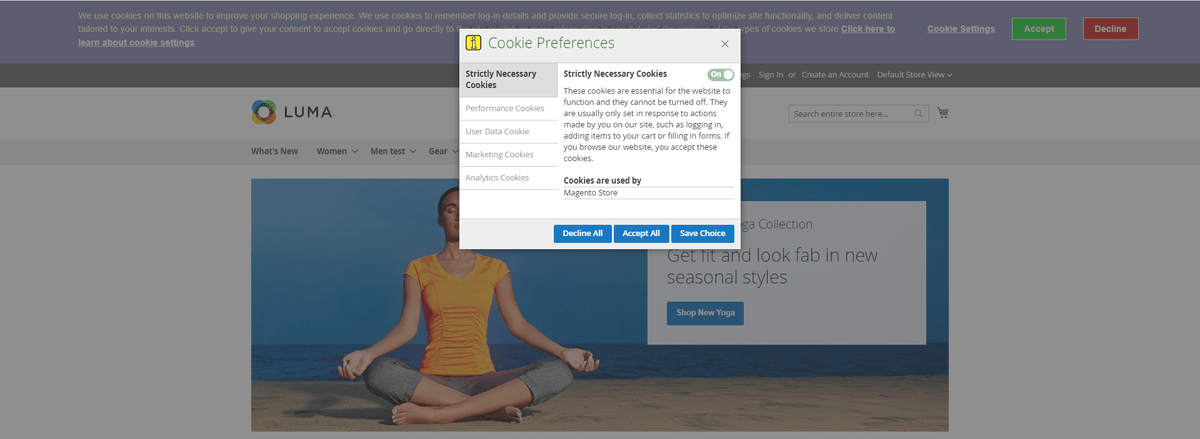
- Visit the store and go to cookie settings on the pop-up. In the cookie preferences:- -- select your cookie. In this case we have created statistics cookie. -- Next from the top right corner select the checkbox to enable the cookie and save your choice.
[](https://docs.scommerce-mage.com/uploads/images/gallery/2025-06/Pvoimage-60-1.png)
- Next check the inspector of your browser to verify whether your cookie is enabled/disabled. If you have enabled the cookie then the value will be 1 and if it is disabled then the value will be 0. Refer to the image below.
[](https://docs.scommerce-mage.com/uploads/images/gallery/2025-06/Tt4image-77.jpg)
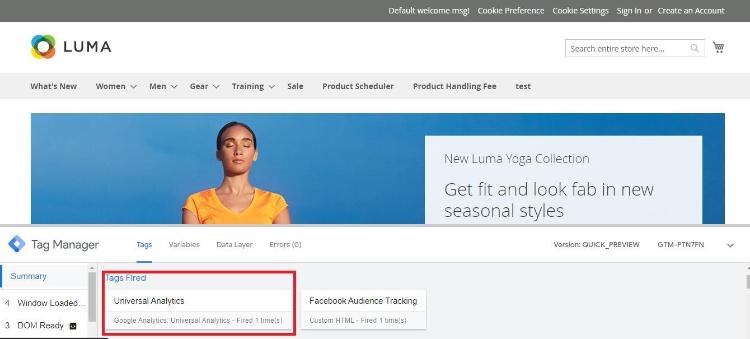
- Finally check the GTM pro to see whether the tags that we associated with your cookie have fired or not. In our case universal analytics is fired since we added the cookie settings for google analytics. Similarly if the cookie is disabled I.e value is 0 then this tag won't be fired.
[](https://docs.scommerce-mage.com/uploads/images/gallery/2025-06/image-78.jpg)
#### Cookie Pop-up- Cookie Accept [](#bkmrk--28)
Cookies are used to improve the experience for user. Once you accept, the file is added and the cookie helps analyse web traffic or lets you know when you visit a particular site. Cookies allow web applications to respond to you as an individual.
[](https://docs.scommerce-mage.com/uploads/images/gallery/2025-06/image-2025-06-10t163459-473.png)
#### Cookie Pop-up- Cookie Accept for different store views [](#bkmrk--28)
Cookies are used to improve the experience for user. As we created different cookies for different store views we will see their behaviour on the frontend.
- Accept cookie for default store view:-
[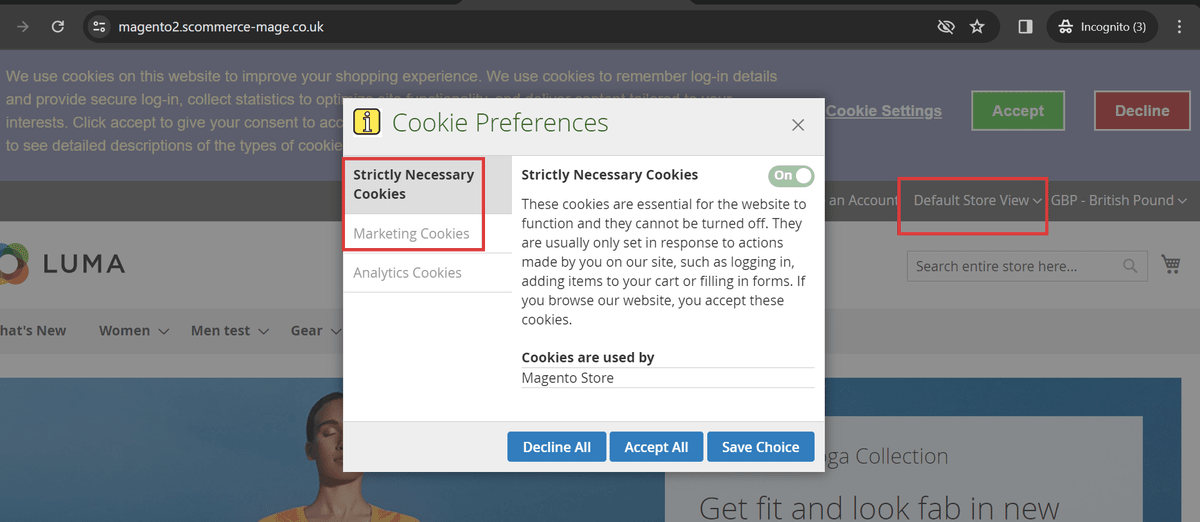](https://docs.scommerce-mage.com/uploads/images/gallery/2025-06/mNdimage-62-1.png)
- Accept cookie for German Store view
[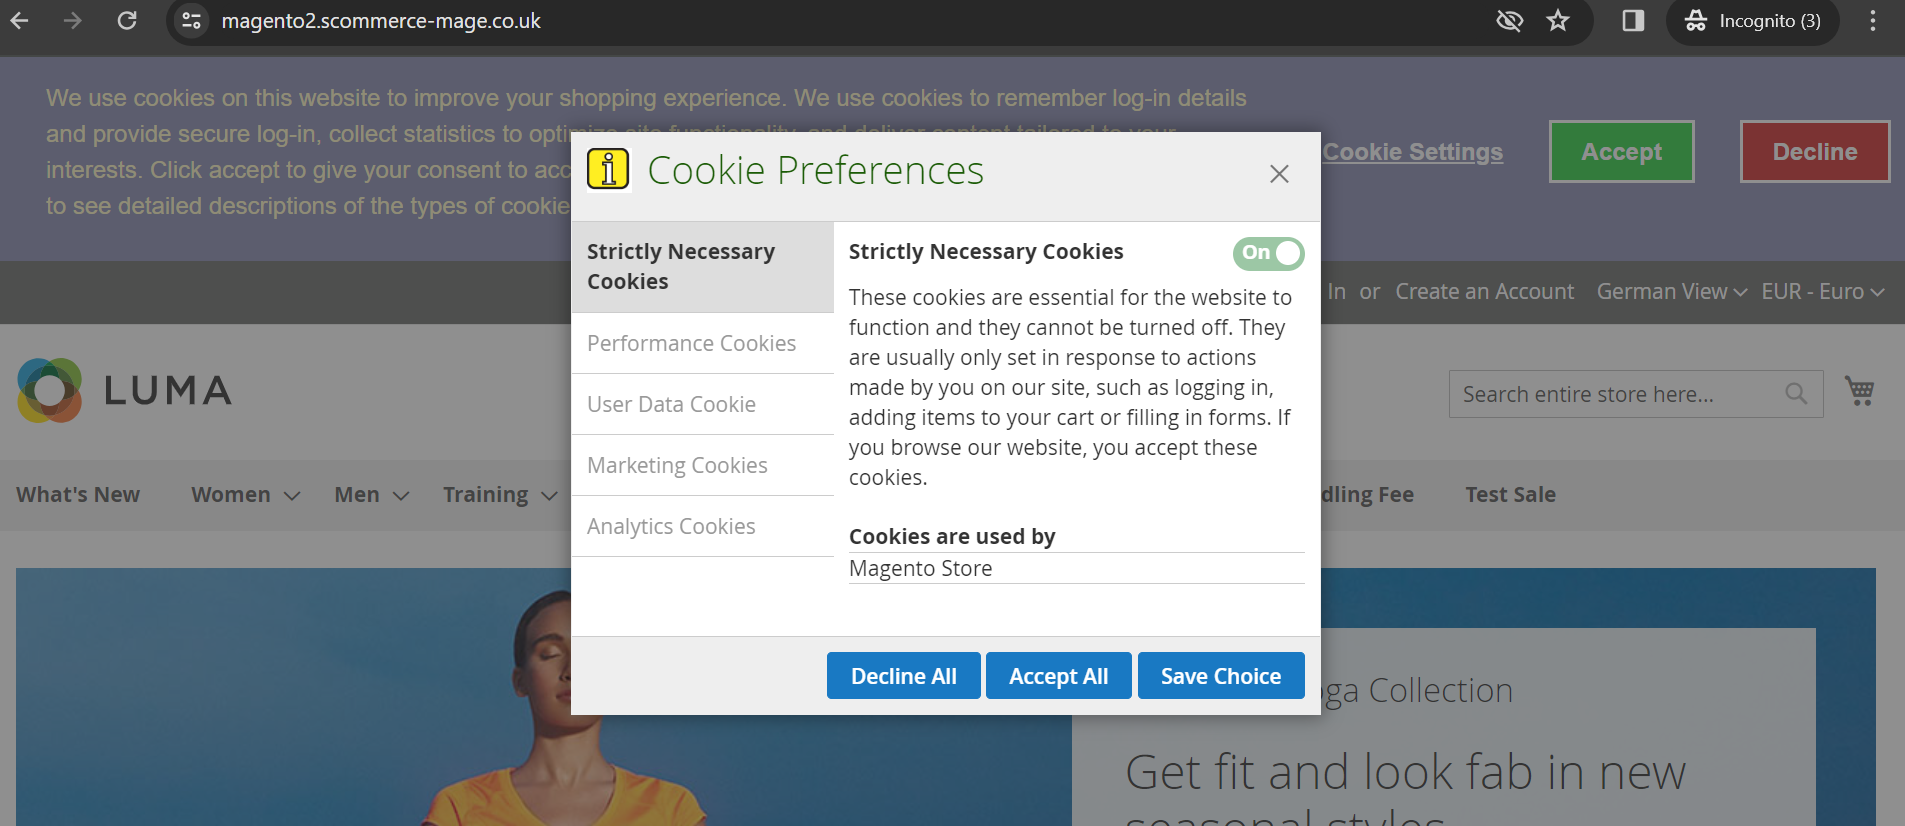](https://docs.scommerce-mage.com/uploads/images/gallery/2025-06/image-2025-06-10t163553-221.png)
#### Check the Value of the Accepted Cookies on the Front-end [](#bkmrk--29)
You can check the value of the accepted cookies by using developer tool (F12). Here is the path to check, **Press F12 > Network > Storage > Cookies >** Click on **site URL >** Check the cookies status/value under **"Value"** column.
**When you "accept" cookies, the value will be set to "1".**
**[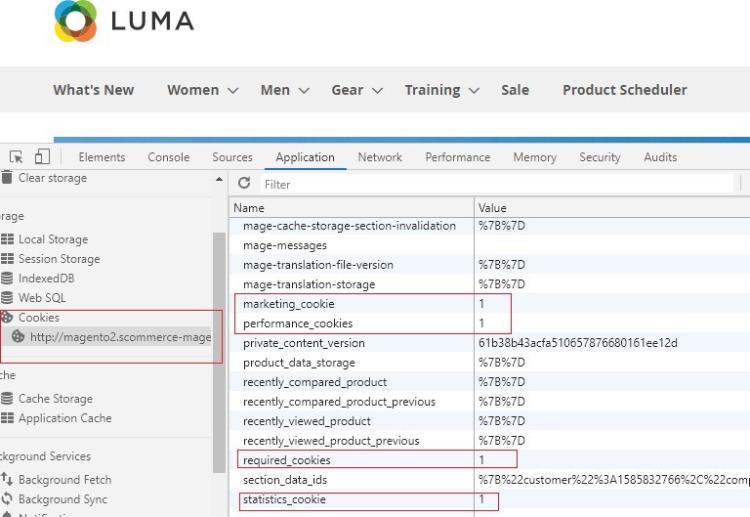](https://docs.scommerce-mage.com/uploads/images/gallery/2025-06/6jXimage-79.jpg)**
**When you "decline" cookies, the value will be set to "0" .**
**[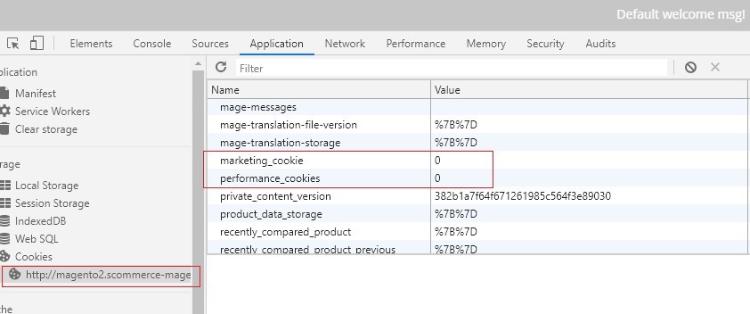](https://docs.scommerce-mage.com/uploads/images/gallery/2025-06/Snximage-80.jpg)**
#### Visibility of "Accept All" Button on the Cookie Popup [](#bkmrk--30)
The "Accept All" button will be shown on the cookie popup, if all cookie choices are not required and "Set by Default" for cookie choices set to "No" from **Admin > Customers > Manage Cookie Choices > Manage Choice List > Select Cookie Choice > Edit >Set by Default - "Yes/No".** If set to "Yes" then "Accept All" won't appear.
#### Newsletter Subscription [](#bkmrk--31)
Once Enable Newsletter is configured from **Admin > Stores > Configuration > Scommerce Configuration > GDPR > Privacy Settings > Enable Newsletter - "Yes"** , then you can see the privacy agreement checkbox on the newsletter subscription. This is a mandatory option. Click on "Privacy Policy" link redirects to privacy policy page.
[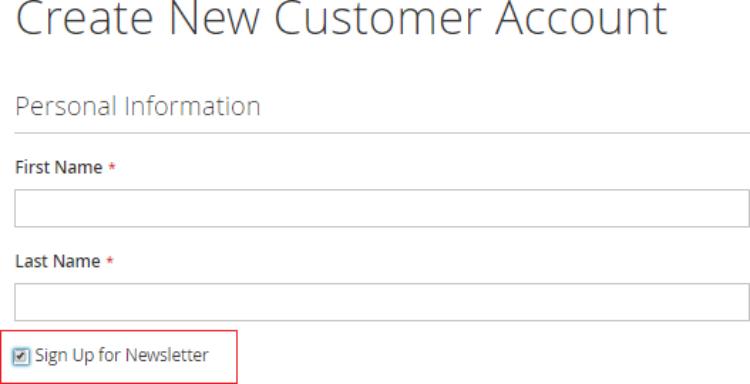](https://docs.scommerce-mage.com/uploads/images/gallery/2025-06/4gyimage-81.jpg)
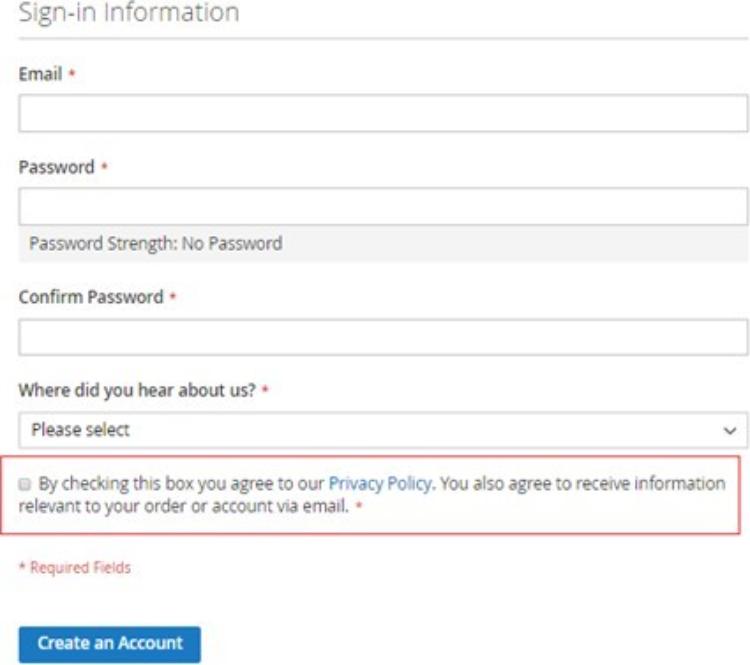
#### Privacy Policy Checkbox on Registration and Checkout Page [](#bkmrk--32)
The privacy policy checkbox will be shown on the registration and checkout page.
[](https://docs.scommerce-mage.com/uploads/images/gallery/2025-06/M8Jimage-82.jpg)
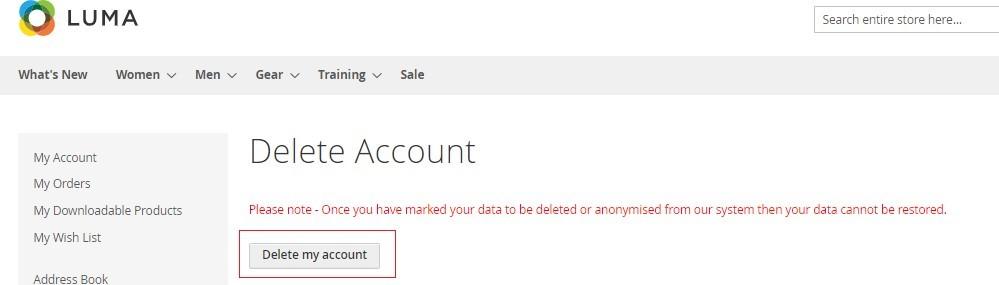
#### Delete Account from My Account Section [](#bkmrk--33)
You can delete the account from **Front-end > My Account > Delete Account section.**
**[](https://docs.scommerce-mage.com/uploads/images/gallery/2025-06/T9oimage-83.jpg)**
If you have a question related to this extension please check out our [**FAQ Section**](https://www.scommerce-mage.com/magento-2-gdpr.html#customfaq) first. If you can't find the answer you are looking for then please contact [**support@scommerce-mage.com**](mailto:core@scommerce-mage.com)\*\*.\*