Integration Extensions
- Magento 2 Diamond Search
- Magento 2 Not On The High Street Integration
- Magento 2 Creditsafe Integration
- Magento 2 PunchOut & ERP Integration
Magento 2 Diamond Search
Installation and User Guide for Magento 2 Diamond Search Extension
Table of Contents
- Prerequisites( module installed previously )
- Module Installed via composer
- Module Installed by Placing Files in app/code
- Installation
- Installation via app/code
- Installation via Composer
- Configuration Settings for Diamond Search
- General Settings
- Filter Widget Settings
- Myo Widget
- Integration Modes
- Local
- RapNet
- Custom Attribute Set
- Settings
- Diamonds
- Ring Builder
- Choosing a Diamond
- Choosing a Setting
- Review Complete Ring
- Setup 360 view and Certificate
- Certificate
- 360 view
- Frontend
Prerequisites( module installed previously )
If you have previously installed this module on your store using MageInn Extension then you need to follow the steps below in order to install it again on your site. You will need to remove the module first then proceed with the installation steps in the next section.
Module Installed via Composer
If the module was installed previously via composer then run the commands below to remove it completely:-
// disable the module php bin/magento module:disable Mageinn_DiamondSearch

//remove the module composer remove mageinn/module-diamondsearch

//run upgrade commands
php bin/magento setup:upgrade
php bin/magento setup:di:compile
php bin/magento setup:static-content:deploy
Module Installed by placing files in app/code
If the module was previously installed by placing extension files in app/code then simply go the following directory app/code/MageInn/ and remove the DiamondSearch folder completely then run the upgrade commands as shown below:-
php bin/magento setup:upgrade
php bin/magento setup:di:compile
php bin/magento setup:static-content:deploy
Installation
-
Installation via app/code: Upload the content of the module to your root folder. This will not overwrite the existing Magento folder or files, only the new contents will be added. After the successful upload of the package, run below commands on Magento 2 root directory.
php bin/magento setup:upgrade php bin/magento setup:di:compile php bin/magento setup:static-content:deploy -
Installation via Composer: Please follow the guide provided in the below link to complete the installation via composer.
Configuration Settings for Diamond Search
Go to Admin> Stores> Configuration> Scommerce > Diamond Search
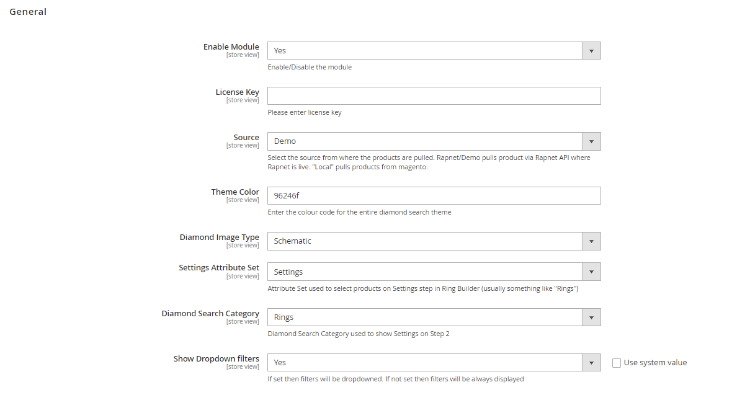
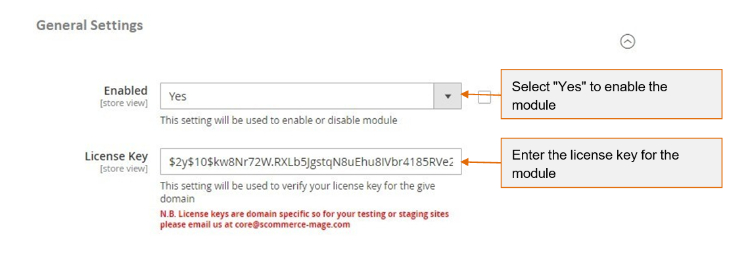
General Settings
-
Enable Module – Select "Yes" or "No" to enable or disable the module.
-
License Key – Please add the license for the extension which is provided in the order confirmation email. Please note license keys are site URL specific. If you require license keys for dev/staging sites then please email us at support@scommerce-mage.com.
-
Source:- Select the source from where the products are pulled. Rapnet/Demo pulls products via Rapnet API where Rapnet is live. "Local" pulls products from Magento.
-
API Key (RapNet):- Enter the API key provided by RapNet here. • http://technet.rapaport.com/ProgrammaticAccess/Keys.aspx The following key works only "localhost" domain: 8EC95570ABE6411290197CB28845A6FF
Please note - "localhost" means domain. Not IP- address like "127.0.0.1", not other domain matched to local IP, "localhost" means domain. So this test API-key used only for local site running via "http://localhost". Not for "http://127.0.0.1", not for "http://my-domain-resolved-to-local-ip.tld", only for "http://localhost"
-
Theme Color:- Enter the color code for the entire diamond search theme
-
Diamond Image Type:- Choose between two image types schematic or photo for diamonds that appear in the list
-
Settings Attribute Set:- Attribute Set used to select products on Settings step(step 2) in Ring Builder (eg:- something like "Rings"). If you are creating a custom attribute set for rings then include critical Settings attributes which are Shape, Size from, and Size To, and these attributes must have values against them for everything to work correctly on the front end as these values get used to select the correct Ring.
-
Diamond Search Category:- Diamond Search Category used to show Settings on Step 2(choose a setting)
-
Show Dropdown filters:- If set then filters will be dropdowned. If not set then filters will be always displayed
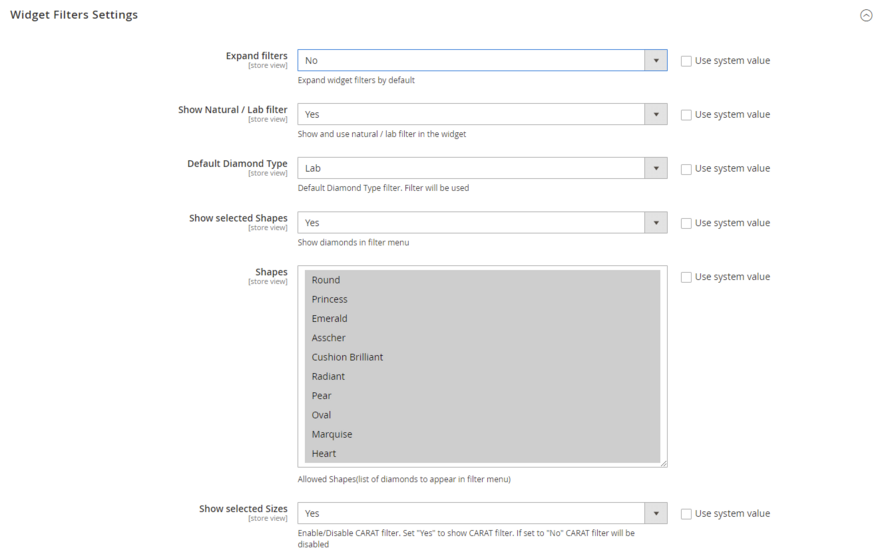
Widget Filter Settings
-
Expand filters:- Select "Yes" to expand widget filters by default and select "No" to keep it hidden
-
Show Natural / Lab filter:- Select "Yes" or "no" to show or hide the natural/lab filter for diamonds.
-
Default Diamond Type:- Select default diamond type filter natural or lab.
-
Show selected Shapes:- Select "Yes" to show different diamond varieties in filter menu and select "No" to keep them hidden
-
Shapes:- Allowed Shapes(list of diamonds to appear in filter menu)
-
Show selected Sizes:- Enable/Disable CARAT filter. Set "Yes" to show CARAT filter. If set to "No" CARAT filter will be disabled
-
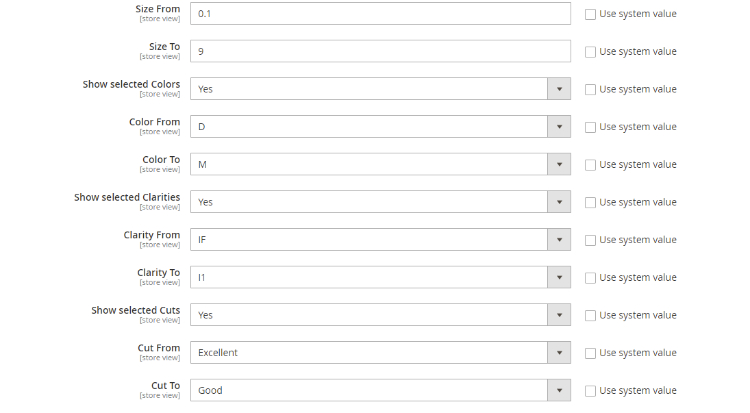
Size From:- CARAT filter range start
-
Size To:- CARAT filter range end
-
Show selected Colors:- Enable/Disable COLOR filter. Set "Yes" to show COLOR filter. If set to "No" COLOR filter will be disabled
-
Color From:- COLOR filter range start
-
Color To:- COLOR filter range end
-
Show selected Clarities:- Enable/Disable CLARITY filter. Set "Yes" to show CLARITY filter. If set to "No" CLARITY filter will be disabled
-
Clarity From:- CLARITY filter range start
-
Clarity To:- CLARITY filter range end
-
Show selected Cuts:- Enable/Disable CUT filter. Set "Yes" to show CUT filter. If set to "No" CUT filter will be disabled
-
Cut From:- CUT filter range start
-
Cut To:- CUT filter range end
-
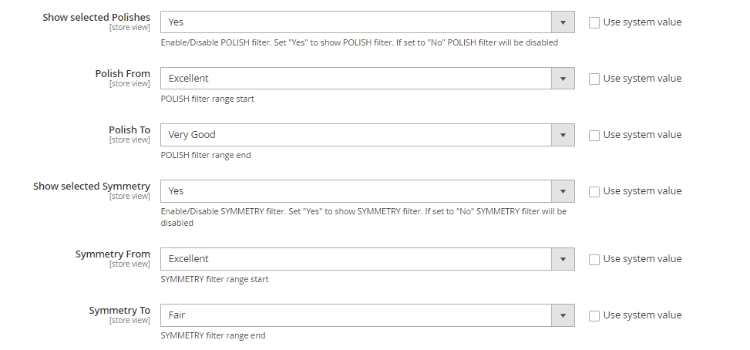
Show selected Polishes:- Enable/Disable POLISH filter. Set "Yes" to show POLISH filter. If set to "No" POLISH filter will be disabled
-
Polish From:- POLISH filter range start
-
Polish To:- POLISH filter range end
-
Show selected Symmetry:- Enable/Disable SYMMETRY filter. Set "Yes" to show SYMMETRY filter. If set to "No" SYMMETRY filter will be disabled
-
Symmetry From:- SYMMETRY filter range start
-
Symmetry To:- SYMMETRY filter range end

-
Show selected Labs:- Enable/Disable CERTIFICATE/LAB filter. Set "Yes" to show CERTIFICATE/LAB filter. If set to "No" CERTIFICATE/LAB filter will be disabled
-
Labs:- Select list of labs to appear in CERTIFICATE/LAB filter
-
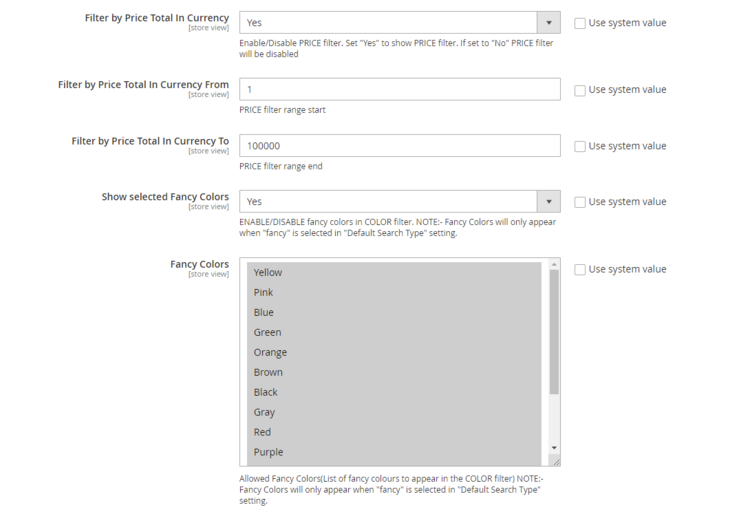
Filter by Price Total In Currency:- Enable/Disable PRICE filter. Set "Yes" to show PRICE filter. If set to "No" PRICE filter will be disabled
-
Filter by Price Total In Currency From:- PRICE filter range start
-
Filter by Price Total In Currency To:- PRICE filter range end
-
Show selected Fancy Colors:- ENABLE/DISABLE fancy colors in COLOR filter. NOTE:- Fancy Colors will only appear when "fancy" is selected in "Default Search Type" setting.
-
Fancy Colors:- Allowed Fancy Colors(List of fancy colours to appear in the COLOR filter) NOTE:- Fancy Colors will only appear when "fancy" is selected in "Default Search Type" setting.
-
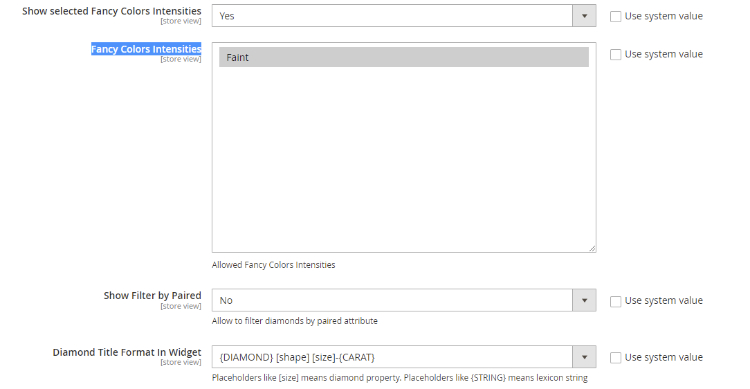
Show Filter by Paired:- ENABLE/DISABLE PAIR filter. If "yes" Pair will be available in the Filter. It allows to filter diamonds by paired attribute.
-
Diamond Title Format In Widget:- Placeholders like [size] means diamond property. Placeholders like {STRING} means lexicon string
-
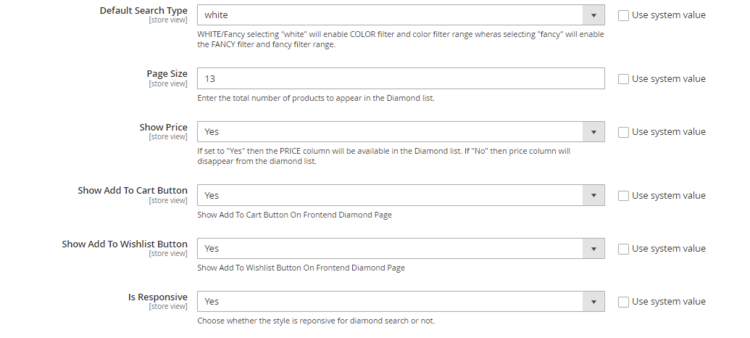
Default Search Type:- WHITE/Fancy selecting "white" will enable COLOR filter and color filter range wheras selecting "fancy" will enable the FANCY filter and fancy filter range.
-
Page Size:- Enter the total number of products to appear in the Diamond list.
-
Show Price:- If set to "Yes" then the PRICE column will be available in the Diamond list. If "No" then price column will disappear from the diamond list.
-
Show Add To Cart Button:- Set "Yes" or "No" to show or hide Add To Cart Button On Frontend Diamond Page
-
Show Add To Wishlist Button:- Set "Yes" or "No" to show or hide Add To Wishlist Button On Frontend Diamond Page
-
Is Responsive:- Set "Yes" or "No" to choose whether the style is reponsive for diamond search or not.
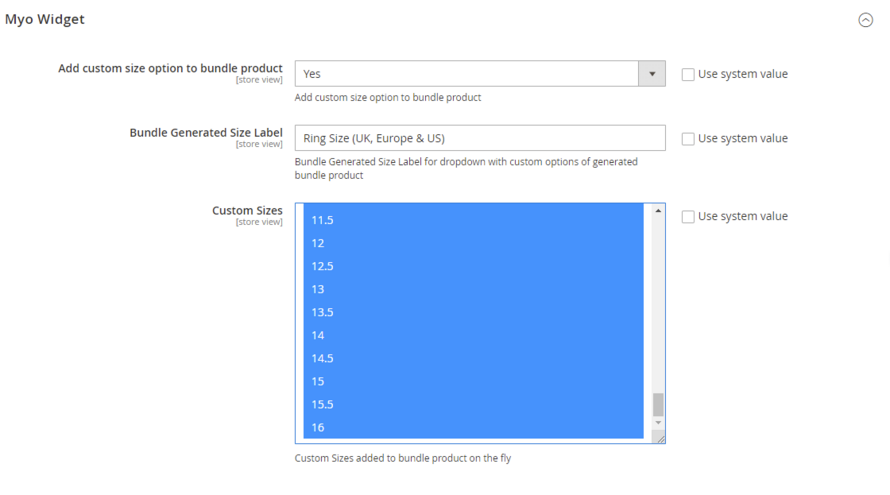
Myo Widget
- Add custom size option to bundle product:- Set "Yes" or "No" to Add or Remove custom size option to bundle product
- Bundle Generated Size Label:- Bundle Generated Size Label for dropdown with custom options of generated bundle product
- Custom Sizes:- Select the custom Sizes added to bundle product on the fly.
Integration Modes
The extension comes with two integration modes:- Local and RapNet.
Local
When mode is set to local you can create your diamond products directly from Magento admin. All you need to do is to assign "Diamonds" attribute set to your diamond products
RapNet
RapNet brings millions of dollars in diamond product to your Magento store, without the cost of owning the physical diamonds. All diamonds and attributes should be configured directly from RapNet admin panel. RapNet provides data and pricing in real time. Once the customer places the order using the ring builder the product gets automatically created in Magento catalog. https://www.rapnet.com/
Custom Attribute Set
By default, the module adds two attribute sets i.e. Settings and Diamonds. These contain essential attributes for the module to work. If you want to create a custom attribute set, you need to include the attributes from these existing sets in order for your custom attribute set to work properly and the functional flow to be correct. We will go through each of these attribute sets and the attributes contained within them.
Settings
If you want to use a custom attribute set for "Rings" aside from settings then include critical Settings attributes which are Shape, Size from and Size To and these attributes must have values against them for everything to work correctly on frontend as these values get used to select correct Ring. All the attributes included in this attribute set are as follows:-
- ds_size_min
- ds_size_max
- ds_shape
- ds_is_paired
Rings
All the attributes included in this attribute set are as follows:-
- mdiamond_id
- mshape
- msize
- mcolor
- mfancy_color_dominant_color
- mfancy_color_secondary_color
- mfancy_color_overtone
- mfancy_color_intensity
- mclarity
- mcut
- msymmetry
- mpolice
- mdepth_percent
- mtable_percent
- mmeas_length
- mmeas_width
- mmeas_depth
- mgirdle_min
- mgirdle_max
- mgirdle_condition
- mculet_size
- mculet_condition
- mfluor_color
- mfluor_intensity
- mhas_cert_file
- mcountry
- mcity
- mlab
- mtotal_purchase_price
- mtotal_sales_price
- mcurrency_code
- mcurrency_symbol
- mtotal_sales_price_in_currency
- mcert_num
- mstock_num
- mhas_sarineloupe
- msarineloupe_url
- mis_fancyColor
- ds_is_paired
- mis_lab_diamond
Ring Builder
Ring Builder is a great tool to allow your customers to pair any diamond with setting of their choice. Ring builder is fully responsive. You can also define a filter for each setting, so that only compatible diamonds are shown when setting is selected.
The entire process is divided into three steps namely, choosing a diamond, choosing a ring and in the final step a bundled product is created using previous selections and customers can place an order with that product.
Note:- Customers can start by either choosing a diamond first or choosing a setting(ring) first they will automatically be redirected to the next step.
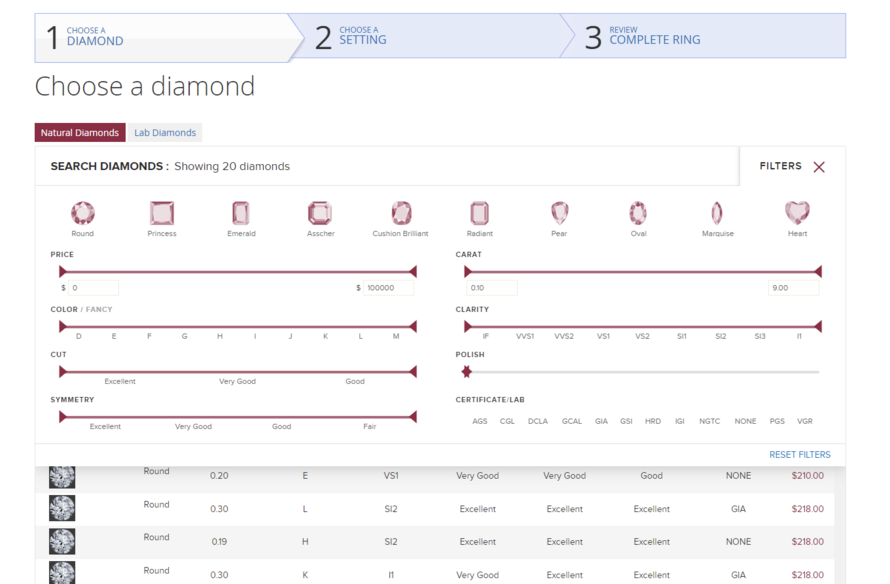
Choosing a Diamond
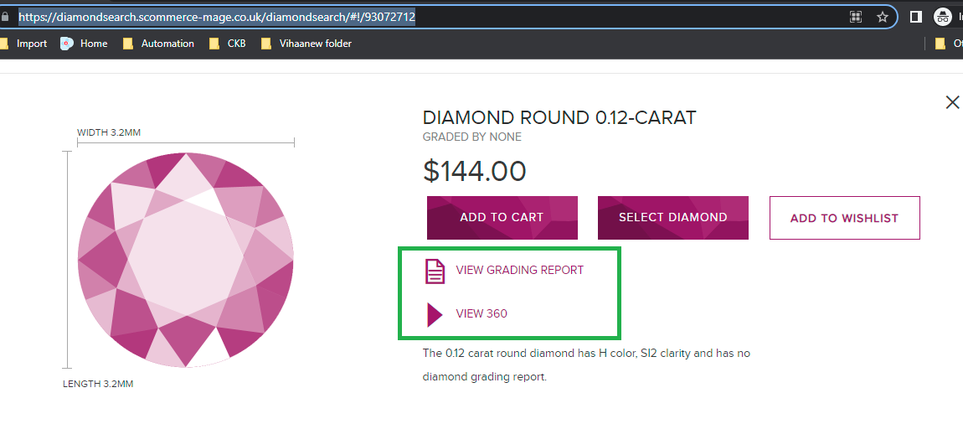
If customers chooses to start by selecting a diamond then they will be able to see the diamond search page as shown in the image below. It contains several filters which can be utilized to pinpoint the exact diamond as per requirements.
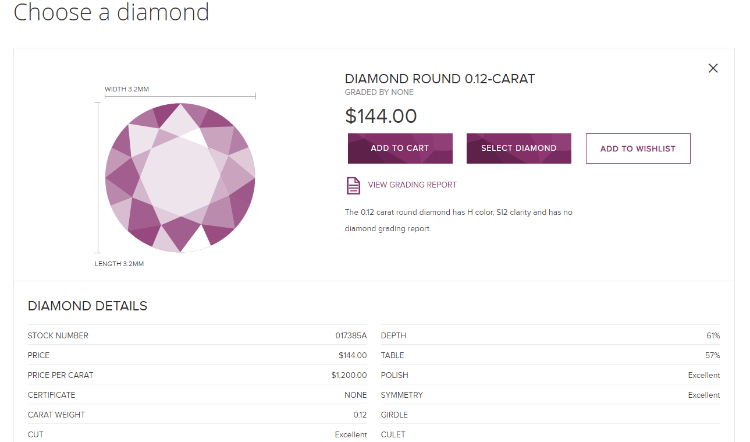
Once the customer decides on a diamond they click on it which takes them to a detailed page for that diamond. It contains all the necessary details related to that specific diamond. Once satisfied they click on SELECT DIAMOND and they are redirected to the next step i.e choosing a ring.
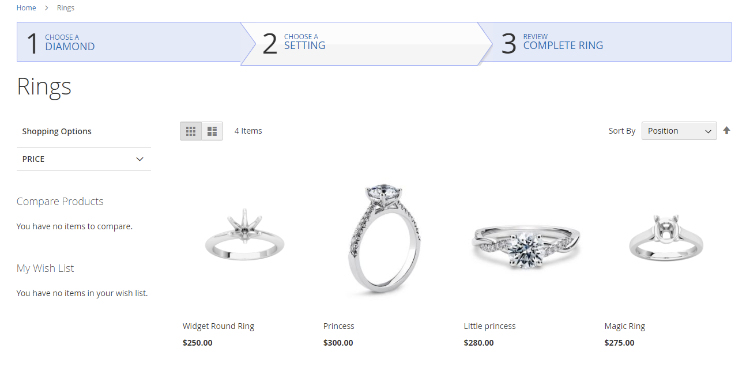
Choosing a Setting(Ring)
In the next step, customers are directed towards the ring selection. Rings automatically get filtered and only the compatible rings for the diamond selected are displayed on this page. Simply click on choose this setting and you will redirected to the final step.
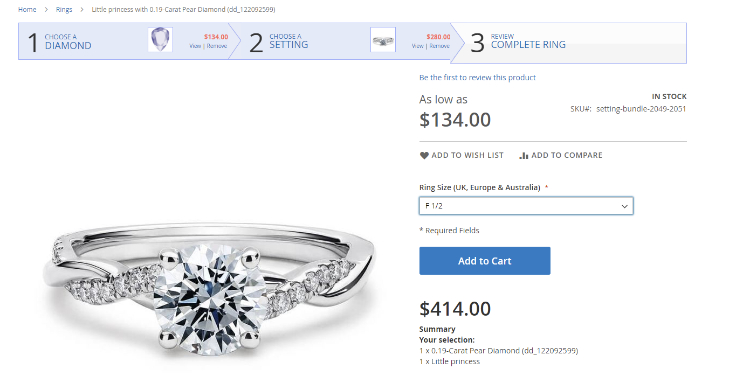
Review Complete Ring
In the final step a bundled product is created using the first two selections which customers can add to basket and place an order with it.
Multicurrency Setup
Multiple currencies can be added/selected from Admin > Stores Configuration > General > Currency Setup - Allowed Currencies - Select currencies
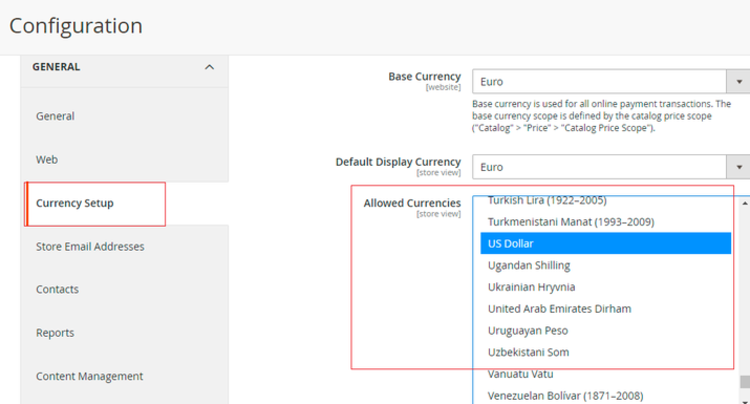
Currency rates can be configured against base currency from Admin > Stores > Currency > Currency Rates

Base currency can be defined from Admin > Stores Configuration > General > Currency Setup > Base Currency - Select currency
Currency Switcher Frontend

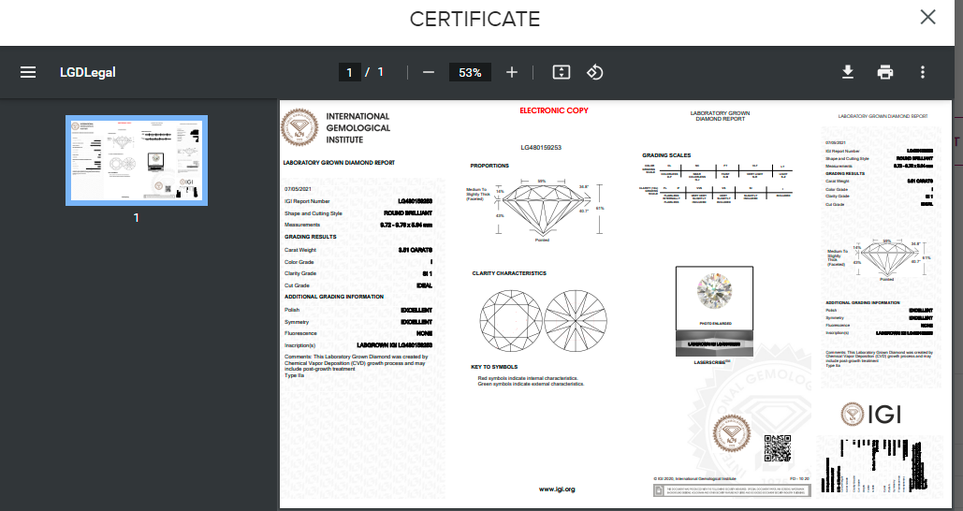
Setup 360 view and Certificate
Please follow the steps provided below in order to setup 360 view and certificate:-
- Use local inventory in the configuration
- Update diamond and add below values from Admin > Catalog > Products > Select Diamiond > Edit > "Diamond Details"
- Put any value with url of the document (ex. https://certimage.s3-accelerate.amazonaws.com/images/full_size/certificates/LG480159253.pdf) in the "Has cert file" attribute for the certificate
- Put any value for 360 url value for " Sarineloupe Url" attribute (ex. V360 Viewer ) and 1 to " Has Sarineloupe" attribute.
Test URL - Choose a diamond
Certificate
360 view

Frontend
The below screengrab contains order with custom ring size selected:-

If you have a question related to this extension please check out our FAQ Section first. If you can't find the answer you are looking for then please contact support@scommerce-mage.com.
Magento 2 Not On The High Street Integration
Installation and User Guide for Magento 2 Noths Integration Extension
Table of Contents
- Installation
- Installation via app/code
- Installation via Composer
- Configuration Settings for Noths Integration
- General Settings
- Integration Settings
- Noths Order(s) View from Back-end
- Noths Order Import
- Noths Order Details on Order View Page
- Noths Order Logs
Installation
-
Installation via app/code: Upload the content of the module to your root folder. This will not overwrite the existing Magento folder or files, only the new contents will be added. After the successful upload of the package, run below commands on Magento 2 root directory.
php bin/magento setup:upgrade php bin/magento setup:di:compile php bin/magento setup:static-content:deploy -
Installation via Composer: Please follow the guide provided in the below link to complete the installation via composer.
Configuration Settings for Noths Integration
Go to Admin > Stores > Configuration > Scommerce Configuration > Noths
General Settings
- Enabled - Select "Yes" or "No" to enable or disable the module.
- License Key - Please add the license for the extension which is provided in the order confirmation email. Please note license keys are site URL specific. If you require license keys for dev/staging sites then please email us at support@scommerce-mage.com.
Integration Settings
- Cron for Order import - Please allow to set cron frequency for order import from Noths.
- API Url - Please enter API Url.
- API Log - Select "Yes" to enable the API Log. If set to "Yes" then it will log communication with Noths API.
- Create Files for Log - Select "Yes" to enable the create files for log. If set to "Yes" then it will log communication with Noths API.
- API Key - Please enter API Key.
- Select the allowed order statuses - Please select order status which will be imported from Noths
- Select the store for NOTHS Orders - Please select the store for Noths orders.

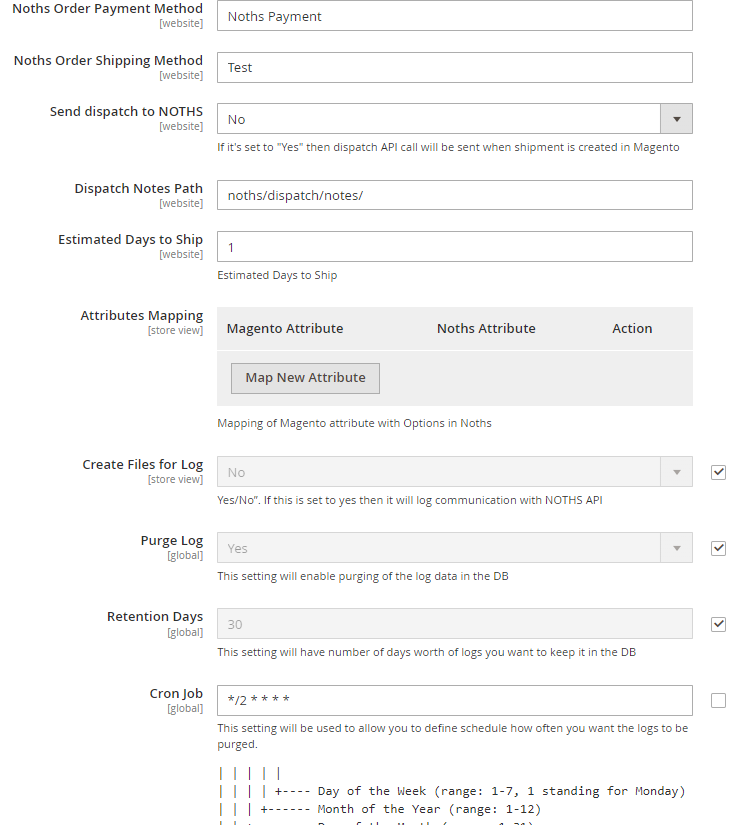
- Noths Order Payment Method - Please add the payment method which will be used to import orders from Noths.
- Noths Order Shipping Method - Please add the shipping method which will be used to import orders from Noths.
- Dispatch Notes Path - Please add the dispatch notes path in media/noths/dispatchnote/[order number].pdf
- Estimated Days to ship - Please add the days for estimated days to ship.
- Attributes Mapping - Please add the mapping of Magento attribute with options in Noths.
- Create Files for Log - Select Yes/No”. If this is set to yes then it will log communication with NOTHS API
- Purge Log - Please enable purging of the log data in the DB.
- Retention Data - Please add number of days worth of logs you want to keep it in the DB.
- Cron Job - Please add define schedule how often you want the logs to be purged.
Noths Order(s) View from Back-end
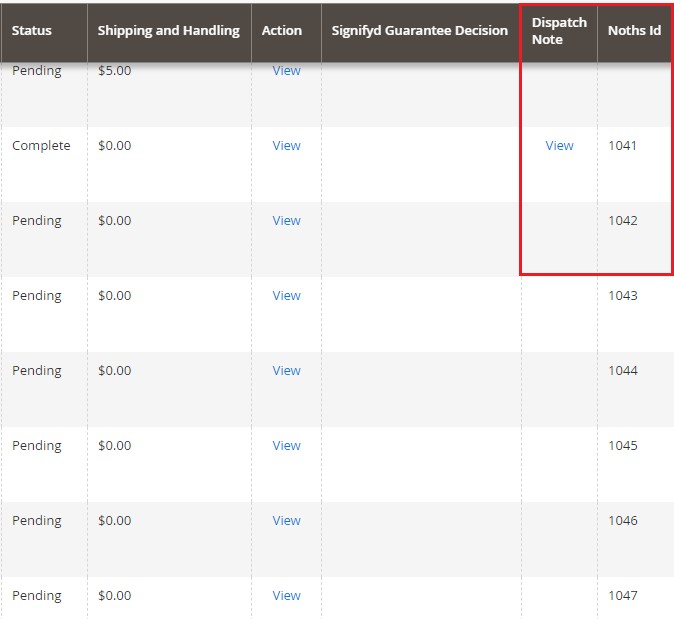
-
Noths Order Import - You can view imported Noths order(s) from Admin > Sales> Orders. This grid will have "Dispatch Note " and "Noths Id".
-
Noths Order Details on Order View Page - You can view Noths order details at Admin > Sales > Select Order > View.

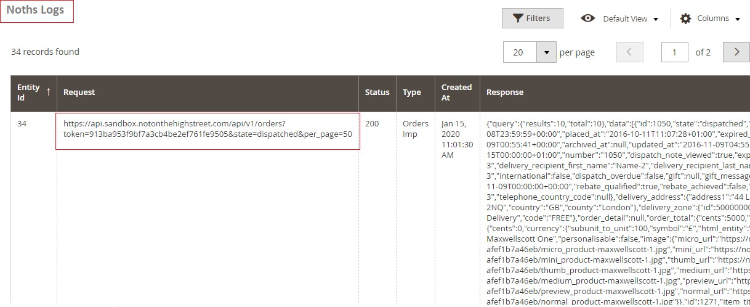
-
Noths Order Logs - To view Noths Logs go to Admin > Scommerce Noths > Order Logs. This log will have Entity Id, Request, Status, Type, Created At, and Response.
If you have a question related to this extension please check out our FAQ Section first. If you can't find the answer you are looking for then please contact support@scommerce-mage.com.
Magento 2 Creditsafe Integration
Installation and User Guide for Magento 2 Creditsafe Integration Extension
Table of Contents
- Installation
- Installation via app/code
- Installation via Composer
- Configuration Settings for Creditsafe Integration
- General Settings
- API Configuration
- Limits and Messages Configuration
- Limits Configuration
- Emails
- Customer Configuration
- CreditSafe API Logs
- CreditSafe Information Stored Against the Customer
- Customer Verification Process
- CreditSafe Adjustment Grid
- CreditSafe Transactions Grid
- Import CreditSafe transactions in the Grid
- Frontend
- Apply for CreditSafe Application
- CreditSafe Company Application
- Successful Credit Application
Installation
-
Installation via app/code: Upload the content of the module to your root folder. This will not overwrite the existing Magento folder or files, only the new contents will be added. After the successful upload of the package, run below commands on Magento 2 root directory.
php bin/magento setup:upgrade php bin/magento setup:di:compile php bin/magento setup:static-content:deploy -
Installation via Composer: Please follow the guide provided in the below link to complete the installation via composer.
Configuration Settings for Creditsafe Integration
Go to Admin> Stores> Configuration> Scommerce > Credit Safe
General Settings
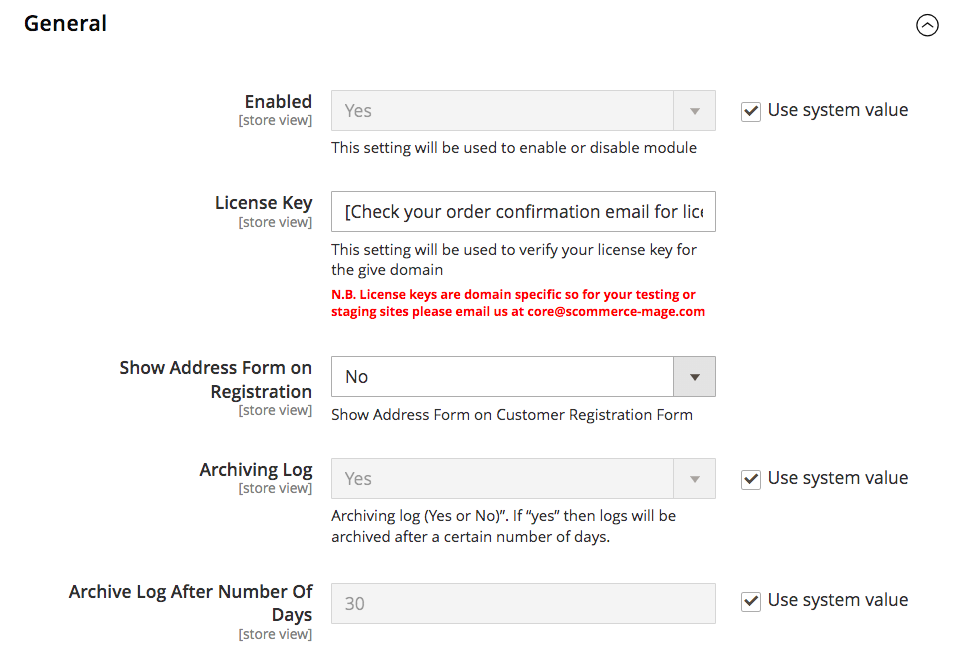
- Enable Module - Select "Yes" or "No" to enable or disable the module.
- License Key - Please add the license for the extension which is provided in the order confirmation email. Please note license keys are site URL specific. If you require license keys for dev/staging sites then please email us at support@scommerce-mage.com.
- Show Address Form on Registration - Set "Yes" to collect billing address from customer on user registration or signup form. If set "No" billing address won't be captured on user registration.
- Archiving Log - Set "Yes" to archive credit safe logs after a certain number of days and set "No" to turn off archiving.
- Archive Log After Number Of Days - Enter the number of days after which the logs will be archived.
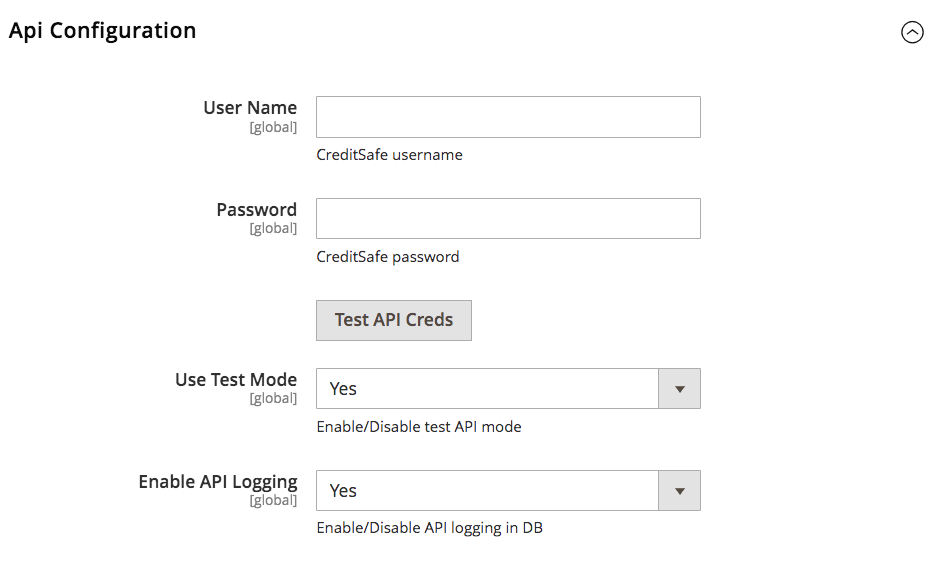
API Configuration
- User Name - Enter the Creditsafe Username
- Password - Enter the Creditsafe Password. Once both username and password are entered and saved click on the "Test API Creds" button if it shown "success" in green then your credentials are correct if not then please re verify your credentials.
- Use Test Mode - Set "Yes" to enable sandbox creditsafe and set "No" to use live creditsafe.
- Enable API Logging - Set "Yes" or "No" to Enable/Disable API logging in DB
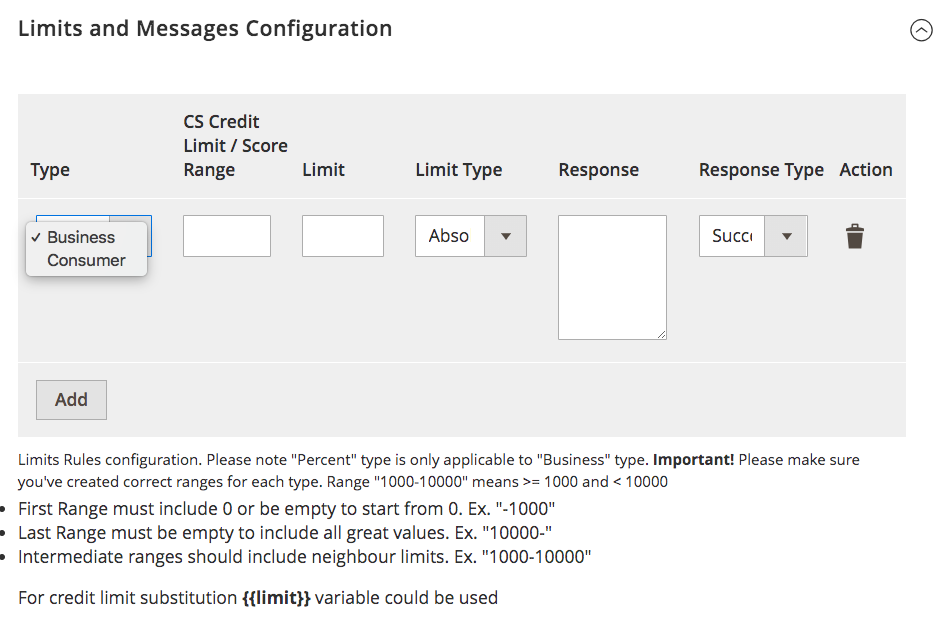
Limits and Messages Configuration
Create creditsafe rules based on your requirements.
- Type - Select the user type either "Business" or "Consumer" this rule will be created for the appropriate applicant type.
- CS Credit Limit/Score Range - Enter the credit limit or credit score range for the particular rule.
- Limit- Enter the credit limit to be assigned for this rule based on the score entered previously. If the score is in this range then the entered limit should be provided to the applicant.
- **Limit Type -**There are two main credit limit types:
- Absolute Limit: This limit is a fixed amount set by you or your business, regardless of external factors. It's directly entered into the "limit field" you mentioned.
- Percentage Limit: This limit is determined as a percentage of an external creditworthiness score. The external score typically comes from CreditSafe.
- The calculation involves: Credit Limit Received from CreditSafe (e.g., 1000) Limit Specified in the Limit Field (e.g., 50) The final credit limit is the percentage of the CreditSafe limit multiplied by the limit field value. In this example: Final Limit = 50% * 1000 = 500
- Response - Enter the response shown to the customer when they fullfill the criteria for this rule and the the limit is assigned to them
- Response Type - Choose the response type from either Success or Failure.
Similarly you can create multiple rules as per your requirements to appropriately assign the credit limits to your applicants.
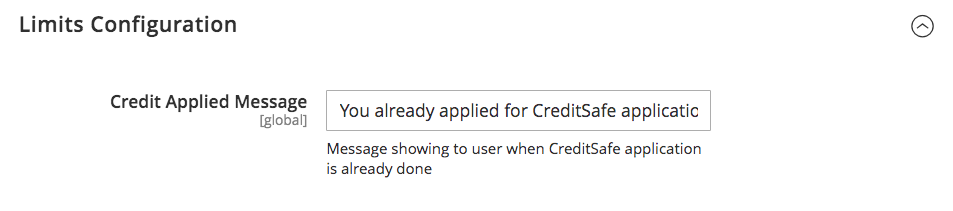
Limits Configuration
- Credit Applied Message - Enter the message that will be displayed to user when they have previously applied for Creditsafe application.
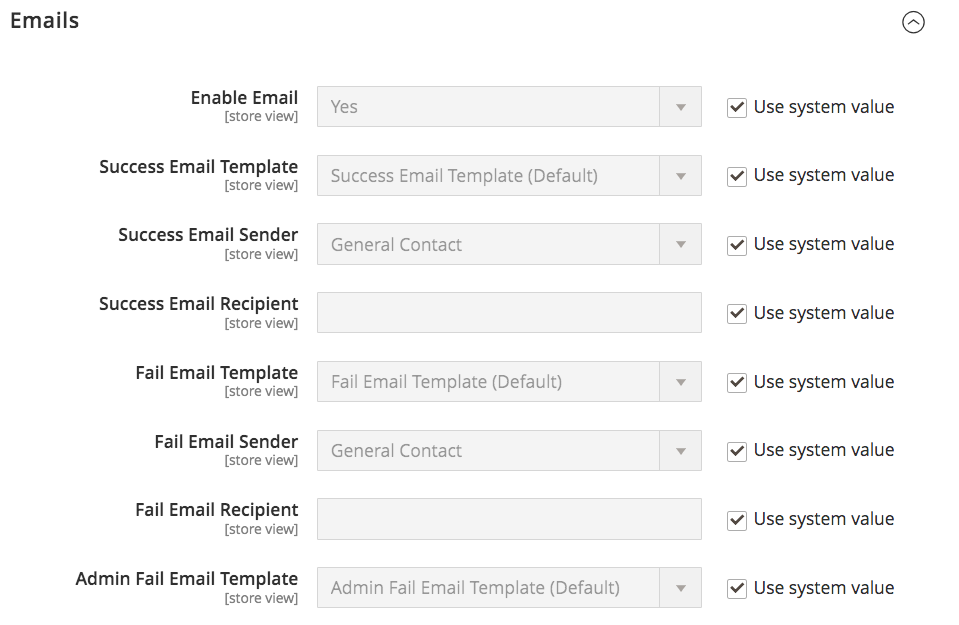
Emails
- Enable Email - Select "Yes" or "No" to enable or disable the creditsafe application emails.
- Success Email Template - Select the template to be used for success emails (successful credit safe application).
- Success Email Sender - Select the Email Sender, the email to be used to send the success emails.
- Success Email Recipient - You can add an additional email where the success emails will be sent alongside the applicant.
- Fail Email Template - Select the template to be used for fail emails (failed credit safe application). This email will only be sent to the customer.
- Fail Email Sender - Select the Email Sender, the email to be used to send the failure emails.
- Fail Email Recipient - This is optional. You can add an additional email where the failure emails will be sent other than the customer. This email will be exactly same as the one sent to the customer.
- Admin Fail Email Template - Select the template to be used for fail emails (failed credit safe application) to admin. This email template is only sent to the Administrator and not the customer. It contains for details regarding the failure of the credit application.
- Admin Fail Email Sender - Select the Email Sender, the email to be used to send the failure emails to admin.
- Admin Fail Email Recipient - This is optional. You can add an additional email where the failure emails will be sent alongside the admin. This failure email will be exactly same as the one sent to administrator.
- Admin API Result Email Template - Select the template to be used for API results to admin. When the credit application occurs the requests and responses from various end points will be sent to the admin via this email template.
- Admin API Result Email Sender - Select the Email Sender, the email to be used to send API results to admin.
- Admin API Result Email Recipient - This is optional You can add an additional email where the API results will be sent alongside the admin. This email will be exactly same as the one sent to administrator contianing requests and responses of various end points hit during the credit application.
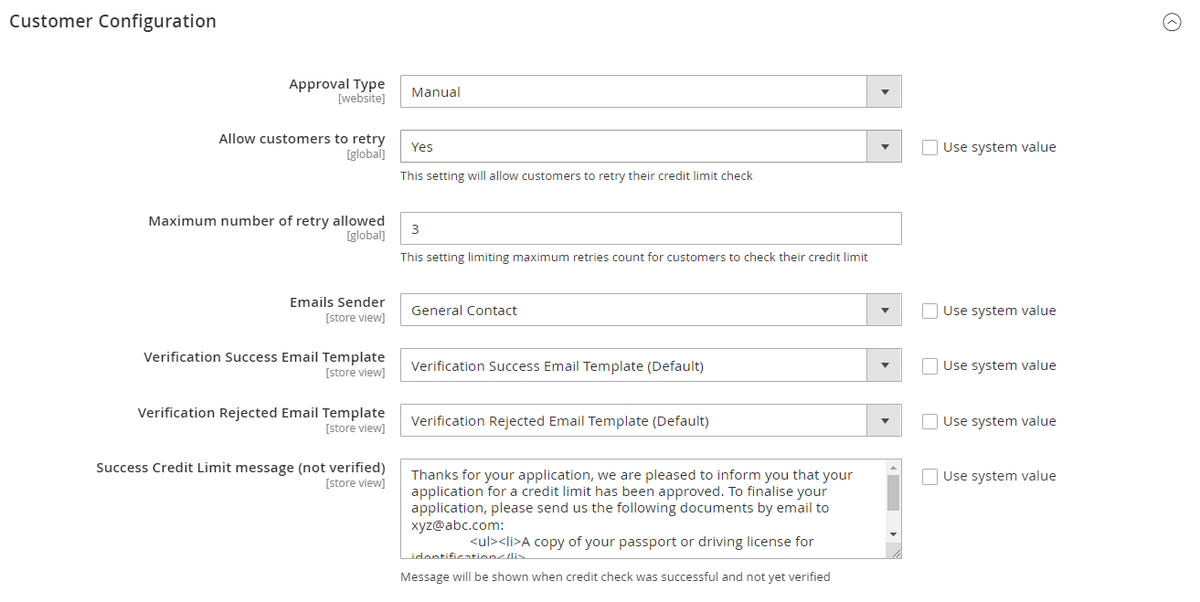
Customer Configuration
- Approval Type - Select either "disabled" "manual" or "automatic". If "disabled" is selected, the verification will be disabled. If "manual" is selected,the credtisafe applications will be only approved/verified by the magento admin. If "automatic" is selected, the credisafe applications will be automatically approved or denied based on the Credit limits and Messages Configuration.
- Allow customers to retry - If set to "Yes", customers will be able to re-apply for creditsafe application. If set to "No", once creditsafe application is submitted they won't be able to retry the application.
- Maximum number of retry allowed:- Enter the maximum number of retries for customers to check their credit limit.
- Email Sender - Select the email sender which will be used to send out applicant verification emails
- Verification Success Email Template - Select the Email template to be used for successfull applicant verification.
- Verification Rejected Email Template - Select the Email template to be used for failed applicant verification.
- Success Credit Limit message (not verified):- Enter the success credit limit message when credit check was successfull but not verified.
- Success Credit Limit message (verified)):- Enter the success credit limit message when credit check was successfull and verified.
- Failed Credit Limit Message - Enter the message that will be displayed to customer when their credit check failedbut they have retries available.
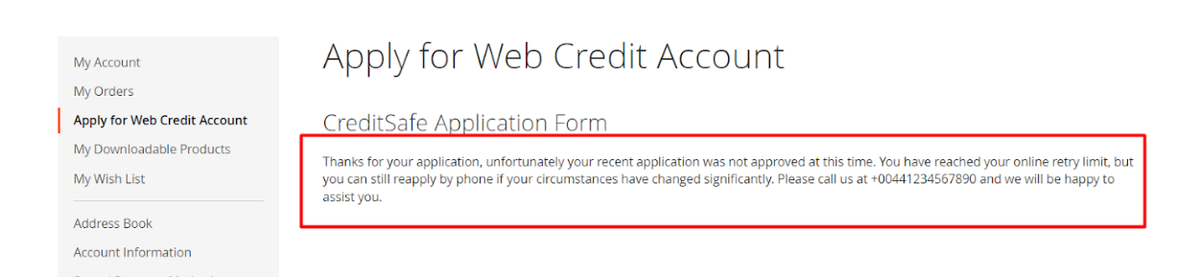
- Failed Credit Limit (no retries) - Enter the message that will be displayed to customer when their credit check failed and they have no retries available.
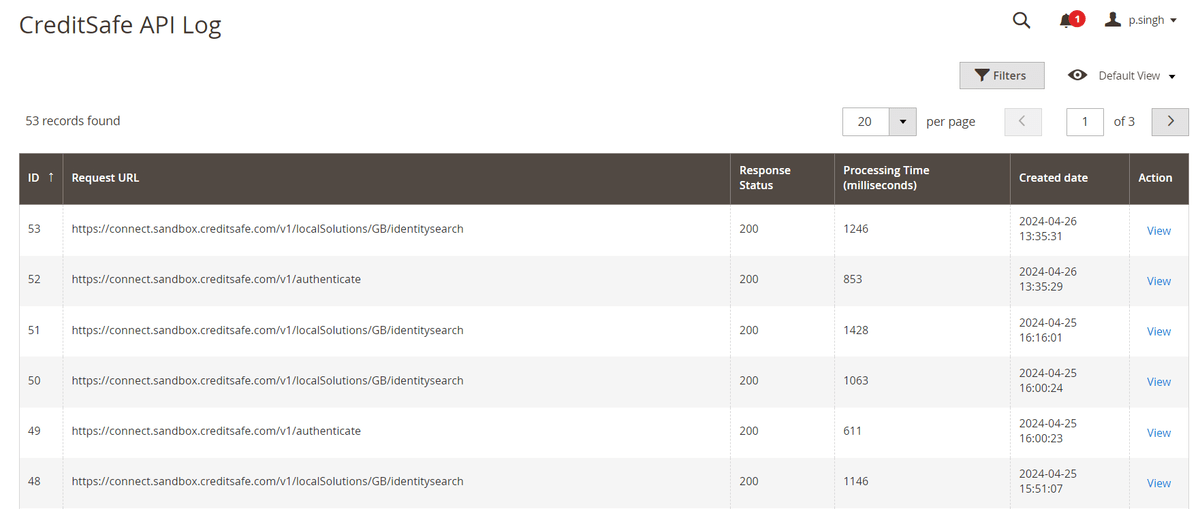
CreditSafe API Logs
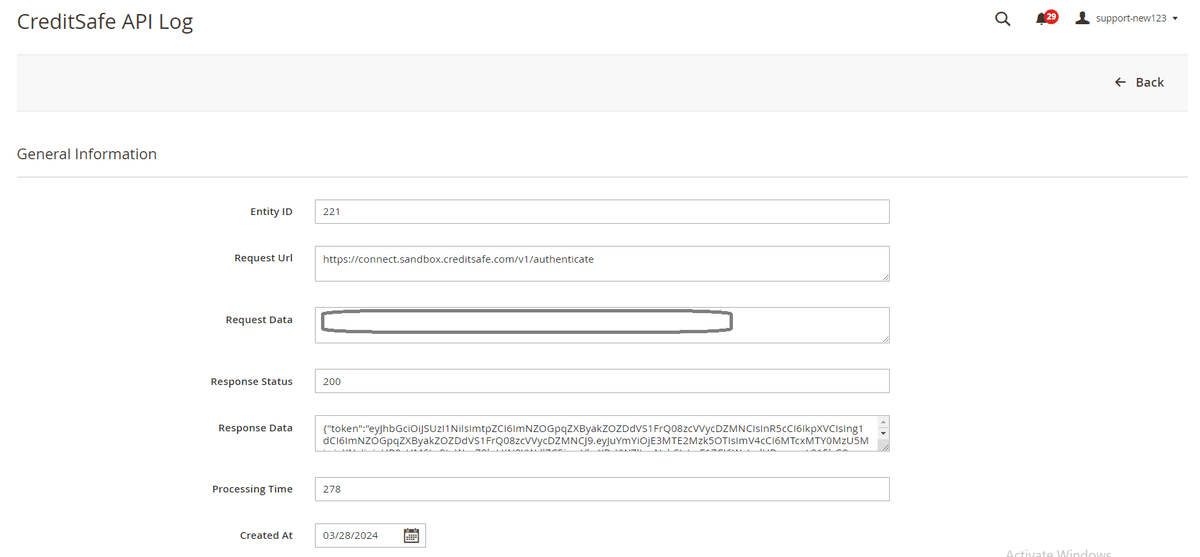
All requests and responses with regards to creditsafe endpoints are logged into a grid. You can view the logs by going into Admin>System>CreditSafe API Logs>Credit Safe Logs.
If you further click on any of the entries it contains the information as shown in the image below:-
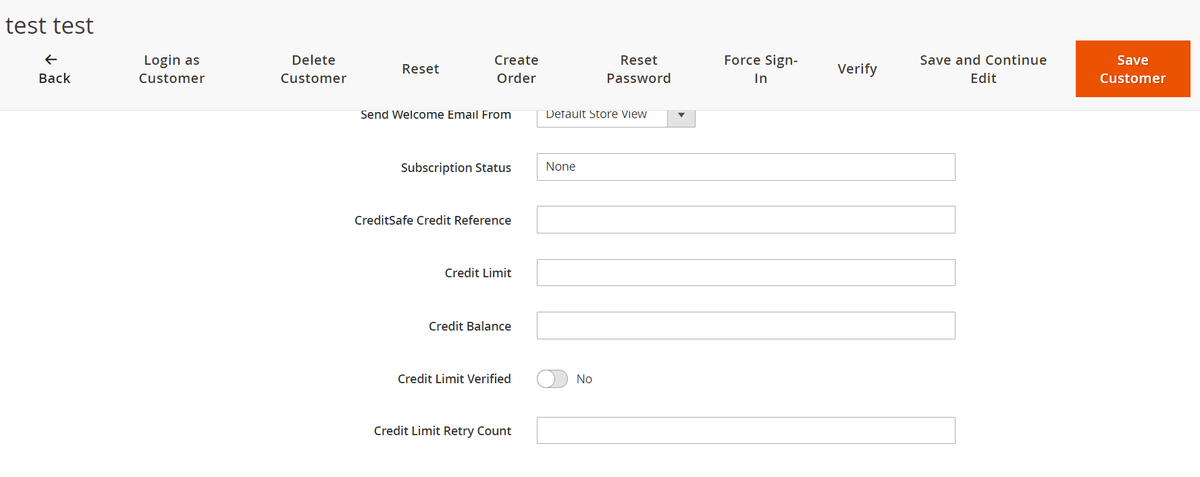
CreditSafe Information Stored Against the Customer
Our module adds certain fields against the customer to keep track of credit assignment and available credit limits. Following fields are added:-
- CreditSafe Credit Reference:- Credit reference number received from creditsafe upon credit application.
- Credit Limit:- The limit received from creditsafe upon succefull credit application. Maximum limit that can be used by the customer to make purchases. It does not decrease after transactions.
- Credit Balance:- The limit received from creditsafe upon succefull credit application. Maximum limit that can be used by the customer to make purchases. This value get's updated based on transactions made by the customer. for eg:- if they make purchase using the credit limit then that amount will be deducted and reflected here.
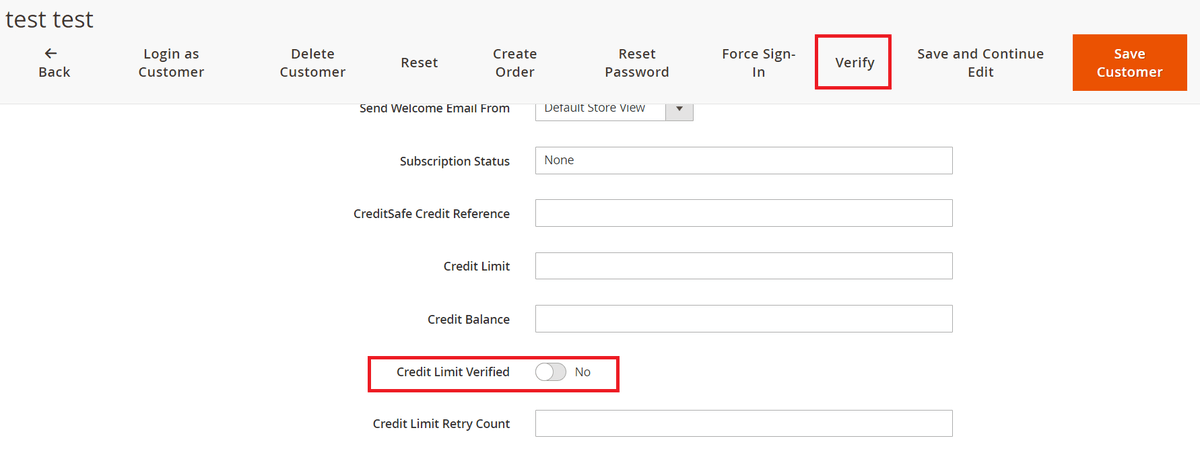
- Credit Limit Verified:- This toggle turns on when the customer verification is complete, either manual or automatic.
- Credit Limit Retry Count:- The number of times a customer has applied for credit application.
Customer Verification Process
Based on the "Approval Type" configuration described earlier, the customer's verification takes place:-
-
Automatic:- The customer verification is done automatically.
-
Manual:- When "manual" verification is selected, then it is upon the administrator to verify the customer, for eg:- asking for documents via email and verifying them in person. Once verified admin can click on the verify button or turn on the toggle in the customer page ( go to Admin>Customers>All Customers>select the customer). Once verified by using the "Verify" button, the customer get an email regarding their successful verification.
-
Disabled:- Customer verification is not required and upon successful application the credit limits are assigned to customer.
CreditSafe Adjustment Grid
CreditSafe Transactions Grid
It allows you to track and manage adjustments made to customer credit limits based on their orders and payments. With this system, you can view and manage adjustments made to customer credit limits in a single, easy-to-use grid. Easily Keep track of adjustments made to customer credit limits. Go to Admin>Sales>Creditsafe>Transactions. The grid reflects both positive and negative adjustments i.e when a customer makes a purchase using their credit limit and when they make the payment of the invoice.

Import CreditSafe transactions in the Grid
You can import transactions by either going into Admin>System>Import our by going to sales>Orders>Import from CSV. Next select the "Entity Type" as "CreditSafe Transaction Import" from the dropdown.
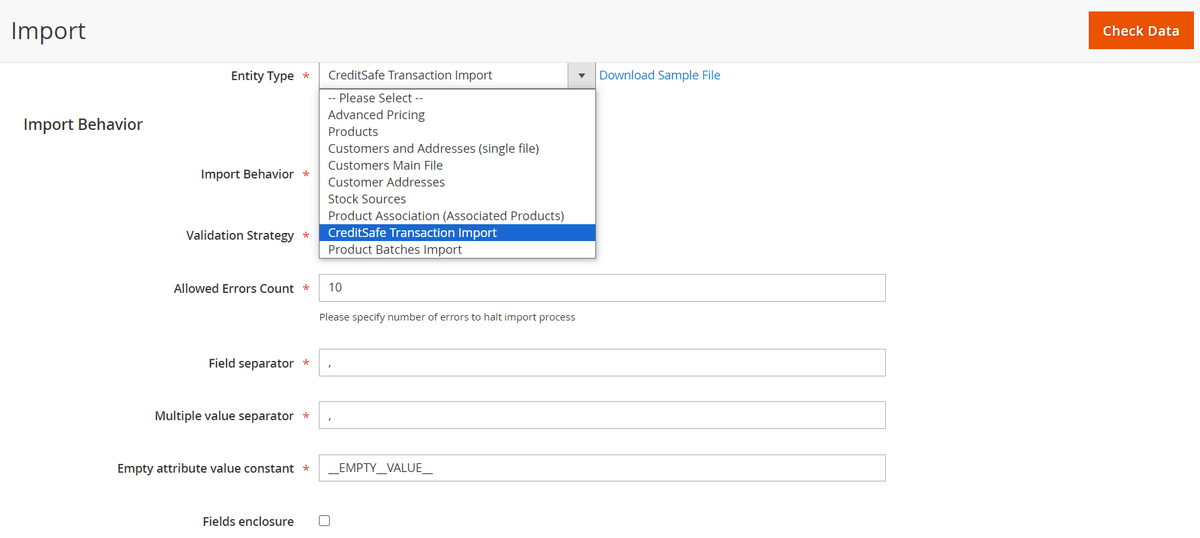
The format of the import file should be as shown in the image. The fields required are as follows:-
- entity_id:- Enter the id of the next transaction as per your CreditSafe Transaction Grid. For eg:- if you have 1-24 transactions then you should start the list from 25..26 and so on.
- payment_date:- Date & time of the payment received or deducted.
- adjustment_amount:- Enter a positive or negative adjustment amount. adding a positive amount will add the amout in the customers credit balanace wheras for negative amount it will deduct the amount from credit balance.
- increment_id:- Enter the order id.
- customer_email:- Enter the customer email.
- transaction_description:- You can add a description of the adjustment which will be reflected in the creditsafe transactions grid.

Frontend
Apply for CreditSafe Application
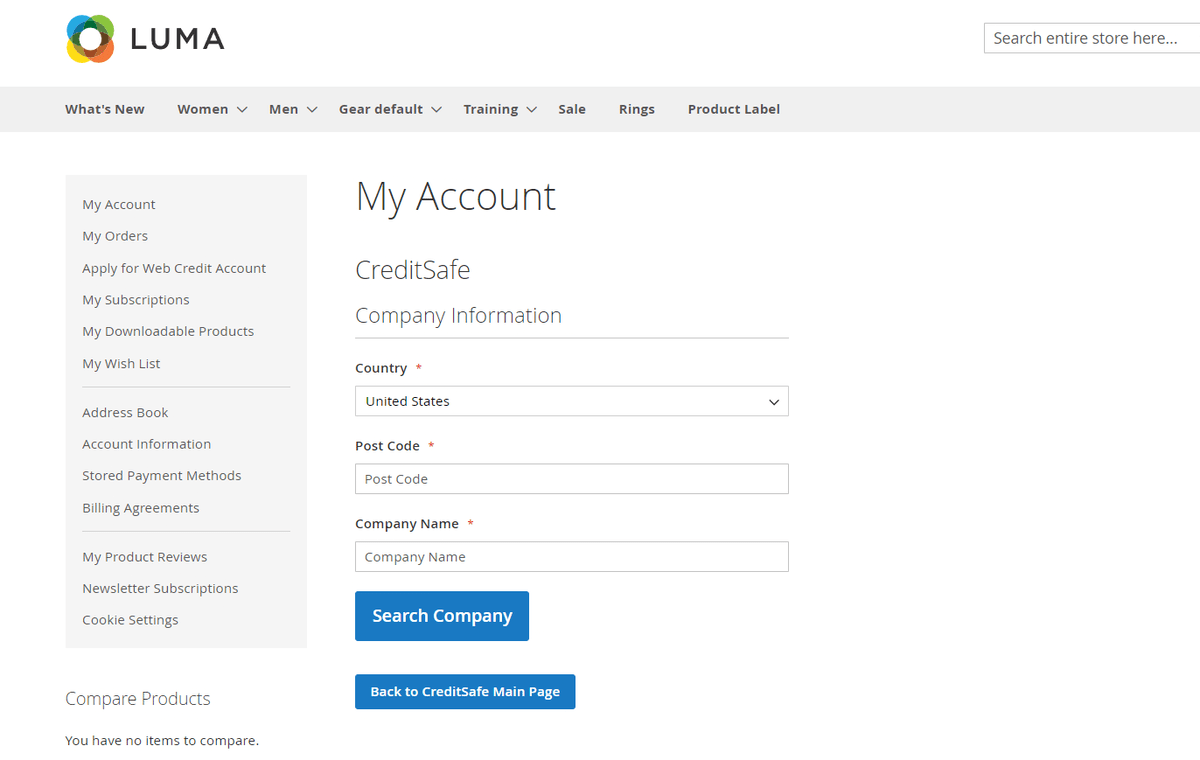
Customers can apply for creditsafe application from their My Account section using the button "Apply for Web Credit Account".


CreditSafe Company Application
Successful Credit Application
If you have a question related to this extension please check out our FAQ Section first. If you can't find the answer you are looking for then please contact support@scommerce-mage.com.
Magento 2 PunchOut & ERP Integration
Installation and User Guide for Magento 2 PunchOut & ERP Integration
- Configuration Settings for PunchOut Integration
- General Settings
- Order Creation Settings
- Catalog Settings
- Punchout Session Settings
- UBL Configuration
- Managing PunchOut Clients
- Setting Up Catalogs and Pricing
- Testing the Integration
- Step-by-Step Testing Guide
- Handling Purchase Orders (End-to-End Workflow)
- Troubleshooting Common Issues
Installation
- Installation via app/code: Upload the content of the module to your root folder. This will not overwrite the existing Magento folder or files, only the new contents will be added. After the successful upload of the package, run below commands on Magento 2 root directory.
php bin/magento setup:upgrade php bin/magento setup:di:compile php bin/magento setup:static-content:deploy - Installation via Composer: Please follow the guide provided in the below link to complete the installation via composer.
Configuration Settings for PunchOut Integration
Go to Admin > Stores > Configuration > Scommerce Configuration > Punchout
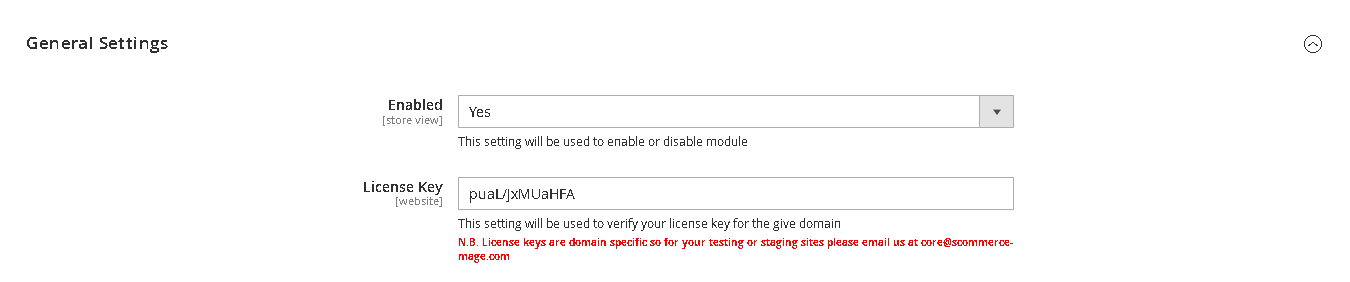
General Settings
- Enabled - Select "Yes" or "No" to enable or disable the module.
- License Key - Please add the license for the extension which is provided in the order confirmation email. Please note license keys are site URL specific. If you require license keys for dev/staging sites then please email us at support@scommerce-mage.com.
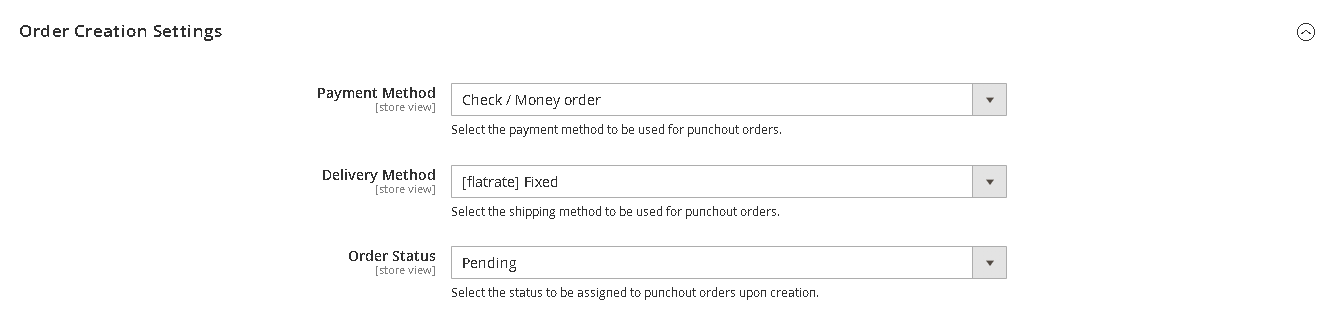
Order Creation Settings
- Payment Method – Select the payment method to be used for punchout orders from the dropdown.
- Delivery Method – Select the shipping method to be used for punchout orders from the dropdown.
- Order Status – Select the order status to be assigned to punchout orders upon creation.
Catalog Settings
- Remove Account Links – Set "Yes" to remove account links when punchout session is started
- Remove Footer – Set "Yes" to remove footer when punchout session is started

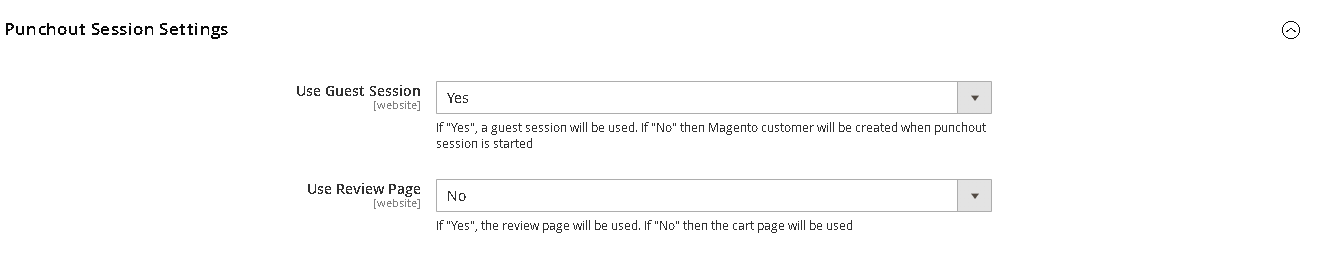
Punchout Session Settings
- Use Guest Session – Set "Yes" to create a guest session when punchout session is start and Set "No" to create a new Magento customer when punchout session is started
- Use Review Page – Set "Yes" to use the review page and "No" to use the cart page.
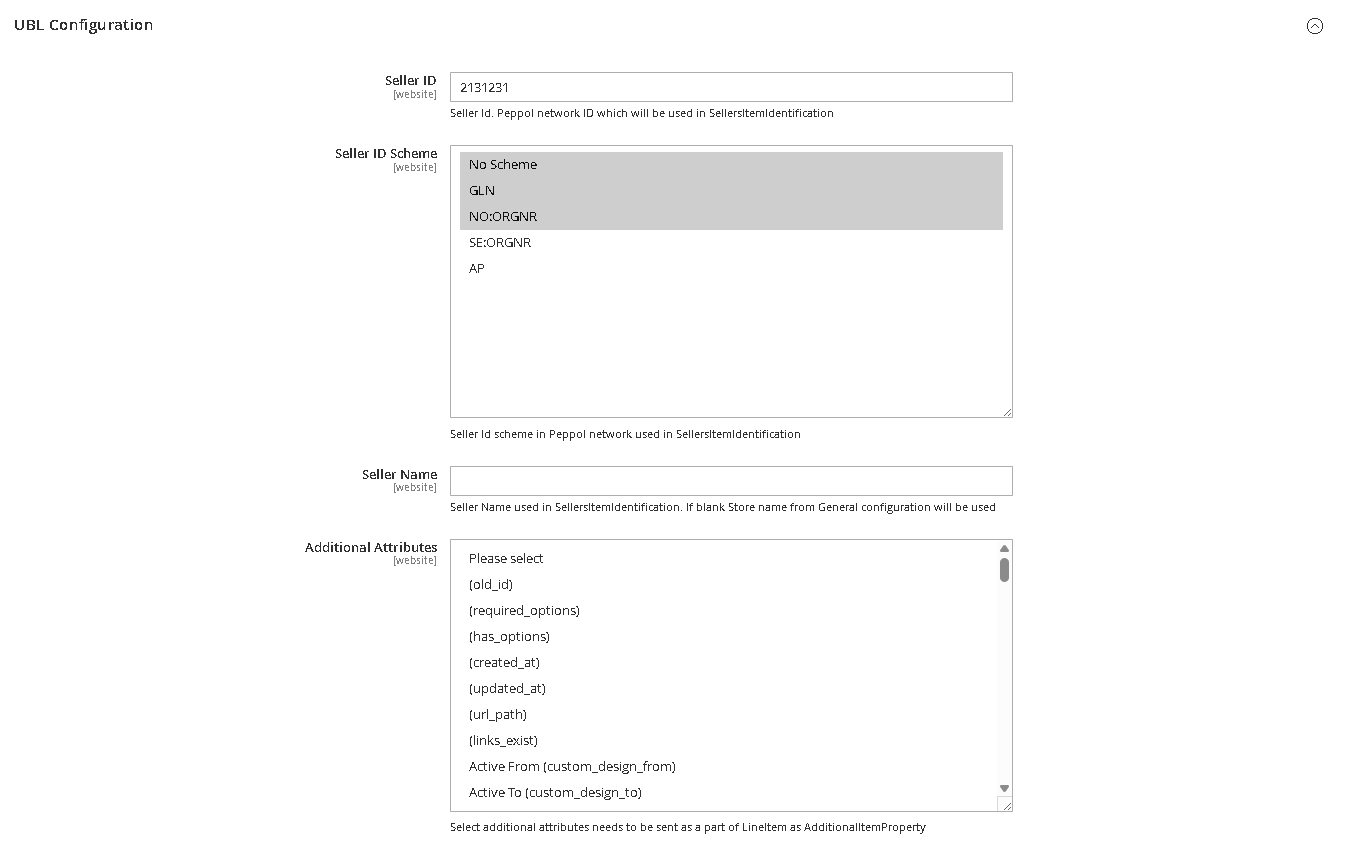
UBL Configuration
- Seller ID – Add the seller ID/Peppol network ID which will be used in SellersItemIdentification
- Seller ID Scheme– Select the Seller Id scheme in Peppol network that gets used in SellersItemIdentification
- Seller Name– Add the Seller Name used in SellersItemIdentification. If blank Store name from General configuration will be used.
- Additional Attributes– Select additional attributes needs to be sent as a part of LineItem as AdditionalItemProperty
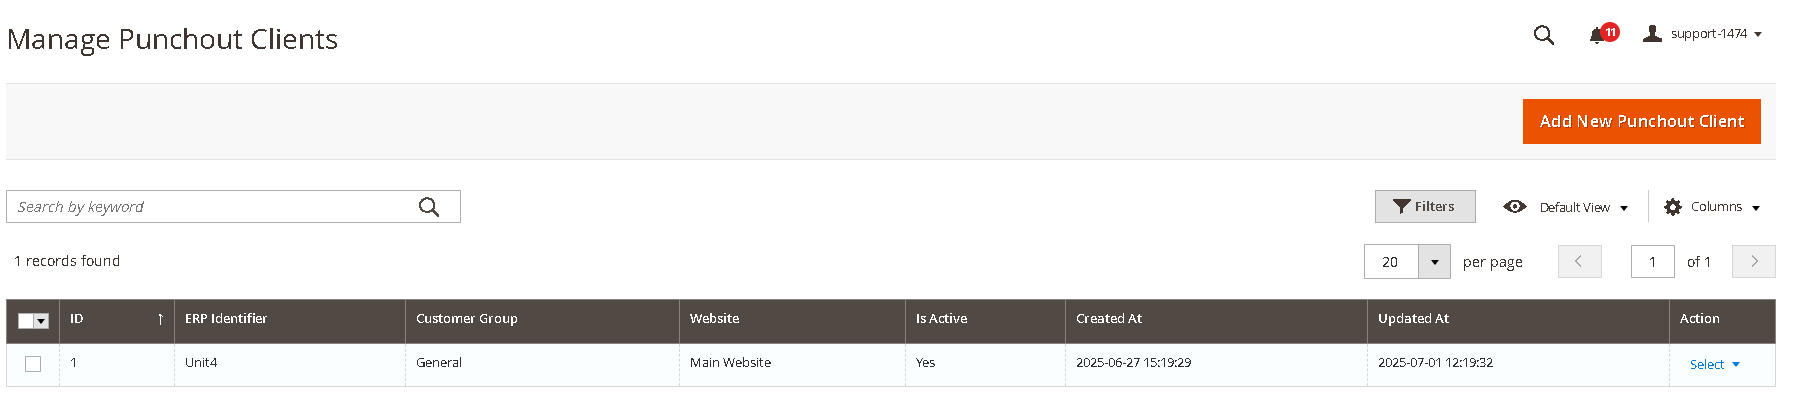
Managing PunchOut Clients
This is the most critical part of the setup. Each corporate client you wish to integrate with must be configured as a "PunchOut Client."
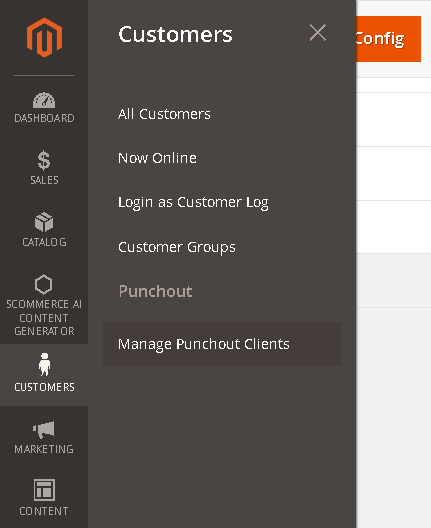
- Go to Admin>Customers>Punchout>Manage Punchout Clients
2. Click "Add New Punchout Client" to configure a new connection.
3. Fill in the following fields:
-
- General Information
- ERP Identifier: The unique identifier provided by the client's ERP system. This is often referred to as the
From IdentityorSender Identityin cXML. - Shared Secret: The password or secret key used for authentication, provided by your client. This must be an exact match.
- Customer Group: This is the key to personalizing the experience. Select the Magento customer group that this client's users should be assigned to upon logging in via PunchOut. This controls the catalog and pricing they see.
- Website: Select Website
- Is Active: Set to "Yes" to activate the connection for this specific client.
- ERP Identifier: The unique identifier provided by the client's ERP system. This is often referred to as the
- UBL Information
- Scheme ID:- Select the Scheme ID
- Endpoint ID:- Add the Endpoint ID
- General Information
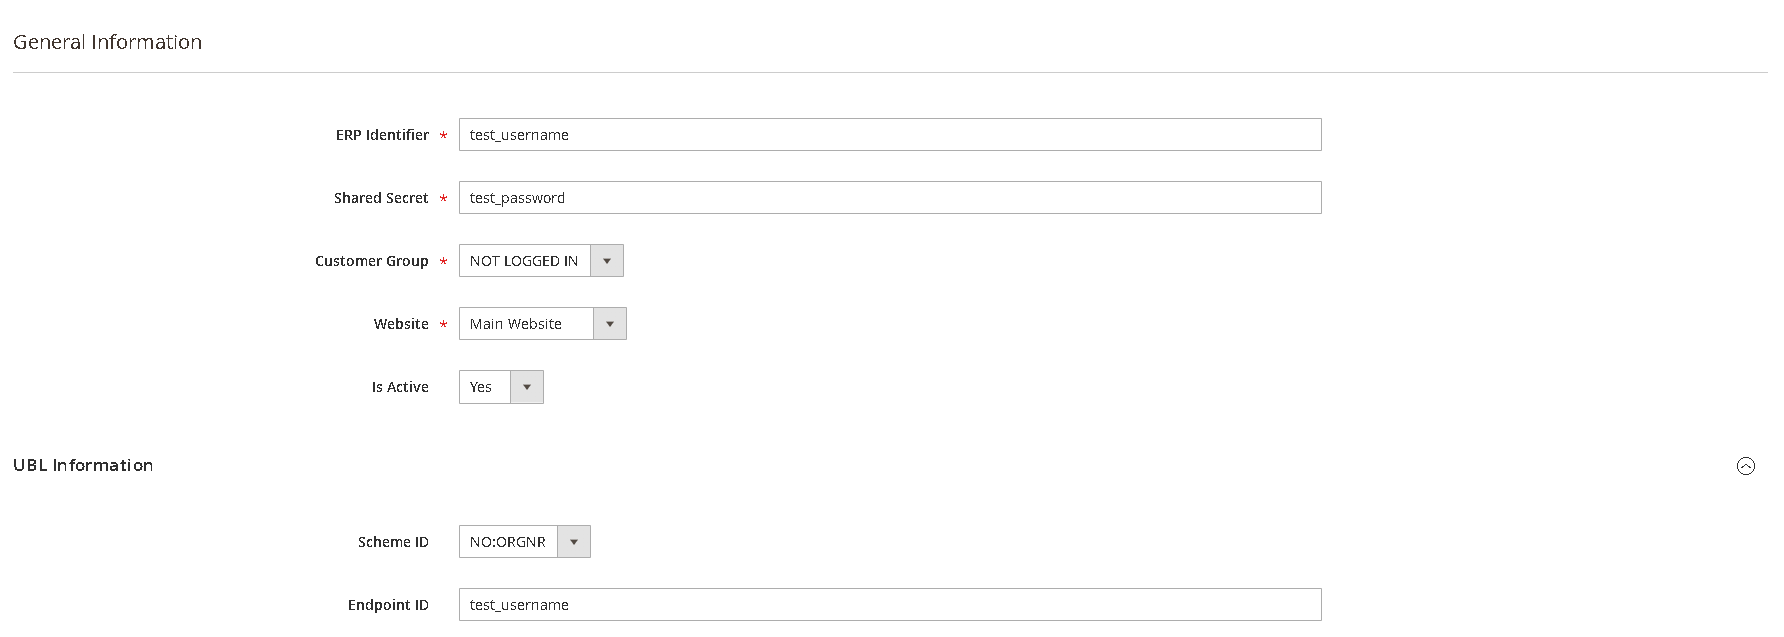
4. Click "Save Config."
Setting Up Catalogs and Pricing
The extension leverages Magento's native customer group functionality to deliver a personalized experience.
- Create a Customer Group: Before configuring a PunchOut client, navigate to Customers > Customer Groups and create a new group for them (e.g., "PunchOut - Global Office Inc.").
- Assign Custom Pricing: Use Marketing > Catalog Price Rules to create rules that apply specific discounts or fixed prices for products and assign the rule to the customer group you just created.
- Restrict Catalog (Optional): If you need to show only specific categories to a client, you may need to use native Magento functionality or a third-party category permissions module to restrict access for the designated customer group.
Testing the Integration
Our extension adheres strictly to industry standards, allowing you to validate your configuration using independent, third-party testing tools. We recommend using the PunchOut Commerce cXML Order Tester.
Step-by-Step Testing Guide:
- Get Your PunchOut URL: Your Magento PunchOut URL is typically your store's base URL followed by
/scpunchout/create/session/. For example:https://yourstore.com/scpunchout/create/session - Open the Testing Tool: Navigate to
https://punchoutcommerce.com/tools/cxml-order-tester. - Configure the Tester:
- PunchOut Login URL: Enter your Magento PunchOut URL from Step 1.
- cXML Payload: The tool provides a template. You must edit the
IdentityandSharedSecretvalues in the XML to exactly match the credentials you configured for your PunchOut Client in the Magento admin. - UBL Payload: The tool provides a template. You must edit the
Username,passwordandEndpoint IDvalues in the XML to exactly match the credentials you configured for your PunchOut Client in the Magento admin.
- Initiate the Session: Click the "Start Session" button on the tester website to test CXL and "Start UBL Session" to test the UBL2.1
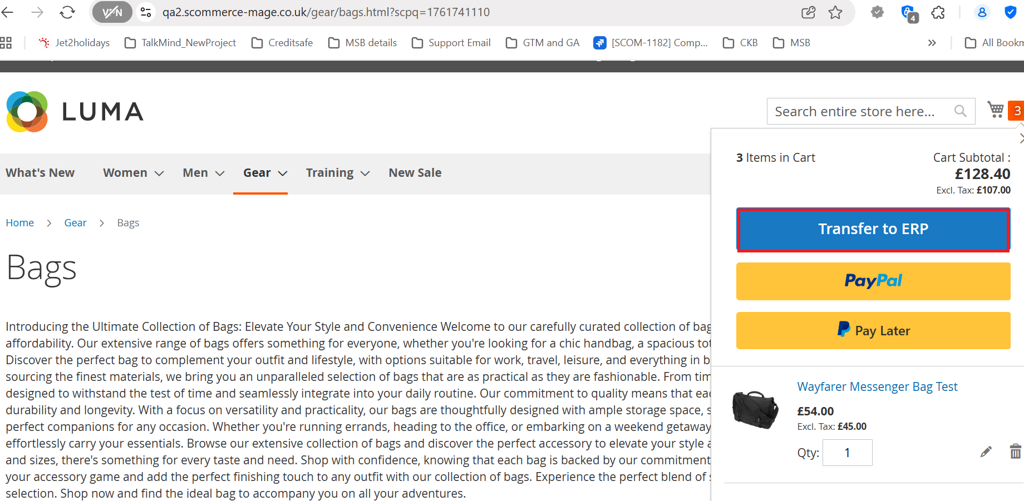
- Shop in Magento: You should be redirected to your Magento storefront and automatically logged in as a member of the mapped customer group. Browse the site and verify that you see the correct products and contract pricing. Add one or more items to your basket.
- Transfer the Cart: Once you have items in your basket, click the "Transfer to ERP" button.
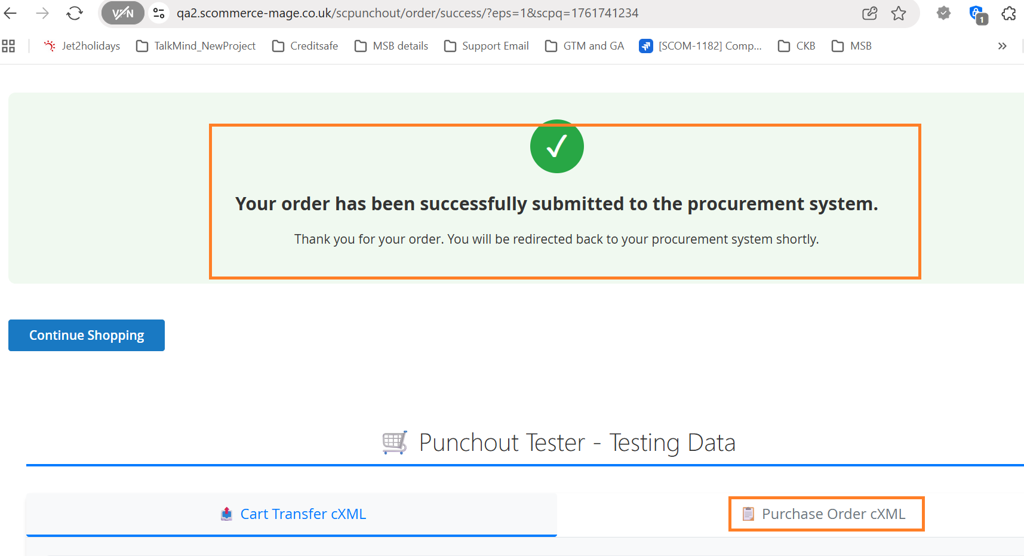
- Verify the Response: You will be redirected back to the PunchOut Commerce testing tool. It will now display the cXML response sent from your Magento store. Carefully inspect this XML to confirm that the correct SKUs, quantities, and prices are present. A successful test confirms your configuration is working correctly. You can validate the UBL output at:- https://ecosio.com/en/peppol-and-xml-document-validator/
Handling Purchase Orders (End-to-End Workflow)
The PunchOut process is typically two-phased.
- Phase 1 (Shopping): The buyer transfers their cart from Magento to their ERP for internal approval. This is what you validated during testing.
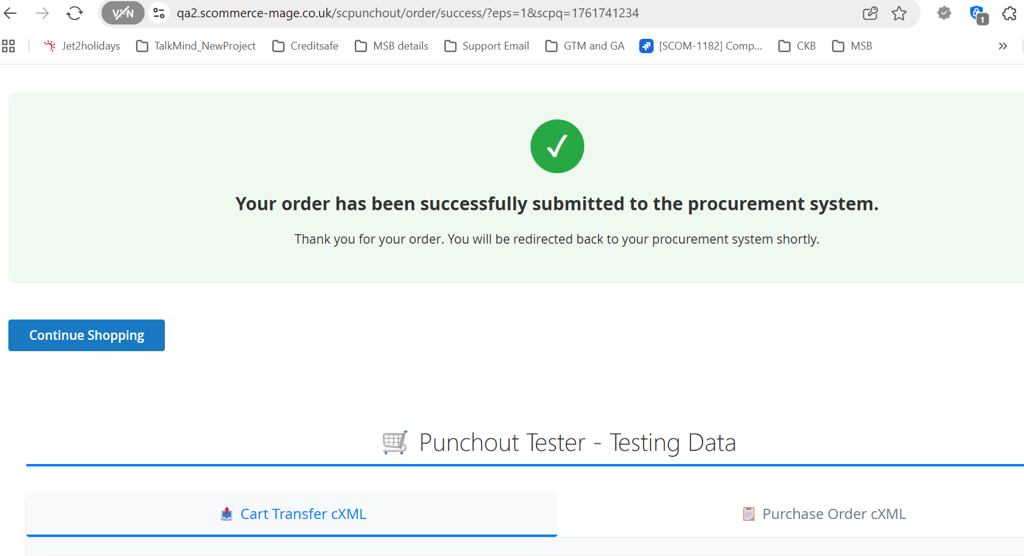
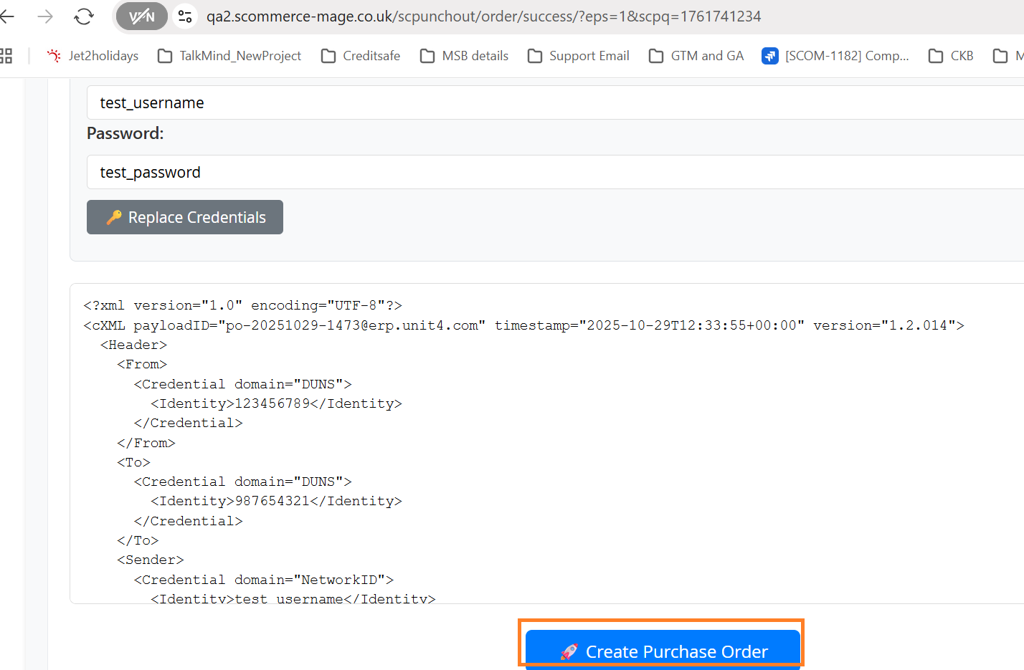
- Phase 2 (Ordering): After the cart is approved, the client's ERP system sends a formal Purchase Order (PO) back to Magento as a new cXML message.
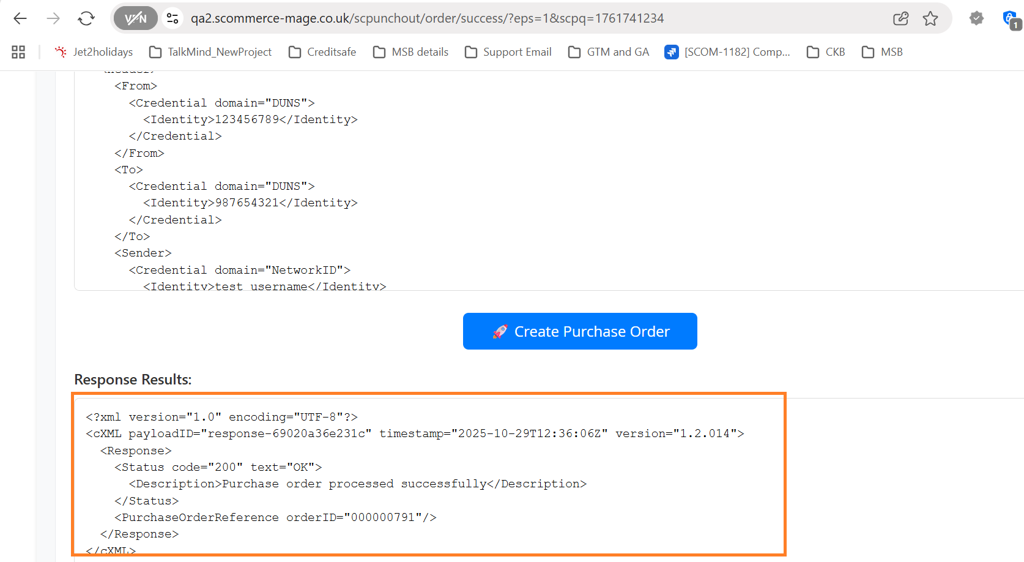
Our extension can receive this incoming Purchase Order and automatically create a corresponding sales order in your Magento system, enabling a fully automated, end-to-end workflow. The specific endpoint URL for receiving POs (/scpunchout/order/) should be provided to your client's IT team.
Troubleshooting Common Issues
- Authentication Failed / Invalid Credentials: This almost always means the Identity or Shared Secret in your PunchOut Client configuration does not match what is being sent by the ERP or testing tool. They are case-sensitive and must be an exact match.
- User Sees Wrong Products or Pricing: Verify that the PunchOut Client is mapped to the correct Magento Customer Group. Then, check the Catalog Price Rules and any category permissions assigned to that specific group.
- Cart Transfer Fails or Returns an Error: Check the Magento exception and system logs for detailed error messages. Common causes include products being out of stock or disabled.
- Connection Timeouts: Ensure your server's firewall allows incoming POST requests from your client's ERP system IP addresses or from the testing tools you are using.
If you have a question related to this extension please check out our FAQ Section first. If you can't find the answer you are looking for then please contact support@scommerce-mage.com.