Marketing Extensions
- Magento 2 How Did You Hear About Us
- Magento 2 Perfect Audience Tracking
- Magento 2 Apply Discount coupon Code Via Link
- Magento 2 Free Shipping Bar
- Magento 2 Product Label
- Magento 2 Product Feed
- Magento 2 Facebook Conversion and Audience Pixel Tracking
- Magento 2 Dynamic Sale Catagory
- Magento 2 Google Dynamic Remarketing Tag
- Magento 2 Product Scheduler
- Magento2 Custom Options Discount
- Magento 2 Cash Back Discount
- Magento 2 Competition or Prize Draw with Social Booster
- Magento 2 TikTok Integration
Magento 2 How Did You Hear About Us
Installation and User Guide for Magento 2 How did you hear about us Extension
Table of Contents
- Installation
- Installation via app/code
- Installation via Composer
- Configuration Settings for Where did you hear about us?
- General Settings
- Selected WDYHAU Option in Orders Grid
- WDYHAU Details at Customers Level
- WDYHAU Details on the Sales Order View Page
- "Where did you hear about us?" Drop-down Options in the Back-end
- Front-end Site View
- WDYHAU Option on the Registration Page
- WDYHAU option on the Checkout Page
Installation
-
Installation via app/code: Upload the content of the module to your root folder. This will not overwrite the existing Magento folder or files, only the new contents will be added. After the successful upload of the package, run below commands on Magento 2 root directory.
php bin/magento setup:upgrade php bin/magento setup:di:compile php bin/magento setup:static-content:deploy -
Installation via Composer: Please follow the guide provided in the below link to complete the installation via composer.
Configuration Settings for Where did you hear about us?
Go to Admin > Stores > Configuration > Scommerce Configuration > Where did you hear about us?
General Settings
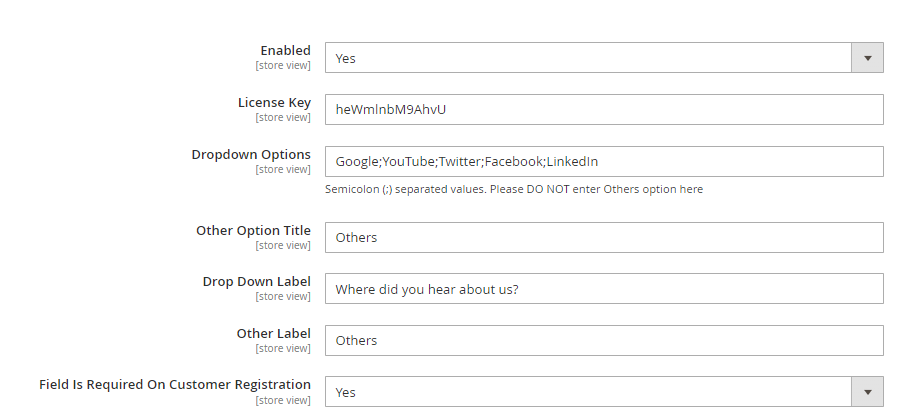
- Enabled – Select "Yes" or "No" to enable or disable the module.
- License Key – Please add the license for the extension which is provided in the order confirmation email. Please note license keys are site URL specific. If you require license keys for dev/staging sites then please email us at support@scommerce-mage.com.
- Dropdown options – Please add the WDHAU options for customers and administrators to choose during checkout and creating order via admin respectively. There should be semicolon (;)separated values for example Google;Facebook;Twitter;Others
- Other Options Title - Please add the title for other options.
- Drop Down Label – Please add the label.
- Other Label – Please add the label for other option.
- Field Is Required On Customer Registration - Select "Yes" or "No" to enable or disable the Field is required on customer registration.
Report
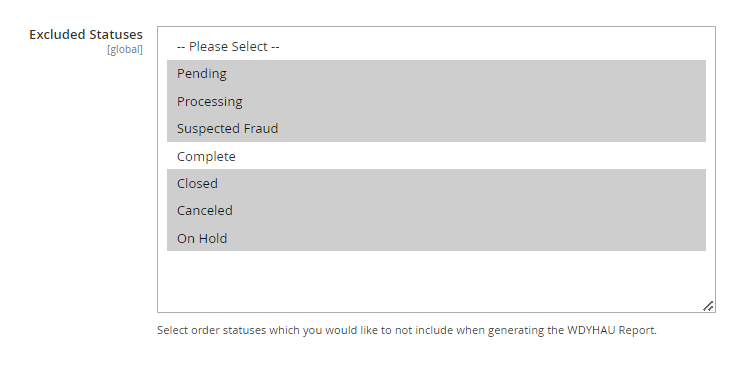
- Exclue Statuses - Select exclude statuses which you would like to not include when generating the WDYHAU Report.
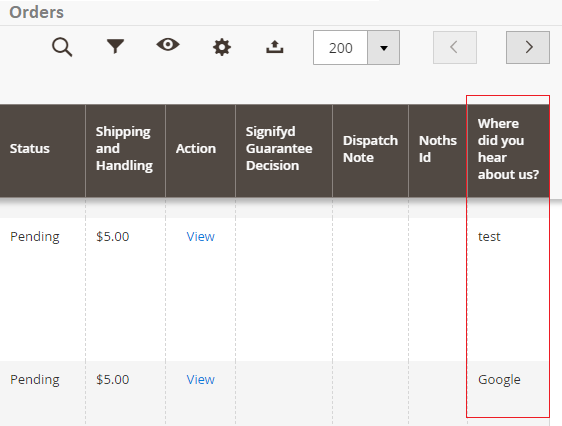
- Selected WDYHAU Option in Orders Grid - You can see the selected "Where did you hear about us?" option at Admin > Sales > Orders grid.
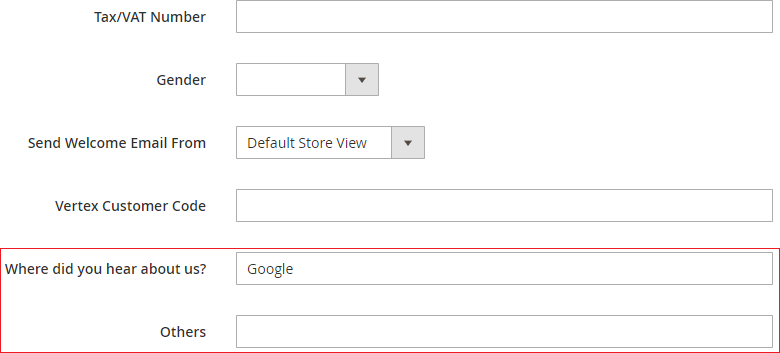
- WDYHAU Details at Customers Level - To see the "Where did you hear about us?" option at customers level go to Admin > Customers > All Customers > Select Customer > Account Information > Where did you hear about us?
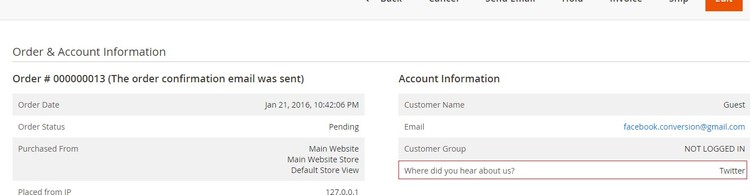
- WDYHAU Details on the Sales Order View Page - The selected WDYHAU option will be shown on order view page under "Account Information" section from Admin > Sales > Select Order > View.
- "Where did you hear about us?" Drop-down Options in the Back-end - When you enable the module, then it shows WDYHAU drop-down option in the back-end at Admin > Sales > Create New Order > Select Customer > Select Product > Select "Where did you hear about us?" option.
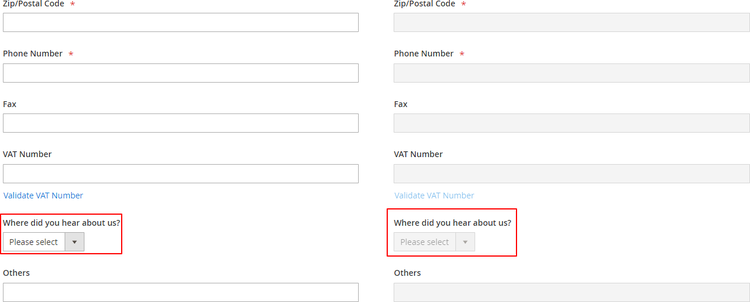
Front-end Site View
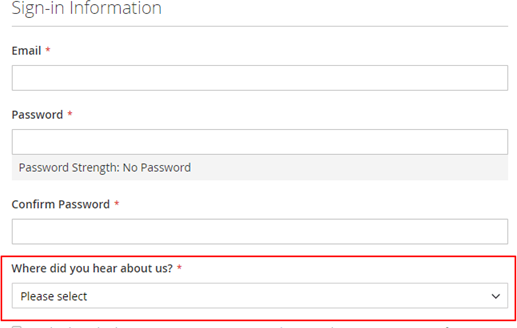
- WDYHAU Option on the Registration Page - You can define the "Where did you hear about us?" drop-down options from Admin > Stores > Configuration> Scommerce Configuration > Where did you hear about us? - Google; Twitter; Facebook; YouTube; Others, which will be shown on the registration page.
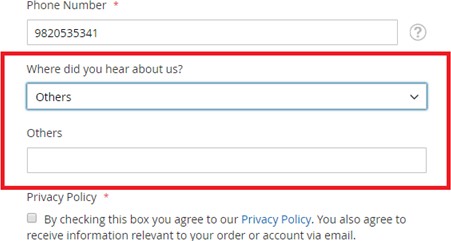
- WDYHAU option on the Checkout Page - You can see the "Where did you hear about us?" option on the checkout page.
If you have a question related to this extension please check out our FAQ Section first. If you can't find the answer you are looking for then please contact support@scommerce-mage.com.
Magento 2 Perfect Audience Tracking
Installation and User Guide for Magento 2 Perfect Audience Extension
Table of Contents
- Installation
- Installation via app/code
- Installation via Composer
- Configuration Settings for Perfect Audience
- General Settings
- Perfect Audience Tag
Installation
-
Installation via app/code: Upload the content of the module to your root folder. This will not overwrite the existing Magento folder or files, only the new contents will be added. After the successful upload of the package, run below commands on Magento 2 root directory.
php bin/magento setup:upgrade php bin/magento setup:di:compile php bin/magento setup:static-content:deploy -
Installation via Composer: Please follow the guide provided in the below link to complete the installation via composer.
Configuration Settings for Perfect Audience
Go to Admin > Stores > Configuration > Scommerce Configuration > Perfect Audience
General Settings
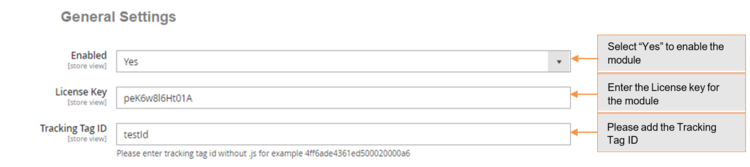
- Enabled – Select "Yes" or "No" to enable or disable the module.
- License Key – Please add the license for the extension which is provided in the order confirmation email. Please note license keys are site URL specific. If you require license keys for dev/staging sites then please email us at support@scommerce-mage.com.
- Tracking Tag ID – Enter tag Id only without .js.
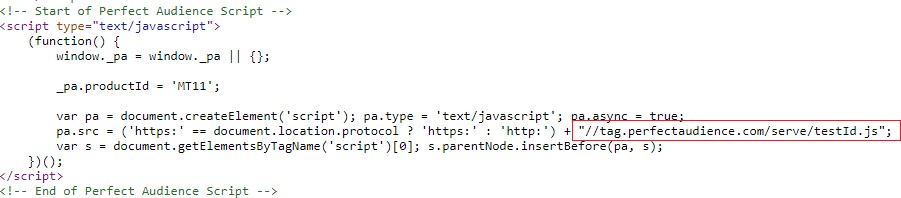
Perfect Audience Tag
You can add perfect audience tracking tag from Admin > Stores > Configuration > Scommerce Configuration > Perfect Audience > Tracking Tag ID.
If you have a question related to this extension please check out our FAQ Section first. If you can't find the answer you are looking for then please contact support@scommerce-mage.com.
Magento 2 Apply Discount coupon Code Via Link
Installation and User Guide for Magento 2 Apply Discount Coupon Code via Link Extension
Table of Contents
- Installation
- Installation via app/code
- Installation via Composer
- Configuration Settings for Auto Coupon
- General Settings
- Discount Setup
- Discount Link
- Front-end site view
- Successful Applied Discount Message on the Front-end
- Coupon Code On the Checkout Page
Installation
-
Installation via app/code: Upload the content of the module to your root folder. This will not overwrite the existing Magento folder or files, only the new contents will be added. After the successful upload of the package, run below commands on Magento 2 root directory.
php bin/magento setup:upgrade php bin/magento setup:di:compile php bin/magento setup:static-content:deploy -
Installation via Composer: Please follow the guide provided in the below link to complete the installation via composer.
Configuration Settings for Auto Coupon
Go to Admin > Stores > Configuration > Scommerce Configuration > Auto Coupon
General Settings
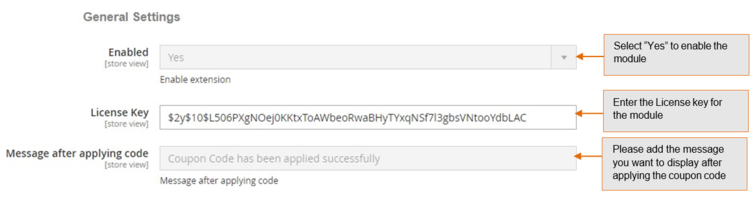
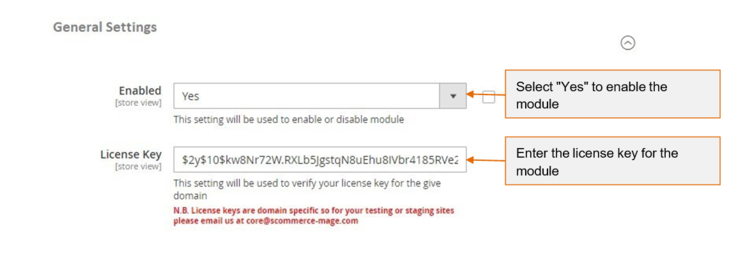
- Enabled – Select "Yes" or "No" to enable or disable the module.
- License Key – Please add the license for the extension which is provided in the order confirmation email. Please note license keys are site URL specific. If you require license keys for dev/staging sites then please email us at support@scommerce-mage.com.
- Message After Applying Code – Message which will displays on the site after successful application of coupon code.
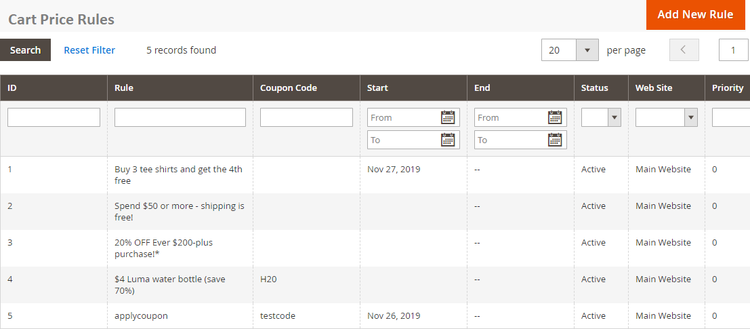
Discount Setup
You can set up the discount coupon code from Admin > Marketing > Cart Price Rules > Click "Add New Rule", it redirects on **"**新ew Cart Price Rule" and by providing all the required details you can create the new rule and set up the discount code.
Discount Link
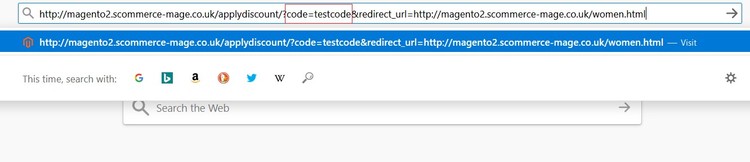
Once the discount is set up then on the front-end it can be applied using the below link :-
http://{[siteurl]}/applydiscount/?code={[discount_code]}&redirect_url={[any_url_ of_your_site]}
- Site url – Site base URL.
- Discount Code – Discount code as set up in discount.
- Returning Site URL – This is optional parameter. If defined, user will be redirected to this URL after successful application of the discount code. If not defined then User will be redirected to the Home page.
Front-end Site View
-
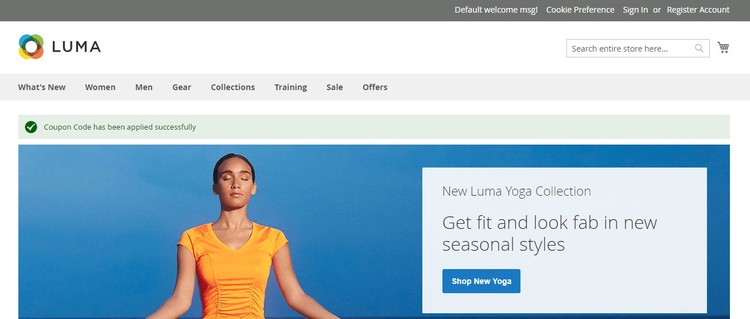
Successful Applied Discount Message on the Front-end - The message you have set from Admin > Stores > Configuration > Scommerce Configuration > Auto Coupon > Message After Applying Code, will be shown on the front-end homepage.
-
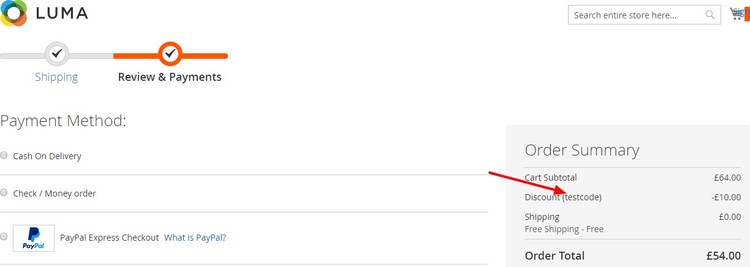
Coupon Code On the Checkout Page - Applied discount coupon code will be shown on the front-end checkout page under "Order Summary" section.
If you have a question related to this extension please check out our FAQ Section first. If you can't find the answer you are looking for then please contact support@scommerce-mage.com.
Magento 2 Free Shipping Bar
Installation and User Guide for Magento 2 Free Shipping Bar Extension
Table of Contents
- Installation
- Installation via app/code
- Installation via Composer
- Configuration Settings for Free Shipping Bar Rule
- General Settings
- Manage Free Shipping Bar Rules
- Free Shipping Bar Rule - Grid
- New Shipping Bar - General Settings
- New Shipping Bar - Websites & Customers Groups
- New Shipping Bar - Shipping Countries
- New Shipping Bar - Display Options
- New Shipping Bar - Content
- New Shipping Bar - Design
- Font Color - Enter font color
- Free Shipping Discount
- Front-end Site View
- Free Shipping Bar on the Homepage with Generic Message
- Free Shipping Bar with Generic Message / Bar Position Bottom Fixed
- Free Shipping Bar with Remaining Amount
- Free Shipping Bar on the Cart Page with Success Message
Installation
-
Installation via app/code: Upload the content of the module to your root folder. This will not overwrite the existing Magento folder or files, only the new contents will be added. After the successful upload of the package, run below commands on Magento 2 root directory.
php bin/magento setup:upgrade php bin/magento setup:di:compile php bin/magento setup:static-content:deploy -
Installation via Composer: Please follow the guide provided in the below link to complete the installation via composer.
Configuration Settings for Free Shipping Bar Rule
Go to Admin > Stores > Configuration > Scommerce Configuration > Free Shipping Bar Rule
General Settings
- Enabled - Select "Yes" or "No" to enable or disable the module.
- License Key - Please add the license for the extension which is provided in the order confirmation email. Please note license keys are site URL specific. If you require license keys for dev/staging sites then please email us at support@scommerce-mage.com.
Manage Free Shipping Bar Rules
You can add and customize Free Shipping Bar Rules from, Admin > Marketing > All Free Shipping Bar Rules > Free shipping Bar Rule
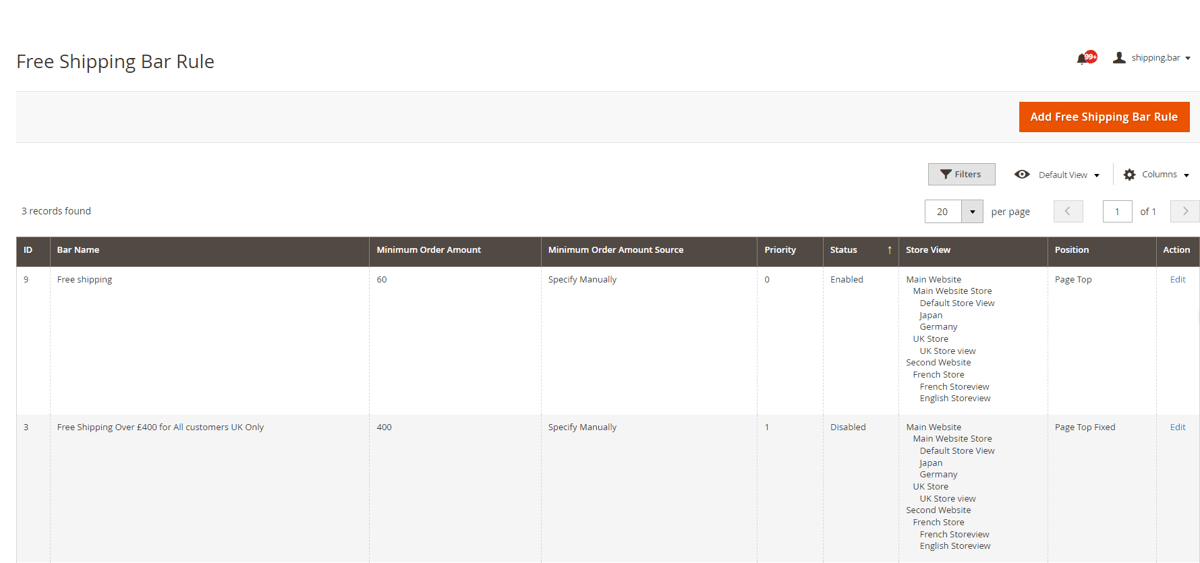
- Free Shipping Bar Rule - Grid - To create new free shipping bar rule click on "Add Shipping Bar" button and to edit existing rule click "Edit" option under "Action"
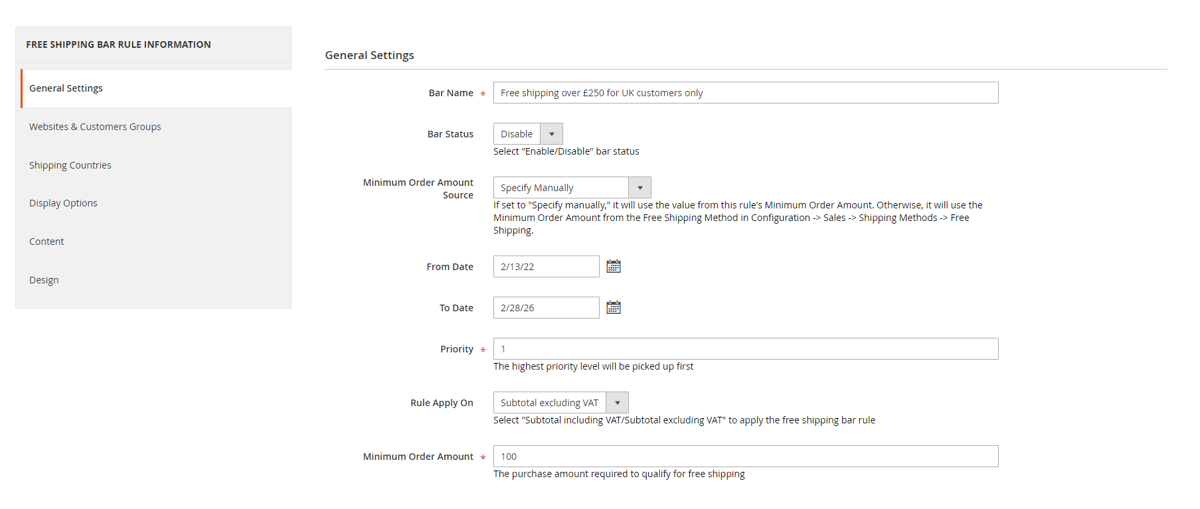
New Shipping Bar - General Settings
- Bar Name - Enter Bar name. This is only for admin use.
- Bar Status - Select "Enable/Disable" bar status.
- Minimum Order Amount Source - Select option "Specify Manually" (utilize the rules minimum order amount) or out of the box "Magento free shipping method"(utilize minimum amount from the freee shipping method).
- From (Date) - Select date from date picker.
- To (Date) - Select date from date picker.
- Priority - Set priority level for the free shipping bar. Highest priority level will be picked up first
- Rule Apply On - Select "Subtotal excluding VAT/Subtotal including VAT" to apply the free shipping bar rule.
- Minimum Order Amount - Enter qualifying amount for cart goal.
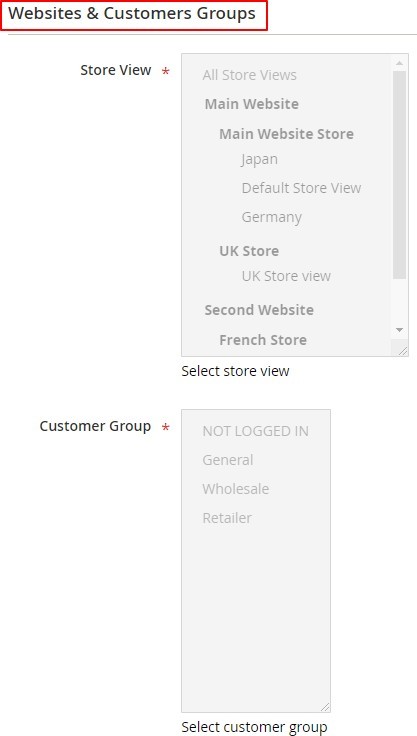
New Shipping Bar - Websites & Customers Groups
- Store View - Select the store view.
- Customer Group - Select customer group.
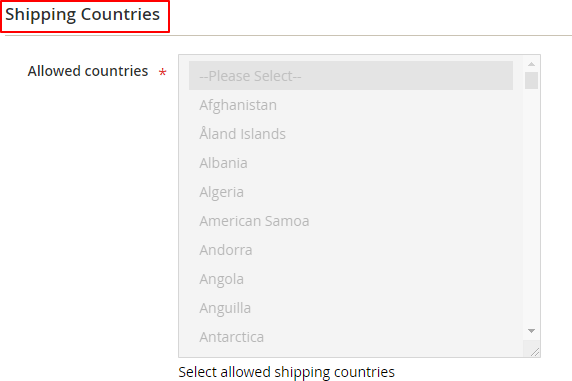
New Shipping Bar - Shipping Countries
- Allowed Countries - Select allowed shipping countries.
New Shipping Bar - Display Options
- Bar Position - Select the bar position from the dropdown list to show on the front-end.
- Pages - Select the page(s) where you want to show the free shipping bar. If all pages are selected then the bar will be shown on all.
- Add Link to the Bar - Select "Yes/No". If set to "Yes" then it will add the information link for terms and conditions.
- Add Close Button - If this is "Yes" then it will hide the bar with 'x' button.
- Show Customize Icon - Select "Yes/No" option. If set to "Yes" then "Upload Icon" option will be shown.
- Upload Icon - This will be an option for user to upload an icon (visible when "Show Customize Icon" set to "Yes")
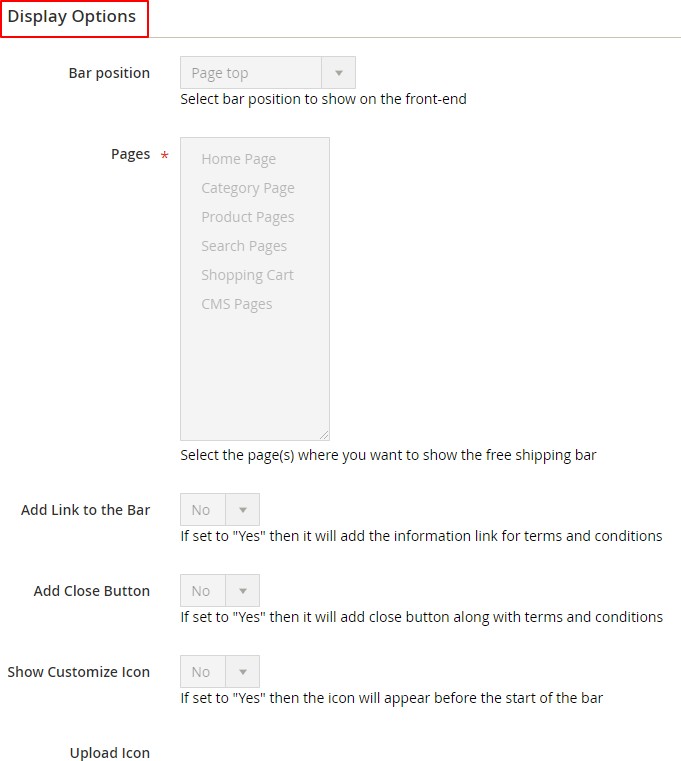
New Shipping Bar - Content
- Initial Message - Provide initial message (This will be an informative or generic message about free shipping conditions).
- In Progress Message - Provide in progress message (A message to inform customers about the amount left for free shipping).
- Achieved Message - Provide achieved message (A customer will get it, when the cart total achieves the needed amount to get a free shipping).
- Free Shipping Terms Content - Provide shipping terms or other important information. (This will be a fill in the message to provide customers with shipping terms or other important information right on the bar).
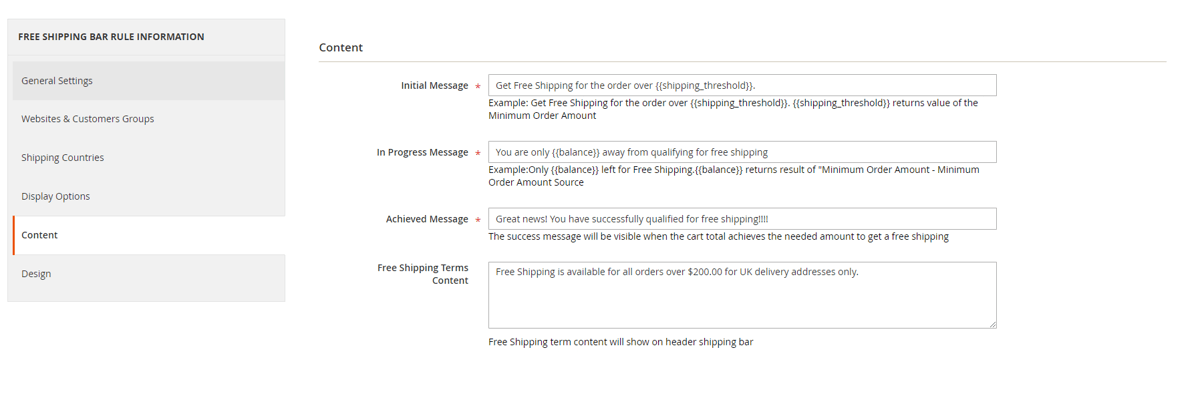
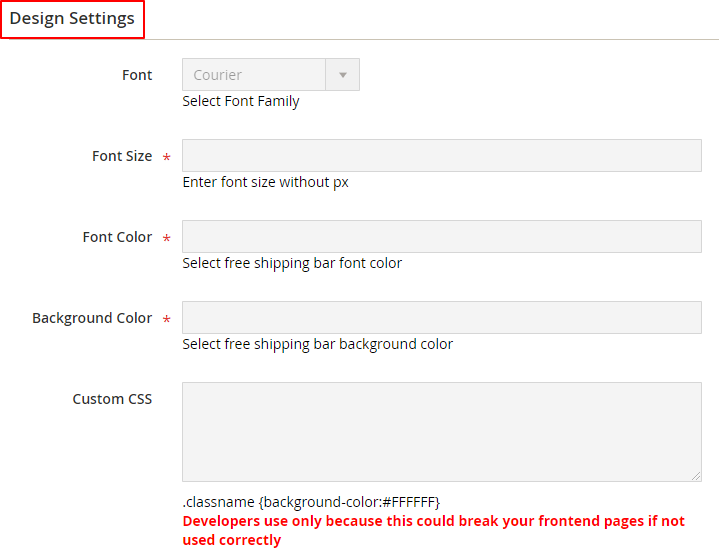
New Shipping Bar - Design
-
Font - Select font
-
Font Size - Enter font size
-
Font Color - Enter font color
-
Background Color - Enter background color
-
Custom CSS - Provide custom CSS (.classname {background- color:{color:#FFFFFF})
-
Free Shipping Discount - The extension only implements the bar display and actual shipping discount needs to be set separately in Magento out of the box.
Front-end Site View
-
Free Shipping Bar on the Homepage with Generic Message - You can set generic message for free shipping bar from Admin > Marketing > All Free Shipping Bar Rules > Free shipping Bar Rule > Click "Add Free Shipping Bar Rule" > New Shipping Bar > Initial Message
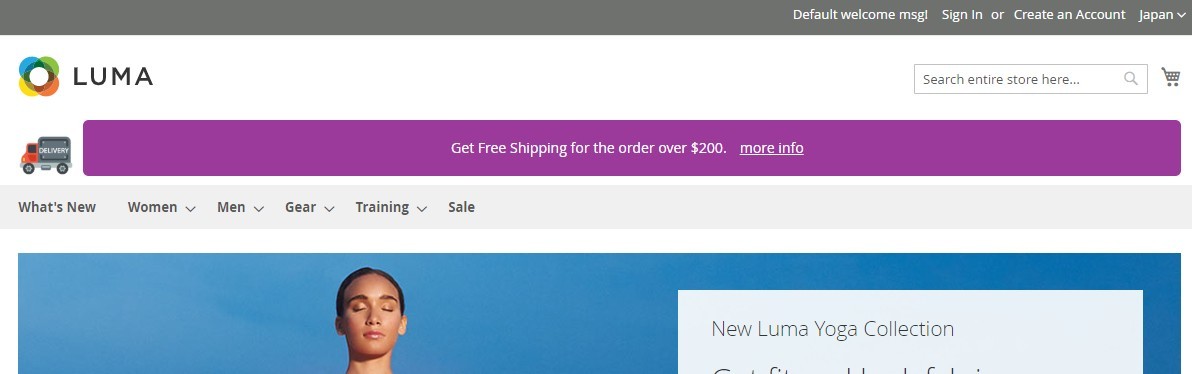
-
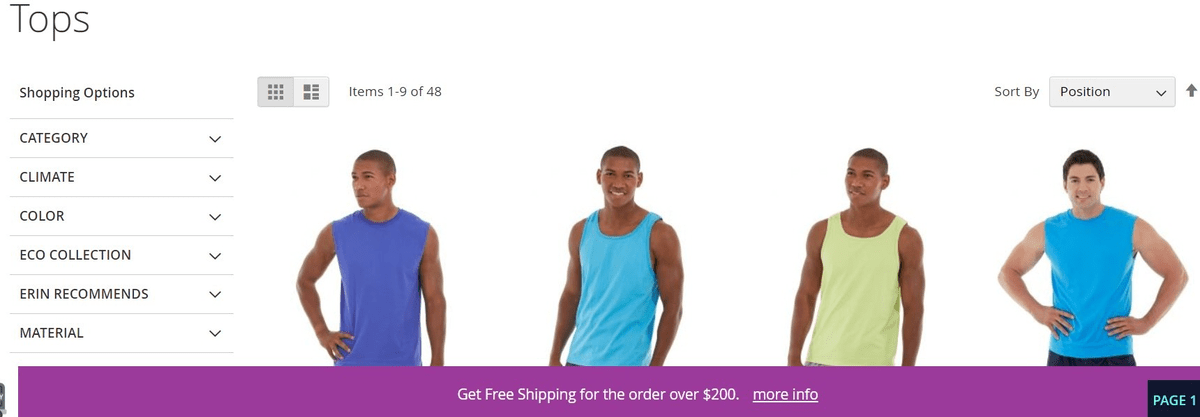
Free Shipping Bar on the Category Page with Generic Message / Bar Position Bottom Fixed - You can set bar position by selecting bar options from Admin > Marketing > All Free Shipping Bar Rules > Free shipping Bar Rule Click "Add Free Shipping Bar Rule" > New Shipping Bar > Display Options Bar Position.
-
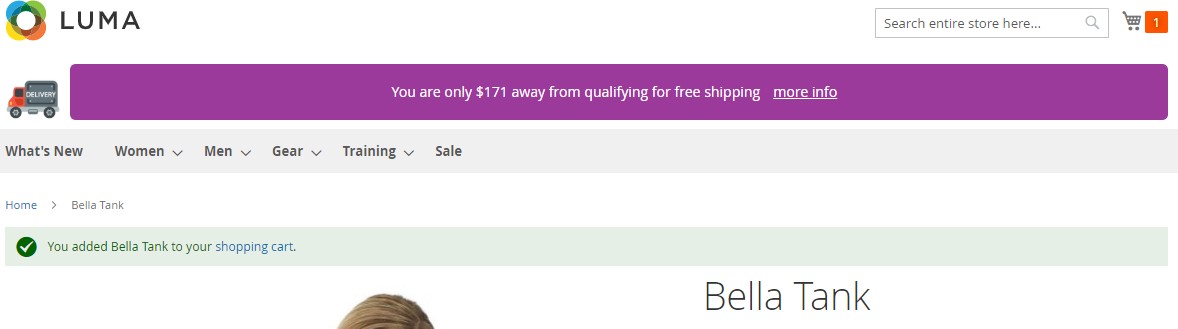
Free Shipping Bar with Remaining Amount - You can inform customers about the remaining amount left for free shipping by providing in progress message from Admin > Marketing > All Free Shipping Bar Rules > Free shipping Bar Rule > Click "Add Free Shipping Bar Rule" > New Shipping Bar > In Progress Message
-
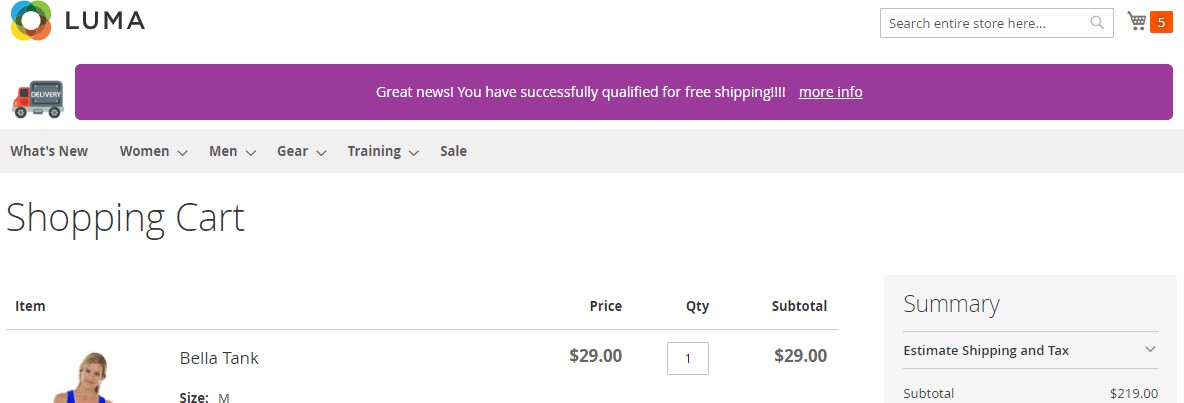
Free Shipping Bar on the Cart Page with Success Message - You can set success message from Admin > Marketing > All Free Shipping Bar Rules > Free shipping Bar Rule > Click "Add Free Shipping Bar Rule" > New Shipping Bar > Achieved Message
If you have a question related to this extension please check out our FAQ Section first. If you can't find the answer you are looking for then please contact support@scommerce-mage.com.
Magento 2 Product Label
Installation and User Guide for Magento 2 Product Label Extension
Table of Contents
- Installation
- Installation via app/code
- Installation via Composer
- Configuration Settings for Product Label
- General Settings
- Product Label Grid
- Add New Product Label
- Front-end Site View
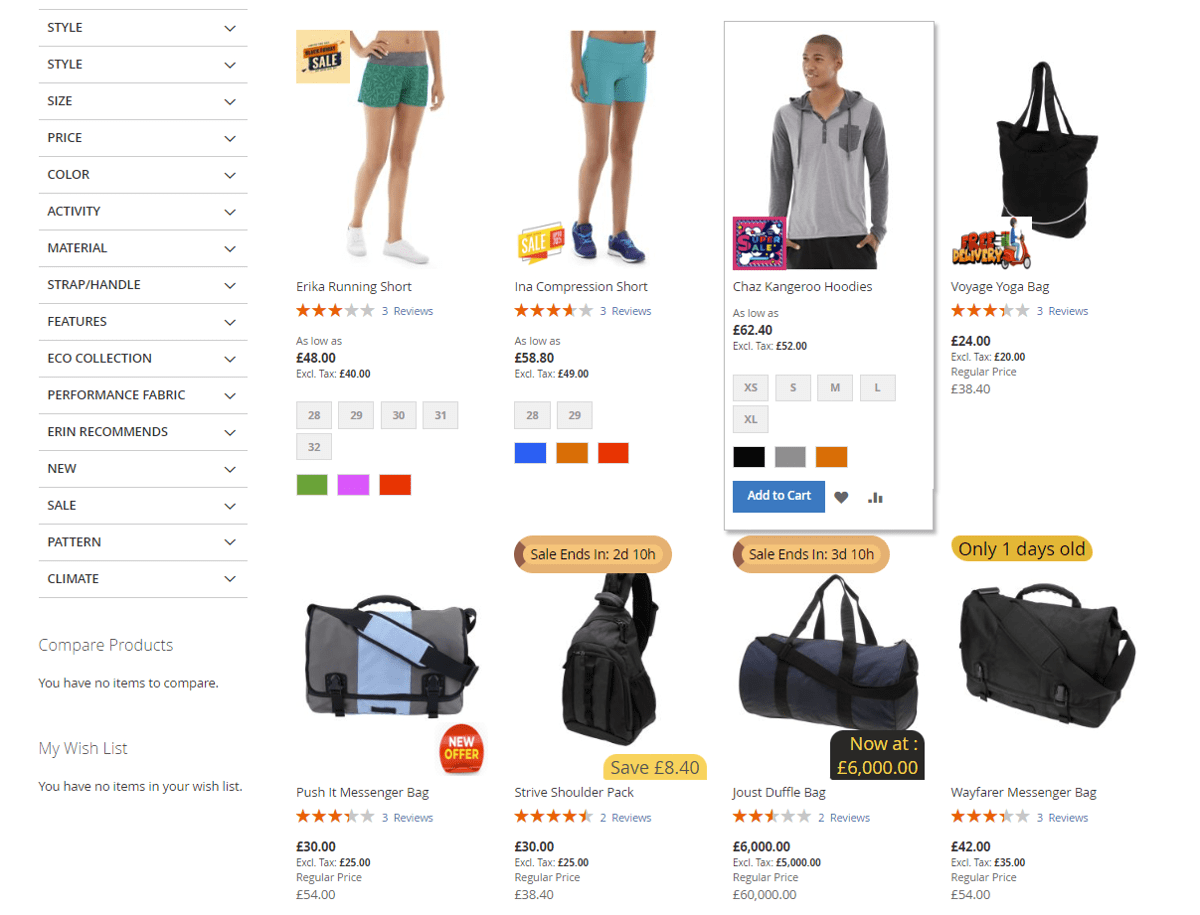
- Product Label on Category Page
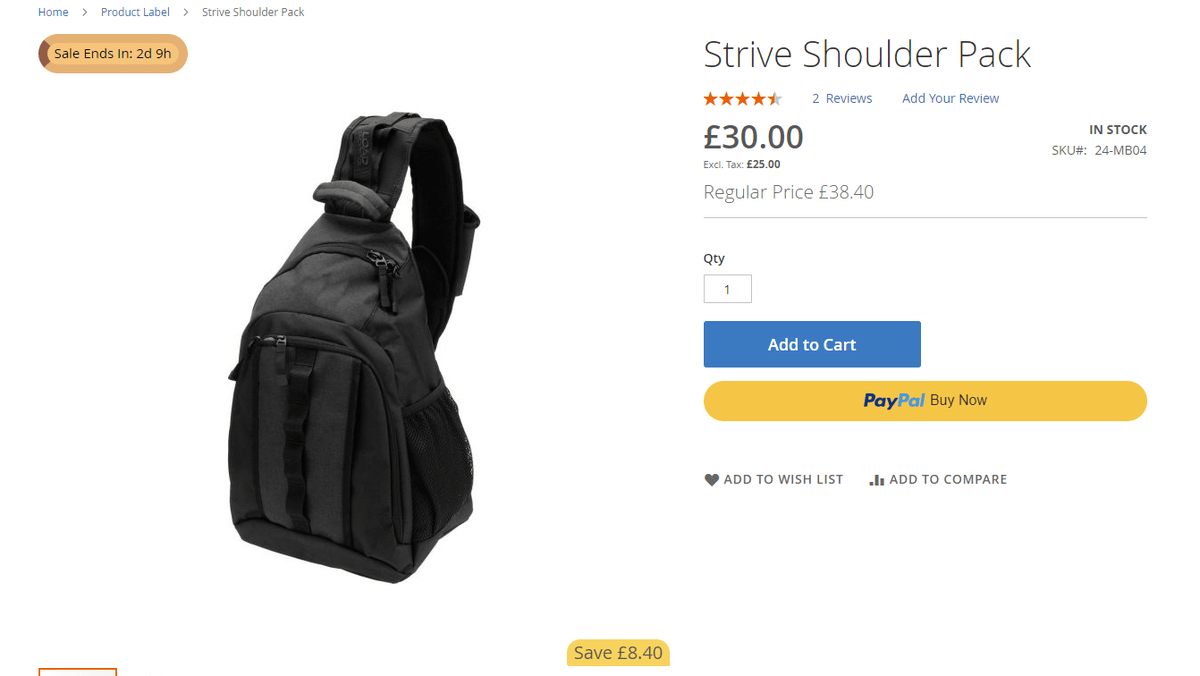
- Product Label on Product Page
Installation
-
Installation via app/code: Upload the content of the module to your root folder. This will not overwrite the existing Magento folder or files, only the new contents will be added. After the successful upload of the package, run below commands on Magento 2 root directory.
php bin/magento setup:upgrade php bin/magento setup:di:compile php bin/magento setup:static-content:deploy -
Installation via Composer: Please follow the guide provided in the below link to complete the installation via composer.
Configuration Settings for Product Label
Go to Admin > Stores > Configuration > Scommerce Configuration > Product Label
General Settings
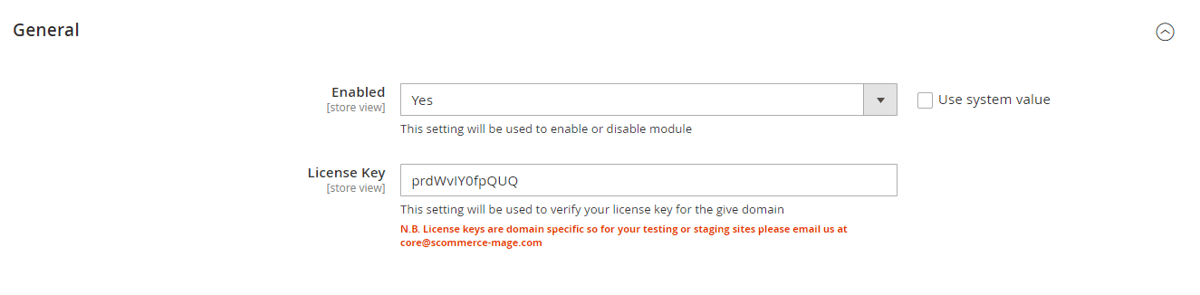
- Enabled – Select "Yes" or "No" to enable or disable the module.
- License Key – Please add the license for the extension which is provided in the order confirmation email. Please note license keys are site URL specific. If you require license keys for dev/staging sites then please email us at support@scommerce-mage.com.
Product Label Grid
Go to Admin>Catalog>Scommerce Product Labels>Product Labels
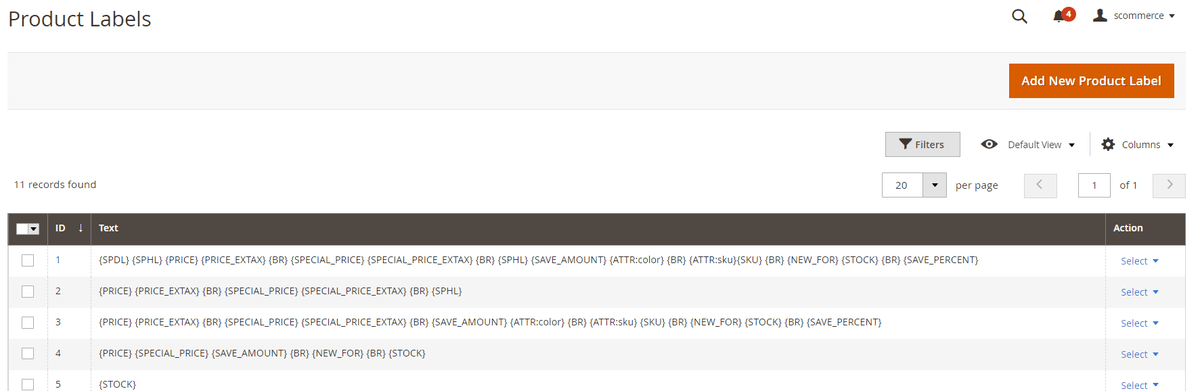
Add New Product Label
Go to Admin>Catalog>Scommerce Product Labels>Product Labels>Add New Product Label
- Status– Select "Enabled" or "Disabled" to enable or disable the product label.
- Scope– Choose the website scope where the product label will be applicable
- Text– Enter the text displayed in the product label. You can use the several special variables mentioned below the inputbox to create enticing labels. Following special variables can be used for the tag:-
- {PRICE} - regular price;
- {PRICE_EXTAX} - price excluding tax;
- {BR} - new line
- {SAVE_PERCENT} - save percent
- {SAVE_PERCENT_EXTAX} - save percent excluding tax
- {SAVE_AMOUNT} - save amount
- {SAVE_AMOUNT_EXTAX} - save amount excluding tax
- {SPECIAL_PRICE} - special price
- {SPECIAL_PRICE_EXTAX} - special price excluding tax;
- {ATTR:code} - attribute value, e.g. {ATTR:color}
- {SPDL} - days left for special price
- {SPHL} - hours left for special price
- {NEW_FOR} - days ago the product was added
- {SKU} - product SKU
- {STOCK} - product qty (for product view page)
- Upload Label Image– Upload the product label image
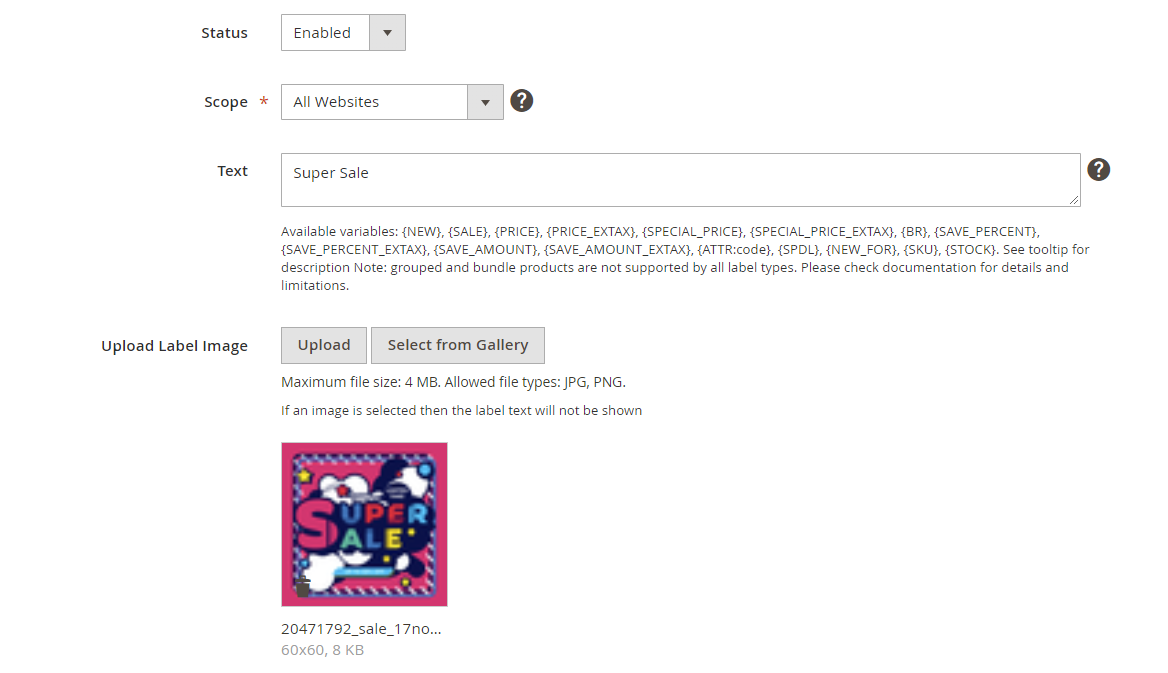
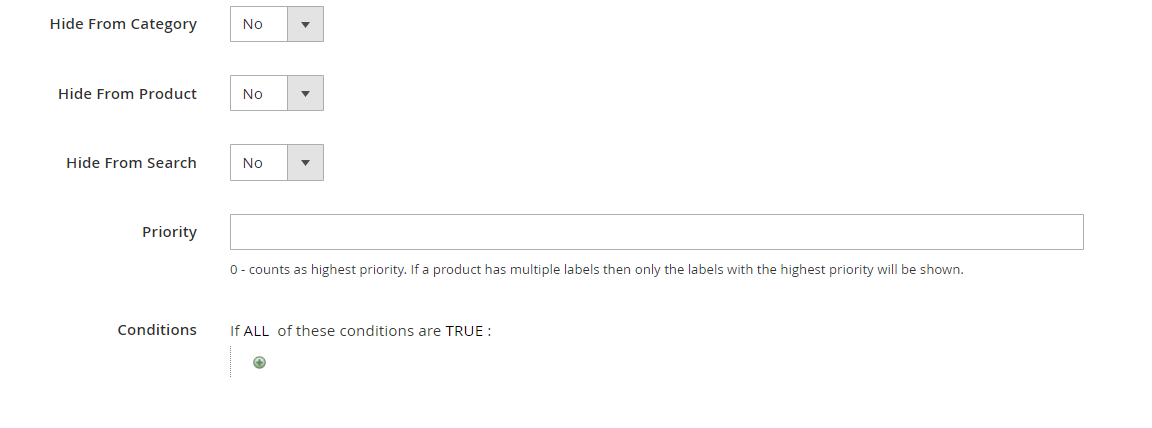
- Hide From Category– Select "Yes" or "No" to hide or show the label on Category page.
- Hide From Product– Select "Yes" or "No" to hide or show the label on product page.
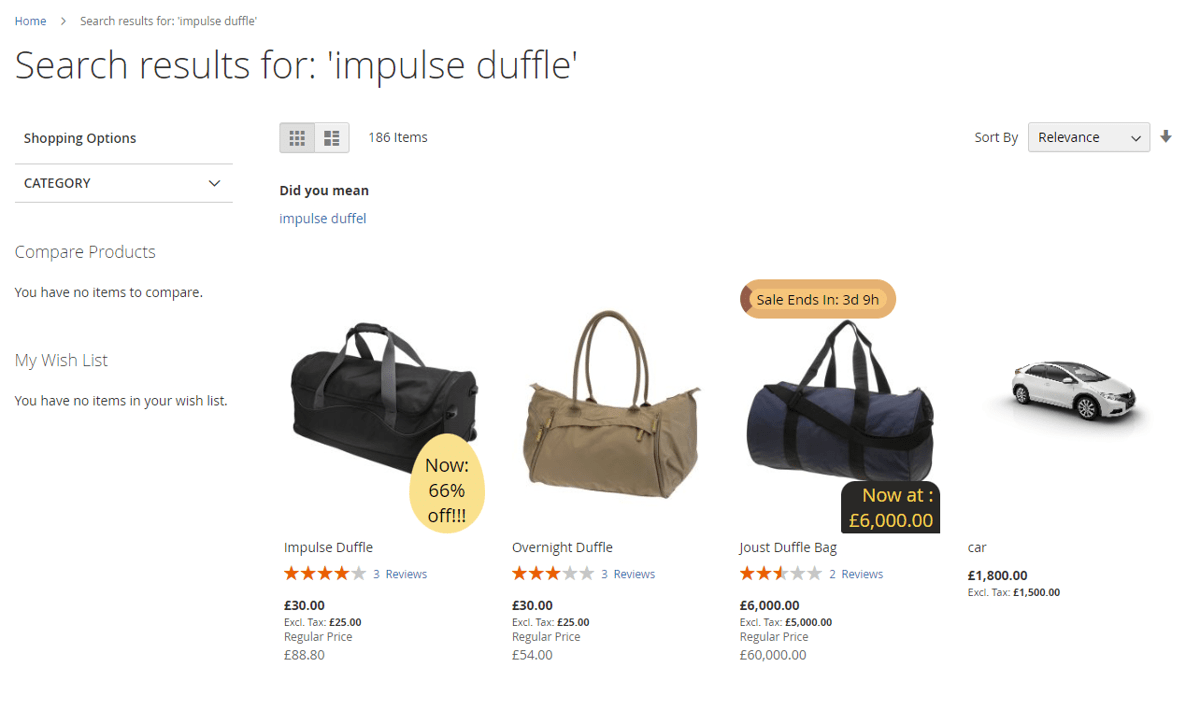
- Hide From Search– Select "Yes" or "No" to enable or disable the label on search page.
- Priority– Add the priority of the label with 0 being the highest priority. Product with multiple labels assigned will display the label with highest priority.
- Conditions– Add conditions for the label as per your requirement
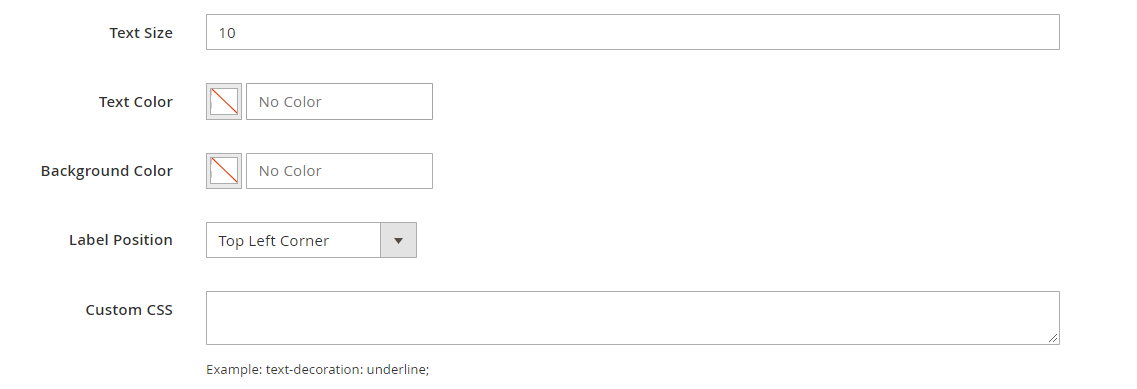
- Text Size– Enter the text size for the product label.
- Text Color– Enter the text color for the product label.
- Background Color– Enter the background color for the product label.
- Label Position– Enter the label position for the product label.
- Custom CSS– Enter the custom CSS for the product label.
Front-end Site View
- Product Label on Category Page
- Product label on Product Page
- Product label on Search Page
If you have a question related to this extension please check out our FAQ Section first. If you can't find the answer you are looking for then please contact support@scommerce-mage.com.
Magento 2 Product Feed
Installation and User Guide for Magento 2 Data Feed for Google, Amazon, Facebook Extension
Table of Contents
- Installation
- Installation via app/code
- Installation via Composer
- Configuration Settings for Product Feed Generator
- General Settings
- Create Data Feeds
- General
- Content
- Format
- Conditions
- Facebook Product Feed XML
- Google Product Feed XML
- Google Product Feed CSV
- Facebook Product Feed CSV
- Make attribute visible in the Google Feed under Rule Conditions
- Product Feed with Swatches
Installation
-
Installation via app/code: Upload the content of the module to your root folder. This will not overwrite the existing Magento folder or files, only the new contents will be added. After the successful upload of the package, run below commands on Magento 2 root directory.
php bin/magento setup:upgrade php bin/magento setup:di:compile php bin/magento setup:static-content:deploy -
Installation via Composer: Please follow the guide provided in the below link to complete the installation via composer.
Configuration Settings for Product Feed Generator
Go to Admin > Stores > Configuration > Scommerce Configuration > Product Feed Generator
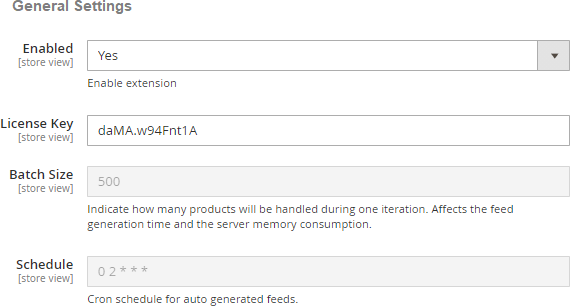
General Settings
- Enabled - Select "Yes" or "No" to enable or disable the module.
- License Key - Please add the license for the extension which is provided in the order confirmation email. Please note license keys are site URL specific. If you require license keys for dev/staging sites then please email us at support@scommerce-mage.com.
- Batch Size – Indicate how many products will be handled during one iteration.
- Schedule – Please add the cron schedule for auto generated feeds.
Create Data Feeds
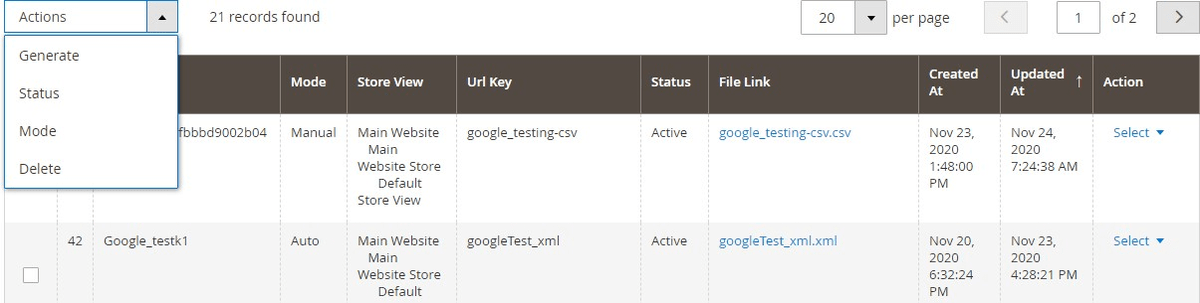
You can create/manage/edit data feeds from Admin > Scommerce > Manage feed list > Click "Add Feed", it redirects on Edit Feed page which contains all the settings required to create a new feed. You can do any custom adjustments while creating a feed or you can do them later. You will find an ACTIONS drop-down on the top left of the list. It contains the following option: -
- Generate: - Click on it to generate the feed manually.
- Status: - Select the feed and you can change the status to active or inactive from this option.
- Mode: - You can also change the mode of a feed Auto or Manual from this option
- Delete: - Click on it to delete a feed.
General
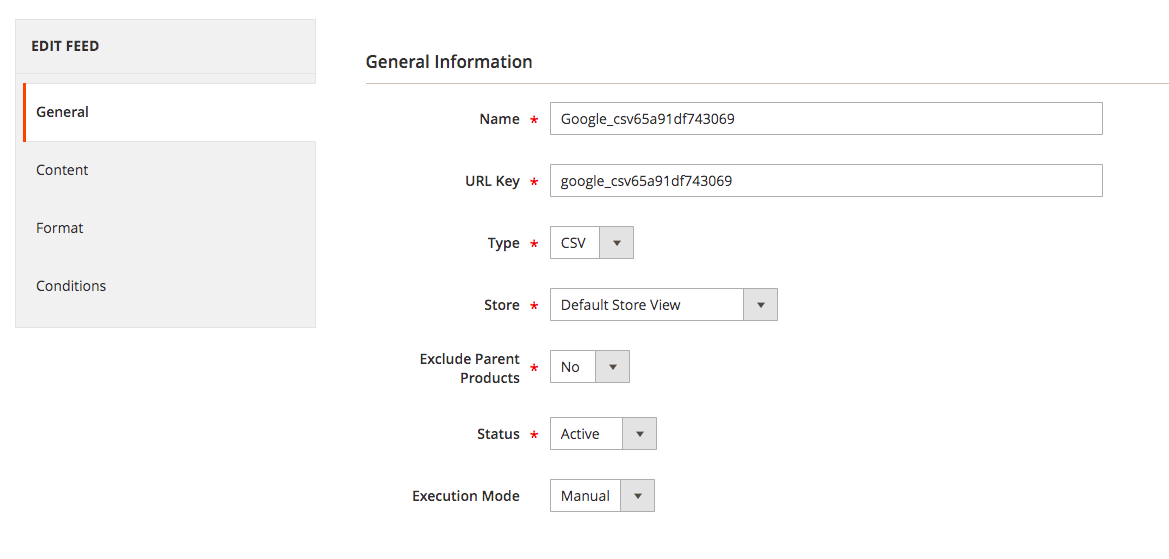
The general tab contains all the general settings such as Name of the feed, URL key, type of feed, store, status, and execution mode.
- URL Key: - Here enter the URL key
- Type: - You can specify the type of feed here such as XML, CSV, TXT etc.
- Store: - Choose the store view
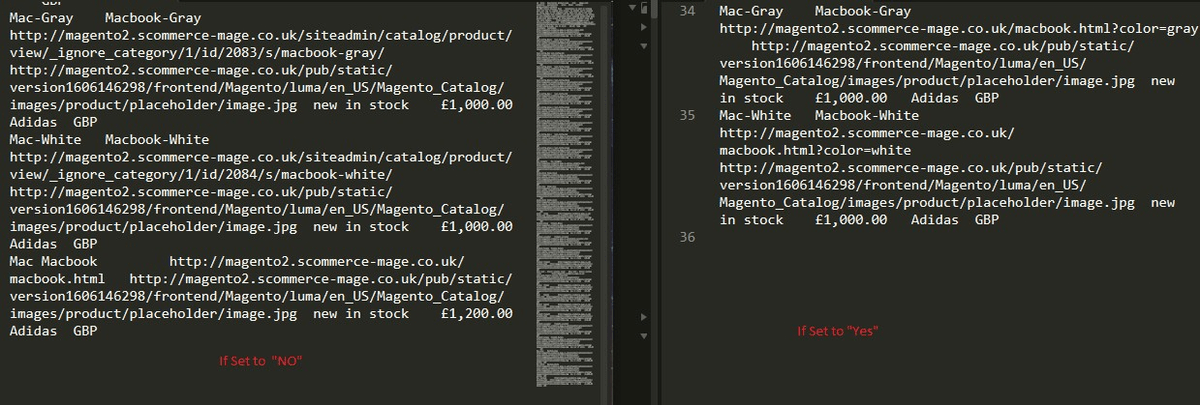
- Exclude Parent Products: - If "Yes" then the feed will contain only child product links and if set to "NO" Then the feed will contain both child and parent products.
- Status: - Status needs to be active to generate the feed.
- Execution Mode: - Execution mode can be Manual or Auto. For the Manual mode you will have generate the feed manually. As for the auto mode, the feed will be generated by the scheduled cron on the time specified in the configurations.
Content
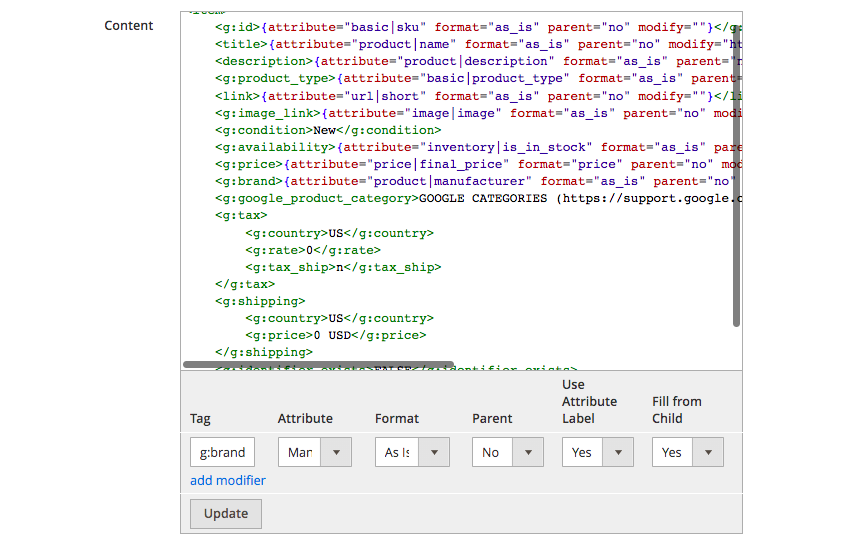
In the content section, you will notice that our extension generates the code automatically for you. You can also make the changes if you want.
- <g:google_product_category>: - Leave this empty but if you want to then please add the category relevant to google categories.
- Tag: - You can add a tag into your content
- Attribute: - Select attribute such as brand, price etc.
- Format: - Now you can also select Price and Date in the format
- Parent: - Select "Yes" to add parent product in the feed and "No" to only include child products.
- Use Attribute Label: - Select "Yes" to display the attribute (in text format) and "No" to display attribute in a identifier format.
- Fill From Child: - If set to "yes" and product is configurable - value will be taken from first child
Eg: - Suppose you want to add GBP in the price attribute then you can change it by simply navigating to the tag <g:price> and add "GBP" before closing the tag. Similarly you can customize any part of the data.
Format
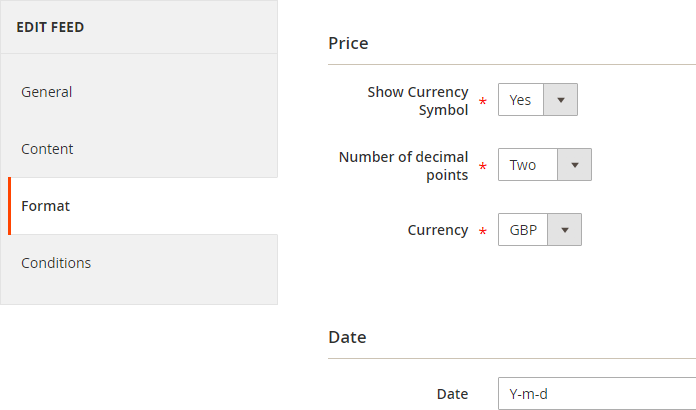
Here, you can customize the format of several parts of the data such as Price, date, etc.
Conditions
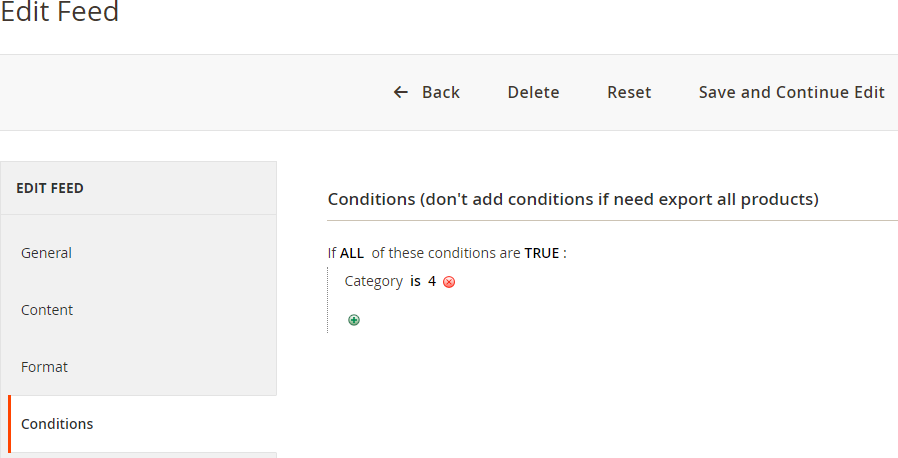
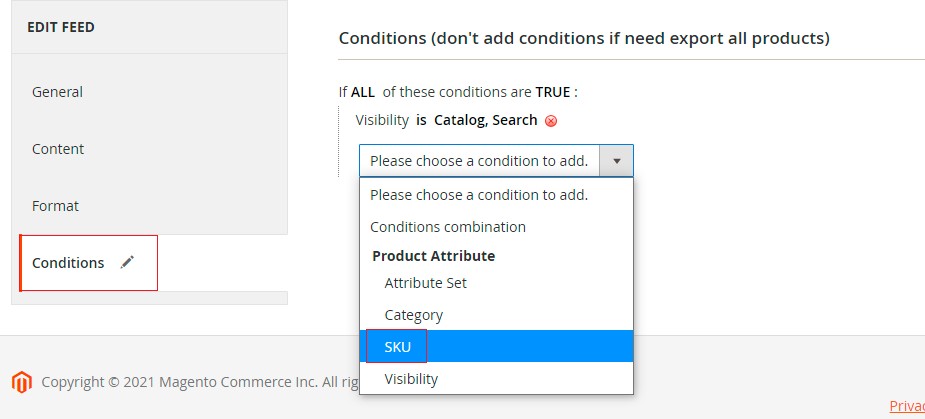
The conditions tab allows you to add custom conditions specific to the feed. For instance, you can apply a condition to generate the feed for only one product by referring to its specific SKU. You can also apply several other conditions from the drop-down list.\
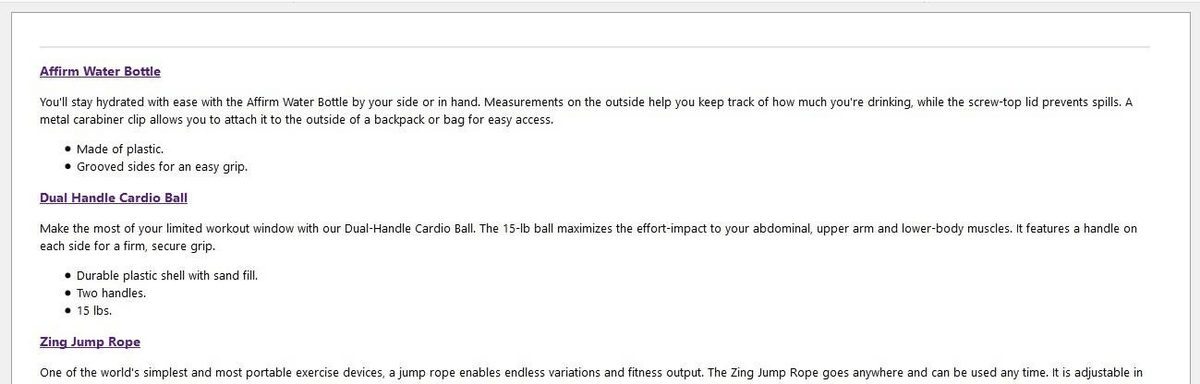
- Facebook Product Feed XML – When you click on the feed from Admin > Scommerce > Manage Feed List > Click "facebook.xml", then it opens the product feed.
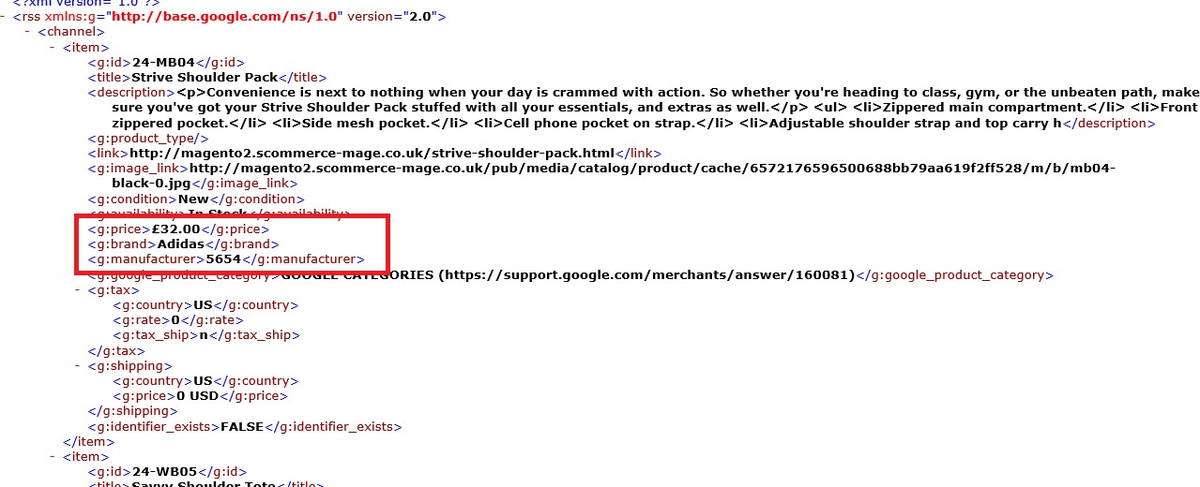
- Google Product Feed XML – To generate Google feed go to Admin > Scommerce > Manage Feed List > Click "google.xml", it opens the product feed.
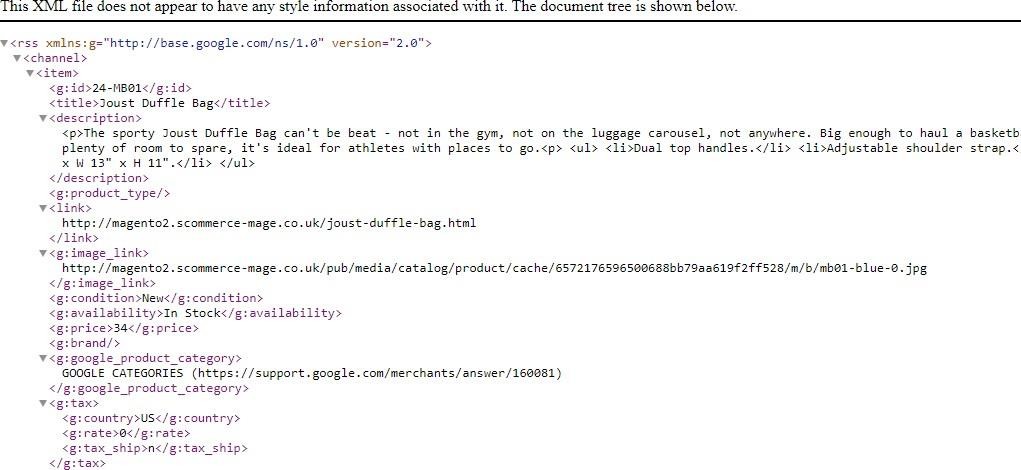
- Google Product Feed CSV – When you click on any CSV feed, it opens the product feed in CSV format.

- Facebook Product Feed CSV – Here is the Facebook product feed in CSV format.

Make attribute visible in the Google Feed under Rule Conditions
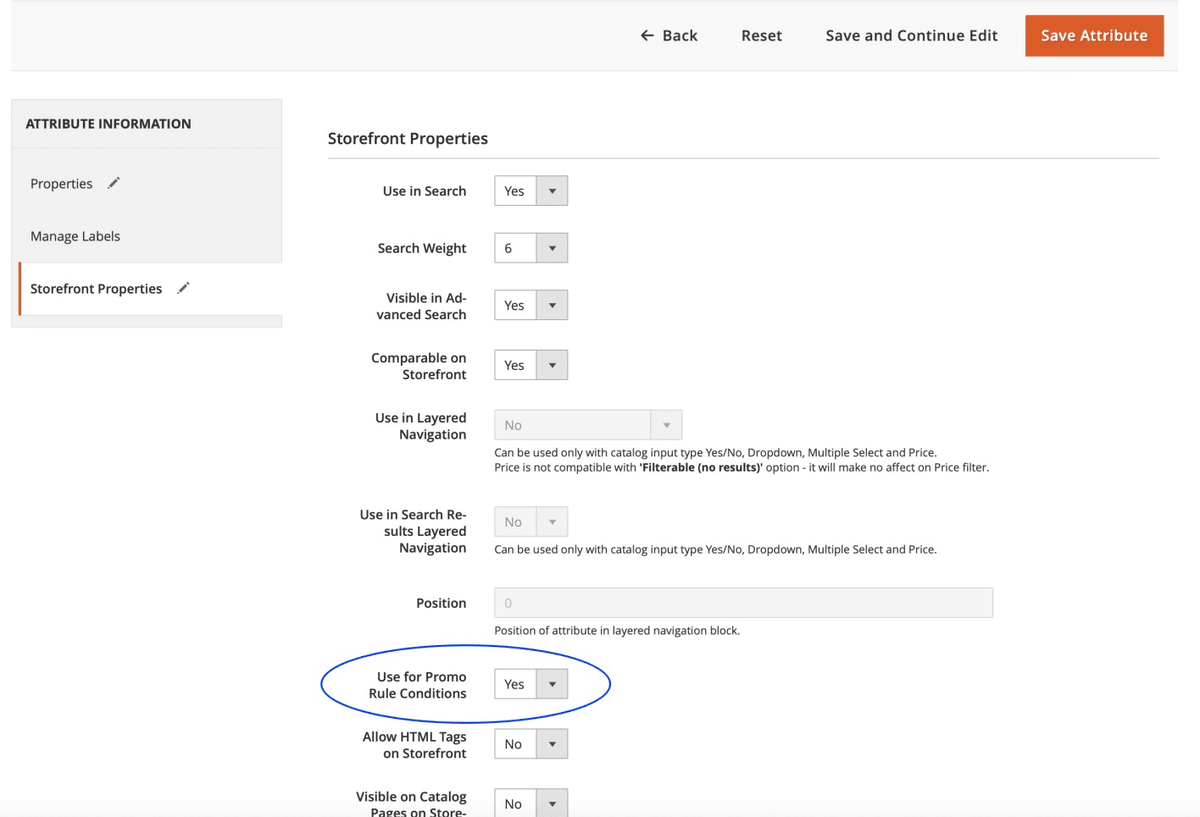
You can add from Admin > Stores > Attributes > Product > Select Product Attribute (e.g. sku) > Use for Promo Rule Conditions - 'Yes'
In the below image you can see that attribute "SKU" added under conditions.
Product Feed with Swatches
To allow colour and size to be auto selected on product page, the URL needs to be created like show below.
attribute name and value of the attribute
for example - size=s&color=red
https://magento2.scommerce-mage.co.uk/orion-two-tone-fitted-jacket.html?size=s&color=redIf you have a question related to this extension please check out our FAQ Section first. If you can't find the answer you are looking for then please contact support@scommerce-mage.com.
Magento 2 Facebook Conversion and Audience Pixel Tracking
Installation and User Guide for Magento 2 Facebook Conversion and Audience Pixel Tracking Extension
Table of Contents
- Installation
- Installation via app/code
- Installation via Composer
- Configuration Settings for Facebook Conversion Tracking
- General Settings
- Analyze Data with Facebook Events Manager
- Facebook Events Manager Graph
- Enable GDPR Support
- Front-end site view
- Facebook Pixel Tag on the Category Page
- Facebook Pixel Tag on the Product Page
- Facebook Pixel Tag on the Cart Page
- Facebook Pixel Tag on the Checkout page
- Facebook Pixel Tag on the Payment Page
- Facebook Pixel Tag on the Success Page
Installation
-
Installation via app/code: Upload the content of the module to your root folder. This will not overwrite the existing Magento folder or files, only the new contents will be added. After the successful upload of the package, run below commands on Magento 2 root directory.
php bin/magento setup:upgrade php bin/magento setup:di:compile php bin/magento setup:static-content:deploy -
Installation via Composer: Please follow the guide provided in the below link to complete the installation via composer.
- Installation via Composer(Breeze Theme): Go to My Account section then go to Composer Instructions. Run the composer config commands mentioned on the page then run the below command to install the module on hyva theme.
composer require scommerce/breeze-googletagmanagerproConfiguration Settings for Facebook Conversion Tracking
Go to Admin > Stores > Configuration > Scommerce Configuration > Facebook Conversion Tracking
General Settings
-
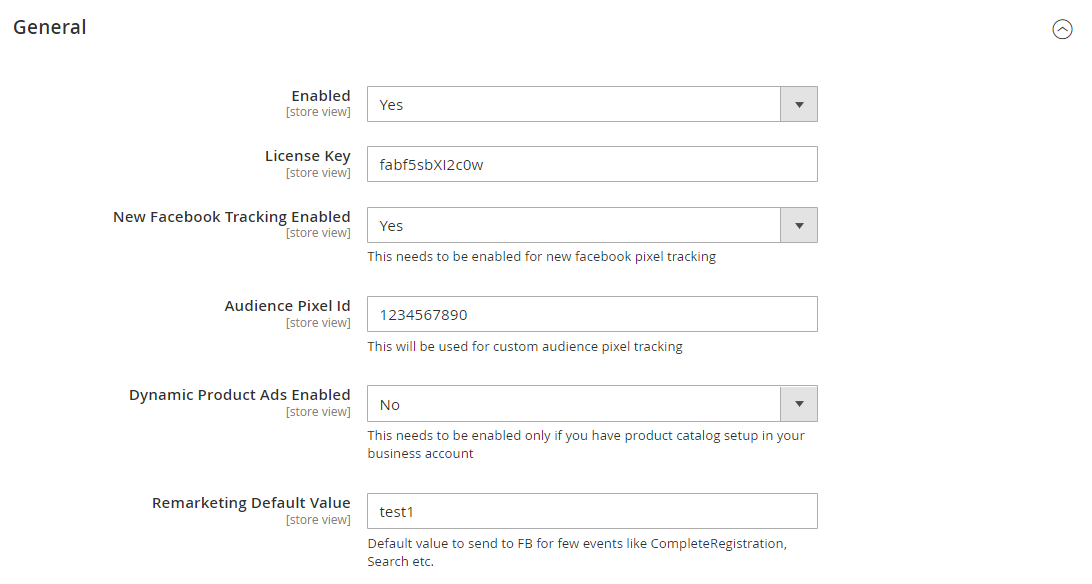
Enabled – Select "Yes" or "No" to enable or disable the module.
-
License Key – Please add the license for the extension which is provided in the order confirmation email. Please note license keys are site URL specific. If you require license keys for dev/staging sites then please email us at support@scommerce-mage.com.
-
New Facebook Tracking Enabled – Set yes to enable Facebook new pixel tracking or Remarketing tag https://developers.facebook.com/docs/ads-for-websites/tag/api/
-
Audience Pixel Tag Id – Enter Custom Audience Pixel Id. This applies to old as well as new Facebook tracking.
-
Dynamic Product Ads Enabled – Set yes to enable the Dynamic Product Ads http://en-gb.facebook.com/business/help/www/455326144628161
-
Remarketing Default Value – Enter default value for events where value can't be defined like CompleteRegistration, Search (only used for new Facebook tracking)
-
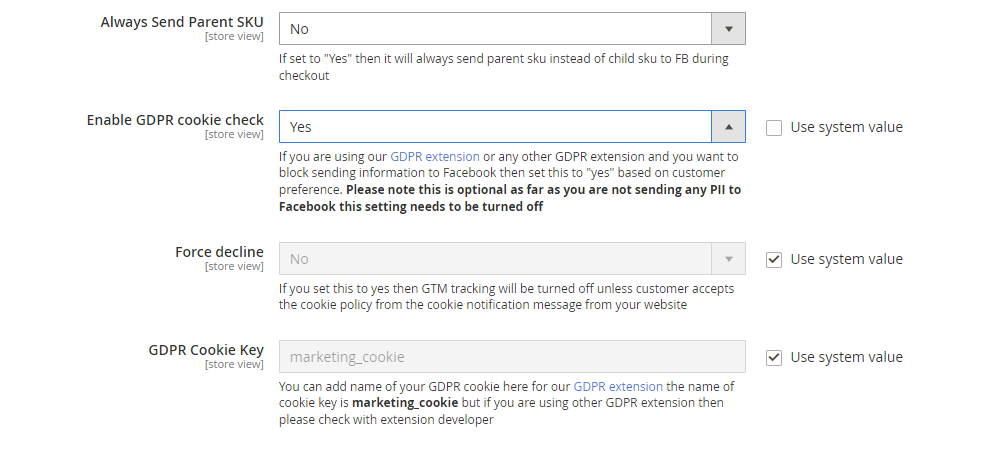
Always Send Parent SKU – Set "Yes" then it always send parent sku instead of child sku to facebook
-
Enable GDPR Cookie Check – Select "Yes" or "No" to enable/disable GDPR Cookie Check
-
Force decline – If you set this to yes then FACEBOOK tracking will be turned off unless customer accepts the cookie policy from the cookie notification message from your website
-
GDPR Cookie Key – You can add name of your GDPR cookie here for our GDPR extension the name of cookie key is marketing_cookie but if you are using other GDPR extension then please check with extension developer
-
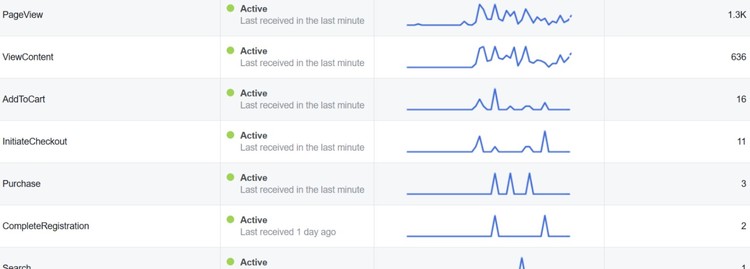
Analyze Data with Facebook Events Manager - Facebook Business Manager gathered enough information so that you can analyze data using event log, which shows how many times the tracker has been fired.
-
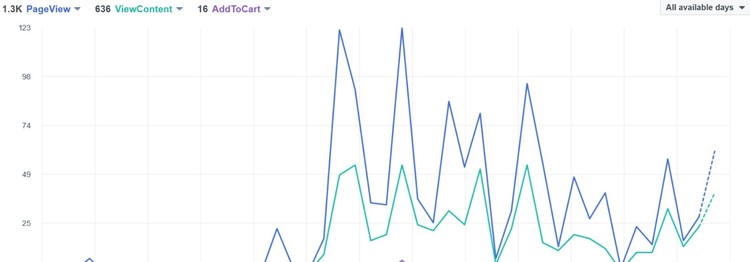
Facebook Events Manager Graph - You can view the event log and graph in Facebook business manager with all the events view details.
Enable GDPR Support
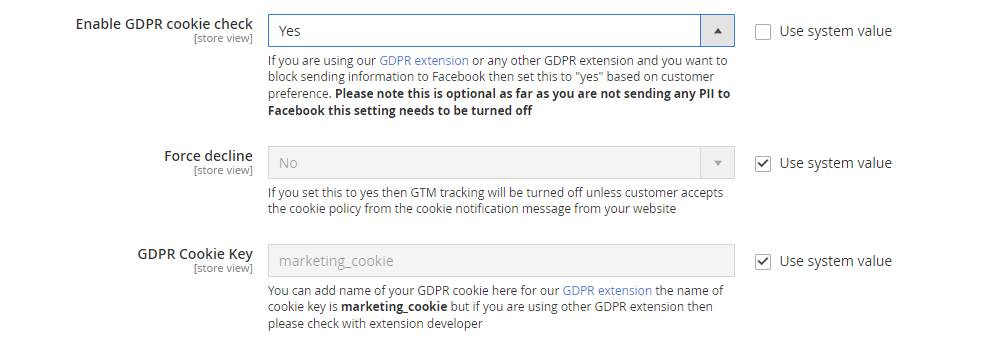
The module is GDPR compliant which can work with both our/third party GDPR modules. You can enable the GDPR support within the module so that the tracking doesent work without users consent.
To enable GDPR support go to Stores>Configuration>Scommerce Configuration>Facebook Conversion Tracking and set 'Enable GDPR cookie check' to 'Yes' then set 'Force decline' to 'Yes' and provide the GDPR cookie name in the 'GDPR Cookie Key' inputbox. If you are using our GDPR module then the cookie name is 'marketing_cookie' but if you are using other GDPR extension then please check with extension developer. Once the setting is complete unless the customer accepts the cookie the facebook tracking won't fire.
Front-end site view
-
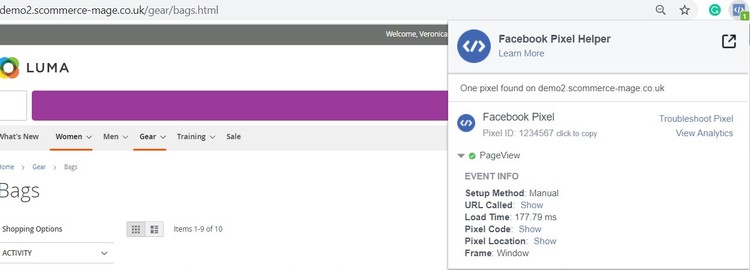
Facebook Pixel Tag on the Category Page - The extension offers all standard trackers that Facebook uses. When the category page is viewed then it shows page view with event info, which you can see in the below image.
-
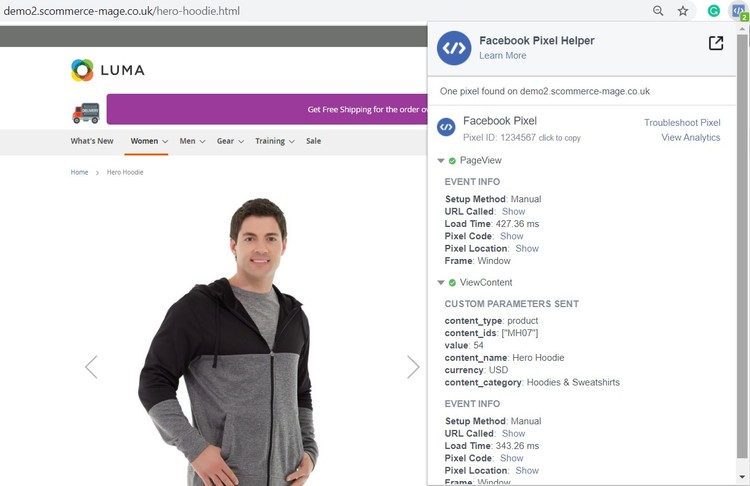
Facebook Pixel Tag on the Product Page - When a key page is viewed such as a product page, e.g. landing on a product detail page. Provides detailed product information (such as Prices, SKU's, Currencies and Categories) for Dynamic Product Ads. You can enable dynamic product ads from Admin > Stores > Configuration > Scommerce Configuration > Facebook Conversion Tracking > Dynamic Products Ads Enabled - "Yes".
-
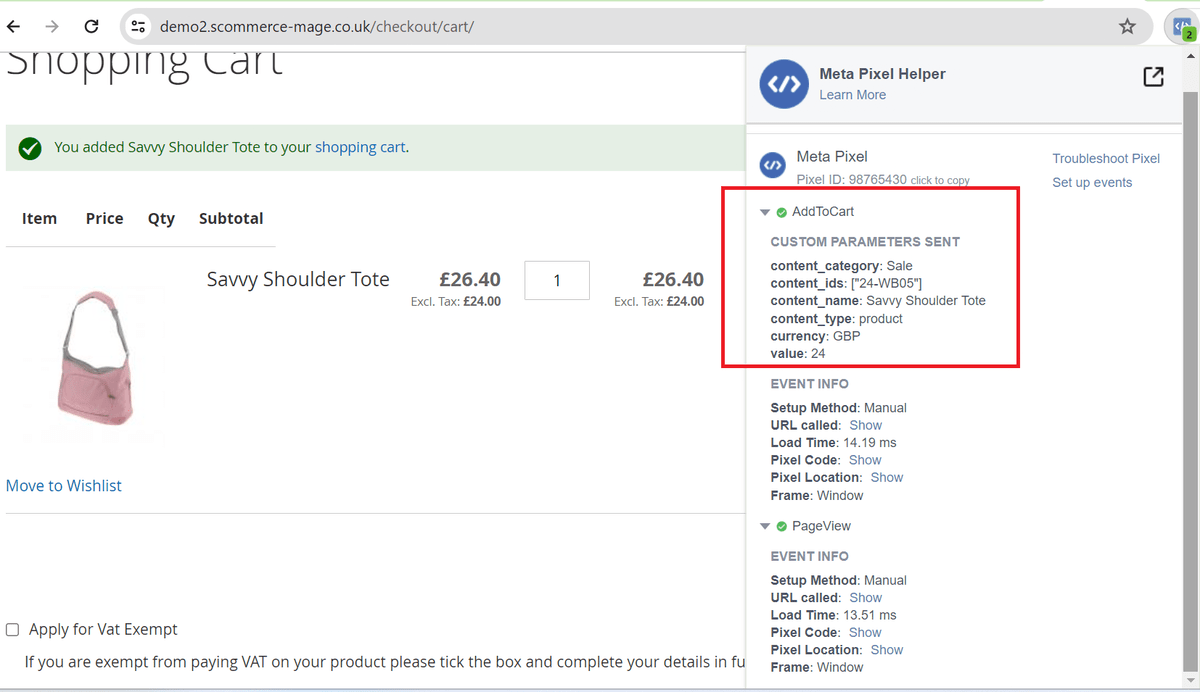
Facebook Pixel Tag on the Cart Page - When a product is added to the shopping cart, then it tracks the cart event.
-
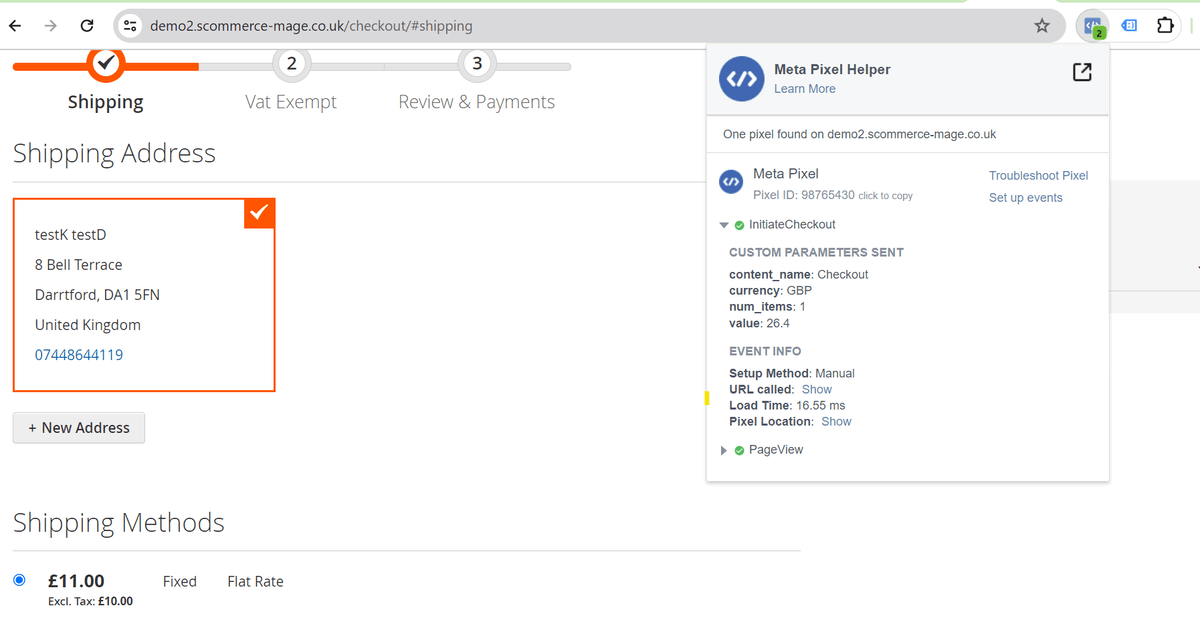
Facebook Pixel Tag on the Checkout page - It tracks checkout , when a user clicks on checkout button.
-
Facebook Pixel Tag on the Payment Page - It tracks AddPaymentInfo when a payment information is added in the checkout flow, e.g. click on payment method.
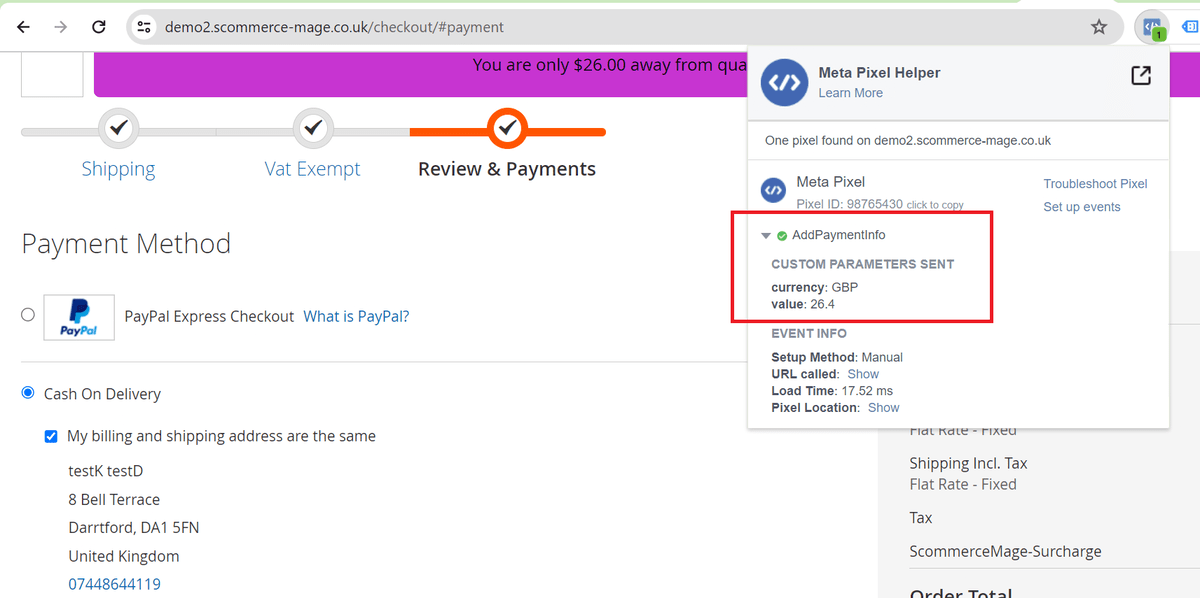
-
Facebook Pixel Tag on the Success Page - When a purchase is made or checkout flow is completed, e.g. landing on thank you/success page, provides detailed order information such as Order Value and Cart Items.
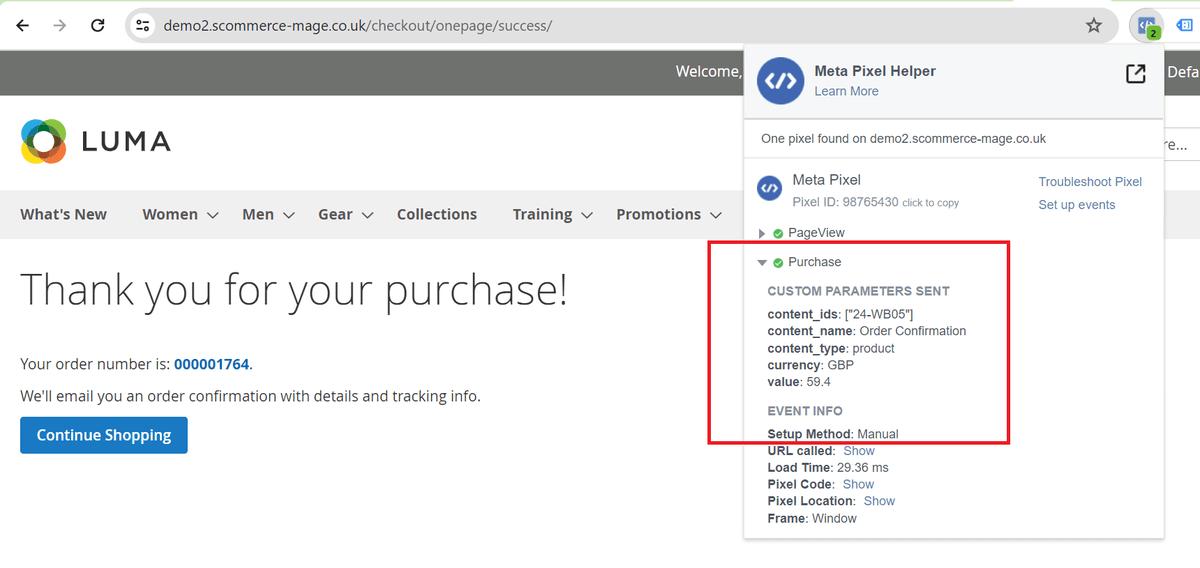
-
Facebook Pixel Tag on Add to Wishlist Page -Add to Wishlist when "Always Send Parent SKU" set to 'NO" AND Dynamic Product Ads Enabled - "YES"
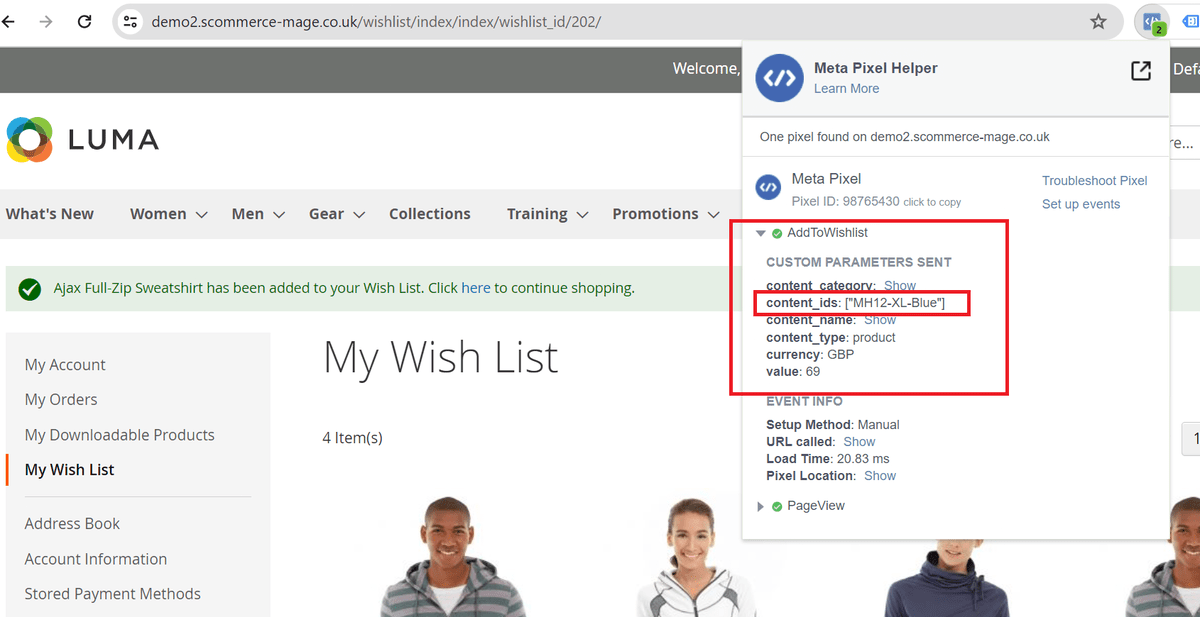
-
Facebook Pixel Tag on Add to Wishlist Page -Add to cart when "Always Send Parent SKU" set to 'NO" AND Dynamic Product Ads Enabled - "YES"
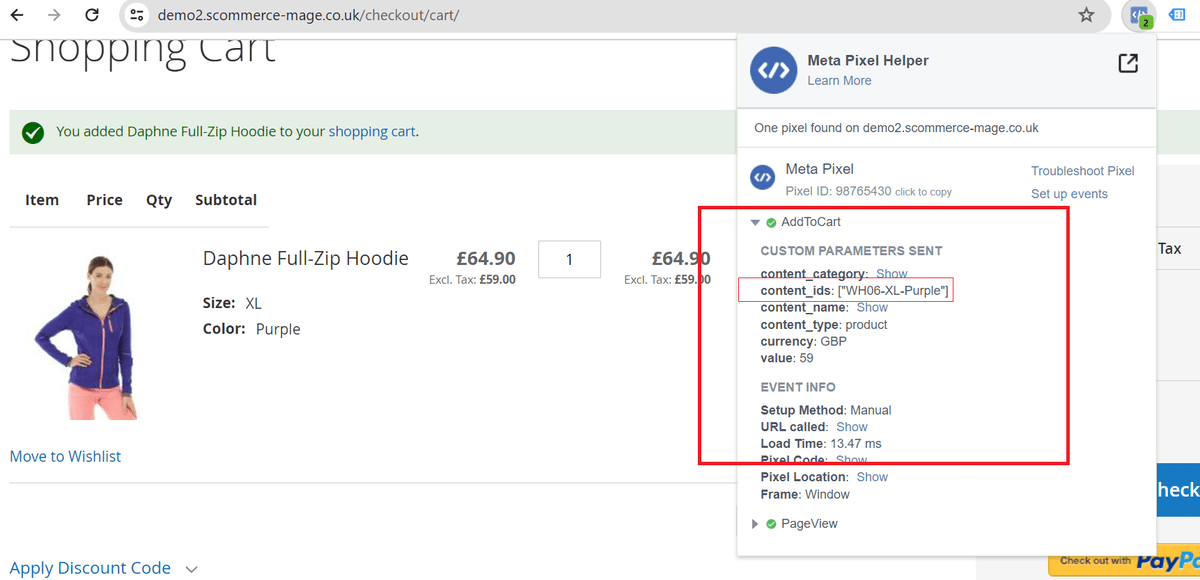
If you have a question related to this extension please check out our FAQ Section first. If you can't find the answer you are looking for then please contact support@scommerce-mage.com.
Magento 2 Dynamic Sale Catagory
Installation and User Guide for Magento 2 Dynamic Sale Category Extension
Table of Contents
- Installation
- Installation via app/code
- Installation via Composer
- Configuration Settings for Dynamic Sale Category
- General Settings
- Product Special Price Set up
- Products Assigned to Sale Category in the Back-end
- Command to Force Run Sale Category Products
- Front-end Site View
- Sale Products on the Category Page
Installation
-
Installation via app/code: Upload the content of the module to your root folder. This will not overwrite the existing Magento folder or files, only the new contents will be added. After the successful upload of the package, run below commands on Magento 2 root directory.
php bin/magento setup:upgrade php bin/magento setup:di:compile php bin/magento setup:static-content:deploy -
Installation via Composer: Please follow the guide provided in the below link to complete the installation via composer.
Configuration Settings for Dynamic Sale Category
Go to Admin > Stores > Configuration > Scommerce Configuration > Dynamic Sale Category
General Settings
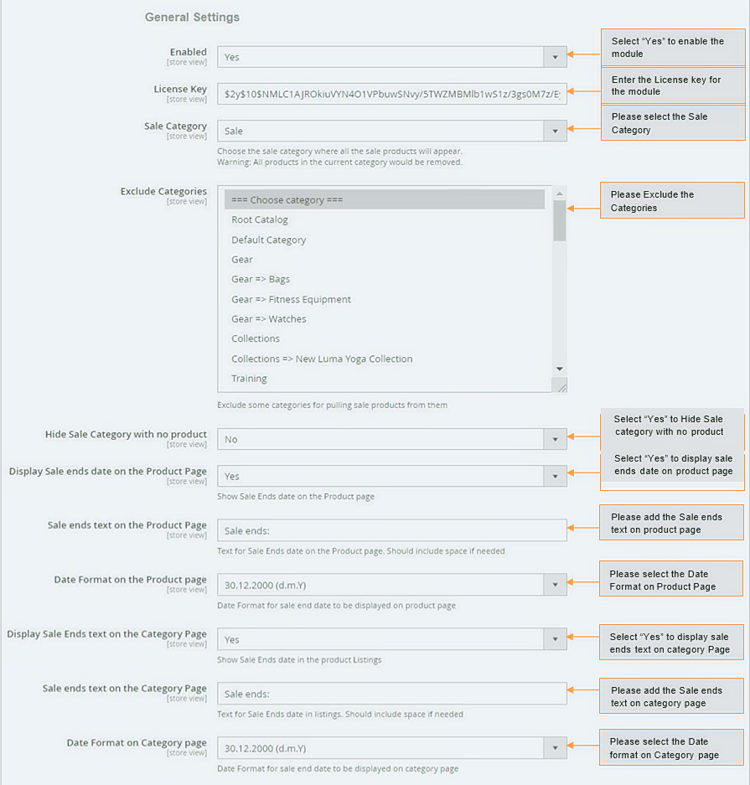
-
Enabled – Select "Yes" or "No" to enable or disable the module.
-
License Key – Please add the license for the extension which is provided in the order confirmation email. Please note license keys are site URL specific. If you require license keys for dev/staging sites then please email us at support@scommerce-mage.com.
-
Sale Category – Choose the sale category where all the sale products will appear. All products in the current category would be removed, If any assigned. This category will only be populated with products set up for offer through special prices.
-
Exclude Categories – Exclude some categories for pulling sale products from them.
-
Hide Sale Category with no Product – Set to yes if you want to hide the sale category when no products are in offer.
-
Display Sale ends date on the Product Page – Set to yes if you want to show the sales end date on the product page.
-
Sale ends text on the Product Page – Add text for sale ends date on the product page.
-
Date Format on the Product Page – Select the date format for sale end date to be displayed on the product page.
-
Display Sale Ends text on the category Page – Set to yes if you want to show sales ends date in the product listing.
-
Sale ends text on the Category Page – Add text for sale ends date in listing. Please include space if needed.
-
Date Format on the Category Page – Select the date format for sale end date displayed on category page.
-
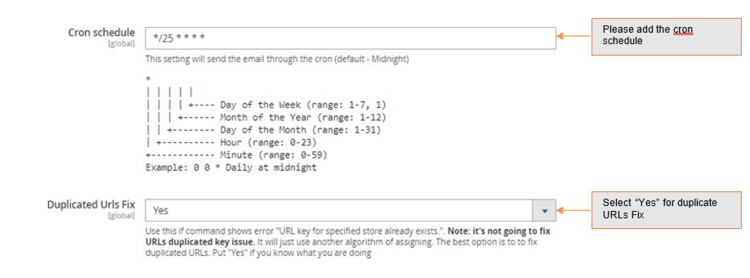
Cron Schedule – This setting will be used to send the email through the cron.
-
Duplicate Urls Fix - Use this if command shows error "URL key for specified store already exists.". Note: it's not going to fix URLs duplicated key issue. It will just use another algorithm of assigning. The best option is to to fix duplicated URLs. Put "Yes" if you know what you are doing
Product Special Price Set up
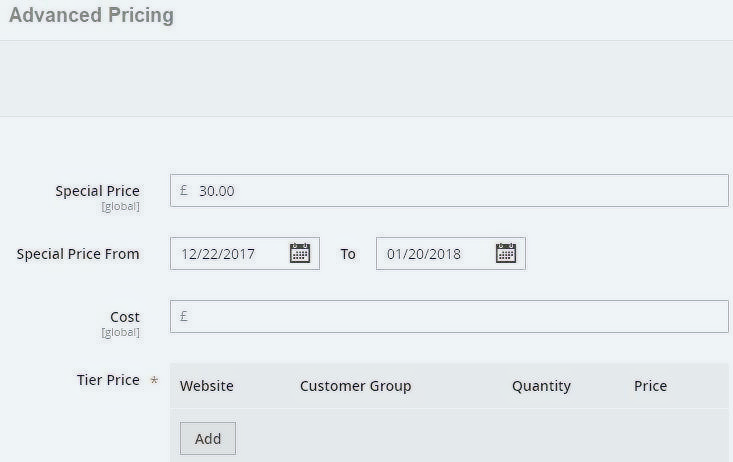
As soon as any product is set with valid special product it automatically gets assigns to category set up for sale/offers in configurations. You can set special price from Admin > Catalog > Products > Select Product > Advanced Pricing > Set "Special Price" . There is a cron job which runs midnight and checks for any product set up under offer.
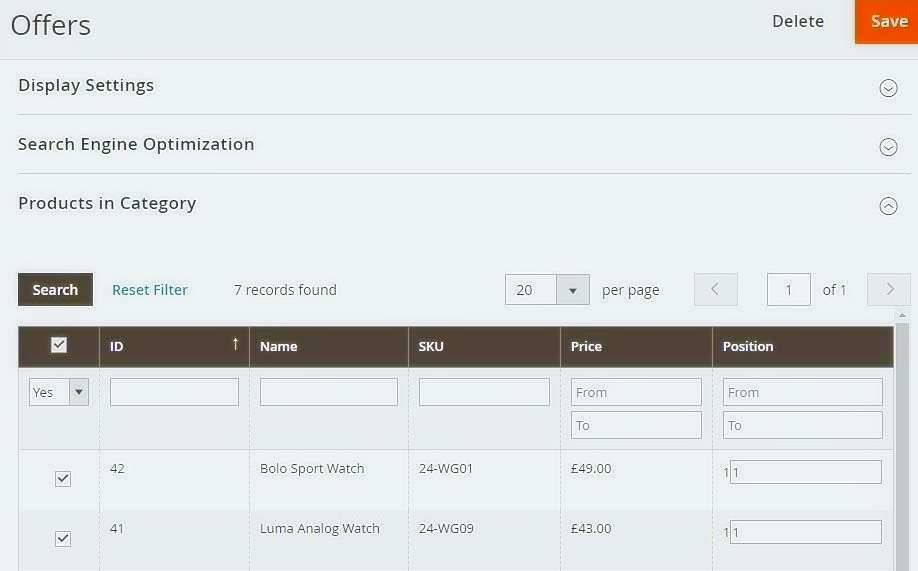
- Products Assigned to Sale Category in the Back-end - You can see the Sale Products in the back-end under "Sale/Offers" categories, from Admin > Catalog > Categories > Select Category "Offers" > Click on "Products in category" .
Command to Force Run Sale Category Products
Run the below refresh command to show the products under sale category.
scommerce:dynamic-sale-category:refreshFront-end Site View
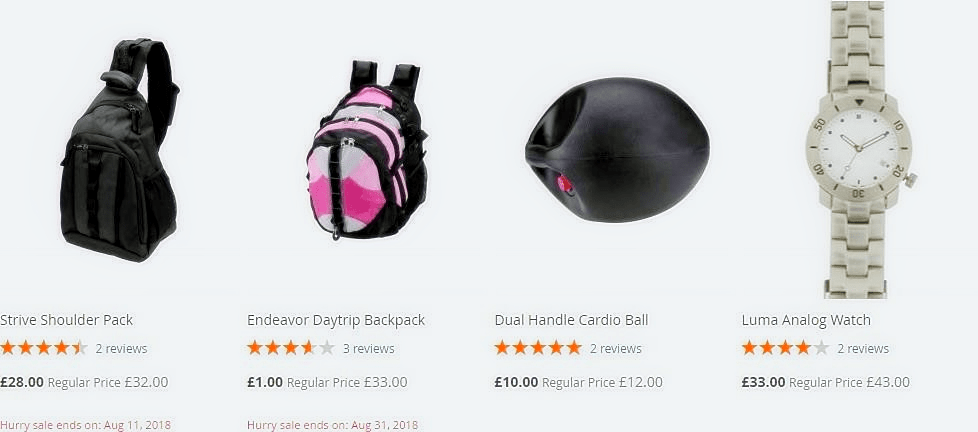
- Sale Products on the Category Page - The products with special price will be shown on the category page under the category you have selected from Admin > Stores > Configuration > Scommerce Configuration > Dynamic Sale Category - "Sale" or "Offer", along with the sale ends date.
If you have a question related to this extension please check out our FAQ Section first. If you can't find the answer you are looking for then please contact support@scommerce-mage.com.
Magento 2 Google Dynamic Remarketing Tag
Installation and User Guide for Magento 2 Google Dynamic Remarketing Tag Extension
Table of Contents
- Installation
- Installation via app/code
- Installation via Composer
- Configuration Settings for Google Remarketing
- General Settings
- Dynamic Remarketing Tag, Code Snippets on the Homepage
- Dynamic Remarketing Tag/Code Snippets with Product Details
- Dynamic Remarketing Ad
Installation
-
Installation via app/code: Upload the content of the module to your root folder. This will not overwrite the existing Magento folder or files, only the new contents will be added. After the successful upload of the package, run below commands on Magento 2 root directory.
php bin/magento setup:upgrade php bin/magento setup:di:compile php bin/magento setup:static-content:deploy -
Installation via Composer: Please follow the guide provided in the below link to complete the installation via composer.
Configuration Settings for Google Remarketing
Go to Admin > Stores > Configuration > Scommerce Configuration > Google Remarketing Tag
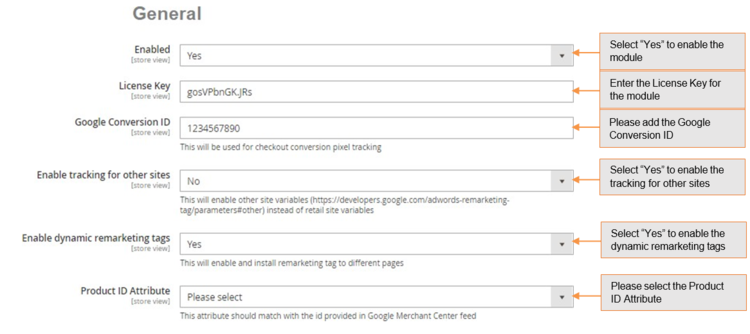
General Settings
-
Enabled – Select "Yes" or "No" to enable or disable the module.
-
License Key – Please add the license for the extension which is provided in the order confirmation email. Please note license keys are site URL specific. If you require license keys for dev/staging sites then please email us at support@scommerce-mage.com.
-
Google Conversion Id – Enter your Google Adwords Account Id.
-
Enable Tracking for other sites – This will enable other sites variables (https:/.developers.google.com/adwords-remarketing-tag/parameters#other) instead of retail site variables.
-
Enable dynamic remarketing tag – Set "Yes" to enable dynamic remarketing tag.
-
Product Id attribute – Use the same id you have submitted in your Google base feed.
-
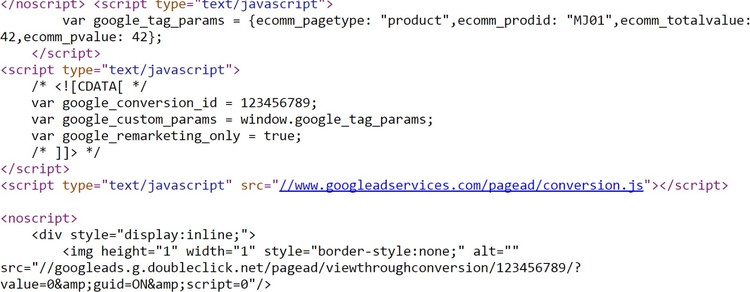
Dynamic Remarketing Tag, Code Snippets on the Homepage - To view remarketing tag and code snippets go to Homepage > View Source . In the below image you can see the conversion ID and Custom variable. You can add conversion Id from Admin > Stores > Configuration > Scommerce Configuration > Google Remarketing Tag > Google Conversion Id.
-
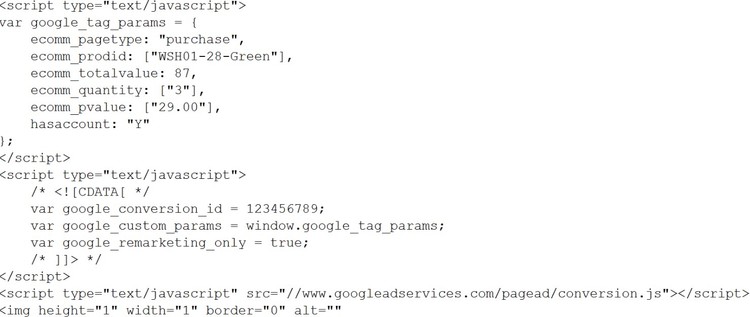
Dynamic Remarketing Tag/Code Snippets with Product Details- In the code snippet you can see the product details with Product ID and Google conversion id. You can select Product Id attribute from Admin > Stores > Configuration > Scommerce Configuration > Google Remarketing Tag > Product Id attribute - Select "SKU".
-
Dynamic Remarketing Ad - When you enable the dynamic remarketing from Admin > Stores > Configuration > Scommerce Configuration > Google Remarketing Tag > Enable dynamic remarketing tag, then it shows ads to people who have previously visited your website.
If you have a question related to this extension please check out our FAQ Section first. If you can't find the answer you are looking for then please contact support@scommerce-mage.com.
Magento 2 Product Scheduler
Installation and User Guide for Magento 2 Product Scheduler Extension
Table of Contents
- Installation
- Installation via app/code
- Installation via Composer
- Configuration Settings for Product Scheduler
- General Settings
- Timer/Label Settings
- Cron Settings
- Setting UP Product Scheduler
- Start and End Date set up with product
- Enable Product on Scheduled Date
- Display Prelaunch Text and/or Countdown Timer (such as Launching Soon)
- Disable Product on Scheduled Date
- When Start and End Date is Same
- Front-end Site View
- "Launching Soon" Text for the New Product on the Category Page
- Launching Soon Timer on the Product Page
Installation
-
Installation via app/code: Upload the content of the module to your root folder. This will not overwrite the existing Magento folder or files, only the new contents will be added. After the successful upload of the package, run below commands on Magento 2 root directory.
php bin/magento setup:upgrade php bin/magento setup:di:compile php bin/magento setup:static-content:deploy -
Installation via Composer: Please follow the guide provided in the below link to complete the installation via composer.
Configuration Settings for Product Scheduler
Go to Admin > Stores > Configuration > Scommerce Configuration > Product Scheduler
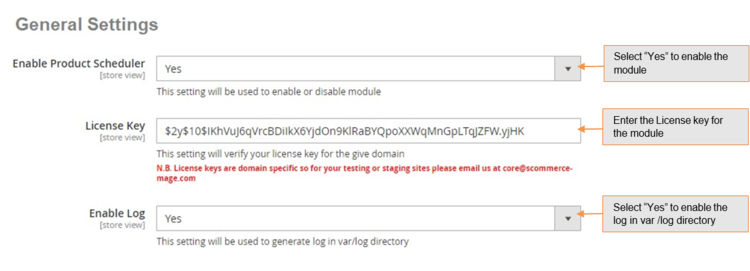
General Settings
- Enable Product Scheduler – Select "Yes" or "No" to enable or disable the module.
- License Key – Please add the license for the extension which is provided in the order confirmation email. Please note license keys are site URL specific. If you require license keys for dev/staging sites then please email us at support@scommerce-mage.com.
- Enable Log – Yes/No (If set to yes then this create a log file in var/log folder for each day with a time stamp like product_scheduler 20190125 log. The log file will record all details about products being set to enable/disable along with the dates/store values).
Timer / Label Settings
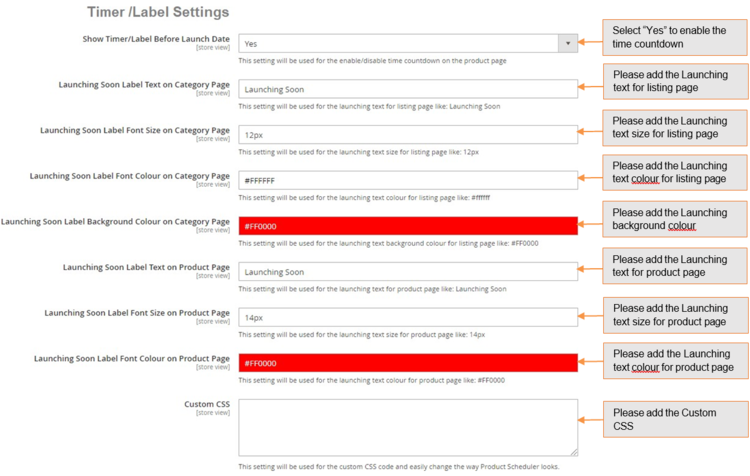
- Show Timer/Label Before Launch Date – Set yes to enable the module. If set to yes then the product status will be enabled and will show on the front end but there will be no add to basket on category or product page. Instead of Add to basket button it will either show timer on product page and launching soon label on category page.
- Launching Soon Label Text on Category Page – This is a text box. This option will only show if "Show timer/label before launch date" is set to yes This is a text for adding label text which will appear with product on category page. Default text should be "Launching Soon".
- Launching Soon Label Font Size on Category Page – This is a text box. This option will only show if "Show/timer before launch date" is set to yes. The user can enter the font size for the launching soon label text on the category page. Default size should be 12px.
- Launching soon Label Font Colour on Category Page – This is a text box. This option will only show if "Show timer/label before launch date" is set to yes. The user can enter the text colour for the launching soon label text on category page. Default colour should be #ffffff.
- Launching Soon Label Background Colour – This is a text box. This option will only show if "Show timer/label before launch date" is set to yes. The user can enter the background colour for the launching soon label text on category page. Default colour should be #FF0000.
- Launching soon Label Text on Product Page – This is a text box. This option will show if "Show timer/label before launch date" is set to yes. This is a text for adding label text which will appear with product on product page. Default text should be "Launching soon".
- Launching soon Label Font Size on Product Page – This is a text box. This option will only show if "Show timer/label before launch date" is set to yes. The user can enter the font size for the launching soon label text on product page. Default size should be 14px.
- Launching Soon Label Font Colour on Product Page – This is a text box. This option will only show if "Show timer/label before launch date" is set to yes. The user can enter the text colour for the launching soon label text on product page. Default colour should be #FF0000.
- Custom CSS – Enter custom CSS code and easily change the way Product Scheduler looks.
Cron Settings
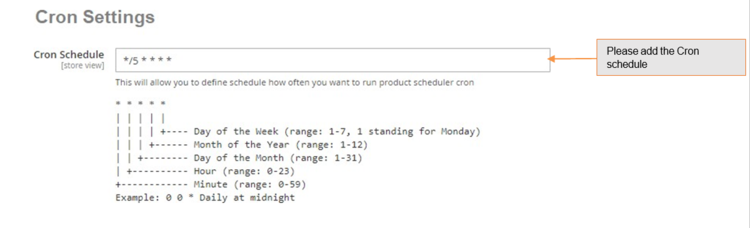
- Cron Schedule – This will allow you to define cron frequency, how often you want to run product scheduler cron.
Setting UP Product Scheduler
The module enables you to pre-launch products with a custom label text such as “Coming Soon/Launching Soon”. This label appears on various pages of your store such as cross-sell products, up sell products, category pages, etc. The style of the label is completely customizable from the backend. We have provided several individual styling options in the configuration that allows you to style aspects such as font size, font color, label background color, etc.
You can add an start and End date to your products based on which a label or a timer or both can be displayed on products and category pages. The time on the timer or the duration in which the label is displayed is calculated from the start date in the product scheduler settings by going into Admin>catalog>Products.
The Product can be enabled and disabled based on start/end date. Upon completion of end date the product gets automatically disabled. It is disabled using the cron job configured as shown above, when the cron runs and the end date is reached the product will be disabled. The product is enabled on the day when the start date and time is set.
Let us look at how to set up start and end date for products.
-
Start and End Date Setup at Product Level - You can schedule product for launching by selecting ''Start Date'' and ''End Date'' from Catalog > Products > Select Product > Start Date / End Date.
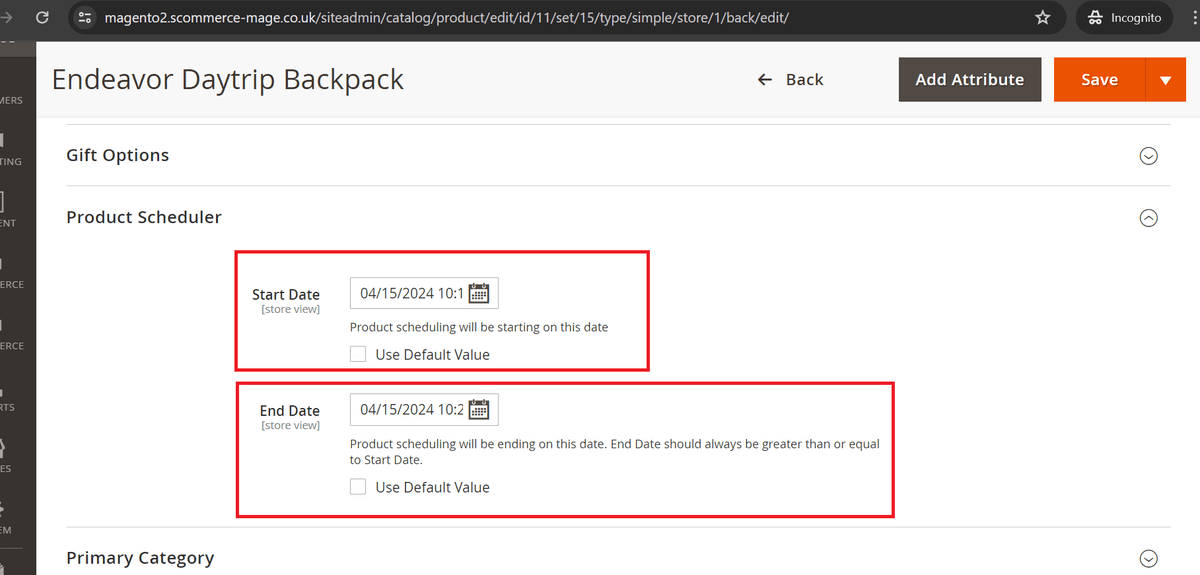
-
Enable Product on Scheduled Date- The product gets enabled based on the Start date added in the product settings. If the start date is set 2 days in the future then the product will be enabled/launched exactly after completion of 2days.
-
Display Prelaunch Text and/or Countdown Timer (such as Launching Soon)- The prelaunch text/Countdown timer gets displayed based on the Start date added in product settings. The time till which these are displayed are calculated based on the current date/time and the start date/time so Its current date and time minus the start date and time. It won't be displayed only when start date has already gone by, if its set in the future then it will always be displayed.
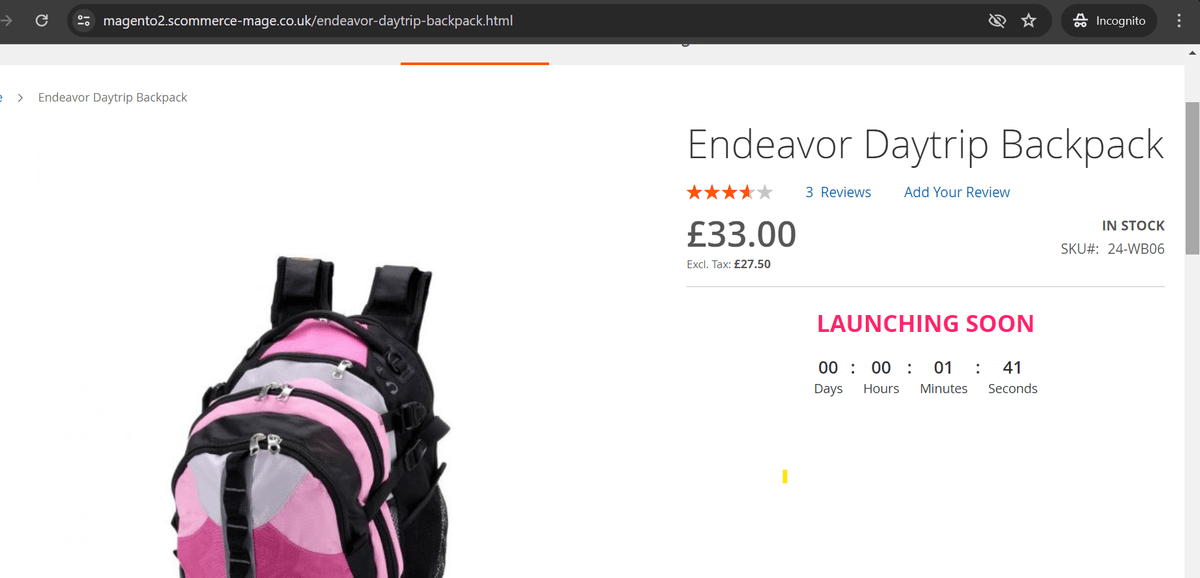
-
Disable Product on Scheduled Date- The product get's disabled on the completion of the end date. If no end date is set and this field is left empty then the product will be enabled unless disabled manually from the product settings.
-
When Start and End Date is Same- Only the Prelaunch text/ Countdown timer will be displayed given that the start date has already gone by i.e its in history. As the start date and end date is same product will be automatically disabled on this day.
Front-end Site View
-
"Launching Soon" Text for the New Product on the Product Page – You can show "LAUNCHING SOON" on the category page for the new product from Admin > Stores > Configuration > Scommerce Configuration > Product Scheduler > Timer /Label Settings > Show Timer/Label Before Launch Date - "Yes".
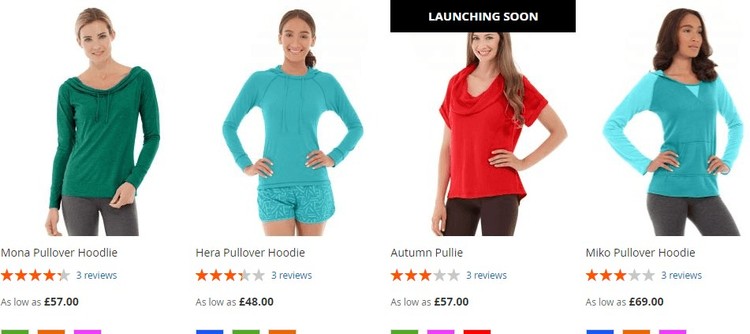
-
Launching Soon Timer on the Product Page - To show launching soon timer on the product page, go to Admin > Stores > Configuration > Scommerce Configuration > Product Scheduler > Timer /Label Settings > Show Timer/Label Before Launch Date - Select "Yes".
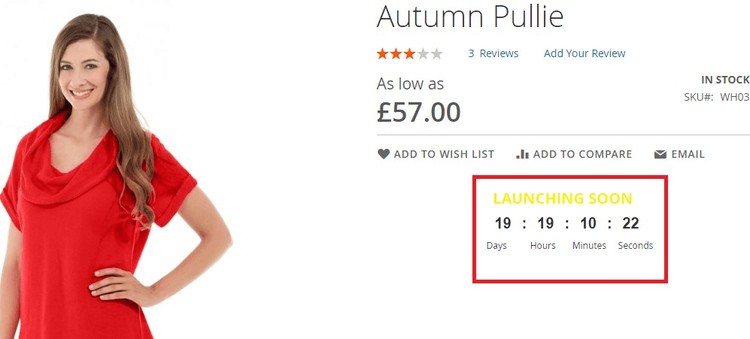
If you have a question related to this extension please check out our FAQ Section first. If you can't find the answer you are looking for then please contact support@scommerce-mage.com.
Magento2 Custom Options Discount
Installation and User Guide for Magento 2 Custom Options Discount
Table of Contents
- Installation
- Installation via app/code
- Installation via Composer
- Configuration Settings for Custom options Discount
- General Settings
- Adding Custom Options to Products
- Adding Cart Price Rules for Custom Options
- Apply Cart Rule for all custom options available
- Apply cart Rule for specific custom options
- Frontend Screengrabs
- When "only for selected custom options is set to "Yes"
- When "only for selected custom options is set to "No"
- When "only for selected custom options is set to "Yes" and Conditions are set
Installation
-
Installation via app/code: Upload the content of the module to your root folder. This will not overwrite the existing Magento folder or files, only the new contents will be added. After the successful upload of the package, run below commands on Magento 2 root directory.
php bin/magento setup:upgrade php bin/magento setup:di:compile php bin/magento setup:static-content:deploy -
Installation via Composer: Please follow the guide provided in the below link to complete the installation via composer.
Configuration Settings for Custom options Discount
Go to Admin > Stores > Configuration > Scommerce Configuration > Custom options Discount
General Settings
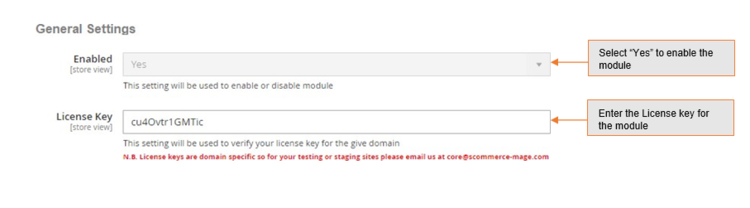
- Enabled - Select "Yes" or "No" to enable or disable the module.
- License Key - Please add the license for the extension which is provided in the order confirmation email. Please note license keys are site URL specific. If you require license keys for dev/staging sites then please email us at support@scommerce-mage.com.
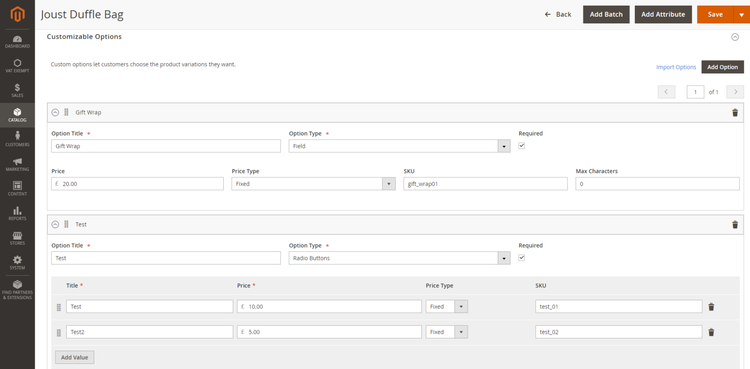
Adding Custom Options to Products
Login to your admin panel then go to Catalog > Products. Select your product and click edit from the action column. Scroll down to Customizable options. Click on add option to add a new custom option for the selected product.
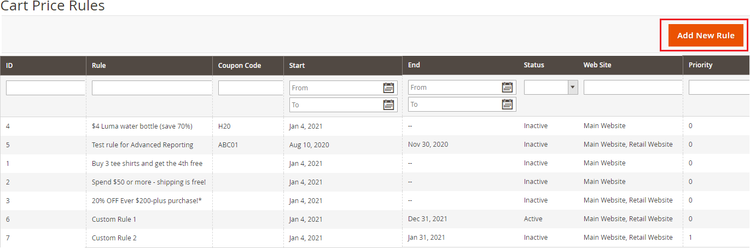
Adding Cart Price Rules for Custom Options
Go to Marketing > Promotions > Cart Price Rules and click on Add New Rule.
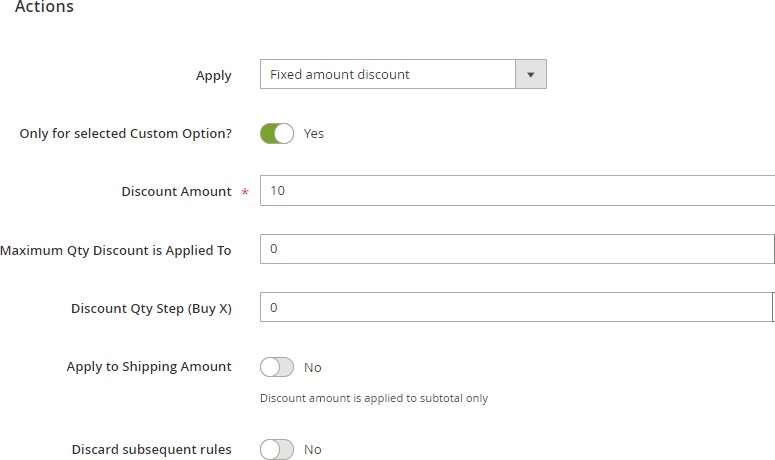
Apply Cart Rule for all custom options available
Create your Cart Price Rule Normally. Then scroll down to Actions dropdown. Make sure Only for selected Custom Option? Is set to "Yes". This option will enable the cart price rule to be applied on the custom options. Make sure there are no conditions set.
Apply cart Rule for specific custom options
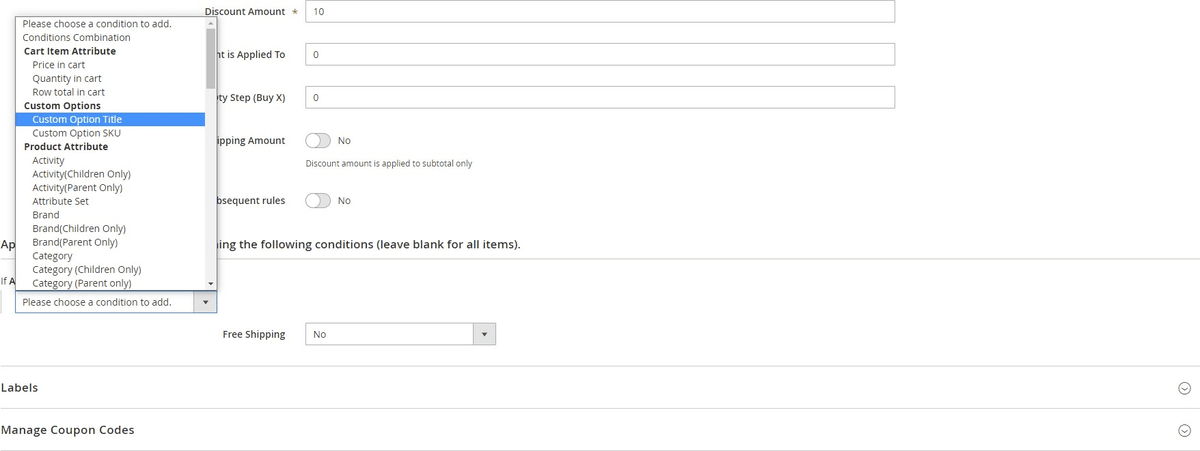
To create cart price rule for specific custom options you will need to add conditions in the Actions Column. For eg: - we have added a condition to apply discount only on the custom option that has custom options title as "Gift Wrap". So now the discount will only be available for the Gift wrap custom option. Similarly, you can create conditions based on custom options SKU and create your custom options discount.

Conditions available for custom options are custom options title and custom options SKU.
Frontend Screengrabs
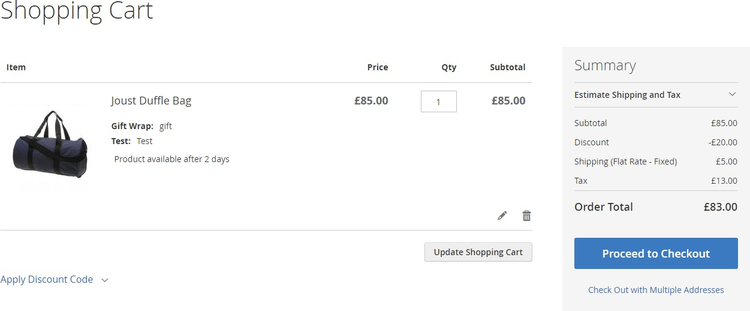
When "only for selected custom options is set to "Yes"
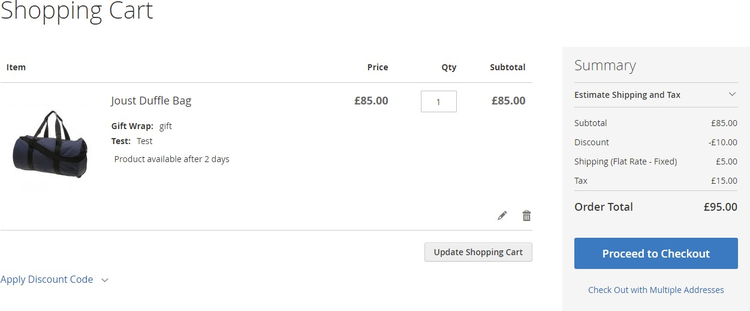
When "only for selected custom options is set to "No"
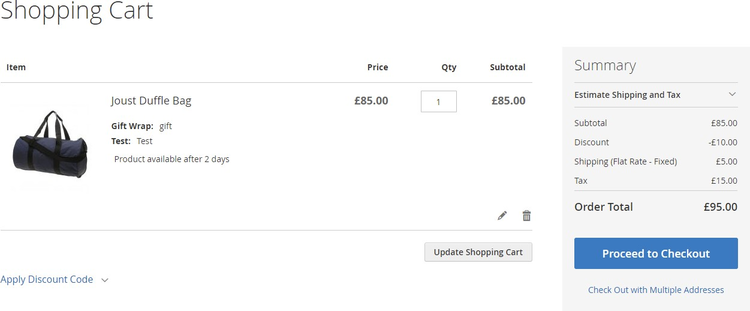
When "only for selected custom options is set to "Yes" and Conditions are set
If you have a question related to this extension please check out our FAQ Section first. If you can't find the answer you are looking for then please contact support@scommerce-mage.com.
Magento 2 Cash Back Discount
Installation and User Guide for Magento 2 Cash Back Discount Extension
Table of Contents
- Installation
- Installation via app/code
- Installation via Composer
- Configuration Settings for Cash Back Discount
- General Settings
- Cash Back
- Cash Back Reminder
- Create Cart Price Rules for Cashback Discount
- Cashback Transactions
- Cashback Customize Email Template
- Front-end Site View
- Cashback Qualifying Message on the Checkout Page
- Cashback Discount Option on the Checkout Page
- Applied Cashback Discount on the Checkout Page
- Auto Apply Discount
- Cashback Discount Details on the Front-end - My Account Section
- Cashback Expiry Reminder Email
- Second Cashback Expiry Reminder Email
- Order Confirmation Email
- Invoice Email
Installation
-
Installation via app/code: Upload the content of the module to your root folder. This will not overwrite the existing Magento folder or files, only the new contents will be added. After the successful upload of the package, run below commands on Magento 2 root directory.
php bin/magento setup:upgrade php bin/magento setup:di:compile php bin/magento setup:static-content:deploy -
Installation via Composer: Please follow the guide provided in the below link to complete the installation via composer.
Configuration Settings for Cash Back Discount
Go to Admin > Stores > Configuration > Scommerce Configuration > Cash Back
General Settings
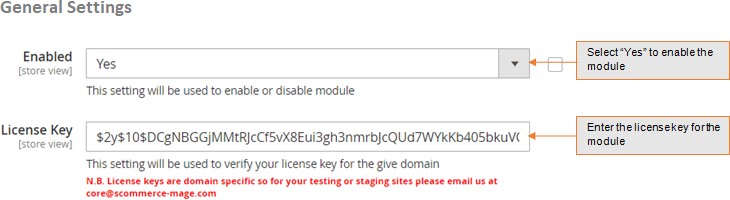
- Module Enable - Select "Yes" or "No" to enable or disable the module.
- License Key - Please add the license for the extension which is provided in the order confirmation email. Please note license keys are site URL specific. If you require license keys for dev/staging sites then please email us at support@scommerce-mage.com.
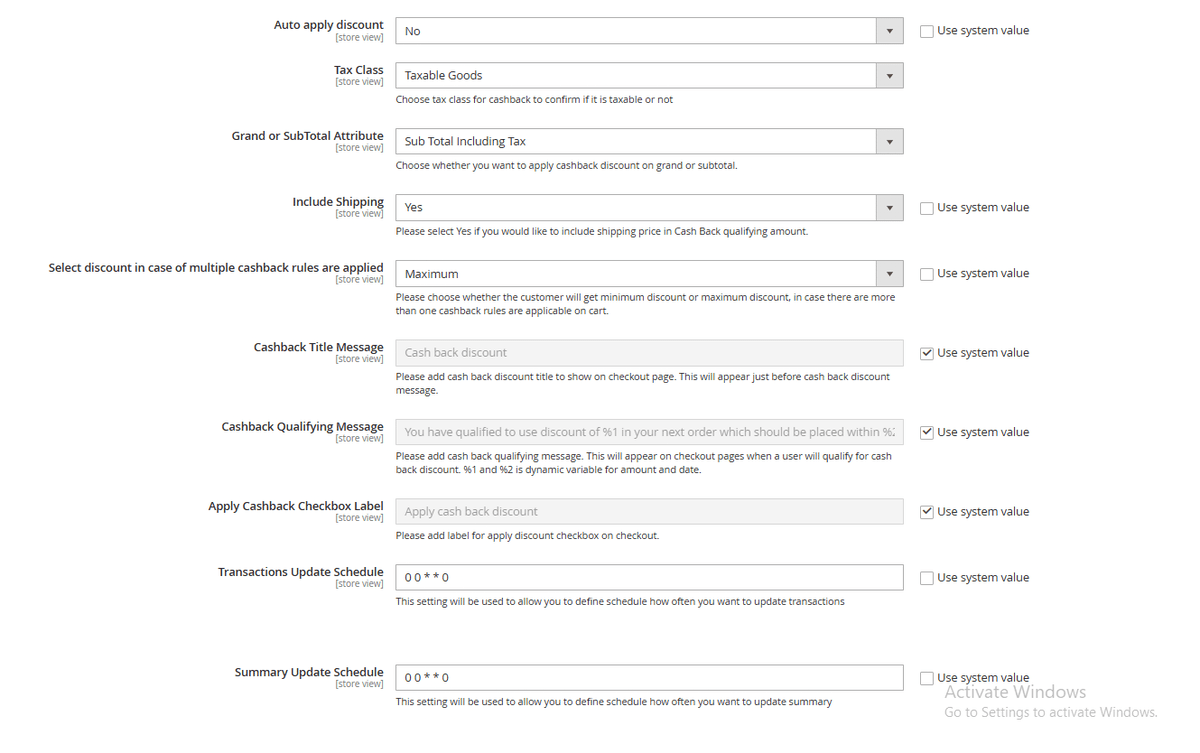
Cash Back
- Auto Apply Discount – Please select "Yes" if you would like to auto apply discount.
- Tax Class - Select the tax class
- Grand or SubTotal Attribute - Select the grand or subtotal attribute
- Select discount in case of multiple cash back rules are applied – Please choose whether the customer will get minimum discount or maximum discount, in case there are more than one cashback rules are applicable on cart.
- Include Shipping (Yes/No) – Please select "Yes" if you would like to include shipping price in Cash Back qualifying amount.
- Cashback Title Message – Please add cashback discount title to show on checkout page. This will appear just before cashback discount message.
- Cashback Qualifying Message – Please add cashback qualifying message. This will appear on checkout pages when a user will qualify for cashback discount %s and %d is dynamic variable for amount and date.
- Apply Cashback Checkbox Label – Please add label for apply discount checkbox on checkout.
- Transactions Update Schedule – This setting will be used to allow you to define schedule how often you want to update transactions.
- Summary Update Schedule – This setting will be used to allow you to define schedule how often you want to update summary.
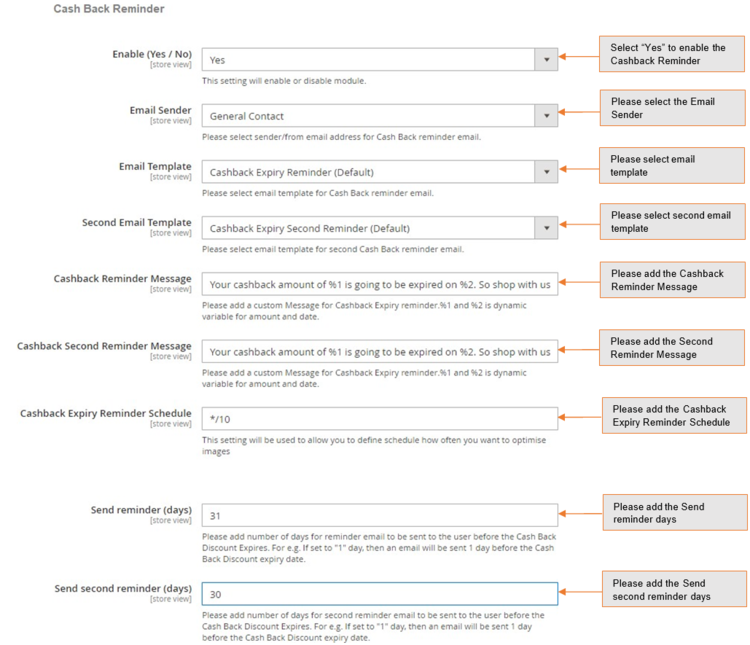
Cash Back Reminder
-
Enable (Yes/No) – This setting will enable or disable module.
-
Email Sender – Please select sender/from email address for Cash Back reminder email.
-
Email Template – Please select email template for Cash Back reminder email.
-
Second Email Template – Please select email template for second Cash Back reminder email.
-
Cashback Reminder Message – Please add a custom message for Cash back expiry reminder %1 and %2 is dynamic variable for amount and date.
-
Cashback Second Reminder Message – Please add a custom Message for Cas back expiry second reminder %1 and %2 is dynamic variable for amount and date.
-
Cashback Expiry Reminder Schedule – Please define how often you want to run cron for the cash back reminder email.
-
Send reminder (days) – Please add number of days for reminder email to be sent to the user before the Cash back Discount expires. For e.g. If set to "1" day, then an email will be sent 1 day before the Cash Back Discount expiry date.
-
Send second reminder (days) - Please add number of days for second reminder email to be sent to the user before the Cash back Discount expires. For e.g. If set to "1" day, then an email will be sent 1 day before the Cash Back Discount expiry date.
-
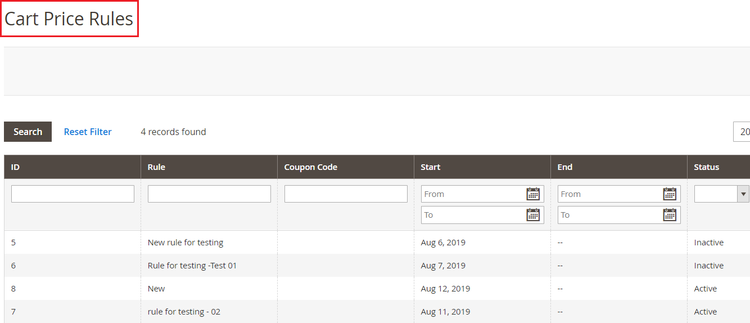
Create Cart Price Rules for Cashback Discount - You can create cart price rules from Admin > Marketing > Promotions > Cart Price Rules > Click on "Add New Rule", it redirects on new cart price rule and by filling all the required details you can create the new cart price rule.
-
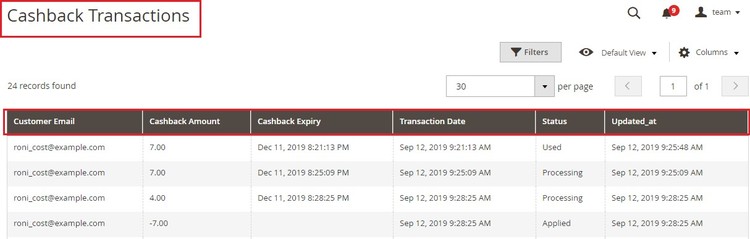
Cashback Transactions - To view cash back transaction go to Admin > Sales > Scommerce Cash Back > Cash Back > Cashback Transactions.
The grid will have following columns/information:-
-
Customer Email – Customer email Id
-
Cashback Amount – Cashback amount
-
Cashback Expiry – Cashback discount expiry date
-
Transaction Date – Date of added or deducted cash back discount
-
Status – Cash Back discount status (Applied/Processing/Used)
-
Updated_at – Updated date
-
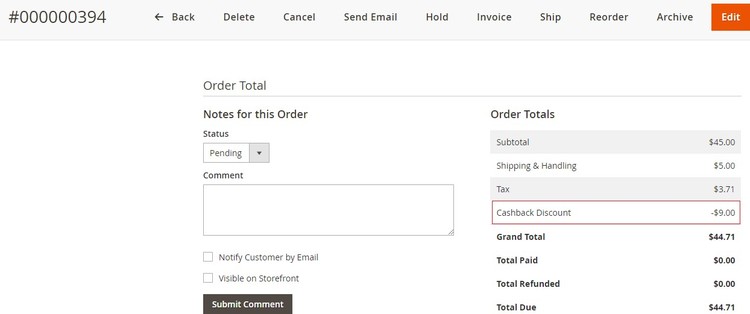
Applied Cashback Details on the Order View Page - You can view the applied cashback discount at Admin > Sales > Orders > select Order > View.
-
Cashback Customize Email Template - You can display cashback discount in any of your email templates using the built in variables.
<p>cashback</p>
{{var cashback}} - - - this is to display cashback value
{{depend cashbackDiscount}} - - - this is to make clause (if cashbackDiscount exist and not 0 then show something)
<p> cashbackDiscount </p>
{{/depend}}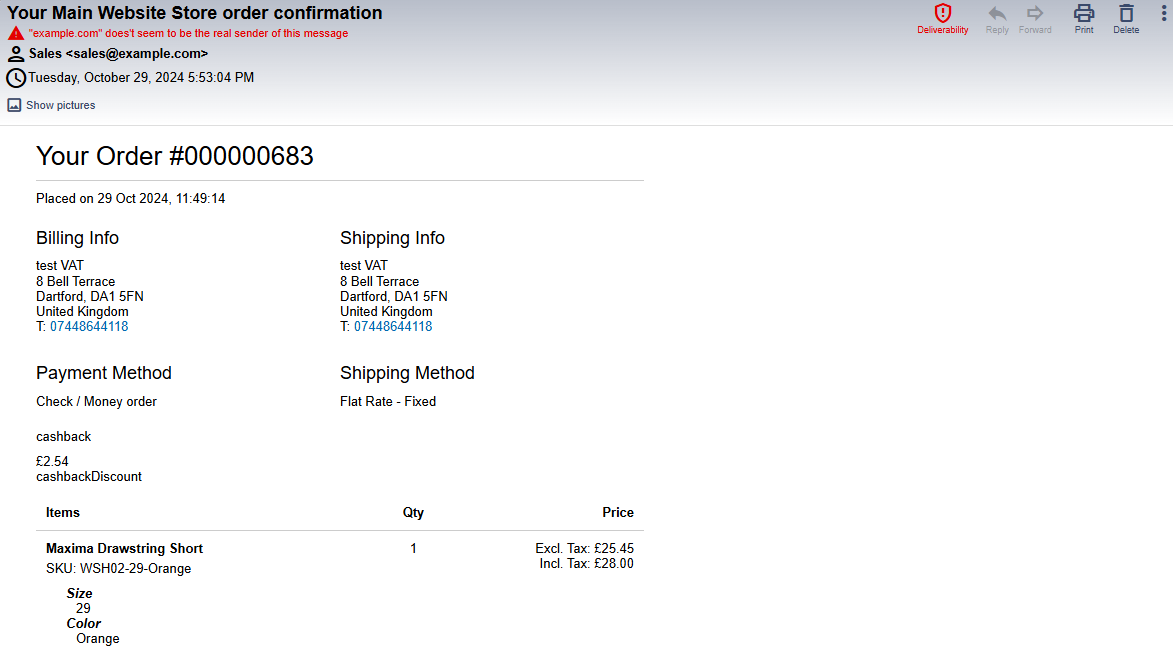
Front-end Site View
- Cashback Qualifying Message on the Checkout Page - You can define qualifying message from Admin > Stores > Configuration > Scommerce Configuration > Cashback Qualifying Message - " ", the message will be shown on the checkout page.
- Cashback Discount Option on the Checkout Page - When you enable the module and if there is any cash back discount available then it shows "Apply cash back discount" option on the checkout page and by checking this option you can apply for cash back discount.
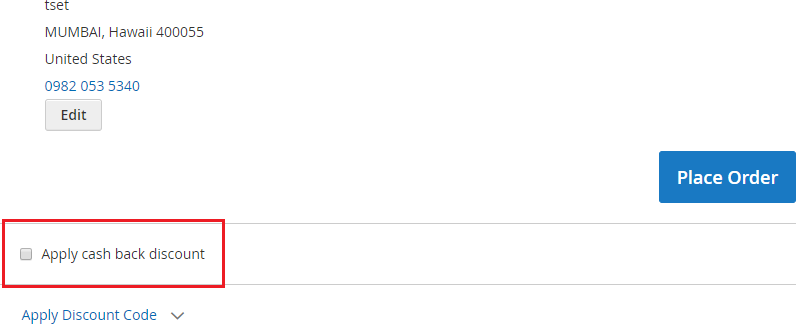
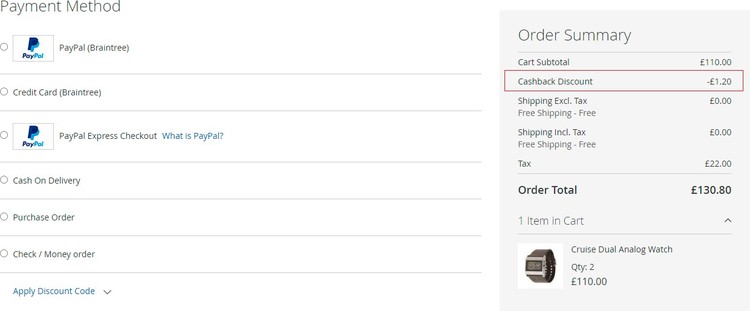
- Applied Cashback Discount on the Checkout Page - You can see the applied cash back discount on the checkout page under "Order Summary" section.
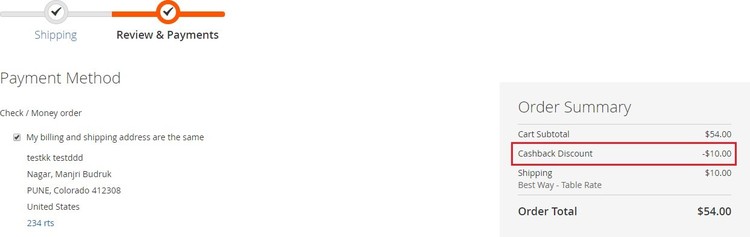
- Auto Apply Discount - To apply discount automatically and hide checkbox on checkout, set 'Auto apply discount' to 'Yes' from Admin > Stores > Configuration > Scommerce Configuration > Cash Back > Auto apply discount – "Yes/No".
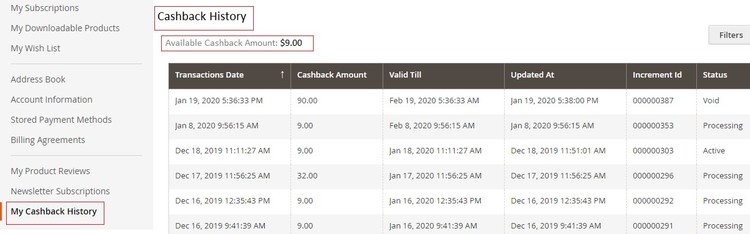
- Cashback Discount Details on the Front-end - My Account Section - You can view cash back details on the front-end from My Account > My Cashback History.
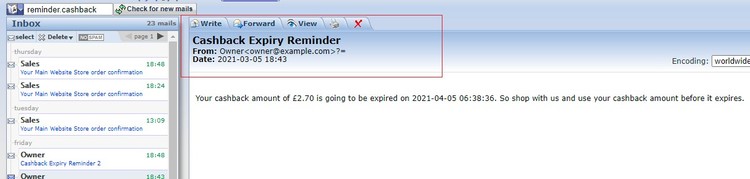
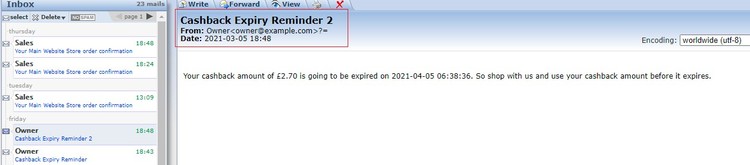
- Cashback Expiry Reminder Email - When you enable the "Cash Back Reminder" from Admin > Stores > Configuration > Scommerce Configuration > Cash Back > Cash Back Reminder > Enable - "Yes", it sends an expiry reminder email to customers before the period of the discount expired.
- Second Cashback Expiry Reminder Email – You can set the email templates and reminder days for second email from Admin > Store > Configuration > Scommerce Configurations > Cash Back Reminder- Second Email Template and Send second reminder (days).
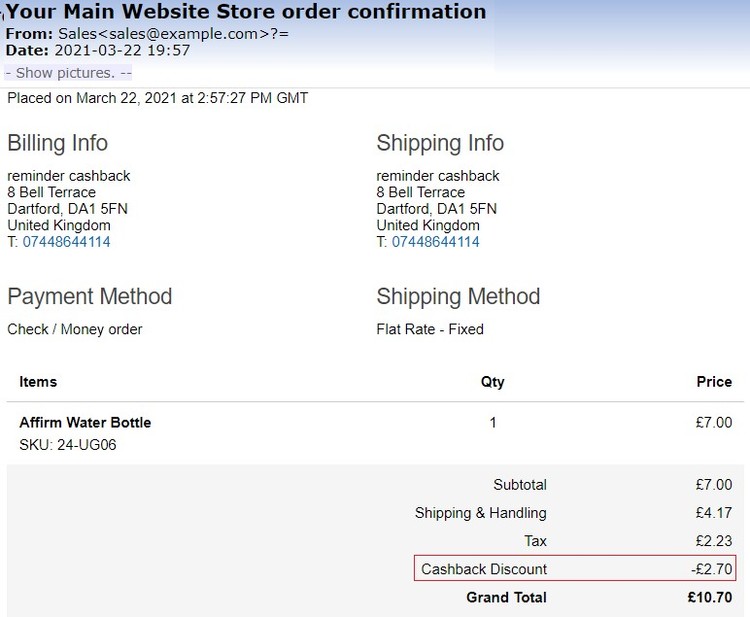
- Order Confirmation Email – You can see the applied cashback discount on the order confirmation and invoice emails.
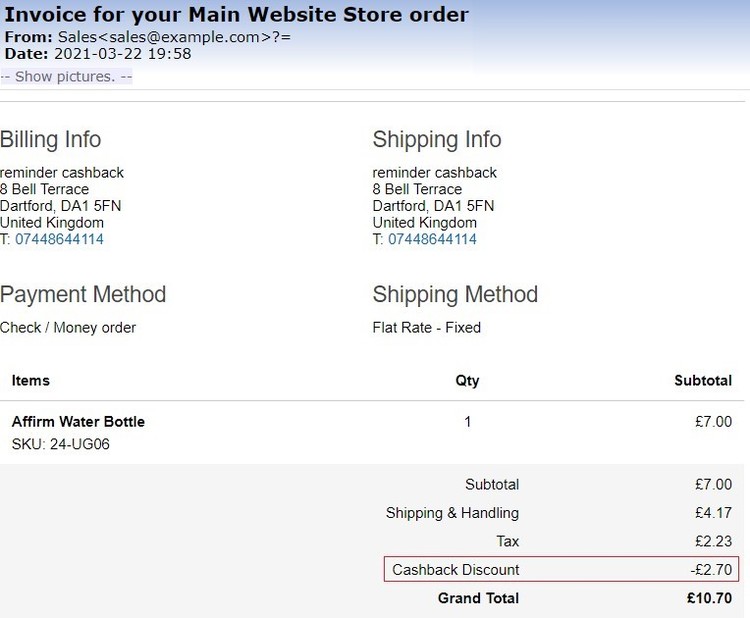
- Invoice Email – Below is the image where you can see applied cashback discount.
If you have a question related to this extension please check out our FAQ Section first. If you can't find the answer you are looking for then please contact support@scommerce-mage.com.
Magento 2 Competition or Prize Draw with Social Booster
Installation and User Guide for Magento 2 Competition or Prize Draw with Social Booster Extension
Table of Contents
- Installation
- Installation via app/code
- Installation via Composer
- Configuration Settings for Competition
- General Settings
- Social Booster - Facebook Settings
- Social Booster - Twitter Settings
- Create/Edit/Delete Custom form fields
- View Custom Field Screen
- Create/Edit Competition
- Create Competition
- Add Fields in Competition Form
- Add Custom Fields
- Design
- Facebook Settings
- Twitter Sharing
- Email Template for Competition Entry Email
- Choose Winner
- Competition Entrants
- View Entrants
- Front-end Site View
- Competition Form
- Social Sharing Links on the Form
- Competition Entry Confirmation Email
- Newsletter Subscription Confirmation Email
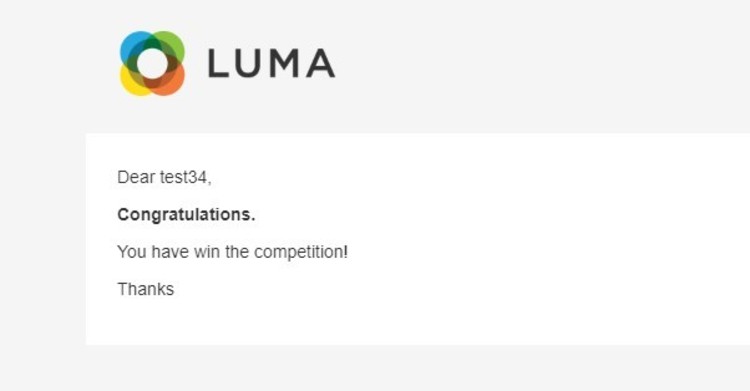
- Competition Winner Confirmation Email
Installation
- Installation via app/code: Upload the content of the module to your root folder. This will not overwrite the existing Magento folder or files, only the new contents will be added. After the successful upload of the package, run below commands on Magento 2 root directory.
php bin/magento setup:upgrade php bin/magento setup:di:compile php bin/magento setup:static-content:deploy - Installation via Composer: Please follow the guide provided in the below link to complete the installation via composer.
Configuration Settings for Competition
Go to Admin > Stores > Configuration > Scommerce Configuration > Competition
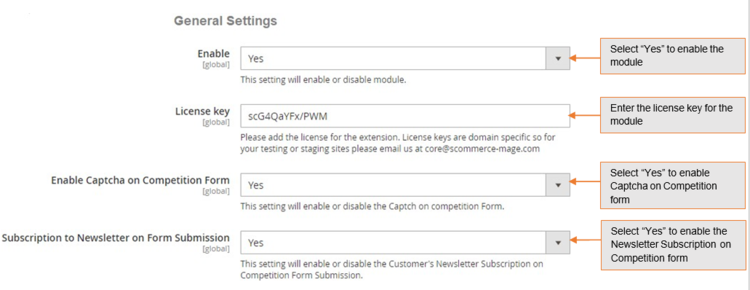
General Settings
- Enabled – Select "Yes" or "No" to enable or disable the module.
- License Key – Please add the license for the extension which is provided in the order confirmation email. Please note license keys are site URL specific. If you require license keys for dev/staging sites then please email us at support@scommerce-mage.com.
- Enable Captcha on Competition Form – Please select "Yes" or "No" to enable/disable captcha on the competition form.
- Subscription to Newsletter on Form Submission – Please select "Yes" or "No" to enable/disable newsletter subscription on the competition form.
Social Booster - Facebook Settings
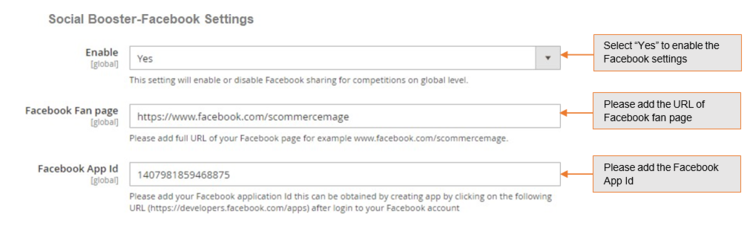
- Enable (Yes/No) – Please select "Yes" or "No" to Facebook sharing for competitions global level.
- Facebook Fan Page – Please add full URL of your Facebook page for example www.facebook.com/scommercemage.
- Facebook App ID – Please add Facebook application Id this can be obtained by creating app by clicking on the following URL (https://developers.facebook.com/apps) after login to your Facebook account.
Social Booster - Twitter Settings
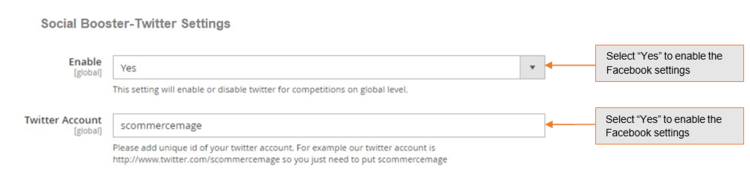
- Enable (Yes/No) – Please select "Yes" or "No" to Twitter for competitions on global level.
- Twitter Account – Please add unique id of your twitter account. For example our twitter account is http://www.twitter.com/scommerce/mage so you just need to put Scommerce Mage.
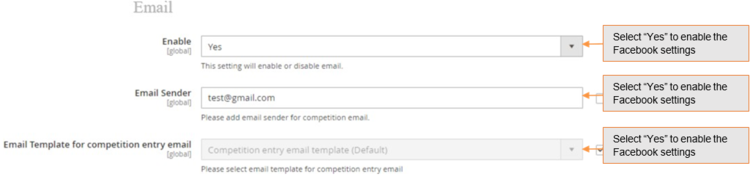
- Enable (Yes/No) – Please select "Yes" or "No" for competition email.
- Email Sender (Textbox) – Please add email sender for competition email.
- Email Template for competition entry email – Please select dropdown to select default global level competition entry email template from the available list of templates. A default template will be added with the extension install.
Create/Edit/Delete Custom form fields
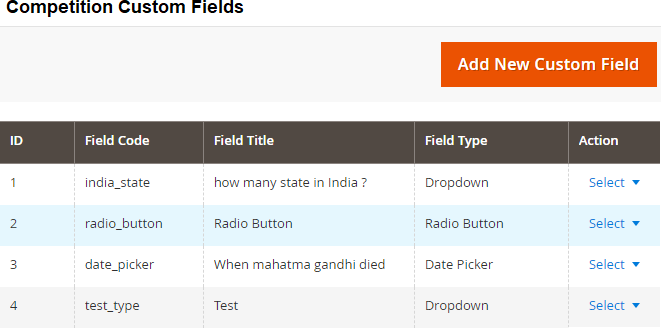
You can create, update and delete custom fields from Admin > Competition > Custom Fields. The grid will have below columns:
-
ID – This will be custom field code.
-
Field code – This will be custom field code.
-
Field Title – This will be custom field title.
-
Field Type – This will be custom field type.
-
Action – Edit/Delete
-
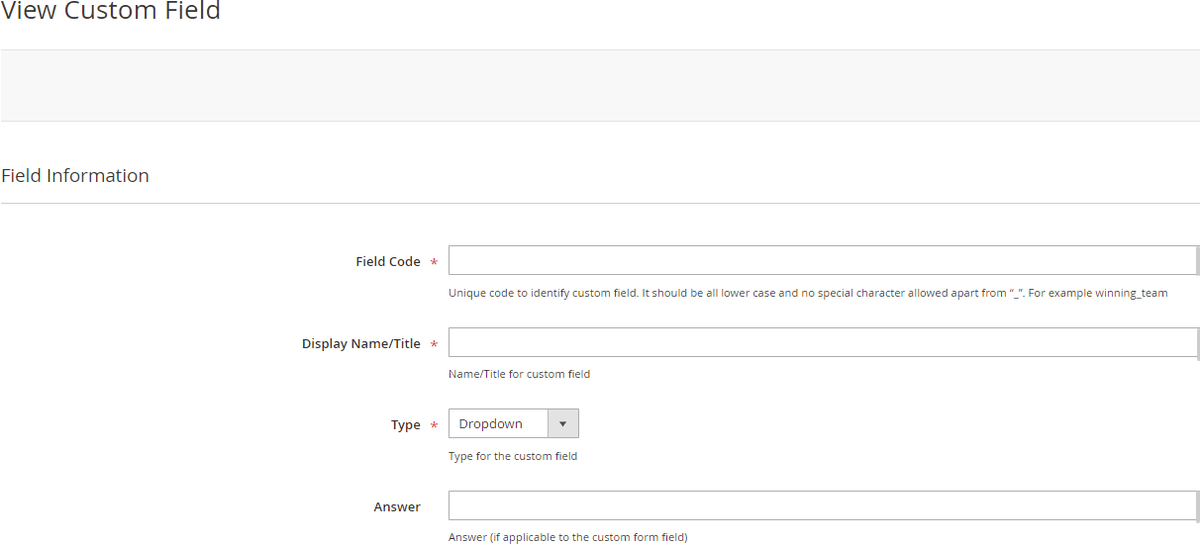
View Custom Field Screen - Click on "Add New Custom Field" will redirect you to detailed view custom field page and by filling all the required details you can create a new custom field. It will have below tabs: -
Field Information
- Field Code (text box) – This will be mandatory and unique. No spaces or special character will be allowed, and it will be all lower cases just like attribute code and will not be editable once created.
- Display Name/Title (text box) – Name/Title for the custom field which will be displayed on front end in competition form.
- Type (drop down) – This will be a drop down to select the type of the field, and it won't be editable once created.
- Text
- Text area
- Checkbox
- Radio Button
- Dropdown
- Multi Select
- Date Picker
- Maximum Character allowed (text box) – This will be only visible, if the type is Text or Text area. User will be able to define max character for the field.
- Options(grid) – This will be only visible, only if the type is Checkbox or Radio or Dropdown or Multiselect. User will be able to relative options here. The grid will have the following columns: -
- Is Default
- Value
- Label default store view
- All other available store views
- Delete/Remove (action)
- Answer (text box) – This will be an optional field for adding answer. If the type is date picker then the date format for answer should be correct.

Create/Edit Competition
You can update, delete and create a new competition from Admin > Competition > Competitions.
The grid will have below columns: -
- ID – This will be competition ID. System generated
- Name – This will be competition name/title
- URL Key – This will be competition URL Key
- Store View – This will be a store view drop down for to select stores for competition.
- Status – Competition status (active/disabled)
- Start date – Start date for the competition
- End date – End date for the competition
- Created date – Created date for the competition
- Updated date – Updated date for the competition
- Action – Edit/Delete
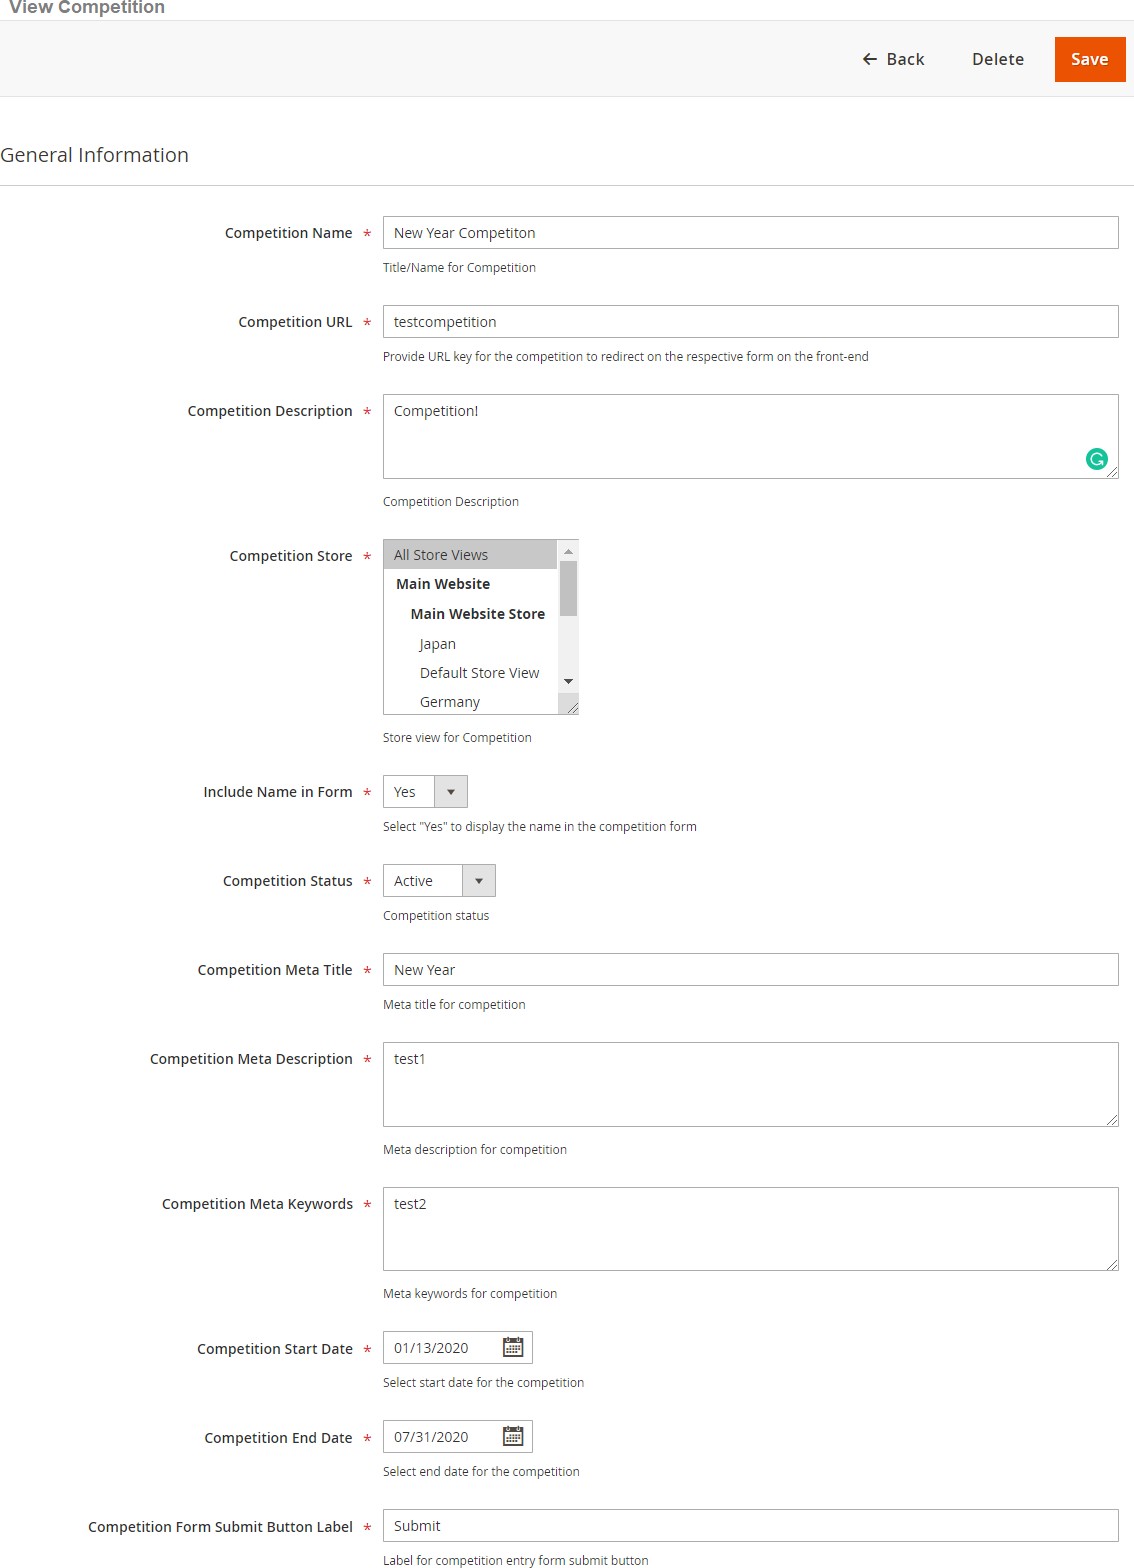
- Create Competition - Click on "Add New Competition" will redirect you to detailed competition page. It will have below tabs: -

General
-
Competition Name - Enter the competition name. The name will appear on the front-end competition form.
-
Competition URL - Enter the URL. This URL will be used to open the completion form on the front-end.
-
Competition Description - Add the description. This description will appear on the front-end competition form.
-
Competition Store – Multi select filled with values.
-
Include Name in Form – Dropdown, Include Name in Form (Yes/No)
-
Competition Status – Drop Down, Competition Status (Active/Disabled)
-
Competition Meta Title - Enter meta title
-
Competition Meta Description – Add meta description.
-
Competition Meta Keywords – Keywords
-
Competition Start Date – Date picker
-
Competition End Date – Date picker
-
Competition form Submit Button Label
-
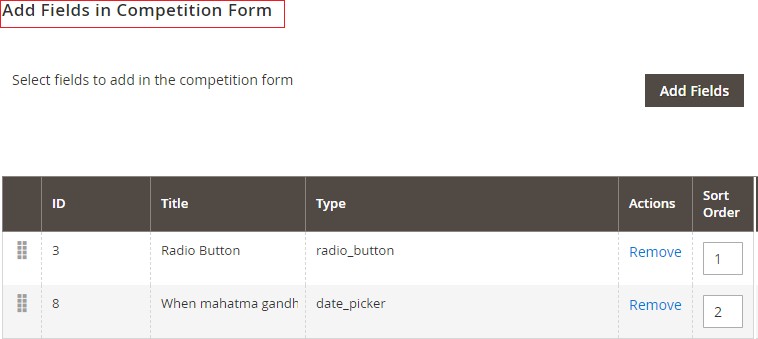
Add Fields in Competition Form - To add fields in competition form go to Admin > Competition > Competitions > Add Fields in Competition Form. It will have the fields: -
- ID
- Field Title
- Field Type
- Action
- Sort Order
-
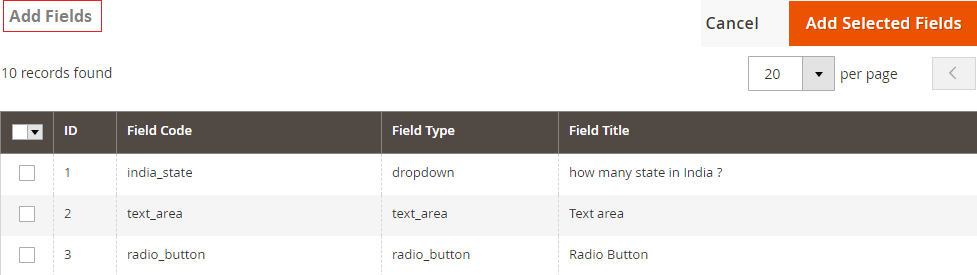
Add Custom Fields - You can add fields from Admin > Competition > Competitions > Add Fields in Competition Form > Click on "Add Fields" > Select fields and Click on "Add Selected Fields". This screen will have all the available custom fields in a grid form and user will be able to select fields to add to the competition form.
- Checkbox to select fields
- Field Code
- Field Name/Title
- Field Type
- Field Position – This will be editable numeric field and will decide the display position for the competition form. This is specific to competition form.
-
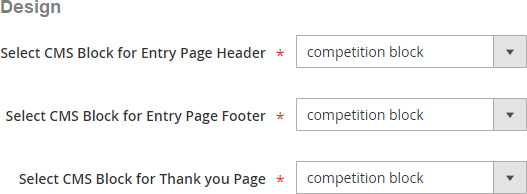
Design - This tab will display two drop downs with all the static block where user will be able to select static block for the competition entry page and success page from Admin > Competition > Competitions > Add Fields in Competition Form > Design.
- Static block for Competition Entry Page – Please select static block for competition entry page on front end.
- Static block for Competition Entry Thank you page – Please select static block for competition entry page on the front end.
-
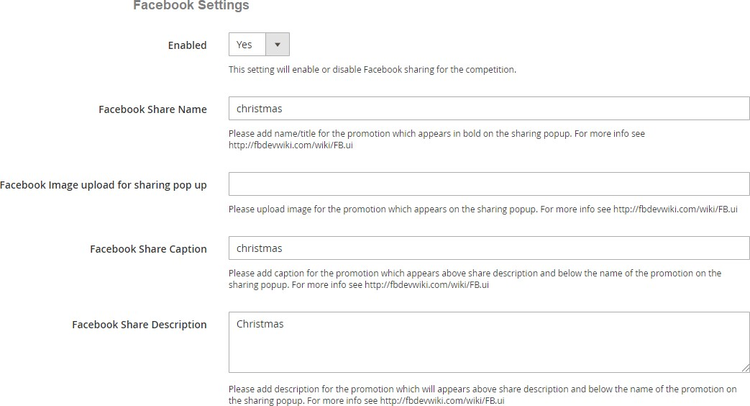
Facebook Settings – This tab will only be visible, if enabled from Admin > Stores > Configuration > Scommerce Configuration > Competition > Social Booster-Facebook settings
- Enabled (yes/no) – Please select "Yes" or "No" for Facebook sharing for the competition.
- Facebook Share Name – Please add name/title for the promotion which appears in bold on the sharing popup. For more info see https://fbdevwiki.com/wiki/FB.ui
- Facebook Image upload for sharing pop up – Please upload image for the promotion which appears on the sharing poup. For more info see https://fbdevwiki.com/wiki/FB.ui
- Facebook Share Caption – Please add caption for the promotion which appears above share description and below the name of the promotion on the sharing popup. For more info see http://fbdevwiki.com/wiki/FB.ui
- Facebook Share Description – Please add description for the promotion which will appears above share description and below the name of the promotion on the sharing popup. For more info see http:fbdevwiki.com/wiki/FB.ui
-
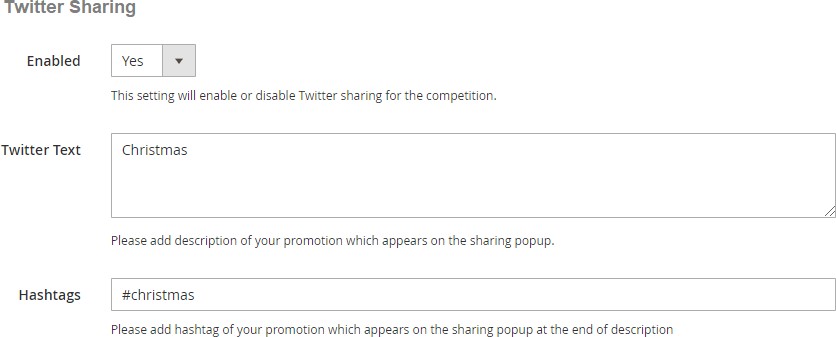
Twitter Sharing – This tab will only be visible, if enabled from Admin >Stores > Configuration > Scommerce Configuration > Competition > Social Booster- Twitter Settings
- Enabled (yes/no) – Please select "Yes" or "No" for Twitter sharing on competition form.
- Twitter Text – Please add description of your promotion which appears on the sharing popup.
- Hashtags – Please add hashtag of your promotion which appears on the sharing popup at the end of the description.
-
Email Template for Competition Entry Email – This will be a dropdown to select default competition level competition entry email template from the available list of templates. If nothing selected, then it will pick up template defined in section Admin > Stores > Configuration > Scommerce Configuration > Email.
-
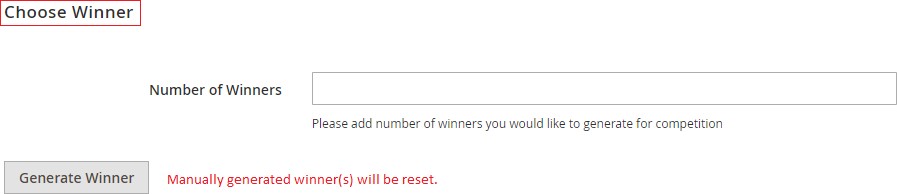
Choose Winner – It generates winners only when the competition has ended. This will be determined by competition end date and will have below two elements.
- Number of winners – Please add number of winners you would like to generate for the competition.
- Generate Winner Button – To generate a winner, click on "Generate Winner" button. It resets manually generated winners and selects a new winner randomly. This is a random process, and doesn't validate any answer or entries.
Competition Entrants
You can generate winner manually from Entrants grid by selecting "Mark Winner" under "Actions" from Admin > Competition > Entrants. Also you can delete and view entrants by selecting "View" from "Actions" . The grid will have below columns:-
-
User Email
-
Username
-
Competition Name
-
Store
-
Winner
-
Date Entered
-
Action

-
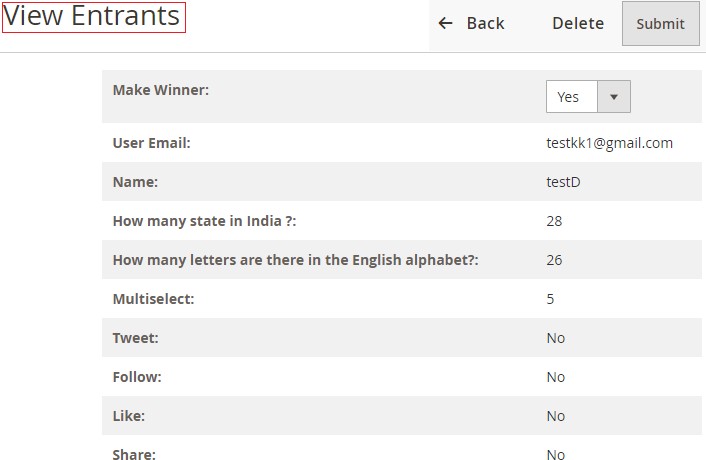
View Entrants – To view entrants details go to Admin > Competition > Entrants> Select "View", it opens View Entrants page from where you can select winner ma by selecting "Yes" from Mark Winner drop-down. It selects winner manually and it doesn't validate any answer or entries.
Front-end Site View
-
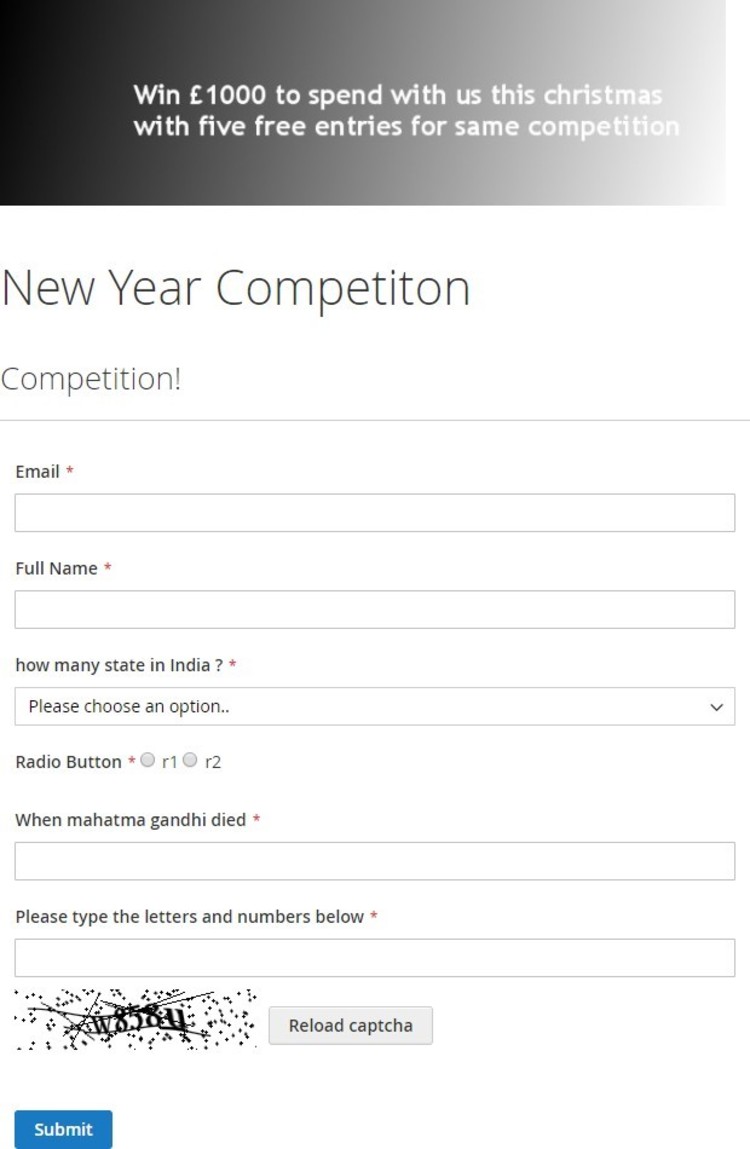
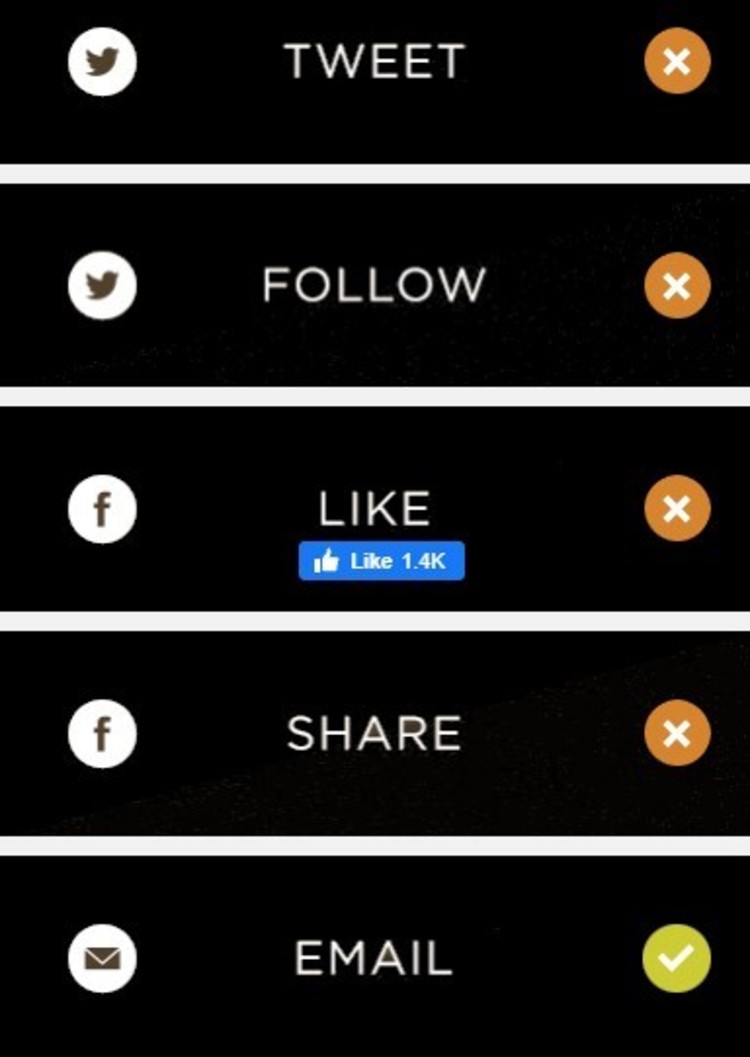
Competition Form - When you create a competition from Admin > Competition > Competitions, then based on defined URL key it opens the competition on the front-end site with the social sharing options, which you can see in the below screen grab.
-
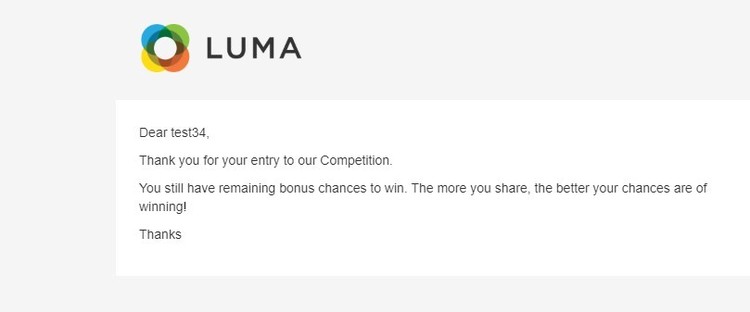
Competition Entry Confirmation Email - It sends an email to users to confirm their entry into the prize draw or competition.
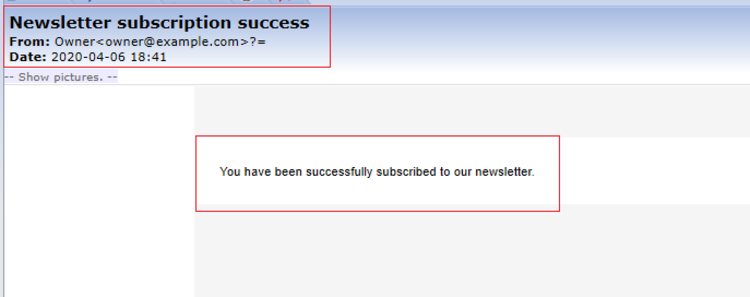
-
Competition Winner Confirmation Mail
If you have a question related to this extension please check out our FAQ Section first. If you can't find the answer you are looking for then please contact support@scommerce-mage.com.
Magento 2 TikTok Integration
Installation and User Guide for Magento 2 Tiktok Integration Extension
Table of Contents
- Installation
- Installation via app/code
- Installation via Composer
- Configuration Settings for Tiktok Integration
- General Settings
- Integration
- Product
- How to Test Products in Tiktok
- How to place Order from Tiktok to Magento
Installation
- Installation via app/code: Upload the content of the module to your root folder. This will not overwrite the existing Magento folder or files, only the new contents will be added. After the successful upload of the package, run below commands on Magento 2 root directory.
php bin/magento setup:upgrade php bin/magento setup:di:compile php bin/magento setup:static-content:deploy - Installation via Composer: Please follow the guide provided in the below link to complete the installation via composer.
Configuration Settings for Tiktok Integration
Go to Admin > Stores > Configuration > Scommerce Configuration > Tiktok Integration
General Settings
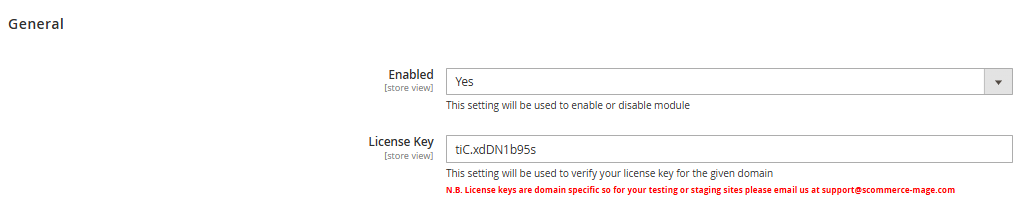
- Enabled – Select "Yes" or "No" to enable or disable the module.
- License Key – Please add the license for the extension which is provided in the order confirmation email. Please note license keys are site URL specific. If you require license keys for dev/staging sites then please email us at support@scommerce-mage.com.
Integration
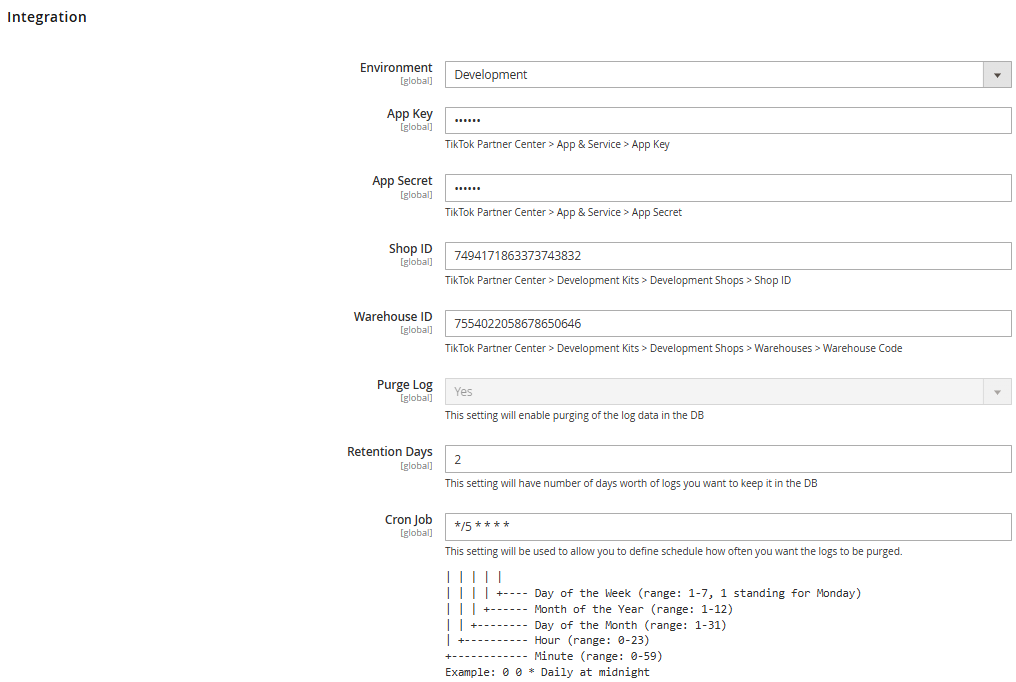
- Environment – Please select either 'Developer' or 'Production' as the environment from the configuration settings.
- App key - Please add the App key.
- App Secret - Please add the App Secret.
- Shop ID - Please add the Shop ID.
- Warehouse ID - Please add the Warehouse ID.
- Purge Log - Select either 'Yes' or 'No'. Choosing 'Yes' will enable the purging of log data from the database.
- Retention Days - Please specify the number of days for which you would like to retain log data in the database.
- Cron Job - This allows you to define a schedule for how often the logs should be purged.
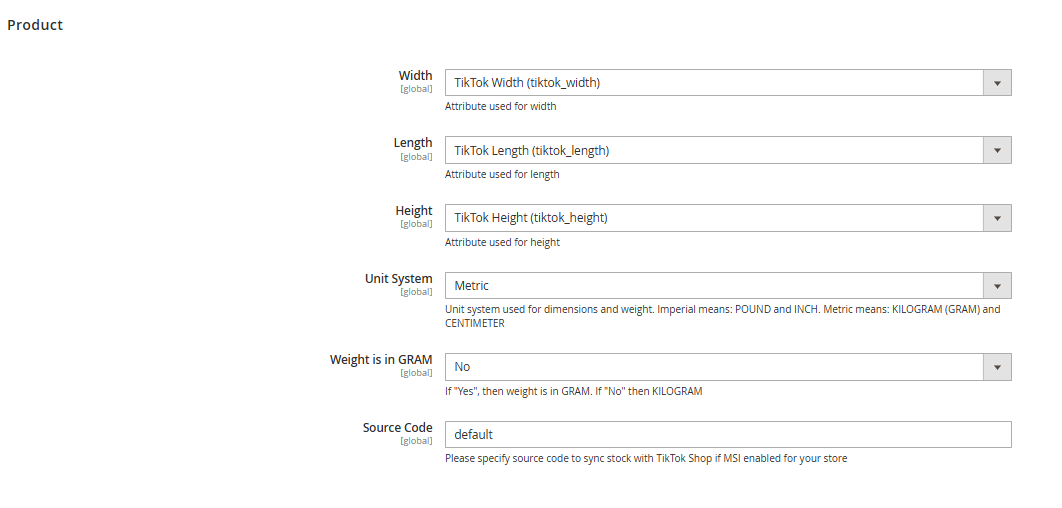
Product
- Width - Please select the attribute that will be used to define the width.
- Length - Please select the attribute that will be used to define the length.
- Height - Please select the attribute that will be used to define the height.
- Unit System - Please select the unit system to be used for dimensions and weight. 'Imperial' refers to POUND and INCH, while 'Metric' refers to KILOGRAM (or GRAM) and CENTIMETER.
- Weight in Gram - Select either 'Yes' or 'No'. If you choose 'Yes', the weight should be entered in grams. If you choose 'No', the weight should be entered in kilograms.
- Source Code - Please enter the source code to synchronize stock with TikTok Shop, if Multi-Source Inventory (MSI) is enabled for your store.
How to Create Products in Tiktok
To create products in TikTok, go to App and Services > Development Kits > Development Shops > Manage Accounts


Check the Catalogue > click on Authorise

Click ok Confirm to install

Check the terms and conditions block > Click on Authorise

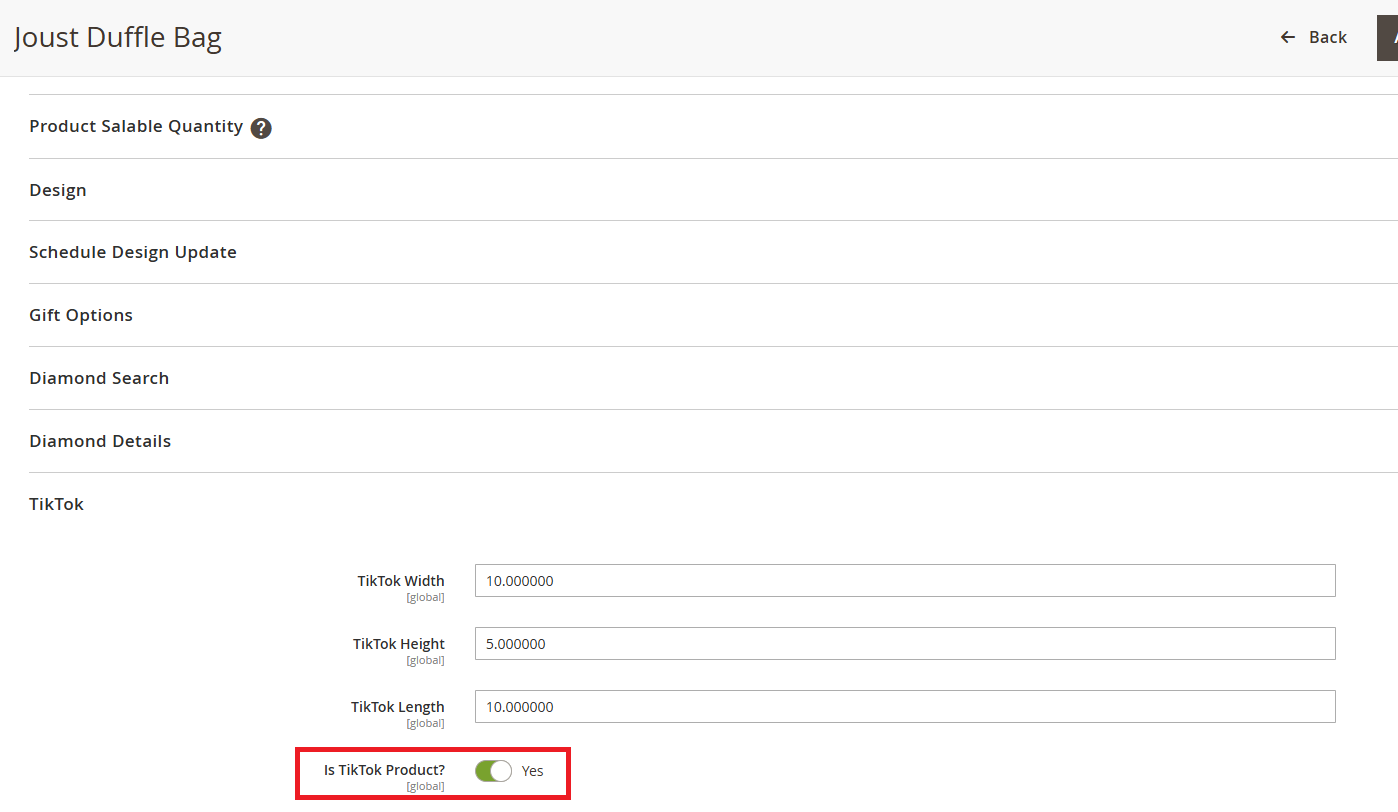
Then, run the following command to import the product(s) on Tiktok:
php bin/magento scommerce:tiktok:createproductsOnce the product setup is complete, go to TikTok > Manage Accounts, click Start Testing, and then select Manage Products as shown in the image below.
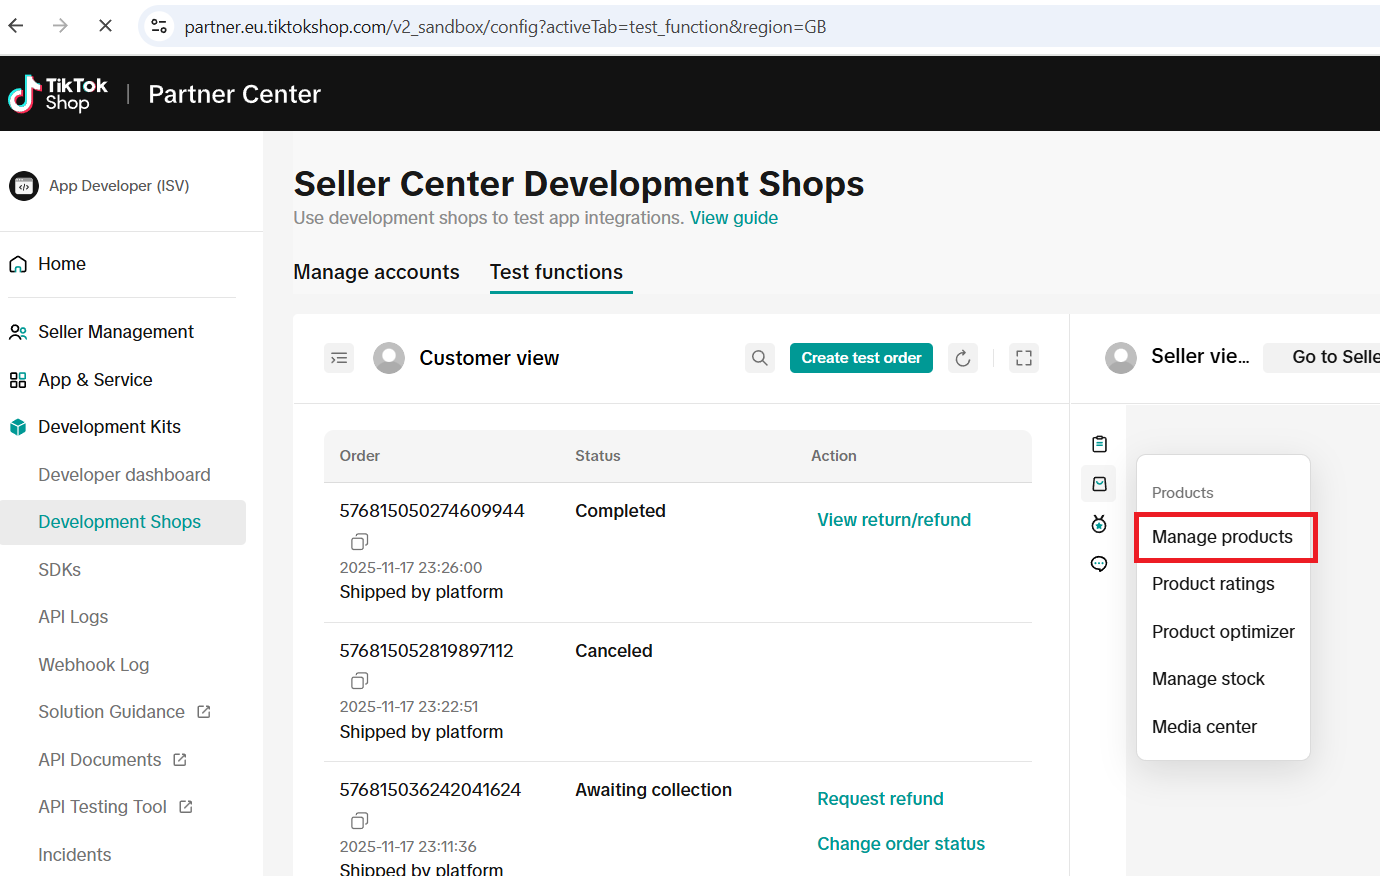
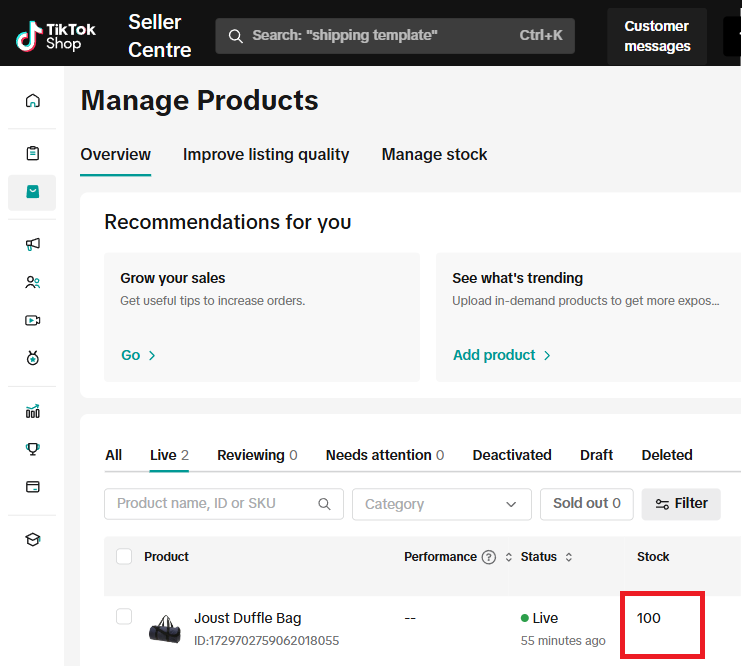
You can see the Joust Duffle Bag product is now created in Tiktok.you can run the product command to show orders in Magento

How to Update product in Tiktok
Updated the quantity of the Joust Duffle Bag to 100 in the Admin panel.
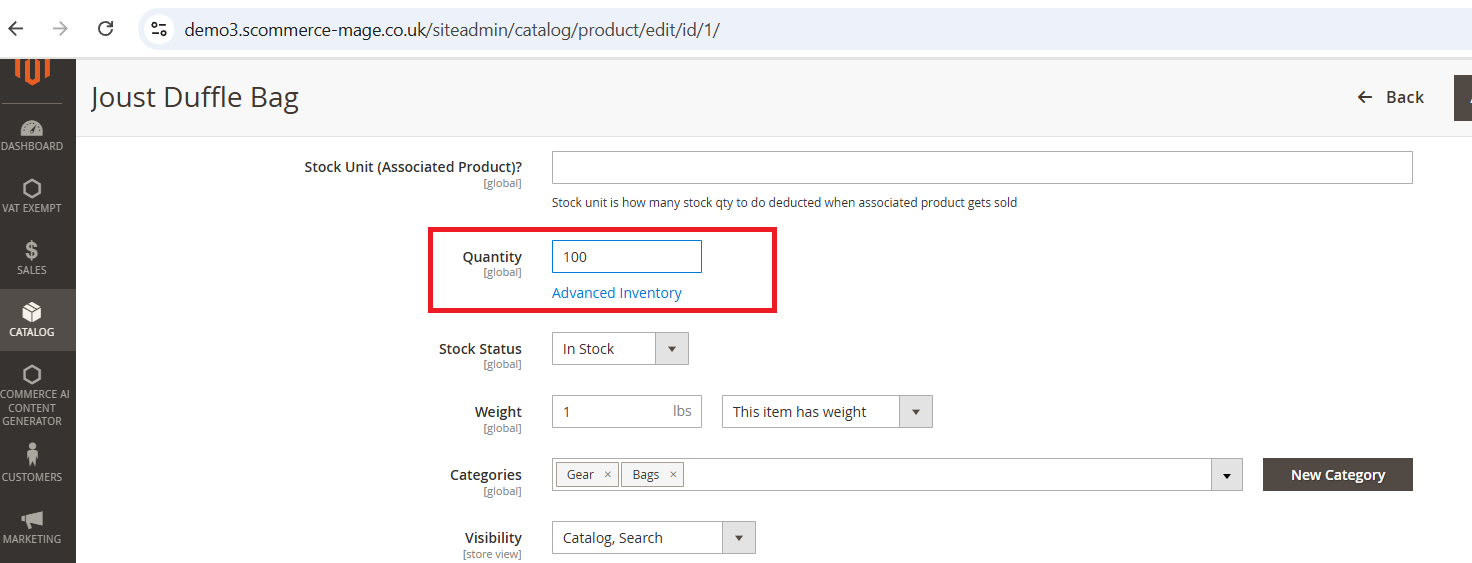
Then run the Tiktok Update product command on the server.
php bin/magento scommerce:tiktok:updateproducts
Once the command is executed, the product quantity in TikTok is updated to 100.
Create Orders in Tiktok and Import into Magento
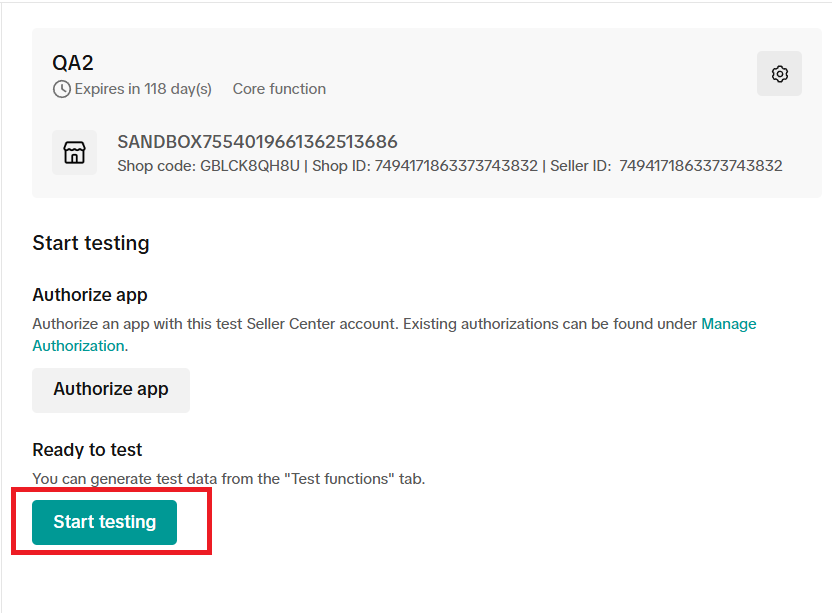
To place an order from TikTok, go to App and Services > Development Kits > Development Shops > Manage Accounts
Click on Start Testing
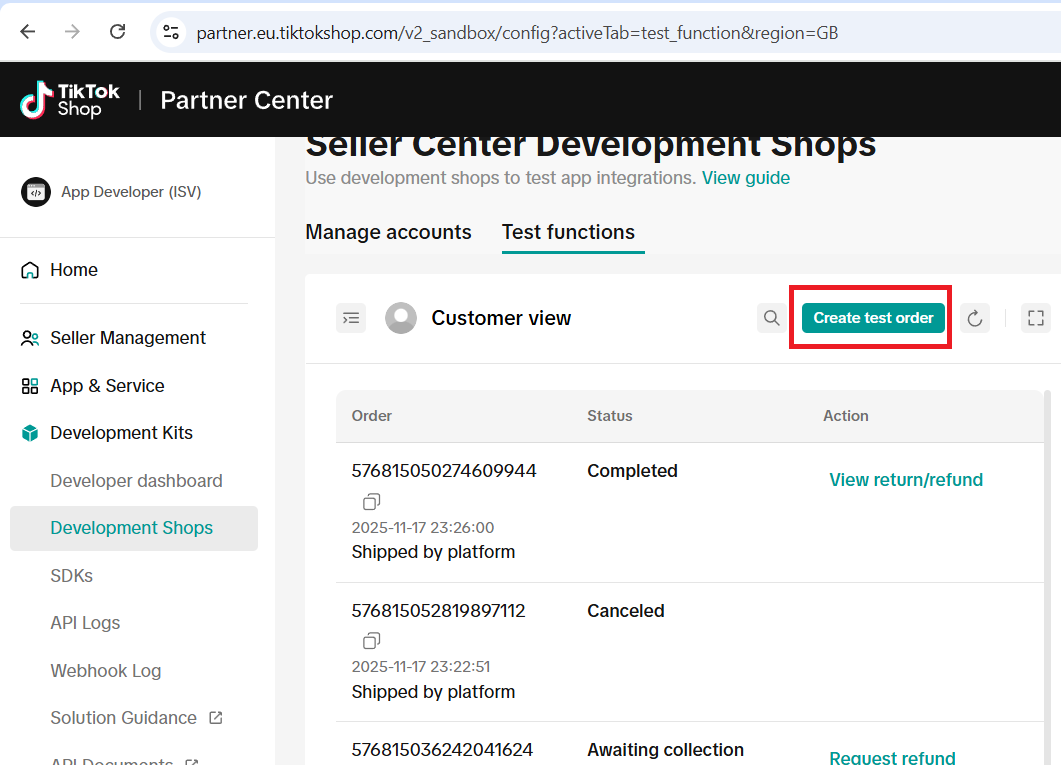
 Then Click on Test Order
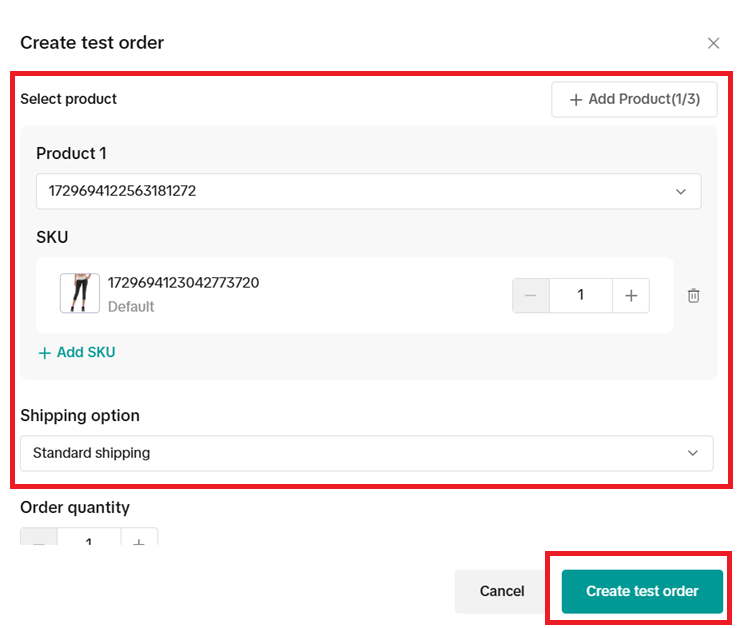
Select the product and shipping option, then click Submit. A new order will be created on TikTok.
Next, execute the order creation command to import orders into Magento.
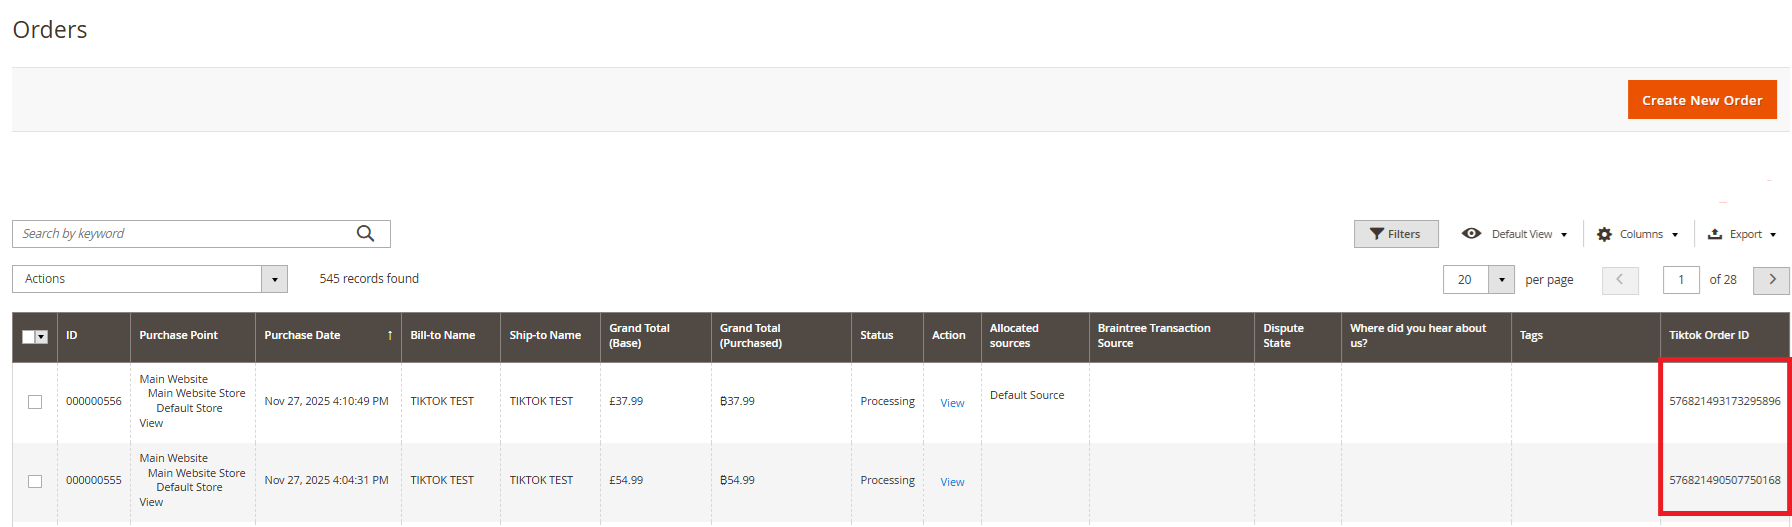
php bin/magento scommerce:tiktok:createordersTikTok orders are now imported in Magento, see the screenshot below.
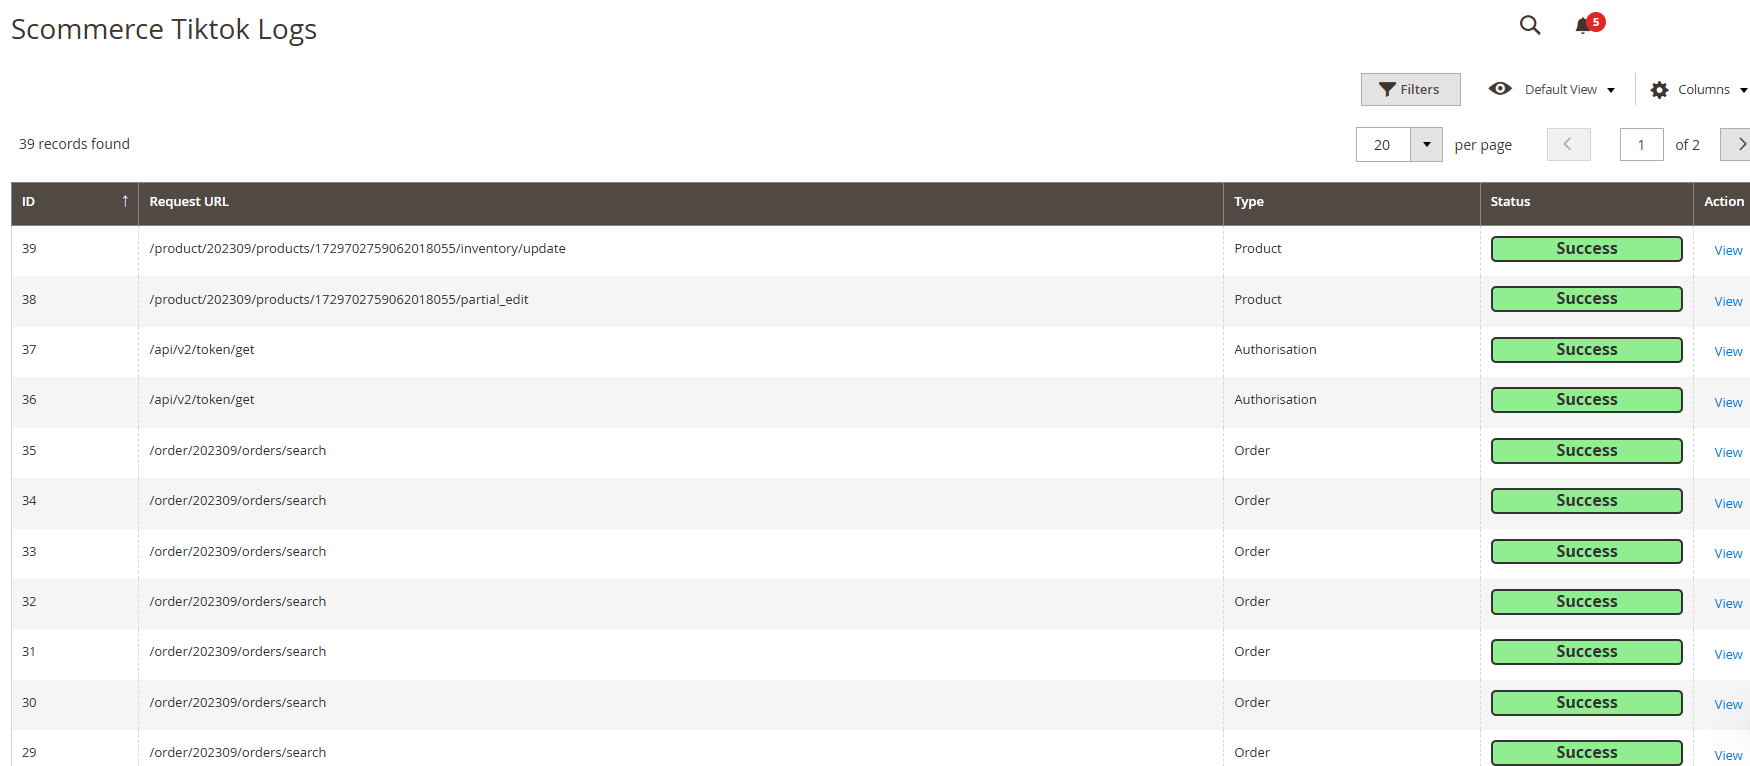
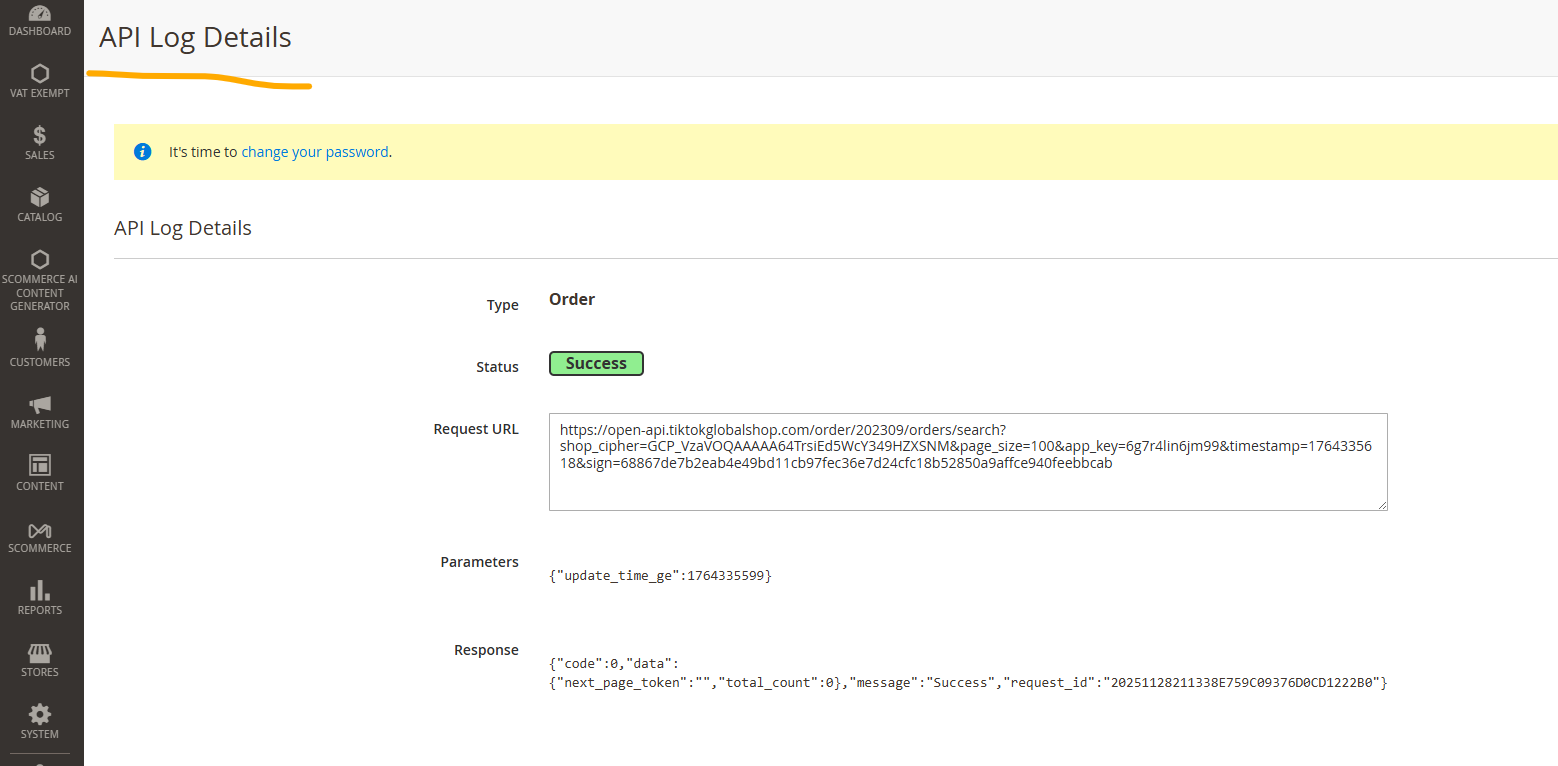
Tiktok API Logs
You can check the Scommerce TikTok Logs by navigating to Admin > System > Scommerce TikTok API Logs > Logs Table
Create Shipment in TikTok and Process Refund/Return
Steps to Create a Shipment and Process Refunds
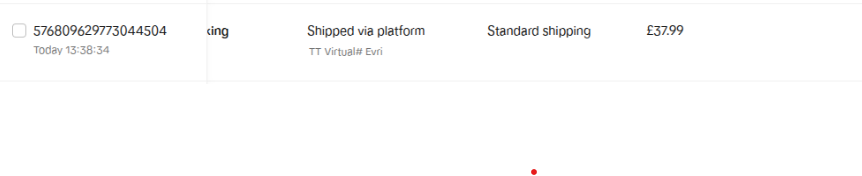
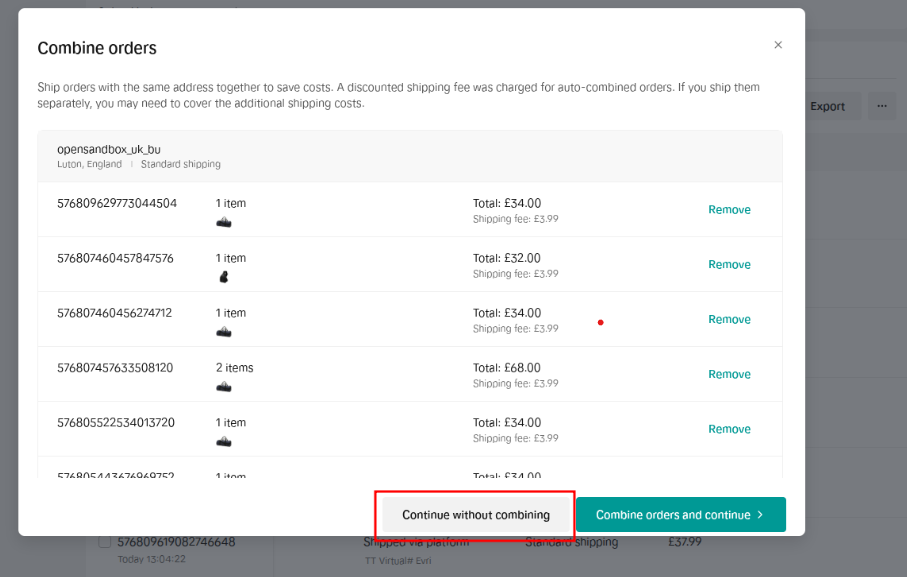
- Go to the TikTok Admin portal and create a shipment.
- On the right side, open the Create Label dropdown and select Continue without combining. The shipment will be created.
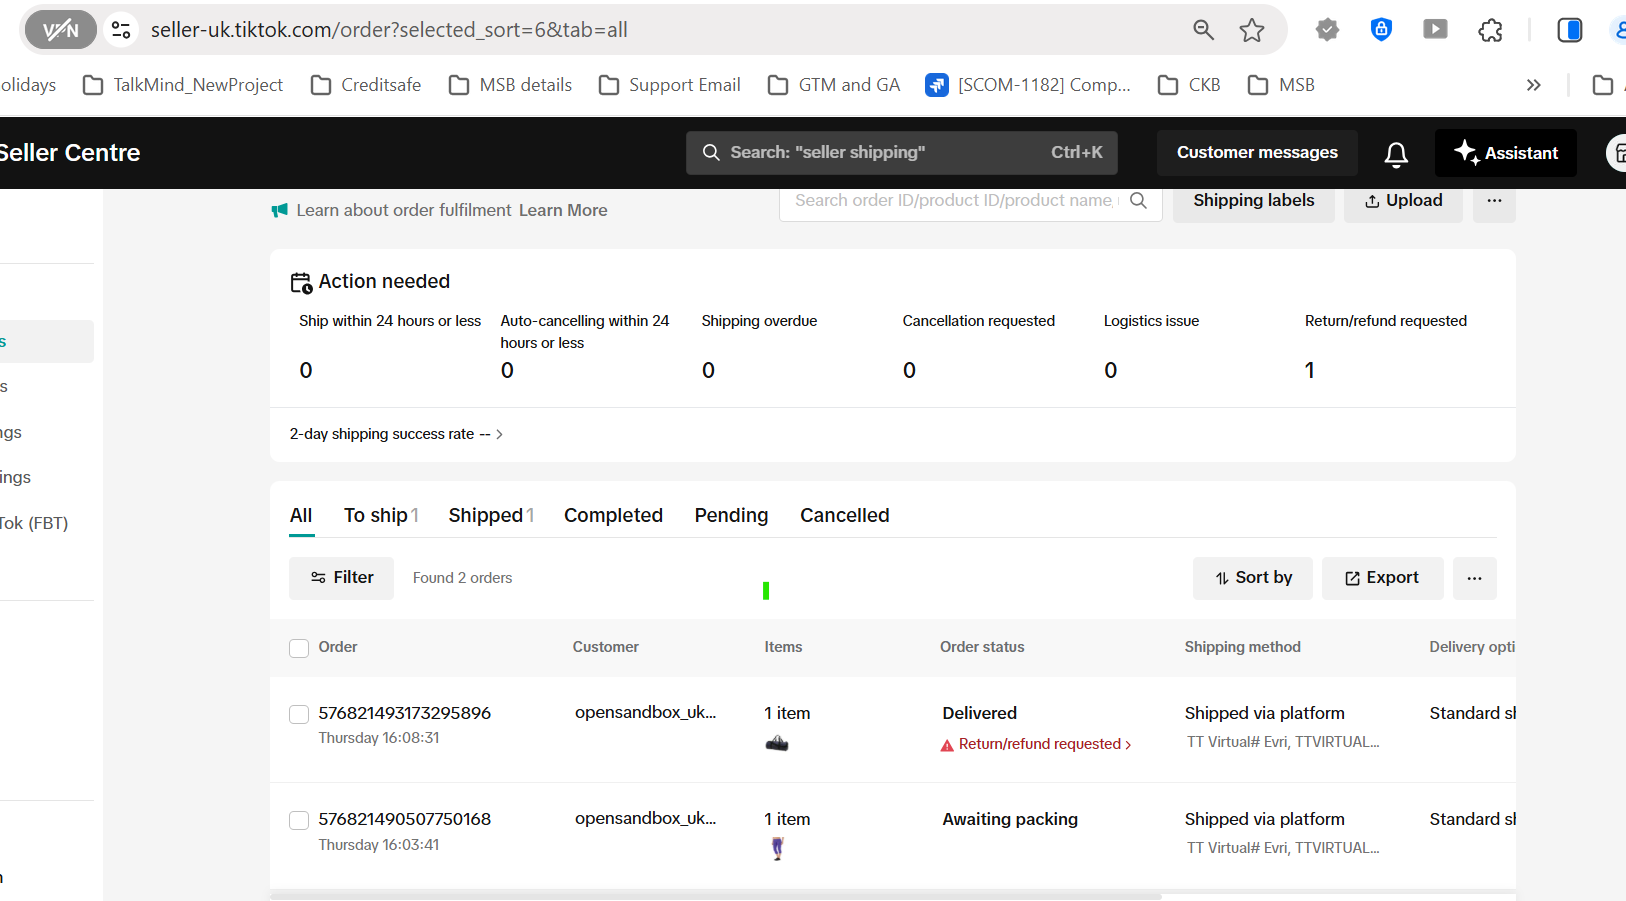
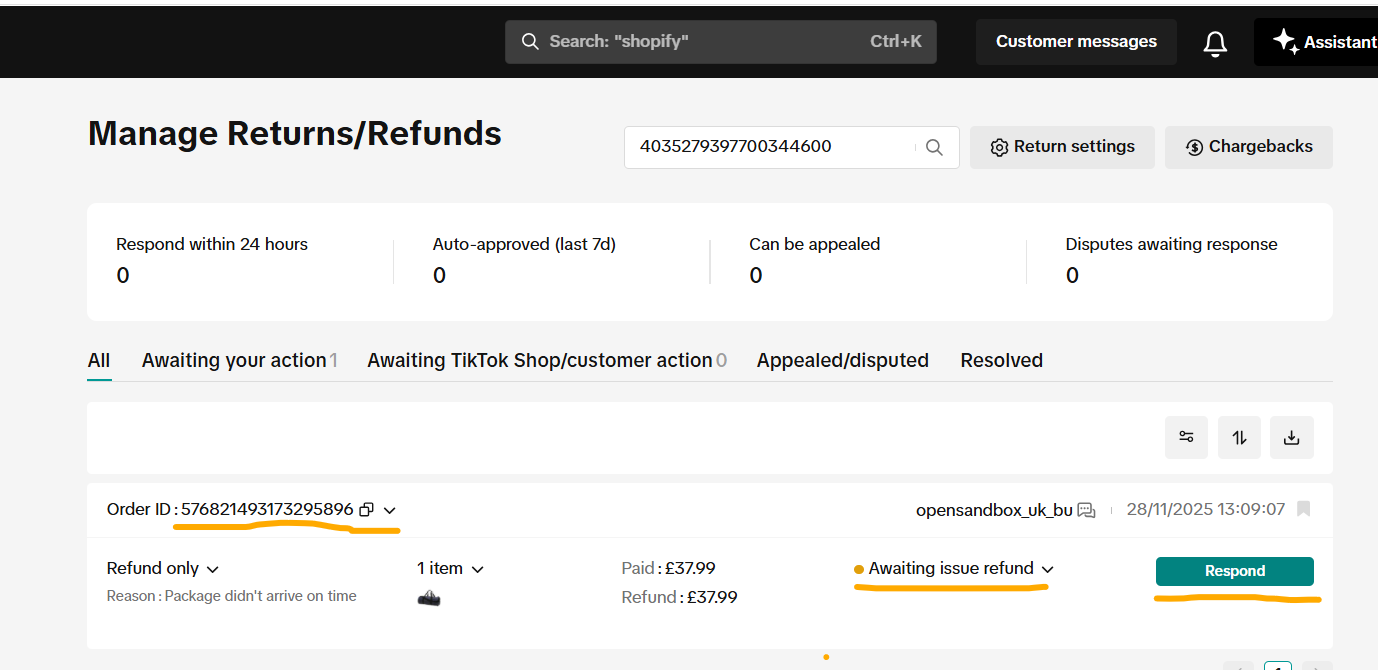
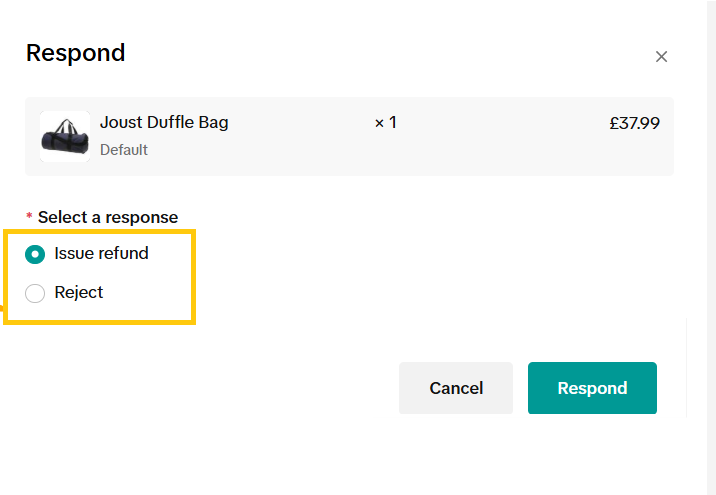
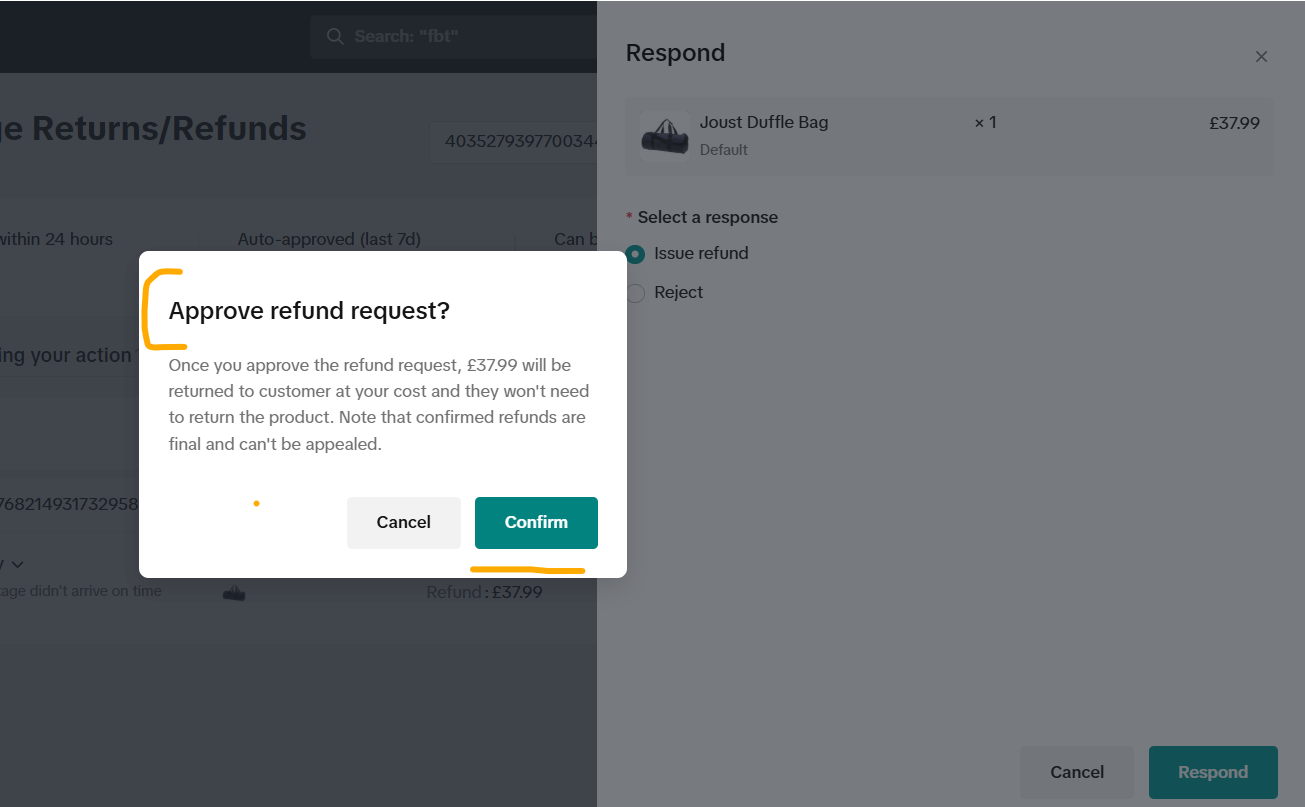
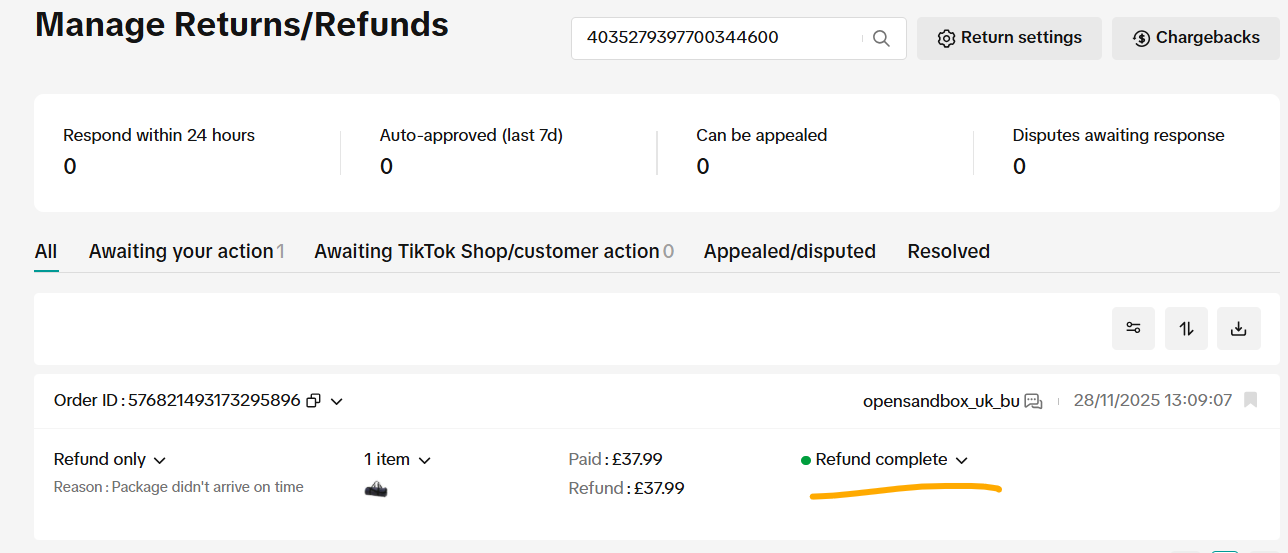
- If you request a refund after the shipment has been created, you must approve the refund from the Admin section and then submit the refund.
- Finally, run the order update command. The order status will then be updated in Magento 2.
php bin/magento scommerce:tiktok:updateorders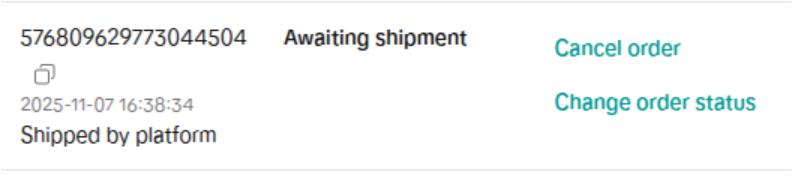


If you have a question related to this extension please check out our FAQ Section first. If you can't find the answer you are looking for then please contact support@scommerce-mage.com.