# Magento 2 TikTok Integration
### Installation and User Guide for Magento 2 Tiktok Integration Extension
****Table of Contents****
1. [**Installation**](#bkmrk-installation)
- **Installation via app/code**
- **Installation via Composer**
2. [**Configuration Settings for Tiktok Integration**](#bkmrk-configuration-settin)
- **General Settings**
- **Integration**
- **Product**
3. [**How to Test Products in Tiktok**](#bkmrk-installation)
4. [**How to place Order from Tiktok to Magento**](#bkmrk-installation)
### Installation
- ****Installation via app/code:**** Upload the content of the module to your root folder. This will not overwrite the existing Magento folder or files, only the new contents will be added. After the successful upload of the package, run below commands on Magento 2 root directory.```php
php bin/magento setup:upgrade
php bin/magento setup:di:compile
php bin/magento setup:static-content:deploy
```
- ****Installation via Composer:**** Please follow the guide provided in the below link to complete the installation via composer.
[https://docs.scommerce-mage.com/magento-2-extensions/installation-via-composer/installation-via-composer](https://docs.scommerce-mage.com/magento-2-extensions/installation-via-composer/installation-via-composer)
### Configuration Settings for Tiktok Integration
Go to ****Admin > Stores > Configuration > Scommerce Configuration > Tiktok Integration****
#### General Settings
- ****Enabled –**** Select "Yes" or "No" to enable or disable the module.
- ****License Key –**** Please add the license for the extension which is provided in the order confirmation email. Please note license keys are site URL specific. If you require license keys for dev/staging sites then please email us at .
[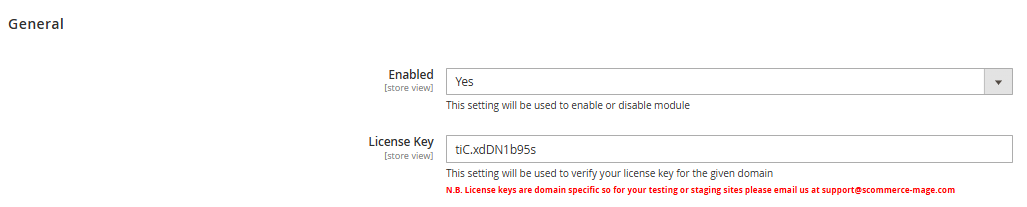](https://docs.scommerce-mage.com/uploads/images/gallery/2025-10/ZXZimage.png)
#### Integration
- ****Environment –**** Please select either 'Developer' or 'Production' as the environment from the configuration settings.
- ****App key -**** Please add the App key.
- ****App Secret**** ****-**** Please add the App Secret.
- ****Shop ID -**** Please add the Shop ID.
- ****Warehouse ID -**** Please add the Warehouse ID.
- ****Purge Log -**** Select either 'Yes' or 'No'. Choosing 'Yes' will enable the purging of log data from the database.
- ****Retention Days -**** Please specify the number of days for which you would like to retain log data in the database.
- ****Cron Job -**** This allows you to define a schedule for how often the logs should be purged.
[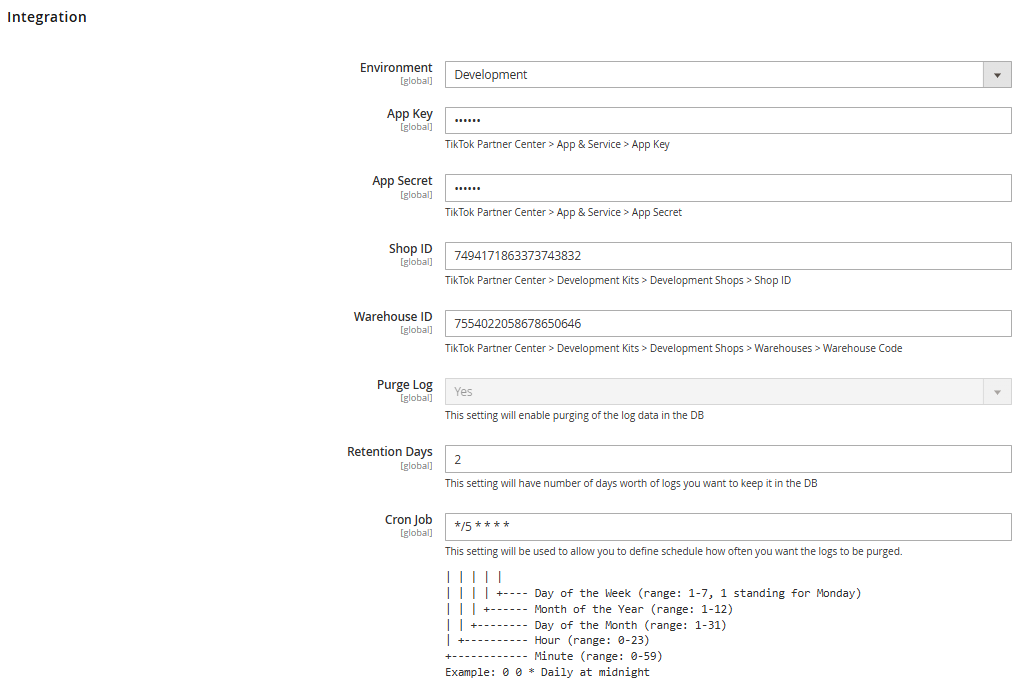](https://docs.scommerce-mage.com/uploads/images/gallery/2025-10/KYVimage.png)
#### Product
- ****Width -**** Please select the attribute that will be used to define the width.
- ****Length -**** Please select the attribute that will be used to define the length.
- ****Height -**** Please select the attribute that will be used to define the height.
- ****Unit System -**** Please select the unit system to be used for dimensions and weight. 'Imperial' refers to POUND and INCH, while 'Metric' refers to KILOGRAM (or GRAM) and CENTIMETER.
- ****Weight in Gram**** - Select either 'Yes' or 'No'. If you choose 'Yes', the weight should be entered in grams. If you choose 'No', the weight should be entered in kilograms.
- ****Source Code -**** Please enter the source code to synchronize stock with TikTok Shop, if Multi-Source Inventory (MSI) is enabled for your store.
[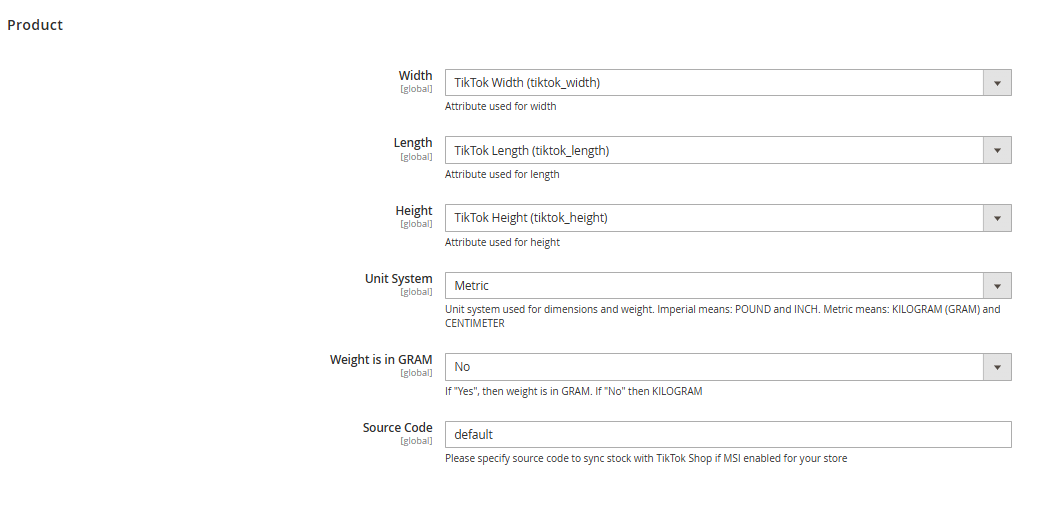](https://docs.scommerce-mage.com/uploads/images/gallery/2025-10/XVcimage.png)
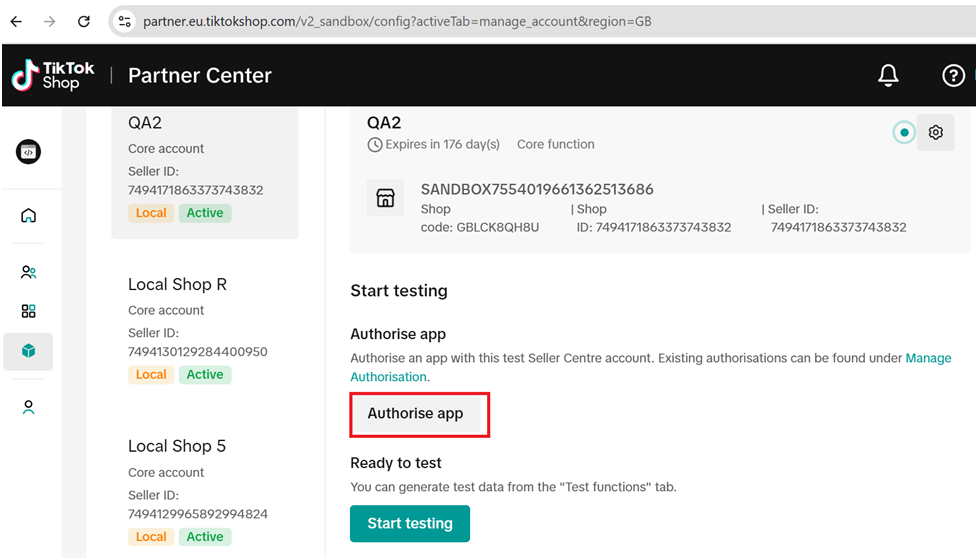
#### ****How to Create Products in Tiktok****
To create products in TikTok, go to **App and Services > Development Kits > Development Shops > Manage Accounts**
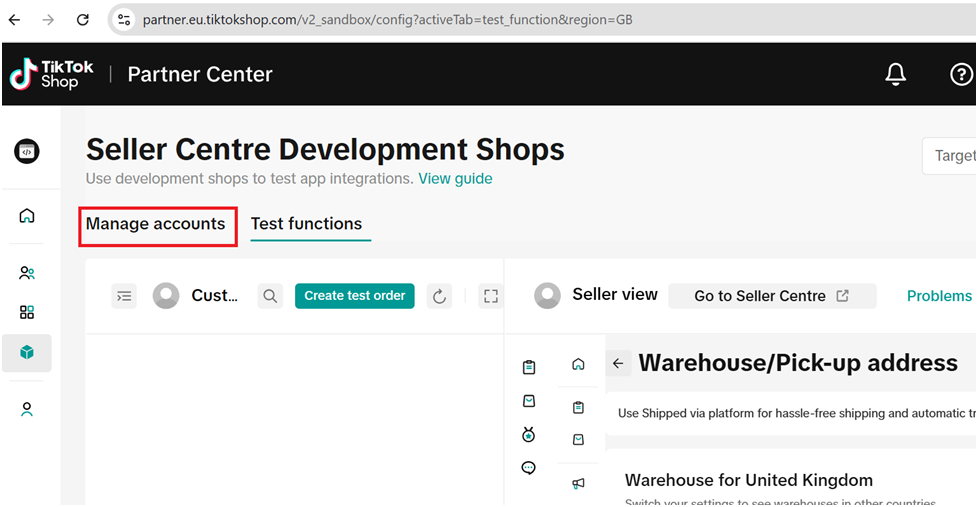
Click on Authorise app
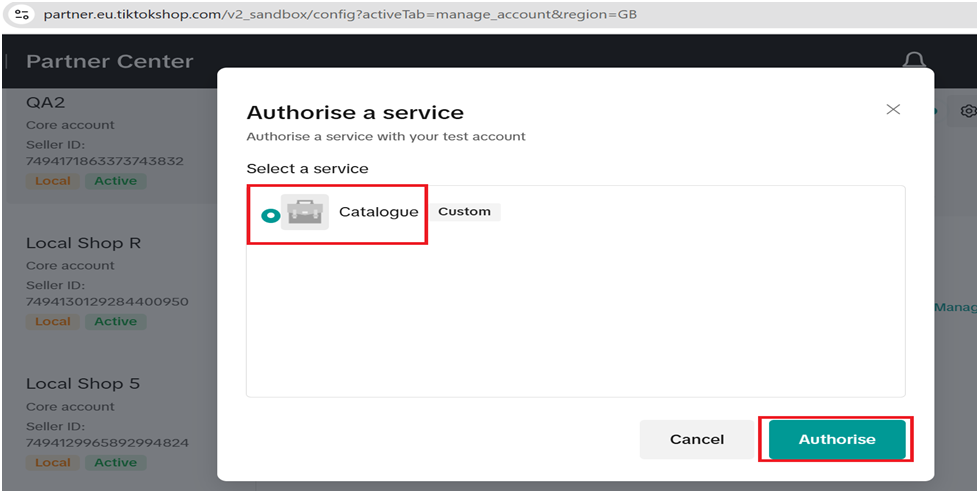
Check the Catalogue > click on Authorise
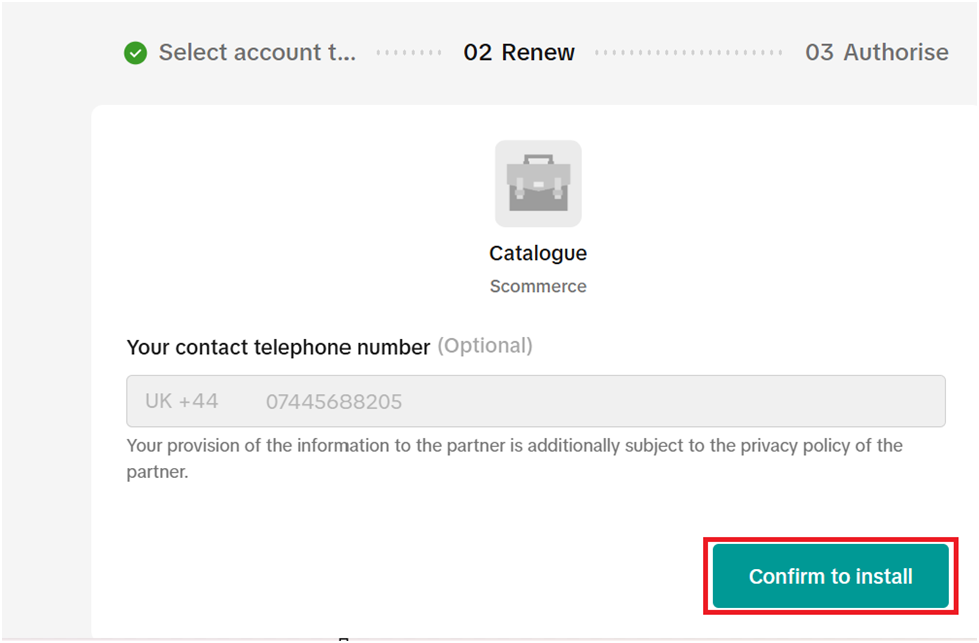
Click ok Confirm to install
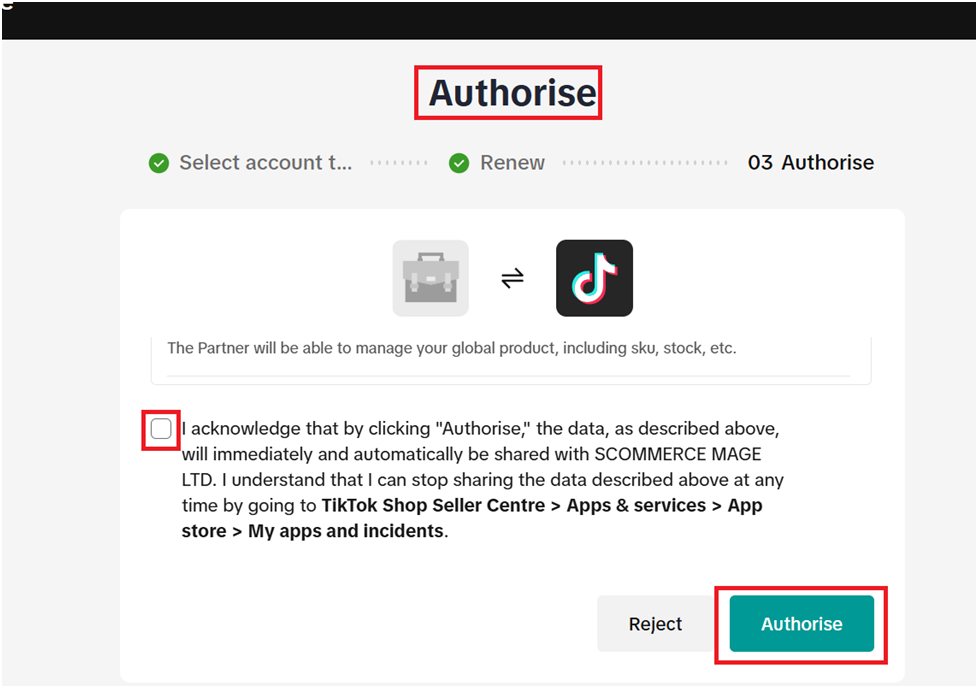
Check the terms and conditions block > Click on Authorise
Navigate to **Admin > Catalog > Product > Strive Shoulder Pack.** Select any product, click Edit, then go to the TikTok section and set the attribute 'Is TikTok product?' to 'Yes'
[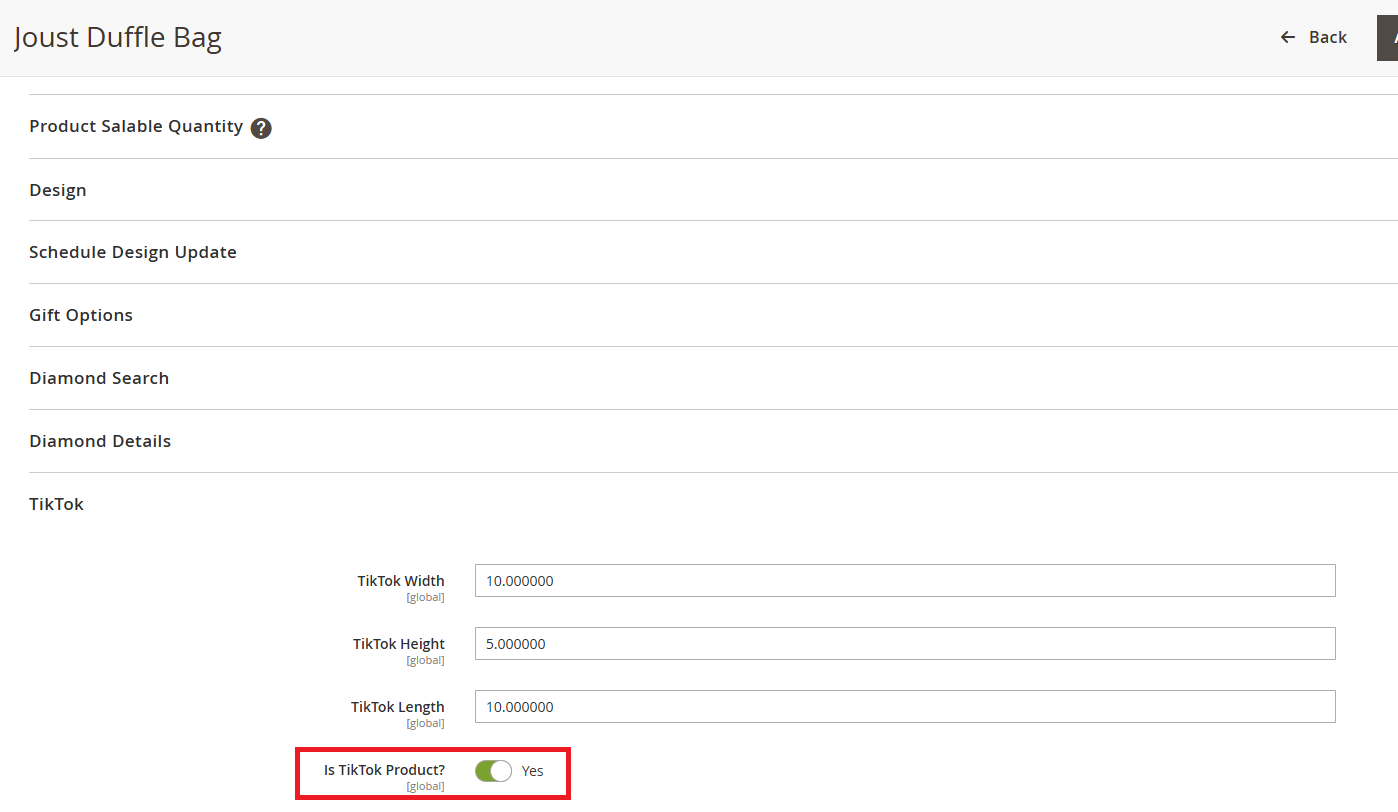](https://docs.scommerce-mage.com/uploads/images/gallery/2025-11/UL0image.png)
Then, run the following command to import the product(s) on Tiktok:
```
php bin/magento scommerce:tiktok:createproducts
```
Once the product setup is complete, go to **TikTok > Manage Accounts**, click Start Testing, and then select Manage Products as shown in the image below.
[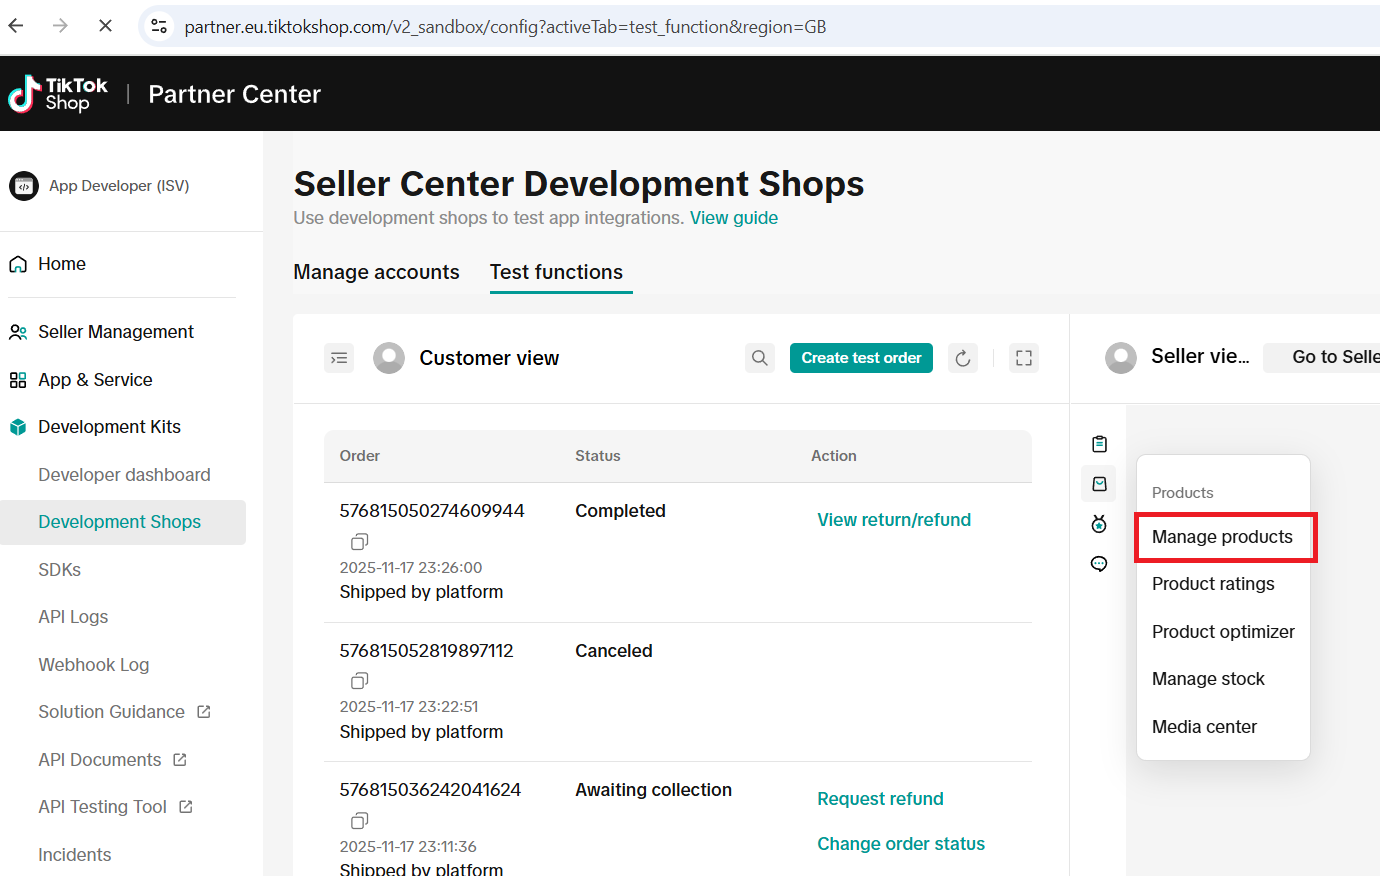](https://docs.scommerce-mage.com/uploads/images/gallery/2025-11/H7gimage.png)
You can see the Joust Duffle Bag product is now created in Tiktok.you can run the product command to show orders in Magento
[](https://docs.scommerce-mage.com/uploads/images/gallery/2025-11/Cyfimage.png)
#### **How to Update product in Tiktok**
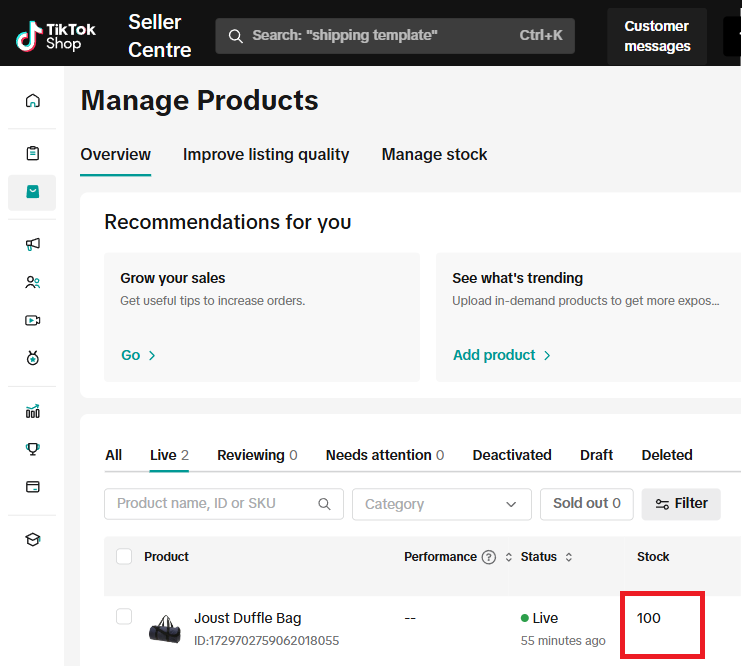
Updated the quantity of the Joust Duffle Bag to 100 in the Admin panel.
[](https://docs.scommerce-mage.com/uploads/images/gallery/2025-11/fpeimage.png)
Then run the Tiktok Update product command on the server.
```
php bin/magento scommerce:tiktok:updateproducts
```
[](https://docs.scommerce-mage.com/uploads/images/gallery/2025-11/8Jmimage.png)
Once the command is executed, the product quantity in TikTok is updated to 100.
[](https://docs.scommerce-mage.com/uploads/images/gallery/2025-11/ds2image.png)
#### ****Create Orders in Tiktok and Import into Magento****
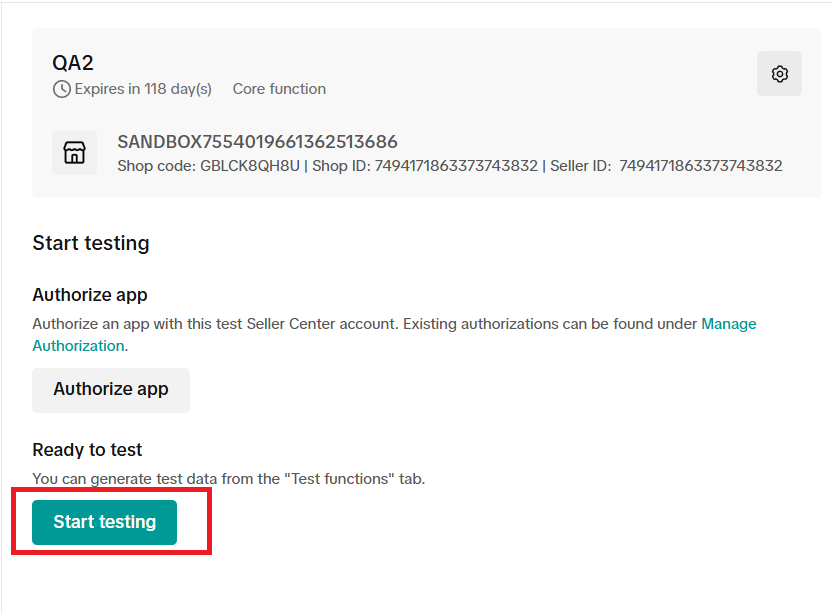
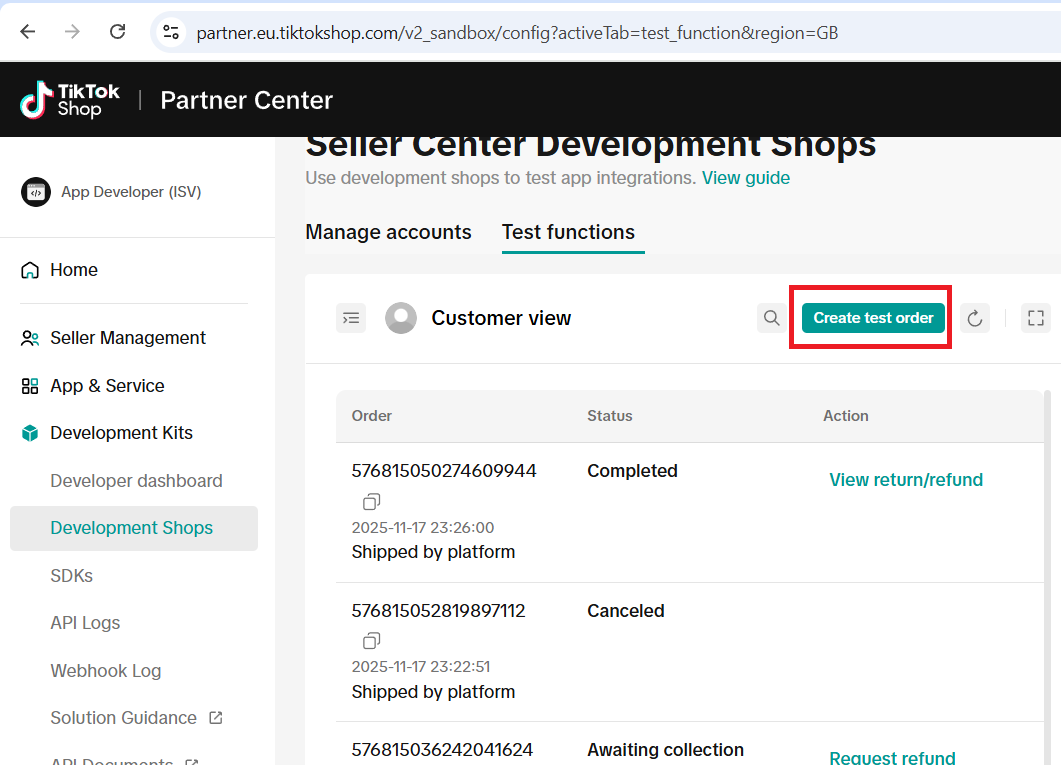
To place an order from TikTok, go to **App and Services > Development Kits > Development Shops > Manage Accounts**

Click on Start Testing
[](https://docs.scommerce-mage.com/uploads/images/gallery/2025-11/13aimage.png)Then Click on Test Order
[](https://docs.scommerce-mage.com/uploads/images/gallery/2025-11/opjimage.png)
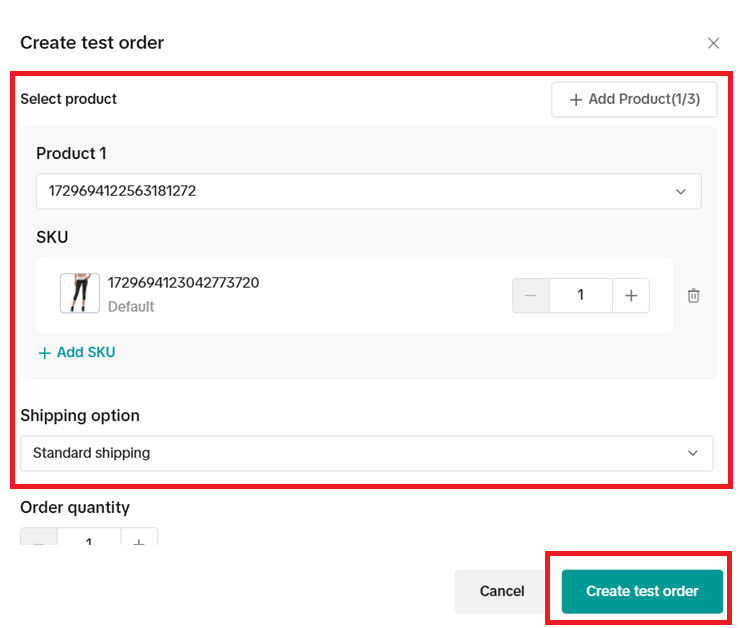
Select the product and shipping option, then click Submit. A new order will be created on TikTok.
[](https://docs.scommerce-mage.com/uploads/images/gallery/2025-11/COpimage.png)
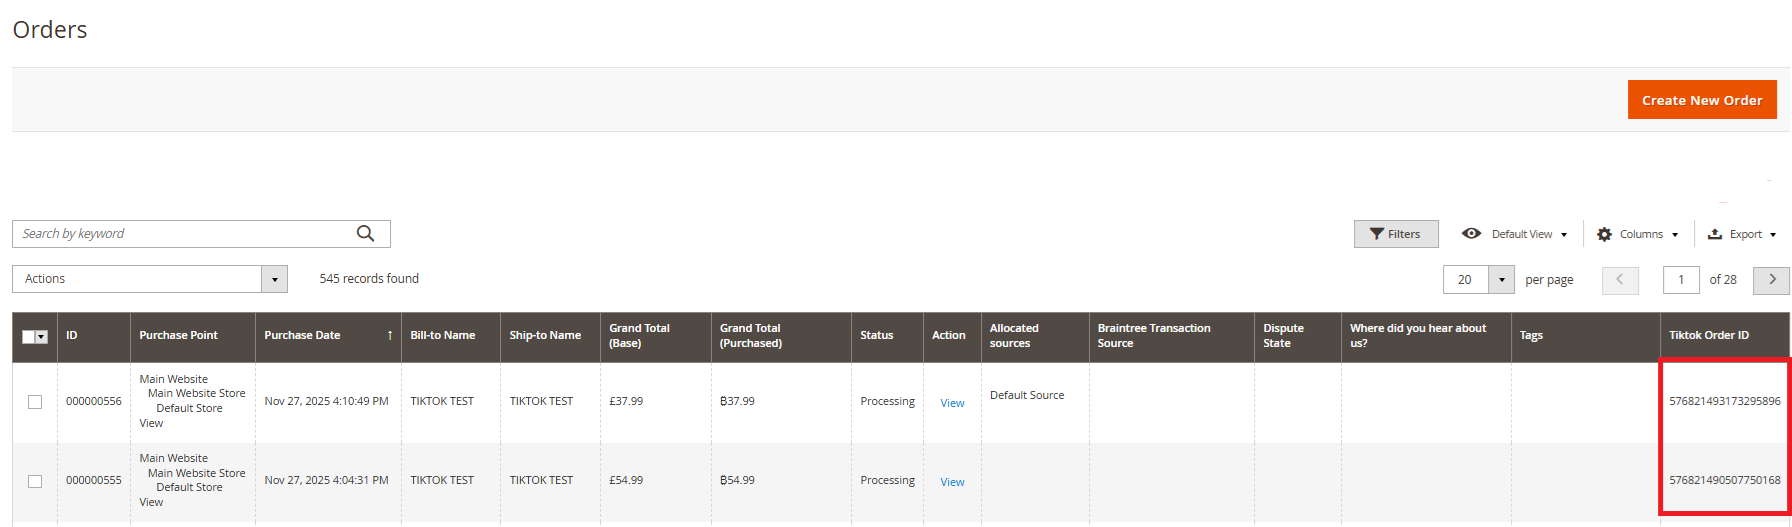
Next, execute the order creation command to import orders into Magento.
```
php bin/magento scommerce:tiktok:createorders
```
TikTok orders are now imported in Magento, see the screenshot below.
[](https://docs.scommerce-mage.com/uploads/images/gallery/2025-11/mD3image.png)
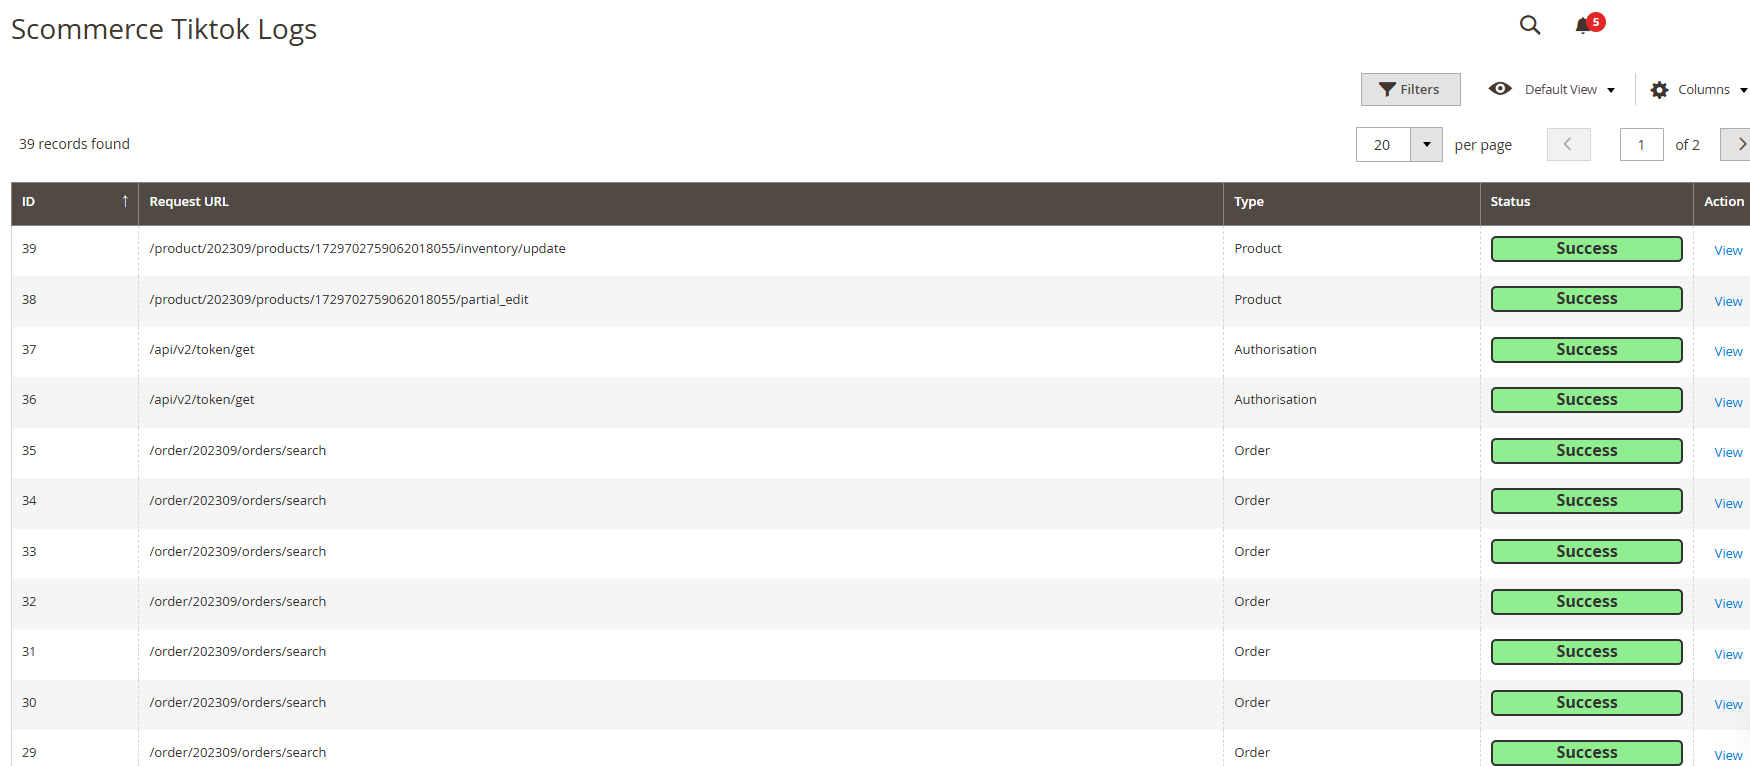
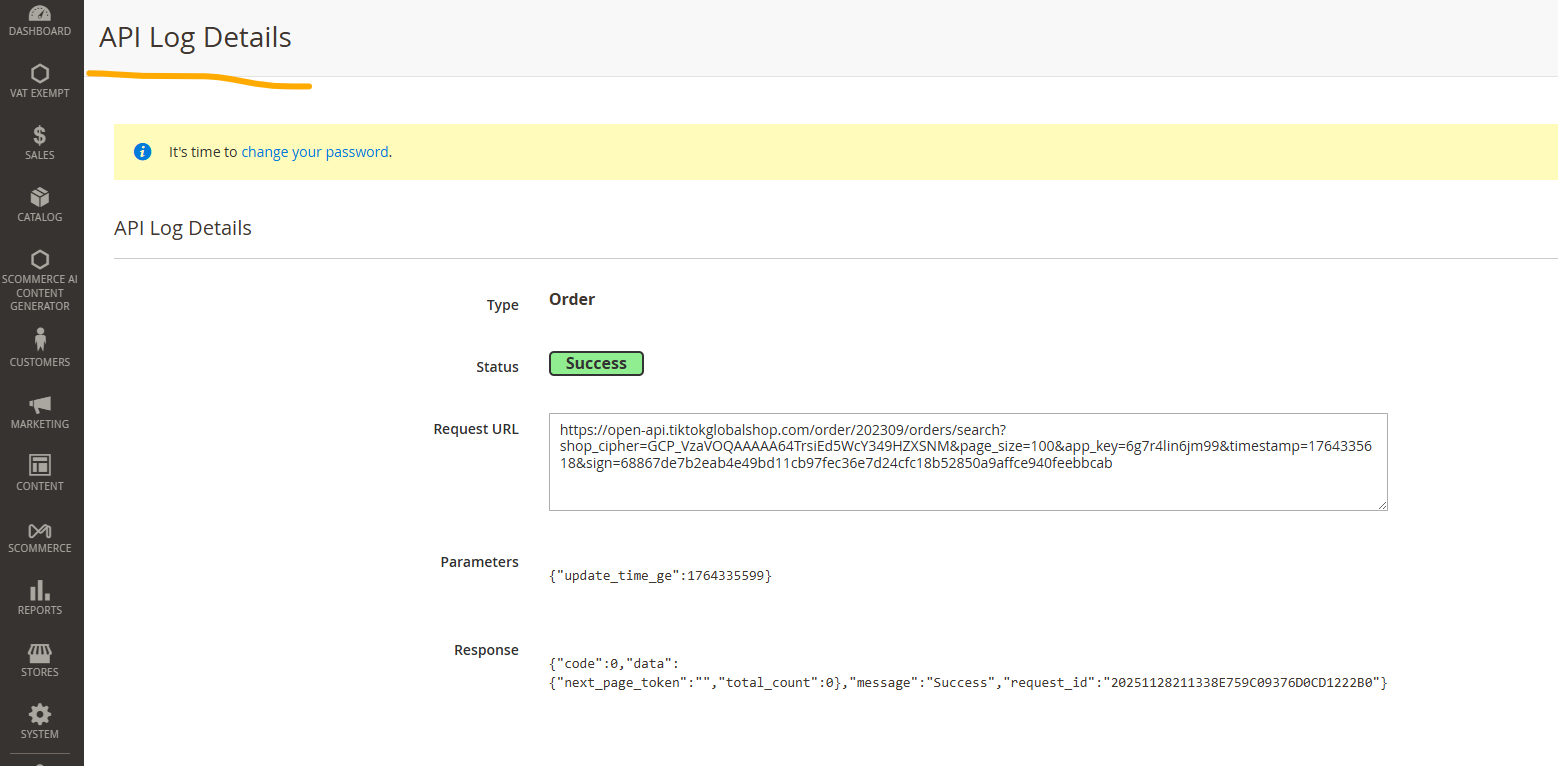
#### **Tiktok API Logs**
You can check the **Scommerce TikTok Logs** by navigating to **Admin > System > Scommerce TikTok API Logs > Logs Table**
[](https://docs.scommerce-mage.com/uploads/images/gallery/2025-11/pJvimage.png)
[](https://docs.scommerce-mage.com/uploads/images/gallery/2025-11/image-2025-11-28t190519-502.png)
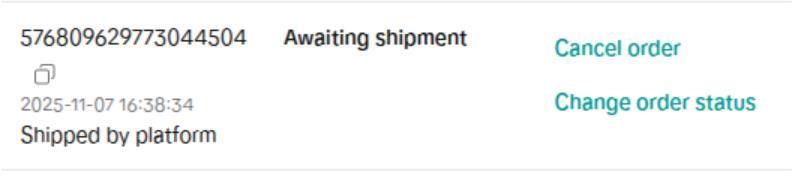
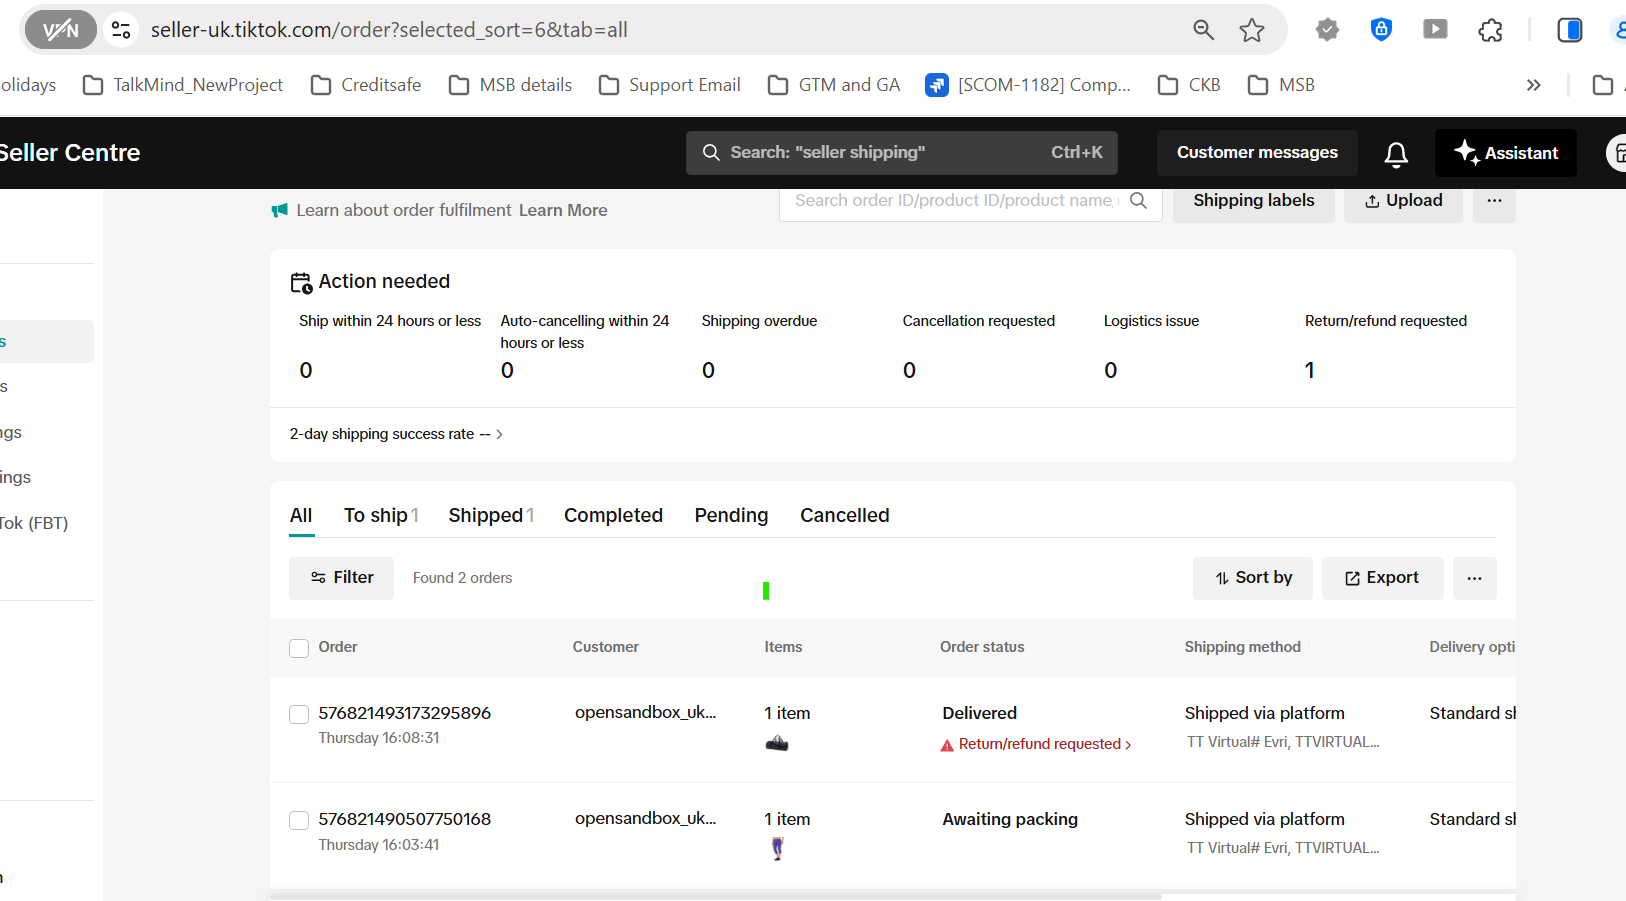
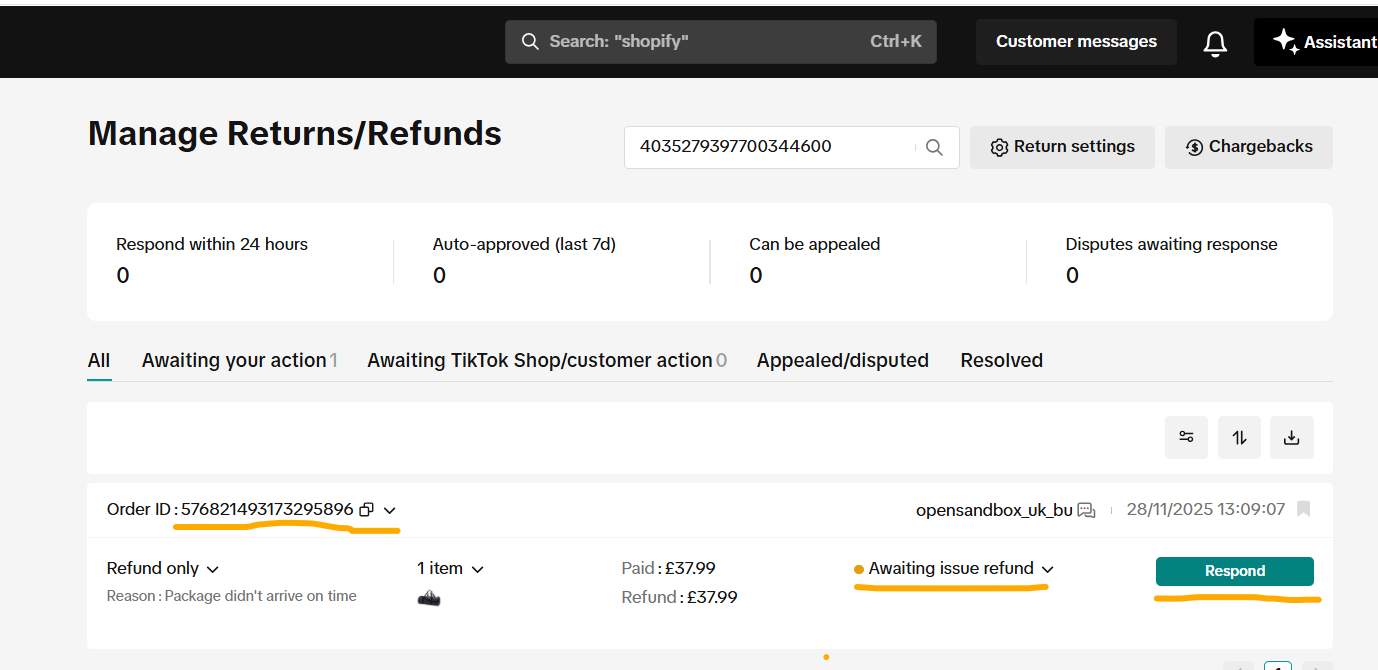
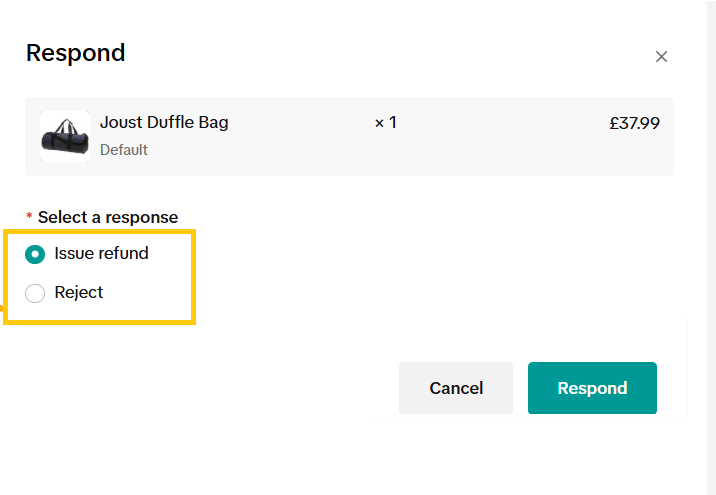
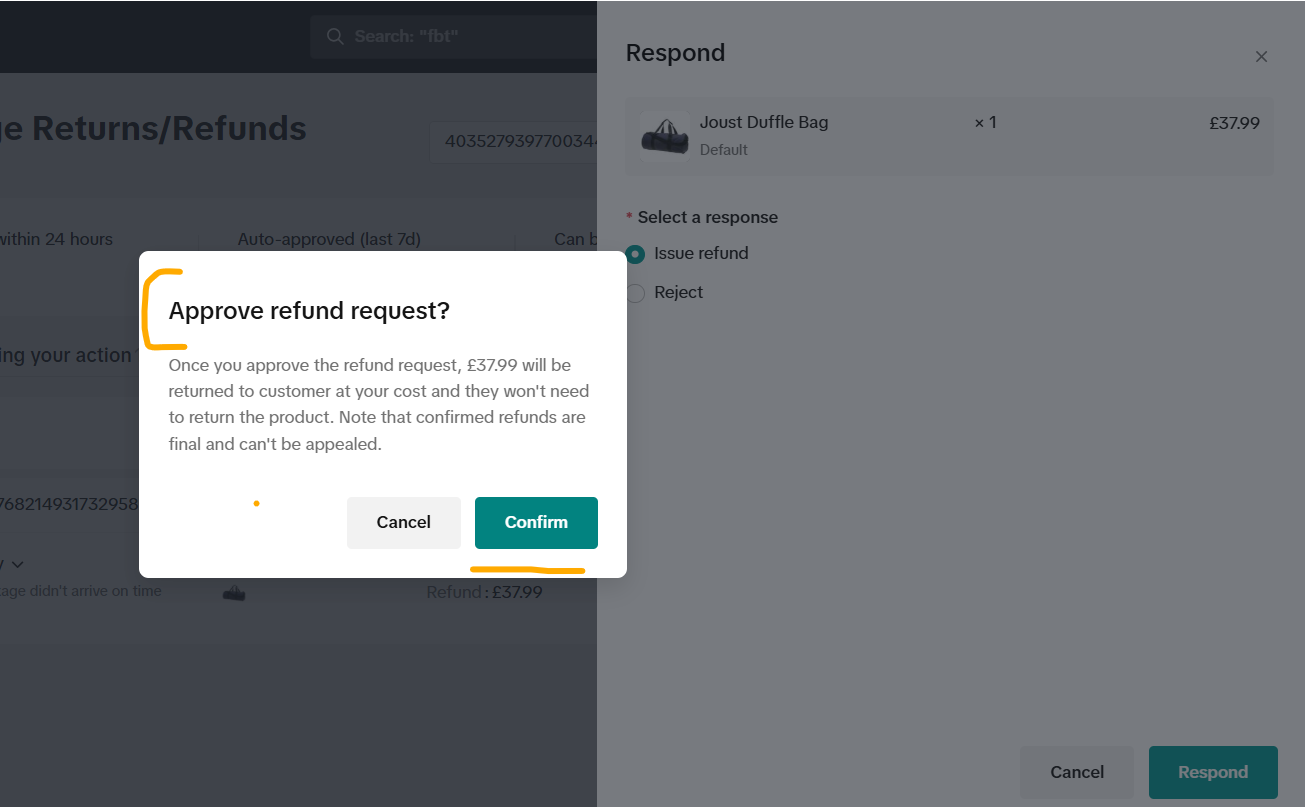
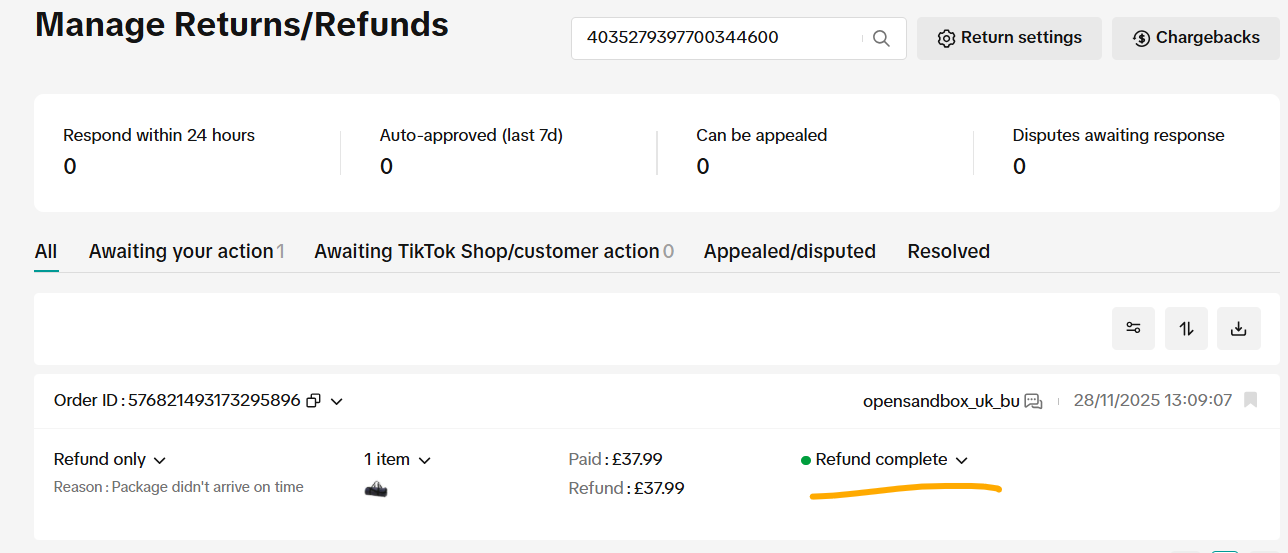
#### **Create Shipment in TikTok and Process Refund/Return**
**Steps to Create a Shipment and Process Refunds**
1. Go to the TikTok Admin portal and create a shipment.
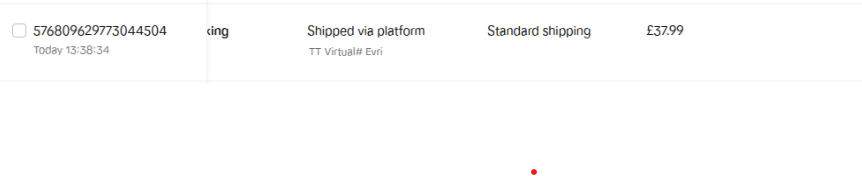
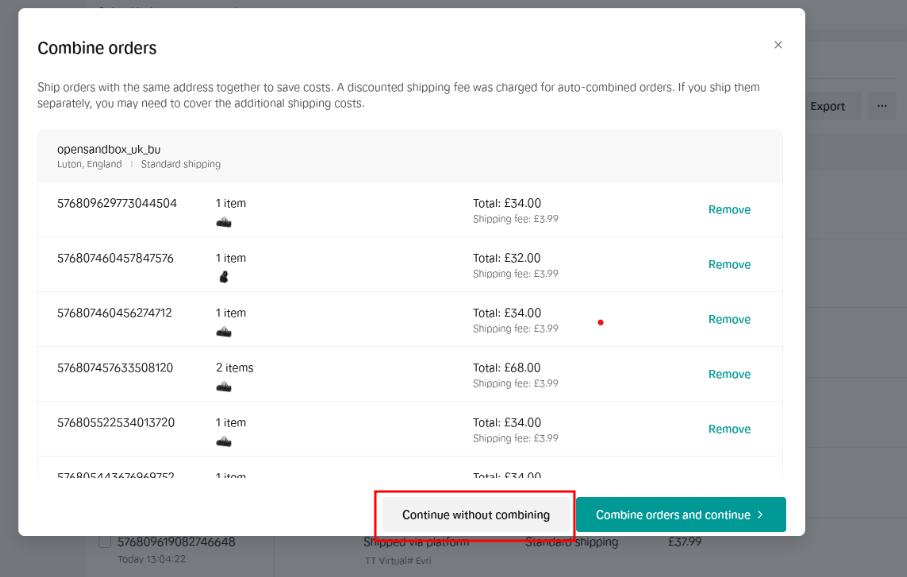
2. On the right side, open the Create Label dropdown and select Continue without combining. The shipment will be created.
3. If you request a refund after the shipment has been created, you must approve the refund from the Admin section and then submit the refund.
4. Finally, run the order update command. The order status will then be updated in Magento 2.
```
php bin/magento scommerce:tiktok:updateorders
```
[](https://docs.scommerce-mage.com/uploads/images/gallery/2025-12/image-2025-12-17t155601-107.jpg)
[](https://docs.scommerce-mage.com/uploads/images/gallery/2025-12/image-2025-12-17t155629-864.png)
[](https://docs.scommerce-mage.com/uploads/images/gallery/2025-12/image-2025-12-17t155653-649.png)[](https://docs.scommerce-mage.com/uploads/images/gallery/2025-12/image-2025-12-17t155714-897.png)
[](https://docs.scommerce-mage.com/uploads/images/gallery/2025-12/image-2025-12-01t133459-497.png)
[](https://docs.scommerce-mage.com/uploads/images/gallery/2025-12/image-2025-12-01t133513-439.png)
[](https://docs.scommerce-mage.com/uploads/images/gallery/2025-12/ebIimage.png)
[](https://docs.scommerce-mage.com/uploads/images/gallery/2025-12/image-2025-12-01t133829-561.png)
[](https://docs.scommerce-mage.com/uploads/images/gallery/2025-12/image-2025-12-01t133530-222.png)
[](https://docs.scommerce-mage.com/uploads/images/gallery/2025-12/image.png)
If you have a question related to this extension please check out our [****FAQ Section****](https://www.scommerce-mage.com/magento-2-how-did-you-hear-about-us.html#customfaq) first. If you can't find the answer you are looking for then please contact [****support@scommerce-mage.com****](mailto:core@scommerce-mage.com)****.****