Payment and Shipping Extensions
- Magento 2 Product Handling or Additional Fee
- Magento 2 Surcharge or Additional Fee
- Magento 2 Delivery Instructions and Delivery Date
- Magento 2 Shipping Carrier Tracker
Magento 2 Product Handling or Additional Fee
Installation and User Guide for Magento 2 Product Handling or Additional Fee Extension
Table of Contents
- Installation
- Installation via app/code
- Installation via Composer
- Configuration Settings for Handling Fee
- General Settings
- Handling Fee on Order Detail View Page
- Add Handling Fee at Product Level
- Add Handling Fee at Product Level(Tiered Pricing)
- Front-end Site View
- Handling Fee on Cart Page
- Handling Fee On Checkout Page
- Handling Fee for a Product with Tiered Pricing(Configurable Product)
- Handling Fee for a Product with Tiered Pricing at (Simple Product)
Installation
-
Installation via app/code: Upload the content of the module to your root folder. This will not overwrite the existing Magento folder or files, only the new contents will be added. After the successful upload of the package, run below commands on Magento 2 root directory.
php bin/magento setup:upgrade php bin/magento setup:di:compile php bin/magento setup:static-content:deploy -
Installation via Composer: Please follow the guide provided in the below link to complete the installation via composer.
Configuration Settings for Handling Fee
Go to Admin > Stores > Configuration > Scommerce Configuration > Handling Fee
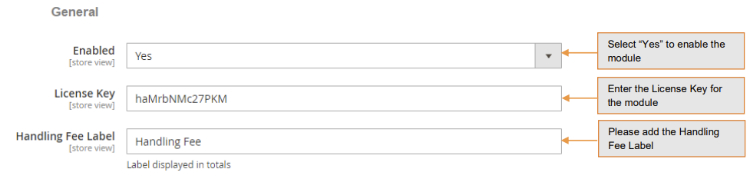
General Settings
-
Enabled – Select "Yes" or "No" to enable or disable the module.
-
License Key – Please add the license for the extension which is provided in the order confirmation email. Please note license keys are site URL specific. If you require license keys for dev/staging sites then please email us at support@scommerce-mage.com.
-
Handling Fee Label – Please add the label displayed in totals.
-
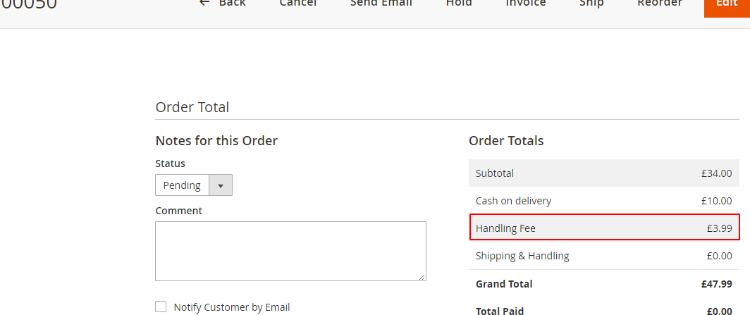
Handling Fee on Order Detail View Page - You can see the handling fee under "Order Totals" section from Admin > Sales > Orders > Select Order > View
-
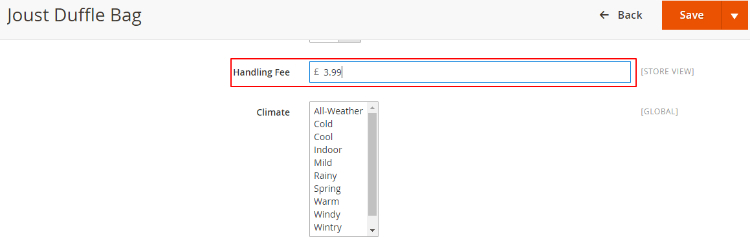
Add Handling Fee at Product Level - To add handling fee go to, Admin > Catalog > Products > Select Product > Handling Fee.
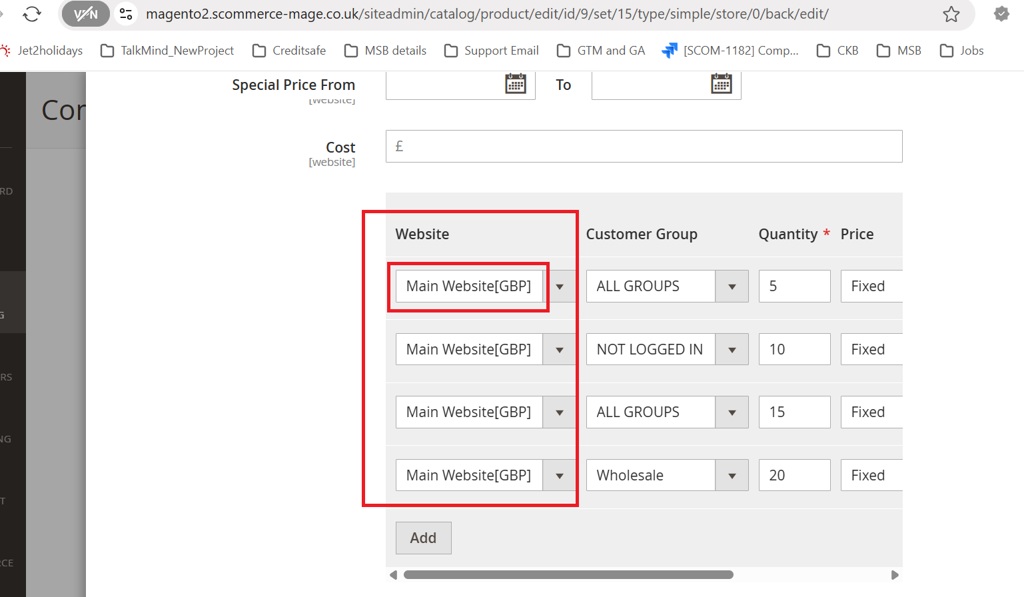
- Add Handling Fee at Product Level (Tiered Pricing) - To add handling fee go to, Admin > Catalog > Products > Select Product > Handling Fee > Price >Advanced Pricing.
- Select website
- Select Customer Group
- Define Quantity
- Price
- Handling fee
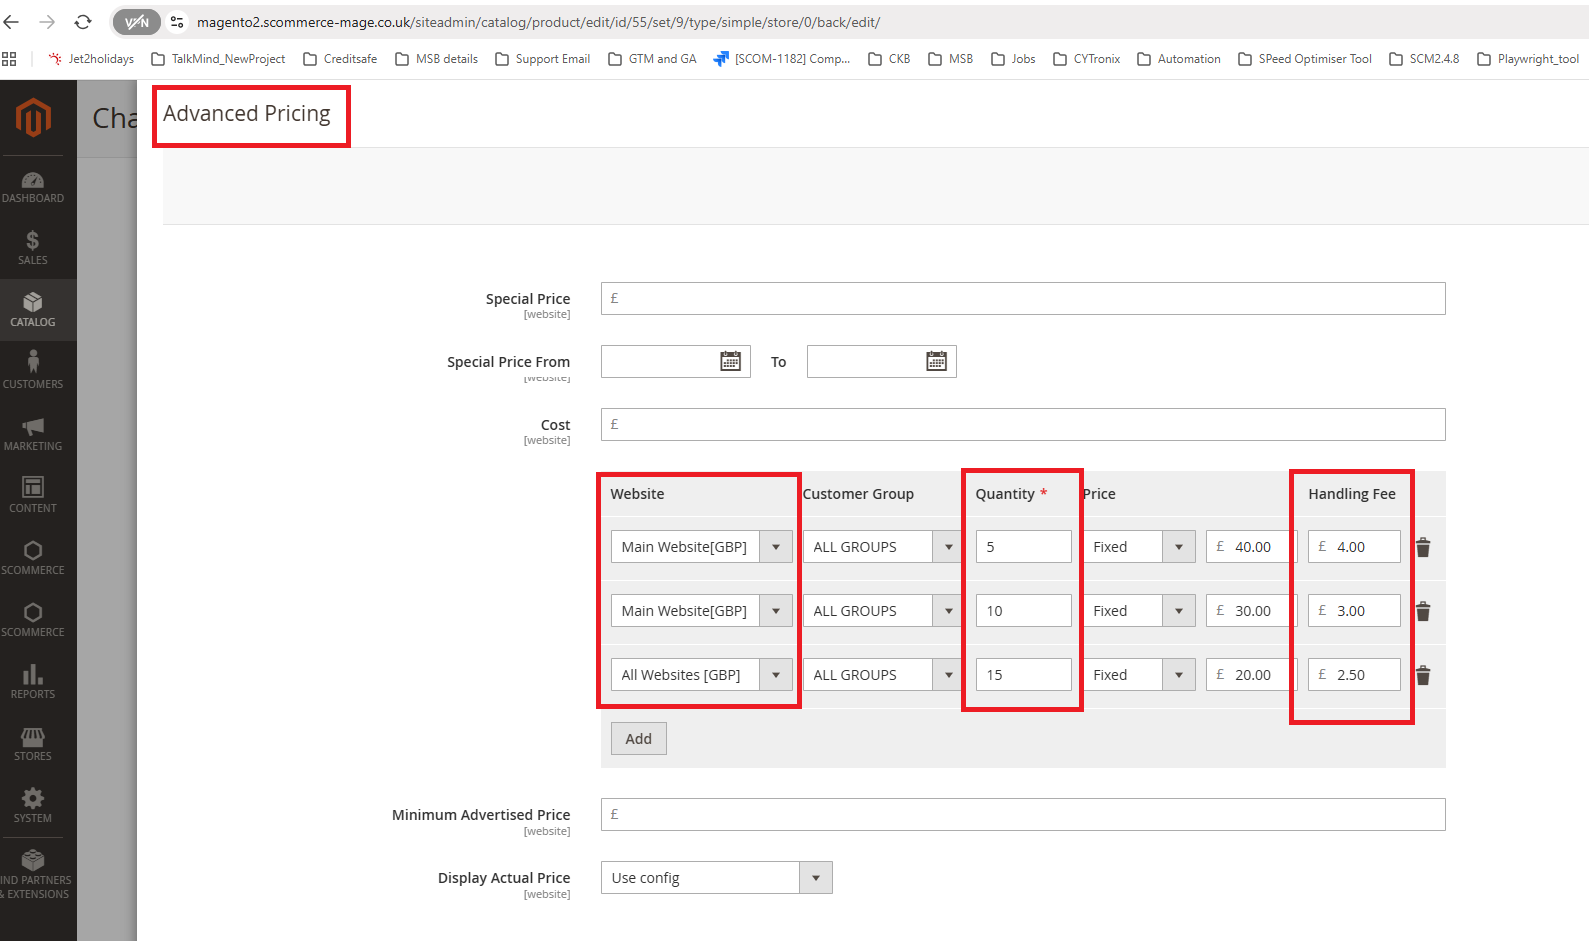
Note:- If you are on Older version of Magento for eg: M2.3.3. then you must select the 'Main Website [GBP]' option under 'Website' when setting tier prices.
Front-end Site View
-
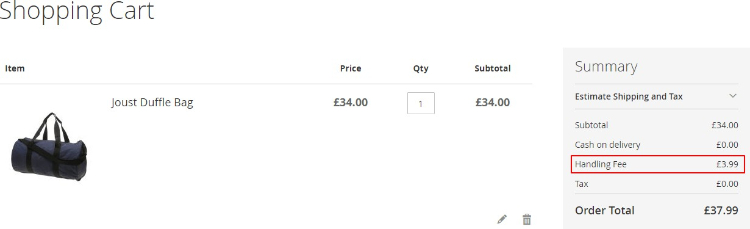
Handling Fee on Cart Page - In the below image you can see the handling fee under "Summary" section.
-
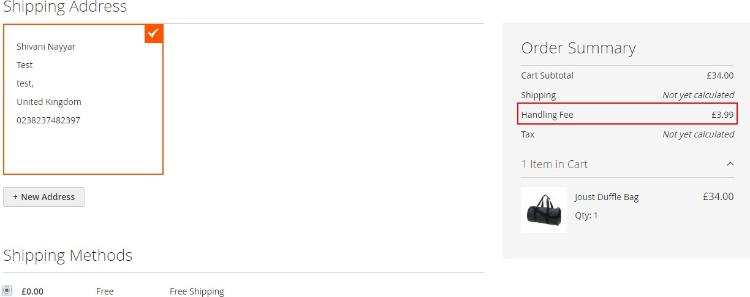
Handling Fee on Checkout Page - On the front-end checkout page the handling fee will be shown under "Order Summary" section.
- Handling Fee for a Product with Tiered Pricing at cart page(Configurable Product)- According to the quantity added to the cart and the tiered pricing configuration, handling fee is added and displayed in the order summary section.
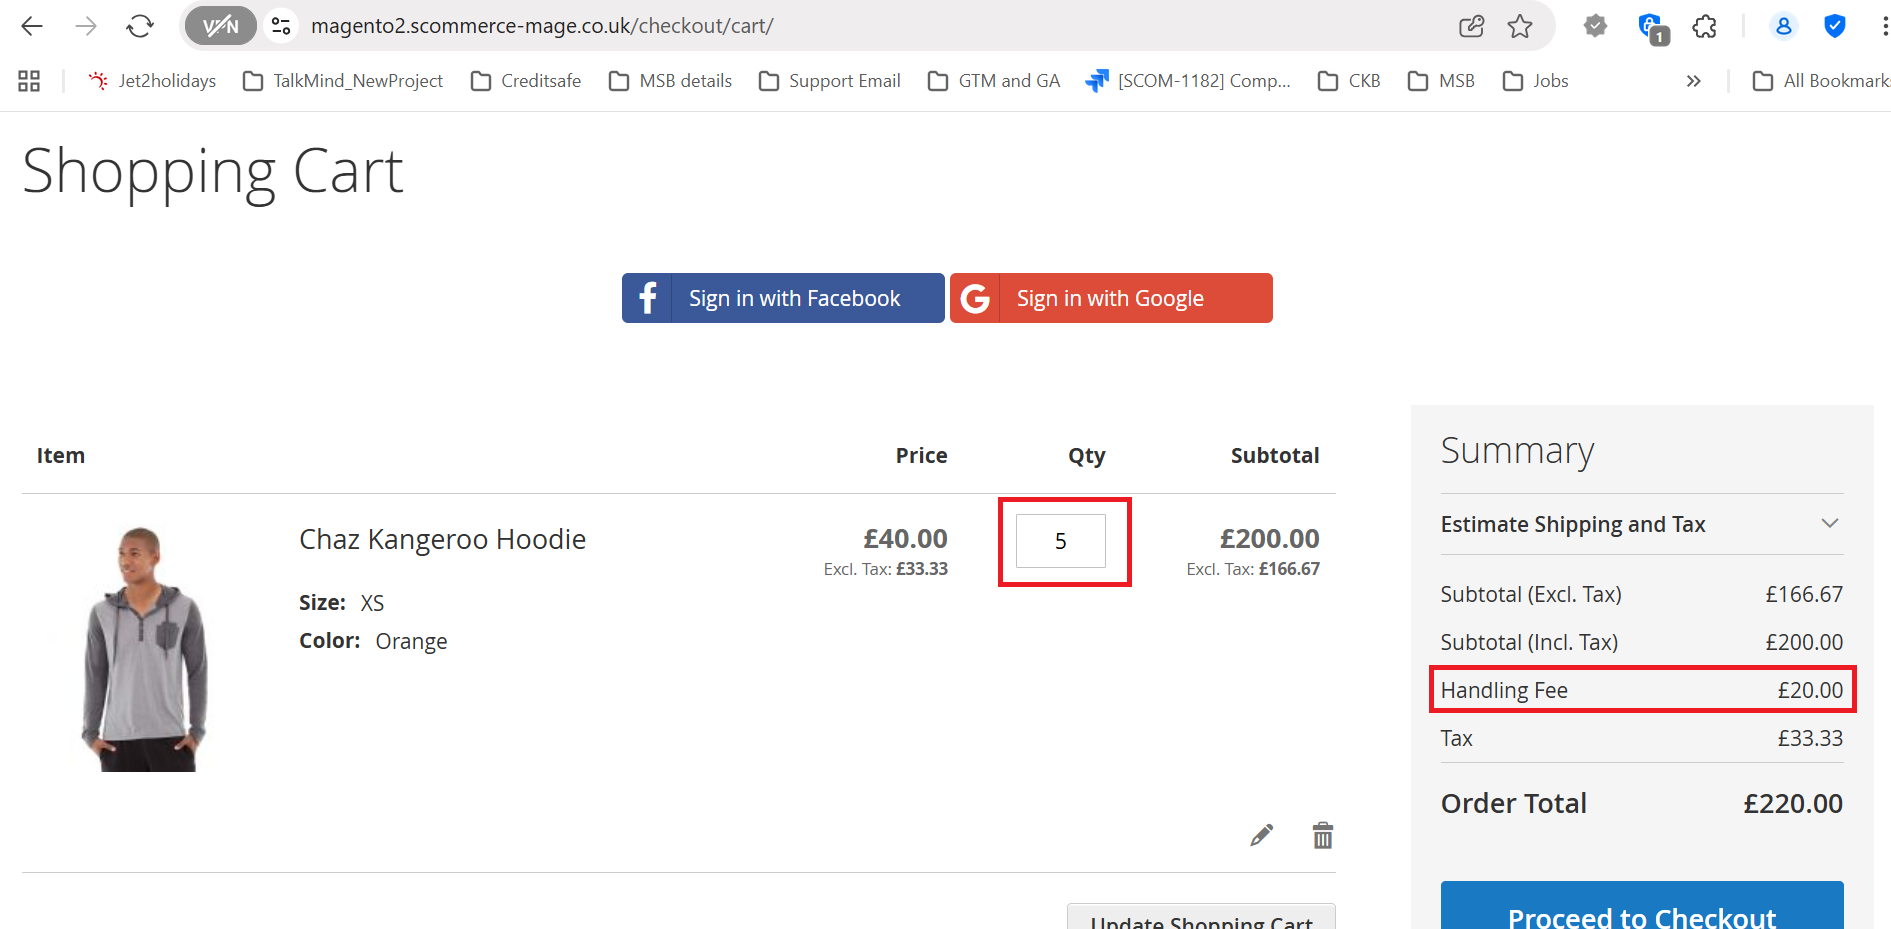
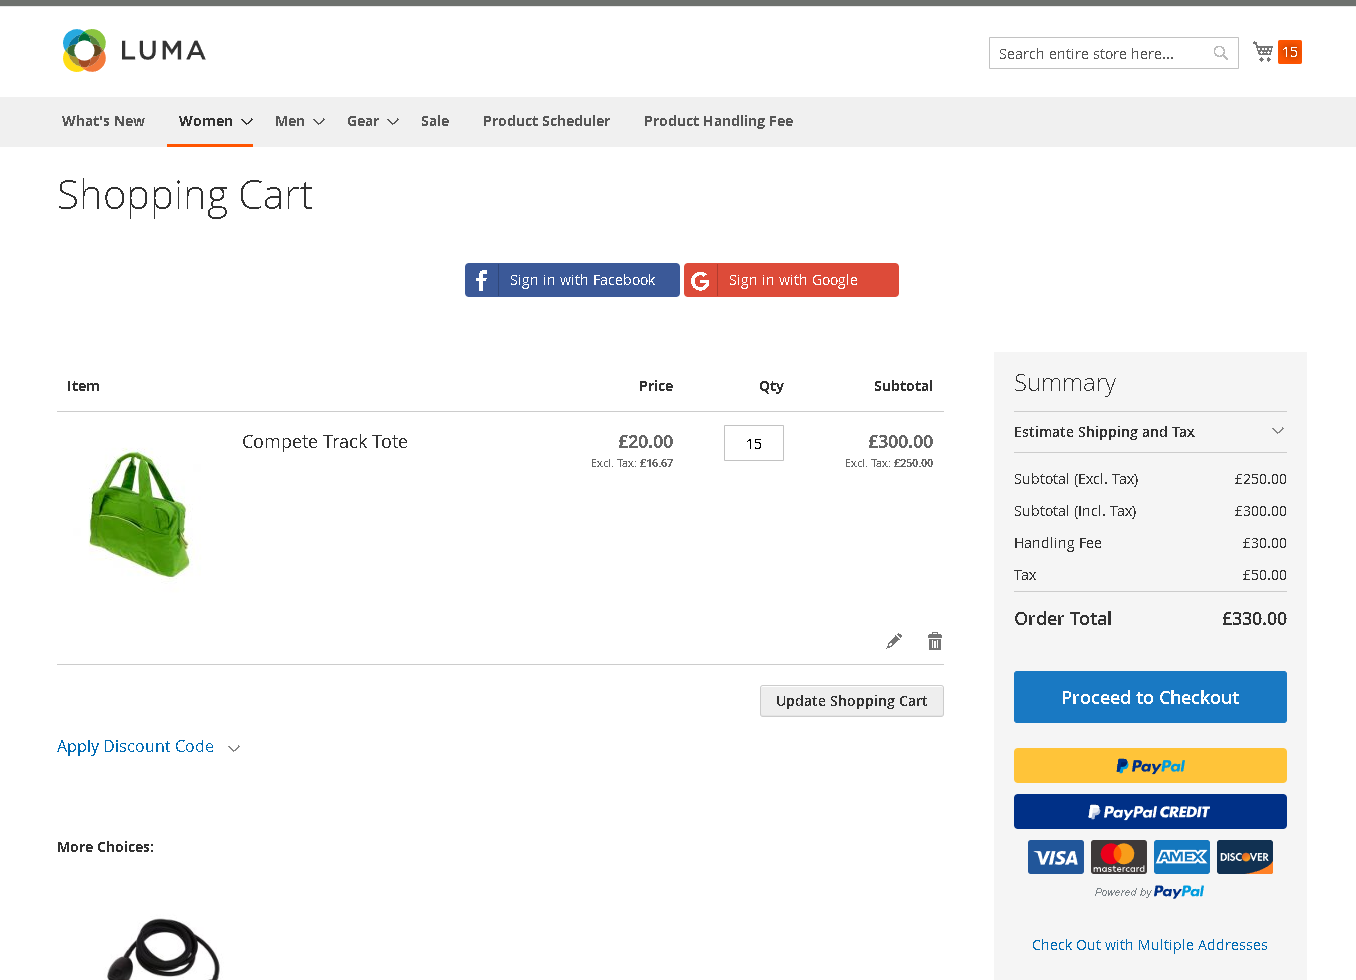
- Handling Fee for a Product with Tiered Pricing at (Simple Product)- According to the quantity added to the cart and the tiered pricing configuration, handling fee is added and displayed in the order summary section. For eg:- here the handling fee is displayed for 15 qty.
- Cart Page
-
- Checkout Page

If you have a question related to this extension please check out our FAQ Section first. If you can't find the answer you are looking for then please contact support@scommerce-mage.com.
Magento 2 Surcharge or Additional Fee
Installation and User Guide for Magento 2 Surcharge or Additional Fee Extension
Table of Contents
- Installation
- Installation via app/code
- Installation via Composer
- Configuration Settings for Surcharge
- General Settings
- Surcharge for Multiple countries/Multiple payment methods
- View Surcharge on the Order Details View Page
- Surcharge for Admin Orders
- Front-end Site View
- Surcharge Percentage/Fixed Amount Per Payment Method and Country
- View Surcharge on the Checkout Page
- Surcharge with the Free Shipping
Installation
-
Installation via app/code: Upload the content of the module to your root folder. This will not overwrite the existing Magento folder or files, only the new contents will be added. After the successful upload of the package, run below commands on Magento 2 root directory.
php bin/magento setup:upgrade php bin/magento setup:di:compile php bin/magento setup:static-content:deploy -
Installation via Composer: Please follow the guide provided in the below link to complete the installation via composer.
Configuration Settings for Surcharge
Go to Admin > Stores > Configuration > Scommerce Configuration > Surcharge
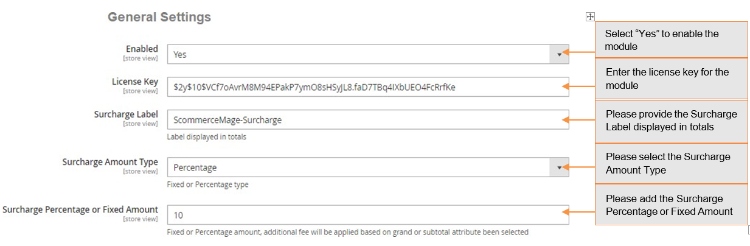
General Settings
-
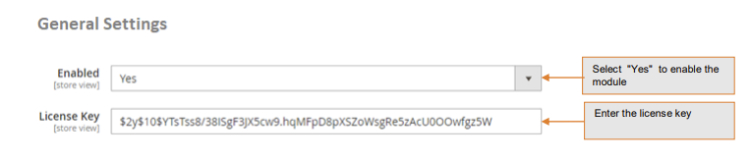
Enabled – Select "Yes" or "No" to enable or disable the module.
-
License Key – Please add the license for the extension which is provided in the order confirmation email. Please note license keys are site URL specific. If you require license keys for dev/staging sites then please email us at support@scommerce-mage.com.
-
Surcharge Label – This label text gets used in the frontend of the website which will be shown on basket, review, invoice, order, shipment, email confirmation and refund.
-
Surcharge Amount Type – This option allows you to choose fixed amount or percentage value. Percentage value gets calculated based on the grand total or subtotal attribute been selected.
-
Surcharge Percentage or Fixed Amount – This is the surcharge or additional fee which will be shown to the customer based on surcharge amount type (fixed to percentage)
- Surcharge Percentage or Fixed Amount per payment method or payment method and country - Fixed or Percentage amount, additional fee will be applied based on grand or subtotal attribute been selected per payment method or payment method and country. Example checkmo:3;cashondelivery:2 or checkmo:3:FR;checkmo:5:GB
-
Grand or Subtotal Attribute – This option allows you to choose whether you want to apply percentage additional fee on grand or subtotal. This will also apply on Minimum Order Total.
-
Minimum Order Total – This value will be checked / validated based on the Grand or Subtotal Attribute value been selected.
-
Skip with Free Shipping – This option can be used if you don't want to charge additional fee when the shipping price is zero. This is useful when you are charging additional fee based on the shipping country but when the shipping is free then you might not want to charge additional fee.
-
Tax Class - Please select the tax class from the drop-down list.
-
Shipping Countries – The additional fee will be applied only to the specific shipping country(s). Please select all if you want to charge additional fee for all shipping countries.
-
Payment Method – The additional fee will be applied only to the specific payment method (s). Please select all if you want to charge additional fee for all payment methods.

Please select the Payment Method, surcharge will be applied only for the selected payment method
- Surcharge for Multiple countries/Multiple payment methods - You can set surcharge for multiple countries by selecting countries from Admin > Stores > Configuration > Scommerce Configuration > Surcharge > General Settings > Shipping Countries, and multiple payment methods from Admin > Stores > Configuration > Scommerce Configuration > Surcharge > General Settings > Payment Method.
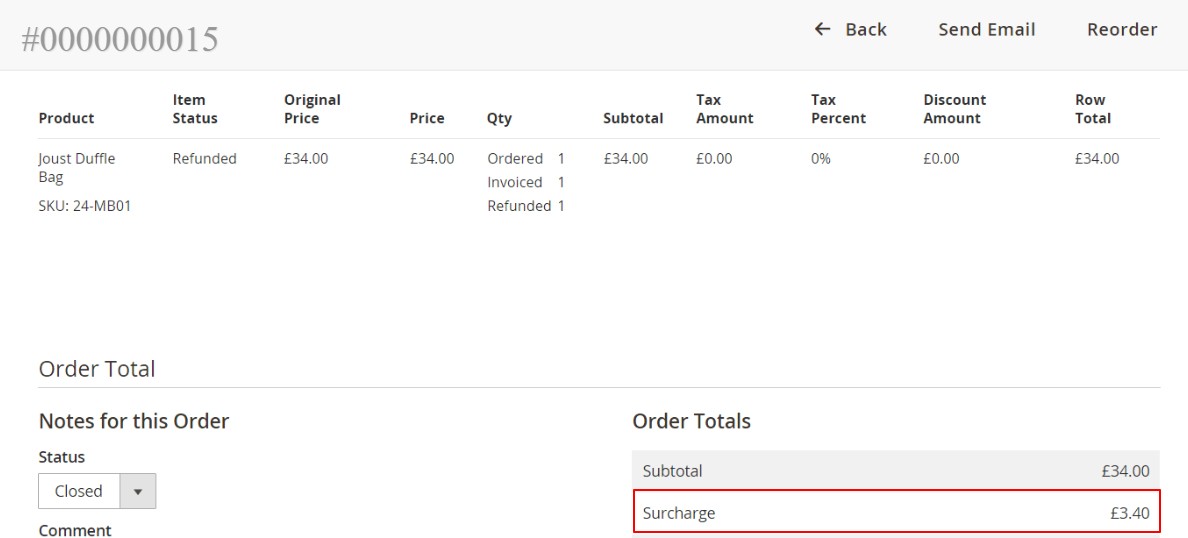
- View Surcharge on the Order Details View Page - You can see the applied surcharge on the order details view page from Admin > Sales > Orders > Select Order > Edit , under "Order Totals" section.
- Surcharge for Admin Orders - In the below image you can see the added surcharge value for the order placed from the admin panel, Admin > Sales > Orders > Create New Order > Select User > Select Product > Add Product.
Front-end Site View
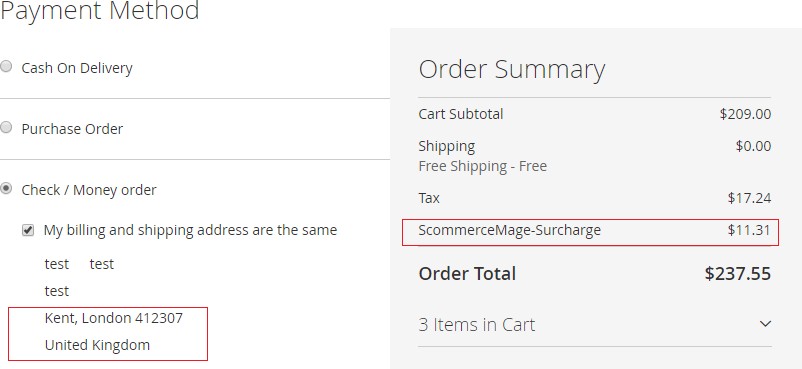
- Surcharge Percentage/Fixed Amount Per Payment Method and Country When you set "Surcharge Percentage or Fixed Amount per payment method and country" to "checkmo:3:FR" from Admin > Stores > Configuration > Scommerce Configuration > Surcharge > Surcharge Percentage or Fixed Amount per payment method, then the fixed or Percentage amount, additional fee will be applied based on grand or subtotal attribute been selected per payment method or payment method and country.
- checkmo:3:FR - It will add 3% additional fee on "Subtotal Including Tax" , will be applied for shipping country France and payment method Check Money order.
- checkmo:5:GB - It will add 5% additional fee on "Subtotal Including Tax" , will be applied for shipping country UK and payment method Check Money order.
- checkmo:3 - It will add 3% additional fee on "Subtotal Including Tax", and will be applied only for Check Money Order payment method and shipping countries selected from Admin > Stores > Configuration > Scommerce Configuration > Surcharge > Shipping Countries .

- Set Different Surcharge for Countries - You can set different surcharge for countries from Admin > Stores > Configuration > Scommerce Configuration > Surcharge > Surcharge Percentage or Fixed Amount per payment method - checkmo:3:FR;checkmo:5:GB.
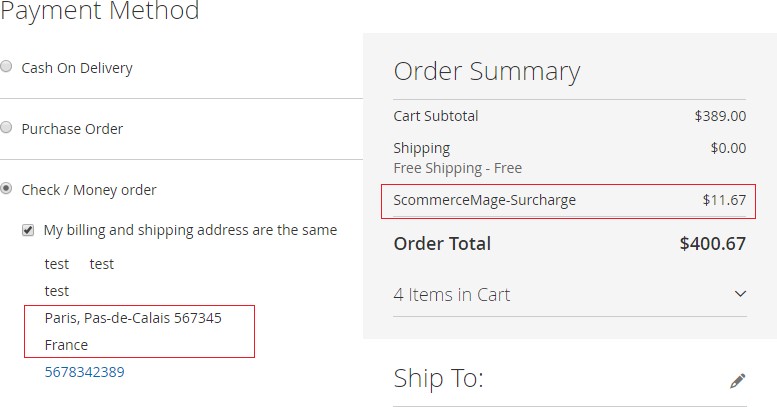
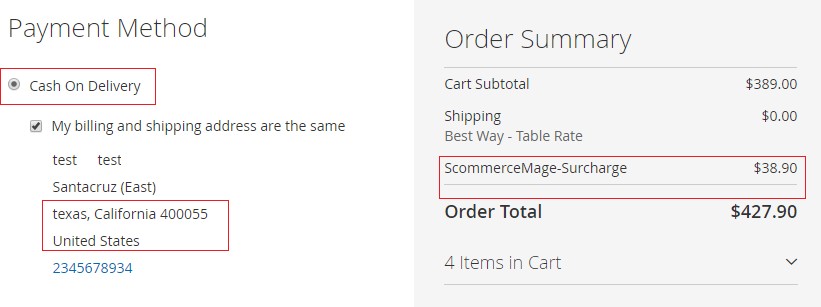
- View Surcharge on the Checkout Page - When you select "Surcharge Amount Type" to "Percentage" , " Surcharge Percentage or Fixed Amount " to "10" and " Payment Method " to "Cash On Delivery"/"Check Money order" from Admin > Stores > Configuration > Scommerce Configuration > Surcharge, then it adds 10 % additional fee on "Subtotal Including Tax" based on selected payment method and shipping countries. To add shipping countries go to Admin > Stores > Configuration > Scommerce Configuration > Surcharge > Shipping Countries - Select Shipping Countries from the drop-down list.
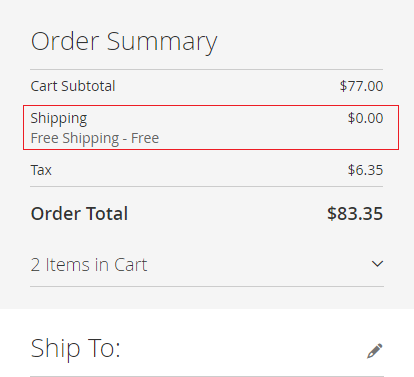
- Surcharge with the Free Shipping - You can skip surcharge for the free shipping orders from Admin > Stores > Configuration > Scommerce Configuration > Surcharge > Skip with Free Shipping - "Yes". This option can be used if you don't want to charge additional fee when the shipping price is zero.
If you have a question related to this extension please check out our FAQ Section first. If you can't find the answer you are looking for then please contact support@scommerce-mage.com.
Magento 2 Delivery Instructions and Delivery Date
Installation and User Guide for Magento 2 Delivery Instructions and Delivery Date Extension
Table of Contents
- Installation
- Installation via app/code
- Installation via Composer
- Configuration Settings for Delivery Instruction
- General Settings
- Configuration Settings
- Back-end - Delivery Instruction Details
- Front-end Site View
- Delivery Instruction Section on the Checkout page
- Delivery Time Selection
- Delivery Date Selection
- Delivery Instructions Details in Order Confirmation Emails
Installation
-
Installation via app/code: Upload the content of the module to your root folder. This will not overwrite the existing Magento folder or files, only the new contents will be added. After the successful upload of the package, run below commands on Magento 2 root directory.
php bin/magento setup:upgrade php bin/magento setup:di:compile php bin/magento setup:static-content:deploy -
Installation via Composer: Please follow the guide provided in the below link to complete the installation via composer.
Configuration Settings for Delivery Instruction
Go to Admin > Stores > Configuration > Scommerce > Delivery Instruction
General Settings
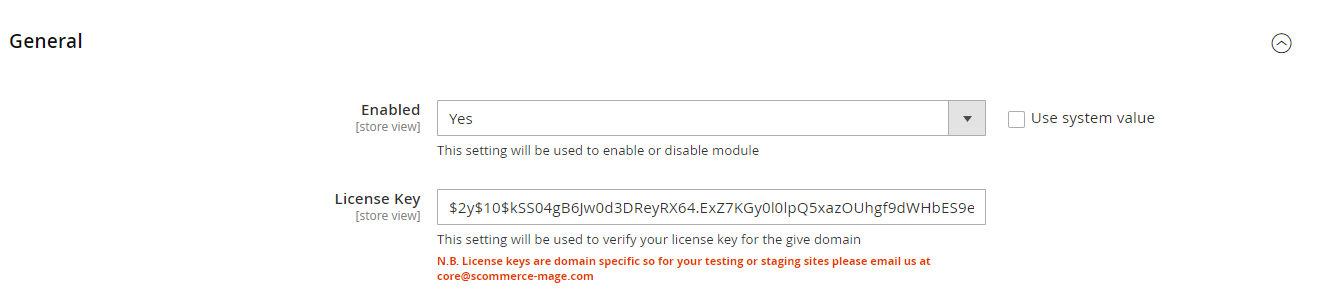
- Module Enable - Select "Yes" or "No" to enable or disable the module.
- License Key - Please add the license for the extension which is provided in the order confirmation email. Please note license keys are site URL specific. If you require license keys for dev/staging sites then please email us at support@scommerce-mage.com.
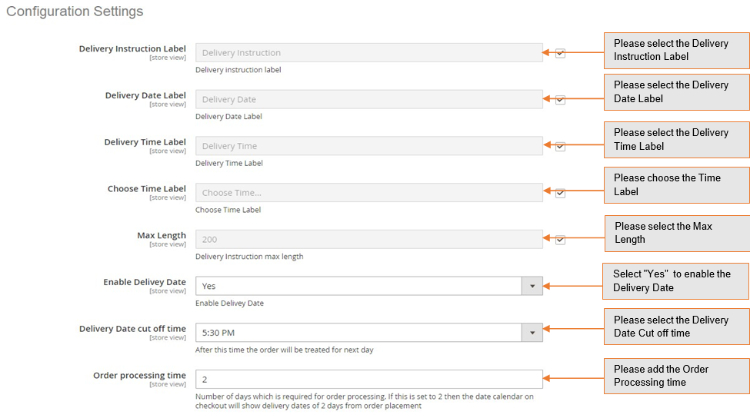
Configuration Settings
-
Delivery Instruction Label – Enter delivery instruction label, this label will be shown on the frontend checkout page under delivery instruction section.
-
Delivery Date Label – Enter delivery date label, this label will be shown on the frontend checkout page.
-
Delivery Time Label – Enter delivery time label, this label will be shown on the frontend checkout page under delivery instruction.
-
Choose Time Label – Enter time label, this label will be shown on the frontend checkout page under delivery instruction.
-
Max Length - Enter max length of delivery instruction.
-
Enable Delivery Date – Select "Yes" to enable the delivery date on checkout.
-
Delivery Date cut off time – Select delivery date cut off time, after this time the order will be treated for next day.
-
Order Processing time – Number of days which is required for order processing. If this is set to 2 then the date calendar on checkout will show delivery dates of 2 days from order placement.
-
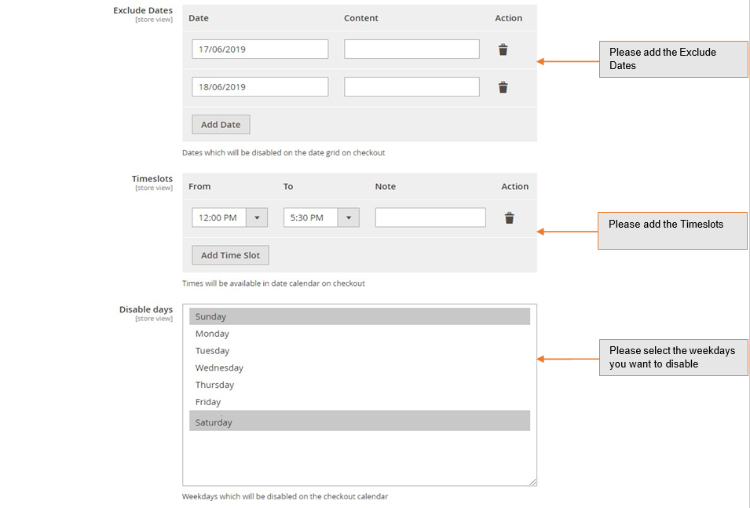
Exclude Dates – Dates which will be disabled on the date grid on checkout.
-
Timeslots – Times will be available in date calendar on checkout.
-
Disable days – Select weekdays which will be disabled on the checkout calendar.
-
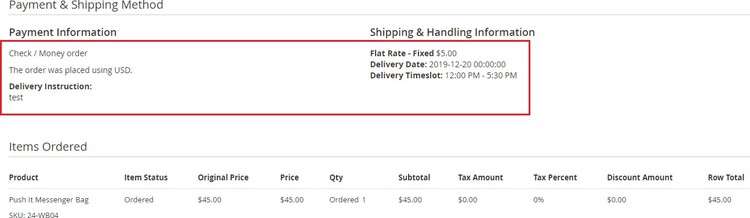
Back-end - Delivery Instruction Details - To view the delivery instructions details, go to Admin > Sales > Order > Select Order > View.
Front-end Site View
-
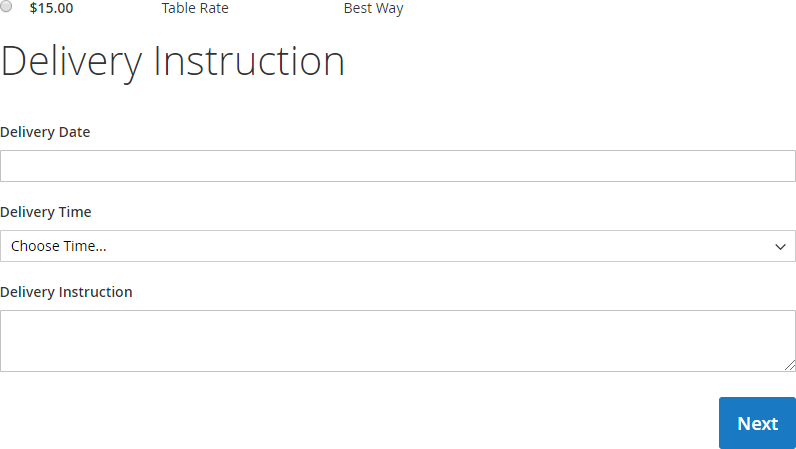
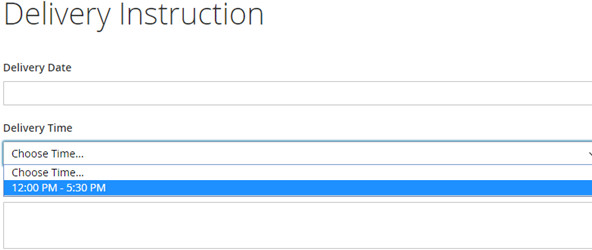
Delivery Instruction Section on the Checkout page - When you enable the module and select the "Enable Delivery Date" to "Yes" from Admin > Stores > Configuration > Scommerce Configuration > Delivery Instruction > Configuration Settings, then it shows Delivery Date, Delivery Time under Delivery Instruction section on the checkout page.
-
Delivery Time Selection - You can add time slots from, Admin > Stores > Configuration > Scommerce Configuration > Delivery Instruction > Configuration Settings > Timeslots, and added time slots will be shown on the checkout page from where you can choose the convenient time slot for delivery.
-
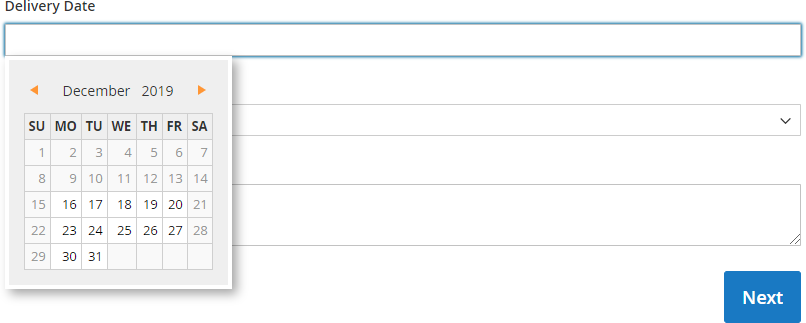
Delivery Date Selection - To show delivery date on the checkout page, select "Enable Delivery Date" to "Yes" from Admin > Stores > Configuration > Scommerce Configuration > Delivery Instruction > Configuration Settings.
-
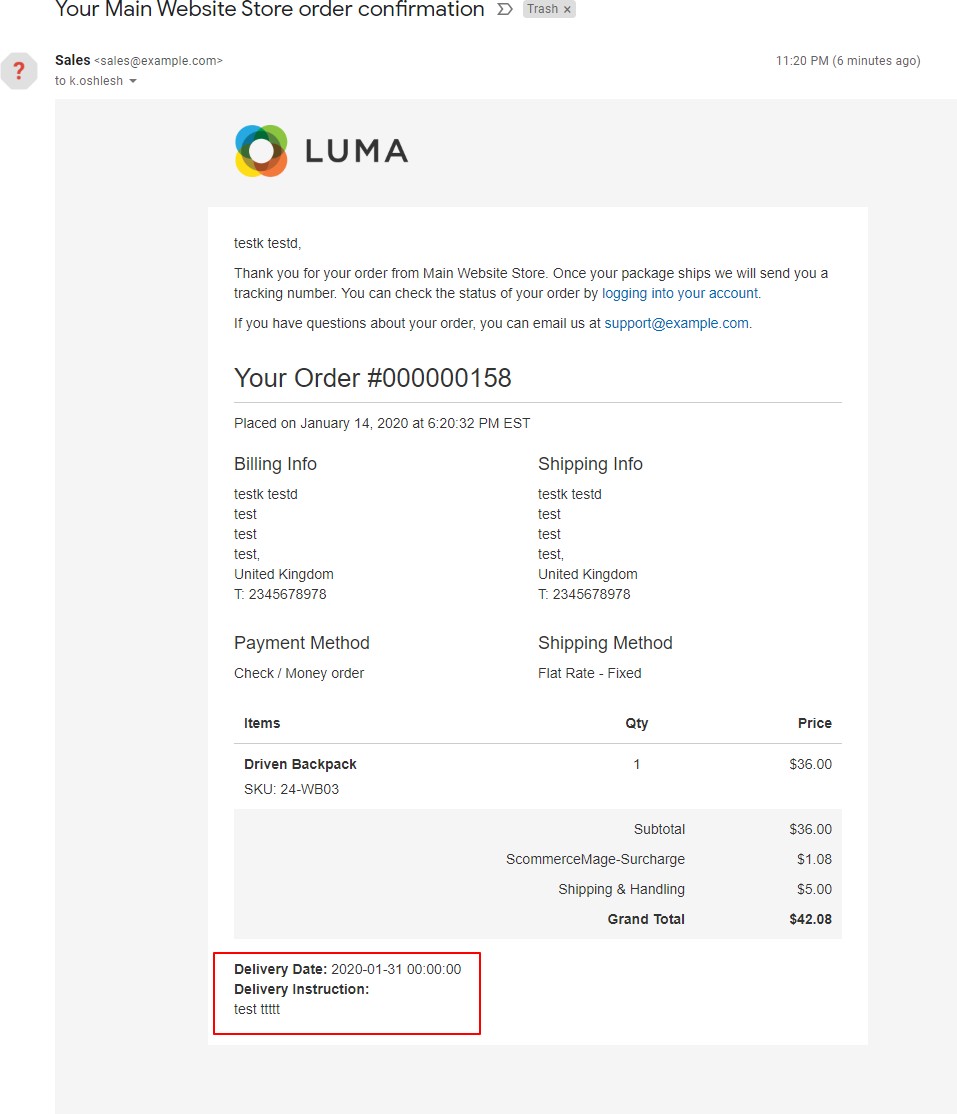
Delivery Instructions Details in Order Confirmation Emails - It sends delivery instructions details in order confirmation emails, which you can see in the below screengrab.
If you have a question related to this extension please check out our FAQ Section first. If you can't find the answer you are looking for then please contact support@scommerce-mage.com.
Magento 2 Shipping Carrier Tracker
Installation and User Guide for Magento 2 Shipping Carrier Tracker Extension
Table of Contents
- Installation
- Installation via app/code
- Installation via Composer
- Configuration Settings for Shipping Carrier Tracker
- General Settings
- Shipping Methods
- Tracking Links
- Admin Panel
- My Account Section
- Shipment Email
Installation
-
Installation via app/code: Upload the content of the module to your root folder. This will not overwrite the existing Magento folder or files, only the new contents will be added. After the successful upload of the package, run below commands on Magento 2 root directory.
php bin/magento setup:upgrade php bin/magento setup:di:compile php bin/magento setup:static-content:deploy -
Installation via Composer: Please follow the guide provided in the below link to complete the installation via composer.
Configuration Settings for Shipping Carrier Tracking
Go to Admin > Stores > Configuration > Scommerce Configuration > Tracking Link
General Settings
- Enabled – Select "Yes" or "No" to enable or disable the module.
- License Key – Please add the license for the extension which is provided in the order confirmation email. Please note license keys are site URL specific. If you require license keys for dev/staging sites then please email us at support@scommerce-mage.com.
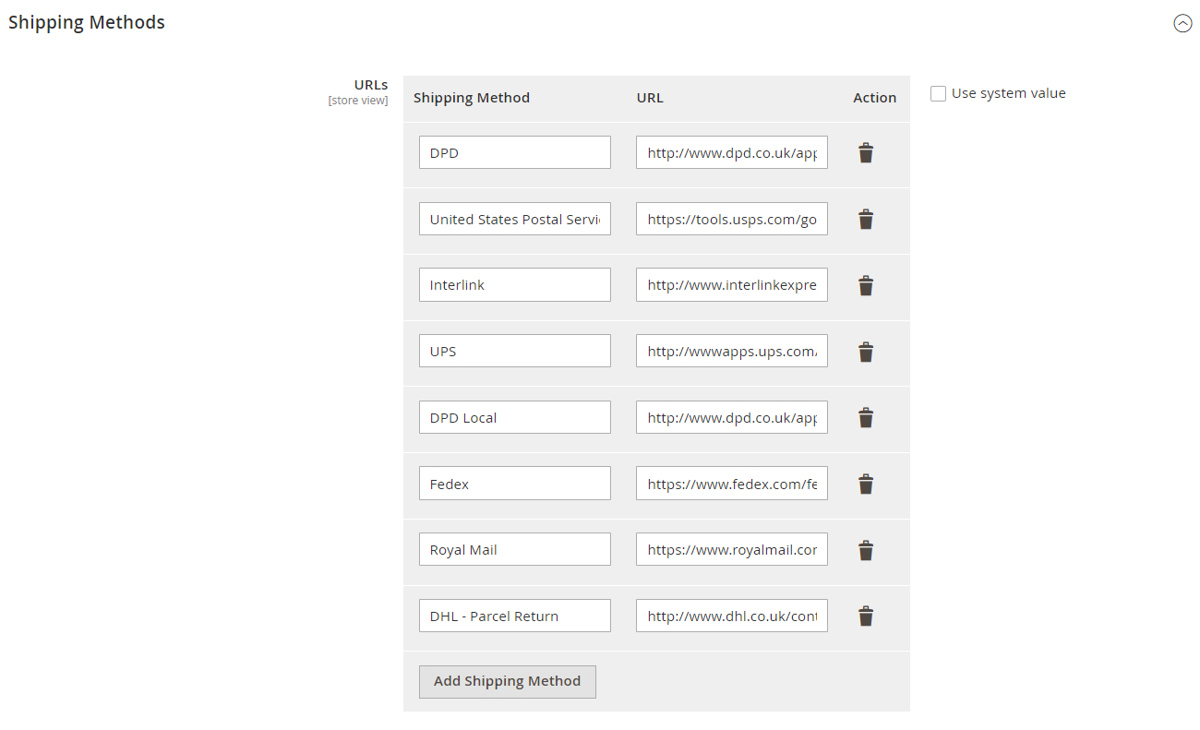
Shipping Methods
- URLs – Enter the shipping method and the URL. The URL should contain the {number} parameter which will be used to pass the tracking number to the shipping carriers tracking site where the shipment can be tracked.
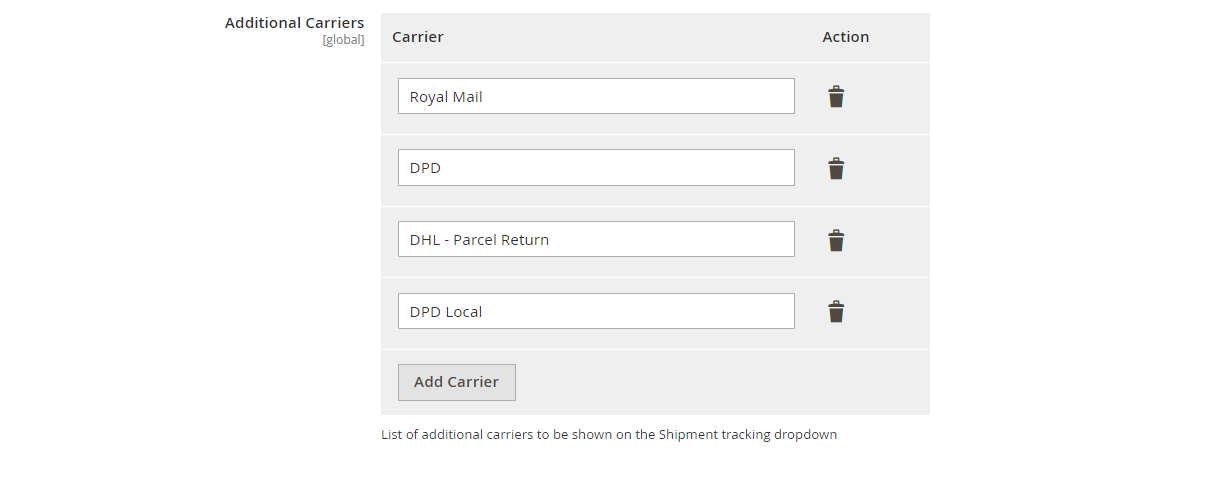
- Additional Carriers- Add the additional carriers which will be available in the carrier selector dropdown list while creating a shipment.
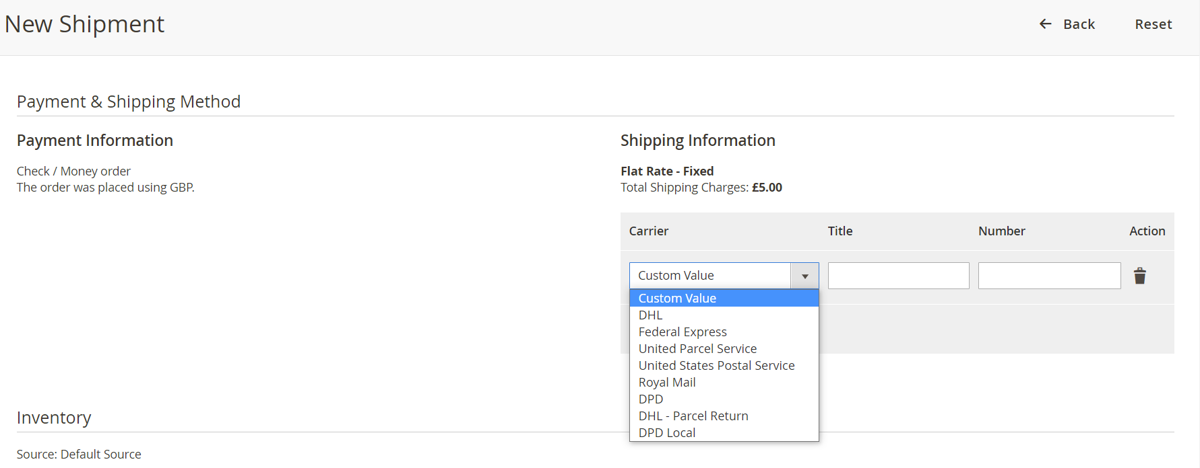
Tracking Links
Go to Admin>Sales>Order and select an order then click on 'Ship' to create a shipment. Scroll down to find shipping information then select the shipping carrier from the carrier dropdown list and enter the tracking number for that carrier. Select email copy of shipment checkbox then generate the shipment.
-
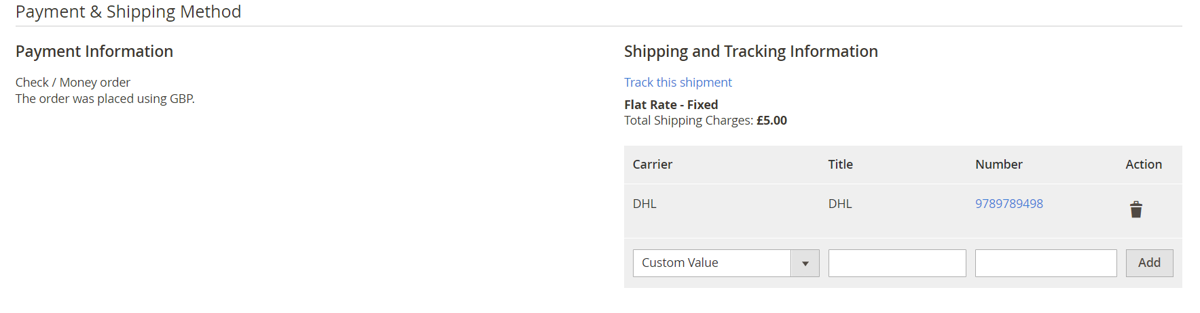
Admin Panel:- Once the shipment is generated you can go to the order then from the left menu select shipments and view the generated shipment. You should see the tracking number consists a link, and once you link on that link it will take you to the shipping carriers tracking site with your tracking number.
-
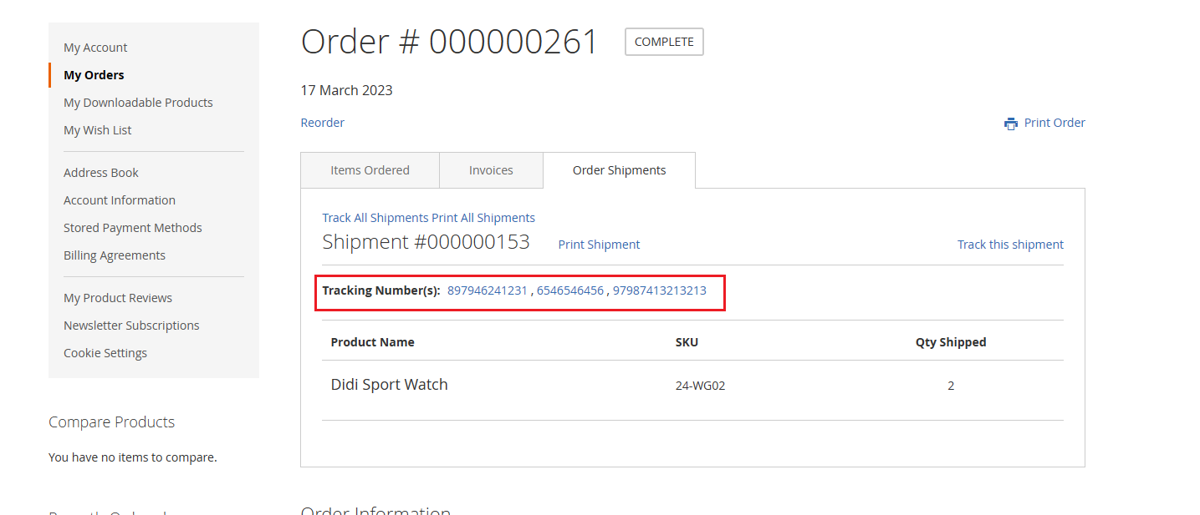
My Account Section:- Once the shipment is generated customers can view the shipmen in the My Account>My Orders>Order Shipments section where the trackings numbers with links will be available as per the shipping carriers selected with the shipment.
-
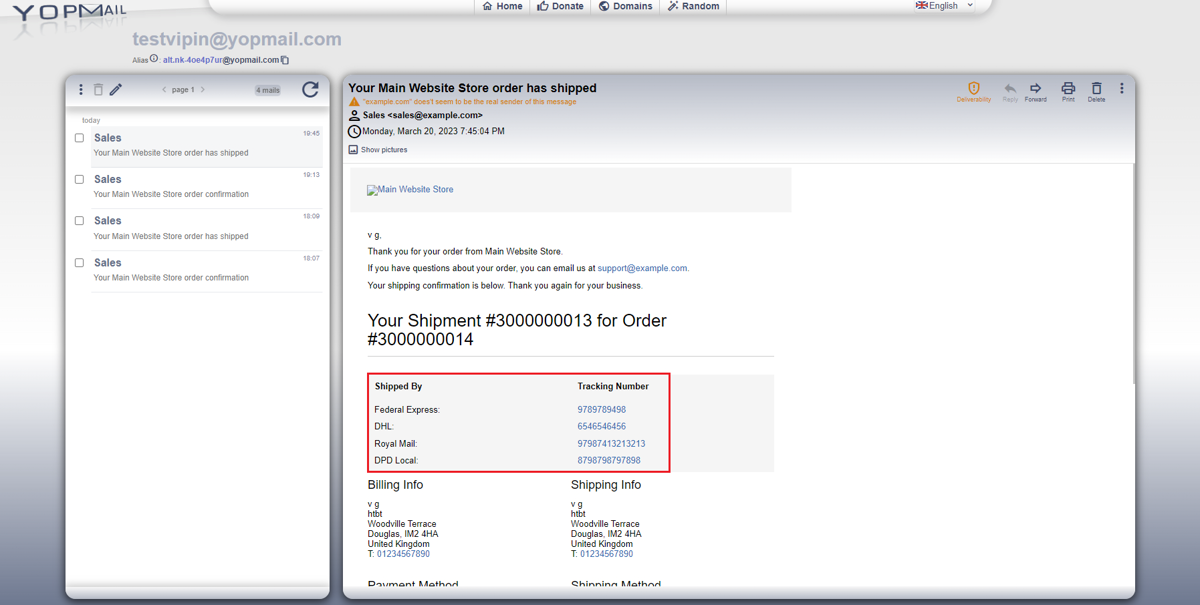
Shipment Email:- Once the shipment is generated the shipment email will be sent to the customer with tracking links to each of the shipping carriers.
If you have a question related to this extension please check out our FAQ Section first. If you can't find the answer you are looking for then please contact support@scommerce-mage.com.