# SEO Extensions
# Magento SEO Unique Catalog URLs
### Installation and User Guide for Magento 1 SEO Unique Catalog URLs
****Table of Contents****
1. [Installation](#bkmrk-installation "Installation")
2. [Configuration Settings for Catalog URL](#bkmrk-configuration-settin "Configuration Settings for Catalog URL")
- General Settings
- Configuration Path to Set Up Primary Category
3. [Front-end site view](#bkmrk-front-end-site-view "Front-end site view")
- Product Page Unique URL
- Search Page / Category Page Unique Catalog Product URL
### Installation
- ****Disable Compilation Mode:**** To check that this is disabled, go to ****System >Tools> Compilation****. If the compiler status is ‘Disabled’, you are ready to go. If not, simply click the ‘Disable’ button on the right-hand side of the screen.
- ****Upload Package:**** Upload the content of the module to your root folder. This will not overwrite the existing Magento folder or files, only the new contents will be added.
- ****Clear Caches:**** This can be done from the admin console by navigating to the cache management page (****System > Cache Management****), selecting all caches, clicking ‘refresh’ from the drop-down menu, and submitting the change.
### Configuration Settings for Catalog URL
Go to ****Admin > Stores > Configuration > Scommerce Configuration > Catalog URL****
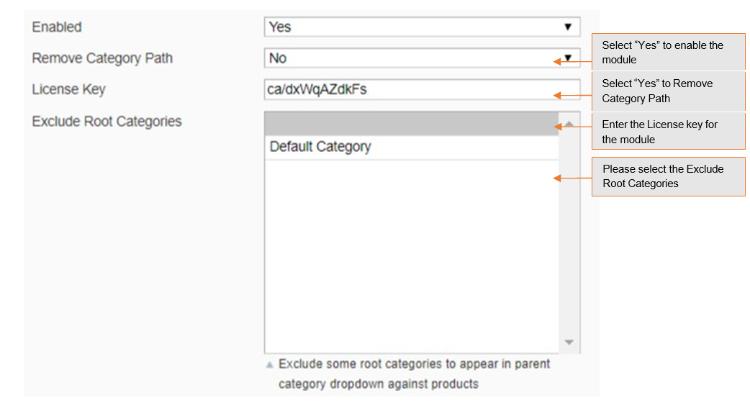
#### General Settings
- ****Enabled –**** Select “Yes” or “No” to enable or disable the module.
- ****Remove Category Path –**** Select “Yes” if you want to remove category path from product URLs. By default it is “No”.
- ****License Key –**** Please add the license for the extension which is provided in the order confirmation email. Please note license keys are site URL specific. If you require license keys for dev/staging sites then please email us at .
- ****Exclude Root Categories –**** Exclude some root categories to appear as primary category dropdown against products.
[](https://docs.scommerce-mage.com/uploads/images/gallery/2025-04/scaled-1680-/image.jpg)
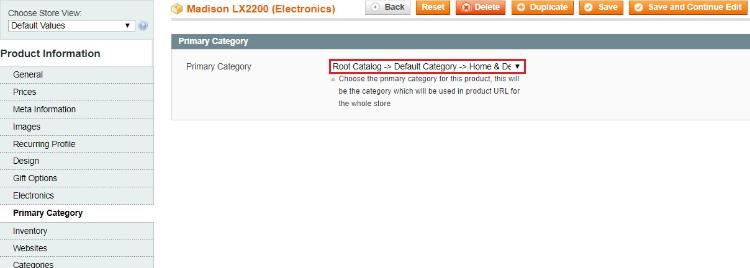
#### Configuration Path to Set Up Primary Category
To set primary category go to ****Admin > Catalog > Select Product > Primary Category.**** The drop down will show all the categories selected for the product from where you can select the primary category of the product.
[](https://docs.scommerce-mage.com/uploads/images/gallery/2025-04/scaled-1680-/image-1.jpg)
### Front-end site view
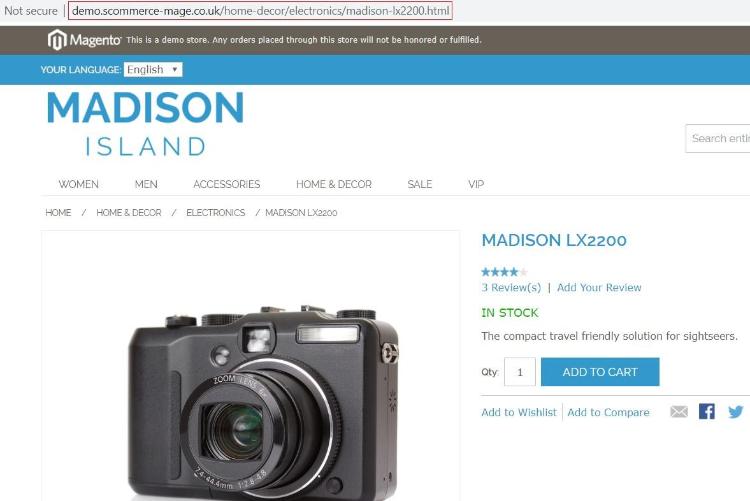
- ****Product Page Unique URL –****You can assign primary category to a product from ****Admin > Catalog > Select Product > Primary Category.**** In the below image you can see the primary category “****Home & Decor > Electronics”**** has been set for the product Madison LX2200****.****
[](https://docs.scommerce-mage.com/uploads/images/gallery/2025-04/scaled-1680-/image-2.jpg)
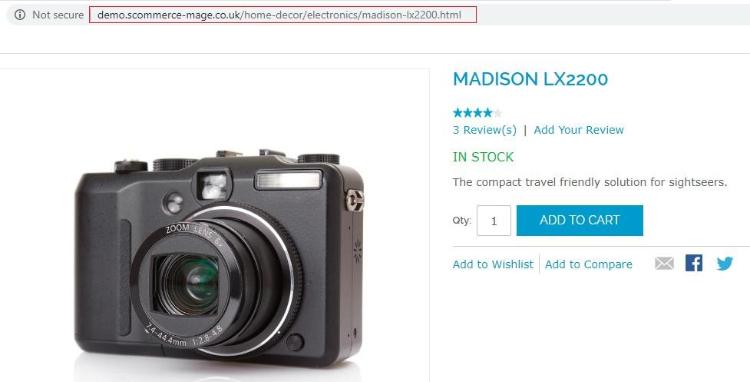
- ****Search Page / Category Page Unique Catalog Product URL –****We have set the primary category of "Madison LX2200" product to “****Home & Decor > Electronics”****, and the category path remains the same when we access the product from the search or any other category, which you can see in the below image.
[](https://docs.scommerce-mage.com/uploads/images/gallery/2025-04/scaled-1680-/image-3.jpg)
If you have a question related to this extension please check out our [FAQ Section](https://www.scommerce-mage.com/magento-seo-catalog-urls.html#faq) first. If you can't find the answer you are looking for then please contact [support@scommerce-mage.com](mailto:core@scommerce-mage.com)****.****
# Jquery Asynchronous Image Loader (JAIL)
### Magento Jquery Asynchronous Image Loader Extension Installation/Set-up Guide
- **Disable Compilation Mode**: To check that this is disabled, go to System->Tools->Compilation. If the compiler status is 'Disabled', you are ready to go. If not, simply click the 'Disable' button on the righ\*\*-\*\*hand side of the screen.
- **Upload Package:** Upload the content of the module to your root folder. This will not overwrite the existing Magento folder or files, only the new contents will be added.
- **Clear Caches:** This can be done from the admin console by navigating to the cache management page (System->Cache Management), selecting all caches, clicking 'refresh' from the drop-down menu, and submitting the change. Log out and login back in Admin.
- **Admin Configuration:** Go to Admin ->System->Configuration->Scommerce Configuration -> Lazy Load Images -> General
- **Enable :** Enable / Disable Module
- **License key :** Enter License key provided by Scommerce Mage
**Theme changes:** If you are not using your custom theme then this module should work out of the box. But if you are using custom theme then follow the following steps -:
- **Check if you have the following file in your custom theme folder**
- **/app/design/frontend/default//template/cate gory /list.phtml**
**If the above file does exist in your custom theme then copy the differences from the following file -:**
- **/app/design/frontend/default/base/template/category/list.phtml**
- **Clear Caches:** Once you are done with everything above, clear the cache to get the changes reflect on your website.
If you have a question related to this extension please check out our [**FAQ Section**](https://www.scommerce-mage.com/magento-lazy-image-loader-jail.html#faq) first. If you can't find the answer you are looking for then please contact [**support@scommerce-mage.com**](mailto:core@scommerce-mage.com)**.**
# Google Friendly SEO Layered Navigation
### Installation and User Guide for Magento 1 Google Friendly SEO Layered Navigation
**Table of Contents**
1. [Installation ](#bkmrk-installation)
- Disable Compilation Mode
- Upload Package
- Clear Caches
2. [Configuration Settings for Layered Navigation ](#bkmrk-configuration-settin)
- General Settings
- Google Friendly SEO Navigation (Fetch as Google)
3. [Front-end Site View ](#bkmrk-front-end-site-view)
- Search Engine Optimization of Layered Navigation
- Custom View of Layered Navigation
### Installation [](#bkmrk-)
- **Disable Compilation Mode:** To check that this is disabled, go to **System >Tools> Compilation**. If the compiler status is 'Disabled', you are ready to go. If not, simply click the 'Disable' button on the right-hand side of the screen.
- **Upload Package:** Upload the content of the module to your root folder. This will not overwrite the existing Magento folder or files, only the new contents will be added.
- **Clear Caches:** This can be done from the admin console by navigating to the cache management page (**System > Cache Management**), selecting all caches, clicking 'refresh' from the drop-down menu, and submitting the change.
### Configuration Settings for Layered Navigation [](#bkmrk--1)
Go to **Admin > Stores > Configuration > Scommerce Configuration > Layered Navigation**
#### General Settings [](#bkmrk--2)
- **Enabled –** Select "Yes" or "No" to enable or disable the module.
- **License Key –** Please add the license for the extension which is provided in the order confirmation email. Please note license keys are site URL specific. If you require license keys for dev/staging sites then please email us at .
[](https://docs.scommerce-mage.com/uploads/images/gallery/2025-06/image-2025-06-16t181054-656.jpg)
#### Google Friendly SEO Navigation (Fetch as Google) [](#bkmrk--4)
[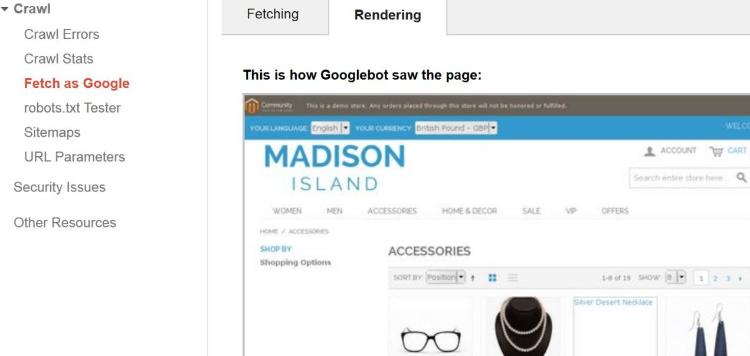](https://docs.scommerce-mage.com/uploads/images/gallery/2025-06/image-2025-06-16t181123-417.jpg)
### Front-end Site View [](#bkmrk--6)
- **Search Engine Optimization of Layered Navigation -** See the image below for Layered Navigation view.
[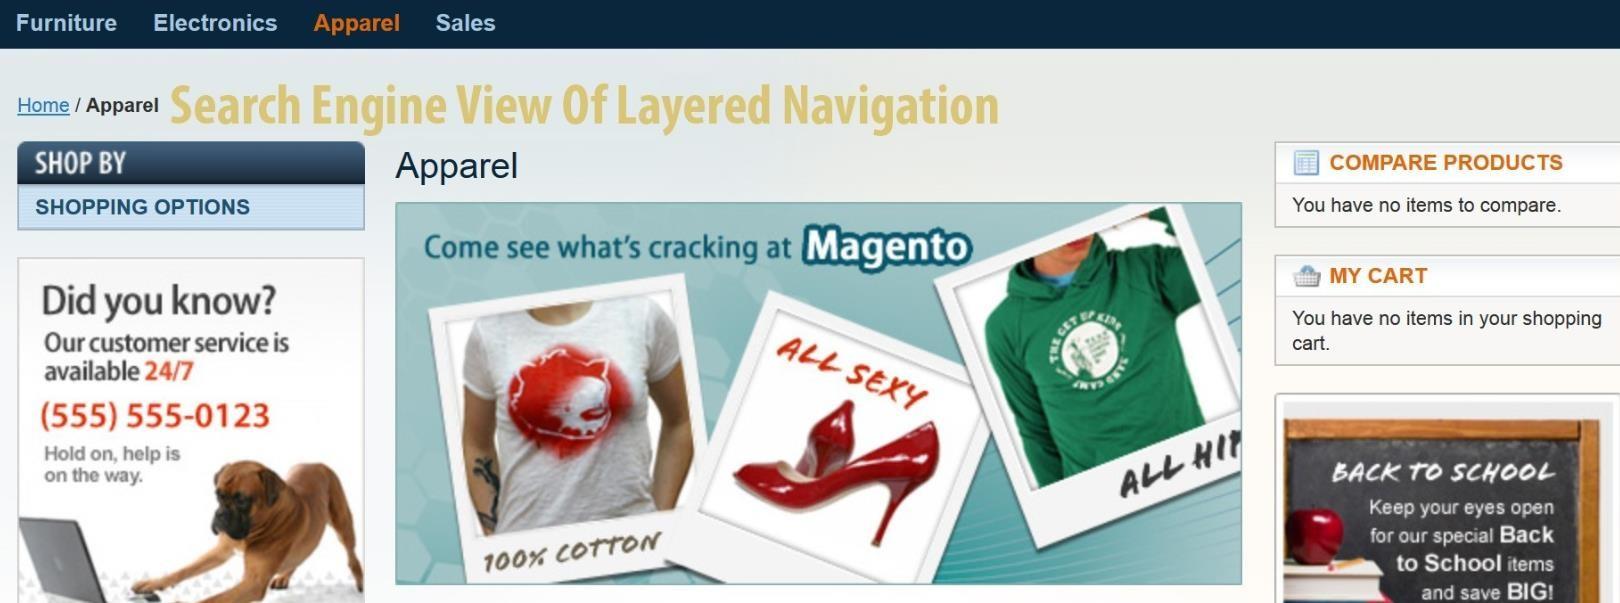](https://docs.scommerce-mage.com/uploads/images/gallery/2025-06/image-2025-06-16t181158-909.jpg)
- **Custom View of Layered Navigation –** Here is the custom view of the Layered Navigation
[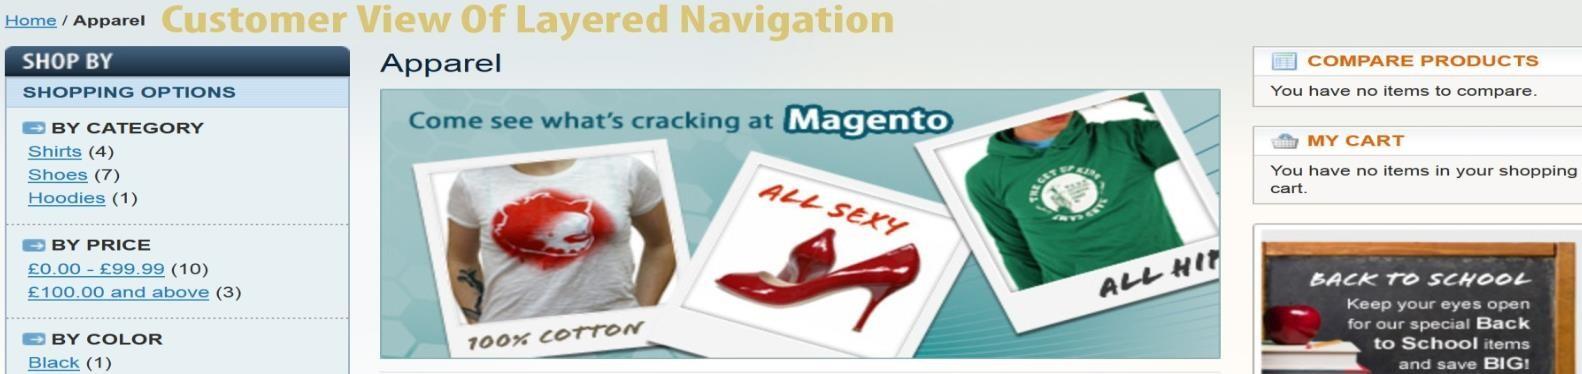](https://docs.scommerce-mage.com/uploads/images/gallery/2025-06/image-2025-06-16t181248-988.jpg)
If you have a question related to this extension please check out our [**FAQ Section**](https://www.scommerce-mage.com/google-friendly-layered-navigation.html#faq) first. If you can't find the answer you are looking for then please contact [**support@scommerce-mage.com**](mailto:core@scommerce-mage.com)**.**
# Meta Information for Any Page
### Installation and User Guide for Magento 1 Meta Information for Any Page
**Table of Contents**
1. [Installation](#bkmrk-installation)
- Disable Compilation Mode
- Upload Package
- Clear Caches
2. [Configuration Settings for Meta Information for Any Page](#bkmrk-configuration-settin)
- General Settings
- Manage Meta Information
- Add Meta Information
### Installation [](#bkmrk-)
- **Disable Compilation Mode:** To check that this is disabled, go to **System > Tools > Compilation**. If the compiler status is 'Disabled', you are ready to go. If not, simply click the 'Disable' button on the right-hand side of the screen.
- **Upload Package:** Upload the content of the module to your root folder. This will not overwrite the existing Magento folder or files, only the new contents will be added.
- **Clear Caches:** This can be done from the admin console by navigating to the cache management page (**System > Cache Management**), selecting all caches, clicking 'refresh' from the drop-down menu, and submitting the change.
### Configuration Settings for Meta Information for Any Page [](#bkmrk--1)
Go to **Admin > Stores > Configuration > Scommerce Configuration > Meta Information for Any Page**
#### General Settings [](#bkmrk--2)
- **Enabled:** Select "Yes" or "No" to enable or disable the module.
- **License Key:** Please add the license for the extension which is provided in the order confirmation email. Please note license keys are site URL specific. If you require license keys for dev/staging sites then please email us at .
[](https://docs.scommerce-mage.com/uploads/images/gallery/2025-06/image-2025-06-16t190616-314.jpg)
#### Manage Meta Information [](#bkmrk--4)
**Manage Meta Information**
**[](https://docs.scommerce-mage.com/uploads/images/gallery/2025-06/image-2025-06-16t190652-850.jpg)**
#### Add Meta Information [](#bkmrk--6)
[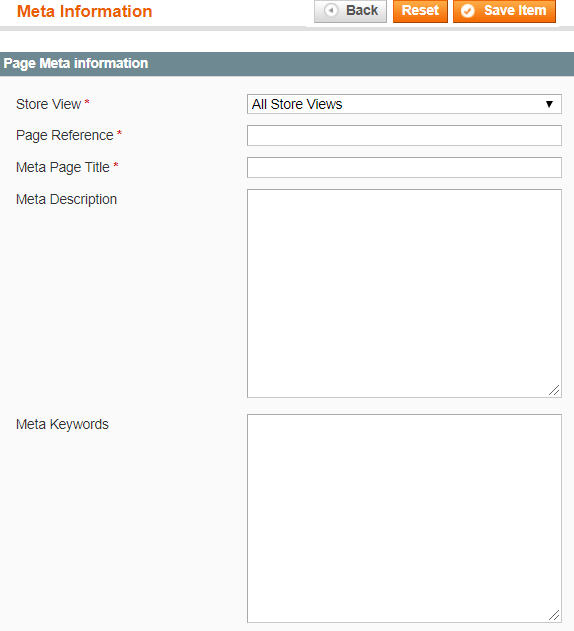](https://docs.scommerce-mage.com/uploads/images/gallery/2025-06/image-2025-06-16t190728-668.png)
### Front-end site view
- **Meta Information**
**[](https://docs.scommerce-mage.com/uploads/images/gallery/2025-06/image-2025-06-16t190757-908.png)**
If you have a question related to this extension please check out our [FAQ Section](https://www.scommerce-mage.com/magento-meta-information-for-any-page.html#faq) first. If you can't find the answer you are looking for then please contact [support@scommerce-mage.com](mailto:core@scommerce-mage.com).
# Canonical Urls for Category, Product and CMS pages
### Installation and User Guide for Magento 1 Canonical URL for Category, Product and CMS Pages
**Table of Contents**
1. [Installation ](#bkmrk-installation)
- Disable Compilation Mode
- Upload Package
- Clear Caches
2. [Configuration Settings for Canonical Tags ](#bkmrk-configuration-settin)
- General Settings
- Category Canonical Tags
- Product Canonical Tags
- CMS Canonical Tags
- No Index No Follow
- Category set up for Canonical URL
- Product set up for Canonical URL
- CMS set up for Canonical URL
- Rollback Plan
3. [Front-end Site View ](#bkmrk-front-end-site-view)
- Category Canonical Tags
- Product Canonical Tags
- CMS Canonical Tags
### Installation [](#bkmrk-)
- **Disable Compilation Mode:** To check that this is disabled, go to **System >Tools> Compilation**. If the compiler status is 'Disabled', you are ready to go. If not, simply click the 'Disable' button on the right hand side of the screen.
- **Upload Package:** Upload the content of the module to your root folder. This will not overwrite the existing Magento folder or files, only the new contents will be added.
- **Clear Caches:** This can be done from the admin console by navigating to the cache management page (**System > Cache Management**), selecting all caches, clicking 'refresh' from the drop-down menu, and submitting the change.
### Configuration Settings for Canonical Tags [](#bkmrk--1)
Go to **Admin > Stores > Configuration > Scommerce Configuration > Canonical Tags**
#### General Settings [](#bkmrk--2)
- **License Key –** Please add the license for the extension which is provided in the order confirmation email. Please note license keys are site URL specific. If you require license keys for dev/staging sites then please email us at .
[](https://docs.scommerce-mage.com/uploads/images/gallery/2025-06/DhNimage-74-1.png)
#### Category Canonical Tags [](#bkmrk--4)
- **Category Canonical Enable –** Set it to yes, if you want canonical tag on category pages.
- **Exclude Current Category in Admin –** Set it to yes, if you don't want same category to appear in the drop-down selection while choosing canonical category for a category.
- **Append Text with Every Category URL Path –** Set it to yes, if you want to append text with overridden canonical URL as well. This setting is useful when you have pagination/filtered navigation/sorting on your site.
- **Append Text with Category URL Path –** Enter text to append with canonical URL. This setting is useful when you have pagination/filtered navigation/sorting on your site. **For example** [http://www.domain.com/category.html?limit=all](http://www.domain.com/category.html?limit=all)
[](https://docs.scommerce-mage.com/uploads/images/gallery/2025-06/image-2025-06-25t173639-349.jpg)
#### Product Canonical Tags [](#bkmrk--6)
- **Product Canonical Enable –** Set it to yes, if you want canonical tag on product pages.
- **Include Category Path –** Set it to yes, if you want to include category path in the canonical tag alone with product URL.
[](https://docs.scommerce-mage.com/uploads/images/gallery/2025-06/image-2025-06-25t173735-076.jpg)
#### CMS Canonical Tags [](#bkmrk--8)
- **CMS Canonical Enable –** Set it to yes, if you want canonical tag on cms pages.
[](https://docs.scommerce-mage.com/uploads/images/gallery/2025-06/JmNimage-76-1.png)
#### No Index No Follow [](#bkmrk--10)
- **Enable –** Set it to yes, if you want to add noindex, nofollow in the head section.
- **Action Names –** Add action names here to add noindex, nofollow in the head section for specific page. New route name needs to be added in next line. Action name can be determined using **$this > getAction() > getFullActionName()**
- **Route Names –** Add route name here to add noindex, nofollow in the head section for list of pages. New route name needs to be added in next line. Route name can be determined using **Mage::app() > getFrontController() > getRequest() > getRouteName()**
[](https://docs.scommerce-mage.com/uploads/images/gallery/2025-06/pxHimage-77-1.png)
### Category set up for Canonical URL [](#bkmrk--11)
Go to **Admin > Catalog > Categories > Manage Categories > Choose Category (for which you want to set Canonical URL)**
- **Canonical URL –** Select the category from the dropdown, this selected category's URL will be rendered for search engines to pick it up as canonical URL.
- **Override Canonical URL –** Enter text here to be used as canonical tag URL. This will be given highest priority if entered.
- **Robots Setting –** Select the robot settings from dropdown, it comes with the following options -:
- **No Index, No Follow**
- **No Index, Follow**
- **Index, No Follow**
**[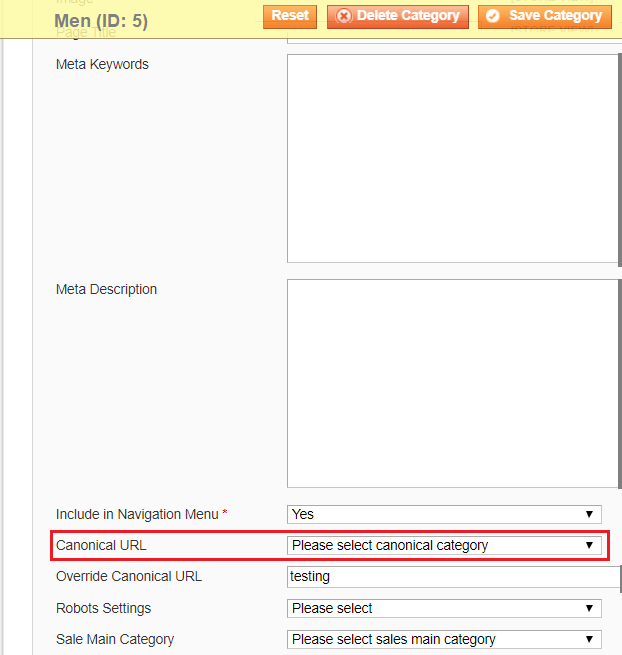](https://docs.scommerce-mage.com/uploads/images/gallery/2025-06/image-2025-06-25t180157-126.png)**
#### Product set up for Canonical URL [](#bkmrk--12)
Go to **Admin > Catalog > Manage Product > Choose Product (for which you want to set Canonical URL)**
- **Override Canonical URL –** Enter text here to be used as canonical tag URL. This will be given highest priority if entered.
- **Canonical Primary Category –** Select primary category to be included in canonical URL tag.
[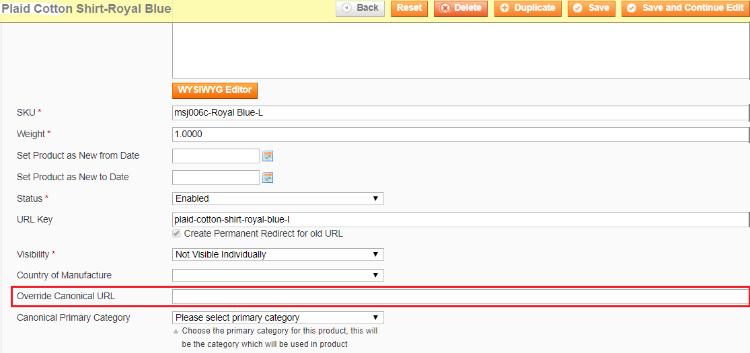](https://docs.scommerce-mage.com/uploads/images/gallery/2025-06/image-2025-06-25t180250-935.jpg)
#### CMS set up for Canonical URL [](#bkmrk--13)
Go to **Admin > Catalog > CMS > Pages > Choose Page (for which you want to set Canonical URL)**
- **Canonical URL –** Enter text here to be used as canonical tag URL. For homepage you can enter "/"
- **Robots Setting –** Select the robot settings from dropdown, it comes with the following options -:
- **No Index, No Follow**
- **No Index, Follow**
- **Index, No Follow**
**[](https://docs.scommerce-mage.com/uploads/images/gallery/2025-06/image-2025-06-25t180250-935.jpg)**
### Front-end Site View [](#bkmrk--15)
- **Category Canonical Tags –** You can enable canonical tags on the category page from **Admin > Stores > Configuration > Scommerce Configuration > Canonical Tags > Category Canonical Enable – Select – "Yes"**
**[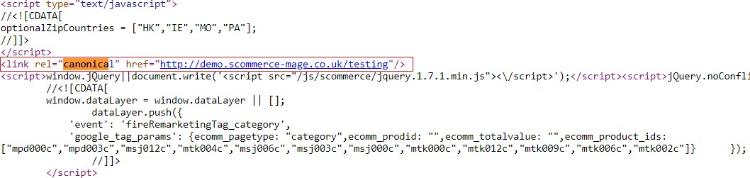](https://docs.scommerce-mage.com/uploads/images/gallery/2025-06/image-2025-06-25t180633-396.jpg)**
- **Product Canonical Tags –** To add canonical tag on the product page, go to **Admin > Stores > Configuration > Scommerce Configuration > Canonical Tags> Product Canonical Enable – Select – "Yes"**
**[](https://docs.scommerce-mage.com/uploads/images/gallery/2025-06/image-2025-06-25t180815-138.jpg)**
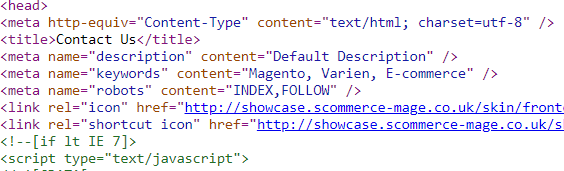
- **CMS Canonical Tags –** You can add canonical tag on the CMS page from **Admin > Stores > Configuration > Scommerce Configuration > Canonical Tags> CMS Canonical Enable – Select – "Yes"**
[](https://docs.scommerce-mage.com/uploads/images/gallery/2025-06/image-2025-06-25t180917-181.jpg)
If you have a question related to this extension please check out our [**FAQ Section**](https://www.scommerce-mage.com/magento-canonical-urls-for-category-product-and-cms-pages.html#faq) first. If you can't find the answer you are looking for then please contact [**support@scommerce-mage.com**](mailto:core@scommerce-mage.com)**.**
# Magento Rich Snippets & Cards (schema.org)
### Installation and User Guide for Magento 1 Rich Snippets & Cards (schema.org)
**Table of Contents**
1. [Installation ](#bkmrk-installation)
- Disable Compilation Mode
- Upload Package
- Clear Caches
2. [Configuration Settings for Rich Snippet ](#bkmrk-configuration-settin)
- General Settings
- HTML Selectors
- Facebook OpenGraph
- Twitter
- Attributes
3. [Structured Data / Markup Code of Front-end Page(s) in Structured Data Testing Tool ](#bkmrk-structured-data-%2F-ma)
- Home Page Markup Code
- Category Page Markup Code
- Product Page Markup Code
- Twitter, Facebook Open Graph Social Sharing Code
- Increased and Optimized Page Ranking in Search Result
### Installation [](#bkmrk-)
- **Disable Compilation Mode:** To check that this is disabled, go to **System >Tools> Compilation**. If the compiler status is 'Disabled', you are ready to go. If not, simply click the 'Disable' button on the right hand side of the screen.
- **Upload Package:** Upload the content of the module to your root folder. This will not overwrite the existing Magento folder or files, only the new contents will be added.
- **Clear Caches:** This can be done from the admin console by navigating to the cache management page (**System > Cache Management**), selecting all caches, clicking 'refresh' from the drop-down menu, and submitting the change.
### Configuration Settings for Rich Snippet [](#bkmrk--1)
Go to **Admin > Stores > Configuration > Scommerce Configuration > Rich Snippet**
#### General Settings [](#bkmrk--2)
- **Enabled –** Select "Yes" or "No" to enable or disable the module.
- **License Key –** Please add the license for the extension which is provided in the order confirmation email. Please note license keys are site URL specific. If you require license keys for dev/staging sites then please email us at .
[](https://docs.scommerce-mage.com/uploads/images/gallery/2025-06/OKyimage-78-1.png)
#### HTML Selectors [](#bkmrk--4)
- **Product view wrapper –** Main CSS class name for the product wrapper.
- **Description Attribute –** CSS class name for short description.
- **Price Info –** CSS class name for price information block including availability.
- **Product Price –** HTML element ID for the product price.
- **Product Price excl. tax –** HTML element ID for the product price excluding VAT or TAX.
- **In Stock Span –** CSS class name for "in stock" span tag for showing availability.
- **Out of Stock span –** CSS class name for "out of stock" span tag for showing availability.
- **Breadcrumbs Wrapper –** CSS class name for breadcrumbs wrapper.
- **Reviews and Rating Wrapper –** CSS class name for review name and rating wrapper.
- **Image –** HTML element ID or CSS class name for product main image.
- **Organisation –** CSS class name for div in the where log is defined.
- **Logo –** CSS class name for anchor element of the logo.
[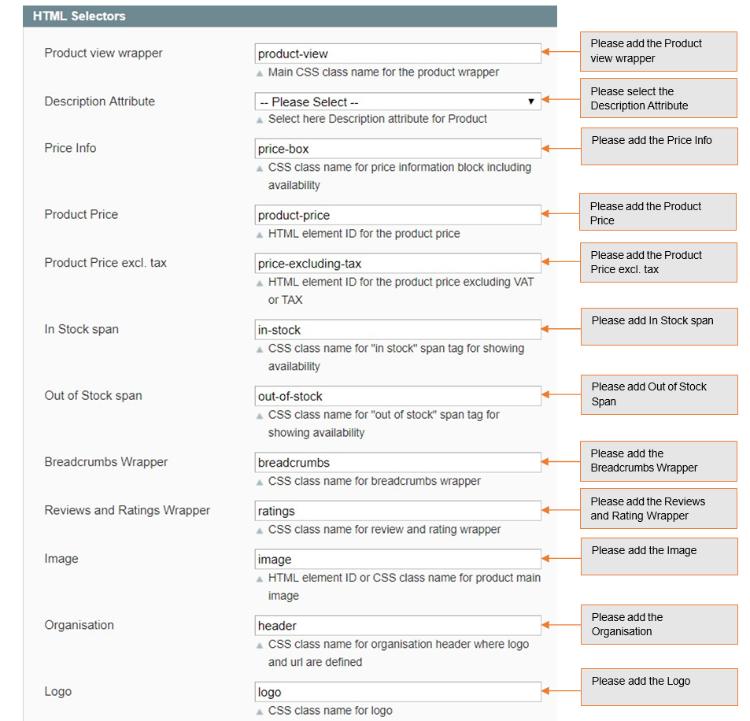](https://docs.scommerce-mage.com/uploads/images/gallery/2025-06/image-2025-06-25t182615-798.jpg)
#### Facebook OpenGraph [](#bkmrk--6)
- **Enable –** Set "yes" to enable Facebook open graph tags.
- **AppId –** Set Facebook app id
- **Sitename –** Set Facebook site name
[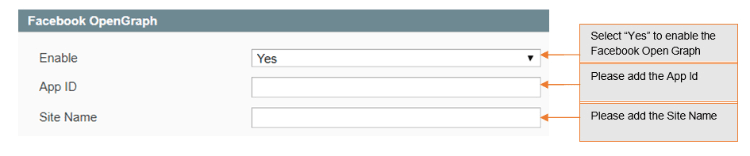](https://docs.scommerce-mage.com/uploads/images/gallery/2025-06/KeOimage-79-1.png)
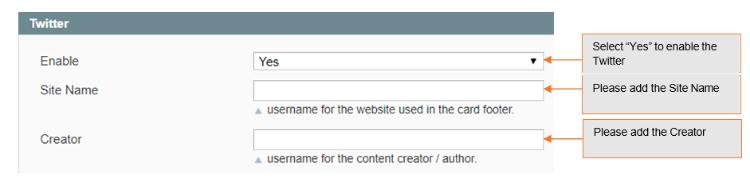
#### Twitter [](#bkmrk--8)
- **Enable –** Set "yes" to enable twitter.
- **Sitename –** Set twitter site name (@username for the website used in the card footer)
- **Creator –** Set twitter creator name (@username for the content creator / author)
[](https://docs.scommerce-mage.com/uploads/images/gallery/2025-06/image-2025-06-25t183343-836.jpg)
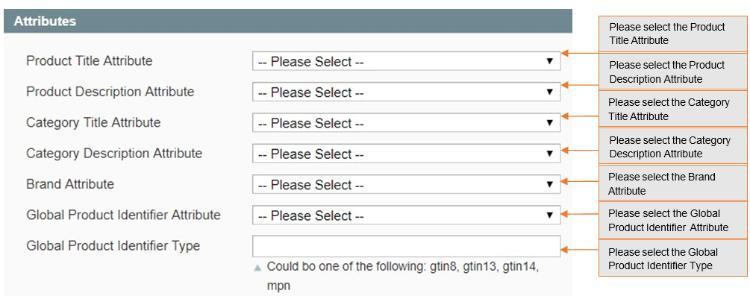
#### Attributes [](#bkmrk--10)
- **Product Title Attribute –** Select product title attribute you want to send to Google, Facebook, Twitter etc.
- **Product Description Attribute –** Select product description attribute you want to send to Google, Facebook, Twitter etc.
- **Category Title Attribute –** Select category title attribute you want to send to Google, Facebook, Twitter, etc.
- **Category Description Attribute –** Select category description attribute you want to send to Google, Facebook, Twitter etc.
- **Brand Attribute –** Please select brand attribute from the dropdown.
- **Global Product Identifier Attribute –** Select product identifier attribute from the drop-down list.
- **Global Product Identifier Type –** Select product identifier type from the drop- down list. It could be one of the following: gtin8, gtin13, gtin14, mpn.
[](https://docs.scommerce-mage.com/uploads/images/gallery/2025-06/image-2025-06-25t183450-872.jpg)
### Structured Data / Markup Code of Front-end Page(s) in Structured Data Testing Tool [](#bkmrk--12)
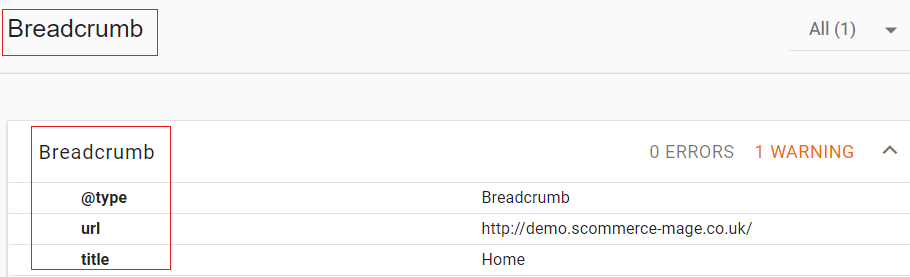
- **Home Page Markup Code –** You can add structured data/markup code on homepage from **Admin > Stores > Configuration > Rich Snippet > Enable – "Yes"**. To test structured data, go to **Structured Data Testing Tool > Provide Home Page URL** > Click **"Run Test"**.
[](https://docs.scommerce-mage.com/uploads/images/gallery/2025-06/image-2025-06-25t183647-081.png)
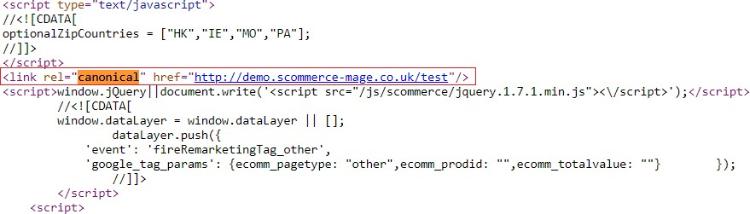
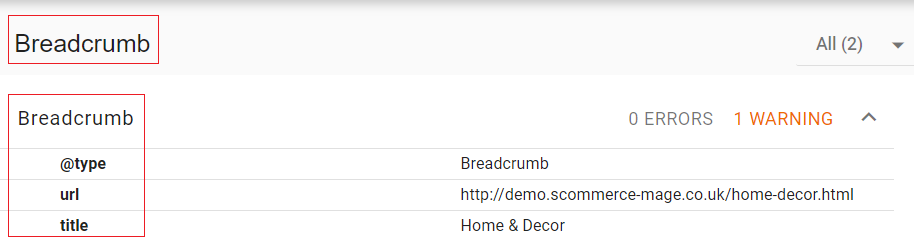
- **Category Page Markup Code –** You can add markup code, breadcrumbs on category page from Admin > Stores > Configuration > Rich Snippet > Enable – "Yes".
[](https://docs.scommerce-mage.com/uploads/images/gallery/2025-06/image-2025-06-25t183738-891.png)
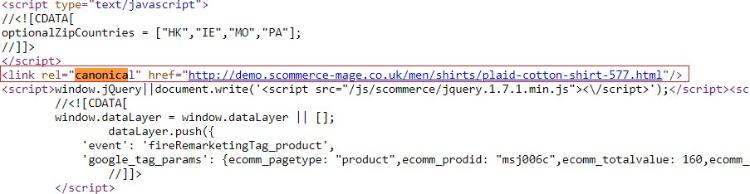
- **Product Page Markup Code –** To add structured data markup code on product page, set "Enable" to "Yes" from **Admin > Configuration > Rich Snippet** .
[](https://docs.scommerce-mage.com/uploads/images/gallery/2025-06/image-2025-06-25t183853-106.png)
#### Twitter, Facebook Open Graph Social Sharing Code [](#bkmrk--16)
- **Twitter Code –** You can enable Twitter from **Admin > Stores > Configuration> Rich Snippet > Twitter > Enable – "Yes"**
**[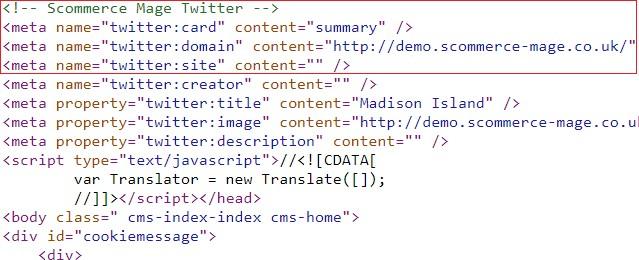](https://docs.scommerce-mage.com/uploads/images/gallery/2025-06/image-2025-06-25t183944-118.jpg)**
- **Facebook Open Graph –** Enable Facebook Open Graph from **Admin > Stores> Configuration > Rich Snippet > Facebook Open Graph > Enable – "Yes"**
**[](https://docs.scommerce-mage.com/uploads/images/gallery/2025-06/image-2025-06-25t184116-743.jpg)**
- **Increased and Optimized Page Ranking in Search Result –** In the below image you can see the increased and optimized page ranking in search results.
[](https://docs.scommerce-mage.com/uploads/images/gallery/2025-06/image-2025-06-25t184217-076.jpg)
If you have a question related to this extension please check out our [**FAQ Section**](https://www.scommerce-mage.com/magento-rich-snippets-for-google-microsoft-yahoo.html#faq) first. If you can't find the answer you are looking for then please contact [**support@scommerce-mage.com**](mailto:core@scommerce-mage.com)**.**
# Magento 1 Google Site Map Exclusion with Image Sitemap
### Installation and User Guide for Magento 1 Google Site Map Exclusion with Image Sitemap
**Table of Contents**
1. [Installation ](#bkmrk-installation)
- Disable Compilation Mode
- Upload Package
- Clear Caches
2. [Configuration Settings for Google Sitemap ](#bkmrk-configuration-settin)
- General Settings
- Exclude Categories from Sitemap
- Exclude Products from Sitemap
- Exclude CMS from Sitemap
- How to Generate Sitemap
- Add new Sitemap
- Magento Out of the Box Functionality to set the Category Path
3. [Google Sitemap XML ](#bkmrk-google-sitemap-xml)
- Product Link in Sitemap XML
- Category Link in Sitemap XML
- CMS Page Link in Sitemap XML
### Installation [](#bkmrk-)
- **Disable Compilation Mode:** To check that this is disabled, go to **System >Tools> Compilation**. If the compiler status is 'Disabled', you are ready to go. If not, simply click the 'Disable' button on the right hand side of the screen.
- **Upload Package:** Upload the content of the module to your root folder. This will not overwrite the existing Magento folder or files, only the new contents will be added.
- **Clear Caches:** This can be done from the admin console by navigating to the cache management page (**System > Cache Management**), selecting all caches, clicking 'refresh' from the drop-down menu, and submitting the change.
### Configuration Settings for Google Sitemap [](#bkmrk--1)
Go to **Admin > Stores > Configuration > Scommerce Configuration > Sitemap**
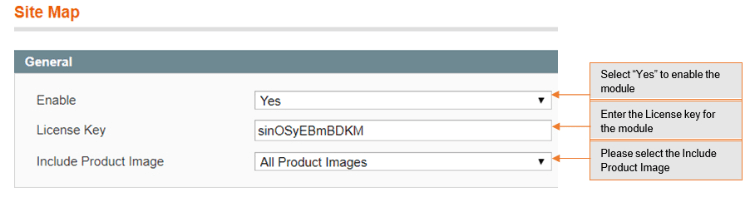
#### General Settings [](#bkmrk--2)
- **Enabled** - Select "Yes" or "No" to enable or disable the module.
- **License Key** - Please add the license for the extension which is provided in the order confirmation email. Please note license keys are site URL specific. If you require license keys for dev/staging sites then please email us at .
- **Include Product Image** - This option allows to add main product image or main and additional product images to Google Site Map.
[](https://docs.scommerce-mage.com/uploads/images/gallery/2025-07/image-82-1.png)
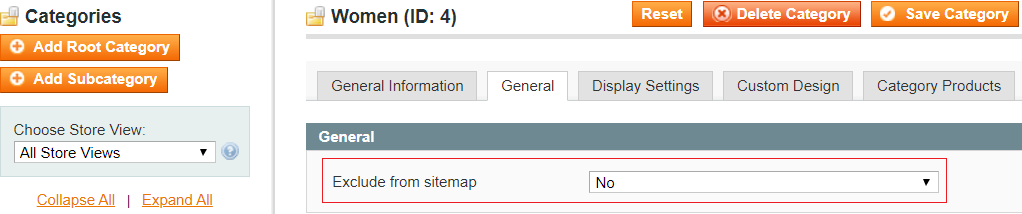
- **Exclude Categories from Sitemap** - To include or exclude categories, go to **Admin > Catalog > Manage Categories > Select Category** (you want to exclude from site map) > General > **Exclude from Sitemap:** Set to **"Yes/No"**.
[](https://docs.scommerce-mage.com/uploads/images/gallery/2025-07/image-2025-07-02t152500-070.png)
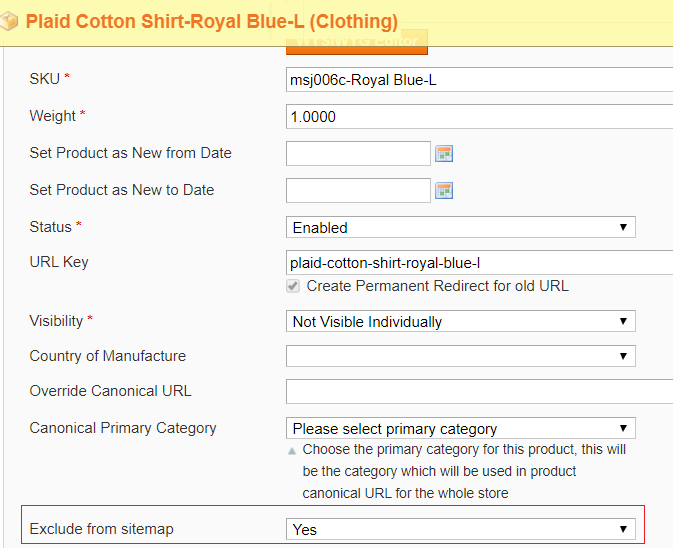
- **Exclude Products from Sitemap** - To exclude products from sitemap, go to **Admin > Catalog > Manage Products > Select Product** (you want to exclude from site map) > General > **Exclude from Sitemap:** Set to **"Yes/No"**.
[](https://docs.scommerce-mage.com/uploads/images/gallery/2025-07/image-2025-07-02t152619-249.png)
- **Exclude CMS from Sitemap** - To exclude CMS pages from sitemap, go to **Admin > CMS > Pages > Select CMS Page** (you want to exclude from site map) > General > **Exclude from Sitemap:** Set to **"Yes/No"**.
[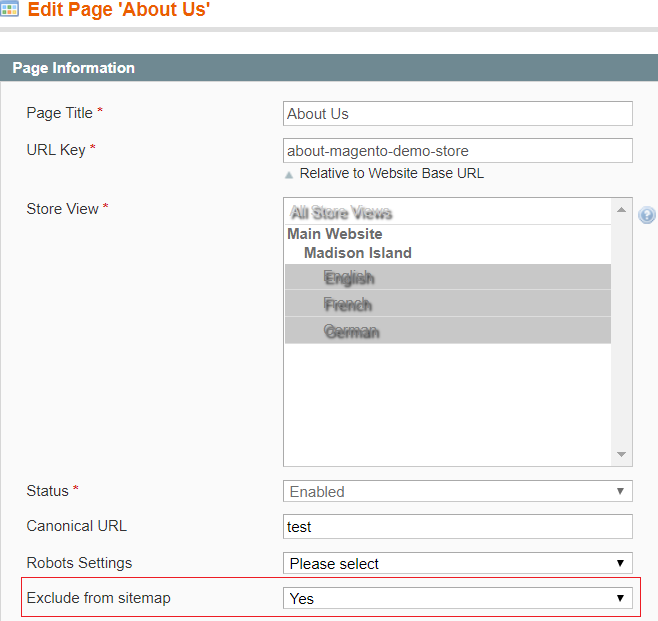](https://docs.scommerce-mage.com/uploads/images/gallery/2025-07/image-2025-07-02t152907-680.png)
- **How to Generate Sitemap** - To generate the site map from the admin panel go to **Admin > Catalog > Google Sitemap >** Click **"Generate Sitemap"**.
[](https://docs.scommerce-mage.com/uploads/images/gallery/2025-07/image-2025-07-02t153026-177.jpg)
- **Add new Sitemap** - You can create a new site map from **Admin > Catalog > Google Sitemap >** Click **"Add Sitemap"**, it redirects to New Site Map page, and by providing all the required details you can create Site Map.
[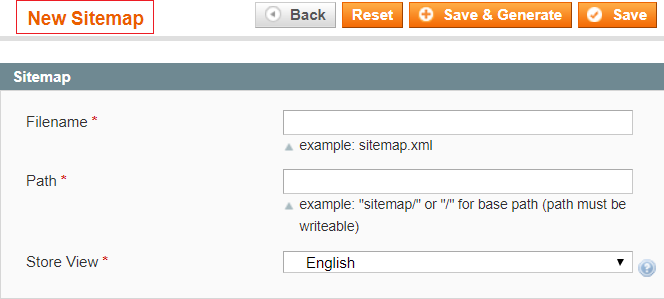](https://docs.scommerce-mage.com/uploads/images/gallery/2025-07/image-2025-07-02t153104-410.png)
- **Magento Out of the Box Functionality to set the Category Path** - To include category path in product URLs in sitemap.xml, go to **Admin > System > Catalog > Catalog > Search Engine Optimizations > Use Categories Path for Product URLs**: Set to **"Yes"**.
[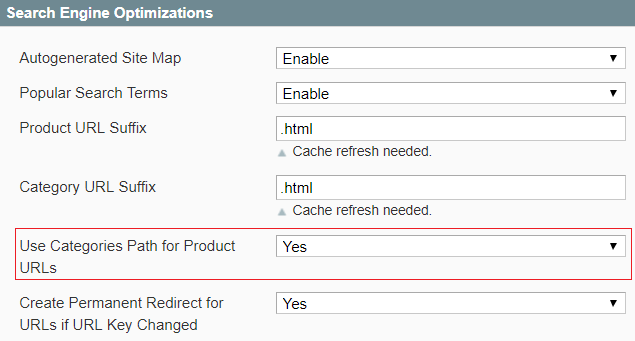](https://docs.scommerce-mage.com/uploads/images/gallery/2025-07/image-2025-07-02t153146-477.png)
### Google Sitemap XML
Google site map shows all the Included Products, Categories, and CMS Page links in the sitemap.xml
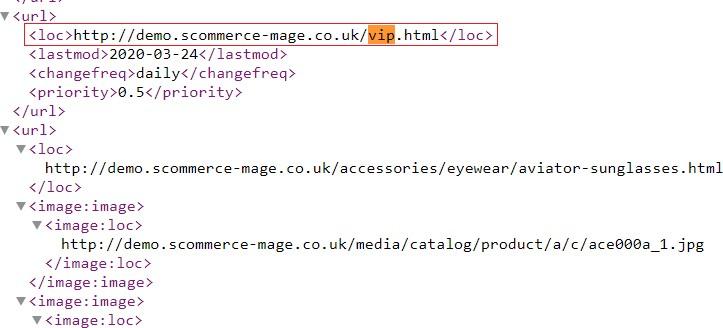
- **Product Link in Sitemap XML** - You can see the product link in the Google Sitemap XML.
[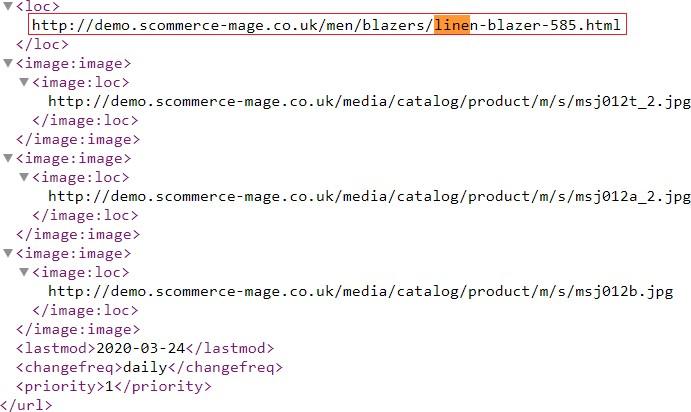](https://docs.scommerce-mage.com/uploads/images/gallery/2025-07/image-2025-07-02t153233-495.jpg)
- **Category Link in Sitemap XML** - You can see the category link in the Google Sitemap XML.
[](https://docs.scommerce-mage.com/uploads/images/gallery/2025-07/image-2025-07-02t153324-184.jpg)
- **CMS Page Link in Sitemap XML** - You can see the about-us page link in the Google Sitemap XML.
[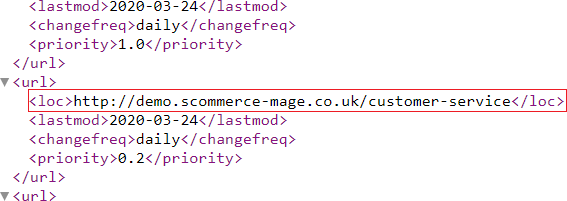](https://docs.scommerce-mage.com/uploads/images/gallery/2025-07/image-2025-07-02t153712-727.png)
If you have a question related to this extension please check out our [**FAQ Section**](https://www.scommerce-mage.com/magento-google-site-map-exclusion.html#faq) first. If you can't find the answer you are looking for then please contact [**support@scommerce-mage.com**](mailto:core@scommerce-mage.com)**.**