User Experience Extensions
- Magento 2 Product 360 view
- Magento 2 FAQ
- Magento 2 Cancel Order by Customer on the Frontend
- Magento 2 Previously Ordered Products
- Magento 2 Product Shelf Life
- Magento 2 Social Login
- Magento 2 VAT Exemption
- Magento 2 Substitute Products
- Magento 2 Product Reviews
- Magento 2 Advanced Store Locator
- Magento 2 Abandoned Basket Email
Magento 2 Product 360 view
Installation and User Guide for Magento 2 Product 360 view extension
Table of Contents
- Installation
- Installation via app/code
- Installation via Composer
- Configuration Settings for Product360 view
- General Settings
- 360 view settings
- Add 360 View Images to a Product
- Frontend
Installation
-
Installation via app/code: Upload the content of the module to your root folder. This will not overwrite the existing Magento folder or files, only the new contents will be added. After the successful upload of the package, run below commands on Magento 2 root directory.
php bin/magento setup:upgrade php bin/magento setup:di:compile php bin/magento setup:static-content:deploy -
Installation via Composer: Please follow the guide provided in the below link to complete the installation via composer.
Configuration Settings for Product 360 view
Go to Admin > Stores > Configuration > Scommerce Configuration > Product 360 view
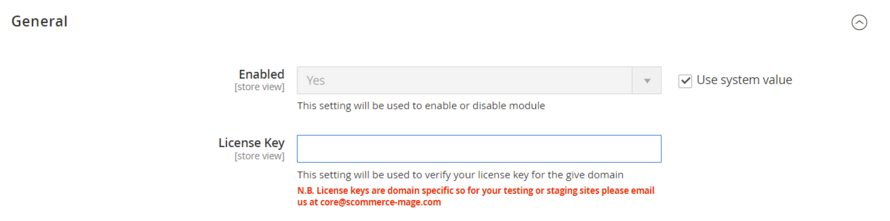
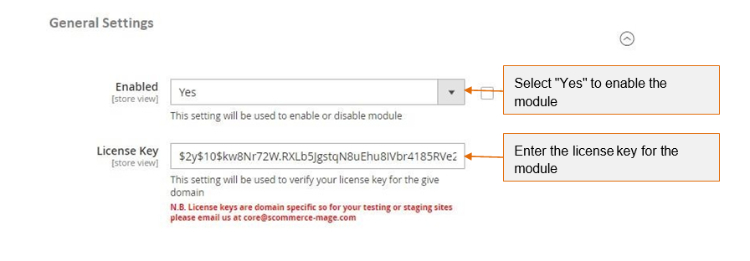
General Settings
- Enabled – Select "Yes" or "No" to enable or disable the module.
- License Key – Please add the license for the extension which is provided in the order confirmation email. Please note license keys are site URL specific. If you require license keys for dev/staging sites then please email us at support@scommerce-mage.com.
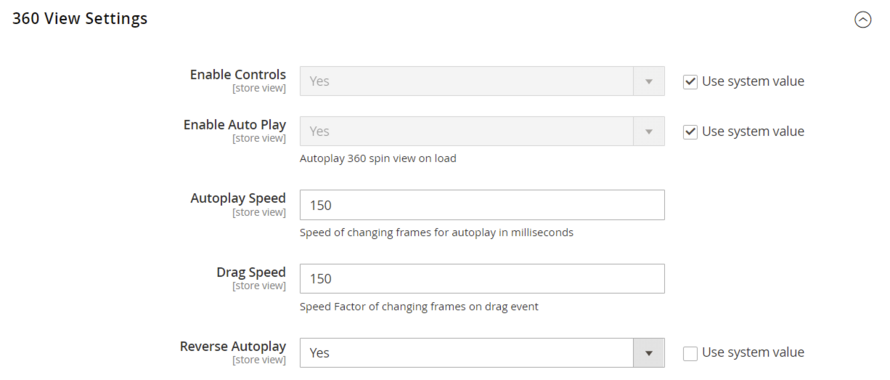
360 View Settings
- Enable Controls – Select "Yes" or "No" to enable or disable the navigation controls on 360view image.
- Enable Auto Play – Select "Yes" or "No" to enable or disable automatically spin 360 view image on page load .
- Autoplay Speed – Enter the speed for automatic spin of 360 view image. It controls the Speed of changing frames for autoplay in milliseconds
- Drag Speed – Enter the speed with which user can drag on the image. It controls the Speed Factor of changing frames on drag event
- Reverse Autoplay – Select "Yes" or "No" to enable or disable reverse autoplay.
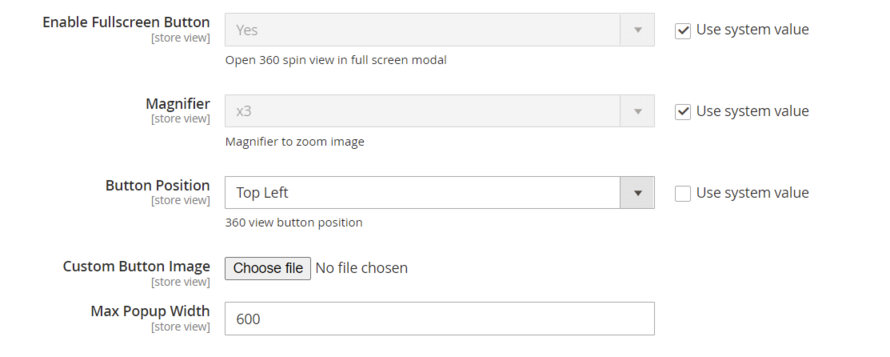
- Enable Fullscreen Button – Select "Yes" or "No" to open or close 360 view spin in fullscreen.
- Magnifier – Select the Magnifier stregnth from dropdown which controls the zoom for the image.
- Button Position – Select the placement of 360 view button on the frontend.
- Custom Button Image– Upload custom 360 view button image.
- Max Popup Width – Enter the maximum width of 360 view popup.
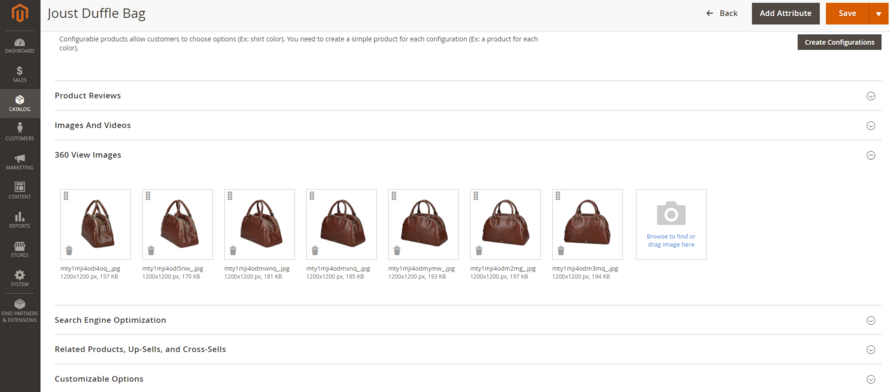
Add 360 View Images to a Product
Login to admin panel and go to Catalog>Products, select a product then click edit from the Action column. Scroll down to find '360 View Images' and upload the images as shown in the below screengrab:-
Frontend
360 View
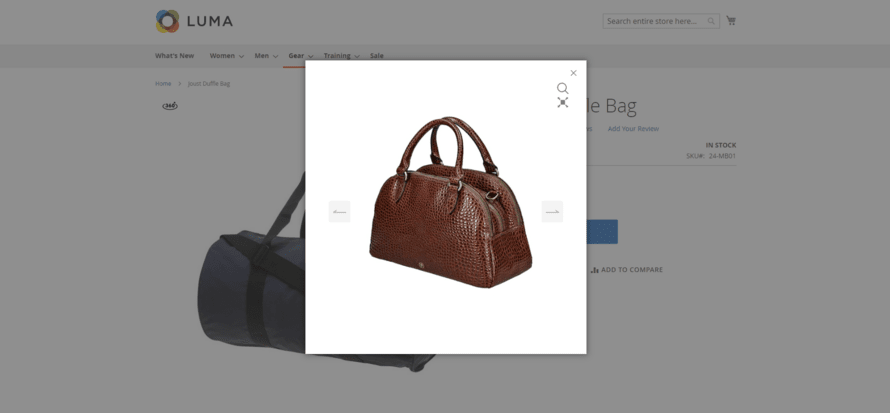
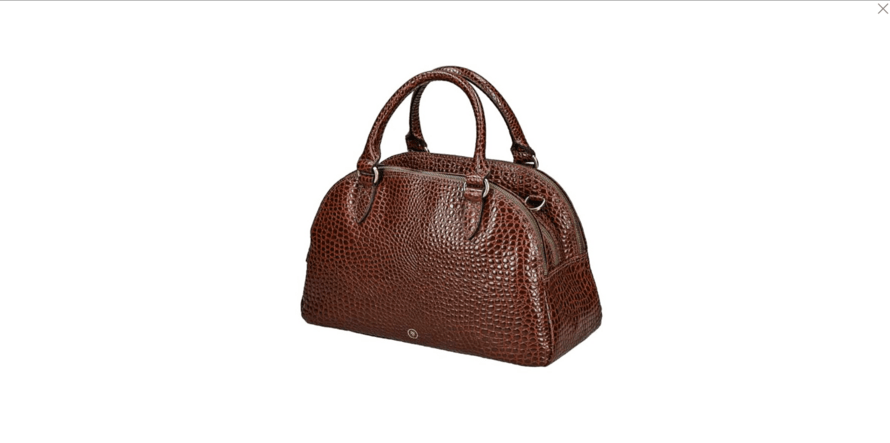
360 View Full Screen Image
If you have a question related to this extension please check out our FAQ Section first. If you can't find the answer you are looking for then please contact support@scommerce-mage.com.
Magento 2 FAQ
Installation and User Guide for Magento 2 FAQ Extension
Table of Contents
- Installation
- Installation via app/code
- Installation via Composer
- Configuration Settings for FAQ
- General Settings
- Manage FAQ's
- Manage FAQ Category
- Front-end Site view
- FAQ Categories
- FAQ Product
Installation
-
Installation via app/code: Upload the content of the module to your root folder. This will not overwrite the existing Magento folder or files, only the new contents will be added. After the successful upload of the package, run below commands on Magento 2 root directory.
php bin/magento setup:upgrade php bin/magento setup:di:compile php bin/magento setup:static-content:deploy -
Installation via Composer: Please follow the guide provided in the below link to complete the installation via composer.
Configuration Settings for FAQ
Go to Admin > Stores > Configuration > Scommerce Configuration > FAQ
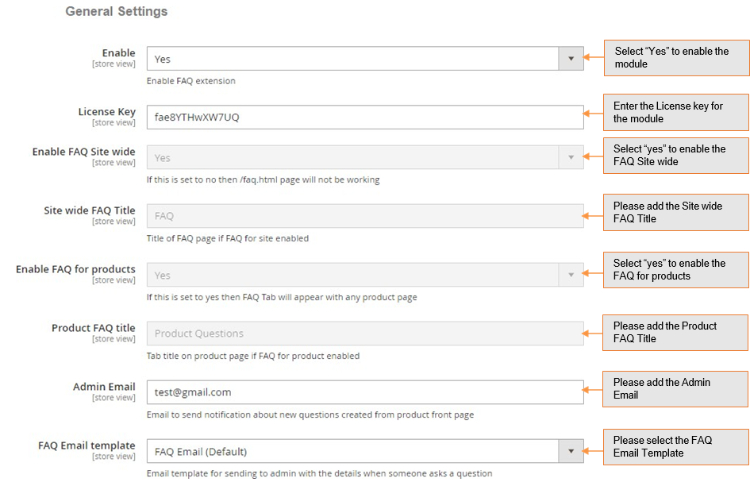
General Settings
- Enabled – Select "Yes" or "No" to enable or disable the module.
- License Key – Please add the license for the extension which is provided in the order confirmation email. Please note license keys are site URL specific. If you require license keys for dev/staging sites then please email us at support@scommerce-mage.com.
- Enable FAQ Site Wide – Set "yes" to enable FAQ page.
- Site Wide FAQ Title – Title of FAQ page if FAQ for site enabled.
- Enable FAQ for Products – If this is set to yes then FAQ Tab will appear on product pages.
- Product FAQ title – Tab title on product page if FAQ for product enabled.
- Admin Email – Email to send notification about new questions created from product front page.
- FAQ Email Template – Email Template for sending to admin with the details when someone asks a question.
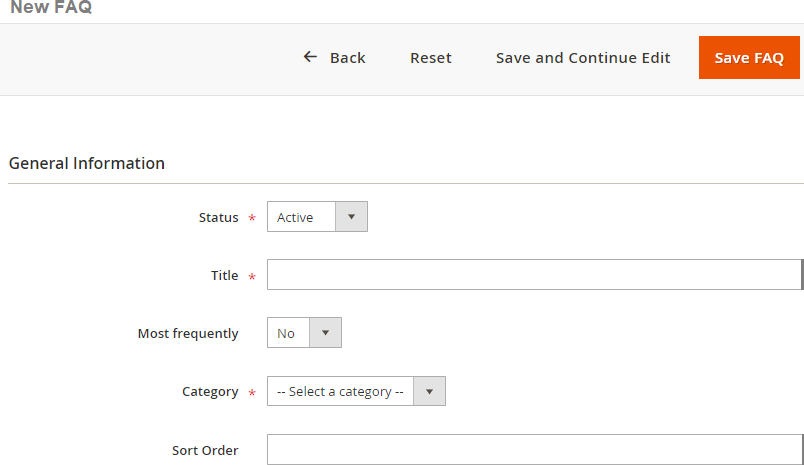
Manage FAQ's - You can manage, update and add new FAQ's from Admin > FAQ > Manage FAQ's. To add new FAQ's follow the below settings:-
Add New FAQ: Add new FAQ > General Tab
- Status – Status of FAQ Active/Inactive
- Title – Title for FAQ
- Most Frequently – Set "Yes" if the question is asked frequently.
- Category – Category for FAQ
- Sort Order – To define sort order for FAQ
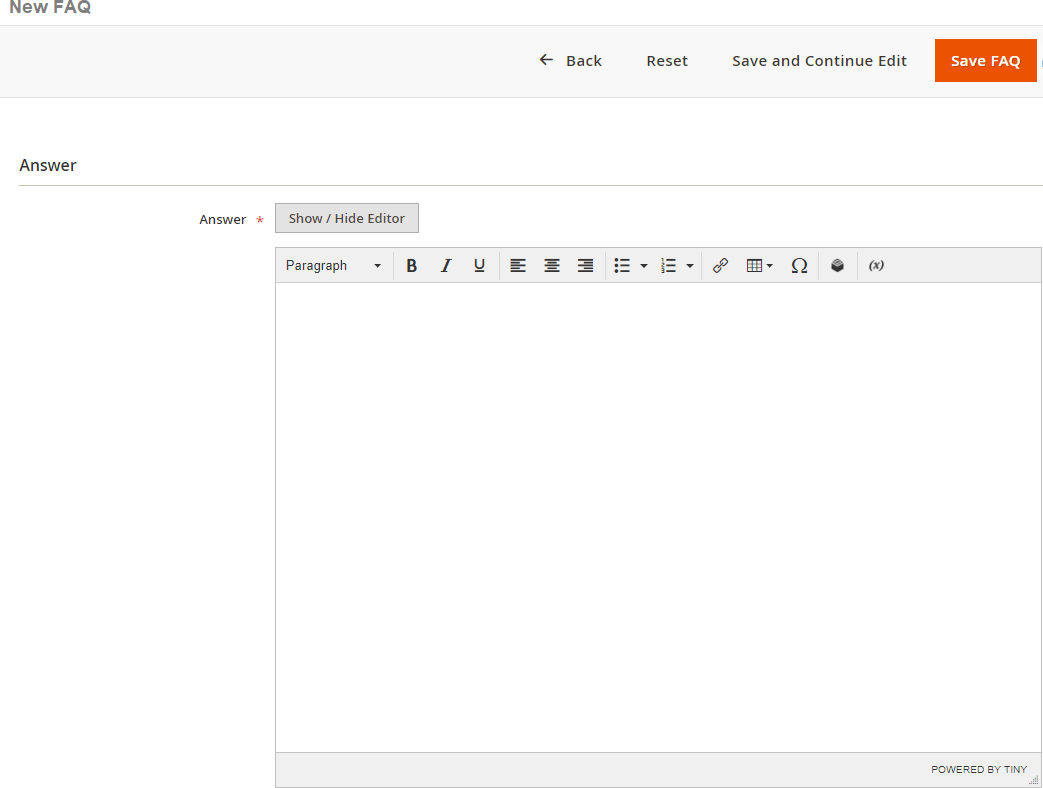
Add FAQ Answer: To add answer go to Admin > FAQ > Manage FAQ's > Add new FAQ > Answer > Save FAQ.
- Answer – Add answer to the FAQ
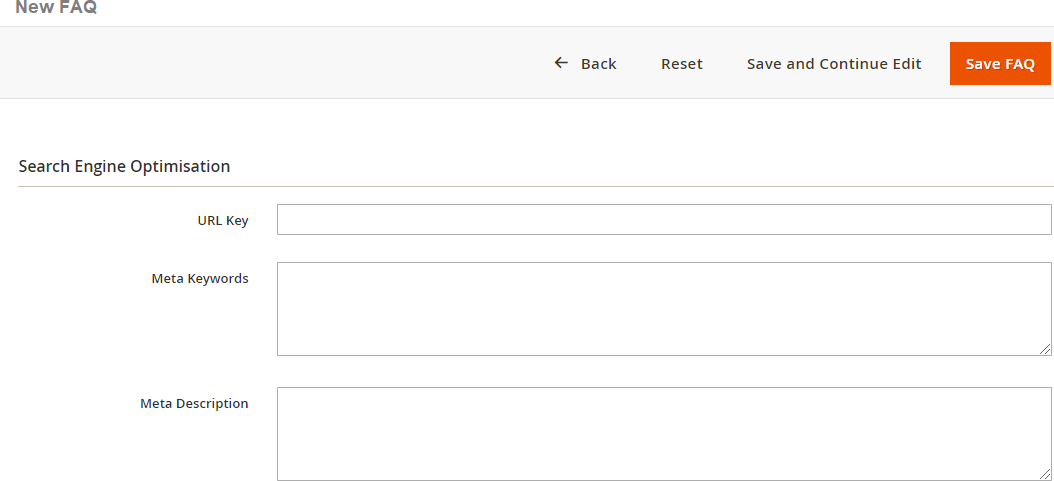
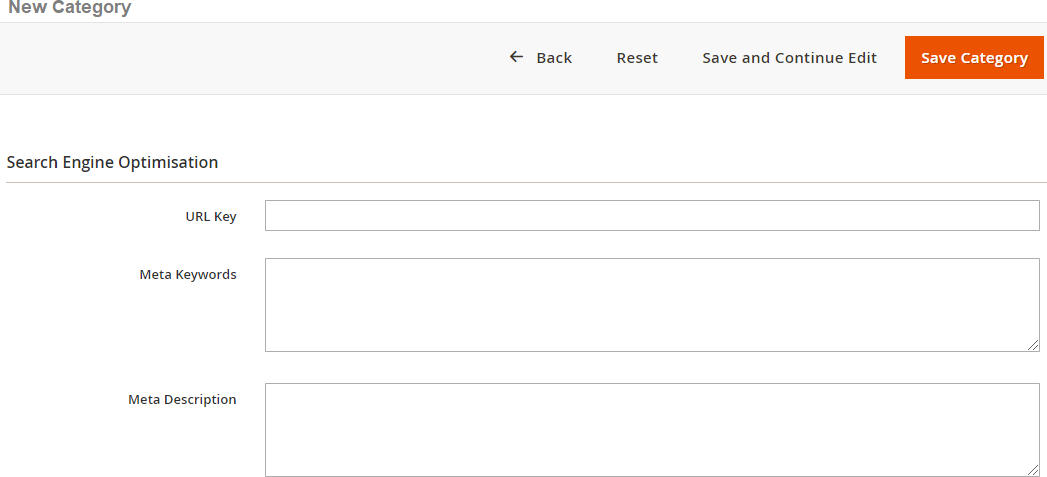
Add Meta Description /Keywords for FAQ's: You can add meta description/keywords from Admin > FAQ > Manage FAQ's > Add new FAQ > Search Engine Optimization.
- URL key – URL for FAQ
- Meta Keywords – Keywords for FAQ
- Meta Description – Description for FAQ
Add Websites: To add websites go to, Admin > FAQ > Manage FAQ's > Add new FAQ > Websites.
- Stores view – Select stores where FAQ will be visible

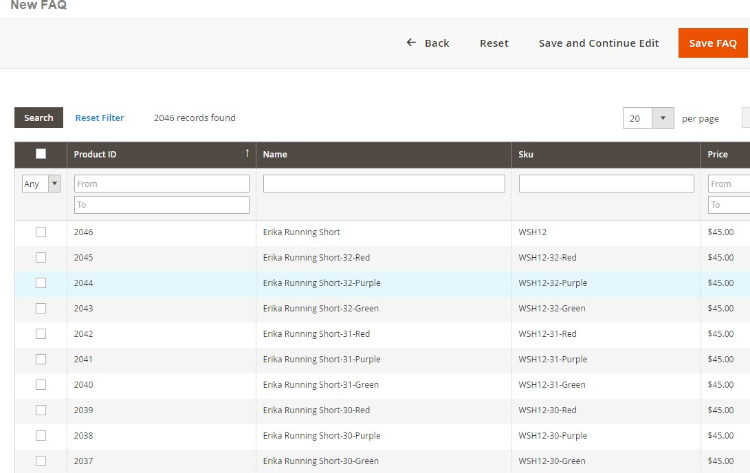
Select Products for FAQ: You can select product from Admin > FAQ > Manage FAQ's > Add new FAQ > Selected Products > Save FAQ.
- Select Product – Select products to associated FAQ's.
Manage FAQ Category: You can manage, update and add new category for FAQ's from Admin > FAQ > Add new FAQ Category. Below is the configuration to add new FAQ category:-
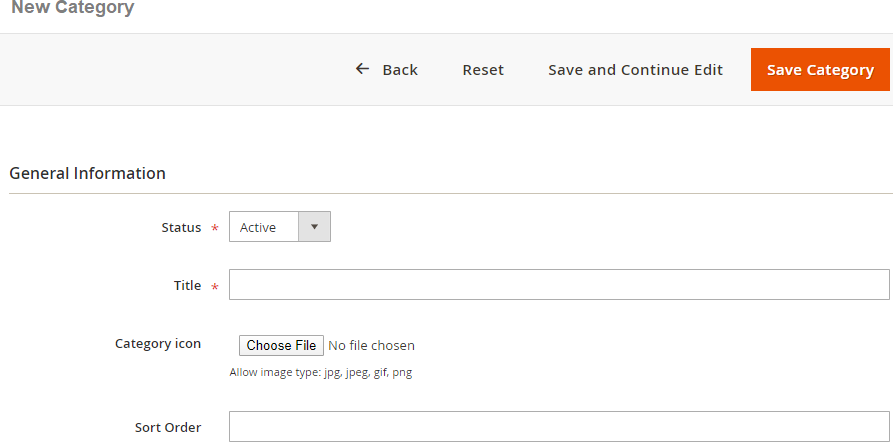
Add New FAQ Category: Add new FAQ Category > General Tab
- Status – Status of FAQ Category Active/Inactive
- Title – Title for FAQ Category
- Category Icon – Icon for Category
- Sort Order – To define sort order for FAQ
Add Meta Description/Keywords for FAQ Category: You can add meta description/keywords from Admin > FAQ > Manage FAQ's > Add new FAQ Category > Search Engine Optimization.
- URL Key – URL for FAQ Category
- Meta Keywords – Keywords for FAQ Category
- Meta Description – Description for FAQ Category
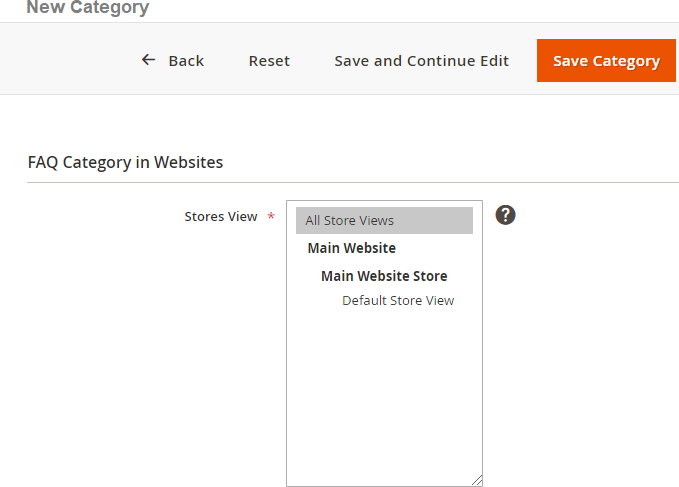
FAQ Category in Websites: To add websites go to, Admin > FAQ > Manage FAQ's > Add new Category > FAQ Category in Websites.
- Stores view – Select stores where FAQ will be visible.
Front-end Site view
-
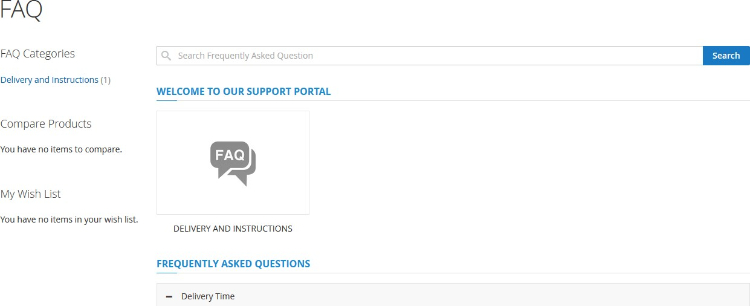
FAQ Categories - When you enable the module and set "Yes" for " Enable FAQ Site Wide" from Admin > Stores > Configuration > Scommerce Configuration> FAQ , then on the front-end, it shows FAQ page with categories.
-
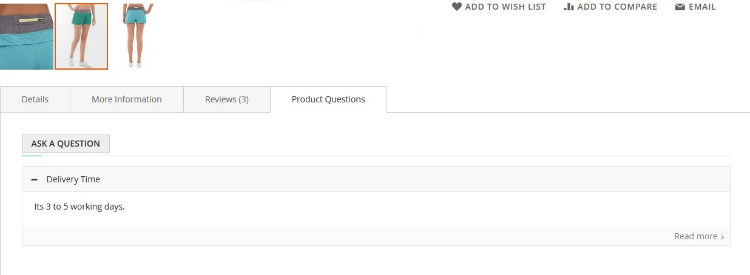
FAQ Product - Select "Yes" for " Enable FAQ for Products" from Admin > Stores > Configuration > Scommerce Configuration > FAQ
If you have a question related to this extension please check out our FAQ Section first. If you can't find the answer you are looking for then please contact support@scommerce-mage.com.
Magento 2 Cancel Order by Customer on the Frontend
Installation and User guide for Magento 2 Cancel Order by Customer on the Frontend Extension
Table of Contents
- Installation
- Installation via app/code
- Installation via Composer
- Configuration Settings for Cancel Order
- General Settings
- Front-end Site View for Order Cancellation from My Account Section
- Cancel Order from My Account Section
- Cancel Order Popup
- Notification Message for Cancel Order
- Cancel Order status (Cancelled)
- Order Cancellation Email
- Guest Form
- Order ID
- Billing Last Name
- Find Order By
- Order Information Page
- Cancel Order Successfully
Installation
-
Installation via app/code: Upload the content of the module to your root folder. This will not overwrite the existing Magento folder or files, only the new contents will be added. After the successful upload of the package, run below commands on Magento 2 root directory.
php bin/magento setup:upgrade
php bin/magento setup:di:compile
php bin/magento setup:static-content:deploy-
Installation via Composer: Please follow the guide provided in the below link to complete the installation via composer.
Configuration Settings for Cancel Order
Go to Admin > Stores > Configuration > Scommerce Configuration > Cancel Order
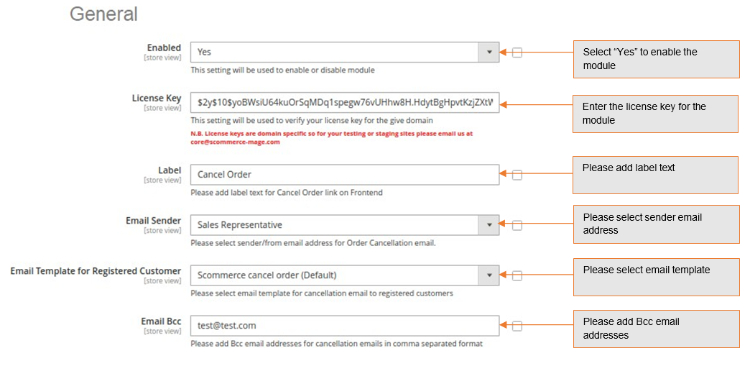
General Settings
-
Enabled - Select "Yes" or "No" to enable or disable the module.
-
License Key - Please add the license for the extension which is provided in the order confirmation email. Please note license keys are site URL specific. If you require license keys for dev/staging sites then please email us at support@scommerce-mage.com.
-
Label – Please provide label text for cancel order link which will be shown on the frontend.
-
Email Sender – Please enter/sender from email address for Order Cancellation email.
-
Email Template for Guest – Please select email template for sending cancellation email to guest customer.
-
Email Template for Registered Customer – Please select email template for sending cancellation email to registered customer.
-
Email BCC – Please add CC email addresses for Order Cancellation emails in comma separated format.
-
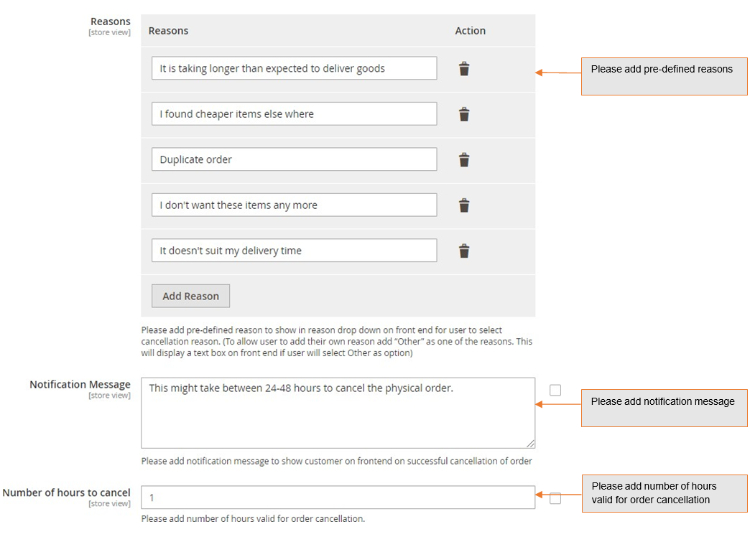
Reasons – Select order cancellation reason from the dropdown or select other to define your own reasons. Option "Other" will display a text box on front end, where you can add reason of cancellation**.**
-
Notification Message – Enter notification message you want to show on frontend for order cancellation.
-
Number of hours to cancel – Please add number of hours valid for order cancellation.
Front-end Site View for Order Cancellation from My Account Section
-
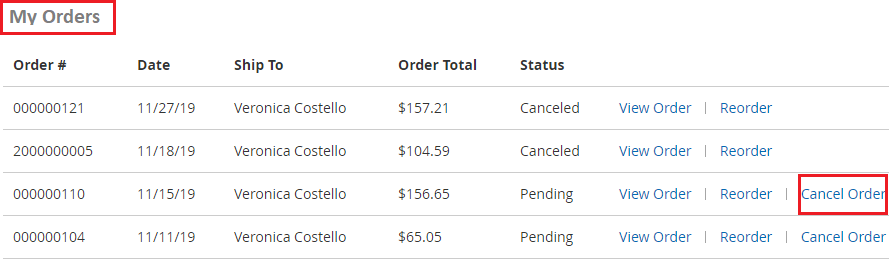
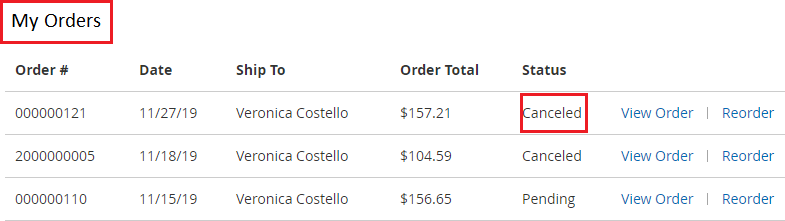
Cancel Order from My Account Section - When you enable the module then it shows "Cancel Order" link on the front-end My Account > My Orders section.
-
Cancel Order Popup - When you click "Cancel Order" button from My Account > My Orders section, it displays a pop up, from where you can add/select your own reasons of order cancellation and by clicking "Cancel Order" button you can cancel order.

-
Notification Message for Cancel Order - After the order cancellation it shows notification message on the front-end.
-
Cancel Order status (Cancelled) - When you cancel the order then it automatically updates the order status from Pending to Cancelled.
-
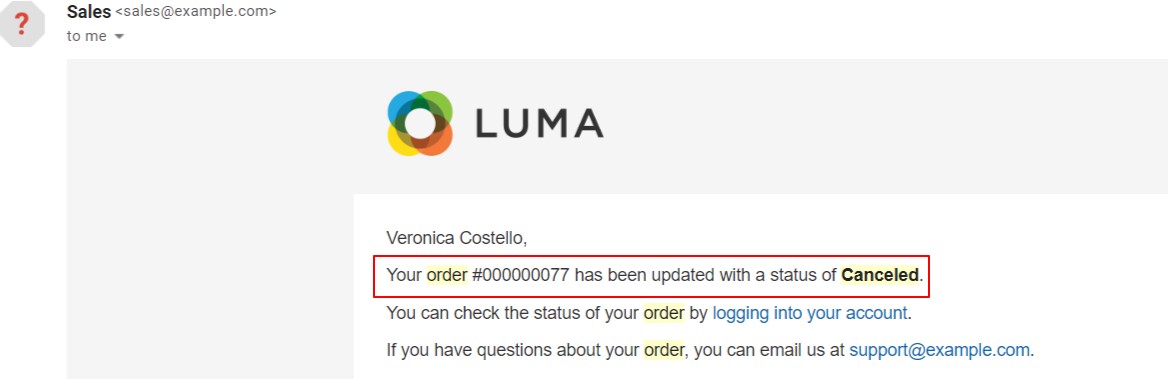
Order Cancellation Email - After the successful order cancellation, it sends an email notification to the administrator and the customer, below is the sample email for the same.
-
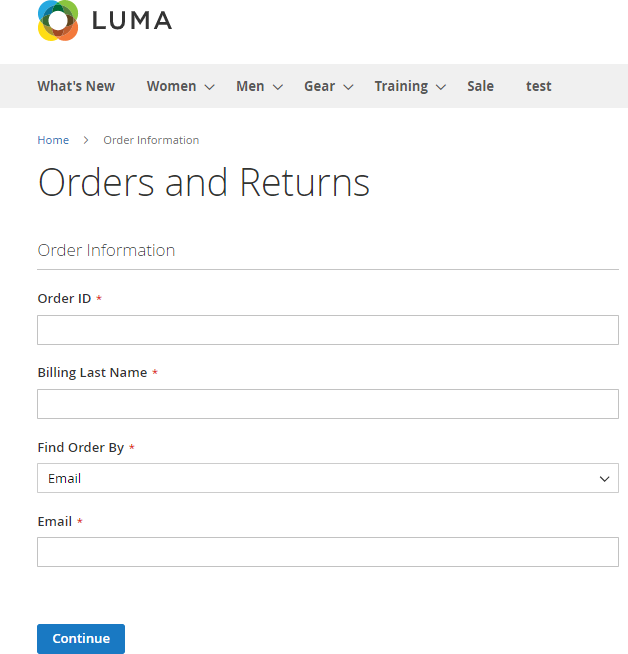
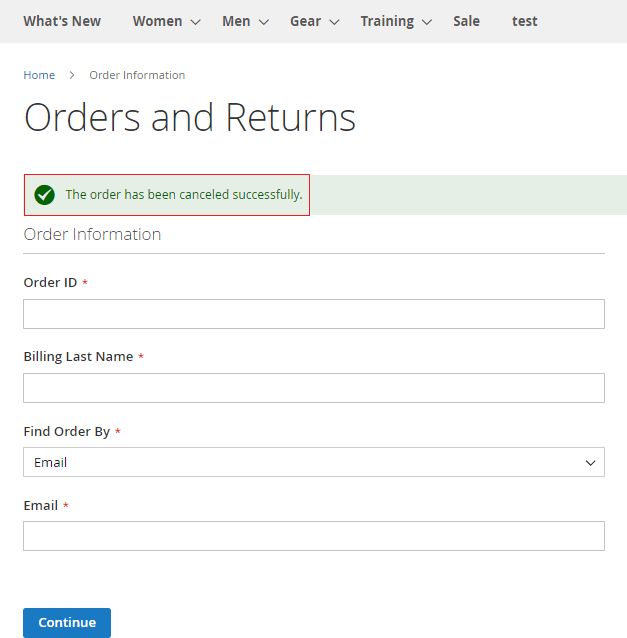
Guest Form - The guest user can cancel order by submitting the Orders and Returns form. Here is the link to access the form Orders and Returns. The form will have the following fields: -
-
Order ID - enter the order Id, you want to cancel.
-
Billing Last Name - enter the last name.
-
Find Order By - select the Email / ZIP code.
-
Email - enter the email address.
-
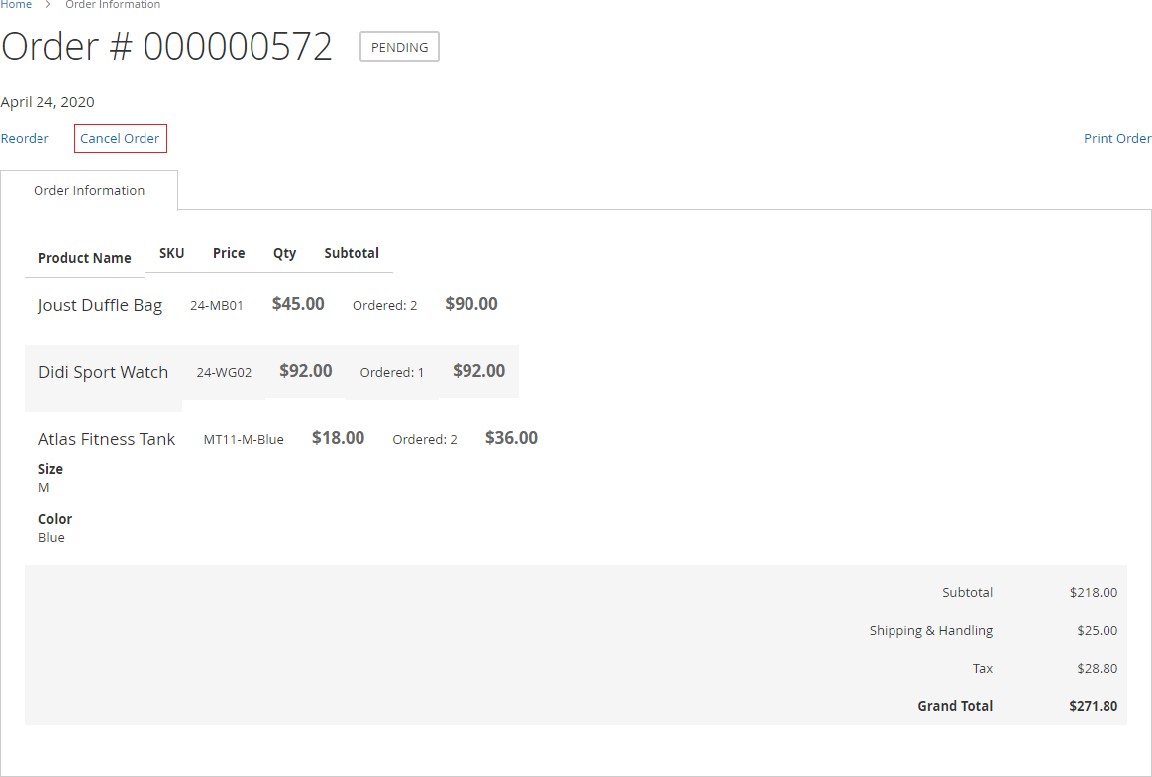
Order Information Page - After filling the Orders and Returns form when you click "Continue" button, it redirects on order information page, from where you can cancel the order by clicking "Cancel Order" button.
-
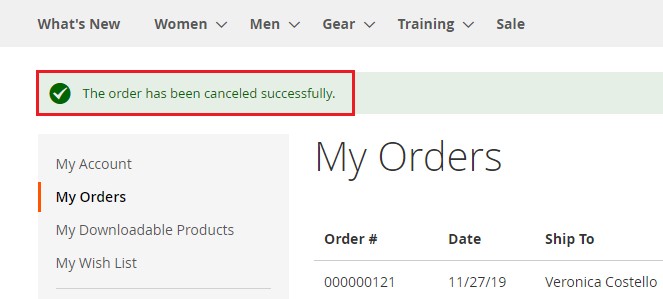
Cancel Order Successfully - Once the order is cancelled, it displays the successful cancellation message.
If you have a question related to this extension please check out our FAQ section first. If you can't find the answer you are looking for then please contact support@scommerce-mage.com.
Magento 2 Previously Ordered Products
Installation and User Guide for Magento 2 Reorder Previous Products Extension
Table of Contents
- Installation
- Installation via app/code
- Installation via Composer
- Configuration Settings for Reorder Previous Products
- General Settings
- Hide One or Multiple Columns from the Previous Purchases Grid
- Front-end Site view
- Previous Purchase Grid
- Hide Columns in the Previous Purchase Grid
- Add One or Multiple Products to Cart Directly From the Grid
Installation
-
Installation via app/code: Upload the content of the module to your root folder. This will not overwrite the existing Magento folder or files, only the new contents will be added. After the successful upload of the package, run below commands on Magento 2 root directory.
php bin/magento setup:upgrade php bin/magento setup:di:compile php bin/magento setup:static-content:deploy -
Installation via Composer: Please follow the guide provided in the below link to complete the installation via composer.
Configuration Settings for Reorder Previous Products
Go to Admin> Stores> Configuration> Scommerce Configuration> Global Site Tag (gtag.js)
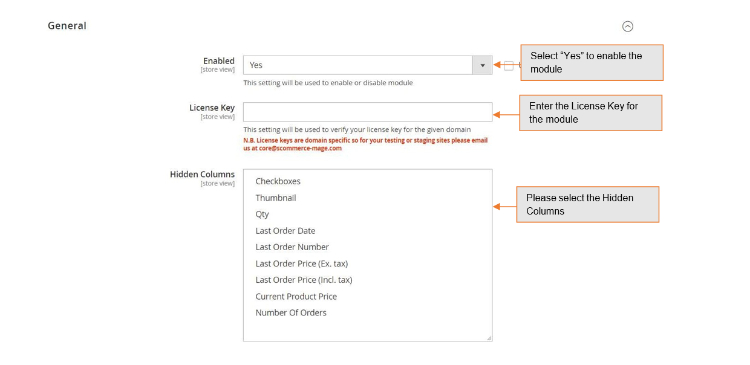
General Settings
- Enabled – Select "Yes" or "No" to enable or disable the module.
- License Key – Please add the license for the extension which is provided in the order confirmation email. Please note license keys are site URL specific. If you require license keys for dev/staging sites then please email us at support@scommerce-mage.com.
- Hidden Columns – You can hide one or multiple columns from the previous purchases grid. The columns that can be hidden are listed below:-
-
Thumbnail
- Qty(Quantity)
-
Last Order Date
-
Last Order Number
-
Last Order Price(Ex. tax)
-
Last Order Price(Incl. tax)
-
Current Product Price
-
Number of Orders
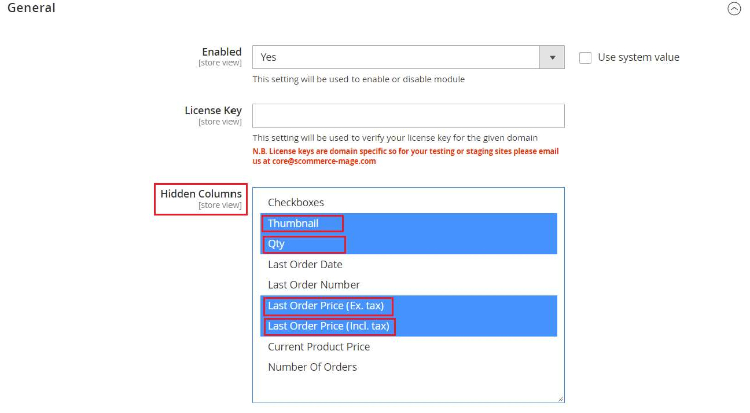
Hide One or Multiple Columns from the Previous Purchases Grid
To hide one or multiple columns from the previous purchases grid please go to Admin> Stores> Configuration> Scommerce Configuration> Previous Products.Find the setting named Hidden Columns select one or multiple columns that you want to hide and save the settings.
Front-end Siteview
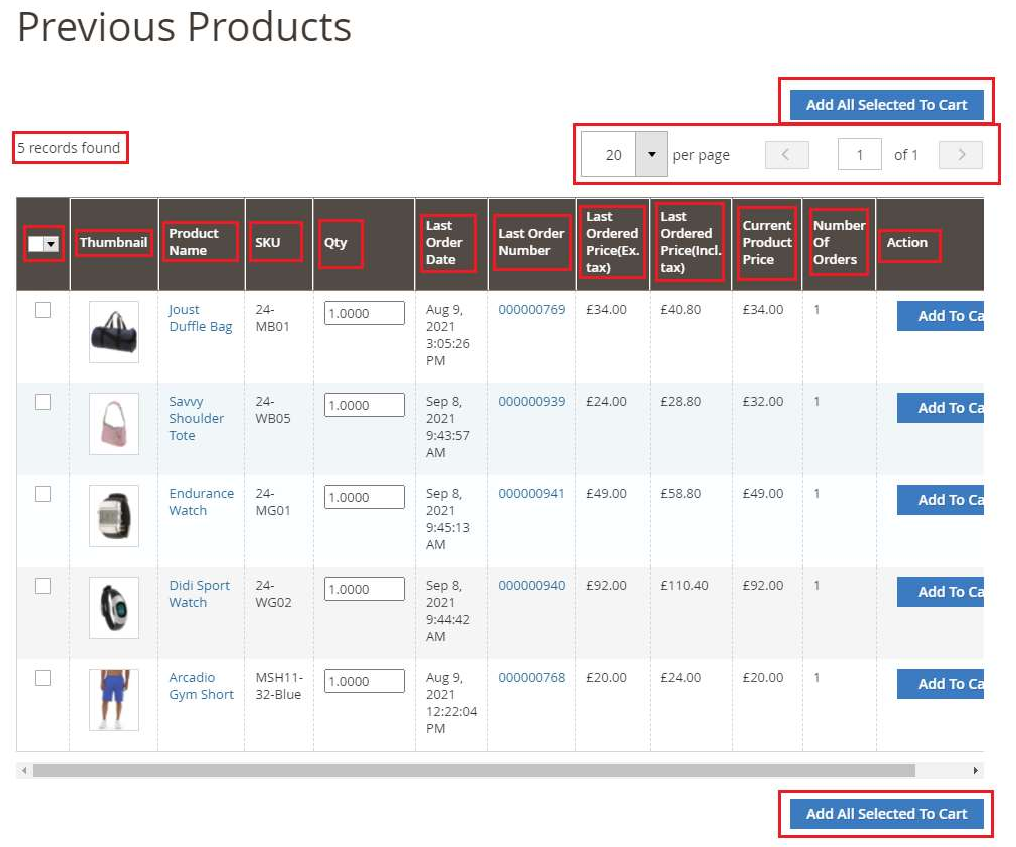
Previous Purchase Grid
Go to the website and login to your account then navigate to My Account section and from the left menu click on My Previous Products. This grid shows detailed information about all off your previous purchases. You can easily navigate through the list with the help of pagination and selectors. The previous purchases grid will open as shown in the image below:-
Hide Columns in the Previous Purchase Grid
Please go to Admin> Stores> Configuration> Scommerce Configuration >Previous Products and select the columns in Hidden Columns that you want to hide. For eg:- we have selected Thumbnail, QTY, Last Order Price(Incl taxes) and Last Order Price(Excl Taxes).

Add One or Multiple Products to Cart Directly from the Grid
If you want to add one product to cart then click on the checkbox in the selector column then click on Add to Cart from the rightmost column Whereas if you want to add multiple products to cart then select the products that you want to purchase then click on the Add All Selected to Cart button either on the top or bottom of the list.
If you have a question related to this extension please check out our FAQ section first. If you can't find the answer you are looking for then please contact support@scommerce-mage.com.
Magento 2 Product Shelf Life
Installation and User Guide for Magento 2 Product Shelf life Extension
Table of Contents
- Installation
- Installation via app/code
- Installation via Composer
- Configuration Settings for Product Shelf Life Expiration
- General Settings
- Batch Settings
- Product Batches Grid
- Add Sources at Product Level
- Add New Product Batch
- Un-Associate / Delete Product Batch
- Product Batches at Product Level
- Add Specific Batch to Product
- Select Batches During Shipment
- Batch Details on the Order View Page
- Deleting or Un- Associating a Product Batch
- Deleting
- Un-Associating
- Batch Report
- Import / Export Product Batches
- Batch Expiration Email Notification
- API - Application Programming Interface
- Authentication Token
- Creating a Batch using API
- Retrieve all Batches using API
- Retrieve Date of Batch using ID 1 Using API
- Delete Batch with ID 1 Using API
Installation
-
Installation via app/code: Upload the content of the module to your root folder. This will not overwrite the existing Magento folder or files, only the new contents will be added. After the successful upload of the package, run below commands on Magento 2 root directory.
php bin/magento setup:upgrade php bin/magento setup:di:compile php bin/magento setup:static-content:deploy -
Installation via Composer: Please follow the guide provided in the below link to complete the installation via composer.
Configuration Settings for Product Shelf Life Expiration
Go to Admin > Stores > Configuration > Scommerce Configuration > Product Shelf Life Expiration
General Settings
- Enabled - Select "Yes" or "No" to enable or disable the module.
- License Key –Please add the license for the extension which is provided in the order confirmation email. Please note license keys are site URL specific. If you require license keys for dev/staging sites then please email us at support@scommerce-mage.com.
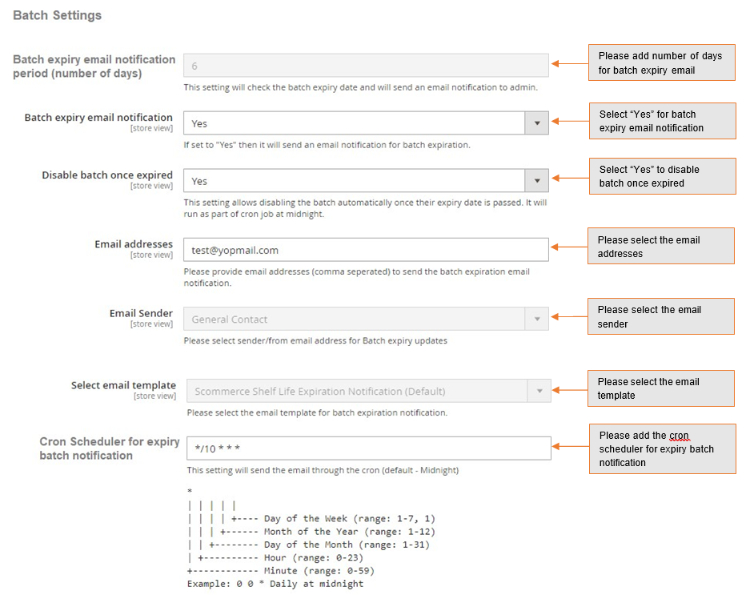
Batch Settings
- Batch expiry email notification period (number of days) - Please define batch expiry email notification period. This setting will check the batch expiry date and will send an email notification to the admin for the same.
- Batch expiry email notification (Yes/No) - Please select "Yes" or "No" to "Enable" or "Disable" the email notification regarding batch expiration.
- Disable batch once expired - Please select "Yes" or "No" to disable the batch. It disables the batch automatically once their expiry date is passed and runs as part of cron job at midnight.
- Email Addresses - Please provide email addresses (comma separated) to send the batch expiration email notification.
- Email Sender – Please select sender/ from email addresses for Batch expiry updated.
- Select Email Template -Please select the email template for batch expiry email notification.
- Cron Scheduler for expiry batch notification - This setting will be used to send the email through the cron.
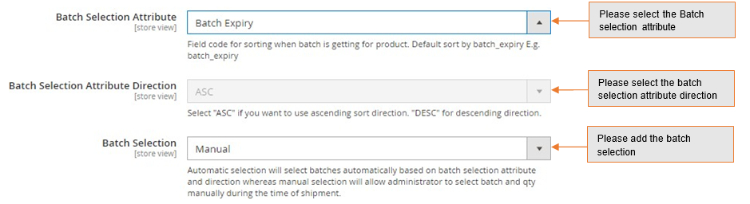
- Batch Selection Attribute – This setting will determine how batches are selected automatically.
- Batch Selection Attribute Direction – As per the batch selection attribute you can choose the direction for example Ascending(ASC) or Descending(DSC).
- Batch Selection – You can choose to select batches automatically based on batch selection attribute or you can set it to Manual. When Manual you will be able to select batches during shipment.
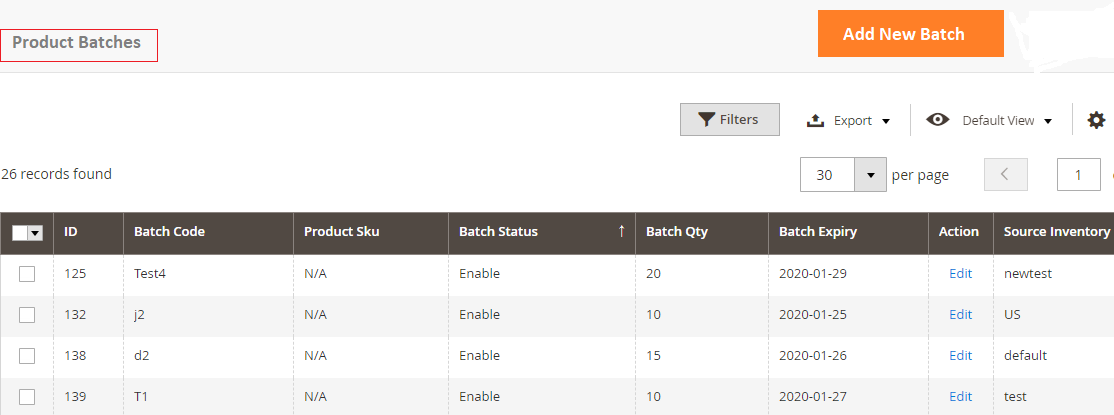
Product Batches Grid
You can create and manage product batches from, Admin> Product Batches. This grid will have all the details about batches like ID, Batch Code, Product SKU, Batch Status, Batch Qty, Batch Expiry, Action/Edit and Source Inventory.
-
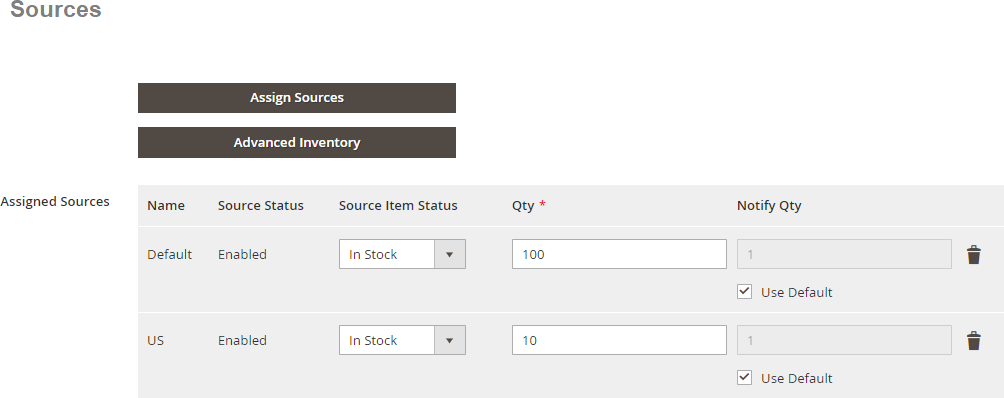
Add Sources at Product Level -You can add product source from Admin > Catalog > Select Products > Click "Assign Sources"> Select "Source"> Click "Done" .
-
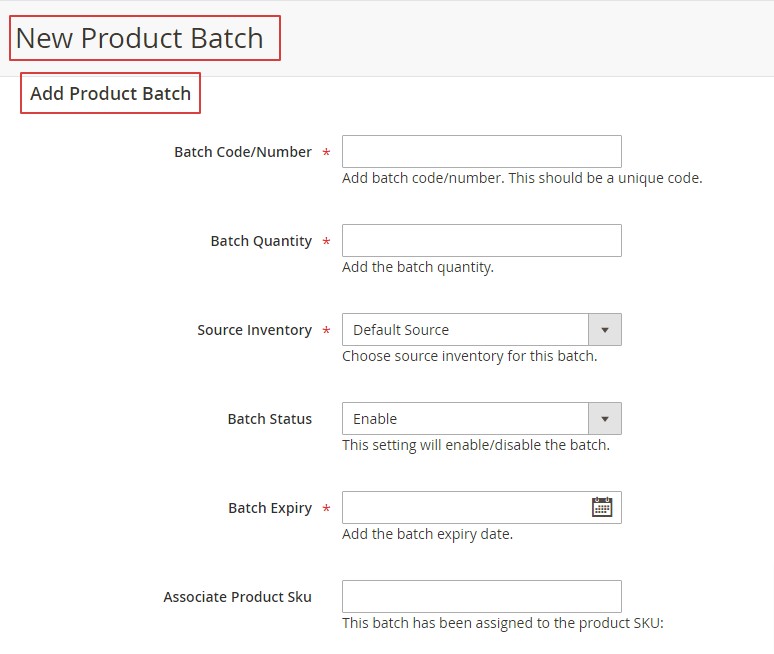
Add New Product Batch -To create new product batch, go to Admin > Product Batches>click 'Add New Batch'. It will take you to the new product batch page and by providing all the required details; you can create the new batch.
-
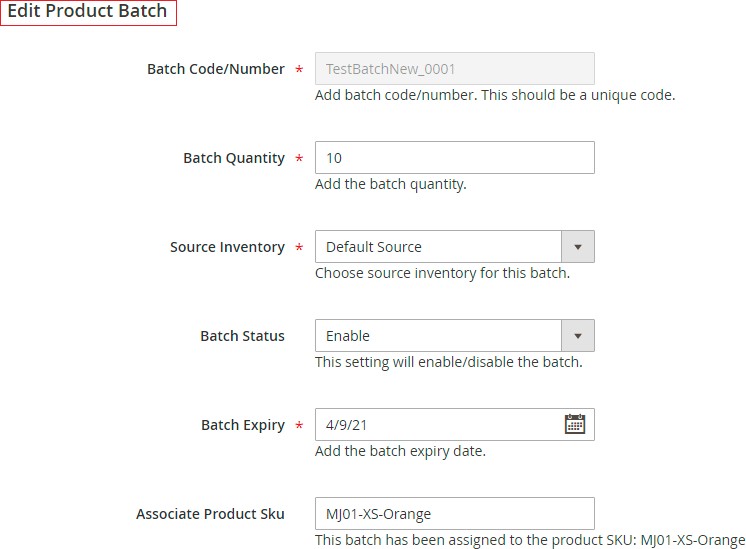
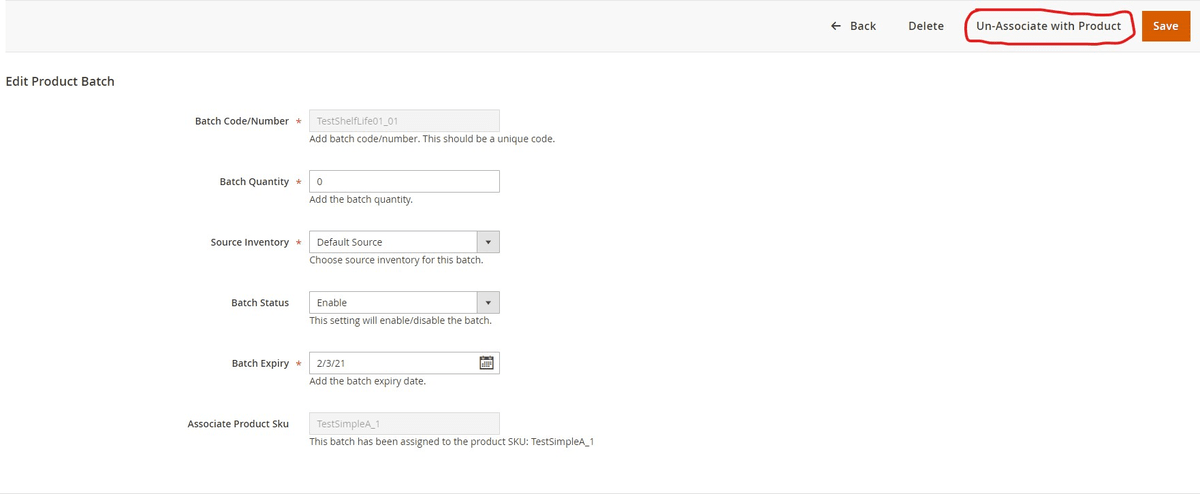
Un-Associate / Delete Product Batch -Toun-associate and delete product batch, go toAdmin > Product Batches> Select Batch > Edit >Click "Un-Associate with Product'' and for Delete click on "Delete" button.
Product Batches at Product Level
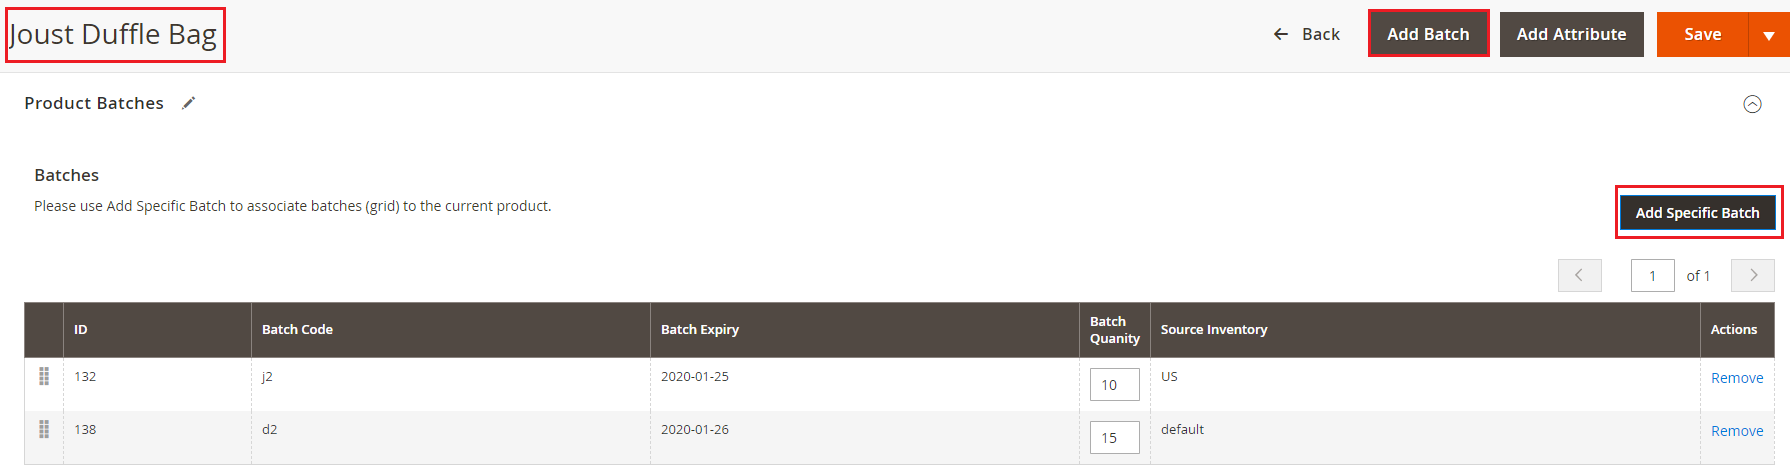
When user enables the module then Product Batches section appears at, Admin>Catalog>Product>Select Product>Edit>Product Batches. From this section, users can add new batch or can associate specific existing batch to a product.
Add Specific Batch to Product
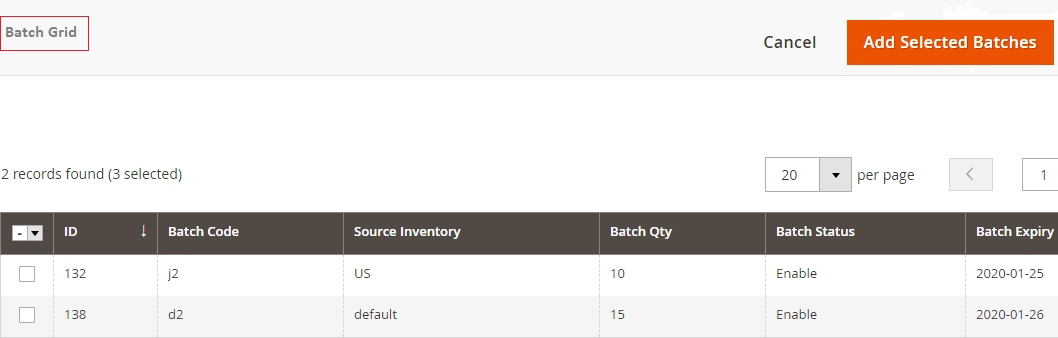
You can also add specific batches to a product from, Admin > Catalog > Product > Select Product >Edit >Product Batches >Click"Add Specific Batch". It redirects to Batch Grid and by selecting batch ID you can associate active batches to a product.
-
Select Batches During Shipment -To select the batch during shipment make sure Batch Selection is set to manual in the configuration then navigate to Admin> Sales > Order > Select Order > View>Generate Invoice>Click on Ship. When you scroll down on the page you will see the option to select the batches manually. The product quantity will be deducted from the selected batch. Please refer to the image below:-

-
Batch Details on the Order View Page -To view theproduct batch related details, go to Admin > Sales > Order > Select Order > View.

Deleting or Un- Associating a Product Batch
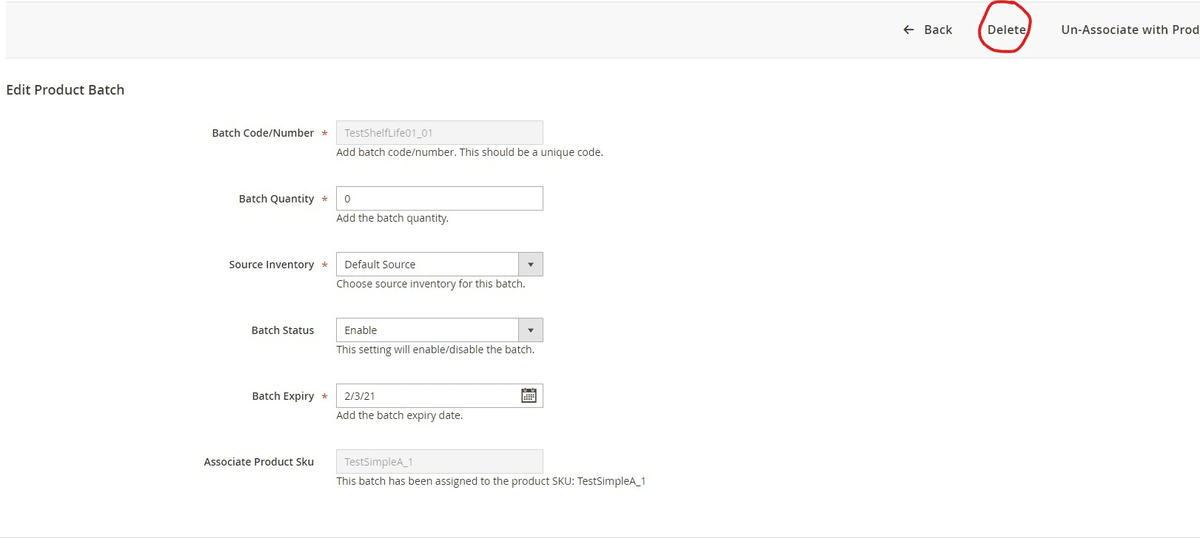
- Deleting: -To delete a product batch, go to Catalog>Product Batches then select the product batch that you want to delete. From Action coloumn click Edit. Here you will see the option to delete the Product batch.
Note:- If an order has been shipped then you won't be able to delete that product batch. You will see an error.
- Un-Associating:- To Un-Associate a product batch, go to Catalog>Product Batches then select the product batch that you want to delete. From Action column click Edit. Here you will see the option to Un-Associate the Product batch.
Note:- If an order has been shipped then you won't be able to delete that product batch. You will see an error.
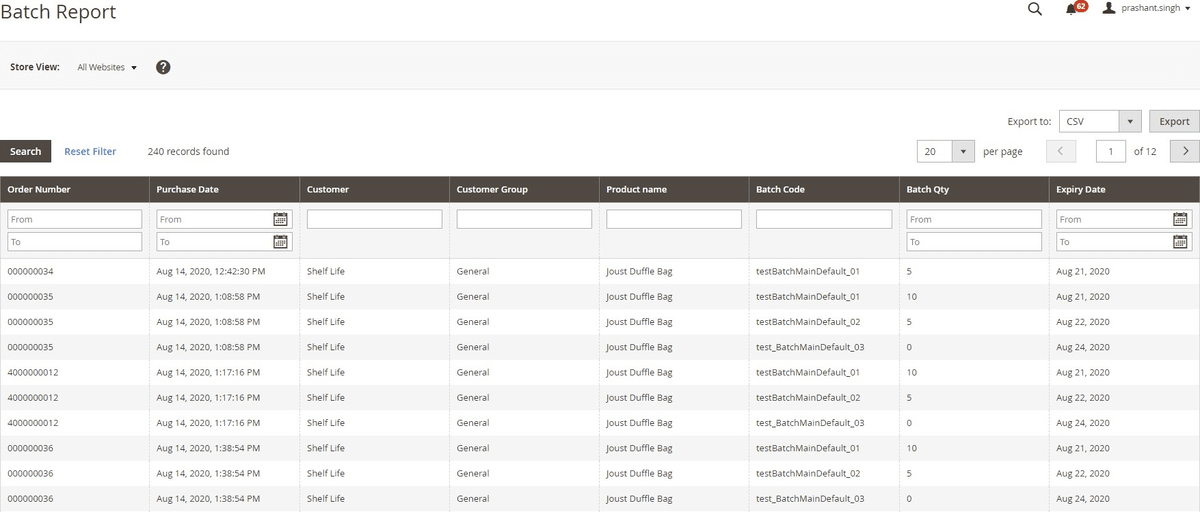
- Batch Report:- To view the detailed batch report go to your admin panel then Reports>Sales>Batches. Here you can see all the orders associated with a product batch with the following information:-
- Order Number
- Purchase Date
- Customer
- Customer Group
- Product Name
- Batch code
- Batch Quantity
- Expiry Date
Import / Export Product Batches
To import and export product batches, go to Admin > System >Import / Export.
- Import - It updates the stock quantity and disables the batches if they are expired.
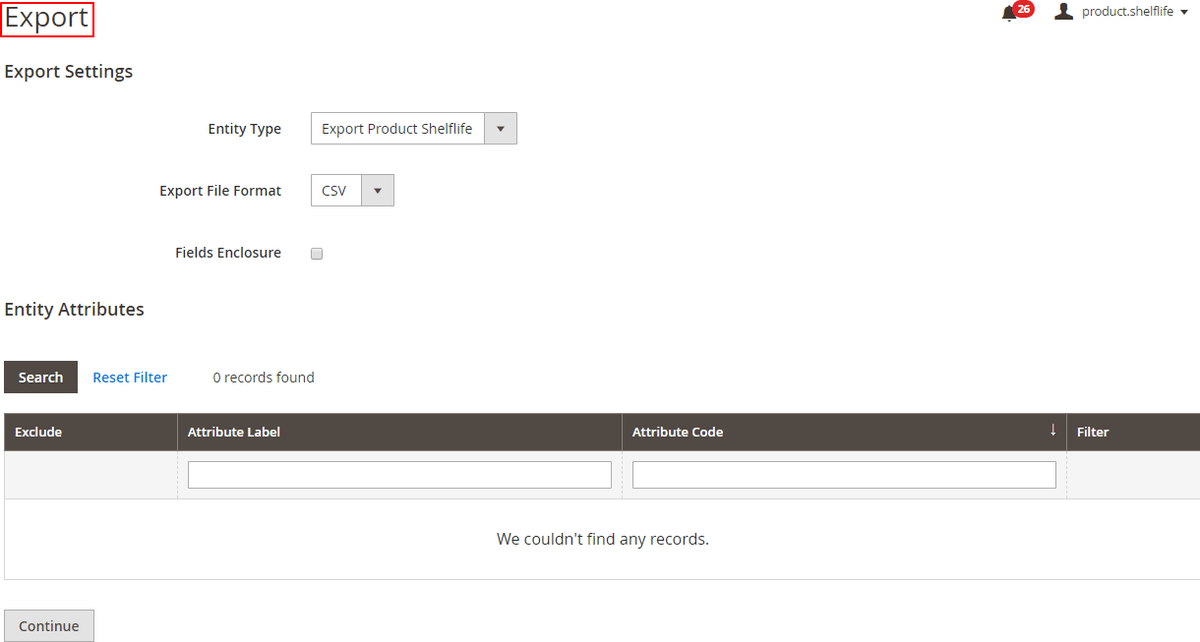
- Export-It exports the batches in the selected file format, e.g. CSV.
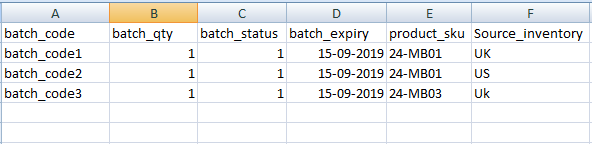
Import Settings
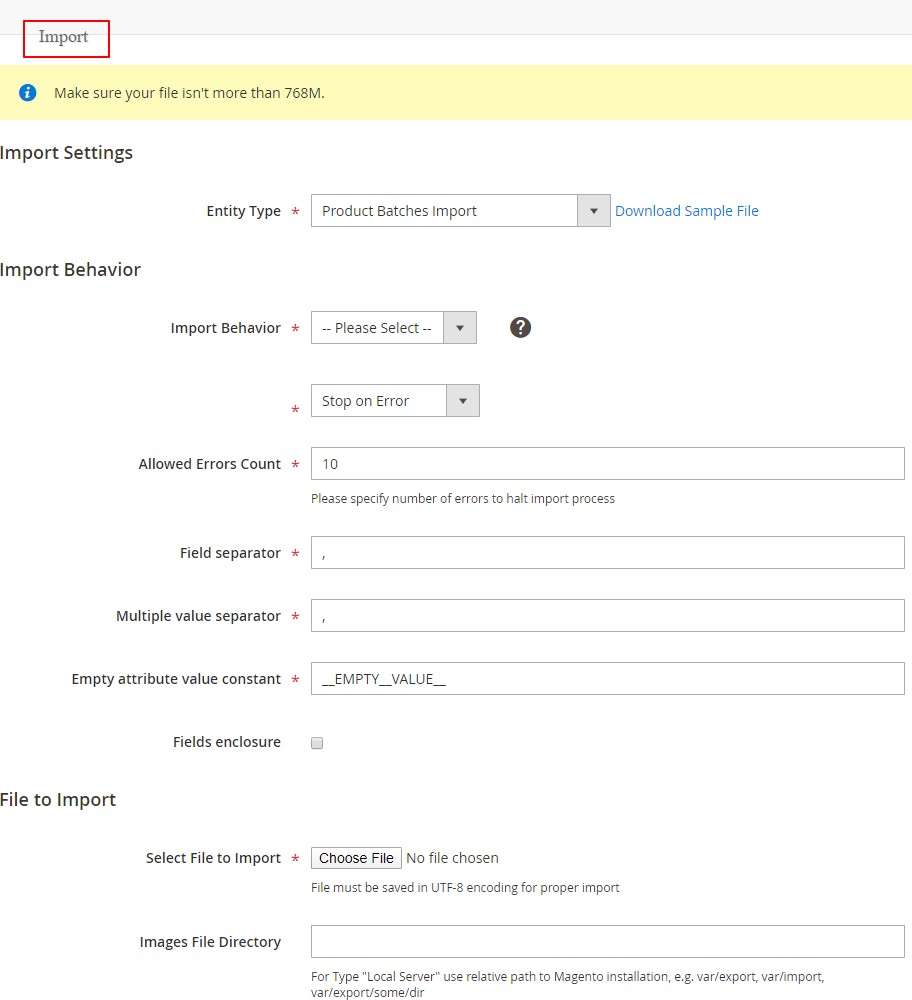
CSV File Format for Import - CSV file will have batch_code, batch_qty, batch_status, batch_expiry, product_sku and source_inventory.
Export Settings
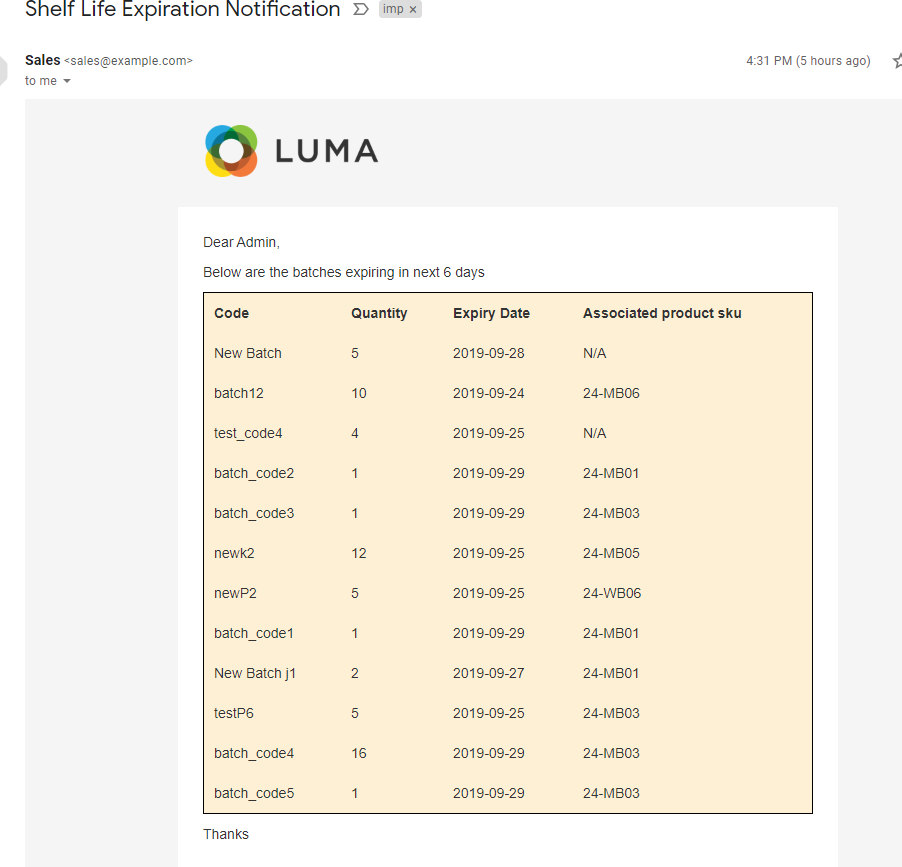
- Batch Expiration Email Notification - When you select "Yes" for "Batch expiry email notification"from Admin > Stores > Configuration > Scommerce Configuration > Product Shelf Life Expiration > Batch Settings, then it sends an email notification for batch expiration.
API - Application Programming Interface
Authentication Token
auth_token can be received using the following: -
You would need credentials to your store with admin rights Parameters:-.Admin credentials
- Username
- Password
POST URL:- http://baseurl/index.php/rest/V1/integration/admin/token Content-Type: application/json
{
"username": "admin", "password": "admin"
}
Creating a Batch using API
Parameters:-
POSTURL:-http://baseurl/index.php/rest/V1/productbatches/createbatch Content-Type: application/json
{
"batch_code": "batchcode_001", "batch_qty": "10",
"batch_status": "1",
"batch_expiry": "2020-12-06", "product_sku": "MH0001"
}
Retrieve all Batches using API
Parameters:-
GET URL:-http://baseurl/index.php/rest/V1/productbatches/getcollection Content-Type: application/json
Retrieve Date of Batch using ID 1 Using API: -
Parameters: -
GET URL:-http://baseurl/index.php/rest/V1/productbatches/getbatch?batchId=1 Content-Type: application/json
Delete Batch with ID 1 Using API: -
Parameters: -
PUT URL: - http://baseurl/index.php/rest/V1/productbatches/deletebatch Content-Type: application/json
{
"batchId": 1
}
If you have a question related to this extension please check out our FAQ Section first. If you can't find the answer you are looking for then please contact support@scommerce-mage.com.
Magento 2 Social Login
Installation and User Guide for Magento 2 Social Login Extension
Table of Contents
- Installation
- Installation via app/code
- Installation via Composer
- Configuration Settings for Social Login
- General Settings
- Create Facebook App Id
- Create Google App Id
- Front-end Site View
- Social Login Options on the Front-end
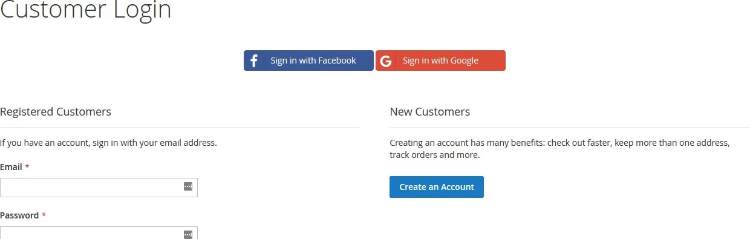
- Social Login Options on the Sign In Page
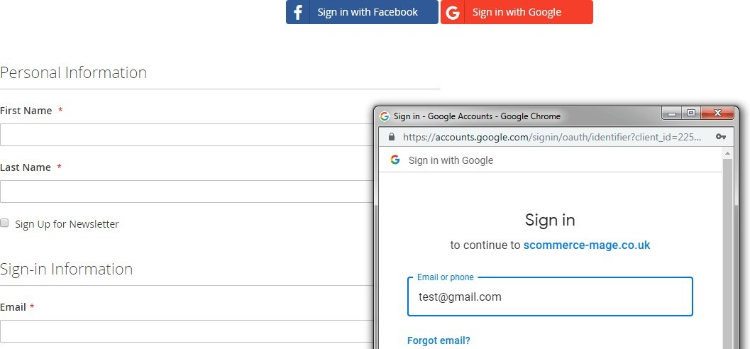
- Social Login Options on the Registration Page
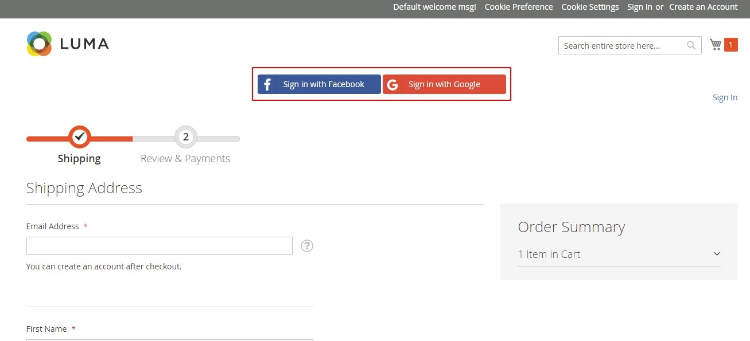
- Social Login Options on the Checkout Page
Installation
- Installation via app/code: Upload the content of the module to your root folder. This will not overwrite the existing Magento folder or files, only the new contents will be added. After the successful upload of the package, run below commands on Magento 2 root directory.
php bin/magento setup:upgrade php bin/magento setup:di:compile php bin/magento setup:static-content:deploy - Installation via Composer: Please follow the guide provided in the below link to complete the installation via composer.
Configuration Settings for Social Login
Go to Admin > Stores > Configuration > Scommerce Configuration > Social Login
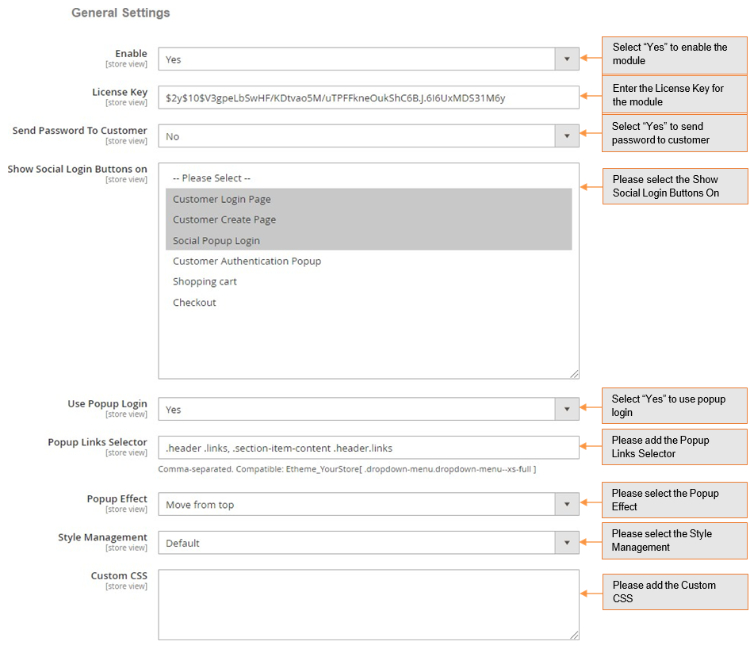
General Settings
- Enabled – Select "Yes" or "No" to enable or disable the module.
- License Key – Please add the license for the extension which is provided in the order confirmation email. Please note license keys are site URL specific. If you require license keys for dev/staging sites then please email us at support@scommerce-mage.com.
- Send Password to Customers – Set yes or no for send password to customers.
- Show Social Login Buttons on – Select where all you want to show the social login options.
- Use Popup Login – Set yes or no to enable/disable the popup.
- Popup Links Selector – Comma-seperated. Compatible: Etheme_YourStore [ dropdown-menu.dropdown-menu—xs-full ]
- Popup effect – Select pop up appearing effect.
- Style Management – Select color for the popup.
- Custom CSS – Enter your Custom CSS.
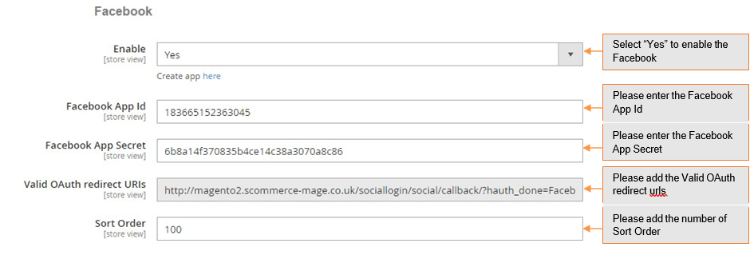
- Enabled – Select "Yes" or "No" to enable or disable the module.
- Facebook App Id – Enter your Facebook App Id. To create App Id, check Facebook Developer.
- Facebook App Secret – Enter your Facebook App secret.
- Valid OAuth redirect URLs – Enter the redirect URLs.
- Sort Order – Enter the sort order for display.
-
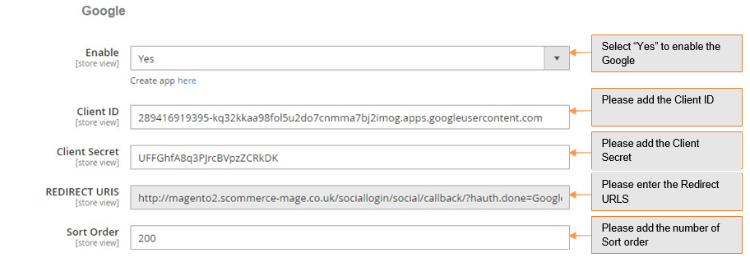
Enabled – Select "Yes" or "No" to enable or disable the module.
-
Client Id – Enter your Google Client Id. To create Client Id, check Google App.
-
Client Secret – Enter your Secret Id.
-
Redirect Urls – Enter the redirect urls.
-
Sort Order – Sort order for display.
-
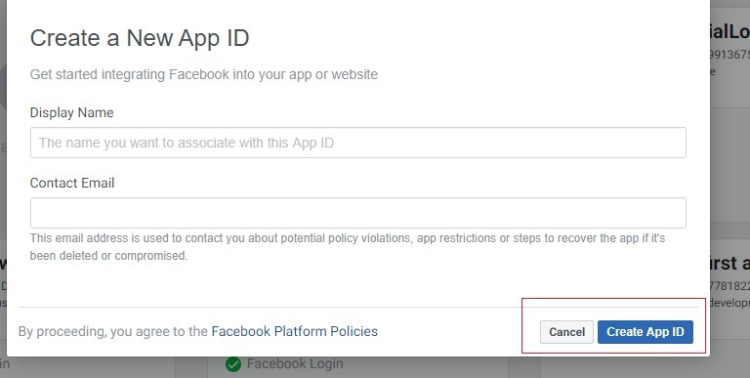
Create Facebook App Id - To create Faceook app Id go to Facebook Developers, login as a developer and choose "Create App" in the "My Apps" drop-down.
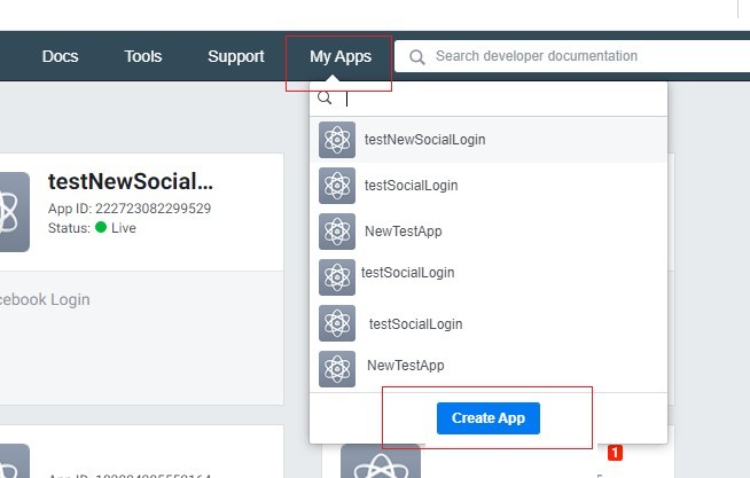
Specify the "Display Name" and "Contact Email" for your app. After that, click the "Create App ID".
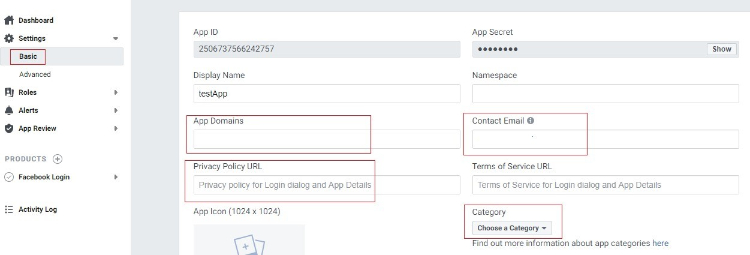
Go to the Settings > Basic tab to configure your app. The App ID and App Secret will be generated automatically. Fill the App Domains field and choose your app Category.
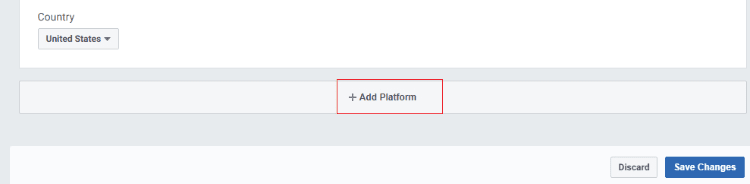
Click on the "Add Platform" button to choose the platform for your social apps.
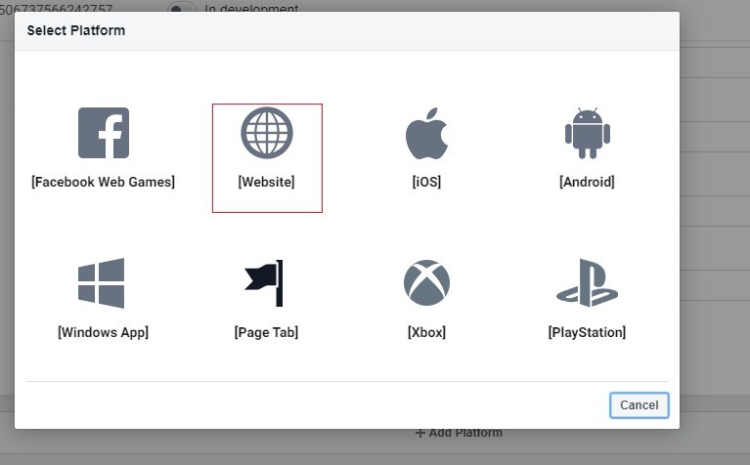
After clicking on the Add Platform button you will see the grid with various platform types. Please select Web.
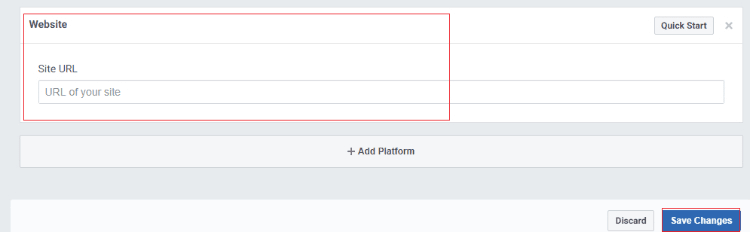
After specifying the platform type, insert your website URL and click on the "Save Changes" button.
Enable the "Client OAuth Login" from Facebook Login > Settings and provide the "Valid OAuth Redirect URLs".

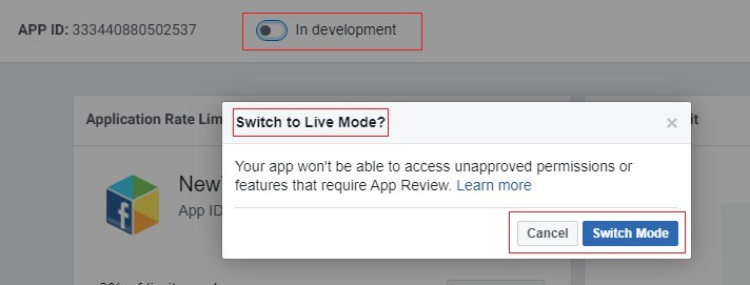
To apply the configuration, change the Status from "In development" to "Live".
Insert your Facebook App Id and Secret Key in Facebook settings and Save the configuration.
Create Google App Id – To create Google App go to Google App. Click on the "CREATE PROJECT" button and configure your app settings.
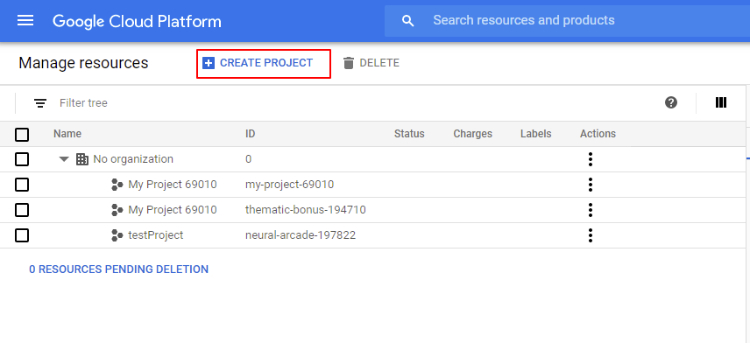
Specify your "Project name", the project ID will be generated automatically.

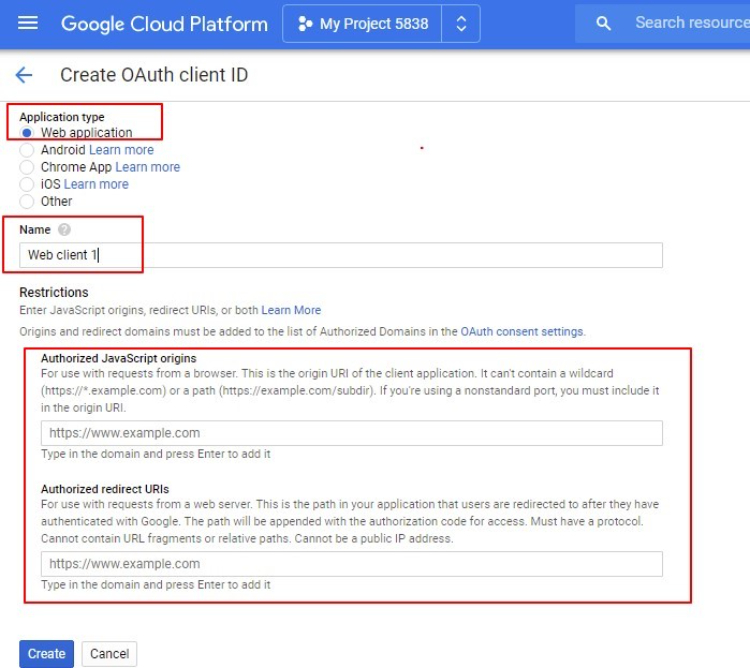
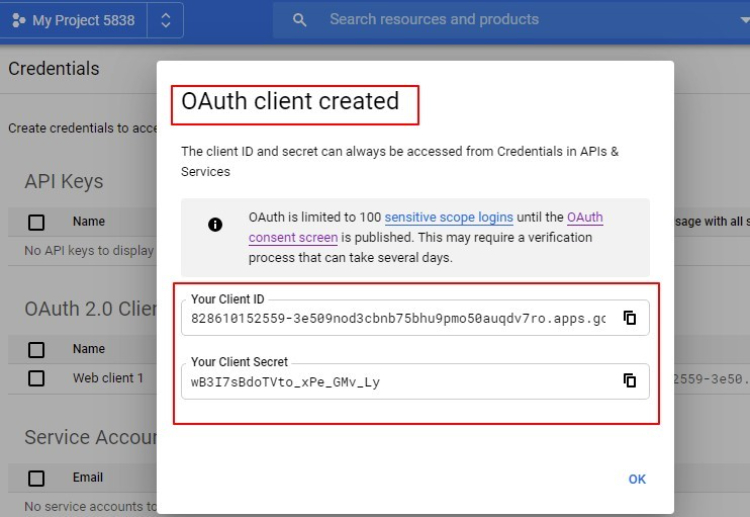
Go to the Credentials tab and create a client ID to integrate your website with Google.

Insert your website URL in the required field. In the field "Authorized Redirect URLs" add redirect website URL. Then, press the Create button.
Please copy the Client ID and Client Secret. Insert your API KEY (Client ID) and API Secret (Client Secret) in the appropriate fields in the backend Google settings and save the configuration.
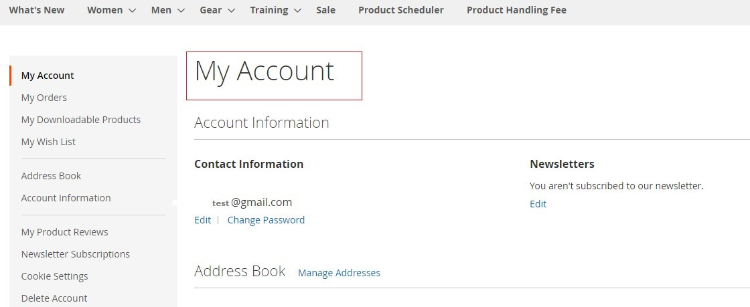
Front-end Site View
After successful login, it redirects to My Account page.
If you have a question related to this extension please check out our FAQ Section first. If you can't find the answer you are looking for then please contact support@scommerce-mage.com**.
Magento 2 VAT Exemption
Installation and User Guide for Magento 2 Vat Exemption Extension
Table of Contents
- Installation
- Installation via app/code
- Installation via Composer
- Configuration Settings for Vat Exemption
- General Settings
- Vat Exempt Settings
- VAT Exempt - Reasons
- Create New Reason
- Admin Order View Page
- Declaration Statement on Order View Page
- VAT Exemption Details on Order View Page
- VAT Exemption Option for Admin Orders
- Enable VAT Exemption for Products
- Include or Exclude Product
- Front-end Site View
- VAT Exempt Form on the Cart Page
- VAT Exempt Message on the Cart Page
- VAT Exempt Option on the Checkout Page
- VAT Exempt Discount
- Shipping VAT…
- VAT Exempt Discount on the Front-end
- VAT Exempt Declaration Statement on the Front-end
Installation
- Installation via app/code: Upload the content of the module to your root folder. This will not overwrite the existing Magento folder or files, only the new contents will be added. After the successful upload of the package, run below commands on Magento 2 root directory.
php bin/magento setup:upgrade php bin/magento setup:di:compile php bin/magento setup:static-content:deploy - Installation via Composer: Please follow the guide provided in the below link to complete the installation via composer.
Configuration Settings for Vat Exemption
Go to Admin > Stores > Configuration > Scommerce Configuration > Vat Exempt Settings
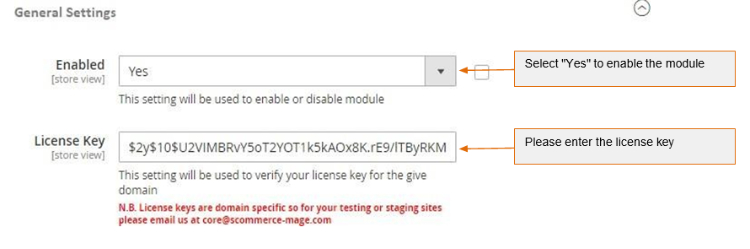
General Settings
- Enabled - Select "Yes" or "No" to enable or disable the module.
- License Key - Please add the license for the extension which is provided in the order confirmation email. Please note license keys are site URL specific. If you require license keys for dev/staging sites then please email us at support@scommerce-mage.com.
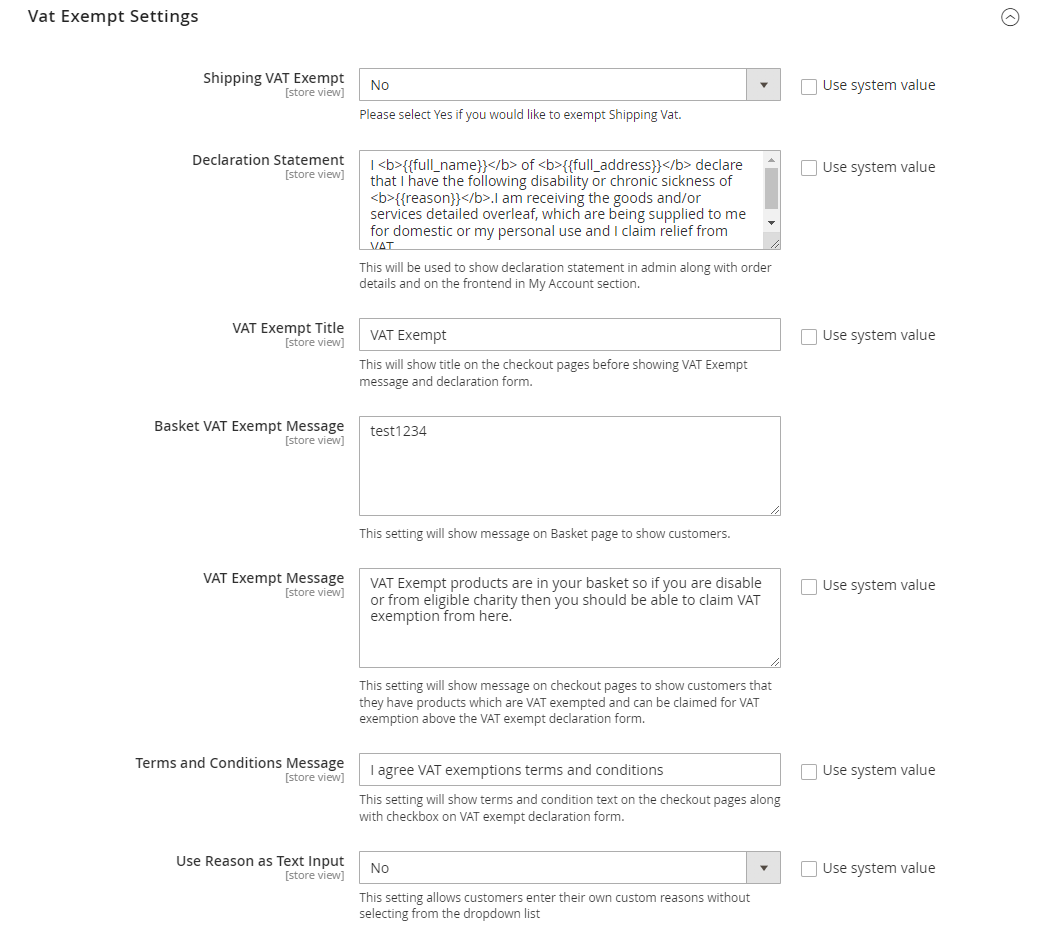
Vat Exempt Settings
-
Shipping VAT Exempt - Please Select "Yes/No" to include or exclude shipping from VAT exemption (Default - No).
-
Declaration Statement - Please provide declaration statement. This will be shown in admin along with order details and on the frontend in My Account section.
-
VAT Exempt Title - Please provide title. This will be shown on the checkout page before VAT Exempt message and declaration form (Default - VAT Exempt).
-
Basket VAT Exempt Message - Please add VAT exempt message. This will be shown on the cart/basket page.
-
VAT Exempt Message - Please provide VAT Exempt message. This will be shown on the checkout page under VAT exempt section to users who are applying for VAT exemption. (Default - VAT Exempt products are in your basket so if you are disable or from eligible charity then you should be able to claim VAT exemption from here).
-
Terms and Condition Message - Please provide terms and conditions message. This will be shown on the checkout pages along with checkbox on VAT exempt declaration form.
-
Use Reason as Text Input- Set "Yes" to allow customers to enter their own custom reasons without selecting from the dropdown list
-
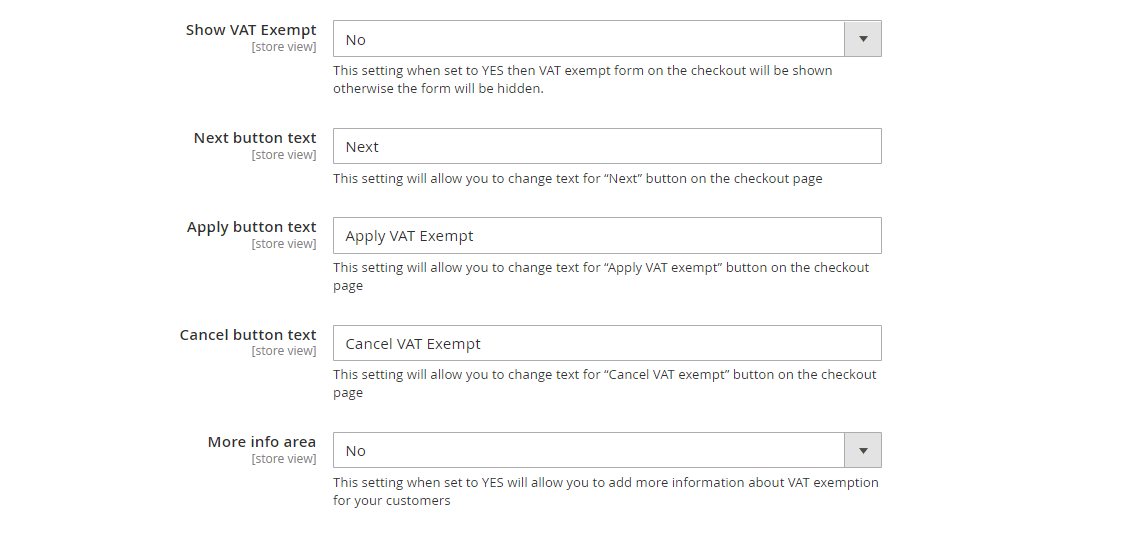
Show VAT Exempt - Set "Yes" to show vat exempt form on the checkout otherwise it will be hidden.
-
Next button text- Use this setting to change text for "Next" button on the checkout page.
-
Apply button text- Use this setting to change text for "Apply VAT exempt" button on the checkout page.
-
Cancel button text- SUse this setting to change text for "Cancel VAT exempt" button on the checkout page.
-
More info area- Set "Yes" to add more information about VAT exemption for your customers
VAT Exempt - Reasons
You can create and manage reasons for VAT Exemption from the backend, Admin > VAT Exempt > Reasons > Vat Exempt Reasons. This grid will have columns like, ID, Reason, Status, Action, along with create new button to add new reason.
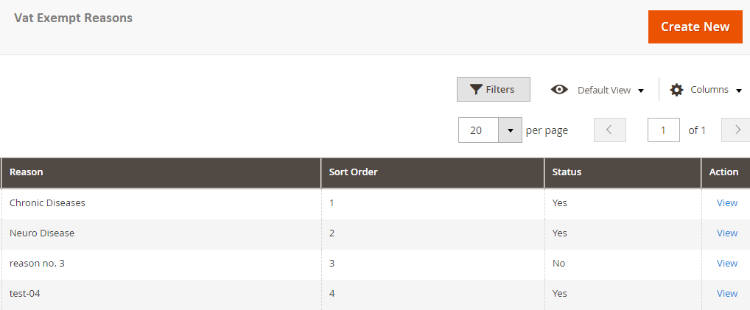
- Create New Reason - To create new reason from the backend, go to Admin > VAT Exempt > Reasons > click "Create New" and set below configuration.
- Reason : Add the reason title
- Sort Order: Enter sort order
- Status: Select reason status
Admin Order View Page
-
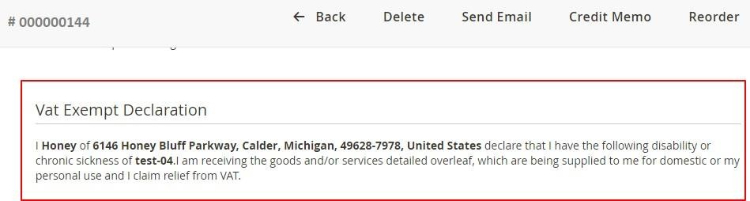
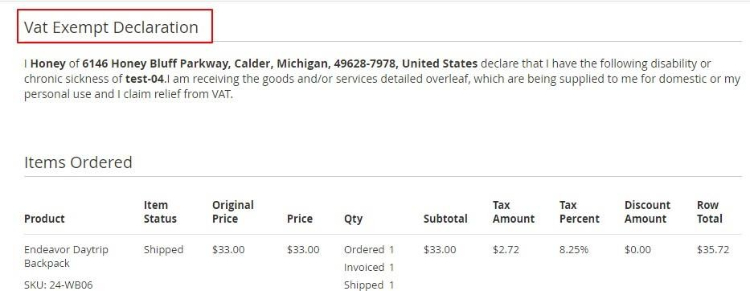
Declaration Statement on Order View Page - You can see the declaration statement and VAT exemption details on the order view page at, Sales > Orders > Select Order > View.
-
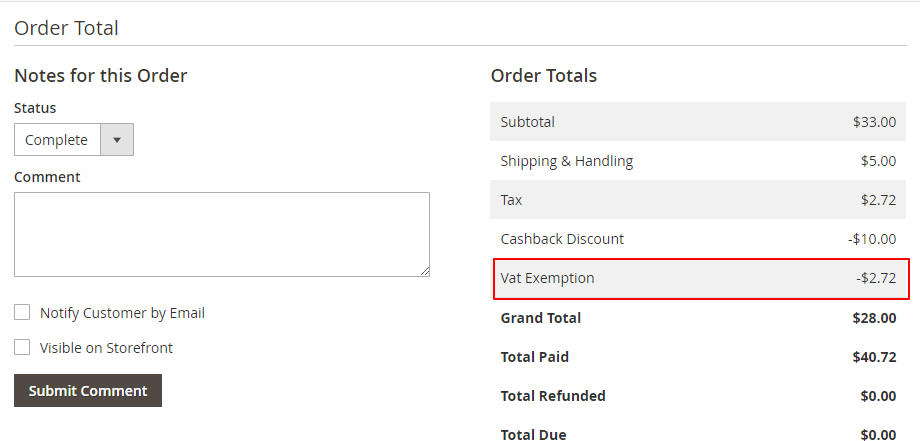
VAT Exemption Details on Order View Page - In the screen grab you can see the Vat exempted amount under ''Order Totals'' section.
-
VAT Exemption Option for Admin Orders - For admin orders you can apply for Vat exemption by checking "Apply Vat Exempt" option from Sales > Orders > Create New Order > Select Customer > Add Products > Vat Exemption – check "Apply Vat Exempt".

Enable VAT Exemption for Products
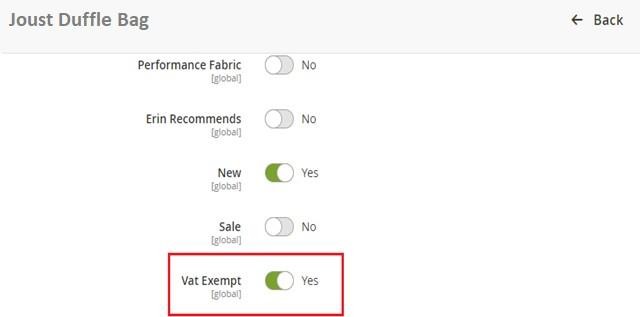
- Include or Exclude Product - To include/exclude store products for the VAT exemption, go to Catalog > Product > Select Product > Edit > VAT Exempt - ''Yes/No''.
Front-end Site View
-
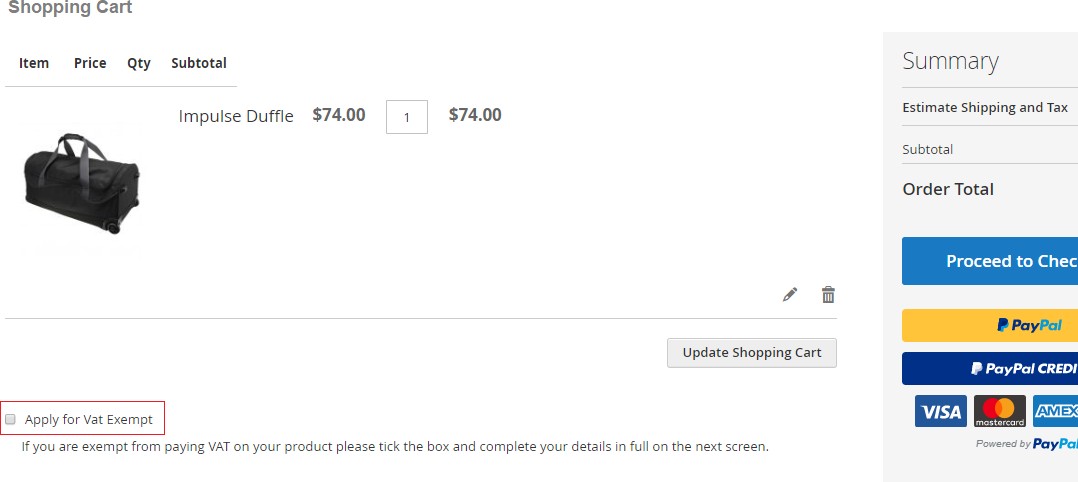
VAT Exempt Option on the Cart Page - Apply for Vat Exempt option appears on the cart page and when user opts for this option, then it opens the form on the checkout page after the shipping details to add the required information.
-
VAT Exempt Message on the Cart Page – You can display VAT exempt message on the cart page from Admin > Stores > Configuration > Scommerce Configuration > Vat Exempt Settings > Basket VAT Exempt Message – add message, the added message will be shown on the cart page.
-
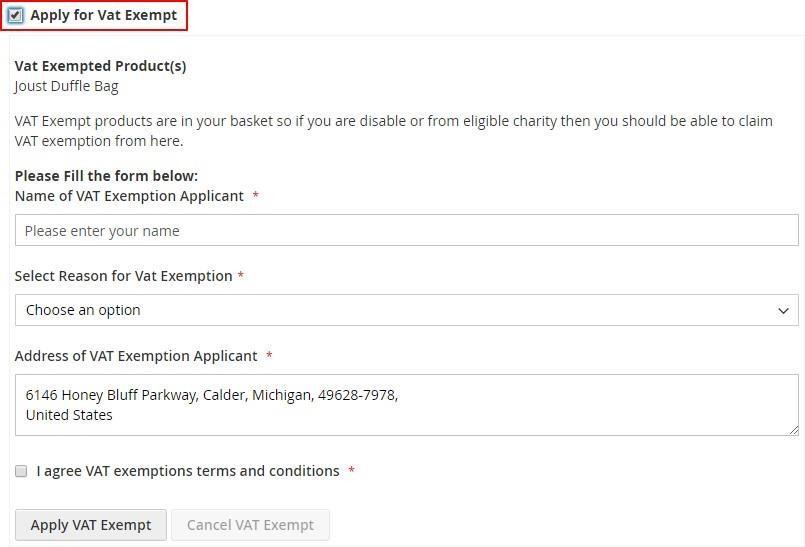
VAT Exempt Form on the Checkout Page - When the user enables the module and adds a VAT exempted product to cart then "Apply for Vat Exempt" option appears on the checkout page and check on this option opens the form. On the form "Apply VAT Exempt" and once applied, "Cancel VAT Exempt" buttons are available for VAT exemption claim.
-
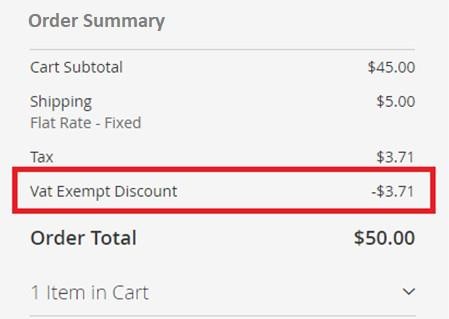
VAT Exempt Discount - You can see the exempted amount on the checkout page under ''Order Summary'' section.
-
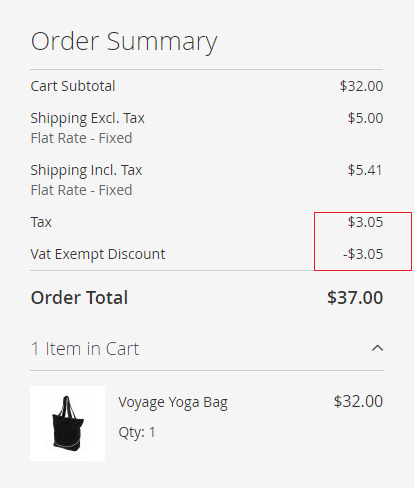
Shipping Vat - You can enable shipping Vat exempt by selecting "Yes" for "Shipping VAT Exempt" from Admin > Stores > Configuration > Scommerce Configuration> Vat Exempt Settings > Shipping VAT Exempt - "Yes". In the below image you can see the exempted Vat is £ 3.05 (Shipping Tax (.41) + Tax (2.64)).
-
VAT Exempt Discount on the Front-end - You can view the VAT exemption information on the front-end under ''My Orders'' section.
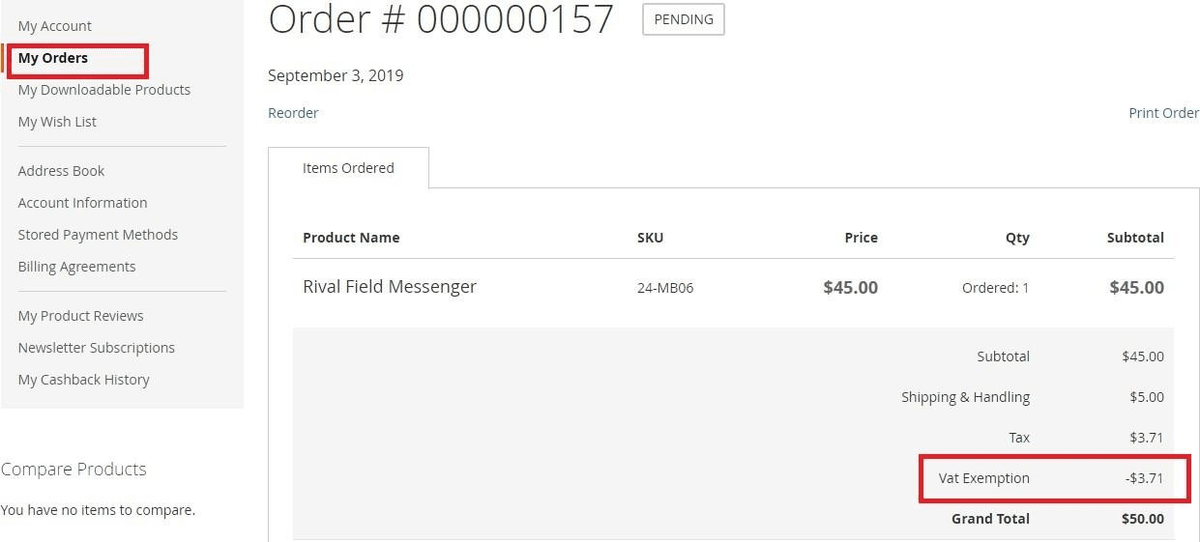
VAT Exempt Declaration Statement on the Front-end - My Account -
You can see the VAT exempt declaration statement under My Account > My Order section.
If you have a question related to this extension please check out our FAQ section first. If you can't find the answer you are looking for then please contact support@scommerce-mage.com.
Magento 2 Substitute Products
Installation and User Guide for Magento 2 Substitute Products Extension
Table of Contents
- Installation
- Installation via app/code
- Installation via Composer
- _Configuration Settings for Substitute Products
- General Settings
- Changes Required Using Custom Product Attribute Set
- _Assigning Substitute Products
- Add Substitute Products
- Order Placed with Substitute Product
- Front-End View
Installation
- Installation via app/code: Upload the content of the module to your root folder. This will not overwrite the existing Magento folder or files, only the new contents will be added. After the successful upload of the package, run below commands on Magento 2 root directory.
php bin/magento setup:upgrade php bin/magento setup:di:compile php bin/magento setup:static-content:deploy - Installation via Composer: Please follow the guide provided in the below link to complete the installation via composer.
Configuration Settings for Substitute Products
Go to Admin > Stores > Configuration > Scommerce Configuration >Substitute Products
General Settings
- Enabled - Select "Yes" or "No" to enable or disable the module.
- **License Key –**Please add the license for the extension which is provided in the order confirmation email. Please note license keys are site URL specific. If you require license keys for dev/staging sites then please email us at support@scommerce-mage.com.

Changes Required Using Custom Product Attribute Set
If you are using custom product attribute set and not the default attribute then this step must be performed to see the Substitute Products option at the product level.
Cause: This issue occurs when the necessary product attribute, is_substitute_products_enabled, has not been correctly assigned within its attribute set. For the extension's interface to work correctly, this attribute must be placed inside a specific group named "Substitute Products."
Solution:
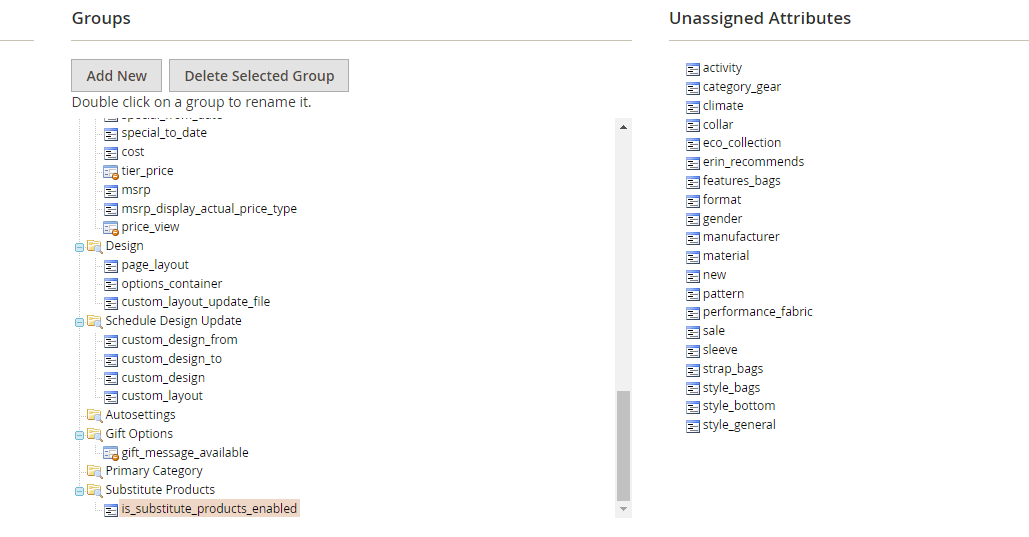
Once you have completed these steps, return to the product edit page. The "Substitute Products" interface will now function as expected, allowing you to add multiple SKUs and save your changes correctly.
Note:- If you are not seeing the substitute product option under products or are not able to add more than one substitute products or save the SKUs that you enter then this step must be followed.
Assigning Substitute Products
The substitute product should have exactly same configurations as the main product only the SKU will be different. You can create a duplicate product of the main product while creating a new substitute product.
Add Substitute Products
Go to Admin>Catalog>Products, navigate to your product from the list and click on Edit from the action column. Scroll down to find the Subsitute Products tab. Please refer to the image below: -

Click on Enabled to enable the substitute products for this main product. Add the SKU of the product that you want to add as a substitute of this product and add the priority. In case of multiple substitute products you can set the priortiy highest being 0 so that whenever products are out of stock, upon order placement the SKU will be chosen based on the priority set.
Also, as long as the substitute products attached to the main product are not out of stock the main product on the frontend will never show out of stock.
You can add substitute products for several products such as Simple, Configurable, Bundled etc.
Order Placed With Subsitute Products
Suppose our main product is out of stock then when a customer visits the storefront they will always see the product available as long as the substiute product assigned is in stock. Orders placed with the main product will be fullfilled with the subsitute product. Place an order with the main product then go to Admin>Sales>Orders, and select your order. We can see the substitute product SKU in the order detail since main product is out of stock.

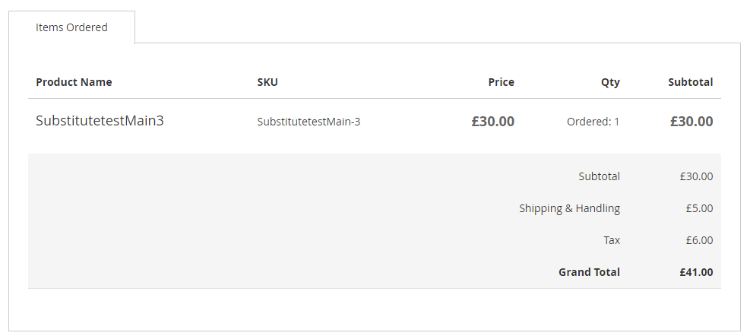
Front-End View
We place the order with the main product having sku SubstitutetestMain but since this product is out of stock the order should be fullfilled with the substitute product assigned. Now upon placing the order go to My Account>My Orders and view the order, you will be able to see that the order is placed with the substiute product.
If you have a question related to this extension please check out our FAQ Section first. If you can't find the answer you are looking for then please contact support@scommerce-mage.com.
Magento 2 Product Reviews
Installation and User Guide for Magento 2 Product Reviews
Table of Contents
- Installation
- Installation via app/code
- Installation via Composer
- Configuration Settings for Product Reviews
- General Settings
- Creating New Review Sliders
- Adding Review Slider
- Category Page
- CMS Pages
- Front-End View
- Email Field in Review Form
- Reviews on CMS Pages
- Reviews on Category Pages
Installation
- Installation via app/code: Upload the content of the module to your root folder. This will not overwrite the existing Magento folder or files, only the new contents will be added. After the successful upload of the package, run below commands on Magento 2 root directory.
php bin/magento setup:upgrade php bin/magento setup:di:compile php bin/magento setup:static-content:deploy - Installation via Composer: Please follow the guide provided in the below link to complete the installation via composer.
Configuration Settings for Substitute Products
Go to Admin > Stores > Configuration > Scommerce Configuration >Substitute Products
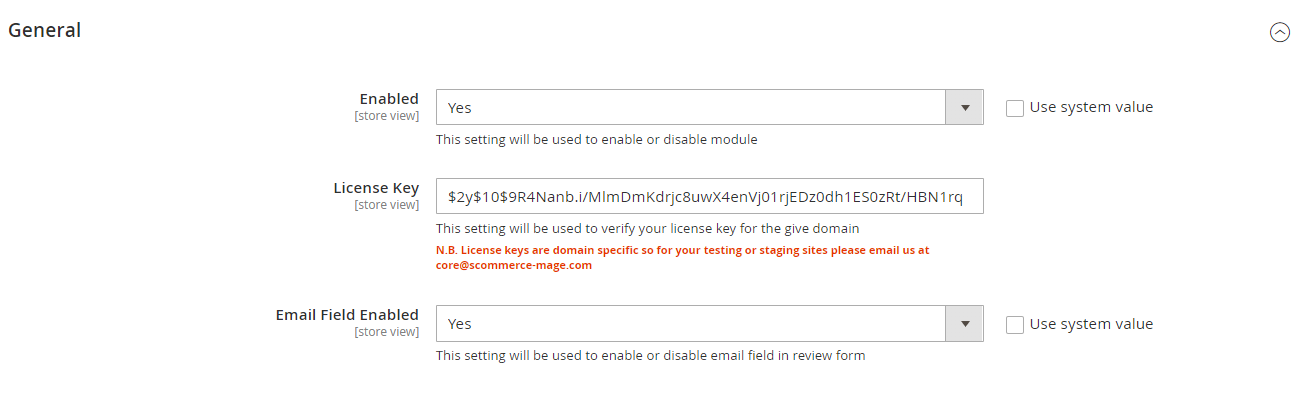
General Settings
- Enabled - Select "Yes" or "No" to enable or disable the module.
- **License Key –**Please add the license for the extension which is provided in the order confirmation email. Please note license keys are site URL specific. If you require license keys for dev/staging sites then please email us at support@scommerce-mage.com.
- **Email Field Enabled -**Set "Yes" to enable the email field in the product review form and set "No" to disable the email field.
Creating New Review Sliders
-
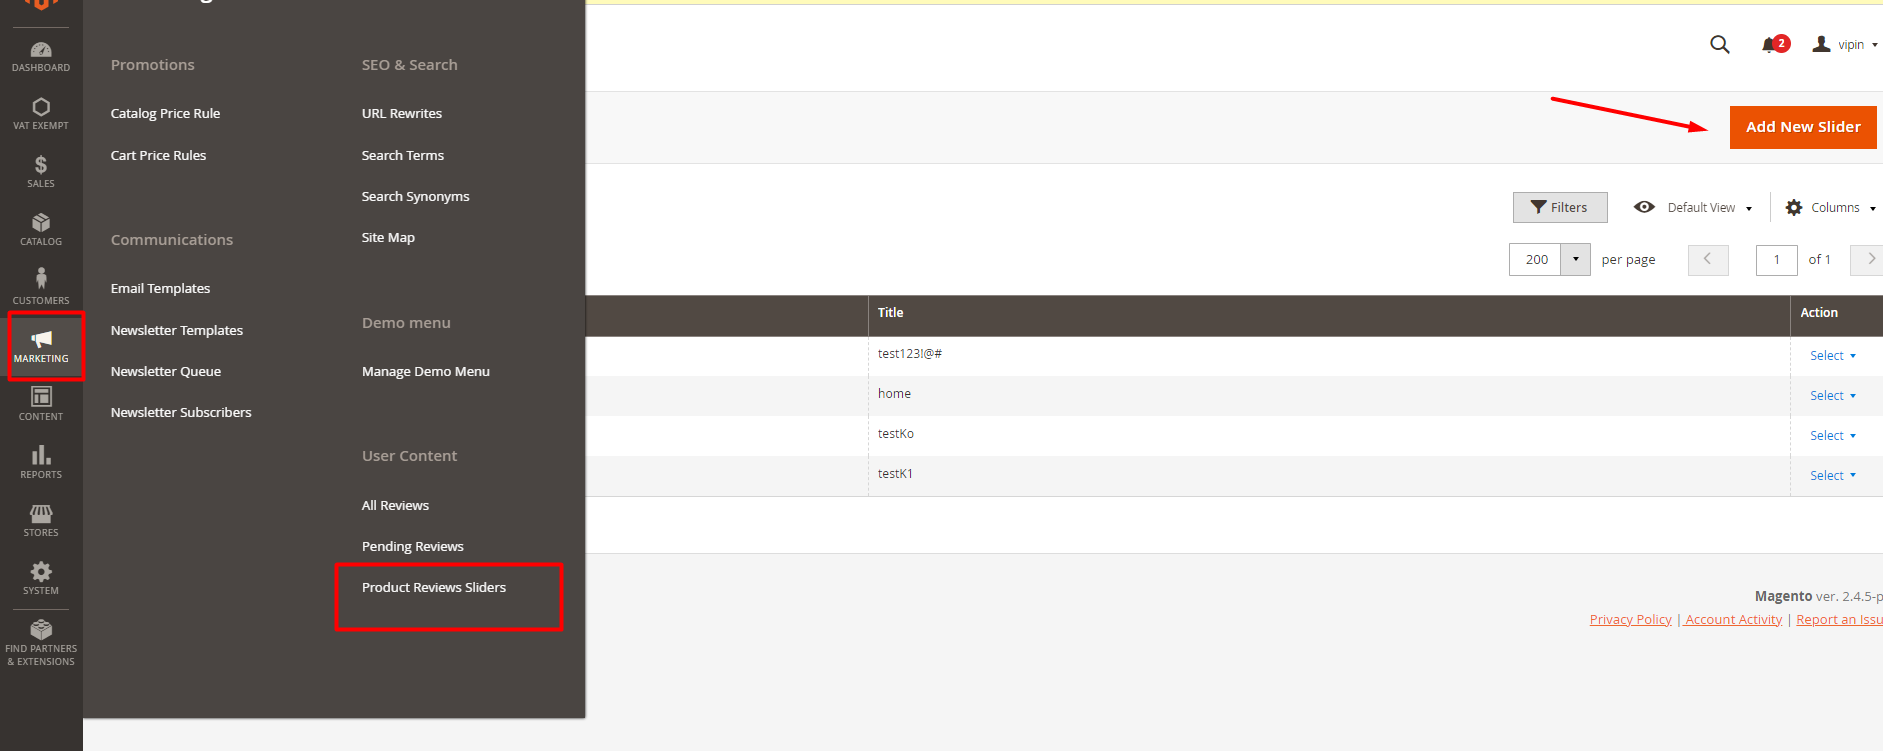
Go to 'Marketing'->'Product Review Slider'
-
Click on 'Add New Slider'
-
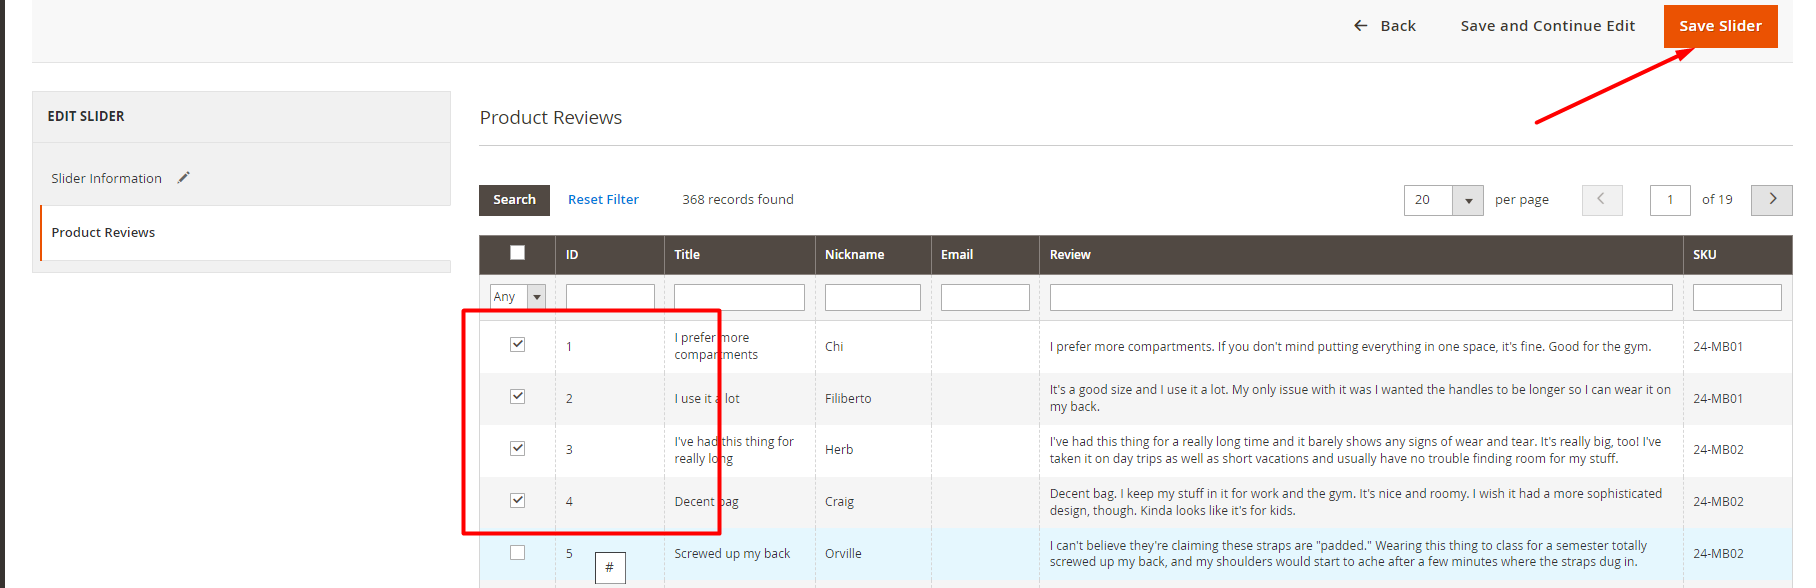
In 'slider information' fill the title then go to 'product reviews'. and you will be able to see approved reviews.

-
Select as many reviews as you want and click on 'Save Slider' or 'Save and Continue Edit'
-
You can add this review slider to any category page, CMS page and CMS block
Adding Review Sliders
Category Page
To see reviews under category page.
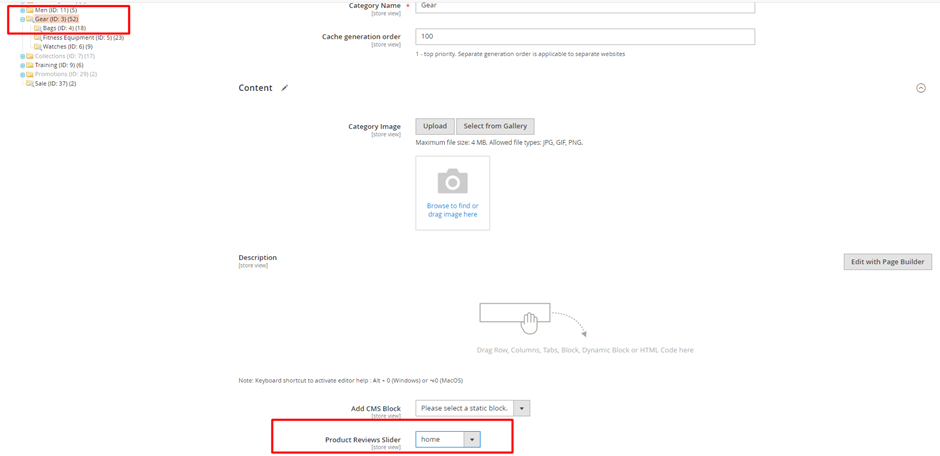
- Go to Catalog-> Categories. Select any category.
- Under 'Content' group, go to 'Product Reviews Slider' and add one of the Review Slider you have created.
- Save and clear the caches.
CMS Pages
To see reviews under CMS page(e.g.->home page)
-
Go to Content->Pages. Select any one of the pages.
-
Select the HTML code and click on edit.
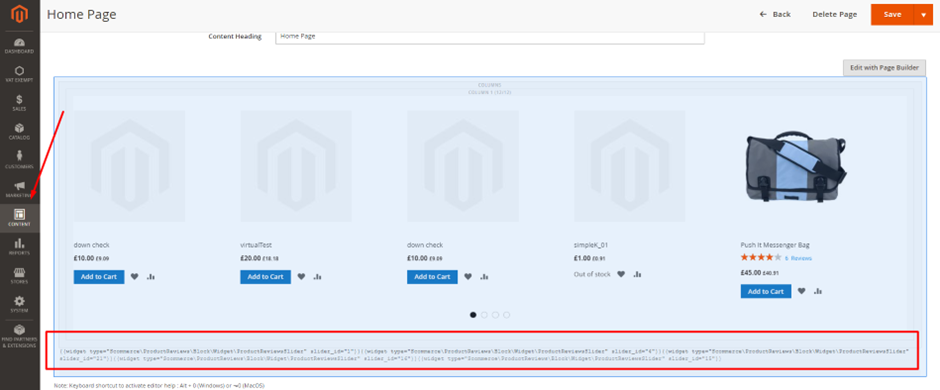
-
Click on Insert Widget. Select the Widget type and widget option.
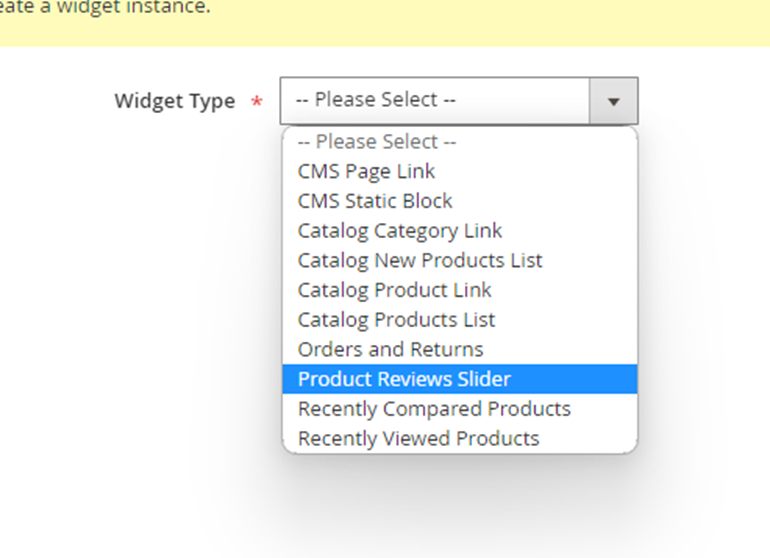
-
Save and clear the caches.
Note:- Similary you add product reviews slider in Blocks using widgets.
Front-End View
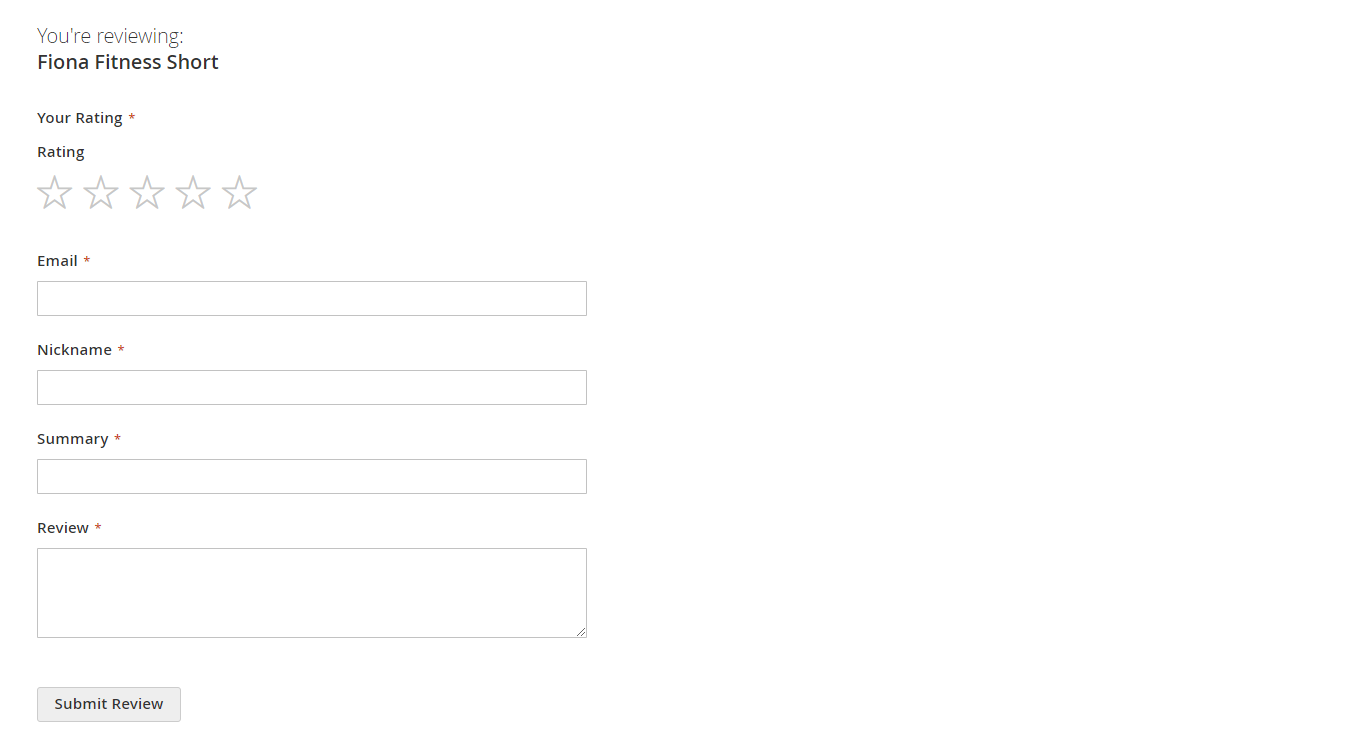
Email Field in Review Form
Once Email field is enabled from the configuration this field is visible in the Product review form:
Reviews on CMS Pages
We had assigned product reviews slider to the What's New Page the review slider can be seen on the product page.
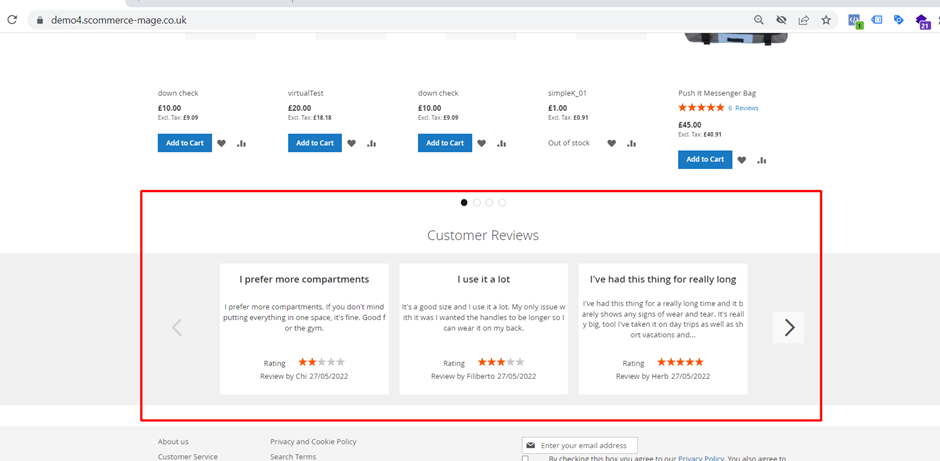
Reviews on Category Pages
Go to the frontend to that category and reviews will be seen at the bottom of the page.
If you have a question related to this extension please check out our FAQ Section first. If you can't find the answer you are looking for then please contact support@scommerce-mage.com.
Magento 2 Advanced Store Locator
Installation and User Guide for Magento 2 Advanced Store Locator
Table of Contents
- Installation
- Installation via app/code
- Installation via Composer
- Configuration Settings for Advanced Store Locator
- General Settings
- Store Locator Region Management (Admin)
- Accessing Region Management
- Creating a New Region
- Editing Existing Regions
- Deleting a Region
- Store Management & Region Association (Admin)
- Accessing Store Management
- Creating a New Store
- Editing Existing Stores
- Deleting a Store
- Store List Display on Frontend (Customer)
- Viewing Stores Within a Selected Region
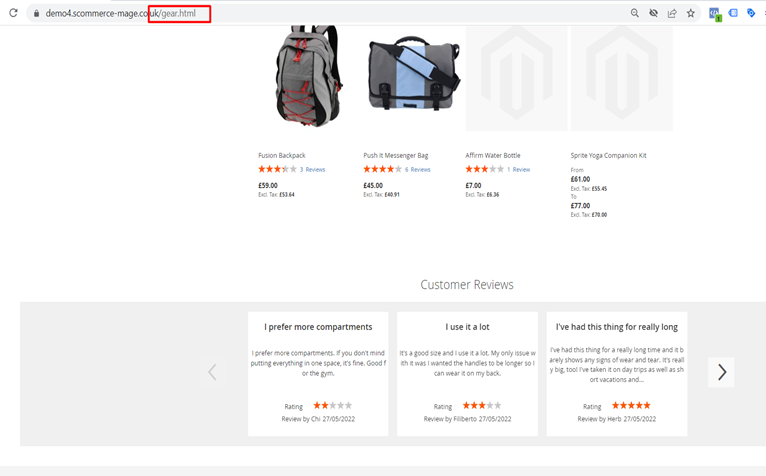
- Viewing All Stores (Without Region Selection)
- Store Detail View (Customer)
- Accessing Store Detail View
- Understanding the Layout
- Detailed Store Information
Installation
- Installation via app/code: Upload the content of the module to your root folder. This will not overwrite the existing Magento folder or files, only the new contents will be added. After the successful upload of the package, run below commands on Magento 2 root directory.
php bin/magento setup:upgrade
php bin/magento setup:di:compile
php bin/magento setup:static-content:deploy- Installation via Composer: Please follow the guide provided in the below link to complete the installation via composer.
Configuration Settings for Advanced Store Locator
Go to Admin > Stores > Configuration > Scommerce Configuration > Store Locator
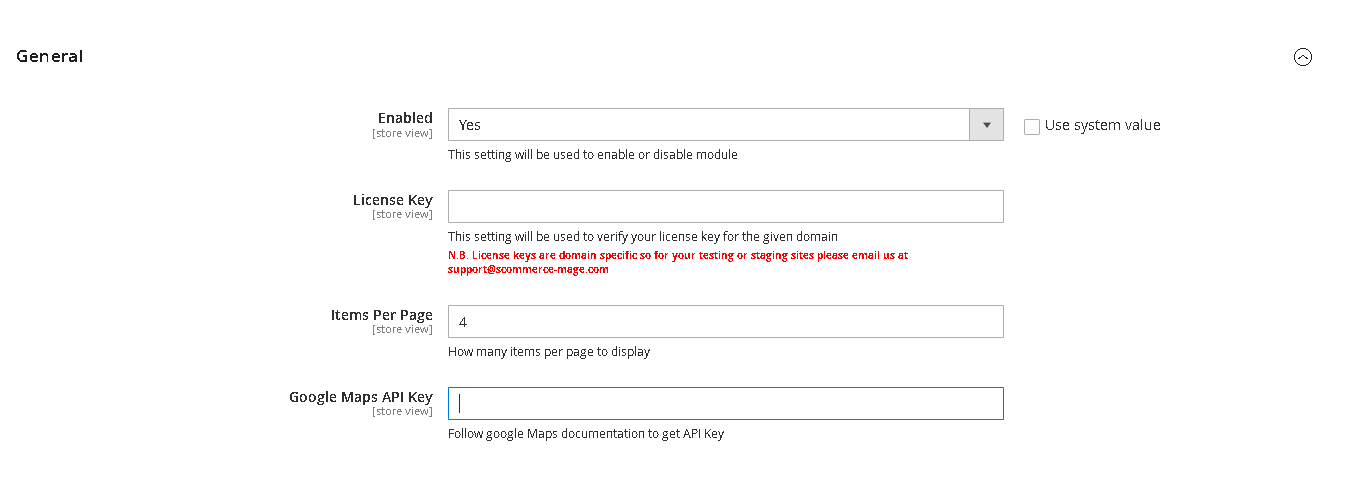
General Settings
- Enabled - Select “Yes” or “No” to enable or disable the module.
- License Key - Please add the license for the extension which is provided in the order confirmation email. Please note license keys are site URL specific. Please go to Admin > Stores > Configuration > Scommerce Configuration > Core and click on "Verify" to verify the license key.
- Items Per Page - Add the number of items to be displayed per page
- Enabled - Enter the Google Maps API key to fetch the map for each store
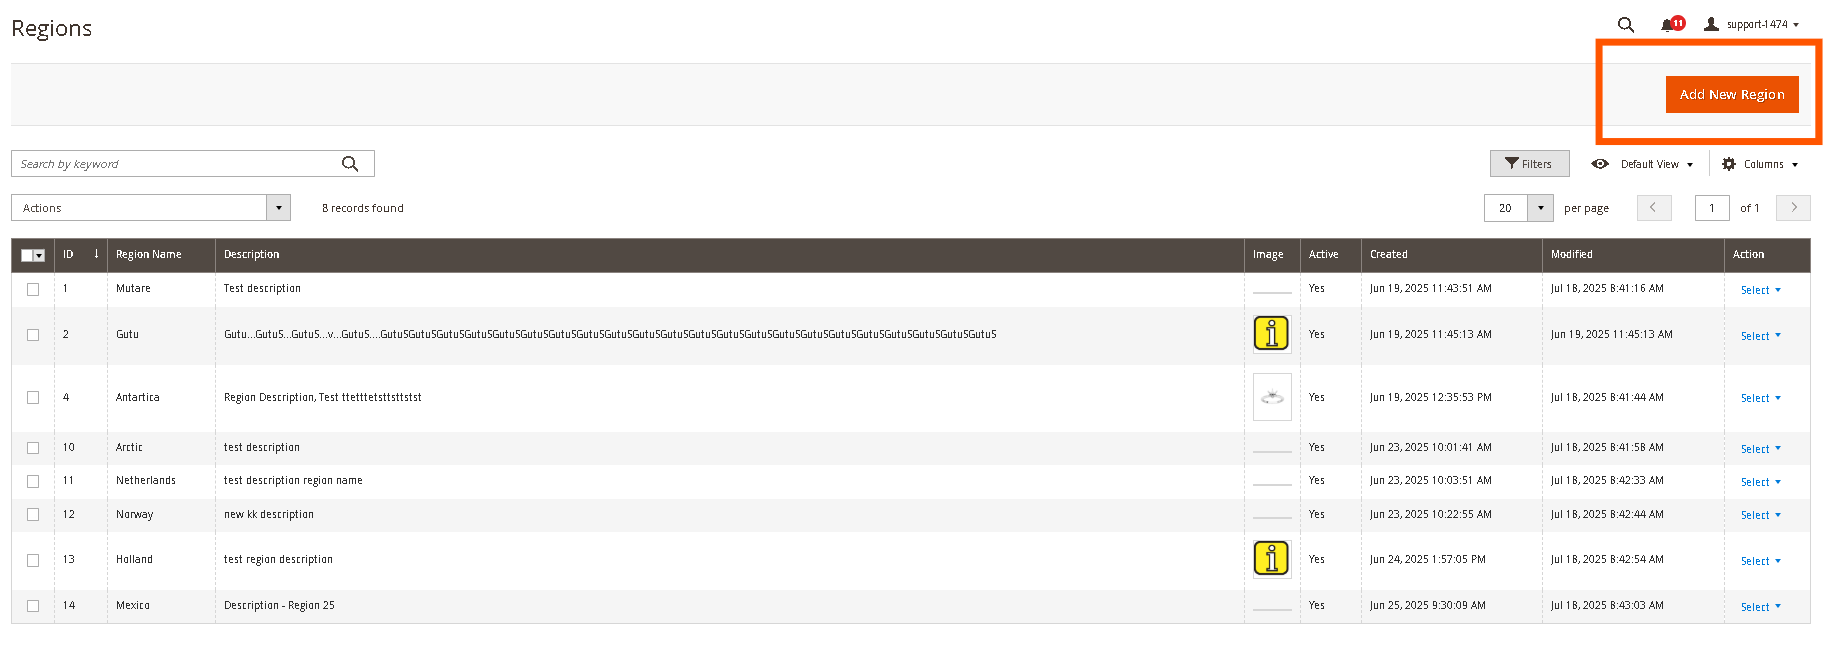
Store Locator Region Management (Admin)
This section outlines how administrators can create, edit, and delete regions to categorize your store locations effectively.
1.1. Accessing Region Management
To begin managing your store locator regions:

1.2. Creating a New Region
Follow these steps to add a new region to your store locator:
-
On the Store Regions grid page, click the Add New Region button in the top-right corner.
-
You will be redirected to the New Region page. Fill in the following details:
- Active: Toggle to activate or deactivate the region.
- Region Name: Enter a unique name for your region (e.g., "North America," "Europe," "Asia Pacific"). This field is required.
- Description: (Optional) Provide a brief description for the region. This can be used for internal reference.
- Region Image: (Optional) Upload an image to represent the region. This might be displayed on the frontend depending on your theme and future enhancements.
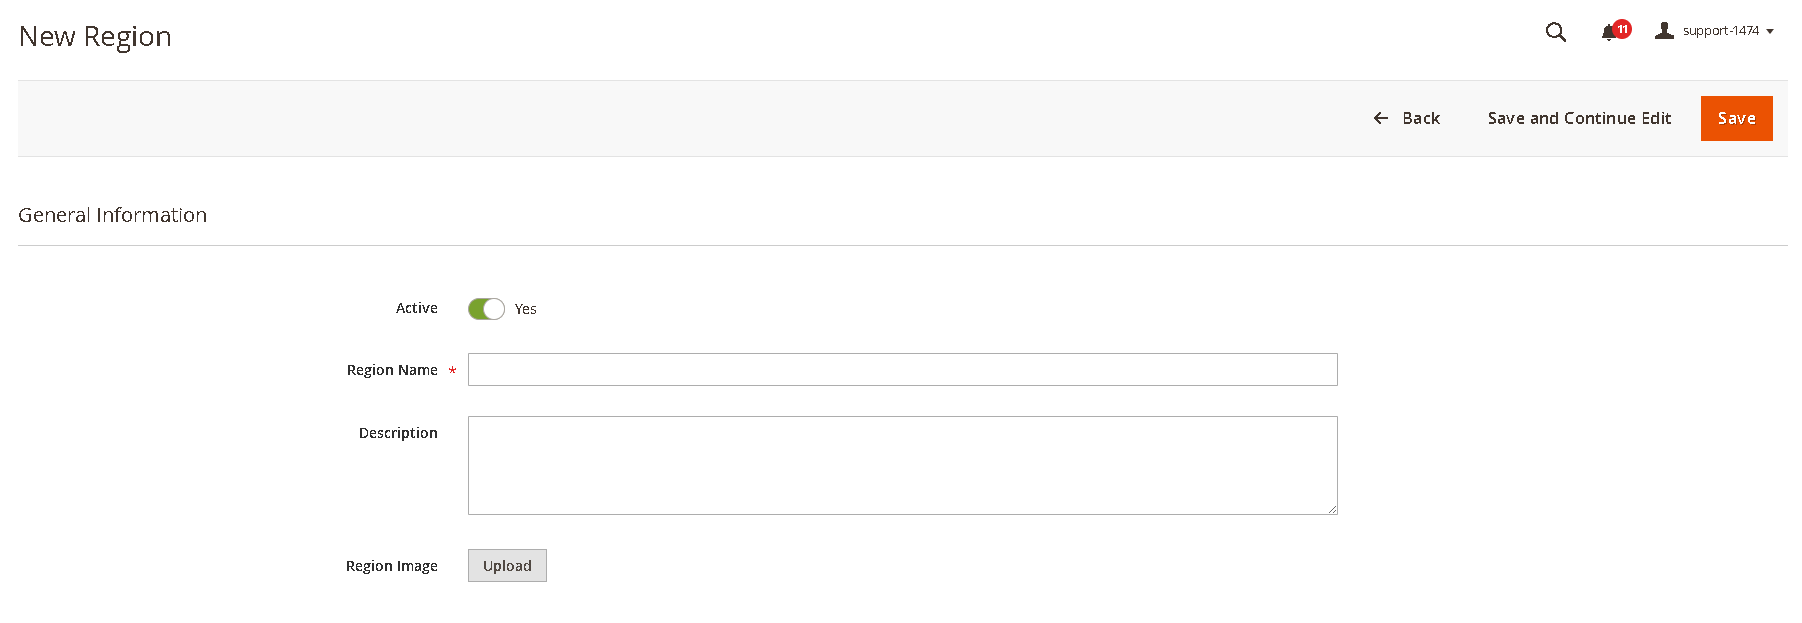
-
Click Save Region to create the new region. A success message will appear, and you will be redirected back to the Region Management grid.
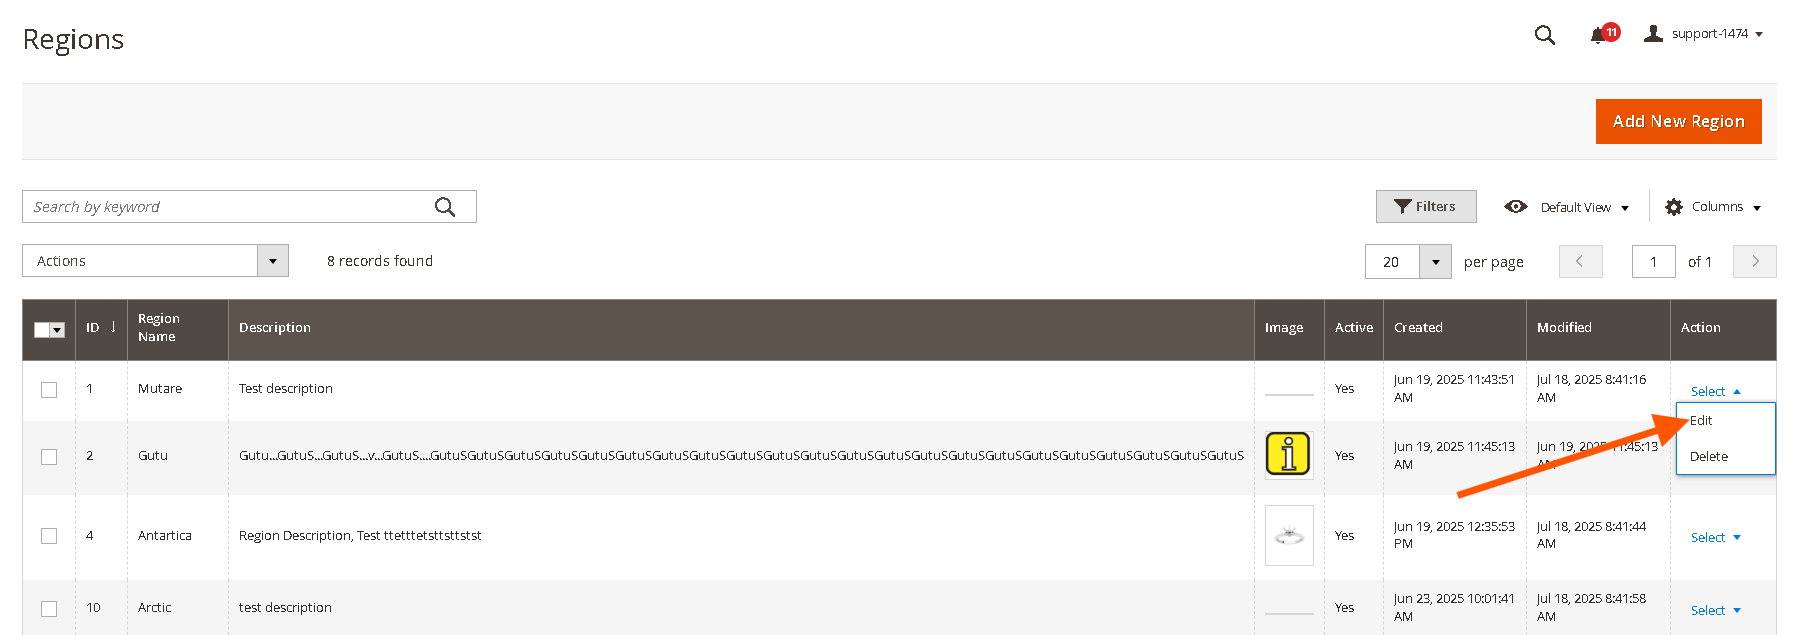
1.3. Editing Existing Regions
To view or modify details of an existing region:
-
From the Region Management grid, locate the region you wish to edit.
-
In the Actions column for that region, click Edit.
- Clicking Edit will open the region details page where you can modify any of the fields (Region Name, Description, Image).
-
After making any changes, click Save Region to apply your updates.
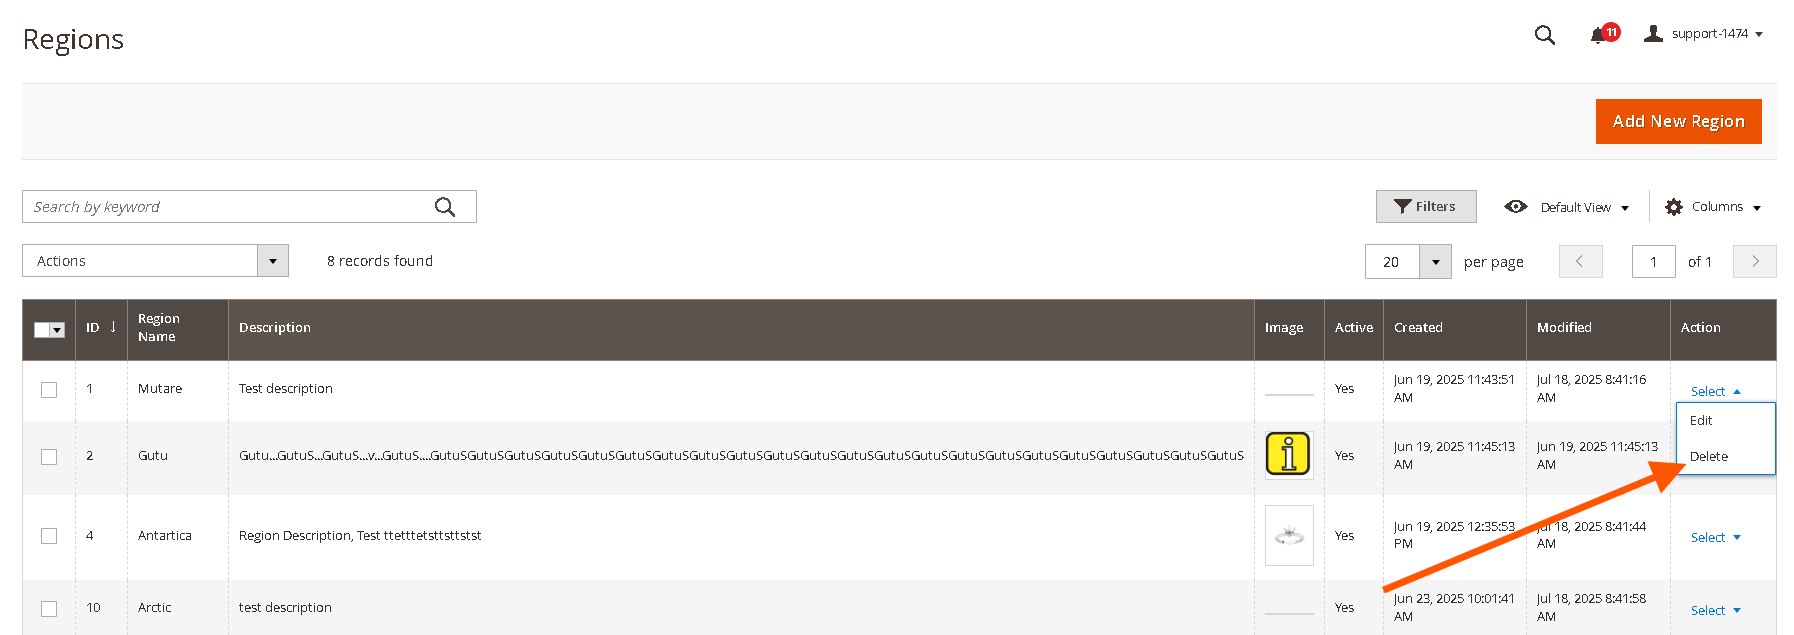
1.4. Deleting a Region
You can remove regions from your system, provided no stores are currently assigned to them:
-
From the Region Management grid, locate the region you wish to delete.
-
In the Actions column for that region, click Delete.
-
Alternatively you can also edit the region and then use the "Delete" button at the top.
-
A confirmation pop-up will appear. Click OK to confirm the deletion.
-
Important: A region can only be deleted if no stores are associated with it. If stores are assigned, you will need to reassign or delete those stores first.
-
Once a region is successfully deleted, it will be removed from the grid and will no longer appear as an option for store categorization or on the front-end store locator navigation.
-
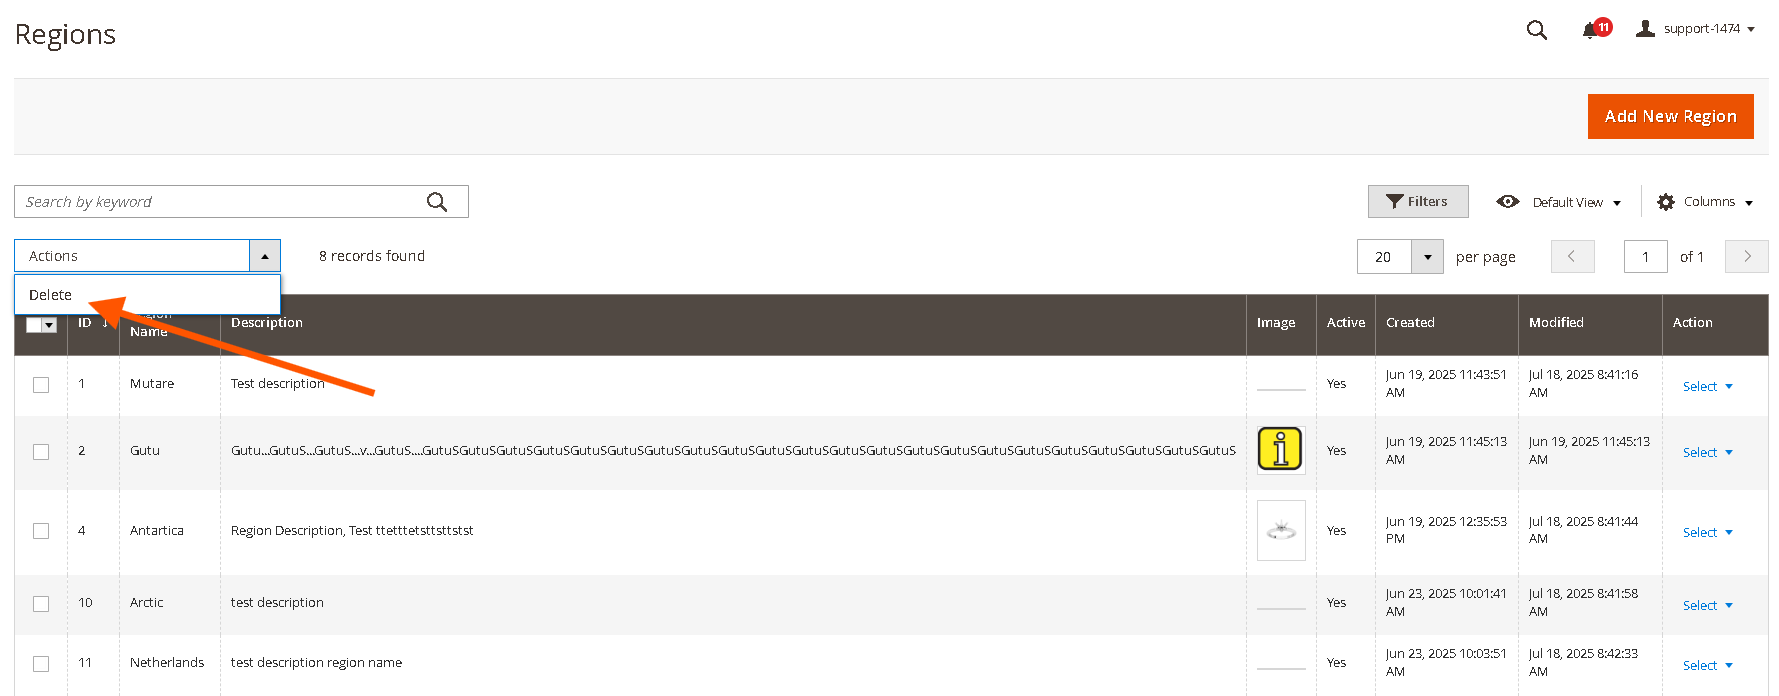
You can also Mass delete regions using following steps:
- Select checkboxes next to messages.
- From the Actions dropdown, choose "Delete".
- Confirm by clicking "OK" in the popup.

1.5. Mass Action to Activate/Deactivate/Delete Regions
Go to Admin>Stores>Scommerce Store Locator>Store Regions select the regions that you want to Deactivate/Activate/Delete. Next click on the mast action button and then select the action as shown below:-
1.6. Import Regions
Go to Admin>System>Data Transfer>Import.
From the Entity Type dropdown select "Scommerce Store Locator Regions"
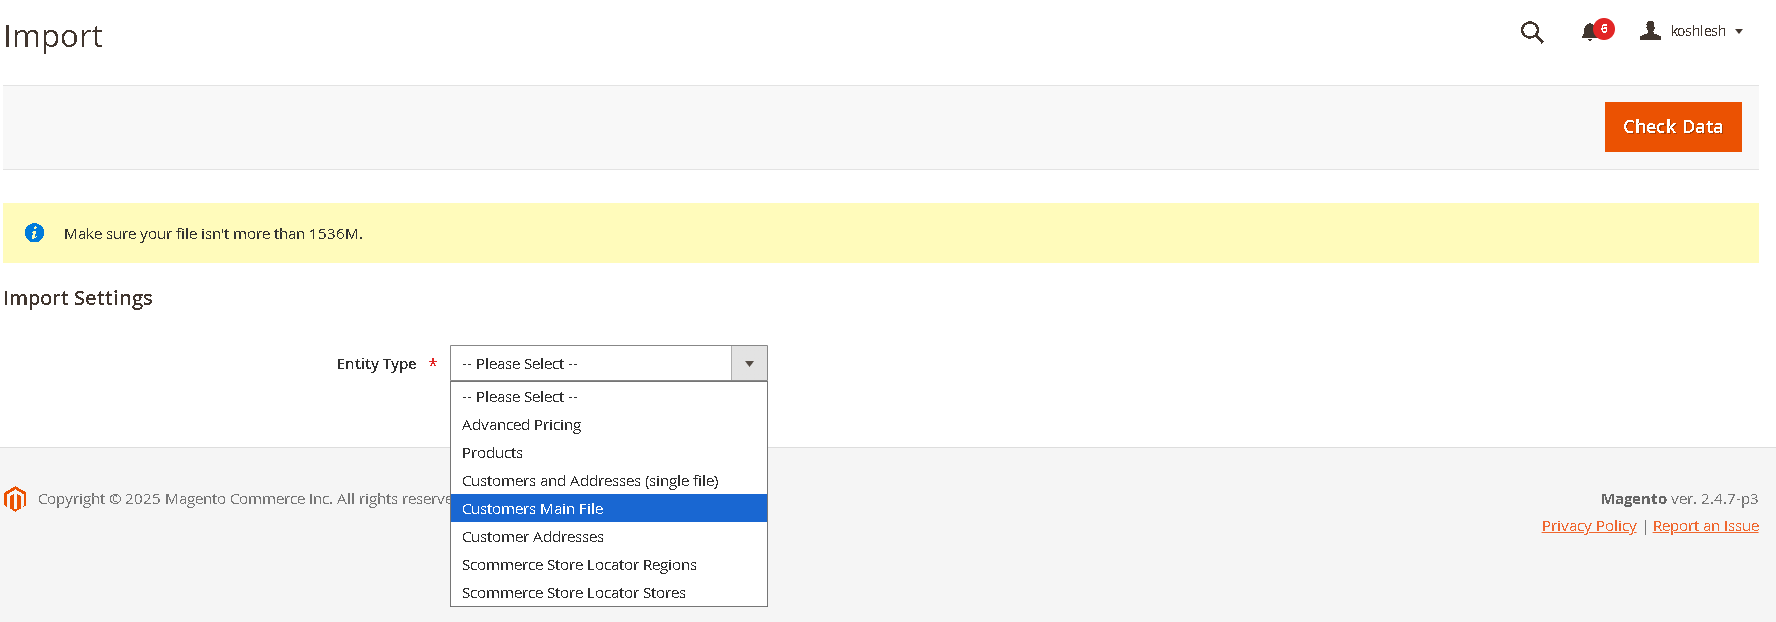
select the import file and other settings as needed then
// Sample Import File
Name,Description, Image
Greater London,"The metropolitan area surrounding London, known for its diverse neighborhoods and vibrant commercial activity.", “greater-london.jpg“
West Midlands,"A central region in England known for its industrial heritage and growing retail hubs.", “west-midland.jpg“
North West,"Encompasses major cities like Manchester and Liverpool, with a mix of urban and suburban retail locations.", “north-west.jpg“
2. Store Management & Region Association (Admin)
This section describes how administrators can create, manage, and associate individual store locations with the regions you've defined.
2.1. Accessing Store Management
To manage your store locations:

2.2. Creating a New Store
Follow these steps to add a new store location:
-
On the Store Locations grid page, click the Add New Store button in the top-right corner.
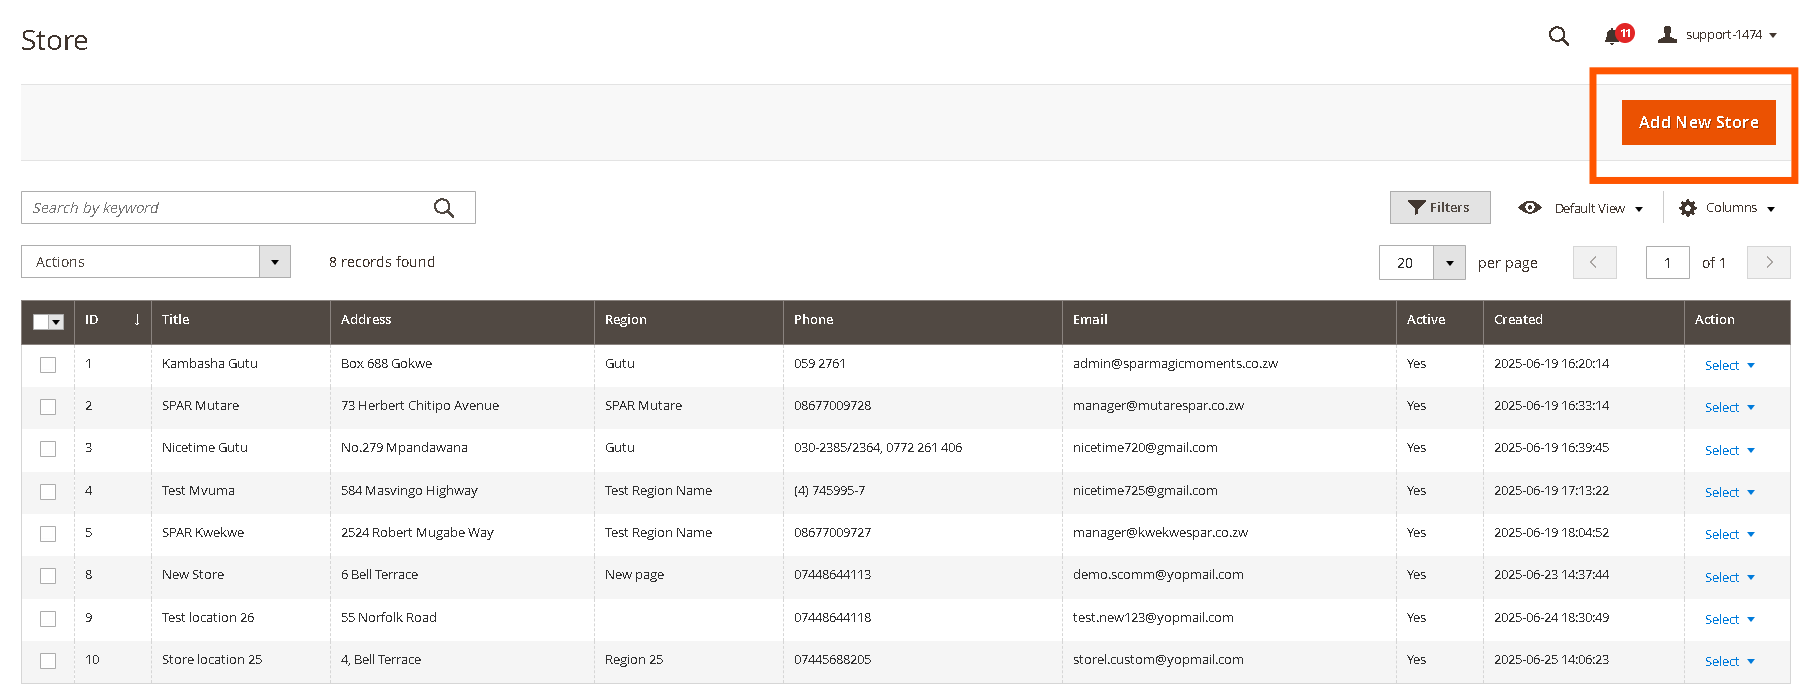
-
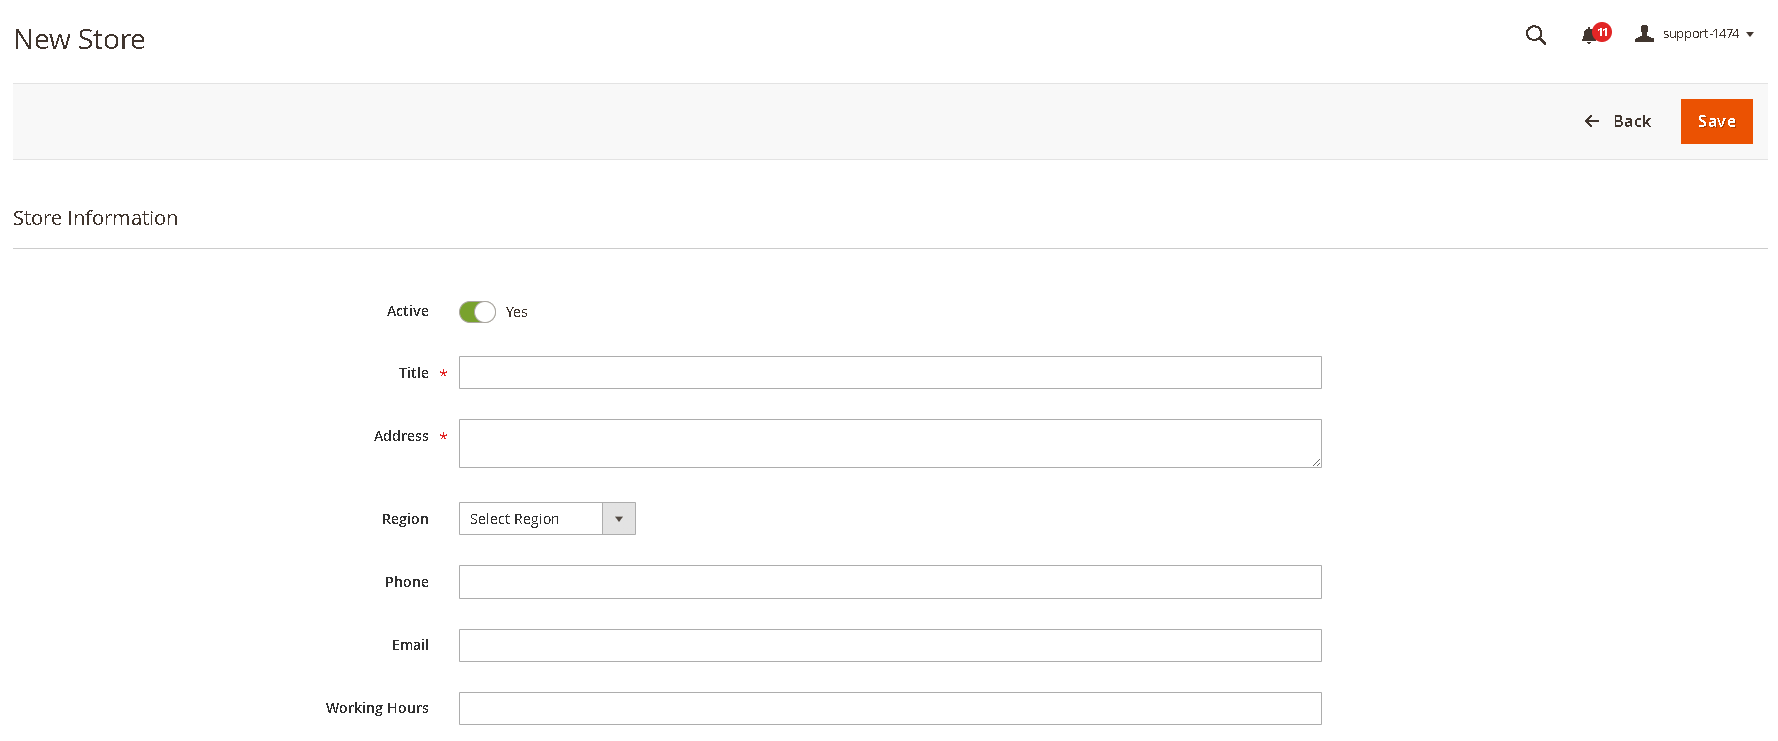
You will be redirected to the New Store page. Fill in the following details:
- Active: Toggle to activate or deactivate the region.
- Store Title: (Required) Enter the name of the store (e.g., "Main Street Branch").
- Store Address: (Required) Provide the full physical address of the store. This will be used for the Google Map display on the frontend.
- Region Selection: (Optional) Select an existing region from the dropdown menu to associate this store with. This dropdown will populate with regions created in the "Region Management" section.
- Phone: (Optional) Enter the store's contact number.
- Email: (Optional) Provide the store's email address.
- Working Hours: (Optional) Describe the store's operating hours (e.g., "Mon-Fri: 9 AM - 6 PM, Sat: 10 AM - 4 PM").
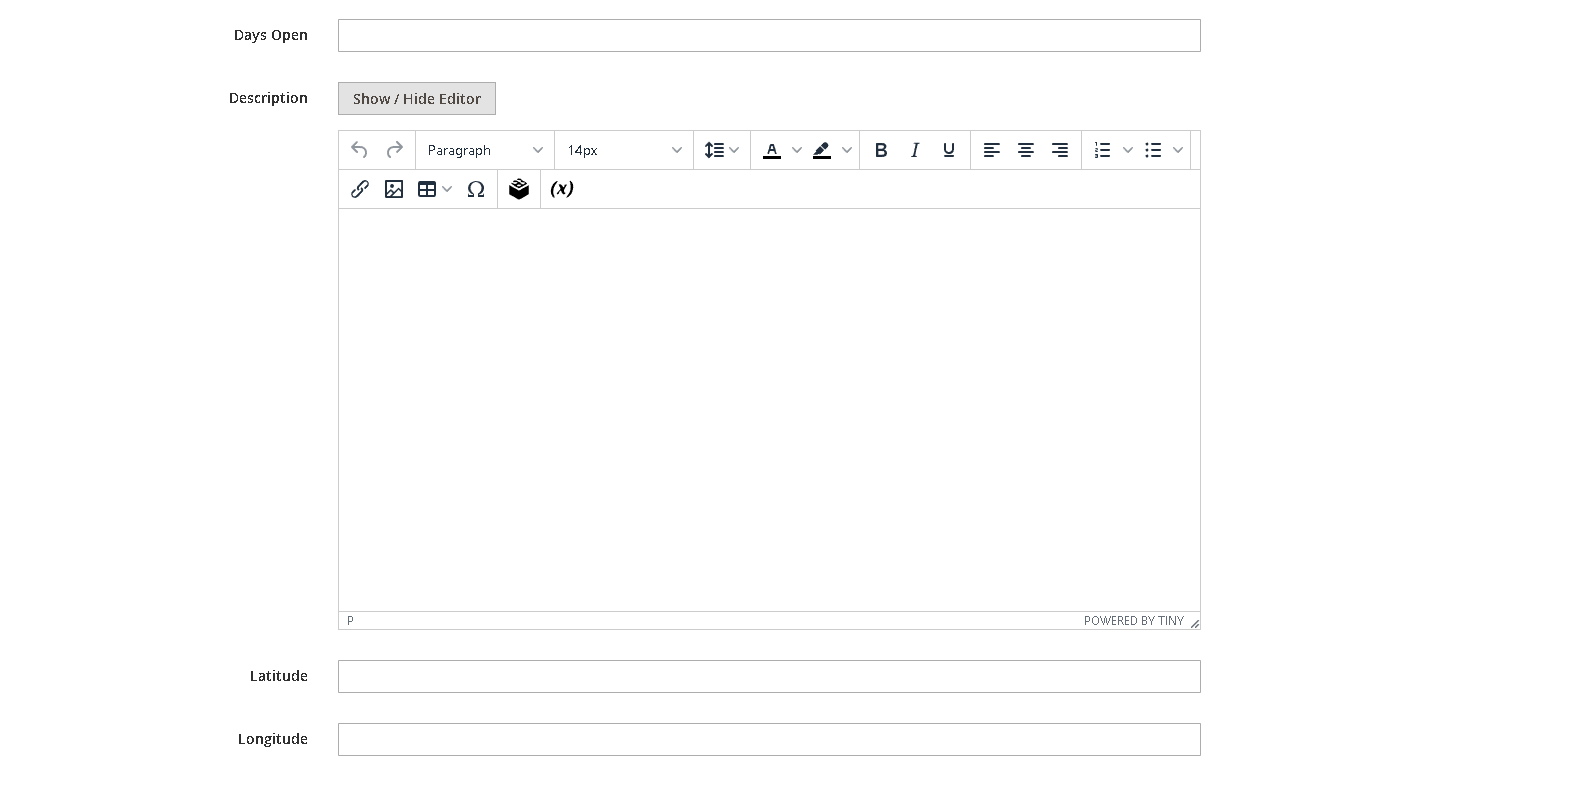
- Days Open: (Optional) List the days the store is open (e.g., "Monday - Saturday").
- Description: (Optional) Any other relevant information about the store (e.g., "Free Parking Available," "Wheelchair Accessible" , "Short Description").
- Latitude: Enter lattitude of the store location
- Longitude: Enter longitude of the store location
-
Click Save Store to create the new store. A success message will appear, and you will be redirected back to the Store Management grid.
2.3. Editing Existing Stores
To modify details of an existing store, including its assigned region:
- From the Store Locations grid, locate the store you wish to edit. The grid displays ID, Title, Address, Region, Phone, Email, Active, Created, and Actions.
- In the Actions column for that store, click Edit
- Clicking Edit will open the store details page where you can modify any of the fields, including the Region Selection.
- Clicking View will open the store details page in a read-only mode.
- After making any changes, click Save Store to apply your updates.

2.4. Deleting a Store
To remove a store location from your system:
-
From the Store Management grid, locate the store you wish to delete.
-
In the Actions column for that store, click Delete.
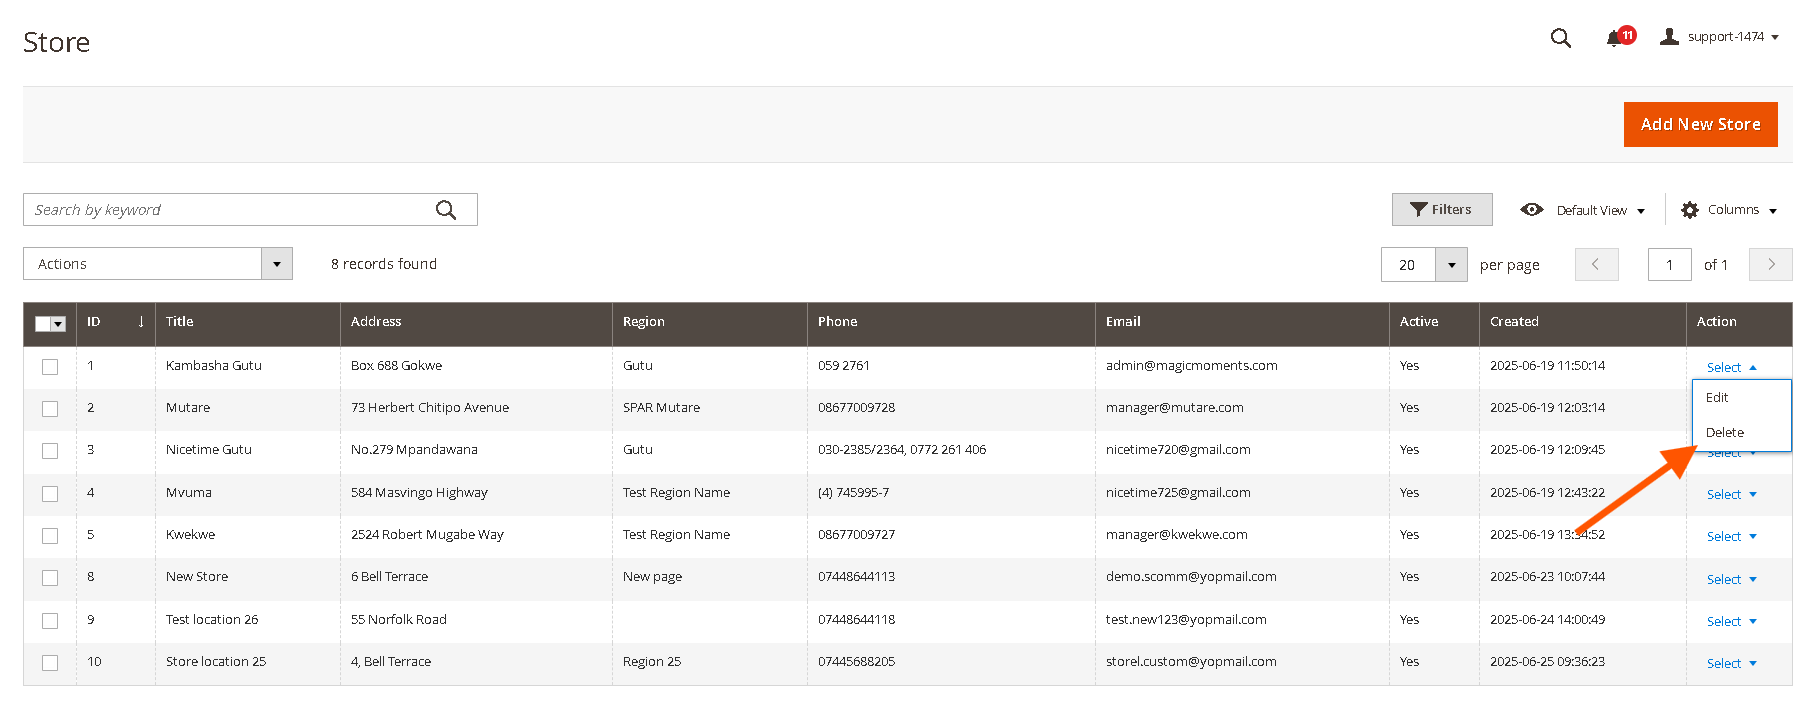
-
Alternatively you can also edit the store and then use the "Delete" button at the top.
-
A confirmation pop-up will appear. Click OK to confirm the deletion.
-
Once a store is successfully deleted, it will be removed from the grid and will no longer appear on the front-end Store Locator. Deleting a store only removes that specific store and does not affect other stores within the same region.
-
You can also Mass delete regions using following steps:
- Select checkboxes next to messages.
- From the Actions dropdown, choose "Delete".
- Confirm by clicking "OK" in the popup.
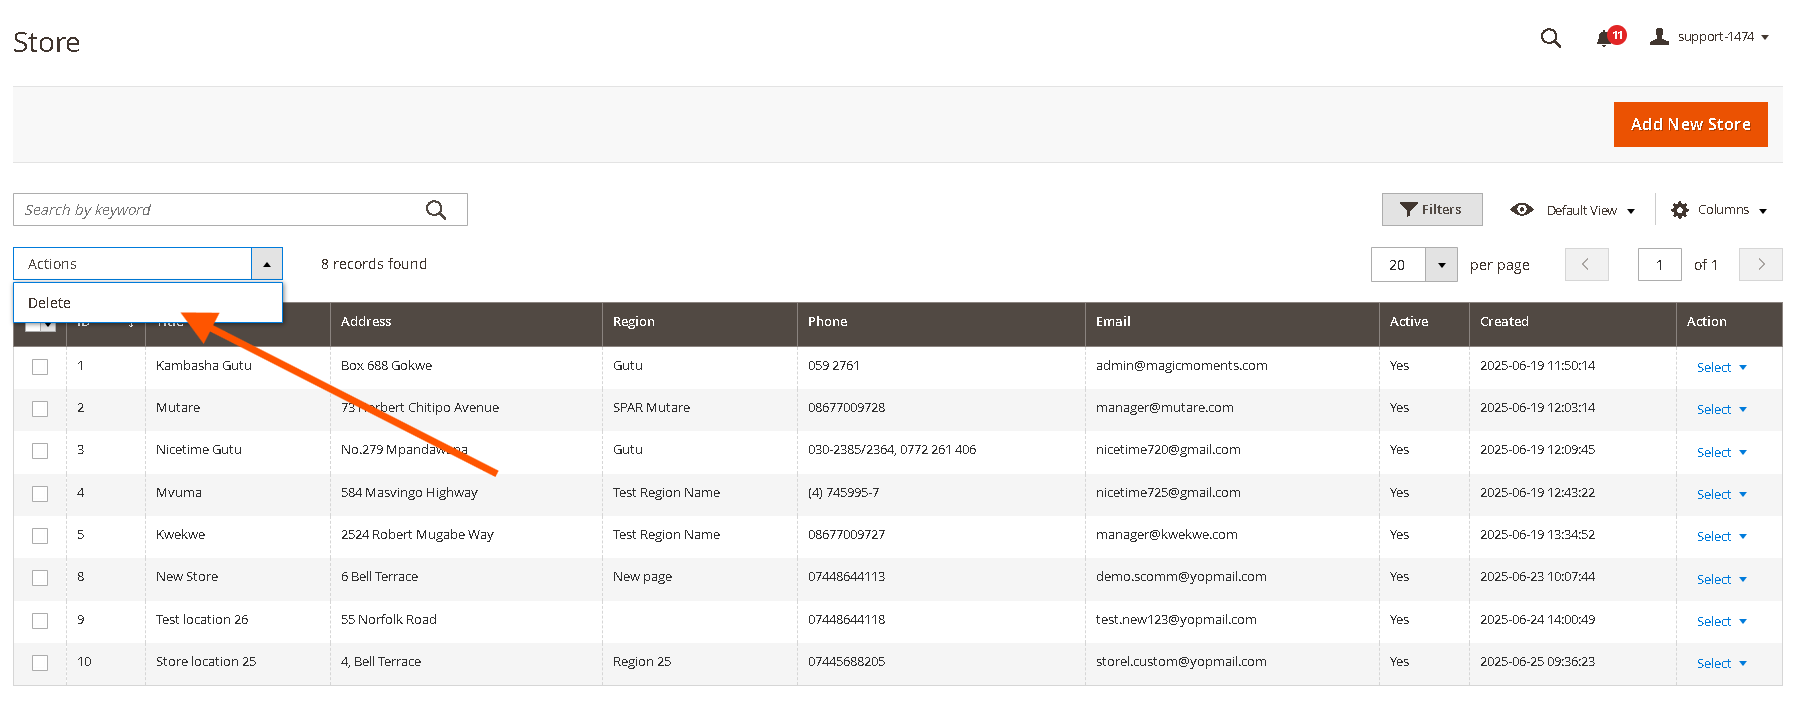
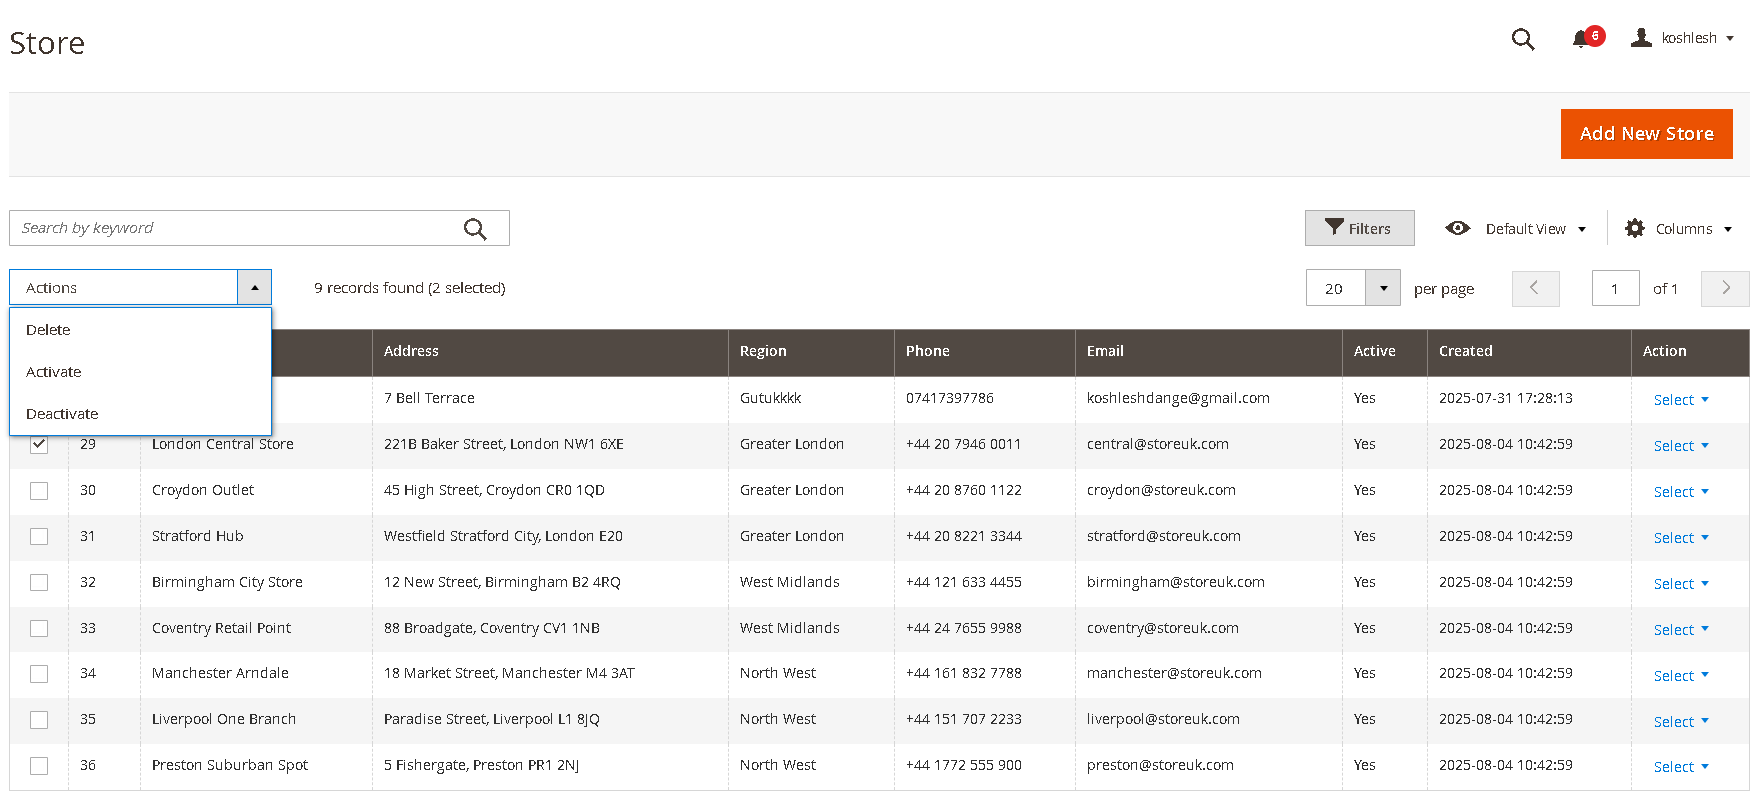
2.5. Mass Action to Activate/Deactivate/Delete Store Locations
Go to Admin>Stores>Scommerce Store Locator>Store Locations select the stores that you want to Deactivate/Activate/Delete. Next click on the mast action button and then select the action as shown below:-
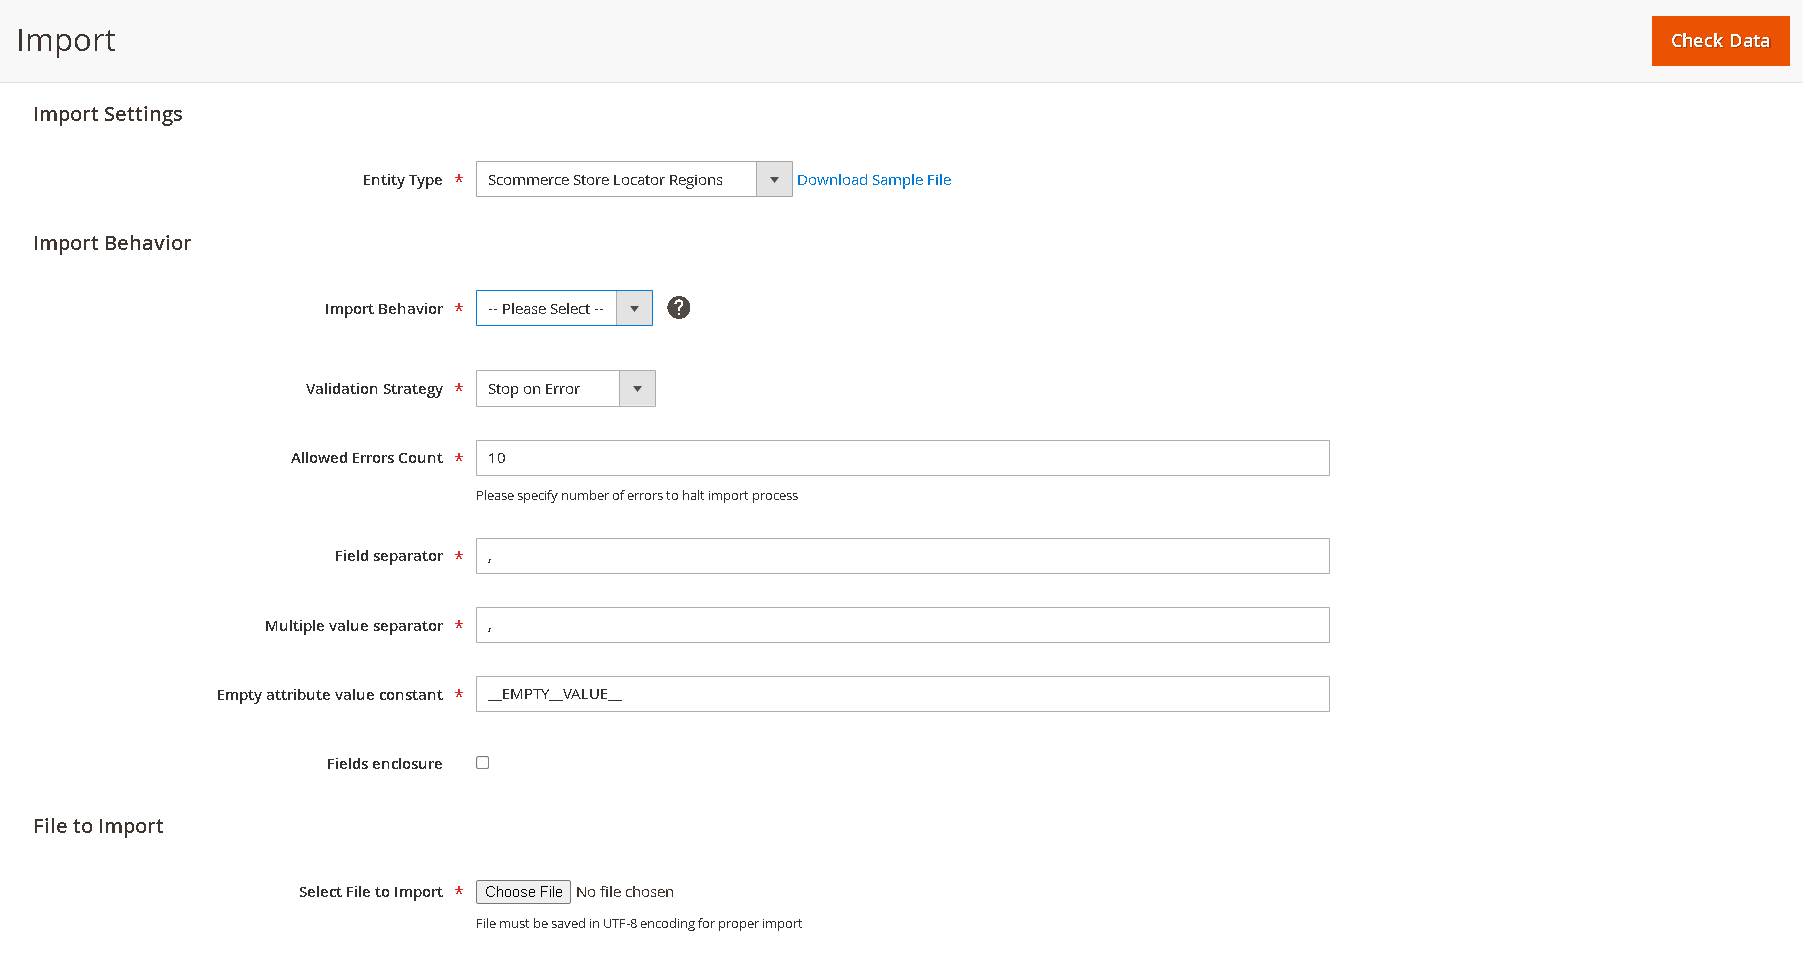
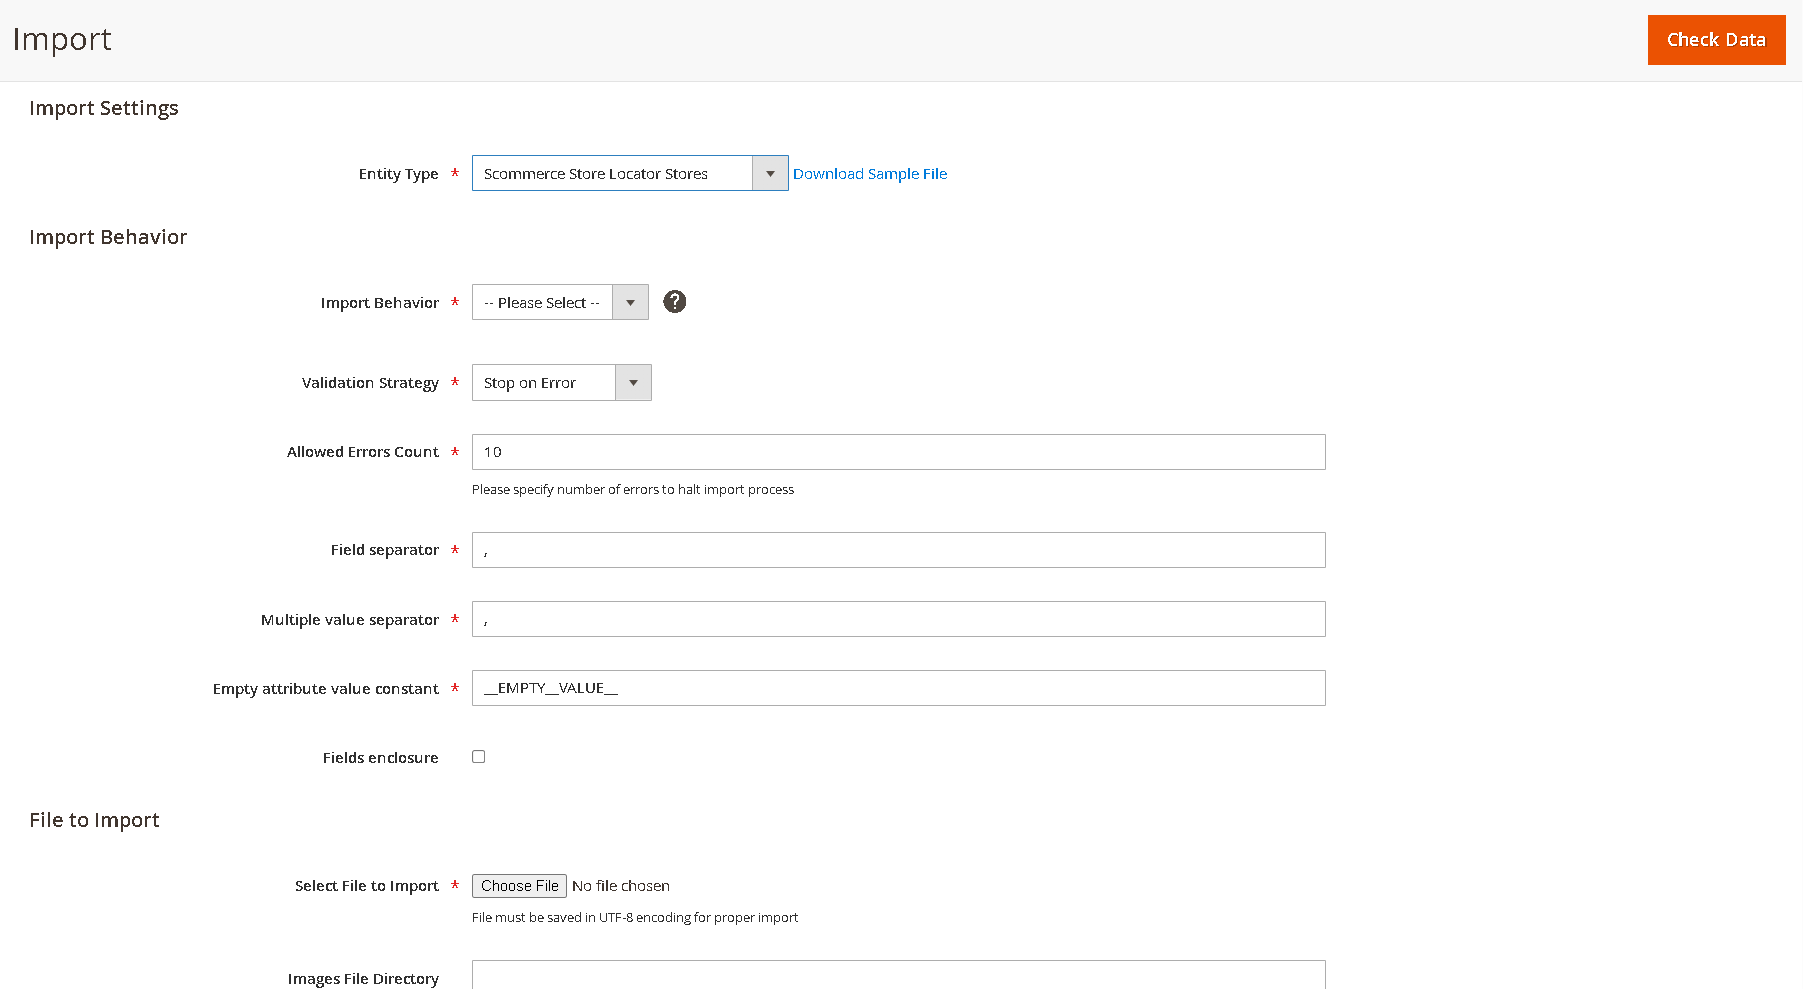
2.6. Import Stores
Go to Admin>System>Data Transfer>Import.
From the Entity Type dropdown select "Scommerce Store Locator Stores"
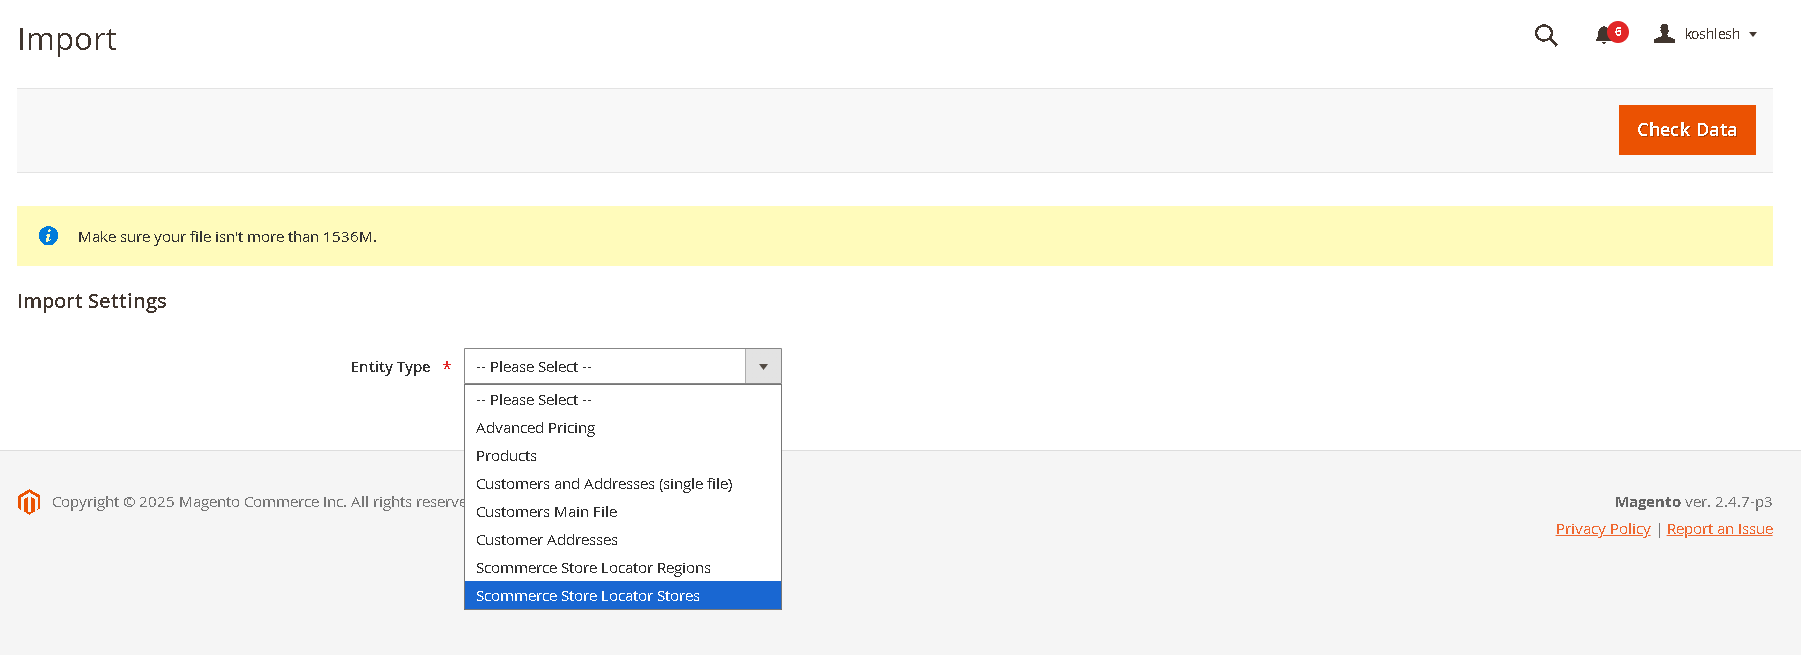
select the import file and other settings as needed then
// Sample Import File
Name,Address,Description,Region,Email,Phone,Working Hours,Longitude,Latitude,Days Open
London Central Store,"221B Baker Street, London NW1 6XE","Flagship store near Regent's Park",Greater London,central@storeuk.com,+44 20 7946 0011,"Mon–Sat: 9am–7pm",-0.1586,51.5237,"Monday–Saturday"
Croydon Outlet,"45 High Street, Croydon CR0 1QD","Discount outlet with parking",Greater London,croydon@storeuk.com,+44 20 8760 1122,"Mon–Fri: 10am–6pm",-0.1004,51.3762,"Monday–Friday"
Stratford Hub,"Westfield Stratford City, London E20","Modern store in shopping centre",Greater London,stratford@storeuk.com,+44 20 8221 3344,"Daily: 10am–8pm",-0.0064,51.5430,"All week"
Birmingham City Store,"12 New Street, Birmingham B2 4RQ","High-traffic location near Bullring",West Midlands,birmingham@storeuk.com,+44 121 633 4455,"Mon–Sat: 9am–6pm",-1.8998,52.4797,"Monday–Saturday"
Coventry Retail Point,"88 Broadgate, Coventry CV1 1NB","Family-friendly store with café",West Midlands,coventry@storeuk.com,+44 24 7655 9988,"Tue–Sun: 10am–5pm",-1.5105,52.4081,"Tuesday–Sunday"
Manchester Arndale,"18 Market Street, Manchester M4 3AT","Located in the heart of the city",North West,manchester@storeuk.com,+44 161 832 7788,"Daily: 9am–8pm",-2.2417,53.4839,"All week"
Liverpool One Branch,"Paradise Street, Liverpool L1 8JQ","Stylish store with seasonal offers",North West,liverpool@storeuk.com,+44 151 707 2233,"Mon–Sat: 10am–7pm",-2.9840,53.4045,"Monday–Saturday"
Preston Suburban Spot,"5 Fishergate, Preston PR1 2NJ","Quiet location with easy access",North West,preston@storeuk.com,+44 1772 555 900,"Wed–Sun: 11am–5pm",-2.7034,53.7590,"Wednesday–Sunday"
3. Store List Display on Frontend (Customer)
This section describes how customers will interact with the Store Locator on your website's front-end.
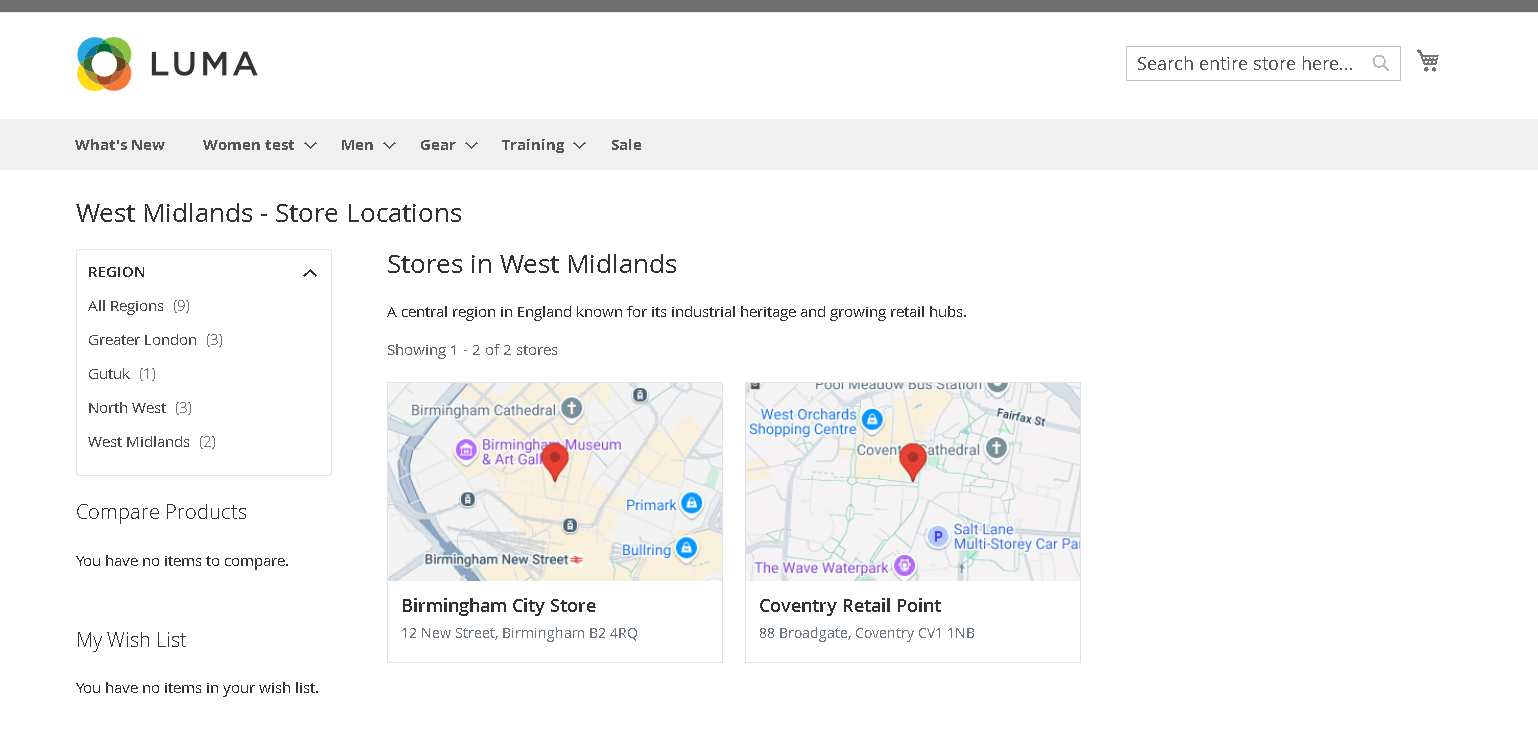
3.1. Viewing Stores Within a Selected Region
Customers can easily find stores by filtering them by region:
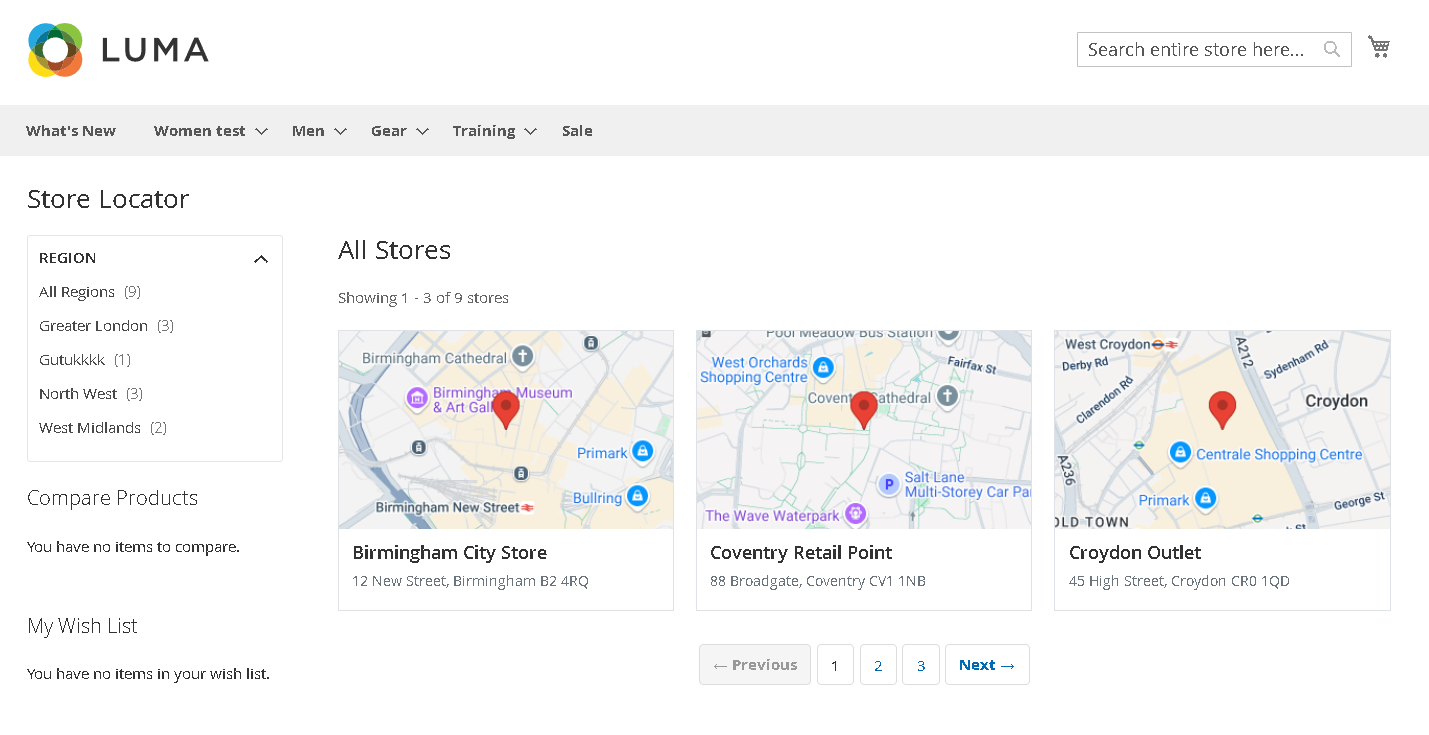
3.2. Viewing All Stores (Without Region Selection)
The Store Locator also allows customers to view all stores without initially filtering by region:
4. Store Detail View (Customer)
This workflow describes how customers can access and view detailed information for a specific store.
4.1. Accessing Store Detail View
- From any store list display (either filtered by region or showing all stores), click on the name of a specific store or an associated "View Details" link.
4.2. Understanding the Layout
- Region List Visibility: The presence of the region list on the left-hand navigation on the store detail page is determined by a configuration setting in the admin panel. Your administrator will decide whether this list is shown or hidden.
- Layout Adaptation:
- If no stores in the system have an associated region, the store detail page will automatically be full width.
- If at least one store is linked to a region, the available regions will be displayed in the left-hand navigation based on the aforementioned configuration.
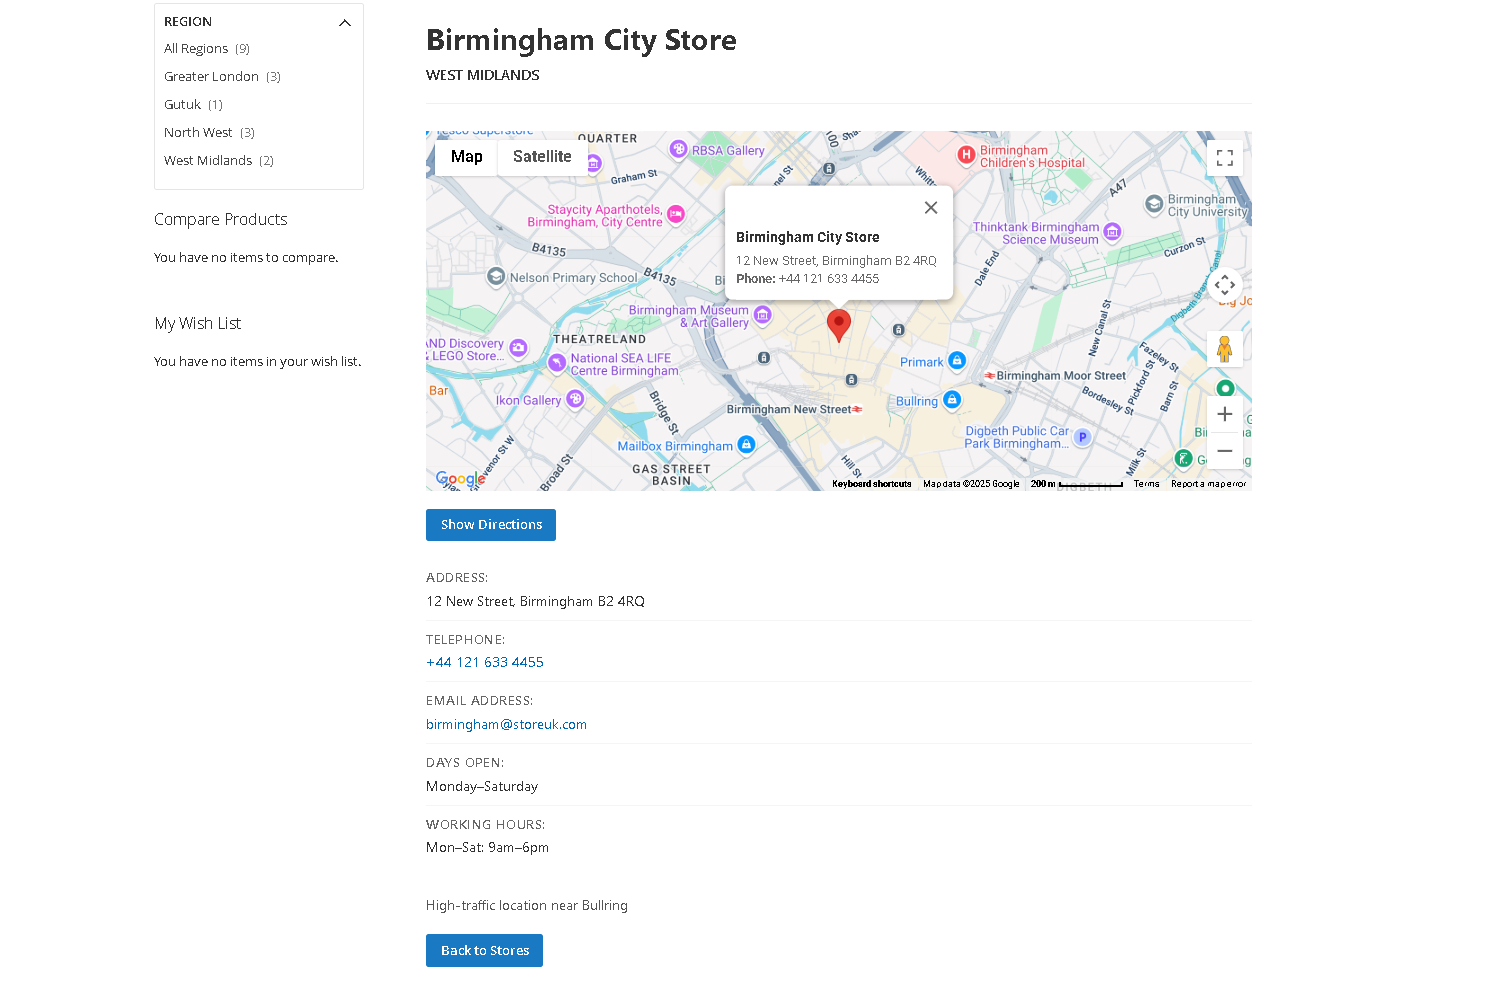
4.3. Detailed Store Information
The store detail view provides comprehensive information about the selected store, including:
- Large Google Map: A larger, more prominent Google Map showing the precise location of the store based on its address.
- Show Directions: Clicking on this button takes you to the map (link) where people can view the directions to the store.
- Store Name and Full Address: Clearly displayed for easy identification.
- Telephone Number: For direct contact.
- Email: For direct email communication.
- Days Open: The specific days the store is open.
- Working Hours: Detailed operating hours.
- Additional Store Details: Any extra information provided by the admin.
- Region: (If applicable) The region to which the store is assigned, providing geographical context.
- Back Button: A button to go back to the list of stores page.
4.4. Navigating Back
To return to the store listing:
- Click the "Back to Stores" link or button. This will navigate you back to the previous store listing page, whether it was filtered by region or showing all stores.
If you have a question related to this extension please check out our FAQ Section first. If you can't find the answer you are looking for then please contact support@scommerce-mage.com.
Magento 2 Abandoned Basket Email
Installation and User Guide for Magento 2 Abandoned Basket email extension
Table of Contents
- Installation
- Installation via app/code
- Installation via Composer
- Configuration Settings for Abandoned Basket Email
- General Settings
- Email Notification 1
- Email Notification 2
- Email Notification 3
- How the Email Sequence Works
- Email Content and Customer Experience
- Discount from Abandoned Cart Email Applied
Installation
-
Installation via app/code: Upload the content of the module to your root folder. This will not overwrite the existing Magento folder or files, only the new contents will be added. After the successful upload of the package, run below commands on Magento 2 root directory.
php bin/magento setup:upgrade php bin/magento setup:di:compile php bin/magento setup:static-content:deploy -
Installation via Composer: Please follow the guide provided in the below link to complete the installation via composer.
Configuration Settings for Abandoned Basket Email
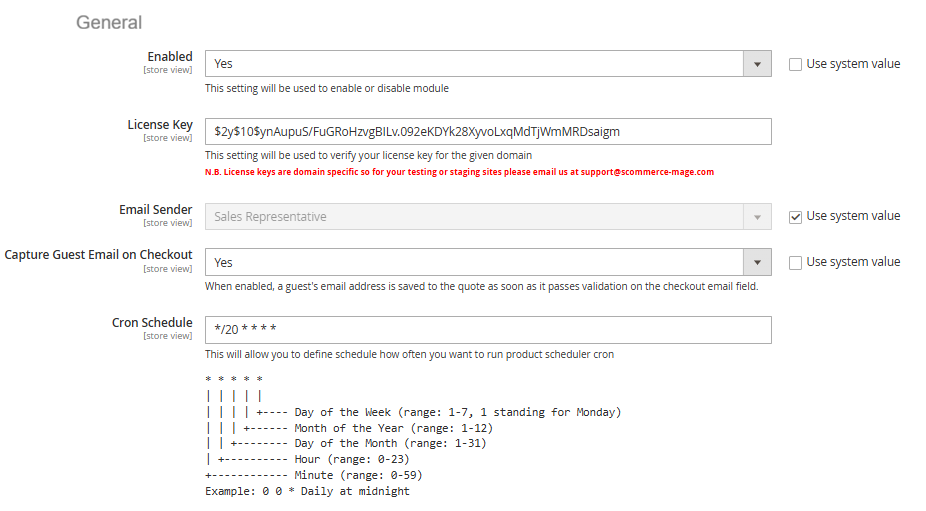
Go to Admin > Stores > Configuration > Scommerce Configuration > Abandoned Basket Email
General Settings
- Enabled – Select "Yes" or "No" to enable or disable the module.
- License Key – Please add the license for the extension which is provided in the order confirmation email. Please note license keys are site URL specific. If you require license keys for dev/staging sites then please email us at support@scommerce-mage.com.
- Email Sender - Please Select the Email Sender.
- Capture Guest Email on Checkout - Select "Yes" to enabled a guest's email address is saved to the quote as soon as it passes validation on the checkout email field.
- Cron Schedule - This will allow you to define cron frequency, how often you want to run Abandoned Basket Email cron.
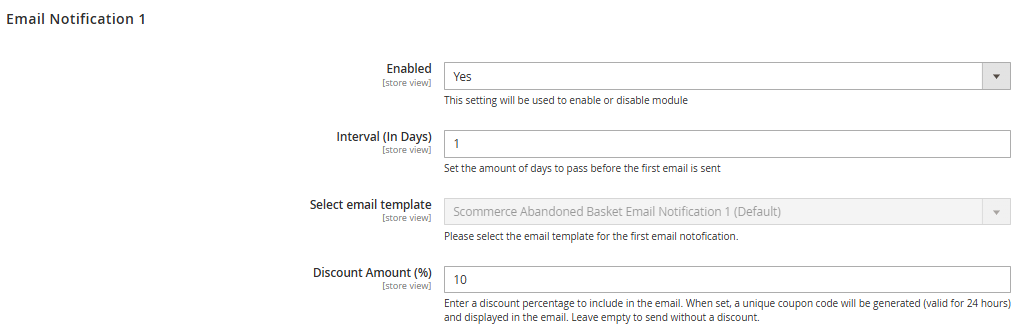
Email Notification 1
- Enabled – Select "Yes" or "No" to enable or disable module.
- Interval (In Days) – Please Set the amount of days to pass before the first email is sent.
- Select Email Template – Please select the email template for the first email notofication.
- Discount Amount (%) – Please enter a discount percentage to include in the email (10%).
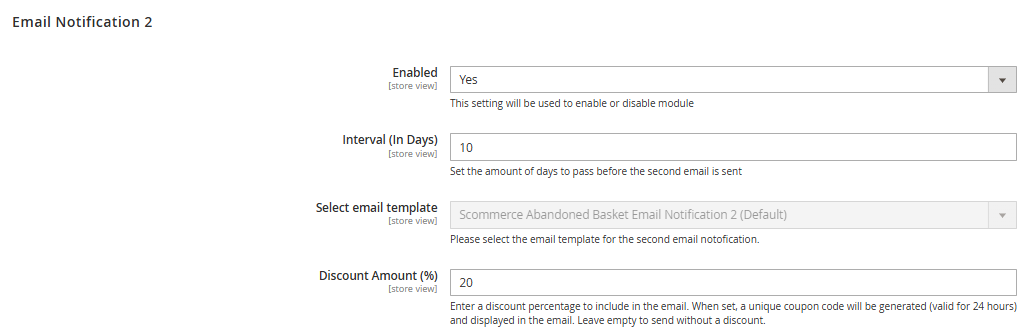
Email Notification 2
- Enabled – Select "Yes" or "No" to enable or disable module.
- Interval (In Days) – Please Set the amount of days to pass before the first email is sent.
- Select Email Template – Please select the email template for the first email notofication.
- Discount Amount (%) – Please enter a discount percentage to include in the email (20%).
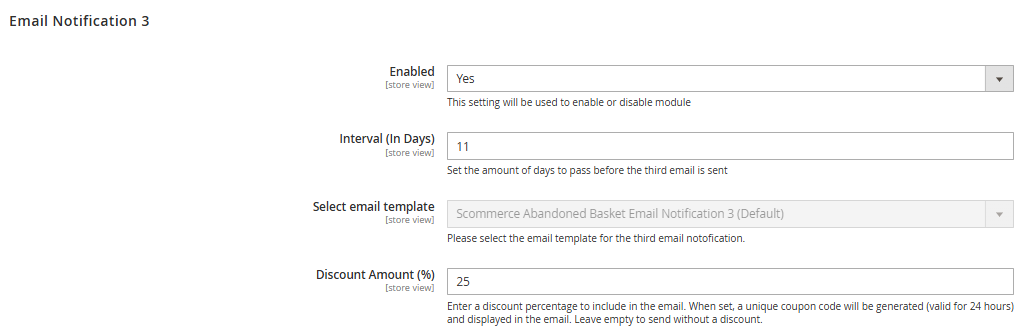
Email Notification 3
- Enabled – Select "Yes" or "No" to enable or disable module.
- Interval (In Days) – Please Set the amount of days to pass before the first email is sent.
- Select Email Template – Please select the email template for the first email notofication.
- Discount Amount (%) – Please enter a discount percentage to include in the email (25%).
How the Email Sequence Works:
A typical workflow begins when a customer, whether a registered user or a guest user, adds items to their cart but leaves the website without completing the order.
The email sequence is based on timed intervals that determine when each reminder is sent after a cart is abandoned. Each email becomes progressively more persuasive by offering a higher discount. Importantly, both the interval days and the discount percentages are fully configurable from Admin → Stores > Configuration > Abandoned Basket Email → General.
For example, if the business wants to send the first email after two days instead of one, or offer a 15% discount instead of 10%, these values can be easily updated in the settings.
A typical flow might look like this: if a customer abandons their cart on Monday, the system sends the first reminder on Tuesday with a 10% discount. If the customer still does not complete the purchase, a second reminder is sent on Thursday with a 20% discount. Finally, if the cart remains incomplete, a third reminder is sent the following Monday with a 25% discount. Once the customer completes the order at any point, the remaining emails are automatically cancelled.
| Interval | Discount | Purpose | |
|---|---|---|---|
| **Email 1** | 1 day after abandonment | **10%** | Gentle reminder + small incentive |
| **Email 2** | 3 days after abandonment | **20%** | Stronger incentive |
| **Email 3** | 7 days after abandonment | **25%** | Final attempt with highest discount |
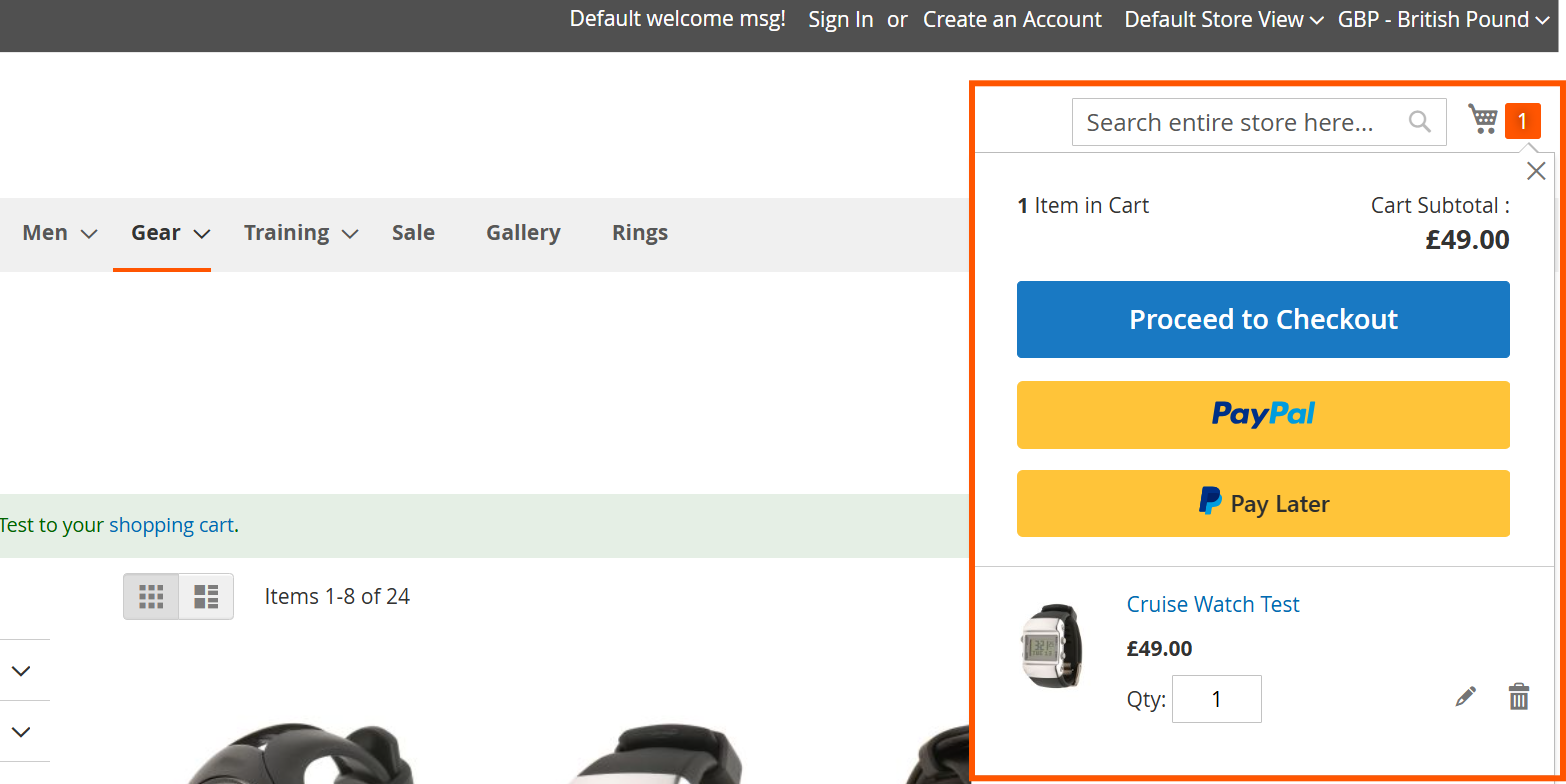
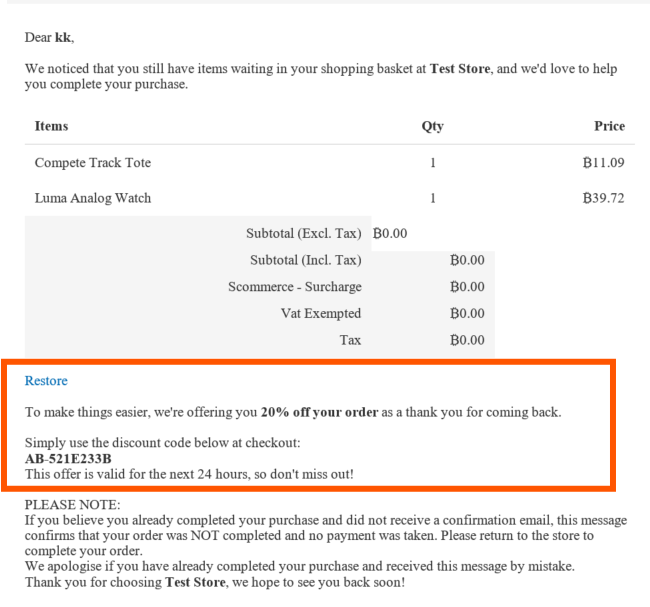
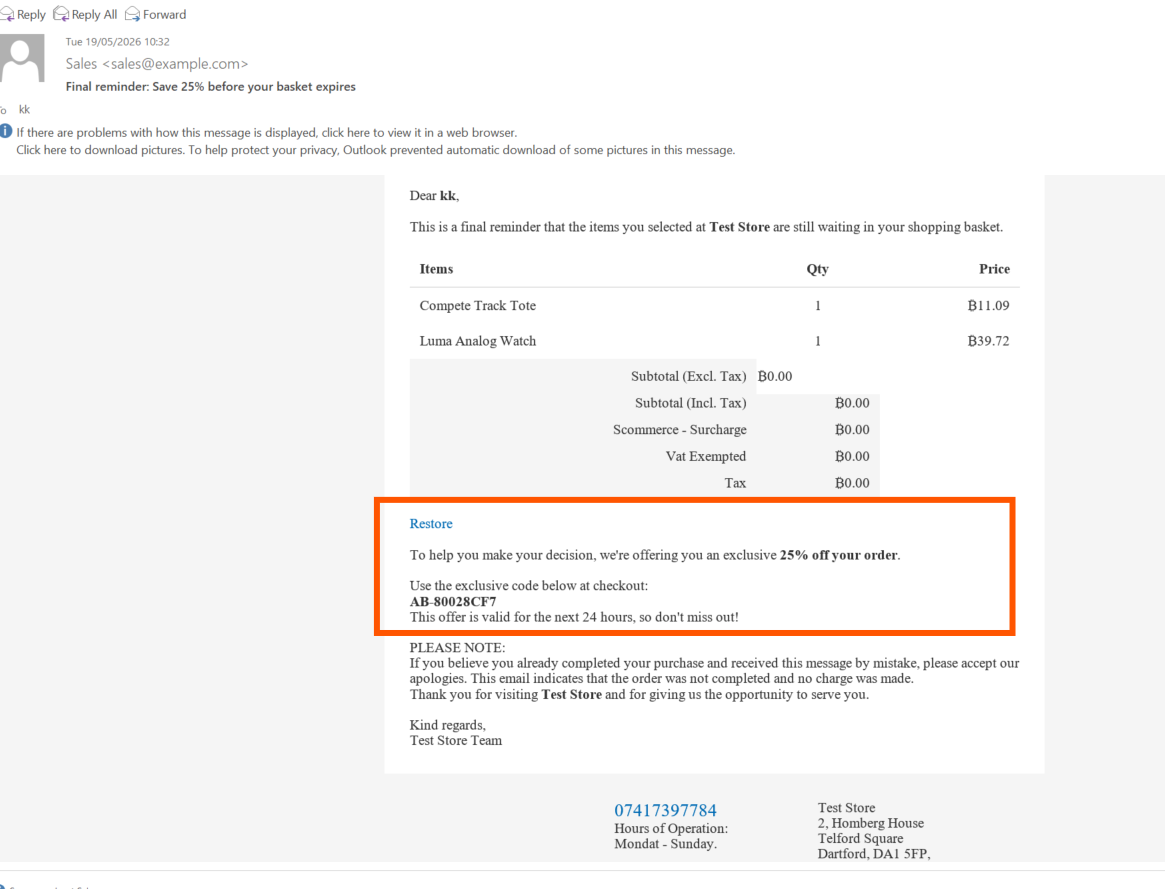
Email Content and Customer Experience:
Each abandoned cart email contains a reminder message, a list of the products left in the customer’s cart, a restore‑cart link, and a discount, a unique coupon code along with a short message explaining the offer.
For example, the email may say: “We’re offering you 10% off your order as a thank you for coming back. Use code XYSZ‑3CAB4F58 at checkout.” Customers can then apply the discount code during checkout and complete their purchase. This creates a smooth and user‑friendly experience that increases the likelihood of conversion.
Email 1 - Discount 10%OFF

Email 2 - Discount 20%OFF
Email 3 - Discount 25%OFF
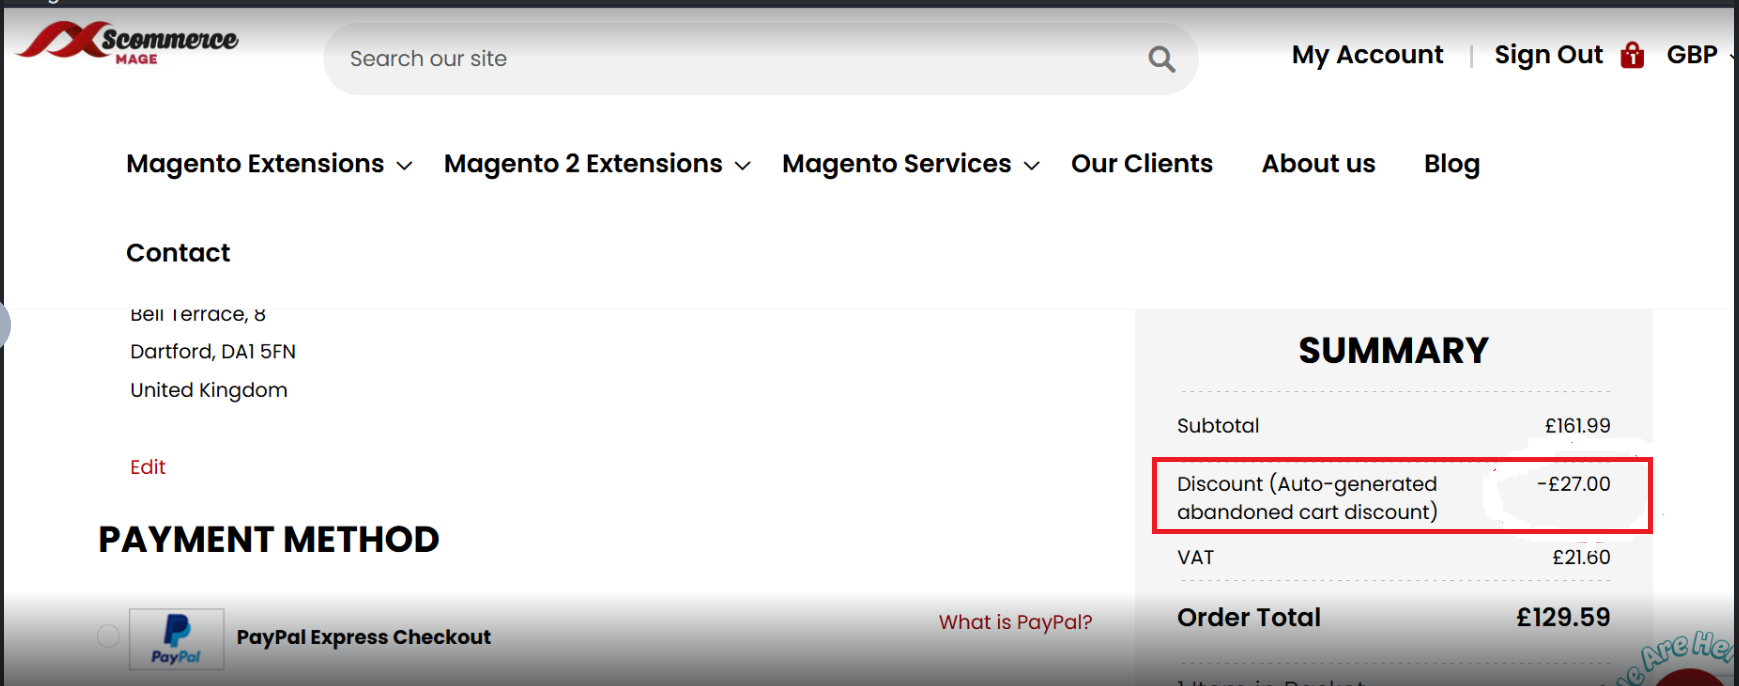
Discount from Abandoned Cart Email Applied
If you have a question related to this extension please check out our FAQ Section first. If you can't find the answer you are looking for then please contact support@scommerce-mage.com.