
Magento 2 Content Generator
Installation and User Guide for Magento 2 Content Protection Extension
Table of Contents
- Installation
- Installation via app/code
- Installation via Composer
- Configuration Settings for Content Protection
- Order Tags Logs
- Order Tags Grid
- General Settings
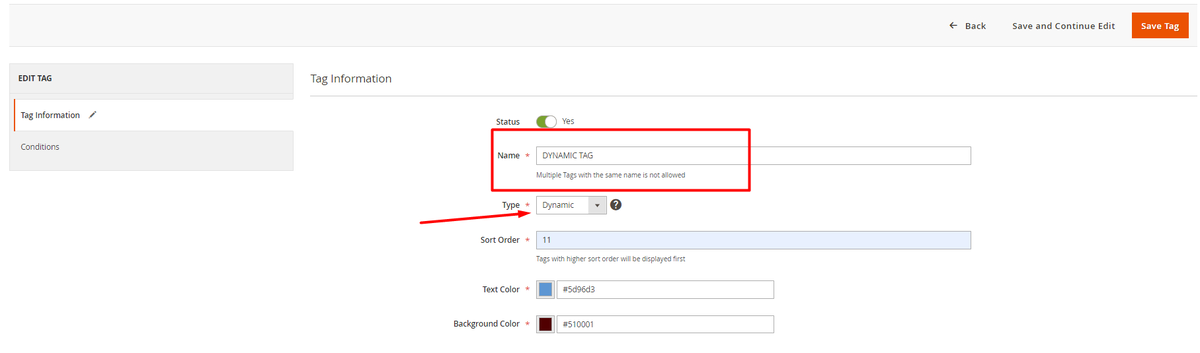
- Types of Tags
- Static Tags
- Dynamic Tags
- Predefined Tags
- Assign Tags
- Manually Assign/Remove Tags
- Assign Tags Based on Conditions
- Tags in Action
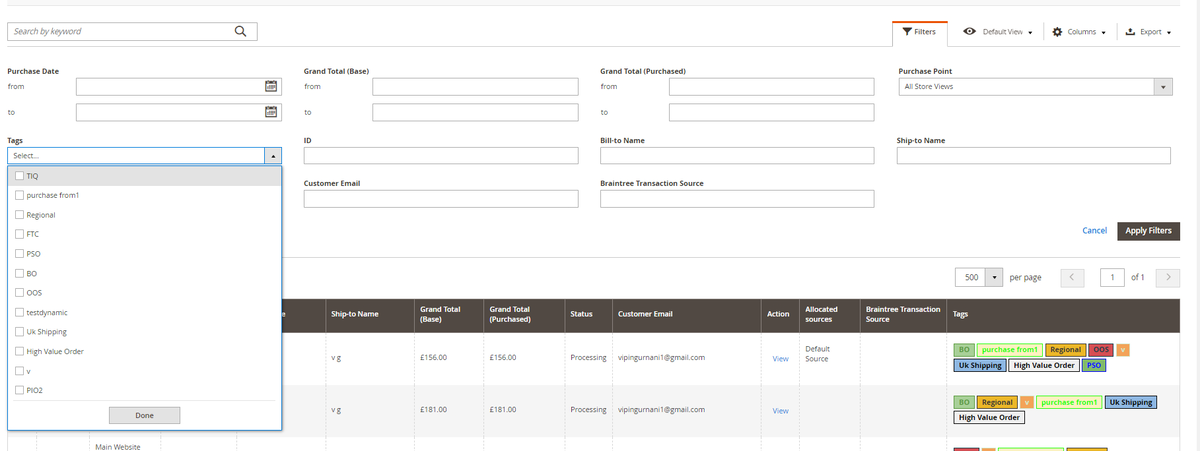
- Order Grid
- Filter Order Grid
Installation
-
Installation via app/code: Upload the content of the module to your root folder. This will not overwrite the existing Magento folder or files, only the new contents will be added. After the successful upload of the package, run below commands on Magento 2 root directory.
php bin/magento module:enable Scommerce_ContentProtect php bin/magento setup:upgrade php bin/magento setup:di:compile php bin/magento setup:static-content:deploy -f php bin/magento cache:flush -
Installation via Composer: Please follow the guide provided in the below link to complete the installation via composer.
[https://docs.scommerce-mage.com/magento-2-extensions/installation-via-composer/installation-via-composer](https://docs.scommerce-mage.com/magento-2-extensions/installation-via-composer/installation-via-composer)
Configuration Settings for OrderContent TaggerProtection
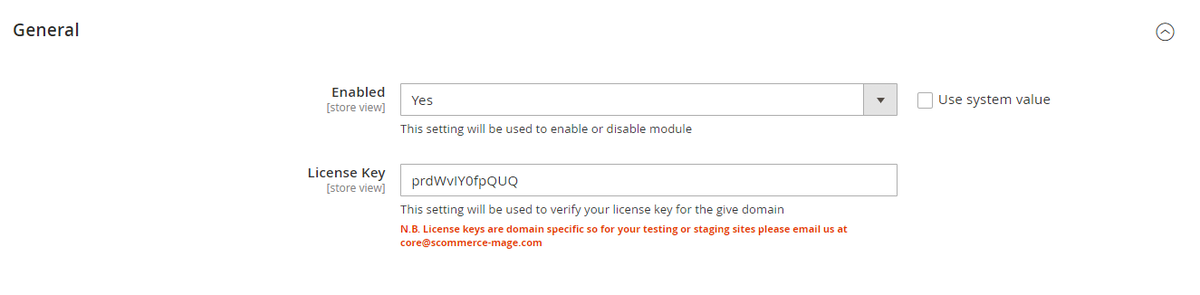
Go to Admin > Stores > Configuration > Scommerce Configuration > OrderContent TaggerProtection
General Settings
- Enabled – Select "Yes" or "No" to enable or disable the module.
- License Key – Please add the license for the extension which is provided in the order confirmation email. Please note license keys are site URL specific. If you require license keys for dev/staging sites then please email us at support@scommerce-mage.com.
OrderPassword TagsConfiguration
Go to Admin > Stores > Configuration > Scommerce Configuration > Content Protect > Password Configuration
- Global Access Password – Enter the password that visitors must provide to unlock access to any password-protected page. The password is stored using Magento's native encryption and will never appear in plain text in the database or configuration files.
Note: If the Global Access Password field is left empty, the gate page will be displayed but no password will unlock it. Always ensure a password is set before enabling protection on any page.
Protecting a CMS Page
Go to Admin >Sales Content >Scommerce Order Tagger>Order TagsPages

Name–PasswordEnterProtectedthe name of the tag.Type–– Select "Static" or "Dynamic" or "Predefined". Static tags can be manually assigned and dynamic tags can be assigned using conditions. Predefined tags already have conditions set so you onlyYes" toselectenable password protection on this CMS page. Select "No" (default) to leave thepredefinedpagetagpubliclytype.Sort Order–Define the priority of the tag(0 being the highest priority), the highest priority tag will be displayed first.Text Color–Add the text color for the tag.Background Color–Add the background color for the tagaccessible.
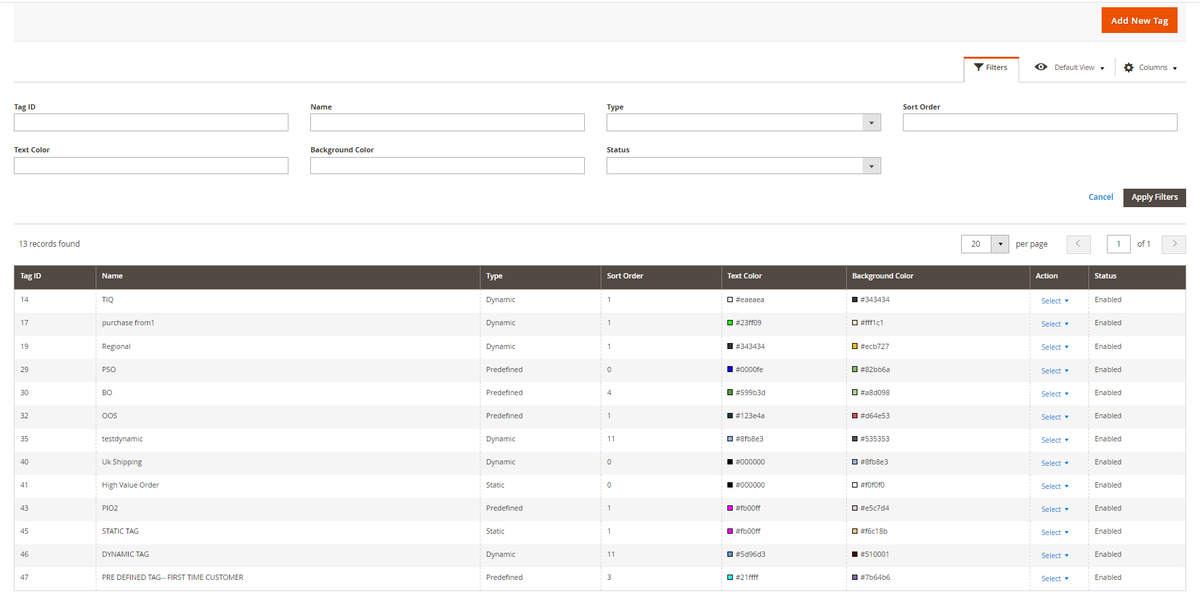
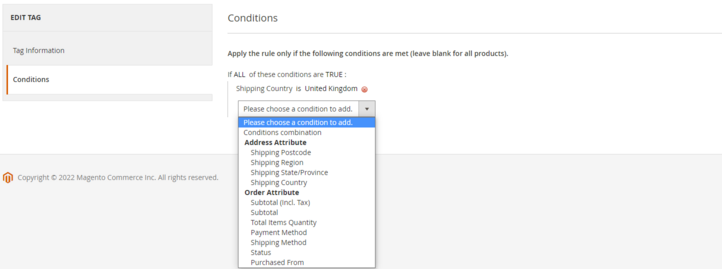
Conditions– Add the conditions using order or address attributes.
OrderProtecting Tagsa LogsProduct Page
Go to Admin >Sales Catalog >Scommerce Order Tagger>Order Tags LogsProducts
TheOpen logsany keepexisting trackproduct ofor allcreate a new one. Scroll down to find the dynamicPage tagsProtection thatfieldset. areSet assignedthe Password Protected toggle to orders.Yes Itand hassave itsthe ownproduct. setVisitors ofattempting filtersto whichaccess canthe product page without an unlocked session will be used to identify a specific assigned tag.

Types of Tags
There are three of tags within the extension static, dynamic, and predefined tags.
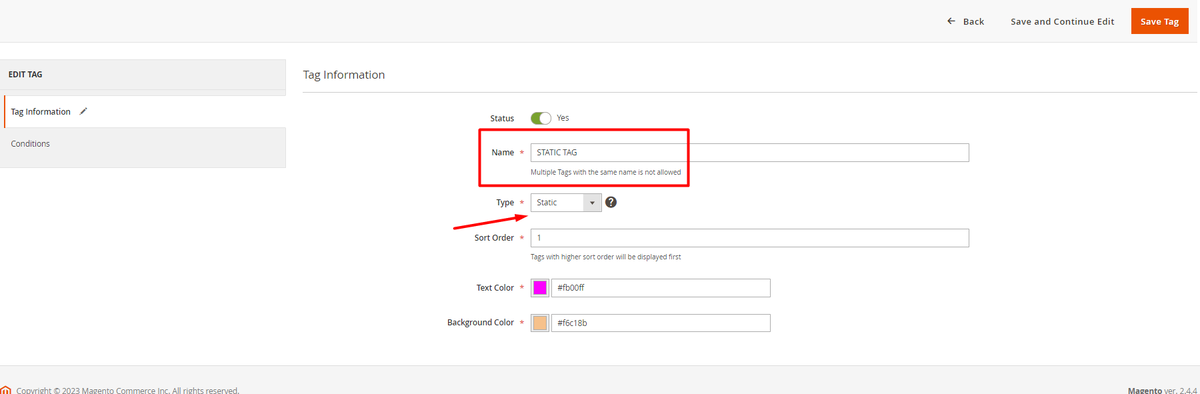
Static Tags
After creation, these types of tags are added manually via Magento order grid. Conditions are not added in these types of tags. They are not shown in order tags logs.
Dynamic Tags
After creation, these types of tags are added automaticallyredirected to the ordersgate applicable.Conditionspage.
- Password Protected – Select "Yes" to enable password protection on this product page. Select "No" (default) to leave the product page publicly accessible.
Note: The Password Protected attribute is scoped to store view level. This means you can enable protection on a product for one store view (e.g. your trade store) while leaving it accessible on another (e.g. your retail store). Make sure you are added in these types of tags.They are shown in the Ordercorrect tagsstore logs.
Predefined Tags
After creation, these types of tags are added automatically to the orders applicable.Conditions are not added in these types of tags as they are already set. They are shown in the Order tags logs Irrespective of the name, only one type of tag can be created for one 'Predefined' field.
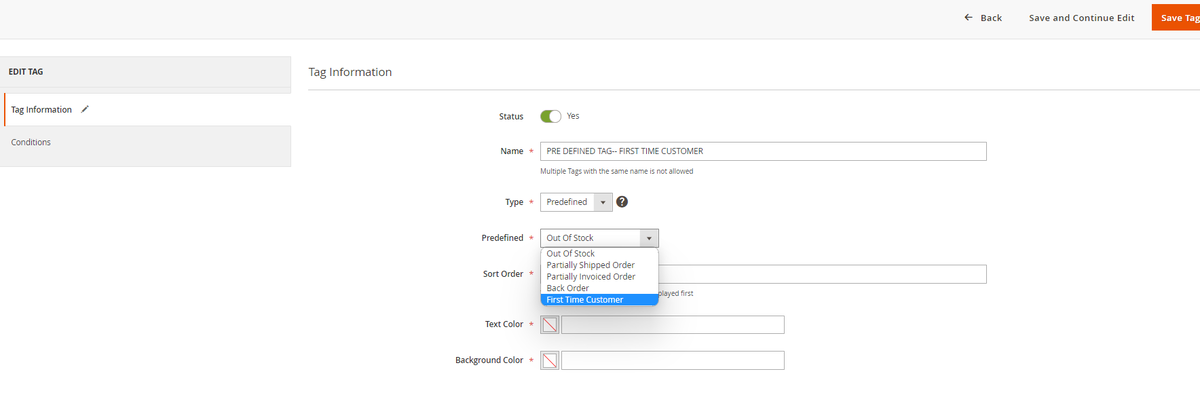
There are five types of predefined tags to choose from:-
Out of Stock :-Gets automatically assigned to the orders whose products are out of stock. As soon as the product is available the tag gets removed automatically.Partially Shipped Order:-Gets automatically assigned to orders that are partially shipped i.e onlyProtecting afewCategoryquantities are shipped from the order. As soon all the entire order is invoiced the tag gets removed automatically.Partially Invoiced Order:-Gets automatically assigned to orders that are partially invoiced i.e only some quantity of the order is invoiced. As soon all the entire order is invoiced the tag gets removed automatically.Back Order:-Gets automatically assigned to backorders. This tag doesn't work with downloadable and virtual products. As soon as all the items in the order are shipped the tag gets removed automatically.First Time Customer:-Gets automatically assigned to the orders that are placed by first-time customers. This works for both guest/registered users.
Assign Tags
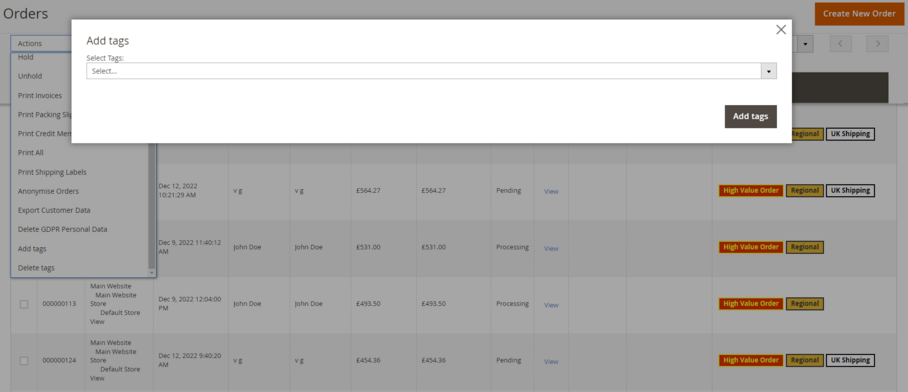
Manually Assign/Remove TagsPage
Go to Admin >Sales Catalog >Orders Categories
Select selectany category from the ordercategory or multiple orders then clicktree on the Actionsleft. dropdownScroll down to find the Page Protection fieldset in the category edit form. Set the Password Protected toggle to Yes and clicksave the category. Visitors attempting to access the category page without an unlocked session will be redirected to the gate page.
- Password Protected – Select "Yes" to enable password protection on
'Addthistags'categoryor 'Remove tags'.page. Selectthe"No"tag(default)thattoyou want add withleave theordercategoryfrompubliclytheaccessible.
Note:- OnlyProtecting statica Tagscategory cangates bethe manuallycategory assigned.
Assignonly. TagsIndividual Basedproduct pages within the category are not automatically protected — you must enable protection on Conditionseach product separately if required. The attribute is scoped to store view level.
Frontend - The Gate Page
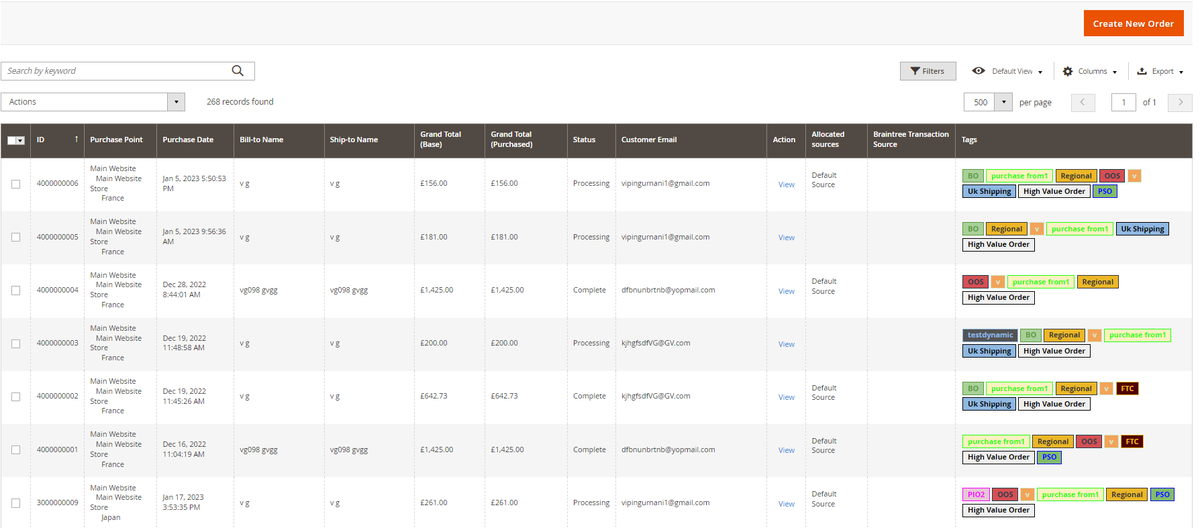
Tags in Action
/contentprotect/page/gate?return=<base64-encoded-return-path>OrderGate GridPage Layout
The Tagsgate arepage displayeduses your store's active theme layout (1-column, full width) and contains two sections:
- Restricted Area (info block) – Displayed at the top of the page. Contains a message informing the visitor that the content is restricted. The message text can be customised by editing view/frontend/templates/gate.phtml.
- Enter Password to Continue (form block) – Displayed below the info block. Contains a password input field, an Unlock button, and a Required Fields note.
Entering the Password
- Correct password – The visitor is redirected directly to the page they originally requested not to the homepage. The return URL is preserved throughout the process.
- Incorrect password – The gate page is redisplayed with an error message: "Incorrect password. Please try again." The return URL parameter is retained so a correct entry on the next attempt still redirects to the original page.
- Empty password submission – Client-side validation prevents the form from being submitted with an empty password field.
Session Unlock Behaviour
- Session duration – The unlock flag persists for the duration of the browser session. Closing the browser or session expiry will require the visitor to enter the password again on their next visit.
- Guest and logged-in
avisitorsseparate–column.The session unlock works for both guest visitors and authenticated customer account holders. - Multiple
tagsprotected pages – A single password entry unlocks all protected pages across all page types (CMS, product, category) for that session.
Disabling Protection
Protection can be assigneddisabled at two levels:
- Per page – Open the CMS page, product, or category in the admin and
displayedsetfortheaPasswordsingleProtectedorder.toggle
to
theFilterNo.OrderSaveGridOrdersrecord.canThebepagefilteredimmediatelybasedbecomes publicly accessible no cache flush required. - Globally (entire module) – Go to Stores Configuration Scommerce Configuration Content Protect and set Enabled to No. This immediately disables all gate redirects across every page on the
tags.store,Newregardlessfilterofoptionindividualcanpagebetogglefoundstates. Your per-page settings are preserved in thefiltersdatabasewhereandorders canwill besortedrestoredbasedif you re-enable the module.
Tip: If you need to quickly make all protected pages public — for example, on public launch day after a pre-launch review — setting Enabled to No in the global configuration is the fastest method. No individual page changes are needed.
Technical notes for Developers
Module Structure
- Vendor / Module name – Scommerce_ContentProtect
- Module path – app/code/Scommerce/ContentProtect/
- Frontend route – /contentprotect/page/gate and /contentprotect/page/unlock
- Session key – content_protect_unlocked (stored in Magento customer session)
Database Changes
The module applies the following database changes via Magento's patch system on setup:upgrade:
- cms_page table – Adds is_password_protected column (SMALLINT, default 0) via SchemaPatchInterface DDL-safe, runs outside of a transaction.
- catalog_product_entity (EAV) – Adds is_password_protected attribute (int, store view scope, default 0) via DataPatchInterface.
- catalog_category_entity (EAV) – Adds is_password_protected attribute (int, store view scope, default 0) via DataPatchInterface.
Plugin Interception
Content Protect uses Magento's around plugin system to intercept the execute() method on three controllers:
- Magento\Cms\Controller\Page\View – Handles CMS page protection loads the page by identifier or ID and checks the is_password_protected flag.
- Magento\Catalog\Controller\Product\View – Handles product page protection loads the product by ID via ProductRepositoryInterface.
- Magento\Catalog\Controller\Category\View – Handles category page protection loads the category by ID via CategoryRepositoryInterface.
All three plugins are registered in etc/frontend/di.xml and apply on the tagsfrontend selected.area Goonly. No core files are modified.
Admin UI Component Injection
The Page Protection fieldset and Password Protected toggle are injected into the three admin forms via Magento's UI component merge system:
- view/adminhtml/ui_component/cms_page_form.xml – Injects the fieldset into the CMS page edit form
- view/adminhtml/ui_component/product_form.xml – Injects the fieldset into the product edit form.
- view/adminhtml/ui_component/category_form.xml – Injects the fieldset into the category edit form.
Customising the Gate Page
The gate page template is located at:
app/code/Scommerce/ContentProtect/view/frontend/templates/gate.phtmlEdit this file to customise the info message text, the password form labels, or the page layout. To customise styles, edit:
app/code/Scommerce/ContentProtect/view/frontend/web/css/content-protect.css Admin>Sales>FiltersNote: If you customise the template or CSS, copy the files to your active theme's directory structure rather than editing the module files directly. This ensures your customisations are not overwritten by future module updates.
Hyva Theme Compatibility
The backend logic plugins, session handling, configuration, and clickredirect is fully themeagnostic and works with any Magento 2 theme including Hyva. The gate page template (gate.phtml) uses standard Magento HTML and the module's own CSS file. For Hyva, we recommend copying gate.phtml to your Hyva theme and adapting the markup to use Tailwind utility classes to match your storefront styling. The CSS file can then be omitted as Tailwind will handle all styling.
Full-page Cache Compatability
ContentProtect intercepts requests at the controller plugin level, which fires before Magento's full-page cache (Varnish or built-in FPC) would serve a cached response. Protected pages that redirect to the gate page are not cached. Once a visitor's session is unlocked, the page proceeds to render normally and may be served from FPC on thesubsequent Tagsrequests dropdownwithin tothat select the tags.session.
If you have a question related to this extension please check out our FAQ Section first. If you can't find the answer you are looking for then please contact support@scommerce-mage.com.