Analytics & Tracking Extensions
Analytics & Tracking Magento 2 Extensions
- Magento 2 Google Tag Manager (GTM) GA4 Ecommerce Tracking
- Magento 2 missing orders or transactions in Google Analytics (GA)
- Magento 2 Google Global Site Tag (gtag.js) with GA4(Google Analytics 4) Enabled
- Magento 2 Consent mode's setup guide
Magento 2 Google Tag Manager (GTM) GA4 Ecommerce Tracking
Installation and User Guide for Magento 2 Google Tag Manager Pro Tracking Extension
Table of Contents
- Installation
- Installation via app/code
- Installation via Composer
- Installation via Composer(Hyvä Theme)
- Installation via Composer(Breeze Theme)
- Configuration Settings for Tracking Base
- General Settings
- Checkout Behaviour
- Configuration Settings for Google Tag Manager Pro
- General Settings
- Cookies From Query Params
- JSONs/Script provided with extension package
- Importing JSONs into GTM
- Setting variable information in GTM
- Publishing Tags in GTM
- Set up Google Analytics 4
- Set up Google Adwords Conversion
- Setup Enhanced Conversion
- Enable Enhanced Conversions in Google Adwords
- Set up Enhanced Conversion with the Module
- Cookies From Query Params
- Upgrading the Module From 3.0.1 and Below
- Secure Execution of Inline Scripts in GTM via CSP Nonce
- Front-end Screenshots
- Order Total of Product without VAT
- Order Total of Product with VAT
- Send SKU of Child Product
- Send SKU of Parent Product Only
- Send Parent Category
- Primary Category
- Set up Consent Mode V2 with GTM
Installation
- Installation via app/code: Upload the content of the module to your root folder. This will not overwrite the existing Magento folder or files, only the new contents will be added. After the successful upload of the package, run below commands on Magento 2 root directory.
php bin/magento setup:upgrade
php bin/magento setup:di:compile
php bin/magento setup:static-content:deploy- Installation via Composer: Please follow the guide provided in the below link to complete the installation via composer.
- Installation via Composer(Hyvä Theme): Go to My Account section then go to Composer Instructions. Run the composer config commands mentioned on the page then run the below command to install the module on hyva theme.
composer require hyva-themes/magento2-scommerce-googletagmanagerpro- Installation via Composer(Breeze Theme): Go to My Account section then go to Composer Instructions. Run the composer config commands mentioned on the page then run the below command to install the module on hyva theme.
composer require scommerce/breeze-googletagmanagerproConfiguration Settings for Tracking Base
Go to Admin > Stores > Configuration > Scommerce Configuration > Tracking Base
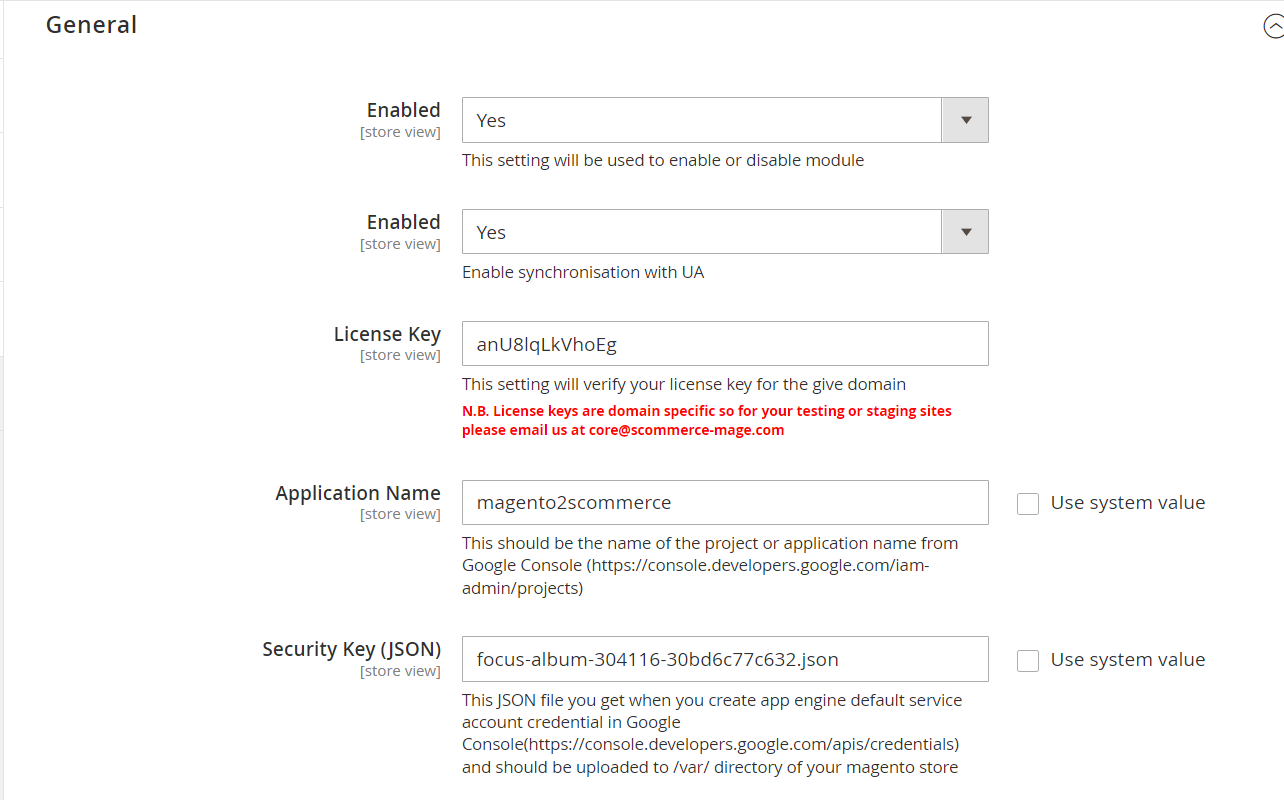
General Settings
- Enabled – Select “Yes” or “No” to enable or disable the module.
- Enable Enhanced Ecommerce – Select ‘Yes’ to enable this module. Please make sure this feature is enabled in Google Analytics first before enabling in Magento2.
- Enable Enhanced Conversion:- Set "Yes" to enable enhanced conversion to send PII data to Google Adwords to target actual customers. You need to turn on enhanced conversions in Google Adwords. Click here for more information
- Enable Consent mode - This setting activates Google Consent Mode v2. It lets us control how Google tags use user consent and protect user data
![]()
![]()
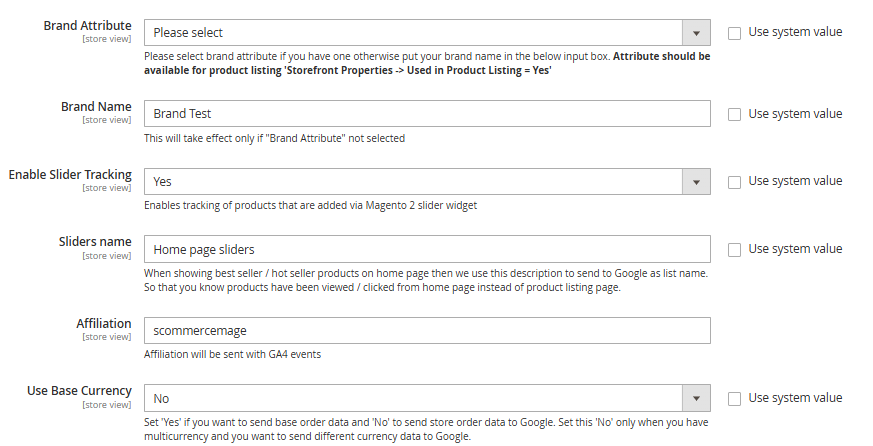
- Brand Attribute – Please select brand attribute, if you have one otherwise put your brand name in the below input box.
- Brand Name - Please add the Brand Name. This will take effect only if the 'Brand Attribute' is not selected.
- Enable Slider Tracking - Select 'Yes' to enable tracking of products added via the Magento 2 slider widget
- Sliders name- Enter the name for custom sliders that will be sent as list name with the data layer.
- Affiliation- Enter the affiliation name which you want to send with the GA4 data layers.
- Use Base Currency - Set ‘Yes’ if you want to send base order data and ‘No’ to send store order data to Google. Set this ‘No’ only when you have multicurrency and you want to send different currency data to Google.

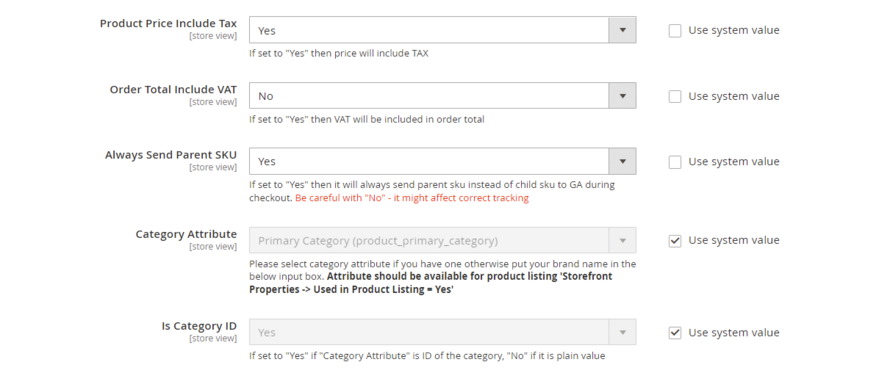
- Product Price Include Tax- Set “Yes” then VAT will be included in the price.
- Order Total Include VAT – Set “Yes” then VAT will be included in order total.
- Always Send Parent SKU – Set “Yes” then it always send parent sku instead of child sku to GA during checkout.
- Category Attribute- Please select category attribute if you have one otherwise put your brand name in the below input box. Attribute should be available for product listing 'Storefront Properties -> Used in Product Listing = Yes'
- Is Category ID- Set "Yes" if "Category Attribute" is ID of the category, "No" if it is plain value
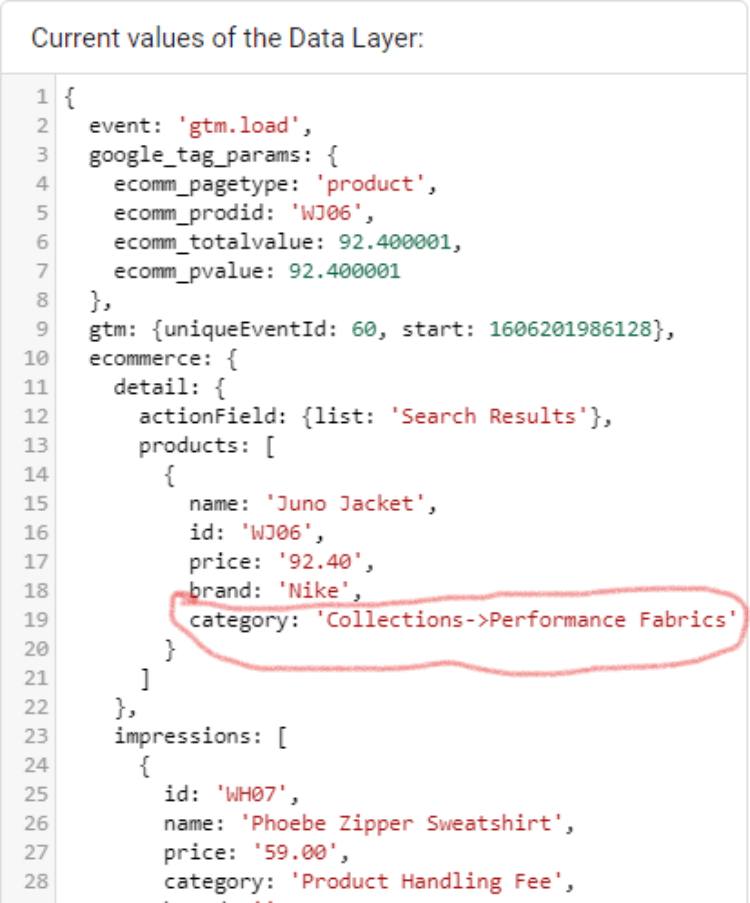
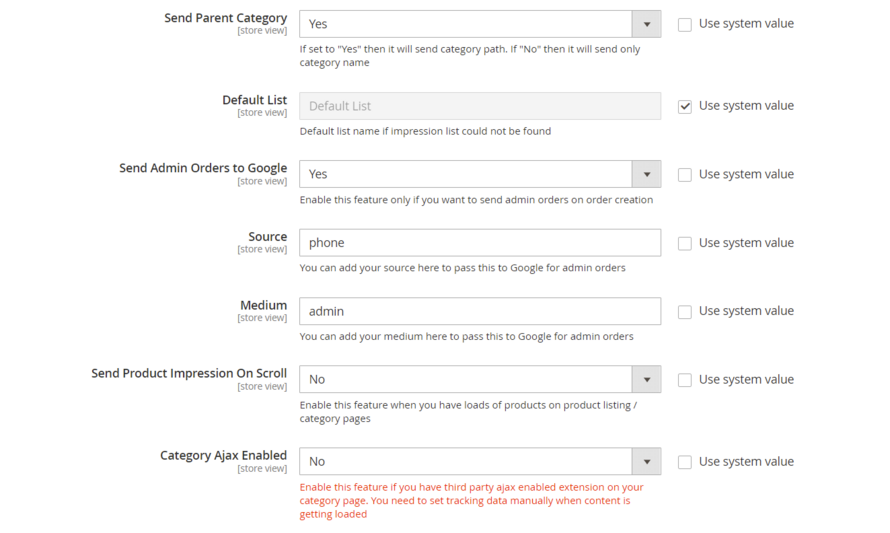
- Send Parent Category – Set “Yes” to send the category path and Set “No” to send the category name only.
- List Name with full path- Choose whether you want to send the full path of the category or not. When 'yes' The breadcrumbs are broken into separate categories and sent as item_category1, item_category2 etc. Set 'No' to send the lowest level category. for ex:- Men>Tops>Jackets, when 'yes' Men, tops, jackets all three categories will be sent. When 'no' only jackets is sent.
![]()
- Send 'Default List'- When customers land on the product page directly then 'default' list' will be sent as list name when set to 'Yes'. When 'No' list name/ list ID will be removed.
- Default List- Enter the default list name if the product impression is not found
- Send Admin Orders to Google– Select “Yes” to track orders created in admin
- Send Refund On Order Cancellation:- Set "yes" to send refund event on order cancellation.
- ****Source-****Please add the Campaign Source for backend orders.
- ****Medium-****Please define the Campaign Medium for Backend Orders.
- Send Product Impression on Scroll - Enable this feature when you have loads of products on product listing / category pages.
- Use Ajax Impressions - Select 'Yes' to enable this feature. When you have a large number of products on product listing, category, or search pages, an Ajax call will be used on scroll to capture impression information.
- Product item class on category / product listing page- Enter the product item class. Make sure this product class item hierarchy is as unique as possible for example for luma theme you can use div.products ol.product-items li.product-item
- Threshold for Scroll:- Enter the number of product impressions to be sent with view_item_list on scroll.
- Category Ajax Enabled – Enable this feature if you have third party ajax enabled extension on your category page.

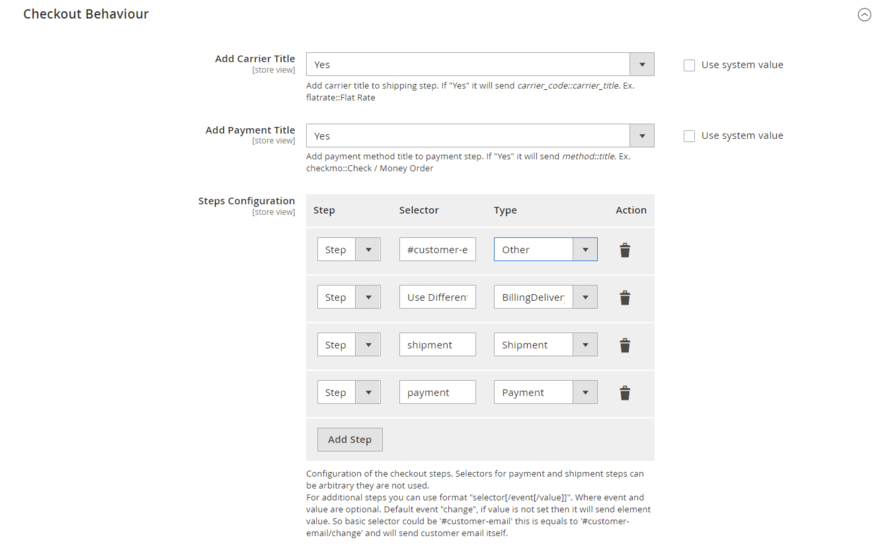
Checkout Behaviour
- Add Carrier Title:- Use this to add carrier title to the shipping step. Set "Yes" to send carrier_code::carrier_title. Ex. flatrate::Flat Rate
- Add Payment Title :- Use this to add payment method title to payment step. Set "Yes" to send method::title. Ex. checkmo::Check / Money Order

Configuration Settings for Google Tag Manager Pro
Go to Admin > Stores > Configuration > Scommerce Configuration > Google Tag Manager Pro
General Settings
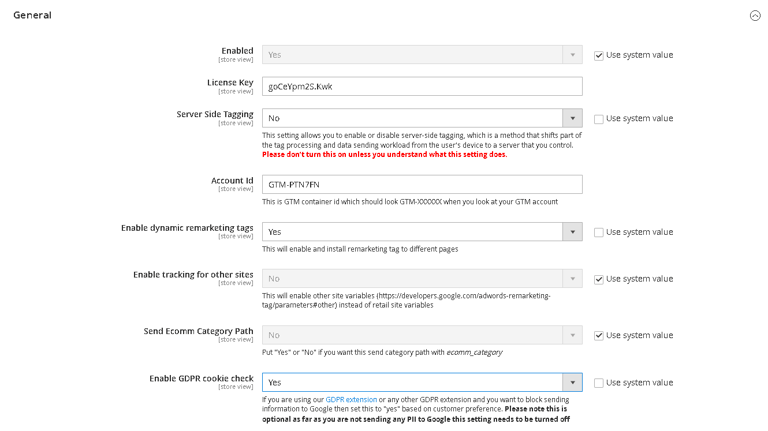
- Enabled – Select “Yes” or “No” to enable or disable the module.
- License Key – Please add the license for the extension which is provided in the order confirmation email. Please note license keys are site URL specific. If you require license keys for dev/staging sites then please email us at support@scommerce-mage.com.
- Server Side Tagging – Set "Yes" to enable server side tagging and "no" to disable it. Please don’t turn this on unless you understand what this setting does.
- Account Id – Enter your Google Tag Manager Account Id.
- Enable dynamic remarketing tags – Set “Yes” if you want to enable google dynamic remarketing tags to used for GTM.
- Enable tracking for other sites – Set “Yes” to enable tracking for other sites.
- Send Ecom Category Path – Set "yes" to send the category path with ecomm_category.
- Enable GDPR Cookie Check – Select "Yes" or "No" to enable/disable GDPR Cookie Check
- Server Side Tagging – Set "Yes" to enable server side tagging and "no" to disable it. Please don’t turn this on unless you understand what this setting does.
- Server Side script part - Enter the HTML code of server side GTM container. It will replace the default HTML code on the frontend.
- Server Side noscript part - Enter the noscript part of server-side GTM code. It will also replace the default HTML code on the frontend.

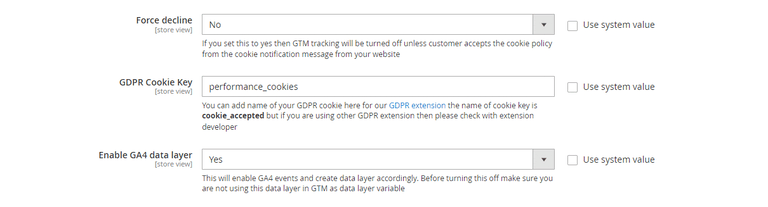
- Force decline – If you set this to yes then GTM tracking will be turned off unless customer accepts the cookie policy from the cookie notification message from your website
- GDPR Cookie Key – You can add name of your GDPR cookie here for our GDPR extension the name of cookie key is cookie_accepted but if you are using other GDPR extension then please check with extension developer
- ****Enable GA4 data layer-****Select "Yes" to add GA4(Google Analytics 4) events to the data layer.
Cookies From Query Params
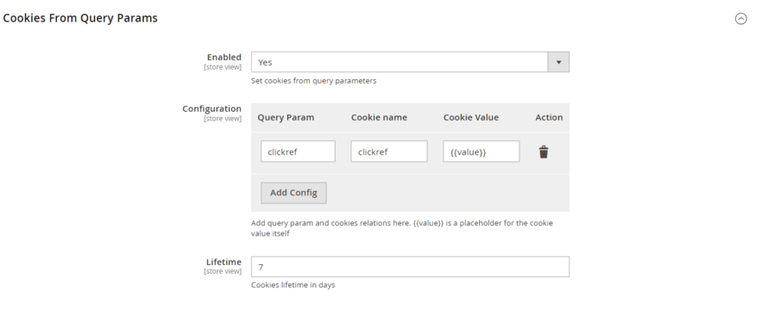
- Enabled – Select “Yes” or “No” to enable or disable the module.
- Configuration – Use this setting to create cookies by entering cookie parameter, cookie name, and cookie value.
- Lifetime – Enter the lifetime of the cookie. It will be stored in the users browser as per the time defined in this setting.
JSONs/Script provided with extension package
NOTE:- Please make sure to import the JSON files again after every upgrade of the module as we keep changing these files time to time and keep them updated with our latest data layers.
The extension package contains JSONs which can be imported in GTM to set up required Tags, Triggers and Variables.
Finding JSON files
Please follow the steps below to download the module:-
Step 1:- Login to your account and go to the My Account Section
 Step 2:- Click on My Downloadable Products
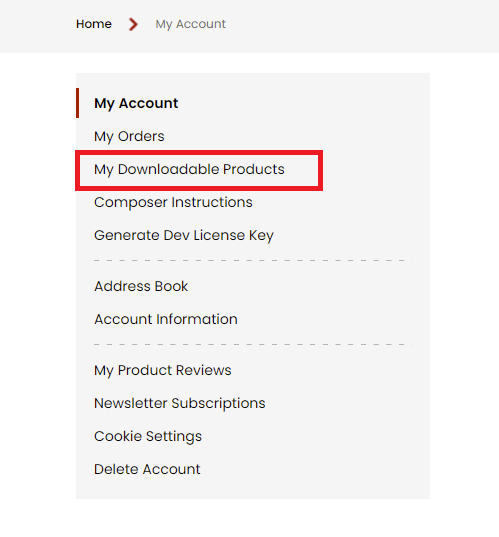
Step 3:- Click on the extension and from the dropdown menu select download
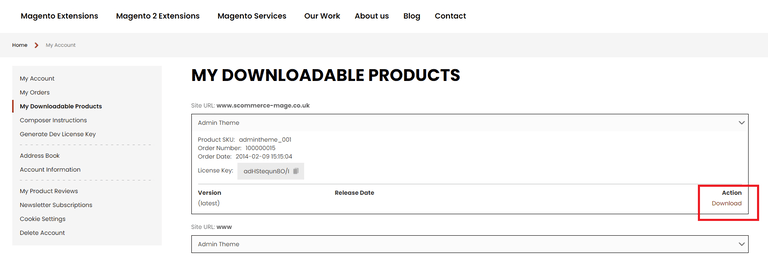
Go to the extension file m2-google-tag- manager-pro and then to the Data Folder (Path - m2-google-tag-manager-pro/data/) to find these files.
The JSONs can be used to set up
- GTM-GoogleAnalytics4.json:- Google Analytics 4
- GTM-Facebook_Pixel_Tracking.json:- Facebook Pixel tracking
- GTM-Snapchat_Tracking.json:- Snapchat Pixel tracking
- GTM-AdwordsDynamicRemarketing.json:- Google AdWords Dynamic Remarketing
- GTM-google_ads_conversion_tracking.json:- Google Ads Conversion Tracking
- GTM-Pinterest.json:- Pinterest tracking
- GTM-Pinterest-GA4.json:- Use this file if you are using only GA4 and not UA
- GTM-Reddit_Pixel_Tracking.json:- Reddit Pixel Tracking
- GTM-Tiktok_Pixel_Tracking.json:- Tiktok Pixel Tracking
- GTM-Twitter.json:- Twitter Pixel Tracking
- GTM-Partnerize.json:- Partnerize
- GTM-Webgains_tracking.json:- Webgains Affiliate tracking
- GTM-google_ads_enhanced_conversion_tracking.json:- Google Ads Enhanced Conversion Tracking(Make sure its enabled in the extension configuration and also ensure that "send conversion data using data layer is set to "No" in tracking base configuration)
- GTM-google_ads_enhanced_conversion_tracking_using_datalayers.json - If you have set "send conversion data using data layer is set to "Yes" in tracking base configuration then import this JSON file which utilizes data layer push to populate the conversion PII data.
- SetPrimaryCategories.php:- Primary Category Script (SetPrimaryCategories.php) – All of the above JSON files can be imported into GTM but primary category script needs to be added into the root directory of your website. Add the SetPrimaryCategories.php file in your website’s root directory and open the link as follows: - http://Your_website_URL.com/SetPrimaryCategories.php
Note:- Please import only one Pinterest JSON file depending upon the extension configuration you are using. If you are only using GA4 and no UA then you can use the Pinterest GA4 JSON file. Also if you have 'Send Product Impression on Scroll ' enabled in Admin>Stores>Configuration>Scommerce Configuration>Tracking Base then use the Pinterest GA4 JSON file as well otherwise you can use the original Pinterest JSON file.
Importing JSONs into GTM
To import JSONS provided with extension package follow below steps:
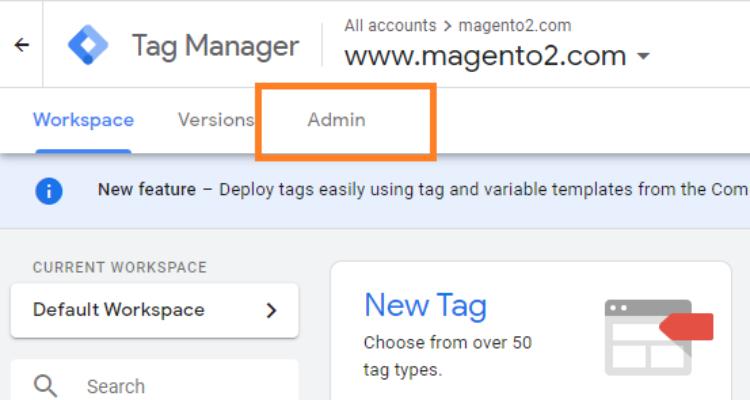
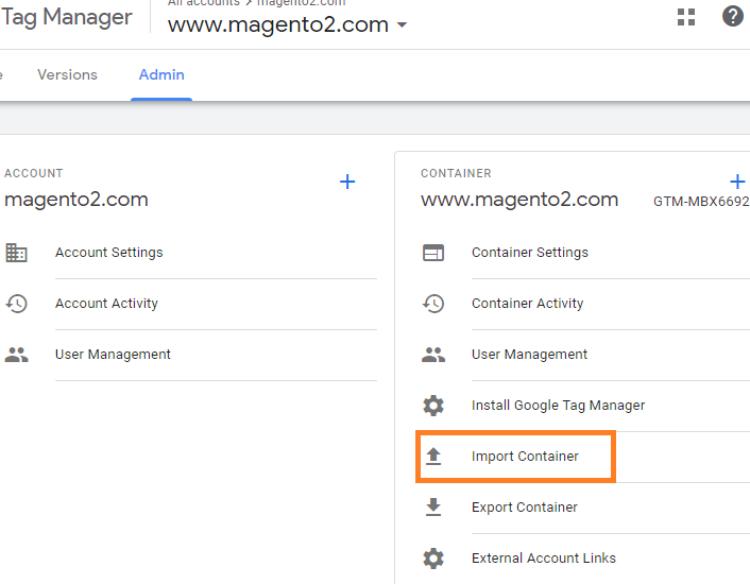
- Under the container options, click on Import Container
- Choose the JSON file which you would like to import

- Choose to either Overwrite or Merge
- Overwriting the existing container will remove all your existing tags, triggers, and variables, and will replace them with those in the imported container. A new container version will be created before the import.
- Merging containers will let you keep your existing tags, triggers, and variables, and just add in the new ones. If you choose to Merge the new container with your existing container, you’ll have to then decide whether you want to overwrite conflicting tags or rename conflicting tags.
- Overwrite – If a variable, tag, or trigger in the new container has the same name but the contents are different, overwrite the old one with the new one.
- Rename – If a variable, tag, or trigger in the new container has the same name but the contents are different, keep the old one and rename the new one.
- Click Continue. You’ll see a preview of changes, showing how many tags, triggers, and variables will be added, modified, or deleted. You can also click the link to View Detailed Changes to see which tags, triggers, and variables are being added, modified, or deleted.
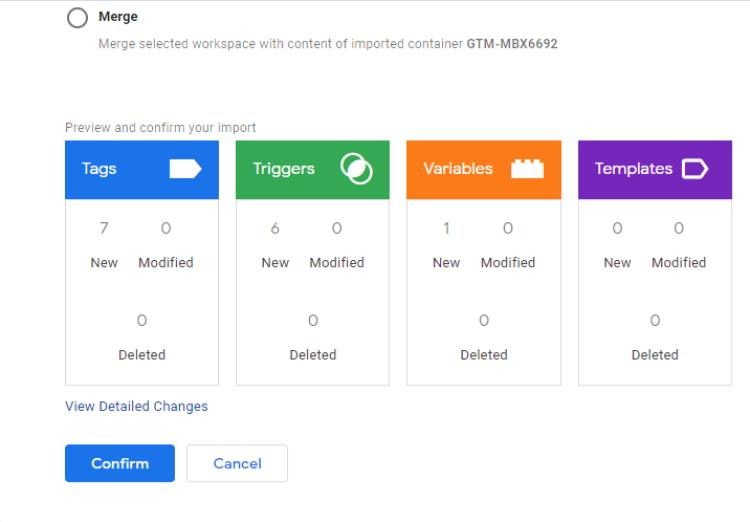
- Once you’re satisfied with the changes, click Confirm.
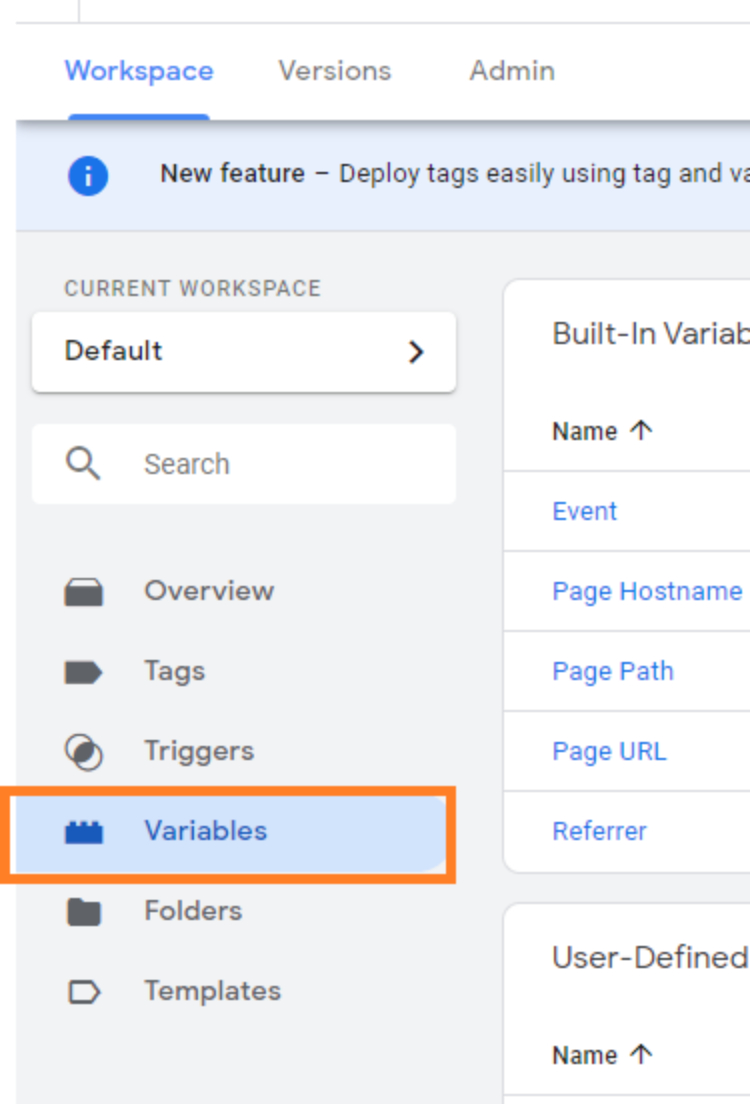
Setting variable information in GTM
Once the GTM container file has been imported, you need to change variable information with correct value corresponding to the site. To access variables, go to workspace where you have imported the JSONs and click on variables on left hand side navigation.
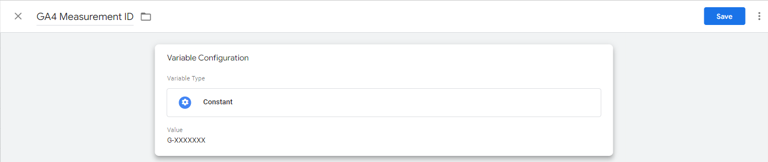
Variables Created with JSON’s
- GA4 Measurement ID – This variable is created when GTM-Google Analytics 4.json is imported and it holds value for Google Analytics 4 Measurement Id for the site. Click on the GA4 Measurement ID and change it to correct value.
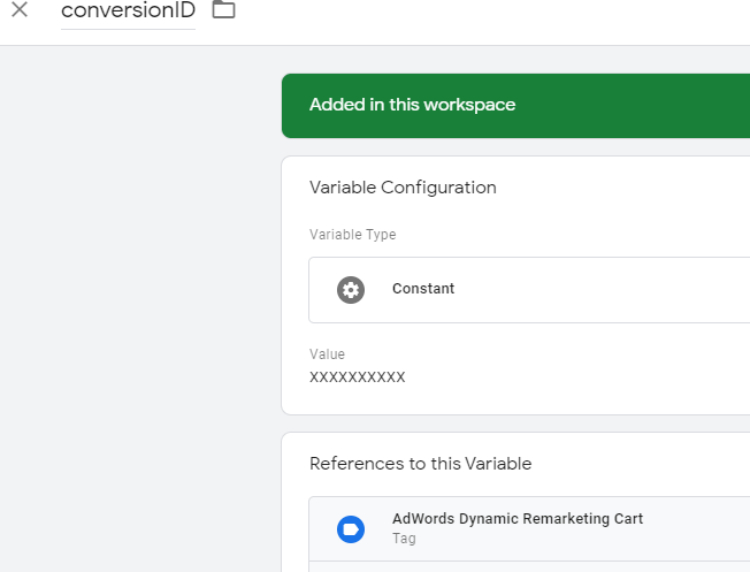
- conversionID - This variable is created when GTM- AdwordsDynamicRemarketing.json is imported and it holds value for Google Adwords Conversion Id for the site. Click on the conversionID and change it to correct value.
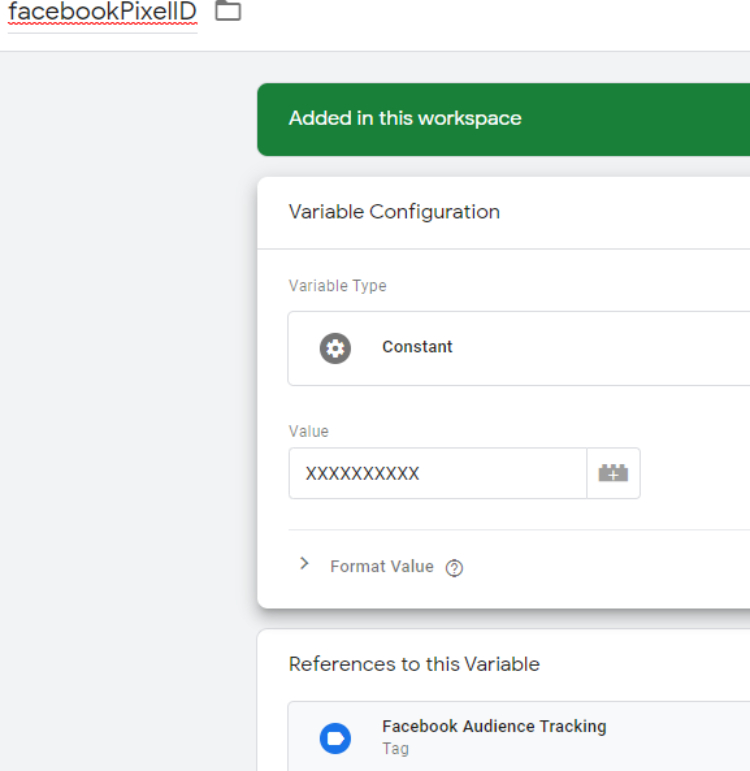
- facebookPixelID - This variable is created when GTM-Facebook.json is imported and it holds value for Facebook pixel Id for the site. Click on the facebookPixelID and change it to correct value.
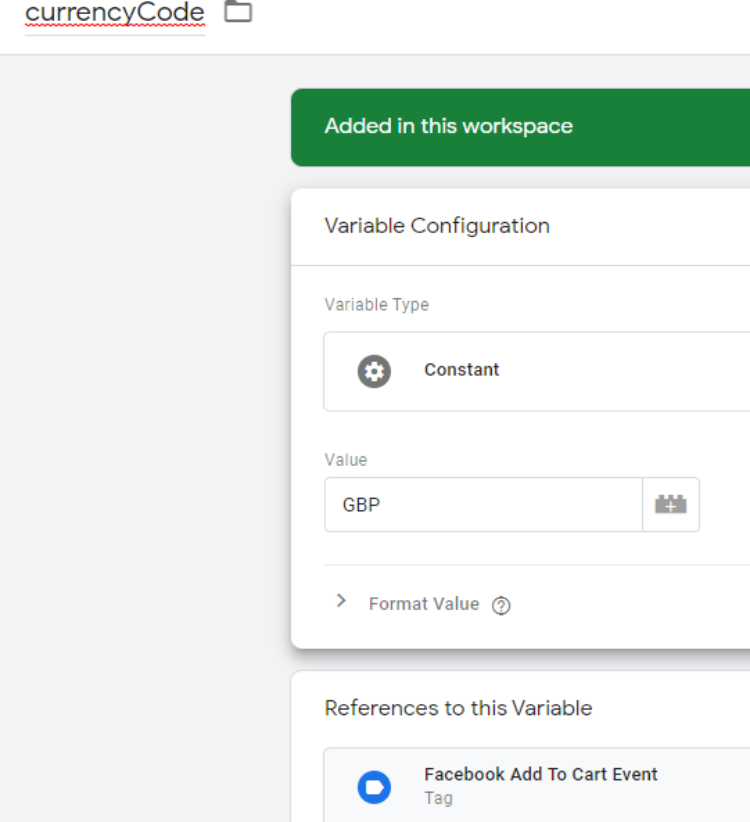
- currencyCode - This variable is created when GTM-Facebook.json is imported and it holds value for currency used on site. Click on the currencyCode and change it to correct value.
- Google Ads Conversion Tracking - Add Conversion ID and Conversion Label in the Google Ads Conversion Tracking tag before publishing the container. These IDs can be found in your Google Ads account.
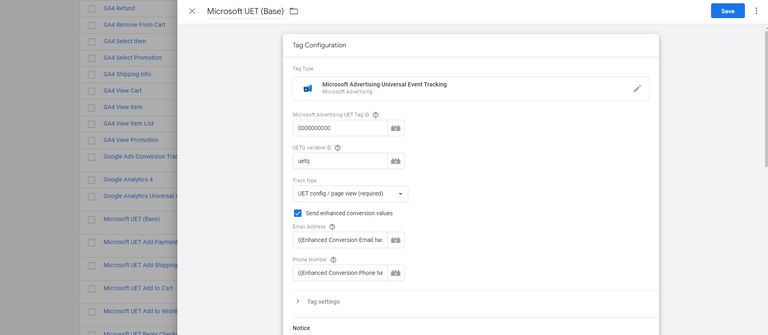
- Microsoft UET Tracking - Add the Microsoft Advertising UET Tag ID which can be obtained from microsoft Ads account.
- Facebook Pixel Tracking - Add the Microsoft Advertising UET Tag ID which can be obtained from microsoft Ads account.
- Snapchat Pixel Tracking - Add the Snapchat Pixel ID which can be obtained from snapchat Ads account as shown below.
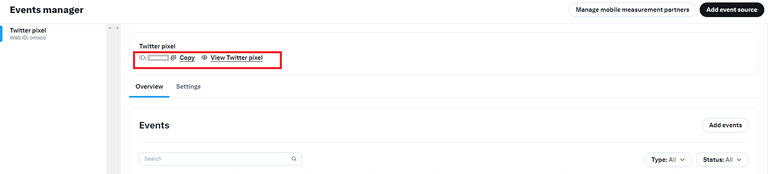
- Twitter Pixel Tracking - Add the Twitter Pixel ID which can be obtained from Twitter Ads account as shown below.
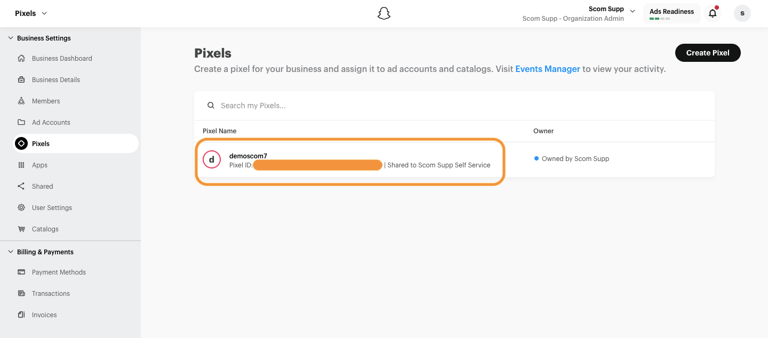
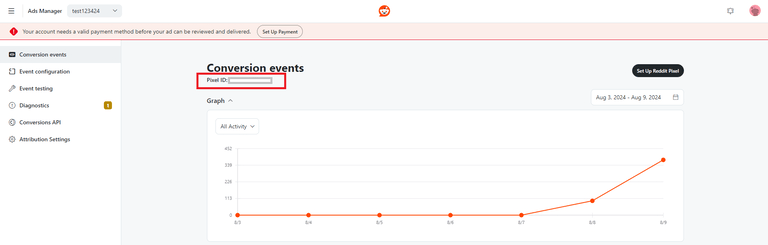
- Reddit Pixel Tracking - Add the Reddit Pixel ID which can be obtained from Reddit Ads account as shown below.
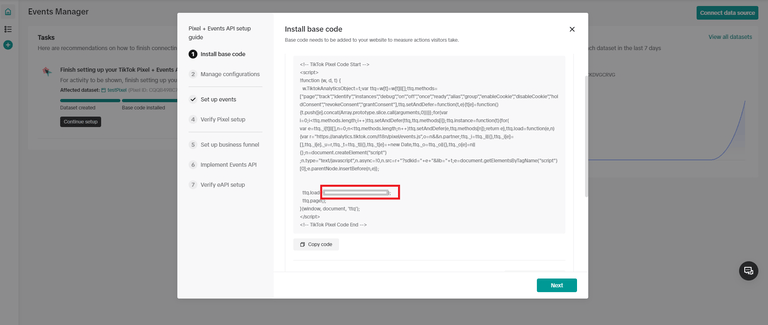
- Tiktok Pixel Tracking - Add the base pixel code and Tiktok Pixel ID which can be obtained from Tiktok Ads account as shown below.
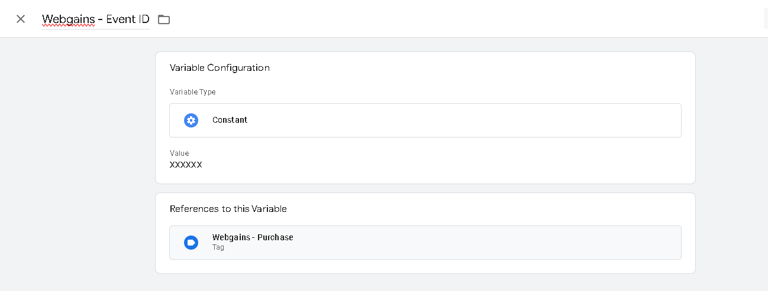
- Webgains Event ID - Add webgains event id received from Webgains in the GTM variable {{Webgains - Event ID}}
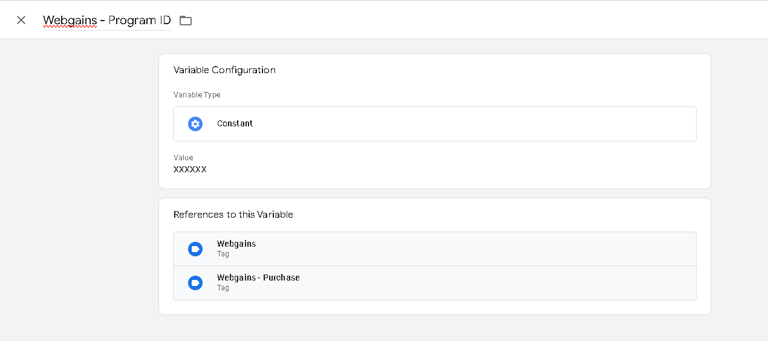
- Webgains Program ID - Add the Webgains Program ID received from Webgains in the GTM Variable {{Webgains - Program ID}}
Publishing Tags in GTM
Once all set up is done and verified, need to Publish the tags to make it live on the website.
Step 1 − Click the SUBMIT button at the top right corner of the screen.
It will show the following screen.
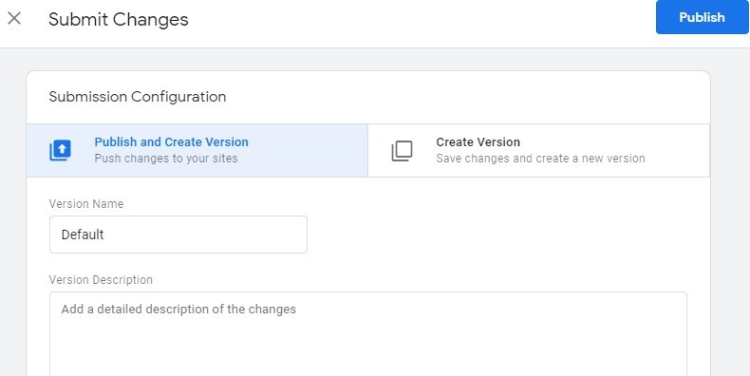
Step 2 − Enter an identifiable Version name so that it can be easily understood for the changes made.
With the version description, you can be as elaborate as possible on the changes/additions of the tag in that version.
Step 3 − Scroll down to the Workspace Changes, you will see all the changes made in the tags, which are unpublished or in the PREVIEW mode.
Step 5 − Click PUBLISH and you will be presented with a summary for this version.
Set up Google Analytics 4
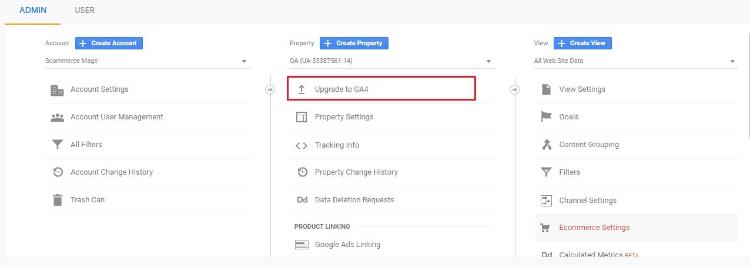
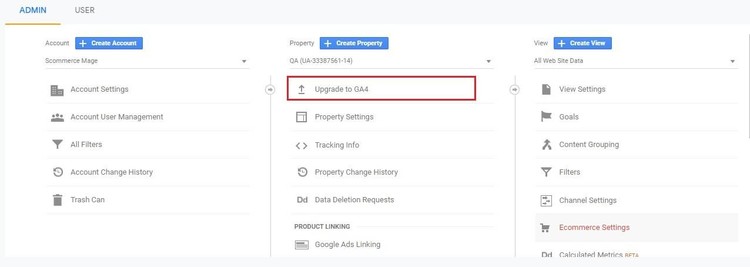
- Go to Analytics and select the website on which you want to implement GA4.
- Once you are in universal analytics panel go into admin settings. Here you will notice an UPGRADE TO GA4 button, click on it. You will be walked with creating a new property. Follow along, once you are finished you will see the new GA4 view on your screen.
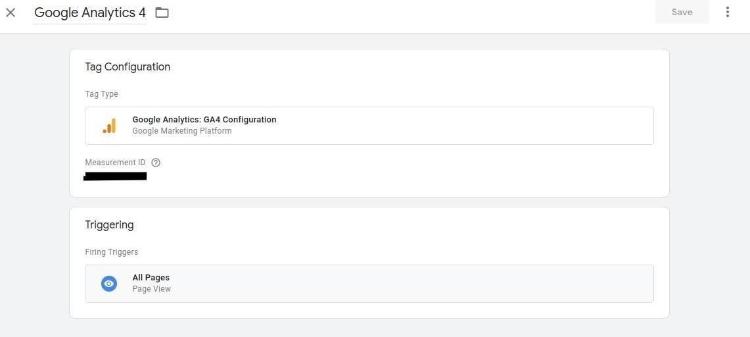
- Now we need to setup the tag manager for GA4. If you have already imported all the tags using our JSON file then you only need to edit the tag and add your Measurement ID. However, if you are creating tags yourself then you need to create a new configuration tag.
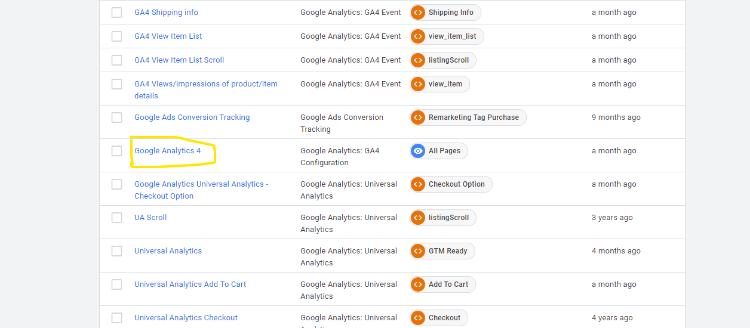
- To create a new configuration tag in GTM. Please look at the image below: -
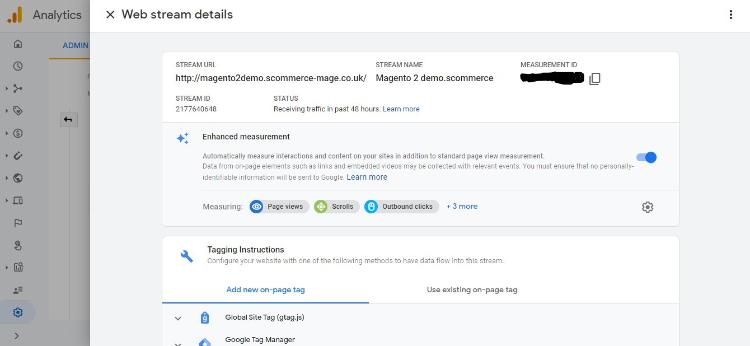
- To get the measurement id you need to go to your GA4 view. Go to the admin settings and then data streams. Click on the website url coloured in #3B82F6 and a popup should open.
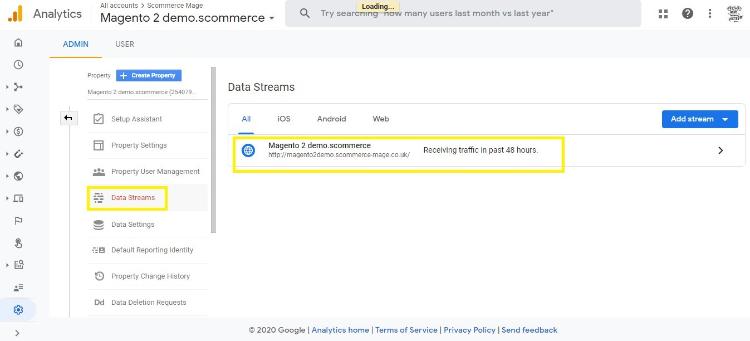
- You will see the Measurement ID listed on the top right corner of this page.
Now for the final step import our Google Analytics 4 JSON file in your GTM to get all the configurations for GA4. Once done you will see data flowing into Google Analytics 4. Learn more about Google Analytics 4.
Set up Google Adwords Conversion
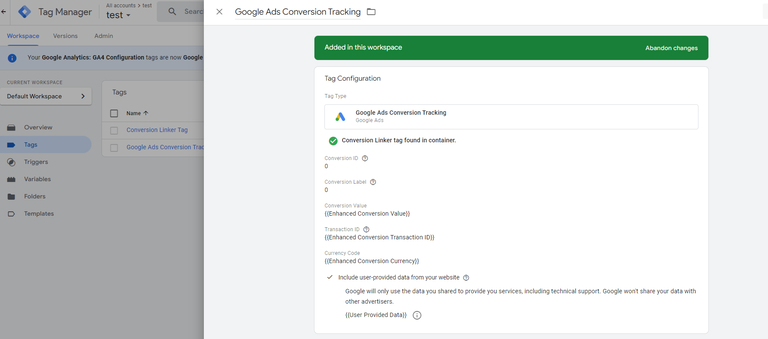
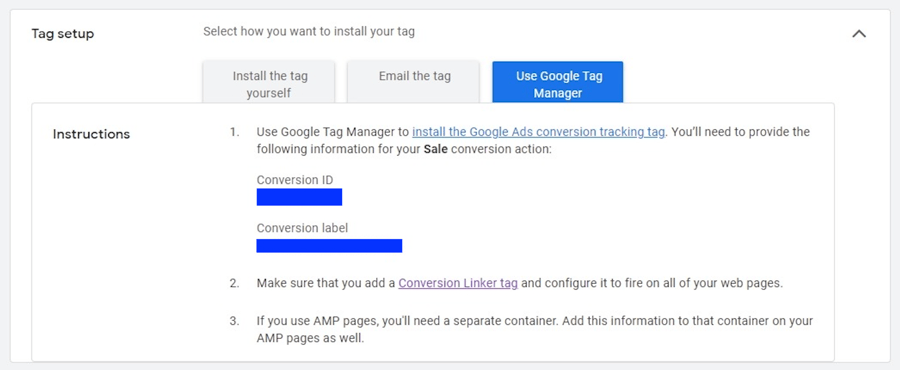
To setup Google Adwords Conversion, please make sure you add GTM-google_ads_conversion_tracking.json (data folder of the extension) file in your GTM container and add Conversion Label and Conversion ID which you should be able to get from Google Adwords account under Conversion section. This import will create the following tags -:
- Conversion Linker Tag
- Google Ads Conversion Tracking
Setup Enhanced Conversion
To enable enhanced conversions we first need to enable enhanced conversions in Google Adwords then complete the extension setup.
Enable Enhanced Conversions in Google Adwords
- Sign in to your Google Ads account.
- In the upper right corner of your account, click the tools icon , and under "Measurement," click Conversions.
- Open the conversion action you want to use for setting up enhanced conversions.
- In the “Enhanced conversions” section at the bottom, click Turn on enhanced conversions.
- Select ”Google tag or Google Tag Manager” to set up enhanced conversions.
- Click Agree to the compliance statement. By turning on enhanced conversions you confirm that you comply with our policies. The Google Ads Data Processing Terms apply to your use of enhanced conversions.
- Click Check URL to check your website for a Google tag.
- In “Tag type” you should be defaulted to Google Tag Manager if that is how you track conversions for this conversion action. Because you used Google Tag Manager to set up website tags, you need to use it to set up enhanced conversions. Follow the instructions below to set up enhanced conversions manually with Google Tag Manager.
- Click Save.
Note: Once you have accepted the Terms of Service, it can take up to 5 days for your Google Tag Manager account to be enabled for enhanced conversions. Make sure your conversion tracking tag is set up in Google Tag Manager and then check back in 5 days to see the enhanced conversions functionality enabled. Please CLICK HERE for more details.
Setup Enhanced Conversion with the Module
Go to Stores>Configuration>Scommerce Configuration>Tracking Base and set "Enable Enhanced Conversion" to "Yes". Import the JSON file either enhanced conversion using data layers or the normal enhanced conversion JSON that fetches the PII data from the global Javascript object.

Once done import the JSON file named "GTM-google_ads_enh anced_conversion_tracking.json" if or import "GTM-google_ads_enhanced_conversion_tracking_using_datalayers.json" provided with the extension(data folder) in your GTM container . Change the 'conversion label' and 'conversion ID' in the "Google Ads Conversion Tracking" tag. Finally publish the changes to finish the setup.
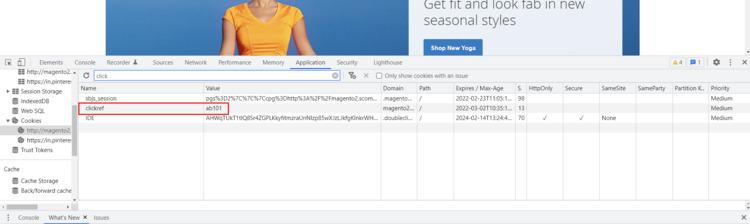
Cookies From Query Params
http://magento2.scommerce-mage.co.uk/?clickref=ab101 :- In this url we passed the cookie parameter "clickref" with the value "ab101". We can see this cookie being created in the below image:-
Upgrading the Module From 3.0.1 and Below
If you are using an older version of the extension(3.0.1 and below) where a common data layer is used to populate data to both UA and GA4 then upon updating to the latest version you need to make the following changes in GTM.
Remove these Tags, Triggers and Variables from GTM container
TAGS
- Google Analytics 4
- GA4 Views/impressions of product/item details
- GA4 View Item List Scroll
- GA4 View Item List
- GA4 Shipping info
- GA4 Remove a product from a shopping cart
- GA4 Refunds
- GA4 Purchases
- GA4 Promotion views/impressions
- GA4 Promotion clicks
- GA4 Product/Item List Clicks
- GA4 Payment info
- GA4 Begin Checkout
- GA4 Add a product to a shopping cart
Variables
- Ecommerce-detail-products
- Ecommerce-product-detail-value
- Ecommerce-checkout-products
- Ecommerce-checkout-option
- Ecommerce-remove-products
- Ecommerce-refund-products
- Purchase-affiliation
- Purchase-tax
- Purchase-shipping
- ecommerce-promoView-promotions
- ecommerce-promoClick-promotions
- Ecommerce-click-products
- ecommerce-product-click-list-name
Triggers
- View_item
- View_item_list
- Shipping Info
- removeFromCart
- Refund
- Purchase
- View_promotion
- promotionClick
- productClick
- Payment_info
- addToCart
Now follow the steps below to import the latest GA4 settings for GTM
Step 1:- Acquire the latest GA4 JSON file provided with the module.
Step 2:- Go to your GTM container then click on admin>Import Container.

Step 3:- Click on Choose container file and choose the JSON file acquired in step 1 then select the workspace new/existing. Also select Merge>Rename conflicting tags, triggers, and variables so that no crucial setting is lost.
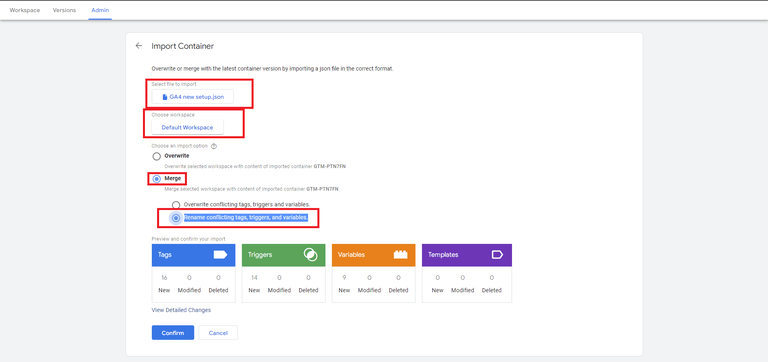
Step 4:- Lastly, click confirm to finish the import. Once it's done you will have the latest tags, triggers and variables for GA4 in your GTM.
Secure Execution of Inline Scripts in GTM via CSP Nonce
To enhance compatibility with Content Security Policies (CSP), a nonce attribute for Google Tag Manager (GTM) has been added. When enabled, the module injects a unique nonce value into a script tag on every page, allowing secure execution of inline scripts in GTM while complying with CSP directives.
Step 1: Enable Nonce Injection
Step 2: Verify Script Tag Injection
After enabling the feature, confirm the following script appears in the <span class="editor-theme-code"><span class="editor-theme-code"><head></span></span> section of all pages:
html
<script id="scomGtmVar" data-scom-gtm-var="<?= $block->getHelper()->getNonceValue() ?>"></script>Note: The <span class="editor-theme-code"><span class="editor-theme-code">data-scom-gtm-var</span></span> attribute contains the dynamically generated nonce value.

Step 3: Create a GTM Variable for Nonce
Use ONE of these methods to capture the nonce value in GTM:
Method A: Custom JavaScript Variable (Recommended)
- In GTM, create a new Custom JavaScript variable.
- Name it (e.g.,
<span class="editor-theme-code"><span class="editor-theme-code">Nonce Value</span></span>). - Paste this code:
javascript
function() {
var el = document.getElementById("scomGtmVar");
return el ? el.getAttribute("data-scom-gtm-var") : undefined;
}
Method B: DOM Element Variable
- Create a DOM Element variable.
- Configure:
- Selection Method: ID
- Element ID: scomGtmVar
- Attribute Name: data-scom-gtm-var

Step 4: Modify GTM Tags with Nonce
For every Custom HTML tag using inline scripts:
- Add the
<span class="editor-theme-code"><span class="editor-theme-code">nonce</span></span>attribute to the<span class="editor-theme-code"><span class="editor-theme-code"><script></span></span>block using the GTM variable:
html
<script nonce="{{Nonce Value}}">
// Your inline code here
</script>- Critical: Enable "Support document.write" in the tag’s Advanced Settings.
- Save and publish the container.
Step 5: Validation & Troubleshooting
Verify Successful Implementation
Nonce in Page Source:
Inspect the page’s <head> to confirm data-scom-gtm-var contains a value (e.g. bTIzb3B5Y2pobDZvamJtamZoaHdrYnRxcXI5b3owcW4<span class="editor-theme-code"><span class="editor-theme-code">=</span></span>). \
Tag Execution:
- Use GTM Preview to confirm tags fire with the nonce attribute.
CSP Errors:
- Check browser console for CSP violations. Absence of errors confirms compliance.


Front-end Screenshots
Order Total of Product without VAT
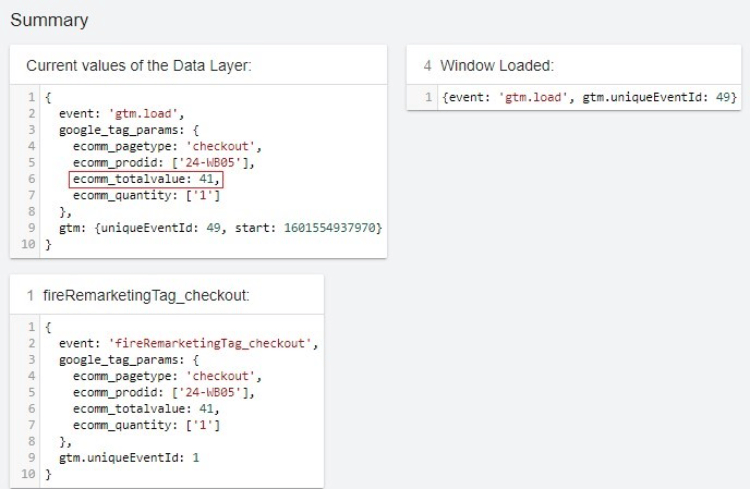
Go to Stores > Configuration > Scommerce > Google Tag Manager Pro. Scroll down to option Order Total Include Vat and toggle it to ‘No’. When turned ‘No’ the total order value data sent to Google analytics will not include VAT.

Order Total of Product with VAT
Go to Stores > Configuration > Scommerce > Google Tag Manager Pro. Scroll down to option Order Total Include Vat and toggle it to ‘Yes’. When turned ‘Yes’ the total order value data sent to Google analytics will also include VAT.
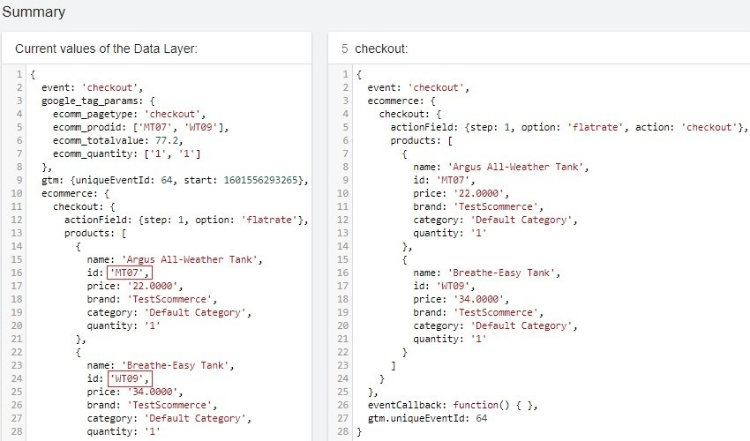
Send SKU of Child Product
Go to Stores > Configuration > Scommerce > Google Tag Manager Pro. Scroll down to the option Always Send Parent SKU and toggle it to ‘No’. When turned ‘No’ if the customer selects a configurable product then the SKU data sent to Google analytics will be of the child product.
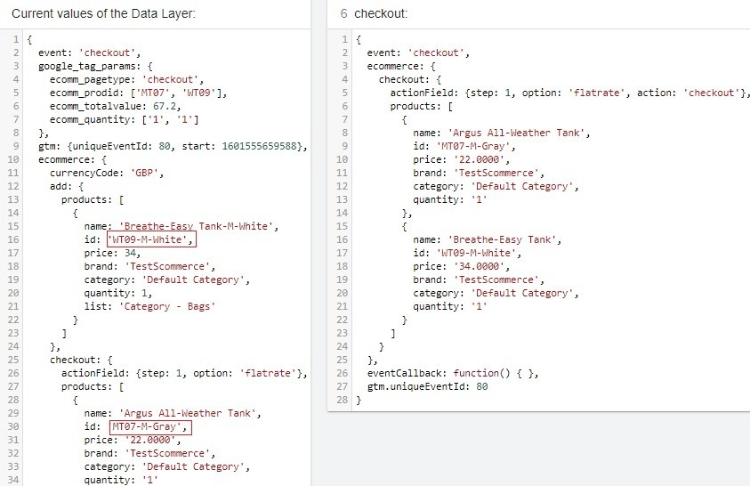
Send SKU of Parent Product Only
Go to Stores > Configuration > Scommerce > Google Tag Manager Pro. Scroll down to the option Always Send Parent SKU and toggle it to ‘Yes’. When turned ‘Yes’ if the customer selects a configurable product then only the SKU of the parent product will be sent to Google analytics.
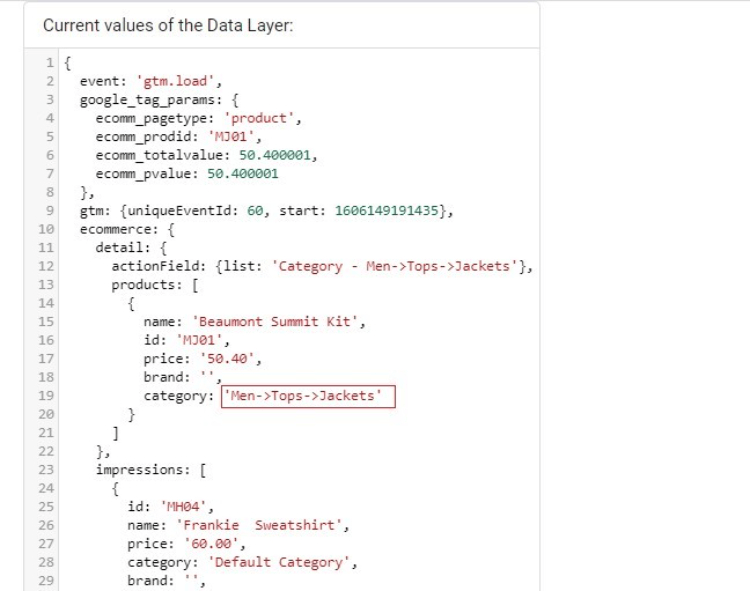
Send Parent Category
Go to Stores > Configuration > Scommerce > Google Tag Manager Pro. Scroll down to the option Send Parent Category and toggle it to ‘Yes’. When turned ‘Yes’ if the customer selects a product then it will send the entire category path to the analytics if “No” then it will only send the category name.
Primary Category
Go to Catalog > Products and select any product. Then Scroll down to the option Primary Category.

Here you can set the primary category for any product. If you do not wish to send the assigned category to analytics, then you select which category path or name you want to send.
Here you can set the primary category for any product. If you do not wish to send the assigned category to analytics, then you select which category path or name you want to send.
Set up Consent Mode V2 with GTM
Please follow the below guide to set up consent mode v2 with GTM, also you would need to have both GTM and GDPR modules to complete this setup.
GDPR:- https://www.scommerce-mage.com/magento-2-gdpr.html
Consent Mode:- https://docs.scommerce-mage.com/magento-2-extensions/analytics-and-tracking-extensions/magento-2-consent-modes-setup-guide
If you have a question related to this extension please check out our FAQ Section first. If you can't find the answer you are looking for then please contact support@scommerce-mage.com.
Magento 2 missing orders or transactions in Google Analytics (GA)
Installation and User Guide for Magento 2 Google Analytics Synchronization Extension
Table of Contents
- Installation
- Installation via app/code
- Installation via Composer
- Configuration Settings for Google Analytics Synchronization
- General Settings
- GA4
- Select Store View
- Verify/Test Synced Transactions
- GA4 Sync Log grid
- GA4 Sync Log File
- Google Analytics 4 Real Time Reports
- Google Analytics 4 Custom Reports
- Order Tracking Information
- Create Project in Google Developer Console for GA Reporting API
- Getting View ID (Universal Analytics)
- Getting Property ID (GA4)
- Command to run the Synch Manually
Installation
- Installation via app/code: Upload the content of the module to your root folder. This will not overwrite the existing Magento folder or files, only the new contents will be added. After the successful upload of the package, run below commands on Magento 2 root directory.
- Installation via Composer: Please follow the guide provided in the below link to complete the installation via composer.
Configuration Settings for Google Analytics Synchronization
Go to Admin > Stores > Configuration > Scommerce Configuration > Google Analytics Synchronization
General Settings
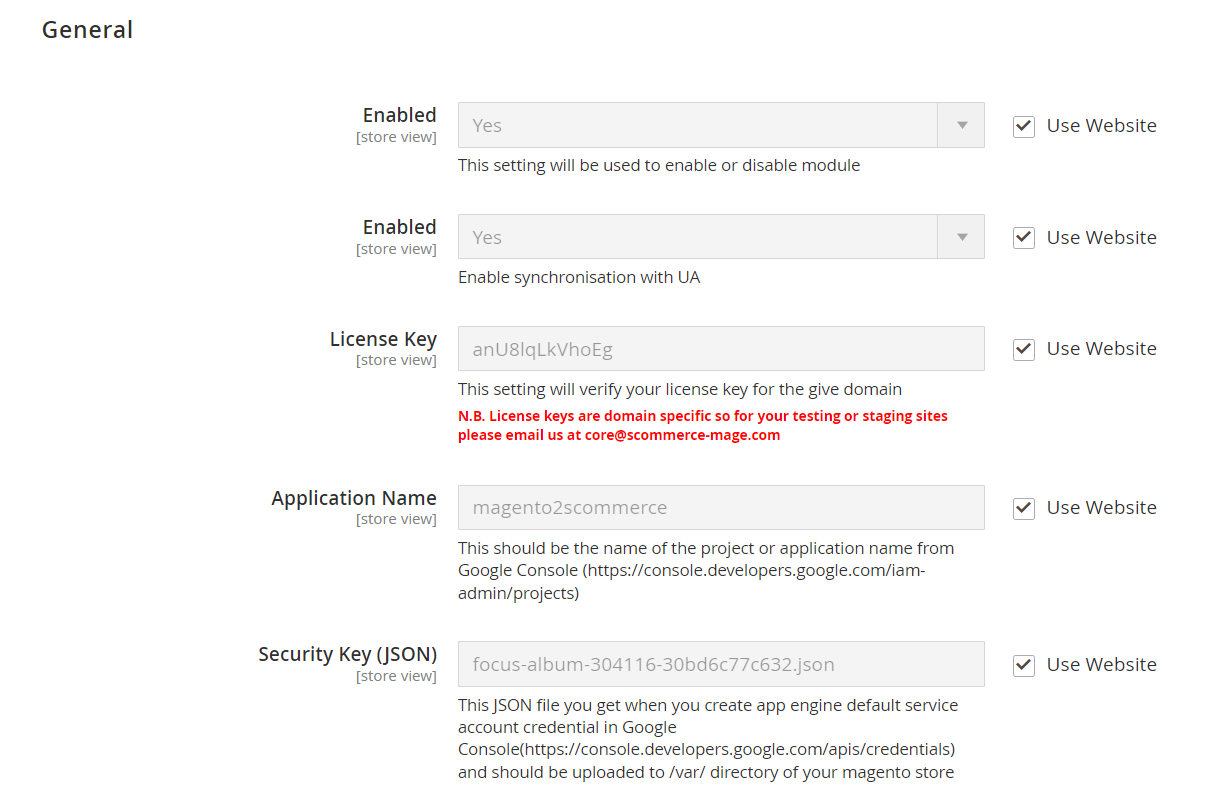
- Enabled – Select "Yes" or "No" to enable or disable the module.
- Enabled – Select "Yes" or "No" to enable or disable synchronization with UA(Universal Analytics).
- License Key – Please add the license for the extension which is provided in the order confirmation email. Please note license keys are site URL specific. If you require license keys for dev/staging sites then please email us at support@scommerce-mage.com.
- Application Name – It is the project name that you get from Google console. ( https://console.developers.google.com/ ) Click here for more information
- Security key (JSON) – Security key JSON file can be obtained from Google Console under account credentials. Click here for more information
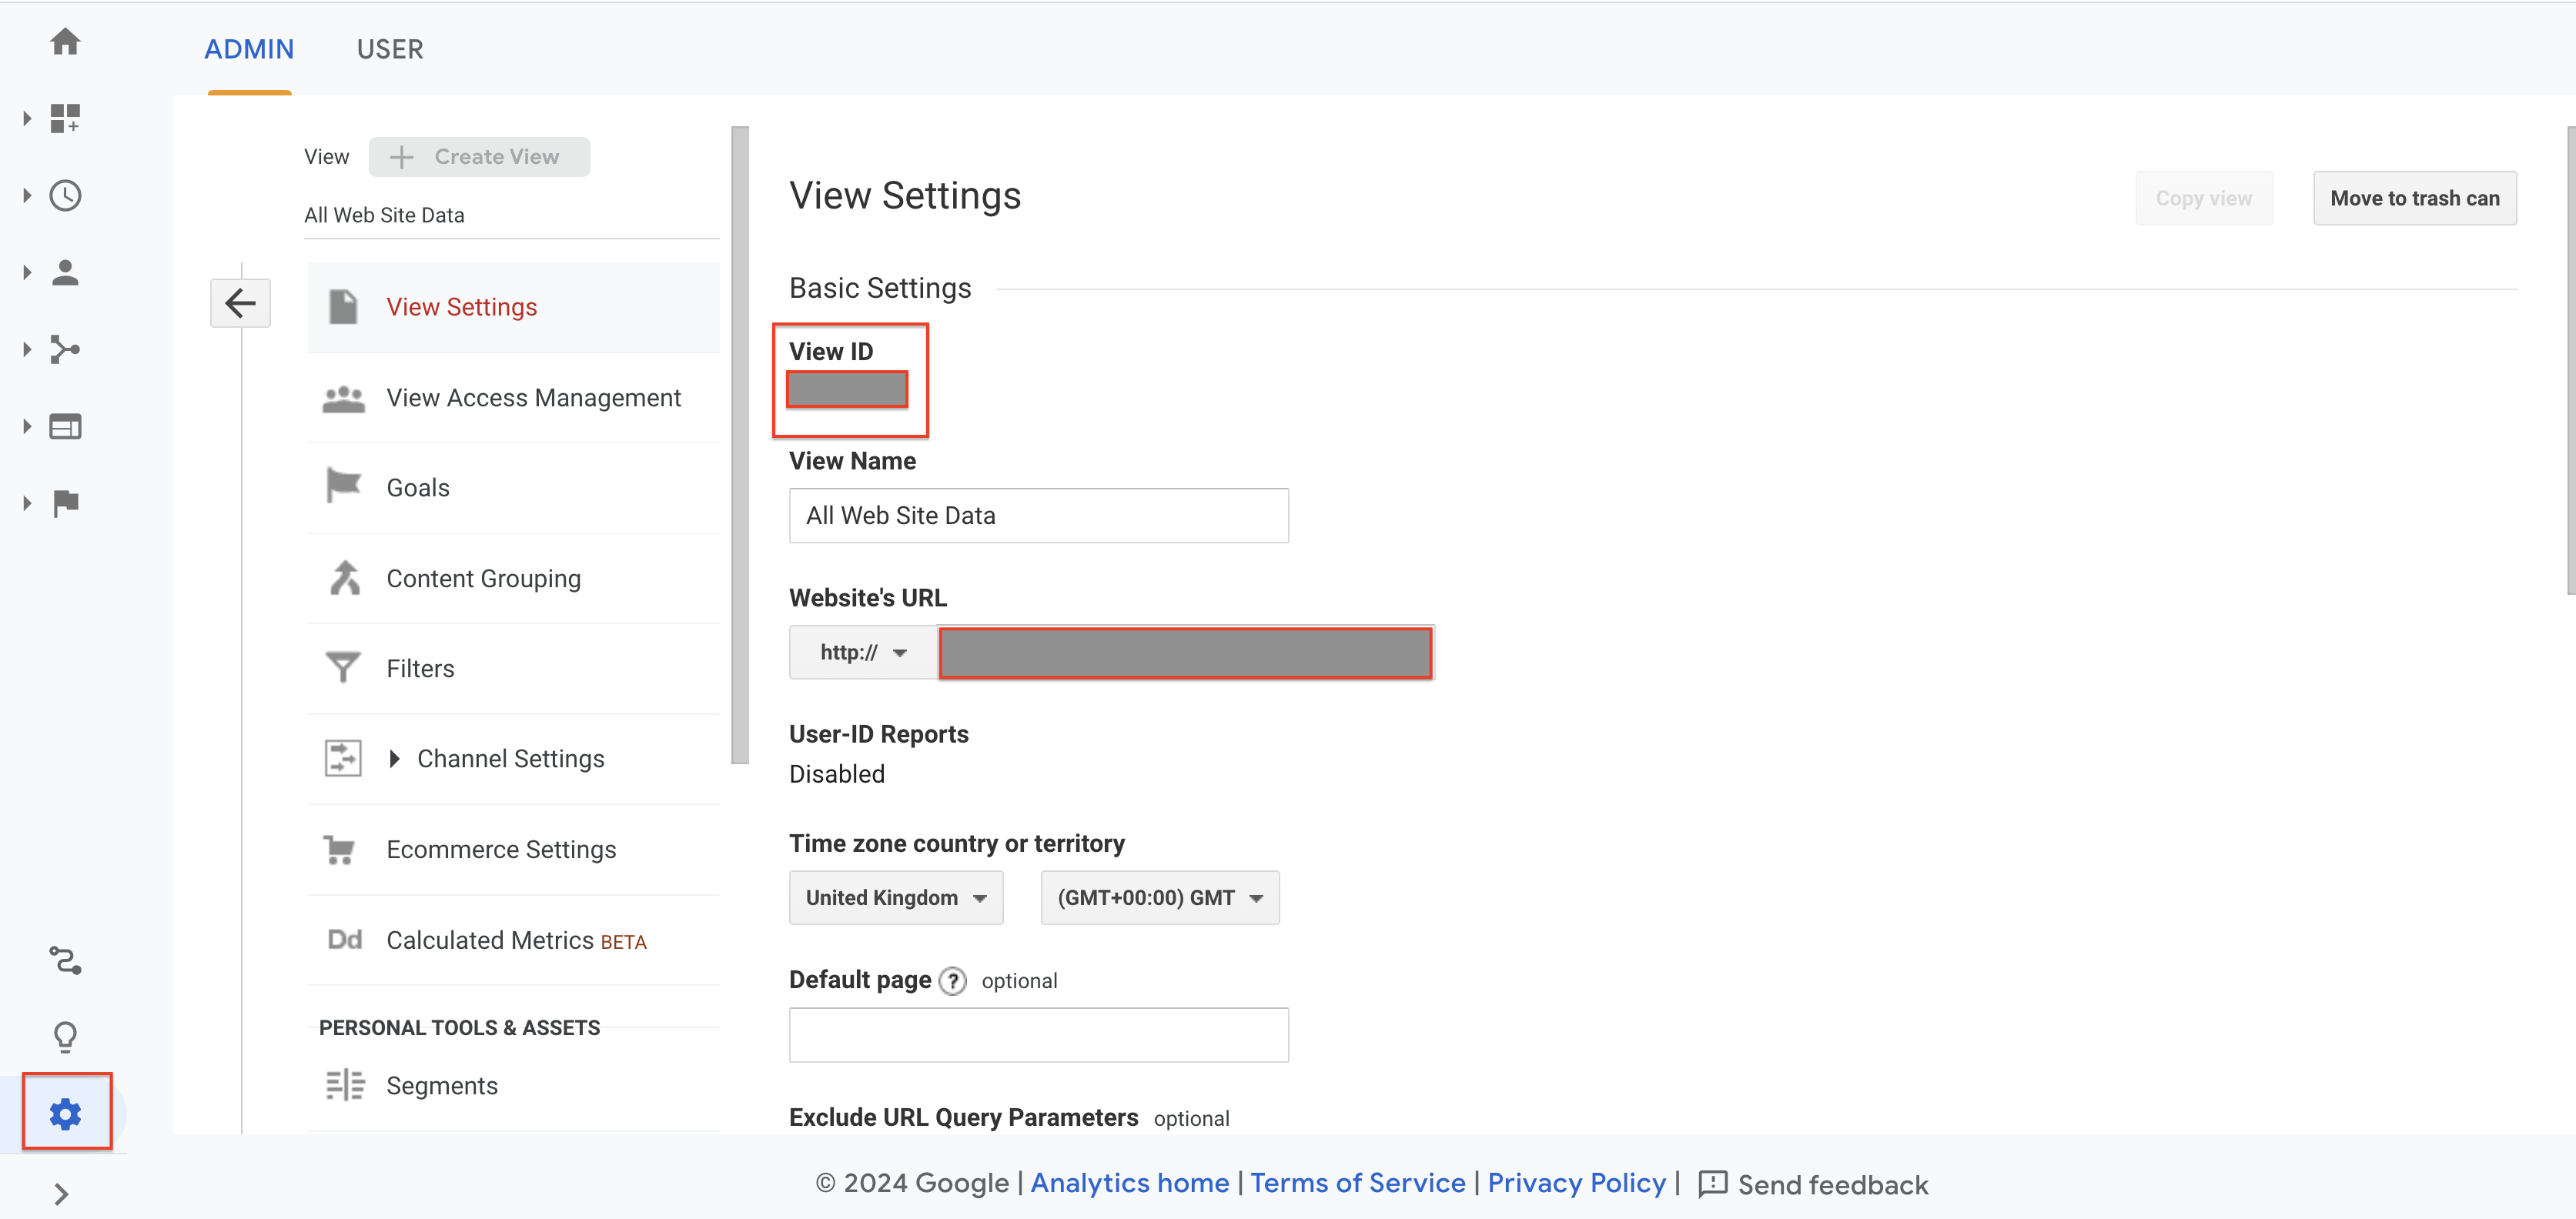
- Google View id – View Id can be obtained from Google Analytics. Go to Admin>View Settings>View ID.
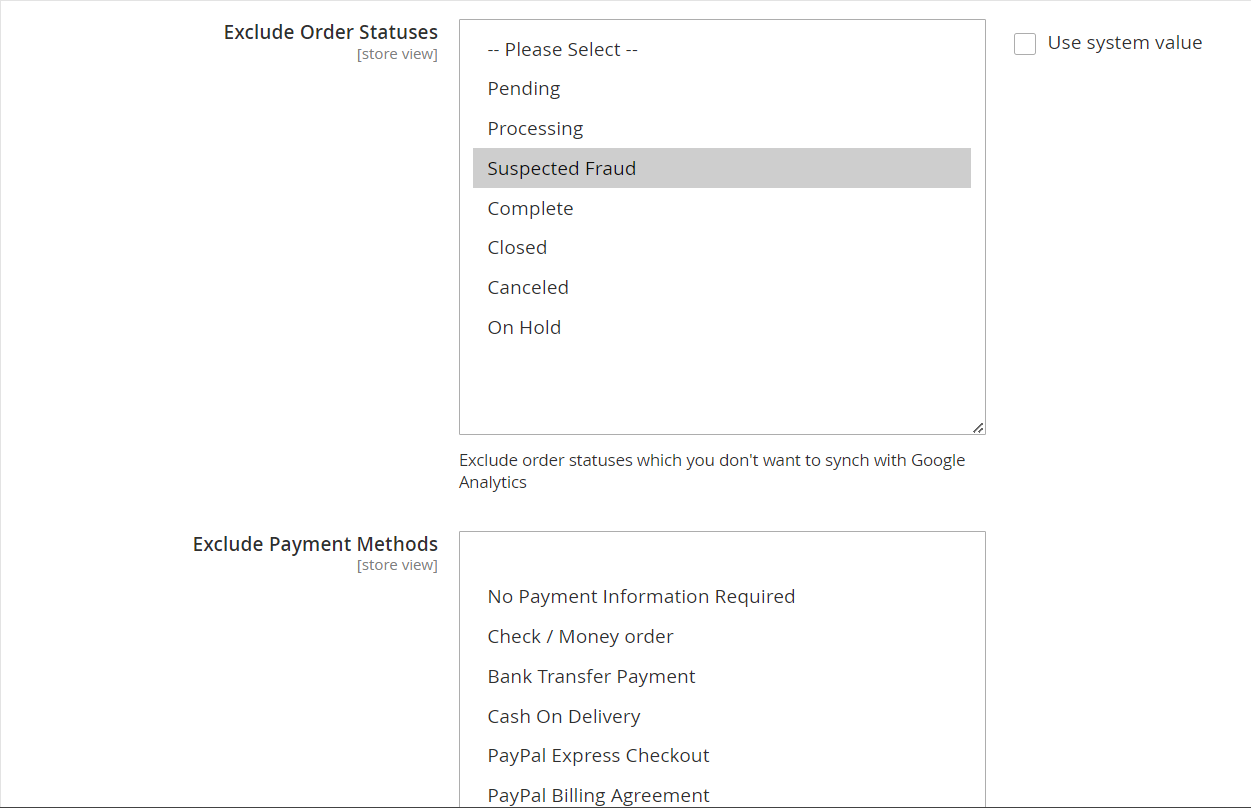
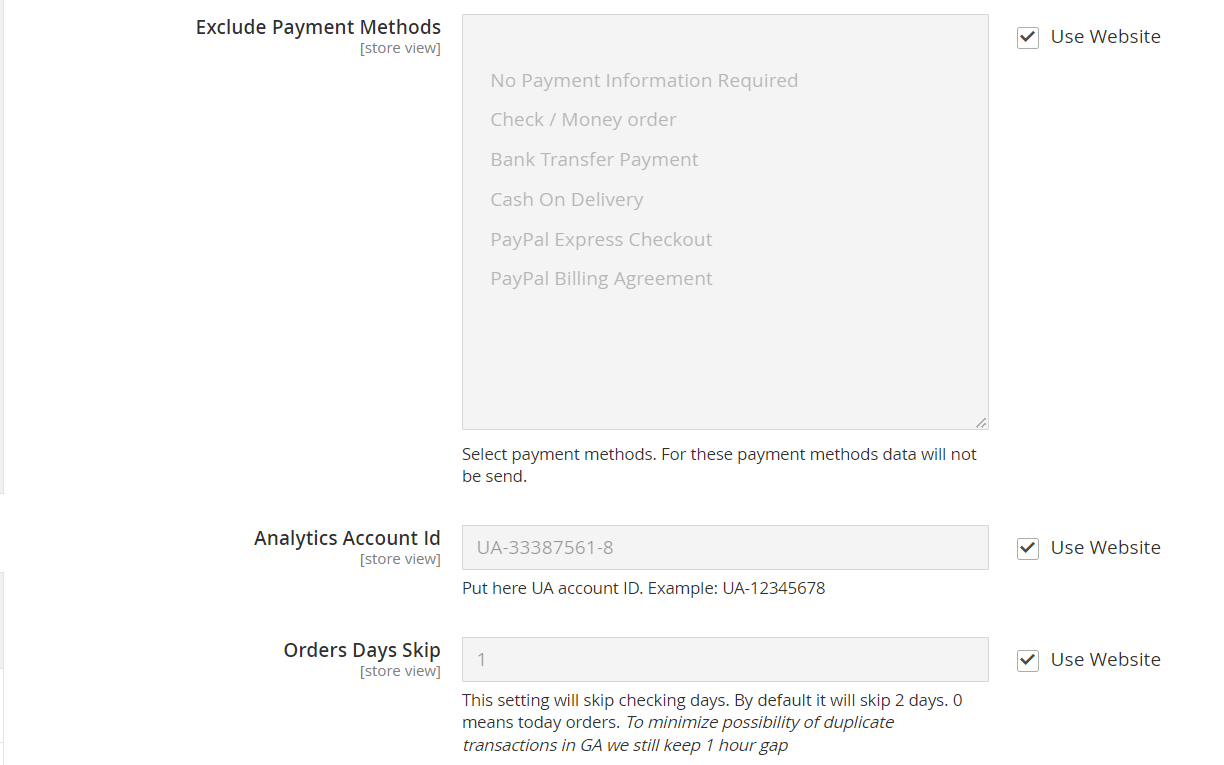
- Exclude order statuses – You can choose to exclude certain order statues from sync. These orders won't be synced with Google Analytics.
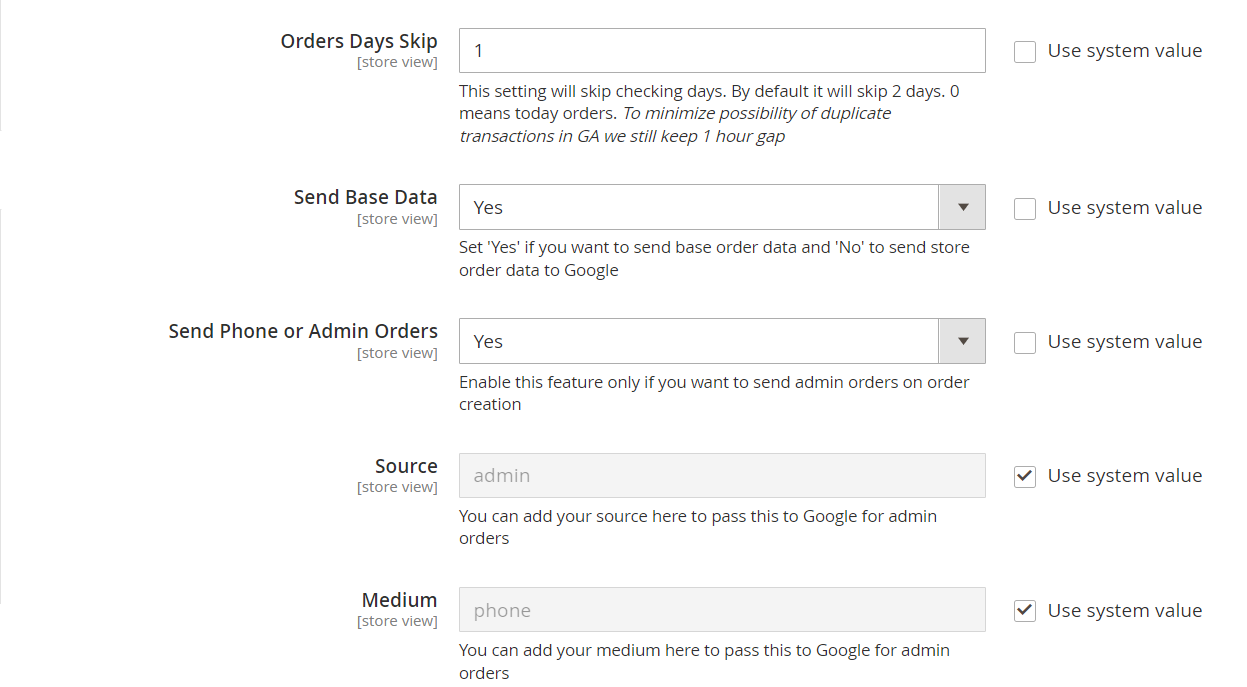
- Orders day Skip – Enter the number of days you want to skip checking. For eg:- Suppose if you enter 2 then orders from 2days ago will be synced today.
- Skip Hours- This setting works in conjunction with Order days skip" setting. When Order days skip is set to 0 then you can add hours here to allow number of hours to skip before considering transaction has been missing and sending it to GA. Default value is 4 and we will recommend to keep it that way because original transaction can take longer to appear in Google Analytics.
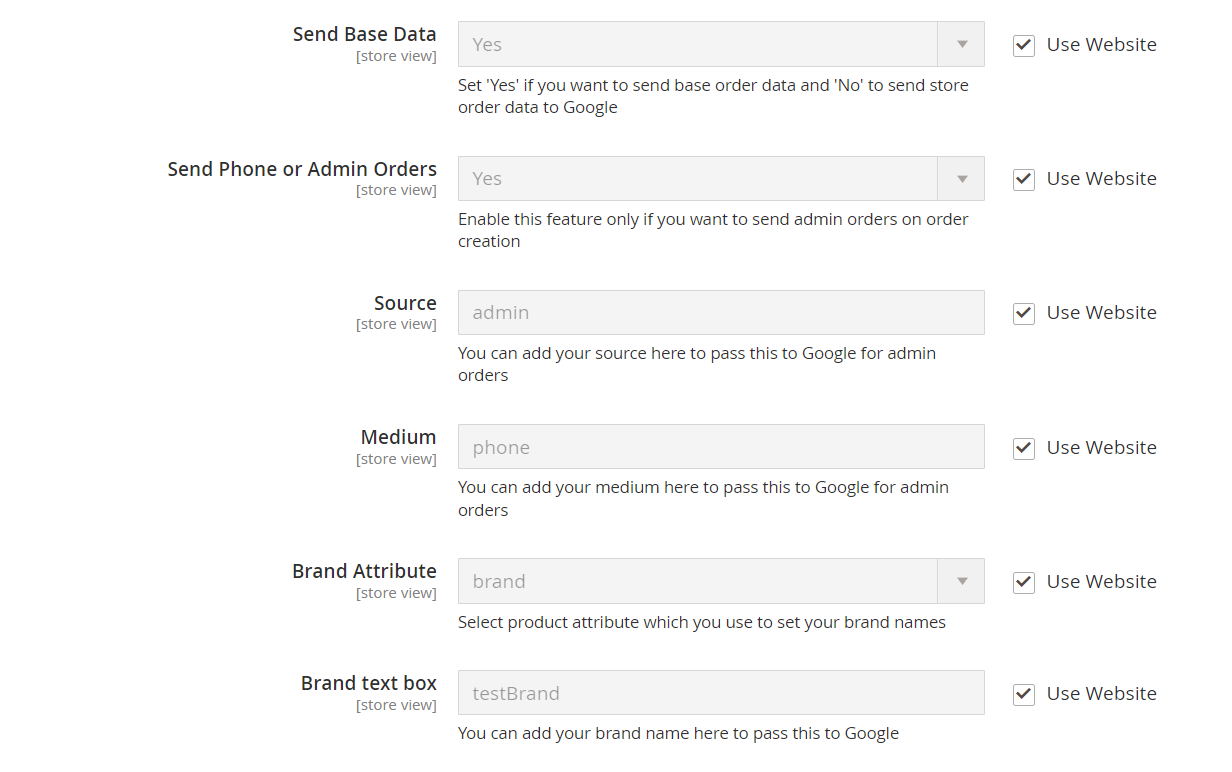
- Send Base Data – Select whether you want to send base order data or store order data.
- Send Phone or Admin Orders – Enabling this option will also sync orders placed from admin panel and phone
- Source – Pass a source to Google for admin orders
- Medium – Pass a medium to Google for admin orders
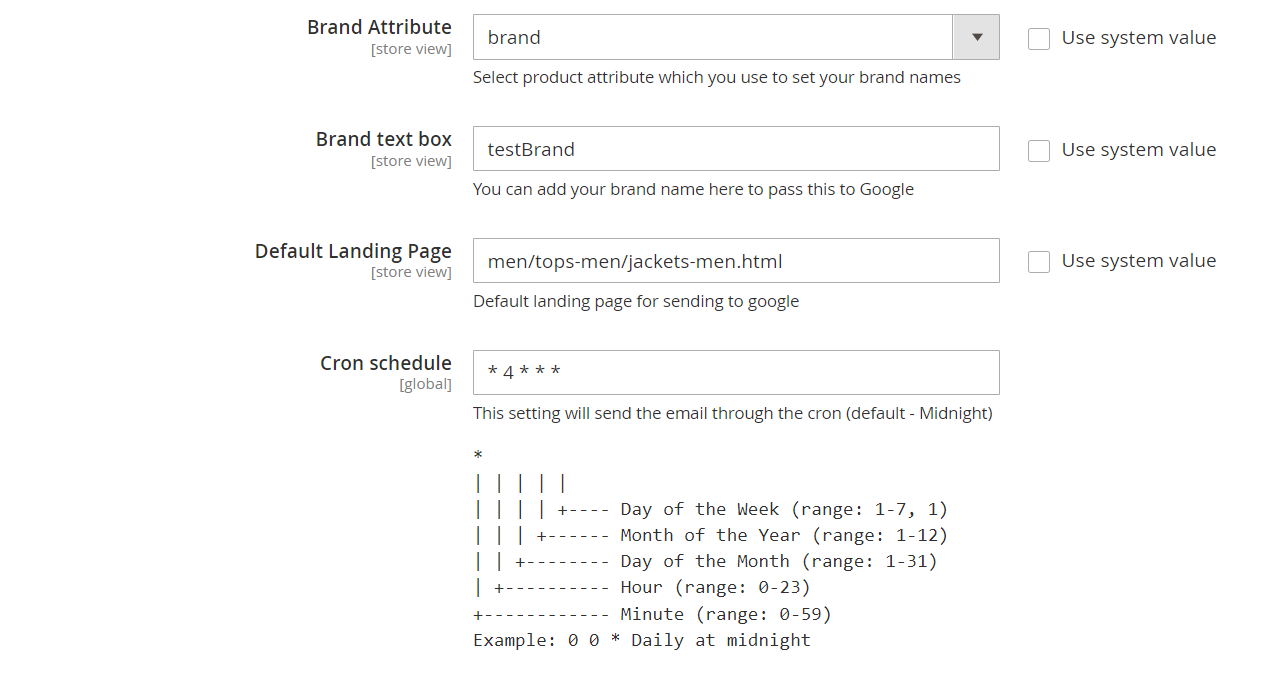
- Brand Attribute – Select a brand attribute to send with brand names
- Brand Text box – Input brand name to send to Google
- Default Landing Page - This setting allows you to set default landing page value which shows in Google Analytics in case landing page is not available to sent as part of missing transaction.
- Cron Schedule – Schedule specific cron time to run the sync automatically.
- Debugging – Enabling debugging will generate a detailed log report in /var/log directory
- Test Mode- This setting allows you to check missing transactions before we send the transactions to GA. It helps in validating the data before it gets posted to Google Analytics

GA4
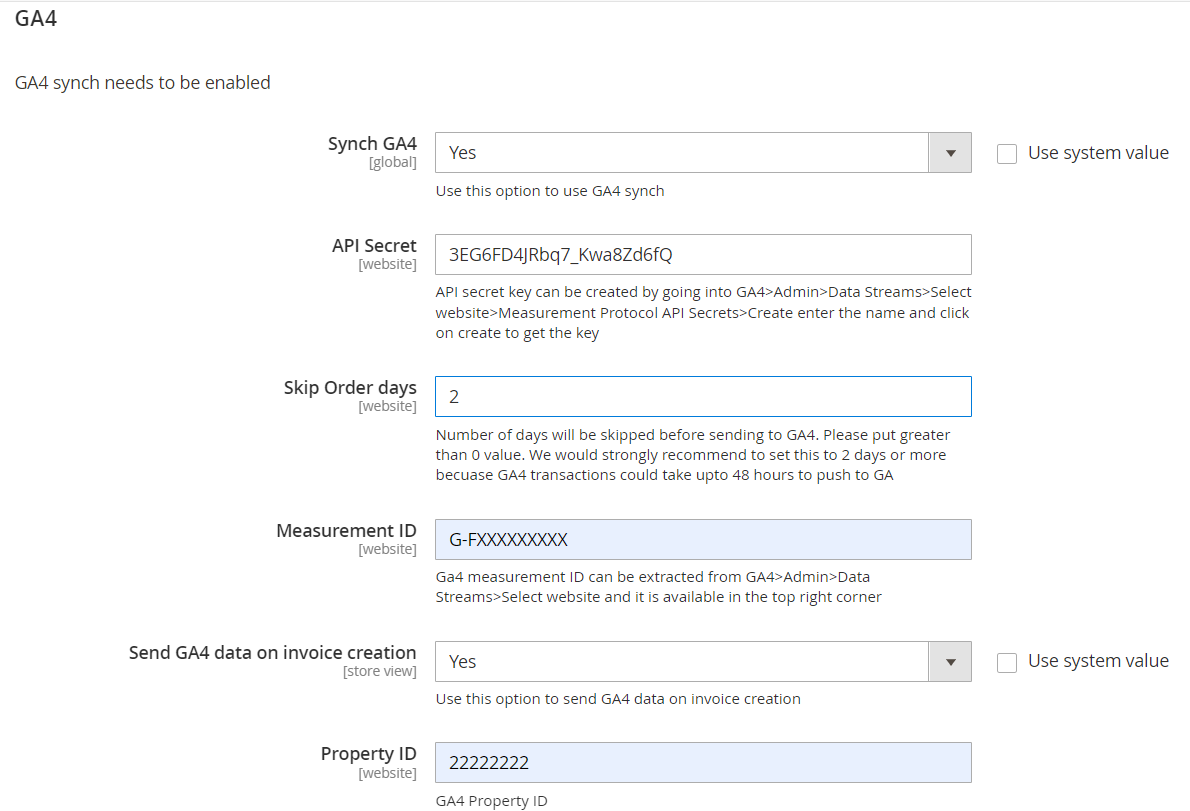
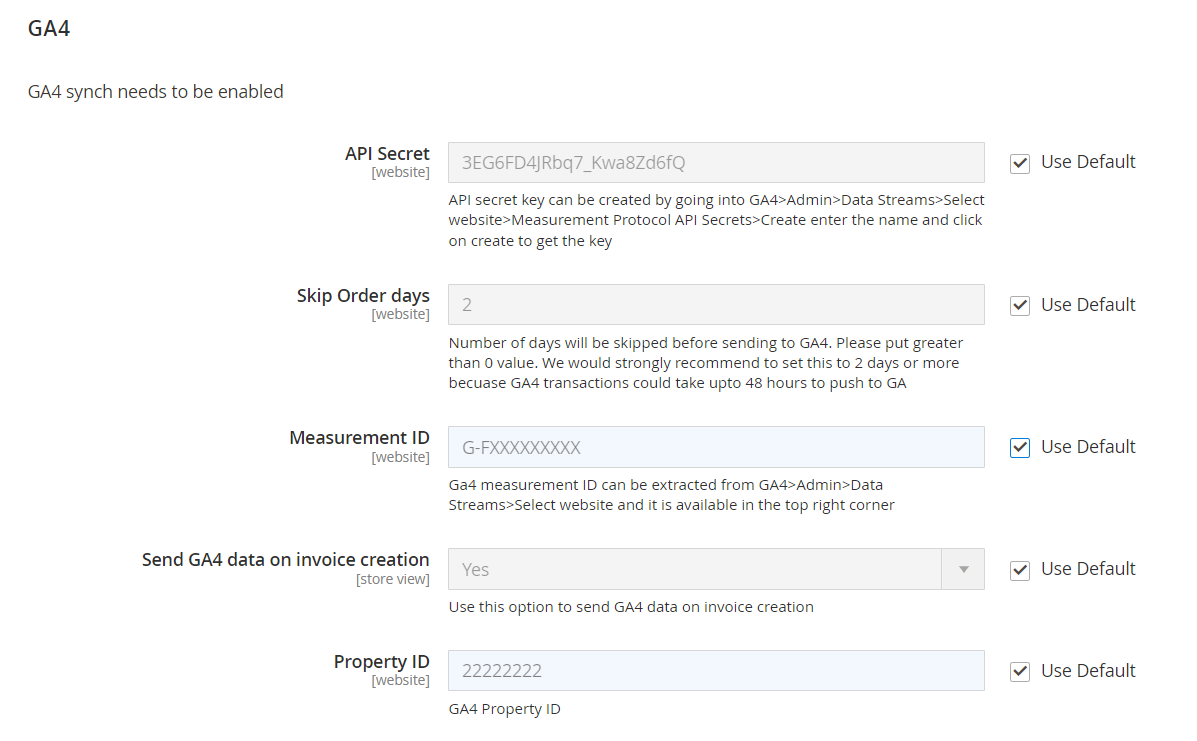
- Synch GA4 – Select "Yes" or "No" to enable or disable the GA4 sync.
- API Secret – Enter the API secret key here. API secret key can be created by going into GA4>Admin>Data Streams>Select website>Measurement Protocol API Secrets>Create enter the name and click on create to get the key.
- Skip Order days – Enter the number of days that will be skipped before sending to GA4. Please put greater than 0 value. This is done to avoid duplicate transactions. For eg:- Suppose if you enter 2 then orders from 2days ago will be synced today.
- Measurement ID – Enter the measurement ID of your GA4 property. Ga4 measurement ID can be extracted from GA4>Admin>Data Streams>Select website and it is available in the top right corner.
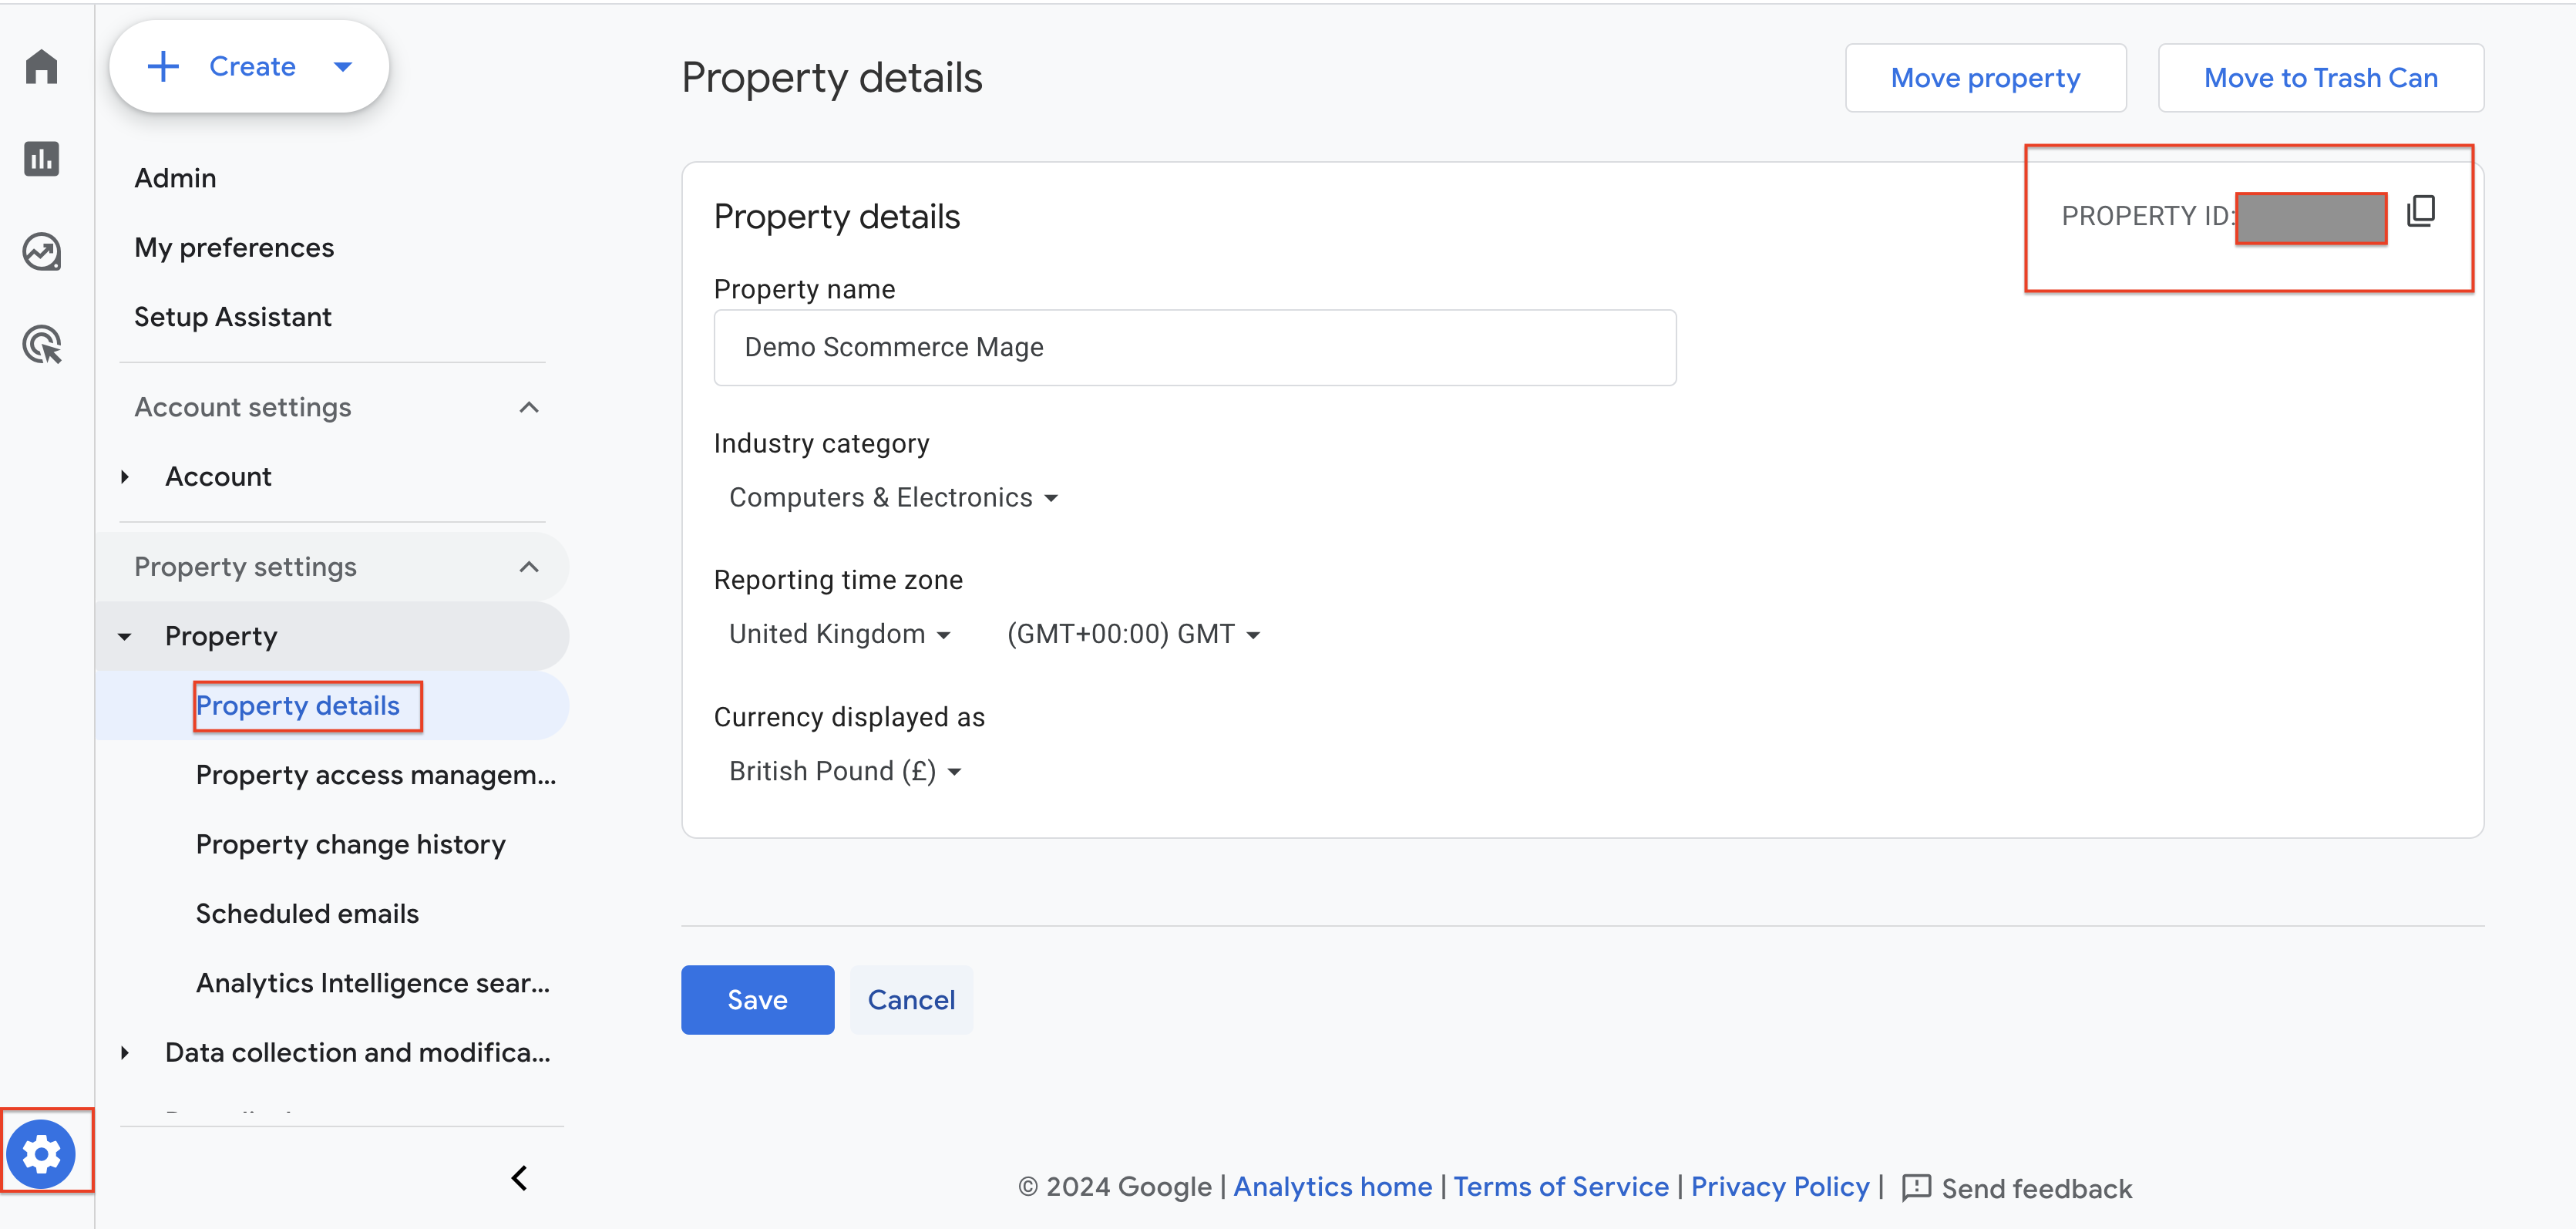
- Property ID – Enter the property ID of GA4. GA4>Admin>Property Settings>Property ID
Select Store View
- Enabled – Select "Yes" or "No" to enable or disable the module.
- Enabled – Select "Yes" or "No" to enable or disable synchronization with UA(Universal Analytics).
- License Key – Please add the license for the extension which is provided in the order confirmation email. Please note license keys are site URL specific. If you require license keys for dev/staging sites then please email us at support@scommerce-mage.com
- Application Name – It is the project name that you get from Google console. ( https://console.developers.google.com/) Click here for more information
- Security key (JSON) – Security key JSON file can be obtained from Google Console under account credentials. Click here for more information
- Google View id – View Id can be obtained from Google Analytics. Go to Admin>View Settings>View ID.
- Exclude order statuses – You can choose to exclude certain order statues from sync. These orders won't be synced with Google Analytics.
- Analytics Account Id – It is your Google Analytics account ID.
- Orders day Skip – Enter the number of days you want to skip checking. For eg:- Suppose if you enter 2 then orders from 2 days ago will be synced today.
- Skip Hours- This setting works in conjunction with Order days skip" setting. When Order days skip is set to 0 then you can add hours here to allow number of hours to skip before considering transaction has been missing and sending it to GA. Default value is 4 and we will recommend to keep it that way because original transaction can take longer to appear in Google Analytics.
- Send Base Data – Select whether you want to send base order data or store order data.
- Send Phone or Admin Orders – Enabling this option will also sync orders placed from admin panel and phone
- Source – Pass a source to Google for admin orders
- Medium – Pass a medium to Google for admin orders
- Brand Attribute – Select a brand attribute to send with brand names
- Brand Text box – Input brand name to send to Google
- Default Landing Page - This setting allows you to set default landing page value which shows in Google Analytics in case landing page is not available to sent as part of missing transaction.

GA4
- Synch GA4 – Select "Yes" or "No" to enable or disable the GA4 sync.
- API Secret – Enter the API secret key here. API secret key can be created by going into GA4>Admin>Data Streams>Select website>Measurement Protocol API Secrets>Create enter the name and click on create to get the key.
- Skip Order days – Enter the number of days that will be skipped before sending to GA4. Please put greater than 0 value. This is done to avoid duplicate transactions. For eg:- Suppose if you enter 2 then orders from 2days ago will be synced today.
- Measurement ID – Enter the measurement ID of your GA4 property. Ga4 measurement ID can be extracted from GA4>Admin>Data Streams>Select website and it is available in the top right corner.
- Property ID – Enter the property ID of GA4. GA4>Admin>Property Settings>Property ID
Verify/Test Synced Transactions
The synced transactions can be verified in two ways. Either checking the GA Sync logs or by checking the Real time reports in GA4 (as it takes 24 to48 hrs for GA4 to attribute data to reports realtime is the quickest way to verify).
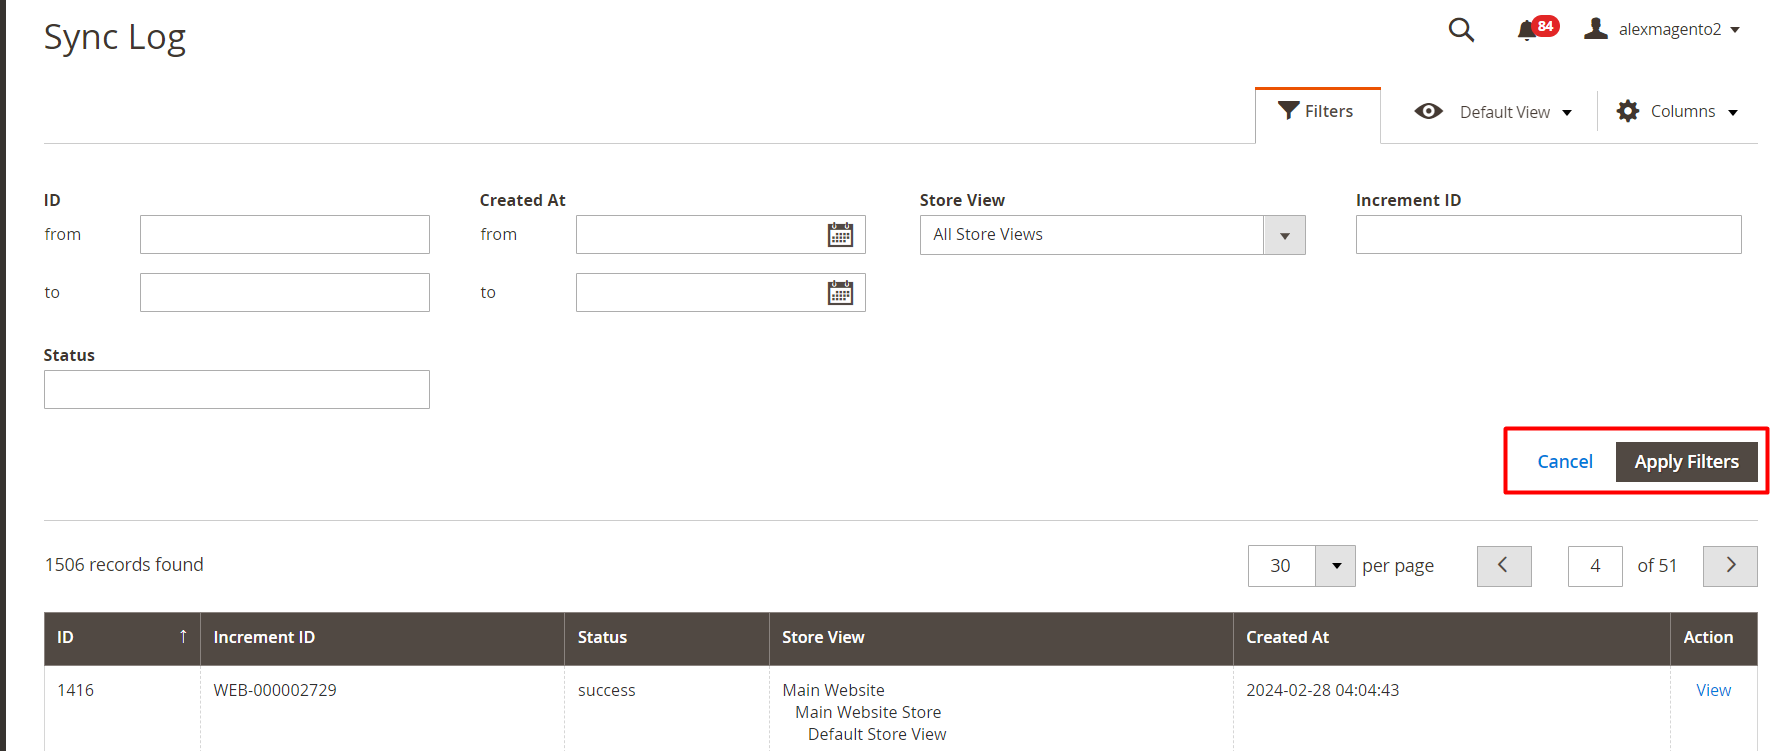
- GA Sync Log Grid: Go to System> Manage GA Sync Logs> GA Sync Logs
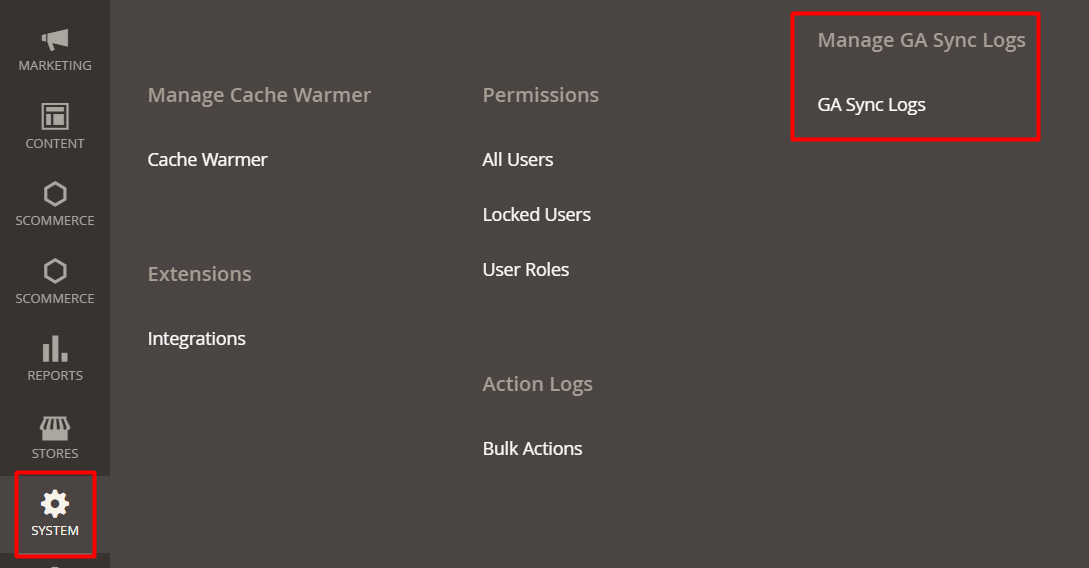
After clicking on "GA Sync Logs", user would see the generated logs in the Sync Log Grid.
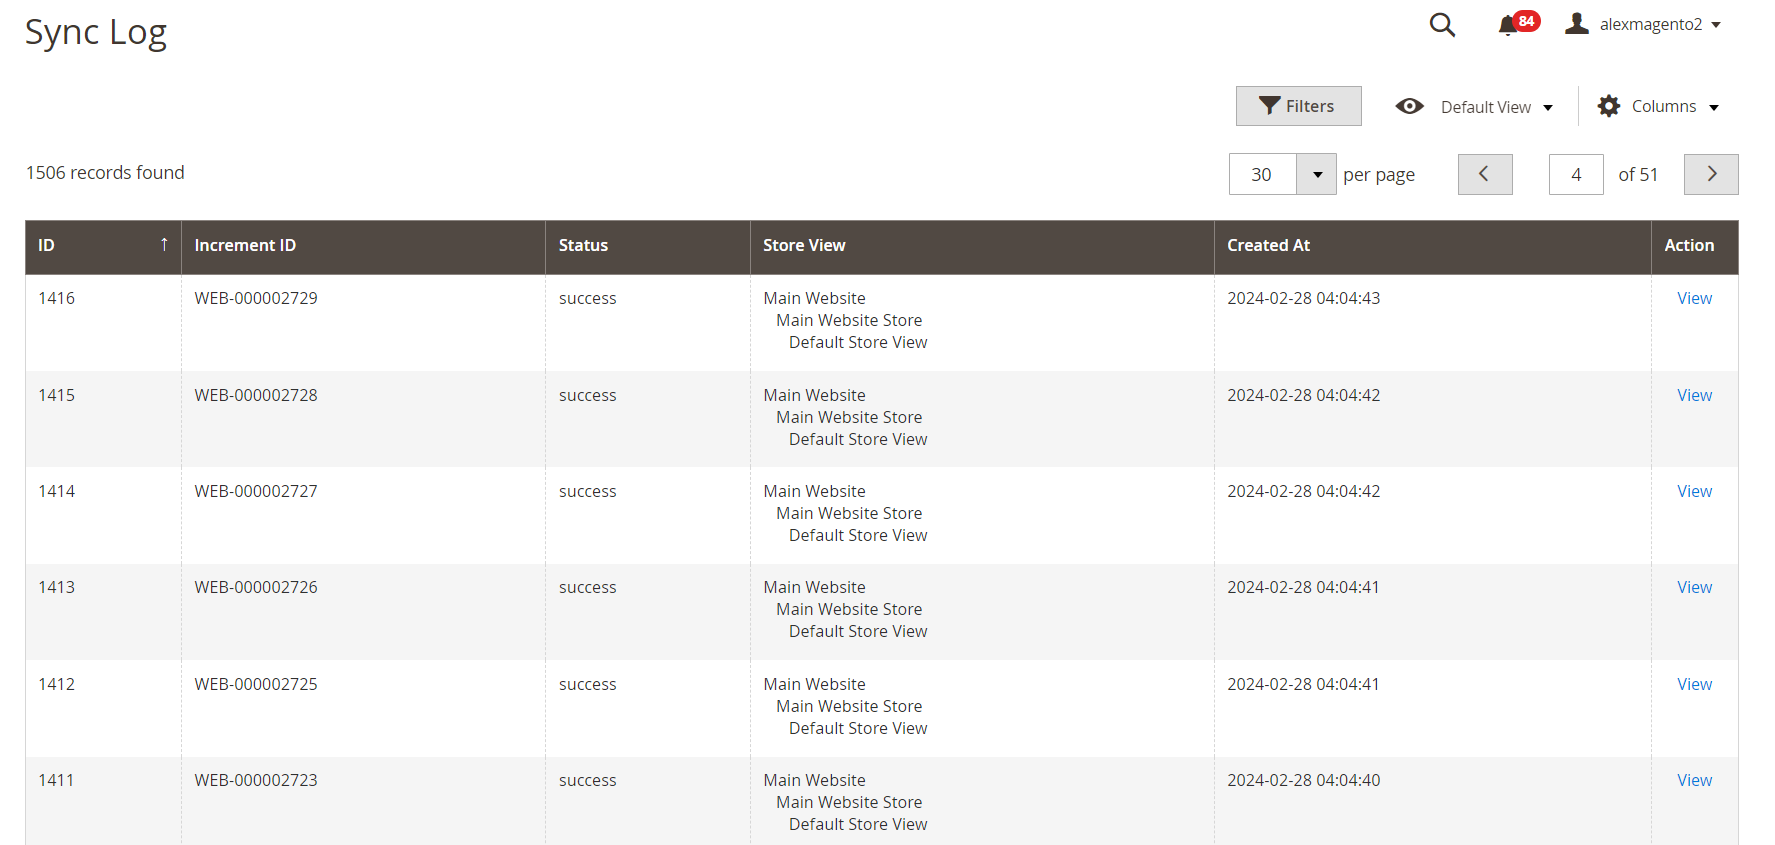
User can also use filters to check a particular log in the grid.
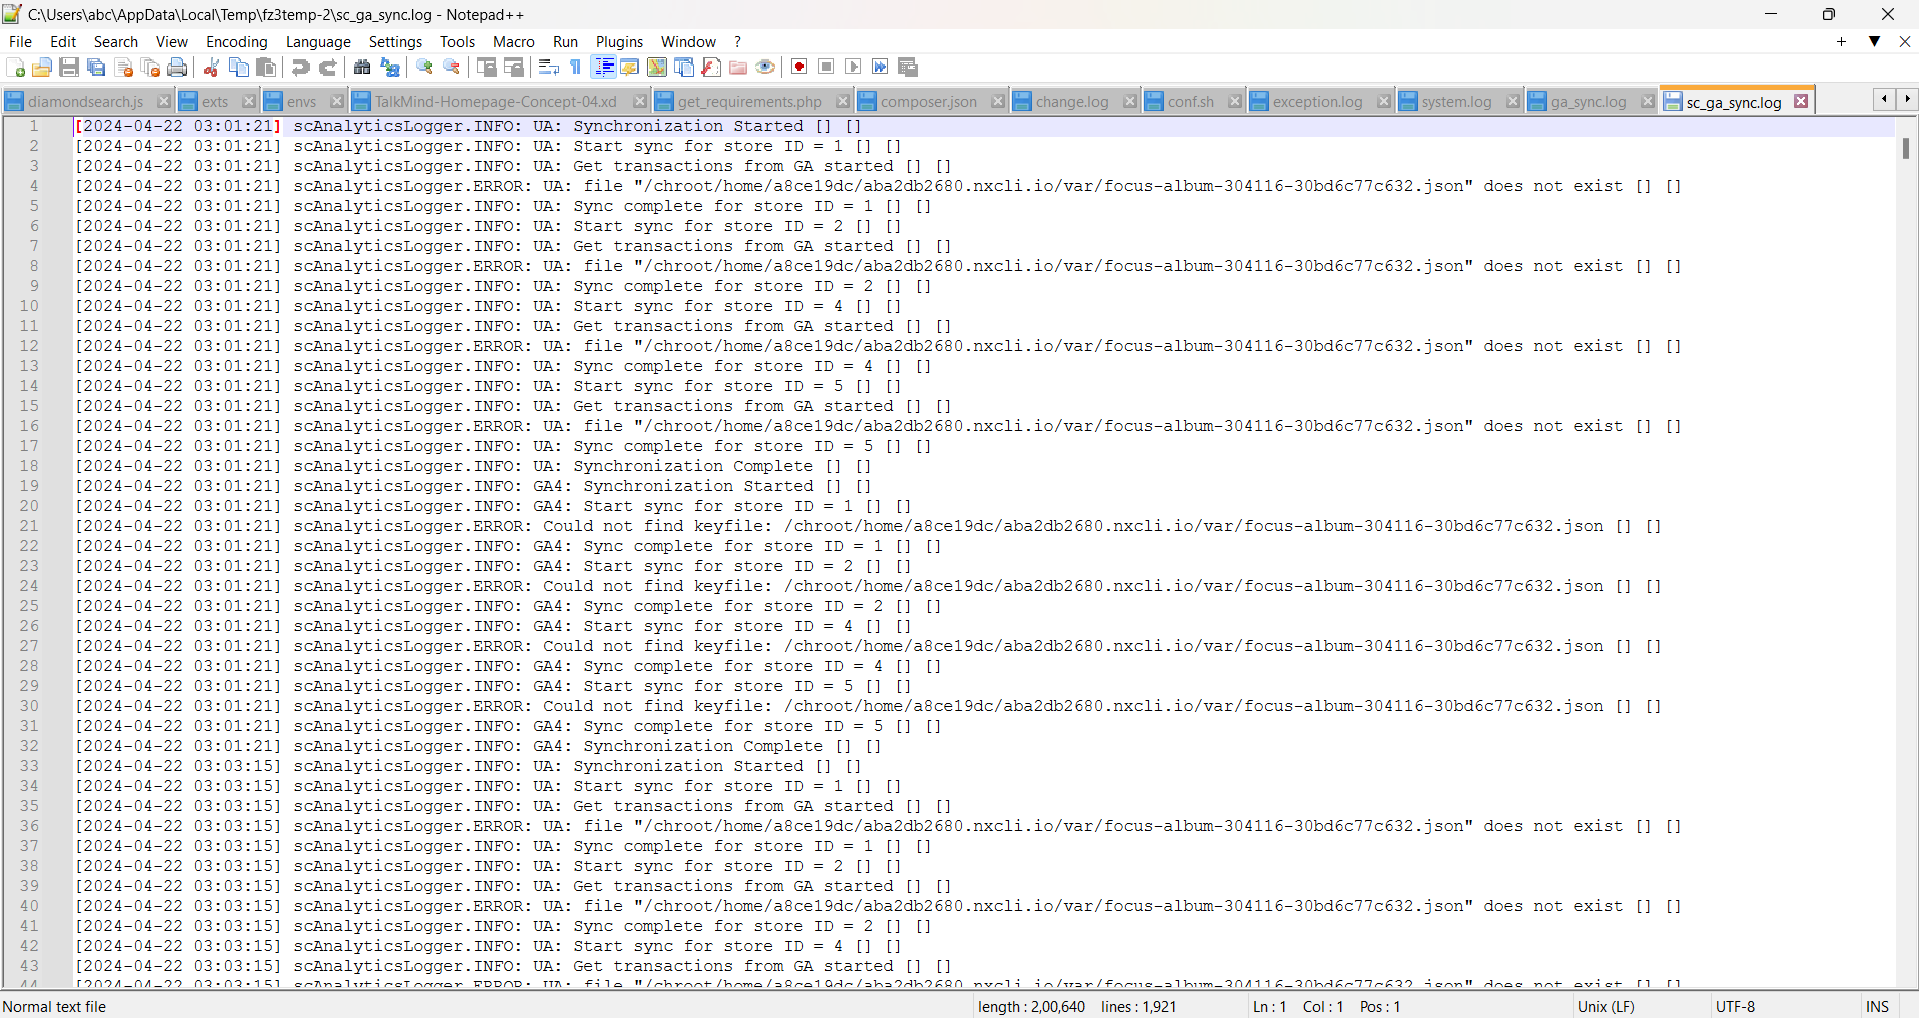
- GA4 Sync Log File: The GA Sync logs can be viewed by going into your server>Magento installation directory>Var>log>ga_sync.log.
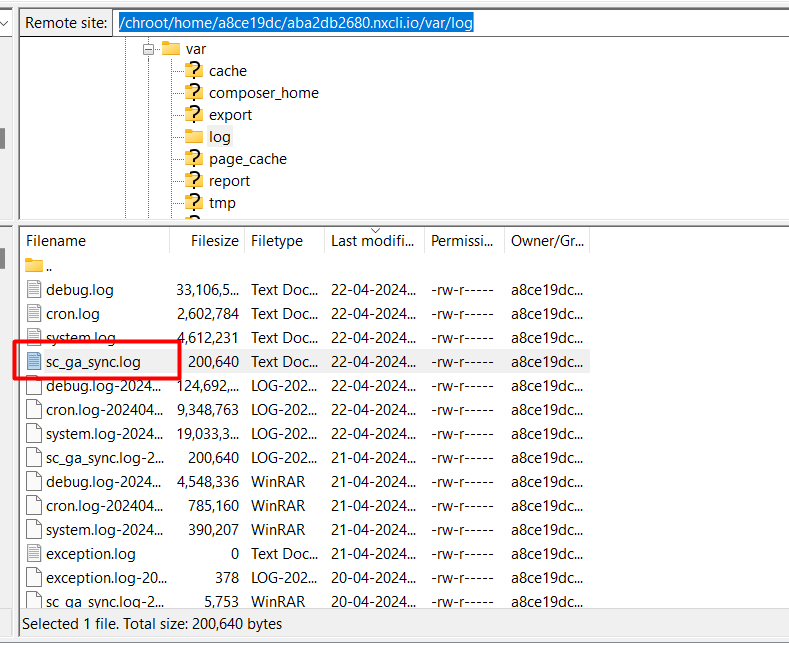
After downloading/viewing the file, user can check the logs. This file contains details of each synced transaction alongwith the order data that was sent, please refer to the image below:-
Google Analytics 4 Real Time Reports
Go to your Google Analytics 4 Property then from left menu click on reports:
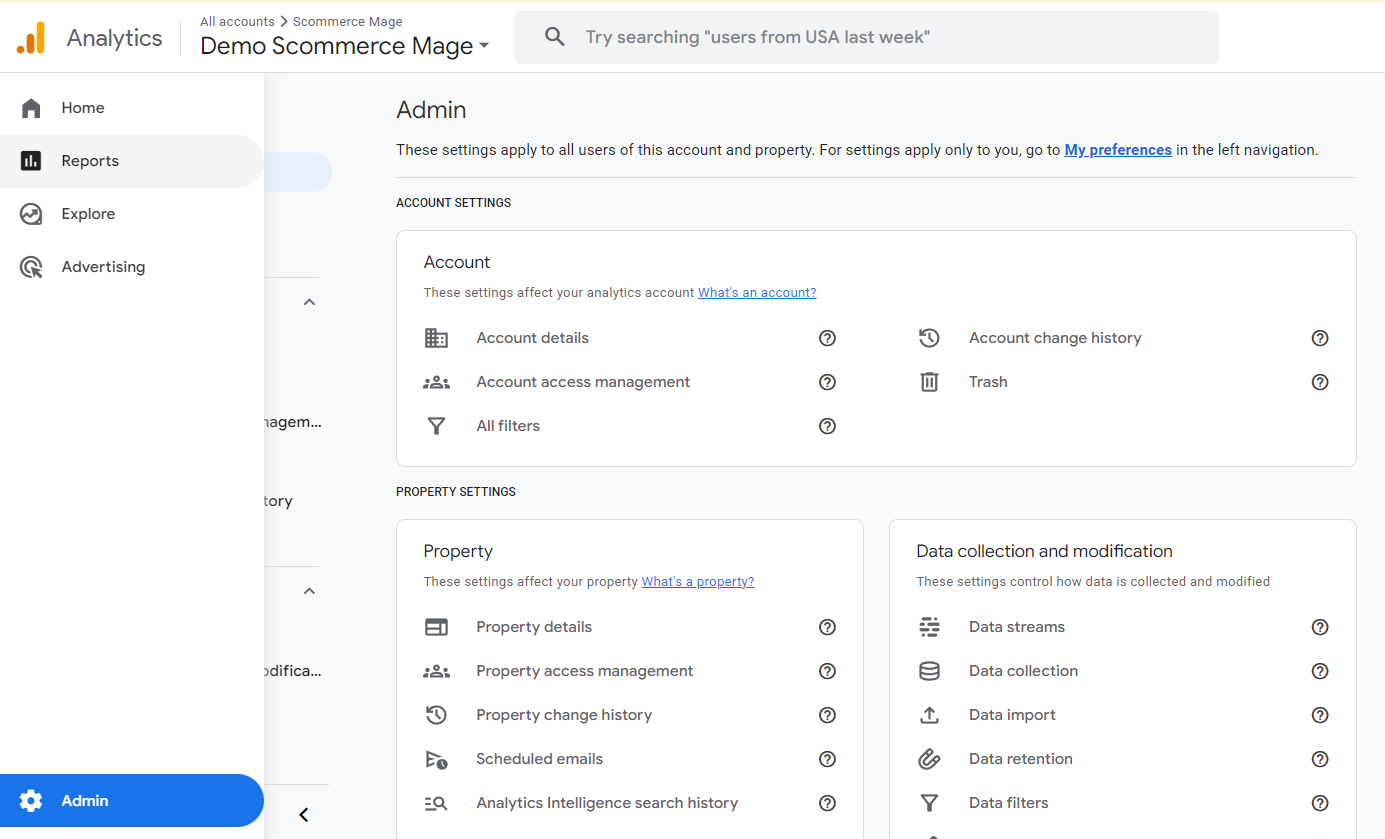
Next, select realtime from the left menu and under the event name column you can find the purchase event by clicking on that you can verify the transaction ID that was sent through the sync module.
Google Analytics 4 Custom Reports
You can create a transaction report in GA4 using custom reports to verify the transactions received. For more information, please Click Here
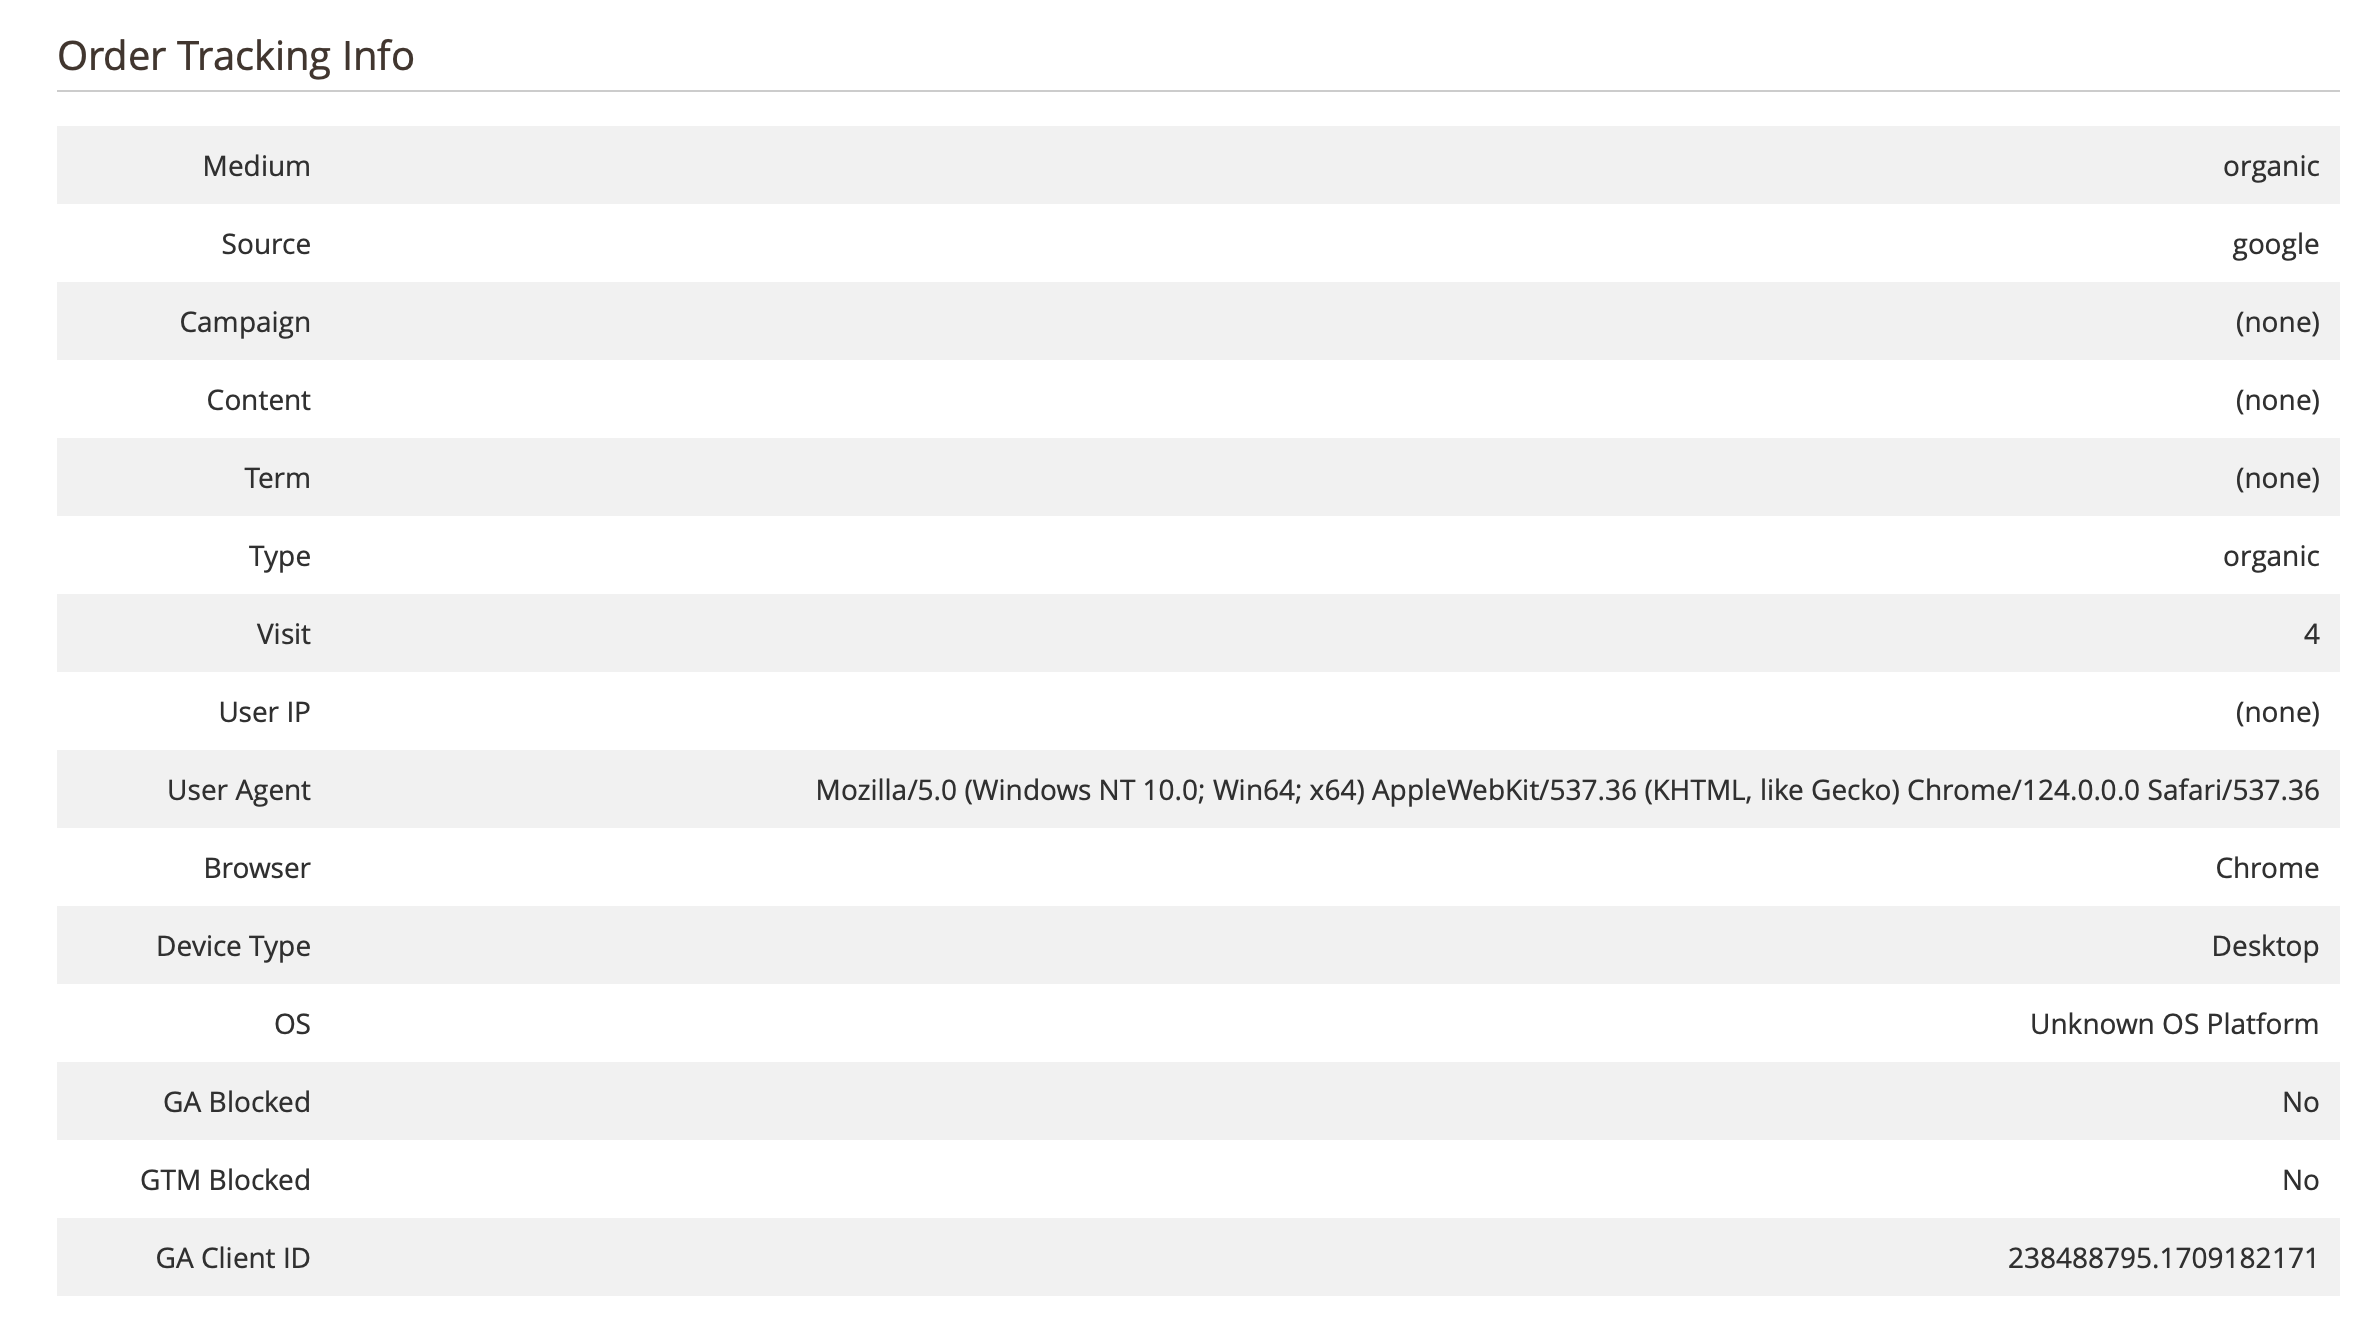
Order Tracking Information
The order tracking info is captured against each order which is later used to sync the transactions to GA4 attributing them to correct sessions and dates to improve report accuracy. The order tracking info can be viewed by going into Admin>Sales>Order>Edit any order. Please refer to the screengrab below.
Create Project in Google Developer Console for GA Reporting API
Please follow the steps below to create project in Google developer console for GA reporting API and to obtain "application name" and "security key JSON File": -
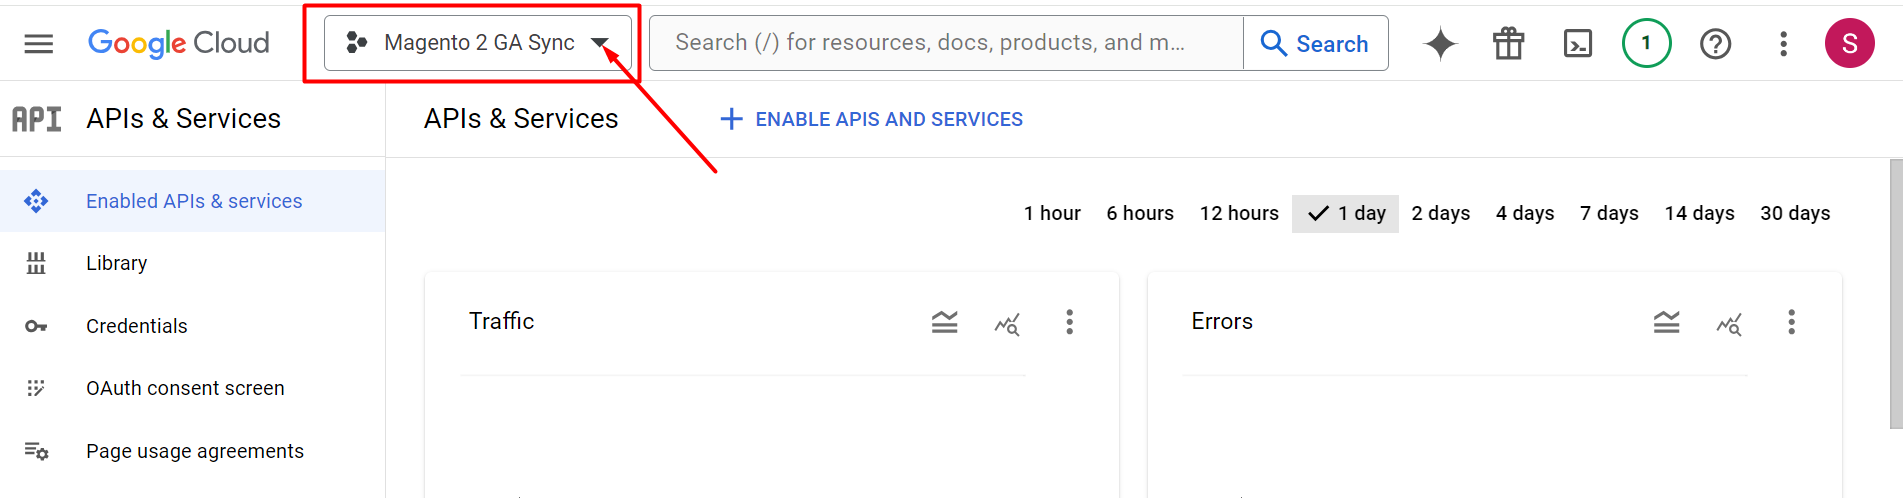
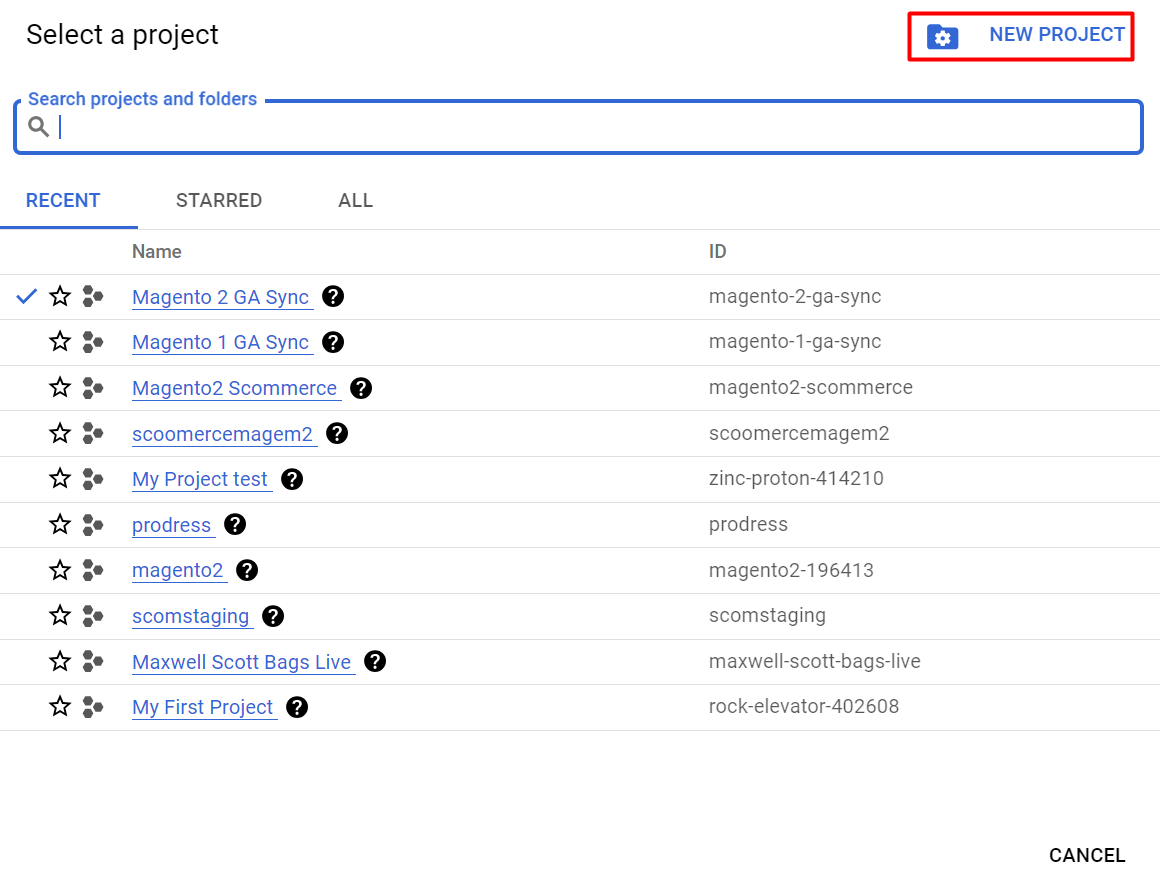
Go to https://console.developers.google.com/. Click on the dropdown on the left as shown in the image below and a popup will appear on your screen.
Click on New Project
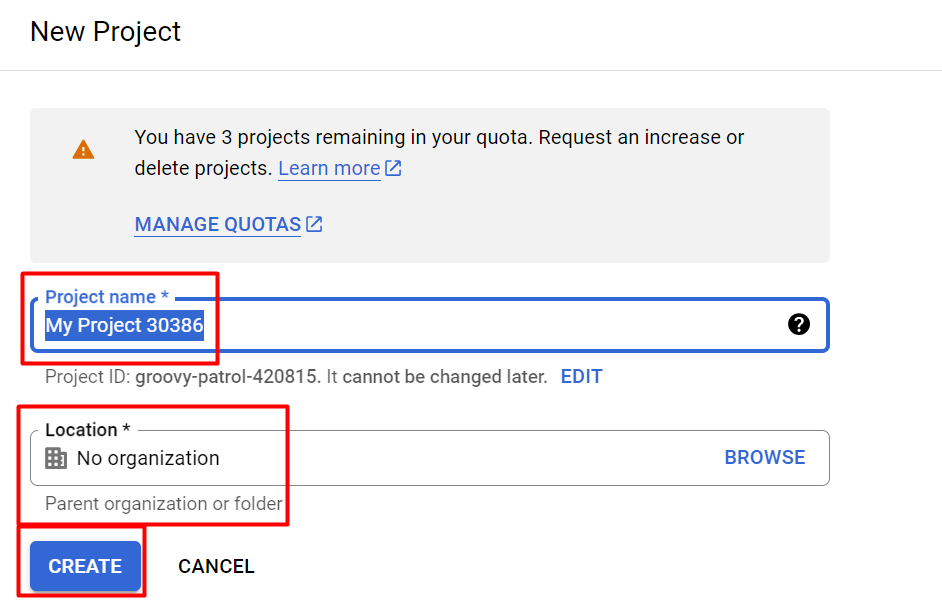
Enter your project name and Location then click on create.
Click on Enable APIS and SERVICES

In the next window search for Google Analytics Reporting API, this API gets used for GA4 along with Analytics Data API
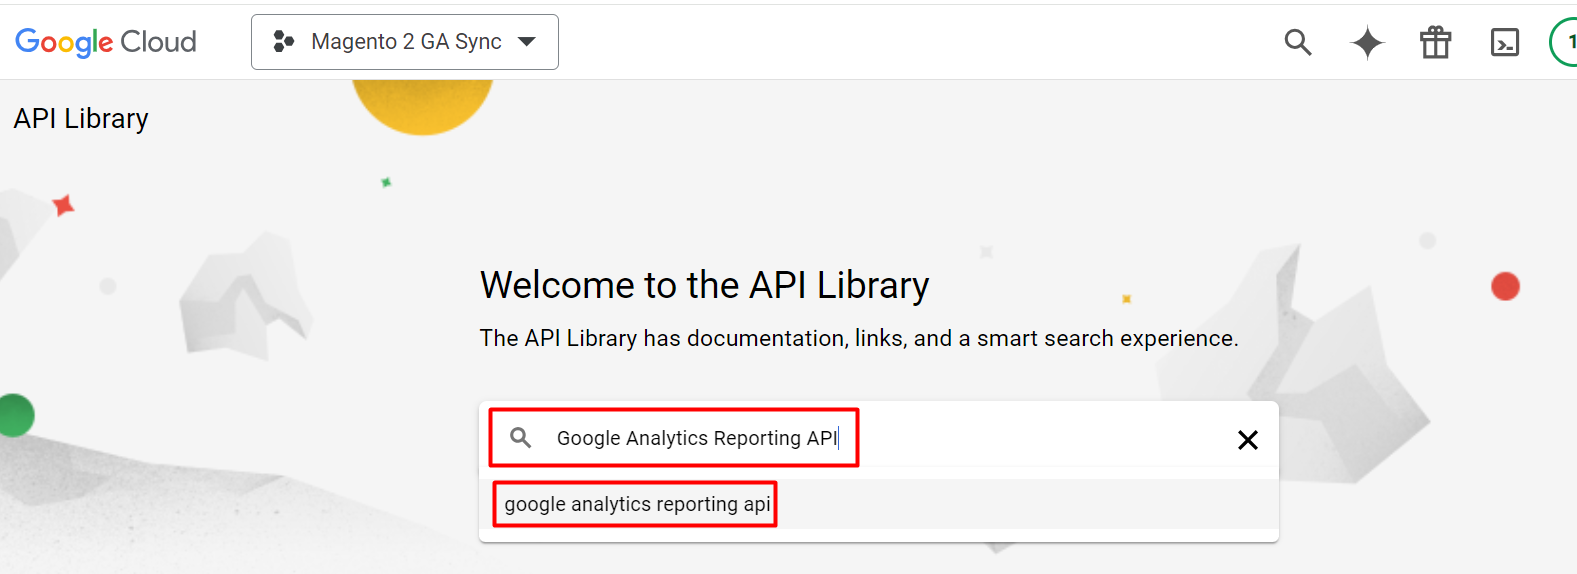
Click on Enable to enable the API
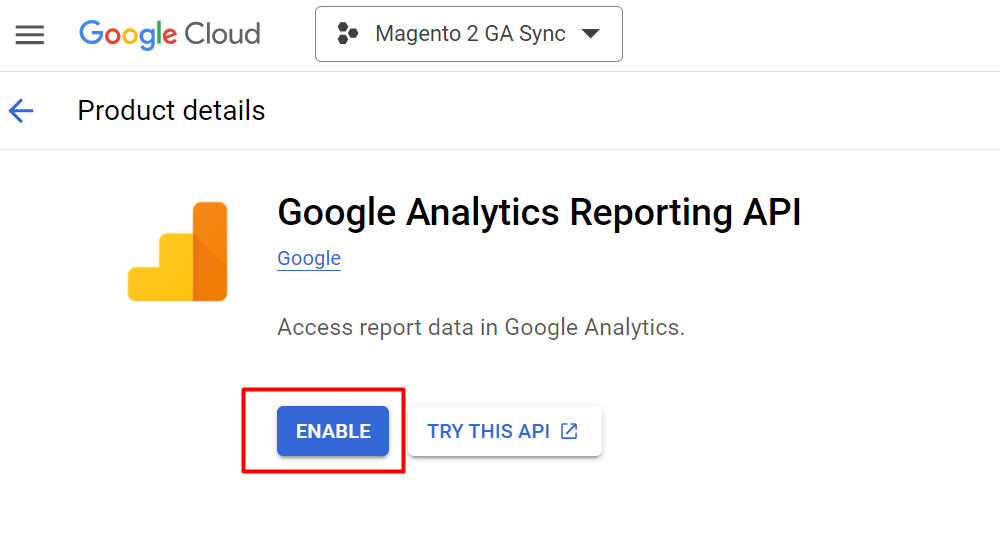
Similarly enable the below API's as well:-
- Google Analytics API (Used to access UA data)
- Google Analytics Data API (Used to access GA4 report Data) https://developers.google.com/analytics/devguides/reporting/data/v1?hl=en_US
Click on Credentials from the left window then click on Create Credentials and choose service account.
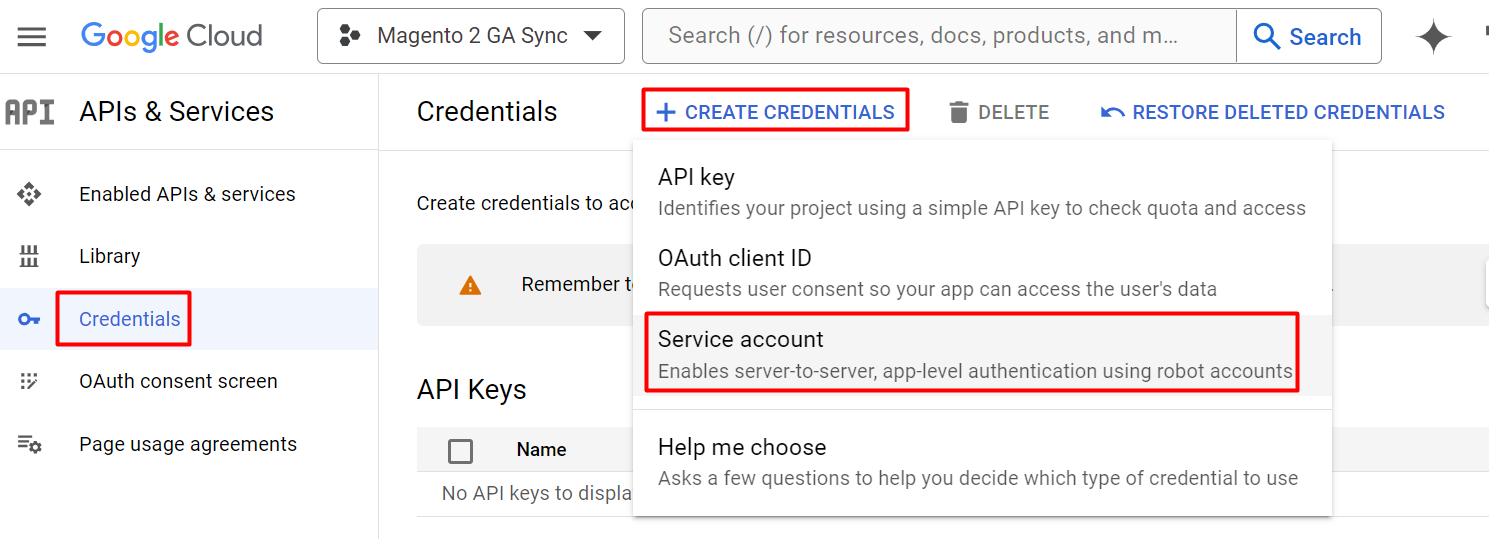
In the next window, fill in your service account name and description then click on Create. An email will be automatically created as per your name. We need to add this email in google analytics. We will do it in the steps down below. Your service name will be your Application Name that you will enter in the configuration.
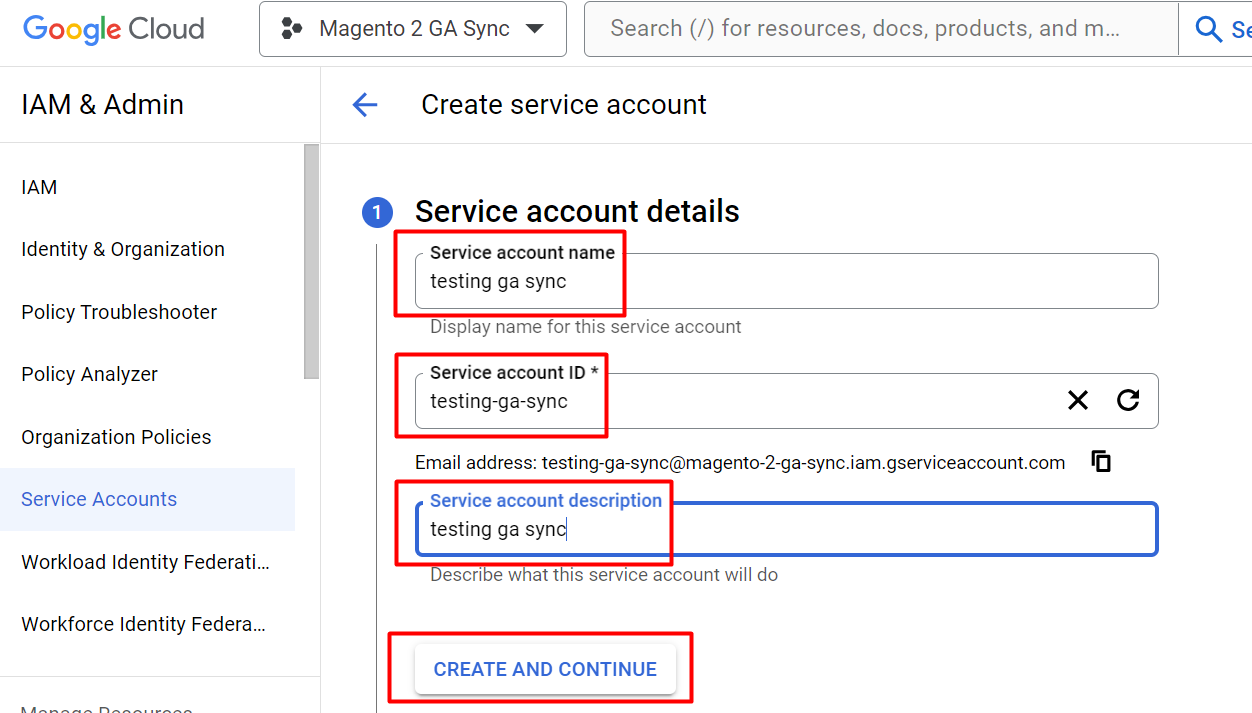
Click on continue without selecting a role.
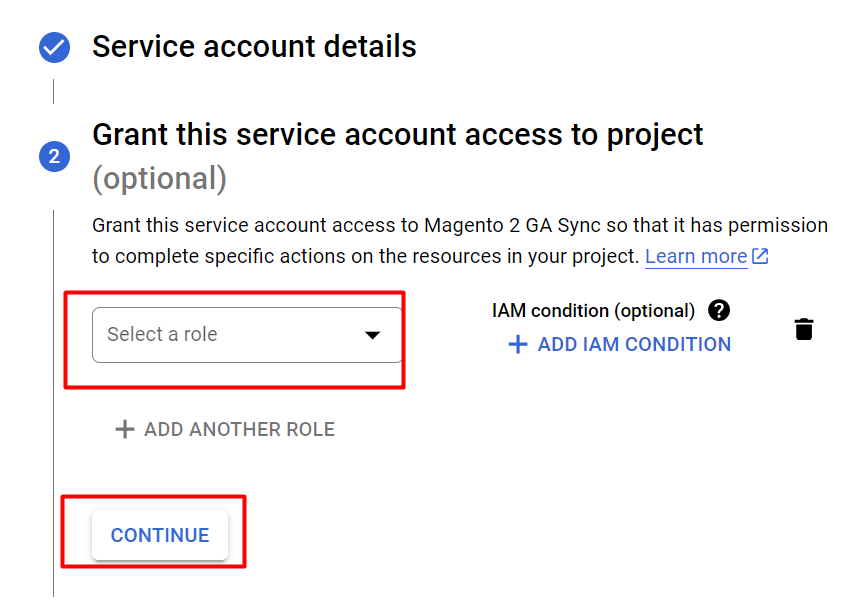
- Click Continue again without any selection
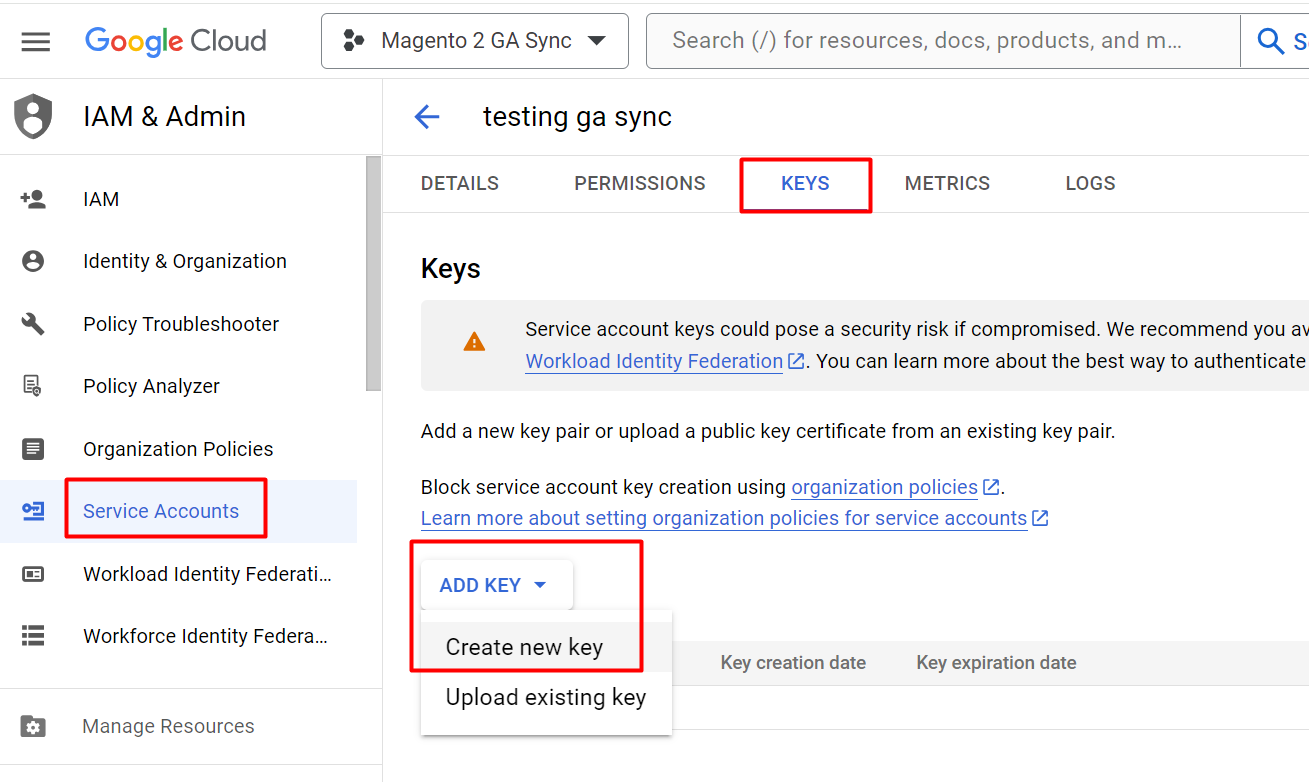
- Click on Create Key from the image above and select json your key file will be downloaded. Place this key file in the VAR directory of your website. Copy the exact name with extension ".json" and input it into security Key in the configuration.
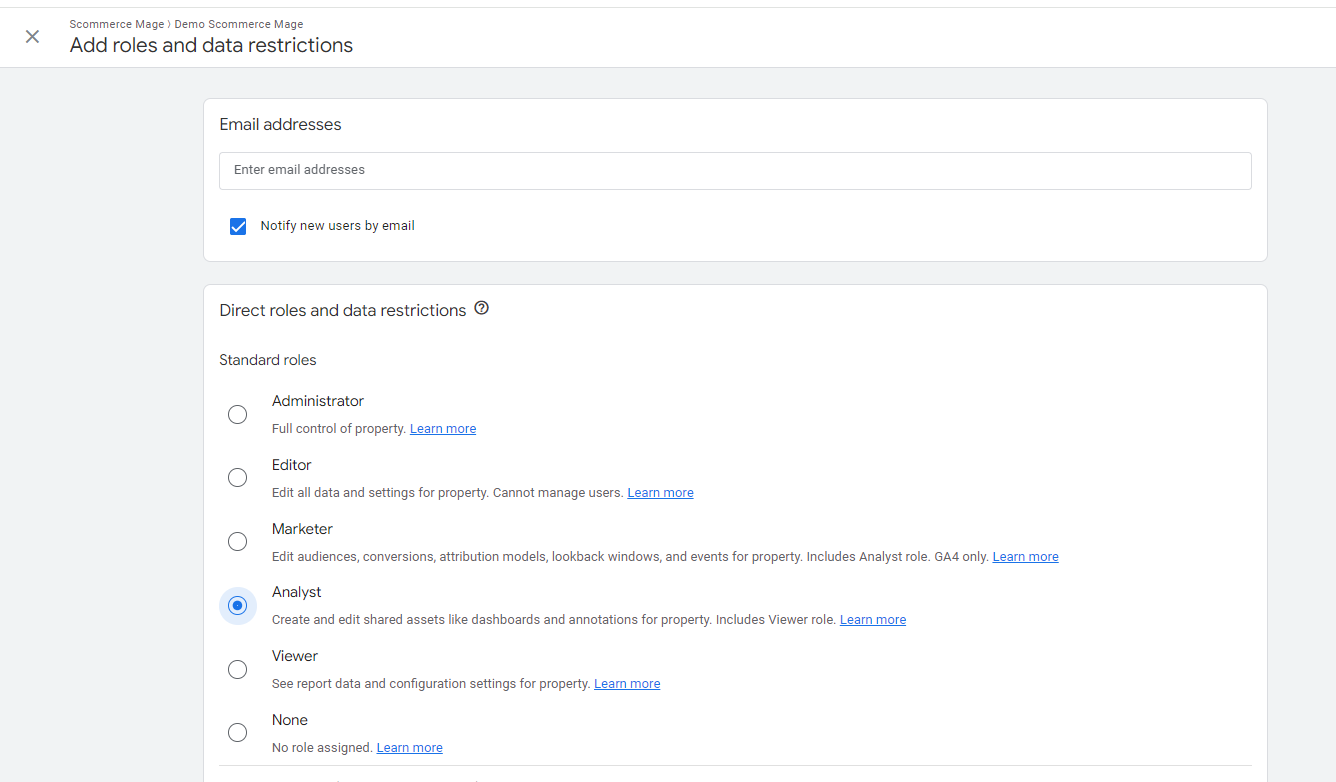
- Login to your GA4 account. Go to Admin -> Property -> Property Access Management. Add the email we got in the steps above with "Viewer" or "Analyst" permissions.
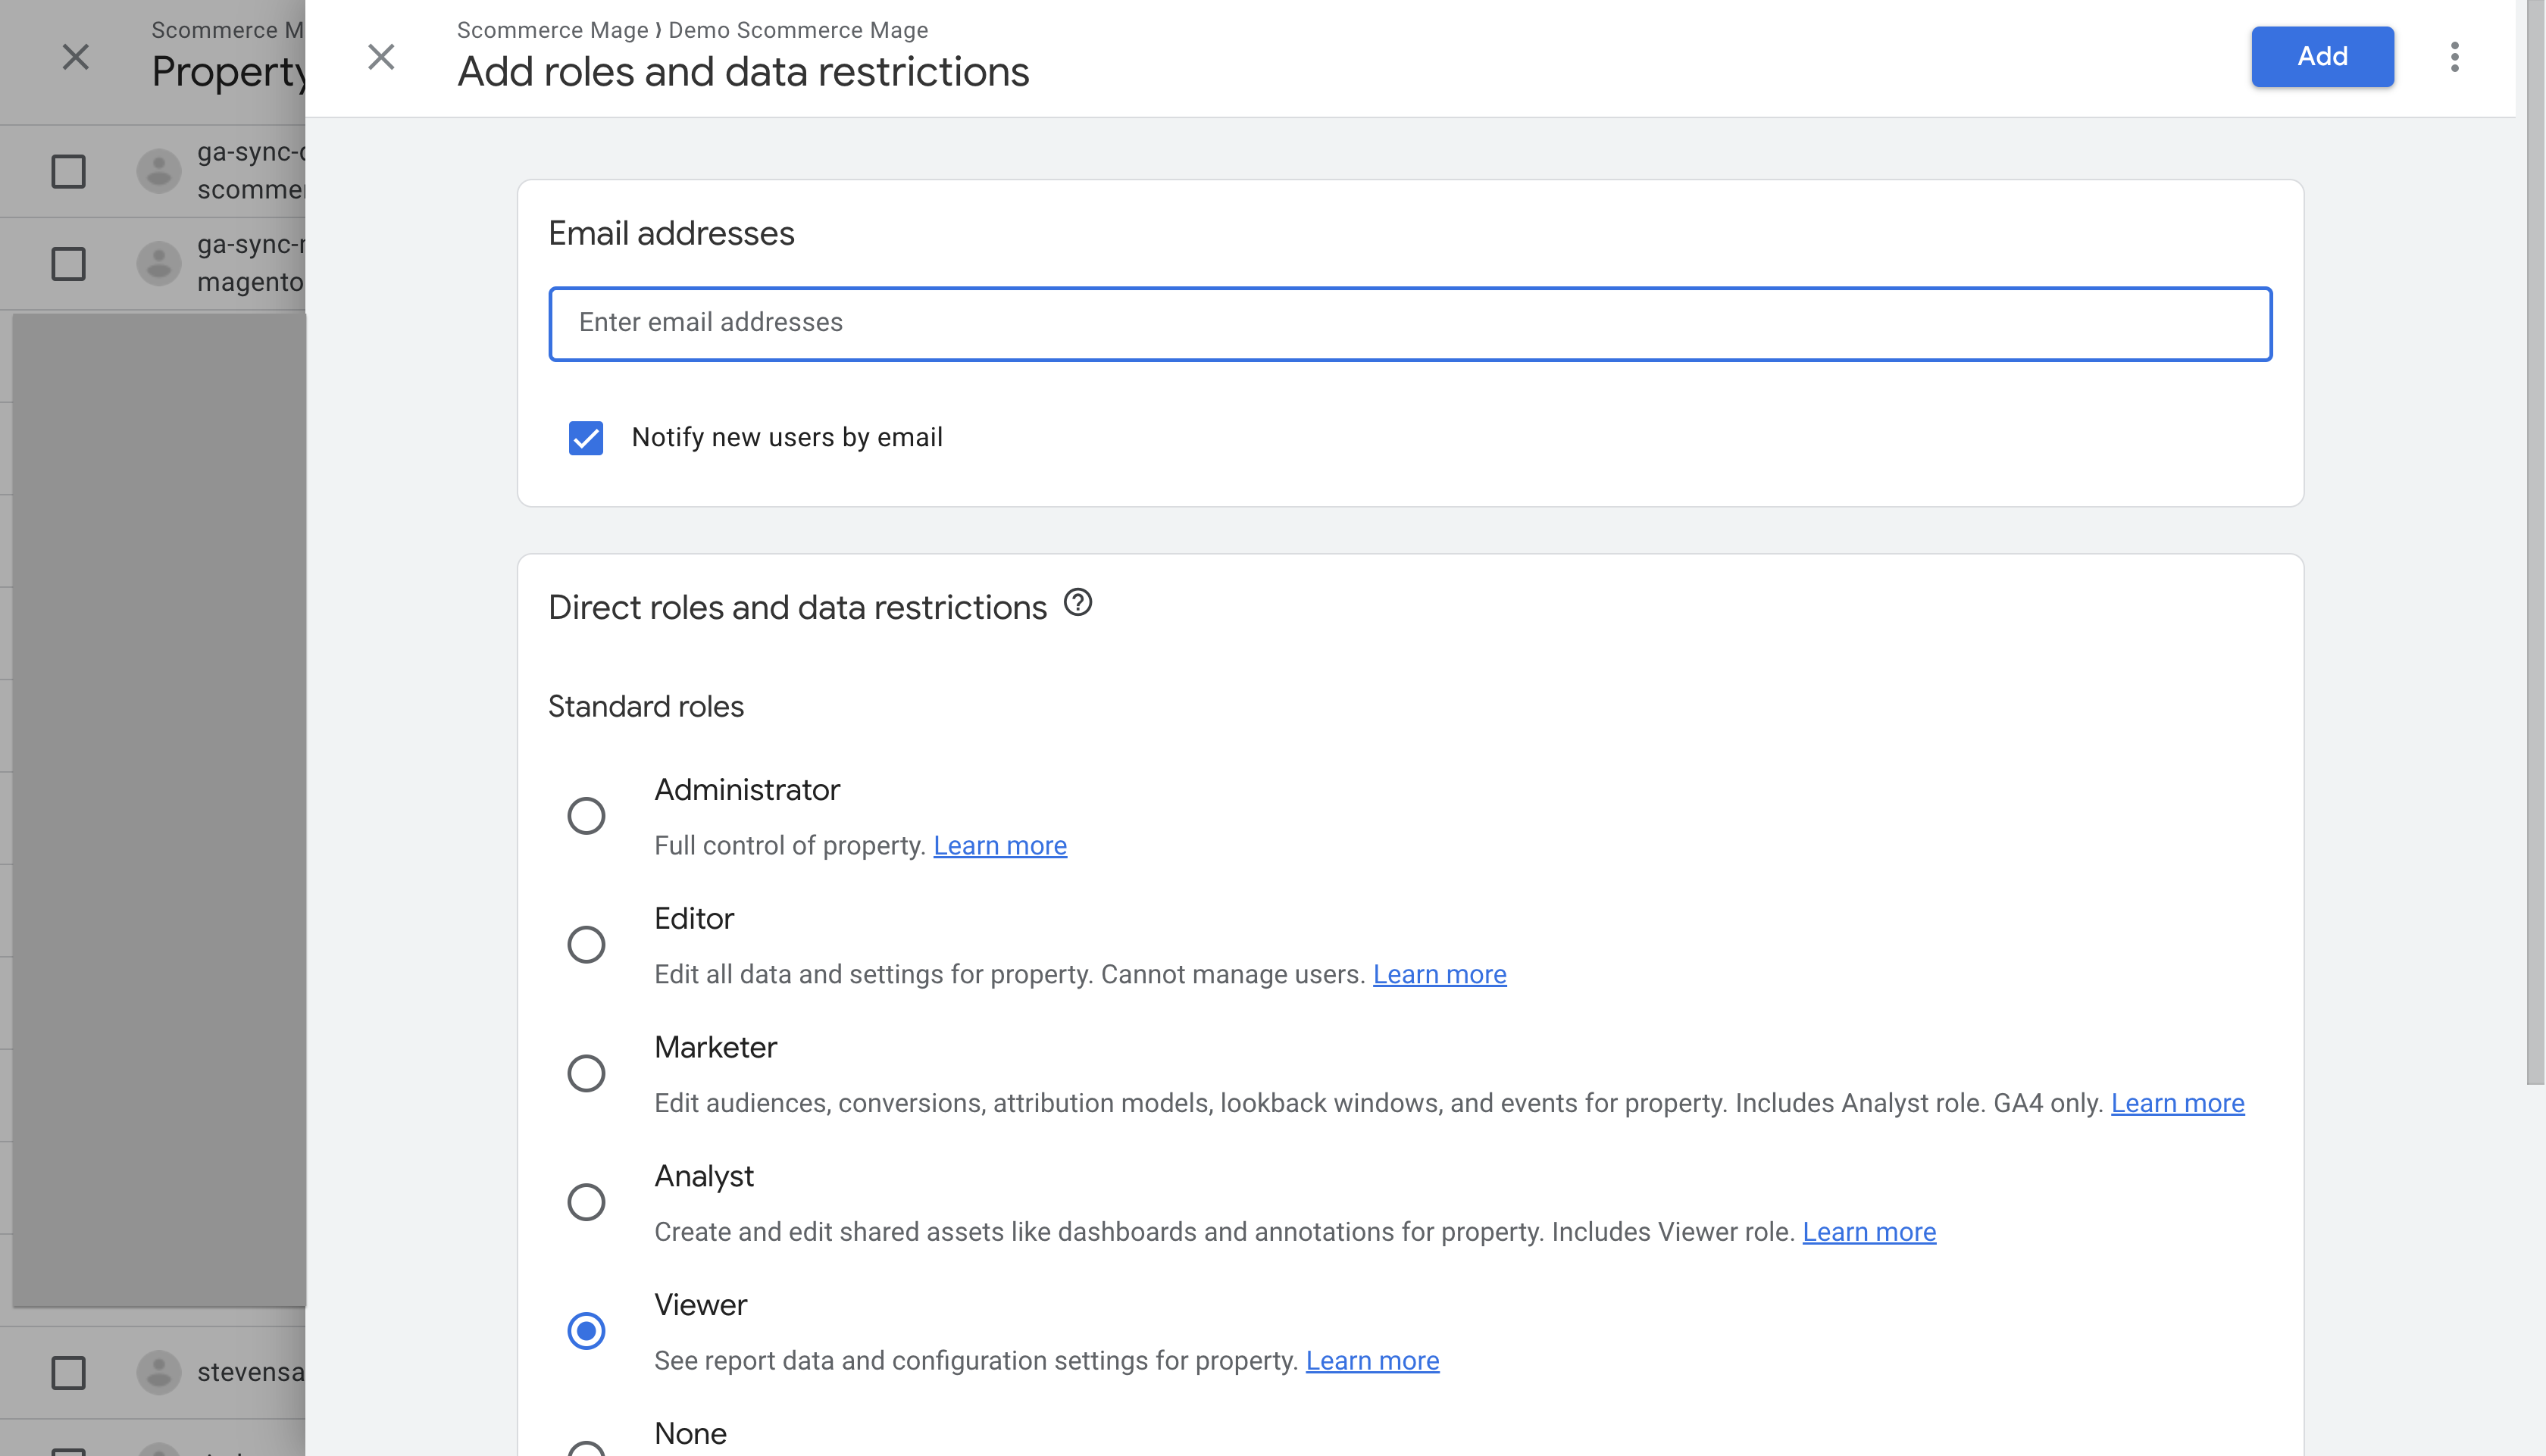
- Login to your Universal Analytics account. Go to Admin > User Management. Add the email we got in the steps above with "Viewer" or "Analyst" permissions.
Getting View ID (Universal Analytics)
Login to Your Google Analytics account and go to Admin>View Settings. You will be able to see your view Id there. You need to input this into the configuration as well.
Getting Property ID (GA4)
Command to run the Synch Manually
php bin/magento scommerce:analyticssync:synchronize
If you have a question related to this extension please check out our FAQ Section first. If you can't find the answer you are looking for then please contact support@scommerce-mage.com.
Magento 2 Google Global Site Tag (gtag.js) with GA4(Google Analytics 4) Enabled
Installation and User Guide for Magento 2 Global Site Tag (gtag.js) Extension
Table of Contents
- Installation
- Installation via app/code
- Installation via Composer
- Installation via Composer( (Hyvä Theme):
- Configuration Settings for Tracking Base
- General Settings
- Checkout Behaviour
- Configuration Settings for Global Site Tag (gtag.js)
- General Settings
- Set up Google Analytics 4
- Set Up Cross Domain Measurement
- Front-end Site view
- Home Page with Tags
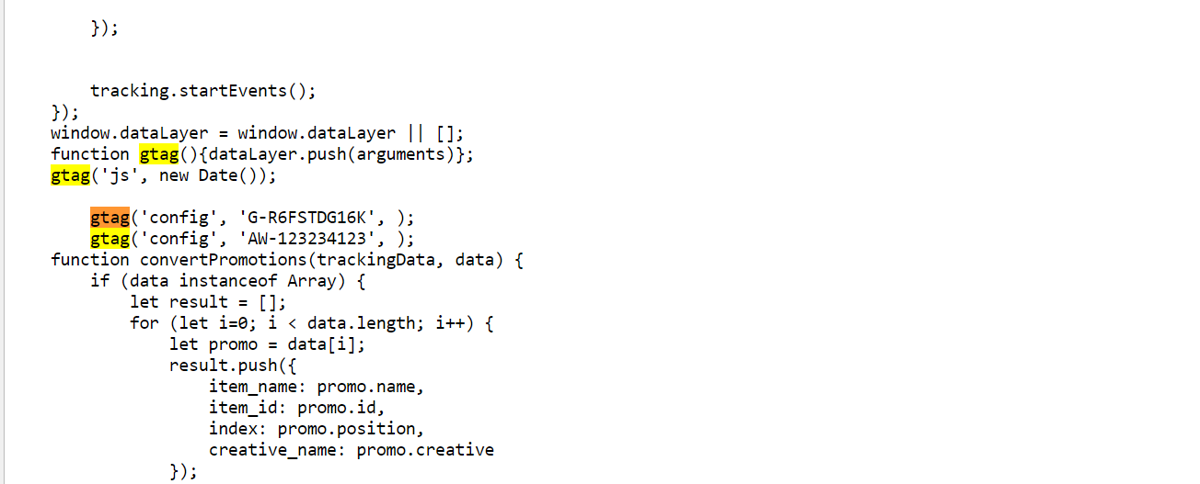
- Gtag.js Code
- Gtag.js Brand Name
Installation
- Installation via app/code: Upload the content of the module to your root folder. This will not overwrite the existing Magento folder or files, only the new contents will be added. After the successful upload of the package, run below commands on Magento 2 root directory.
php bin/magento setup:upgrade
php bin/magento setup:di:compile
php bin/magento setup:static-content:deploy- Installation via Composer: Please follow the guide provided in the below link to complete the installation via composer.
- Installation via Composer(Hyvä Theme): Go to My Account section then go to Composer Instructions. Run the composer config commands mentioned on the page then run the below command to install the module on hyva theme.
composer require hyva-themes/magento2-scommerce-gtagConfiguration Settings for Tracking Base
Go to Admin > Stores > Configuration > Scommerce Configuration > Tracking Base
General Settings
- Enabled – Select "Yes" or "No" to enable or disable the module.
- Enable Enhanced Ecommerce – Select 'Yes' to enable this module. Please make sure this feature is enabled in Google Analytics first before enabling in Magento2.
- Product ID Attribute – Select the attribute which you have submitted in your Google base feed. For e.g. SKU
- Brand Attribute – Please select brand attribute, if you have one otherwise put your brand name in the below input box.
- Use Base Currency - Set 'Yes' if you want to send base order data and 'No' to send store order data to Google. Set this 'No' only when you have multicurrency and you want to send different currency data to Google.

- Product Price Include Tax- Set "Yes" then VAT will be included in the price.
- Order Total Include VAT – Set "Yes" then VAT will be included in order total.
- Always Send Parent SKU – Set "Yes" then it always send parent sku instead of child sku to GA during checkout.
- Category Attribute- Please select category attribute if you have one otherwise put your brand name in the below input box. Attribute should be available for product listing 'Storefront Properties -> Used in Product Listing = Yes'
- Is Category ID- Set "Yes" if "Category Attribute" is ID of the category, "No" if it is plain value
- Send Parent Category – Set "Yes" to send the category path and Set "No" to send the category name only.
- Default List- Enter the default list name if the product impression is not found
- Send Admin Orders to Google– Select "Yes" to track orders created in admin
- Source- Please add the Campaign Source for backend orders.
- Medium- Please define the Campaign Medium for Backend Orders.
- Send Product Impression on Scroll - Enable this feature when you have loads of products on product listing / category pages.
- Category Ajax Enabled – Enable this feature if you have third party ajax enabled extension on your category page.
Checkout Behaviour
- Add Carrier Title:- Use this to add carrier title to the shipping step. Set "Yes" to send carrier_code::carrier_title. Ex. flatrate::Flat Rate
- Add Payment Title :- Use this to add payment method title to payment step. Set "Yes" to send method::title. Ex. checkmo::Check / Money Order
- Steps Configuration:- define checkout steps
- Step:- number of step
- Selector:- add the selector for the step. Basic selector could be '#customer-email' this is equals to '#customer-email/change' and will send customer email itself
- Type:- choose the step type from the dropdown
Configuration Settings for Global Site Tag (gtag.js)
Go to Admin > Stores > Configuration > Scommerce Configuration > Global Site Tag (gtag.js)
General Settings
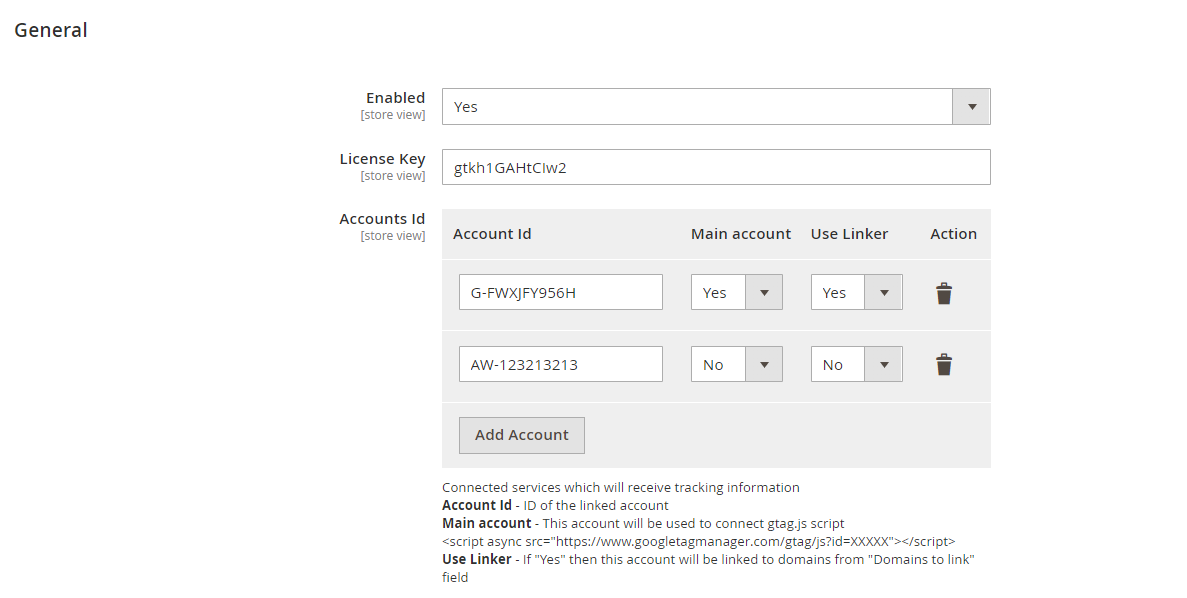
- Enabled – Select "Yes" or "No" to enable or disable the module.
- License Key – Please add the license for the extension which is provided in the order confirmation email. Please note license keys are site URL specific. If you require license keys for dev/staging sites then please email us at support@scommerce-mage.com.
- Accounts ID – You can add multiple account id, it can be Analytics, Adwords.
- Main Account – Select 'Yes' to set your main analytics id as an account id. This account will be used to connect gtag.js.
- Use Linker – If this is enabled (set to 'Yes') then this account will be linked to domains from "Domains to link" field, which is specified below
- Action – You can delete your account\, if required.
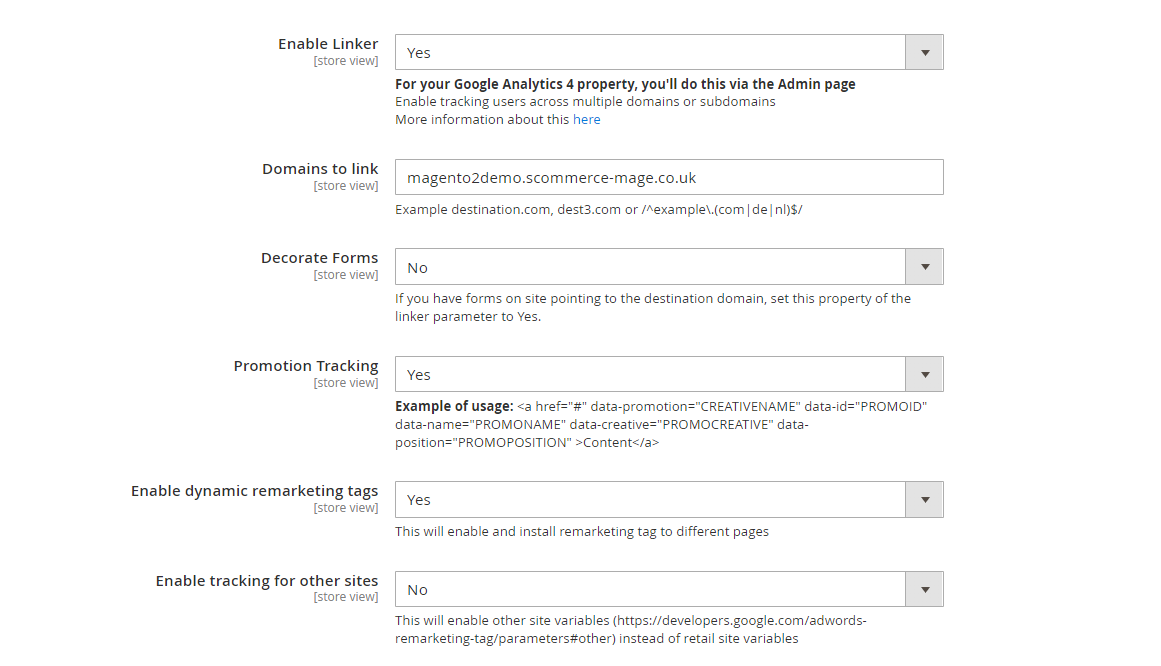
- Enable Linker - If this is enabled then you can set linker properties, in domain configurations which is specified below e.g. Domain to link, Decorate Forms. This setting is mainly for Cross domain mesurement, so to use this you must first enable it in Google Analytics 4 Admin.
- Domains to Link - Enter the domains that you want to link. Example destination.com, dest3.com or /^example.(com|de|nl)$/.
- Decorate Forms - If you have forms on site pointing to the destination domain, set this property of the linker parameter to Yes
- Promotion Tracking – Here is the format to set up the promotion tracking: <a href="#" data-promotion="CREATIVENAME" data-id="PROMOID" data-name="PROMONAME" data-creative="PROMOCREATIVE" data-position="PROMOPOSITION"> Content </a>
- Enable Dynamic Remarketing Tag – If set to 'Yes', then this will enable and install remarketing tag to different pages.
- Enable Tracking for Other Sites – This will enable other sites variables (https://support.google.com/tagmanager/answer/6106009?hl=en-GB#zippy=%2Ccustom) instead of retail site variables.
Set up Google Analytics 4
- Go to Analytics and select the website on which you want to implement GA4.
- Once you are in universal analytics panel go into admin settings. Here you will notice an UPGRADE TO GA4 button, click on it. You will be walked with creating a new property. Follow along, once you are finished you will see the new GA4 view on your screen
Set Up Cross Domain Measurement
Step 1:- Go to Google Analytics 4 Admin>Data Streams>Select your stream>Configure Tag Settings >Configure Your Domains, here add your domains or subdomains that you want to track.
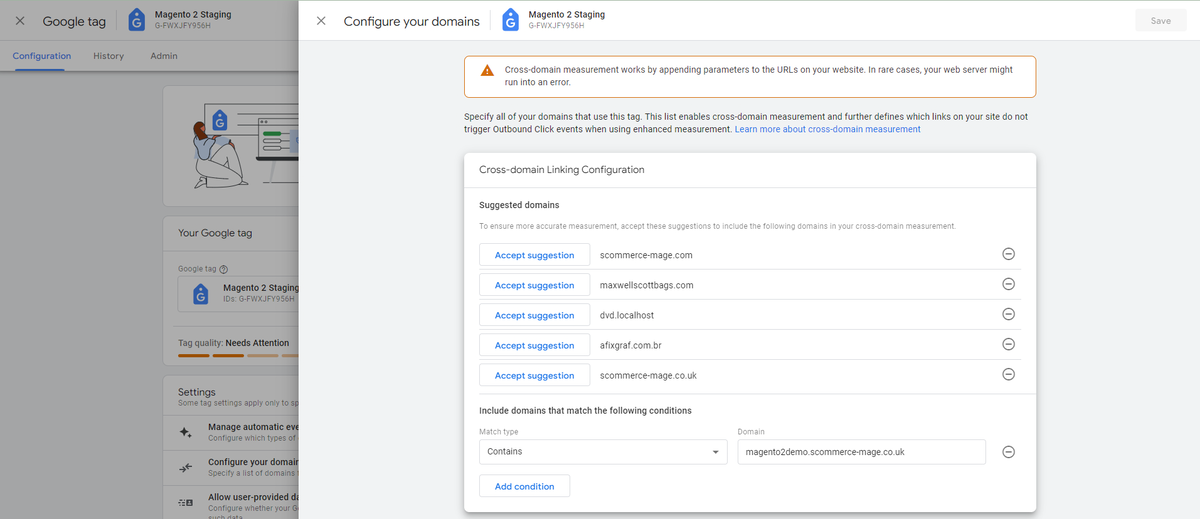
Step 2:- Add the all domains added above in the configuration "Domains to link" comma separated. Now if you have any links taking you from your main site to the linked site, _gl cookie is automatically apended to the URL that contains several information such as source website, source campaign etc hereby accomplishing the cross domain measurement. an example of such URL is as follows:
https://magento2demo.scommerce-mage.co.uk/?_gl=1fzl3bd_gaMTk3ODY0NTU1Mi4xNzIyODQzNDc3_ga_FWXJFY956H*MTcyMjg1OTYxOC40LjEuMTcyMjg1OTYzNS4wLjAuMA..Front-end Site view
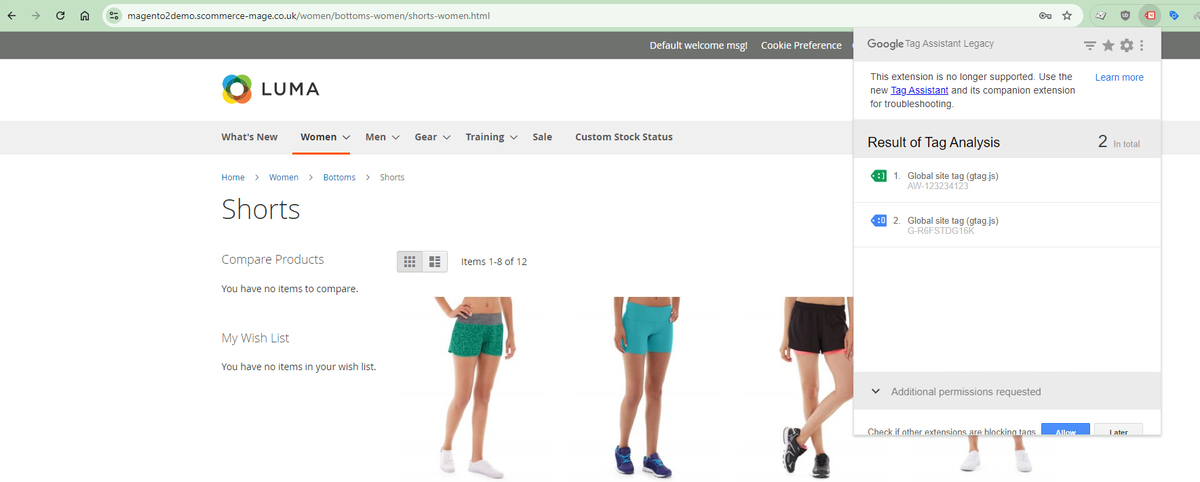
- Gtag.js Code - In the below image you can see the UA and AW tracking id's from Admin > Stores > Configuration > Scommerce Configuration > Global Site Tag (gtag.js) > Account Id > Click on "Add Account" – G-R6FSTDG16K, AW-123234123.
- Gtag.js Brand Name – You can add brand name from Admin > Stores > Configuration > Scommerce Configuration > Global Site Tag (gtag.js) > Brand Name – "TestScommerce".

If you have a question related to this extension please check out our FAQ Section first. If you can't find the answer you are looking for then please contact support@scommerce-mage.com.
Magento 2 Consent mode's setup guide
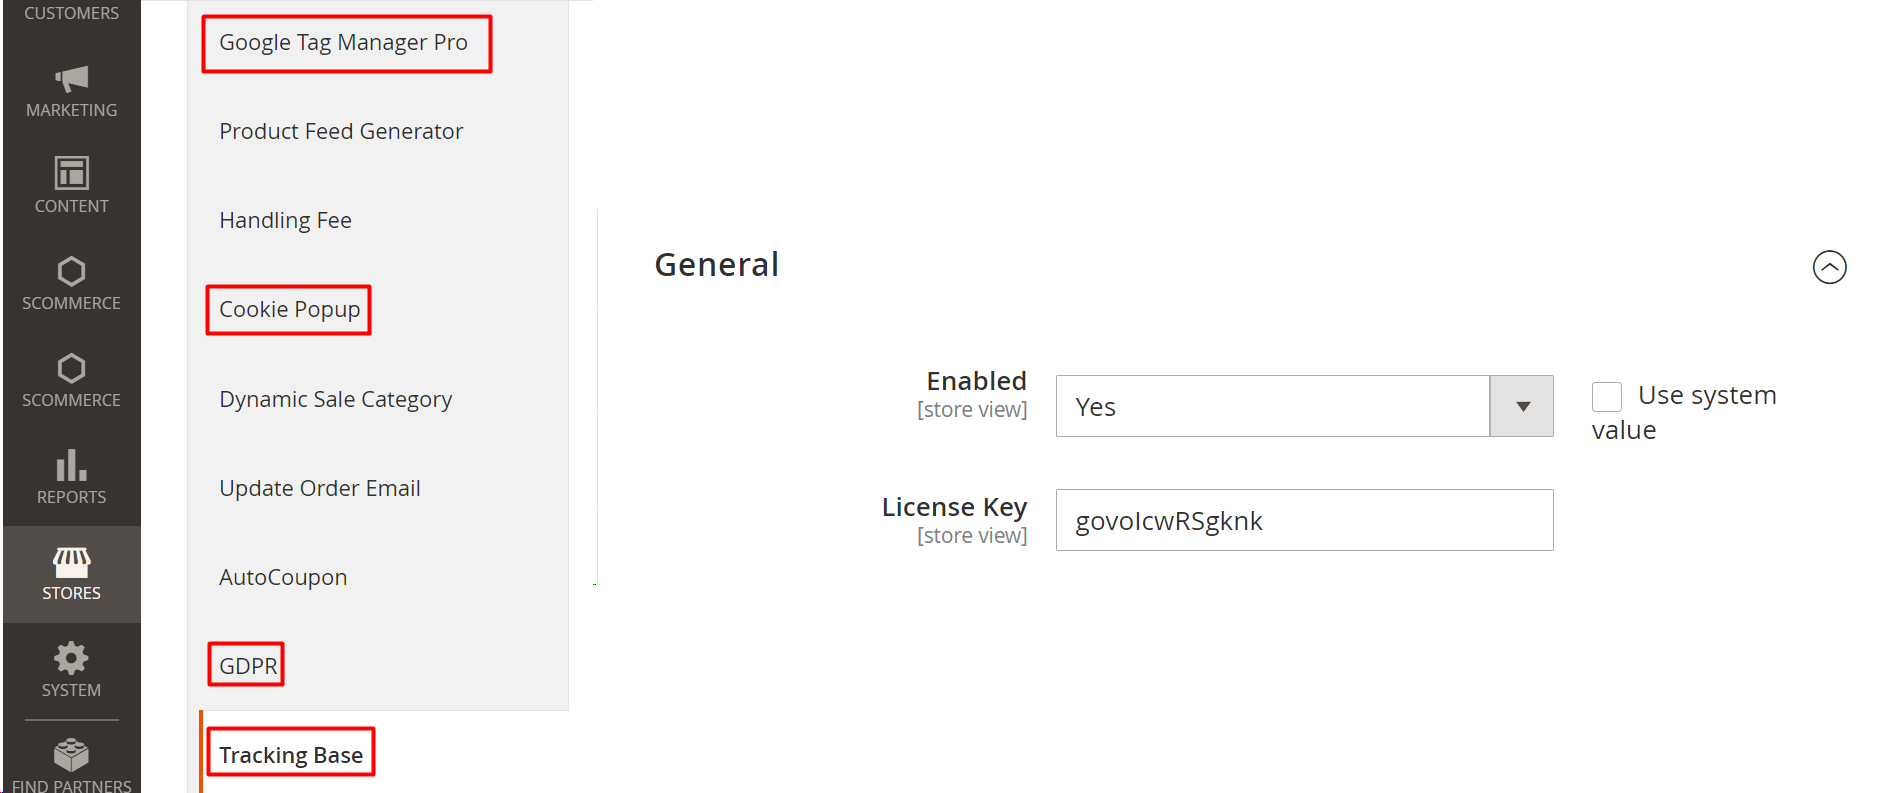
IN MAGENTO
- Once you have installed the modules “Google Tag Manager Pro Tracking”, “Tracking Base”, ”Cookie Popup” and “GDPR”, enable them and enter the correct license key.
%20(1).png)
- After that, go to “Customers” -> “Manage Cookie Choices” and click on “Add new Cookie Choice” to set up cookie choices in the Cookie Popup extension.
.png)

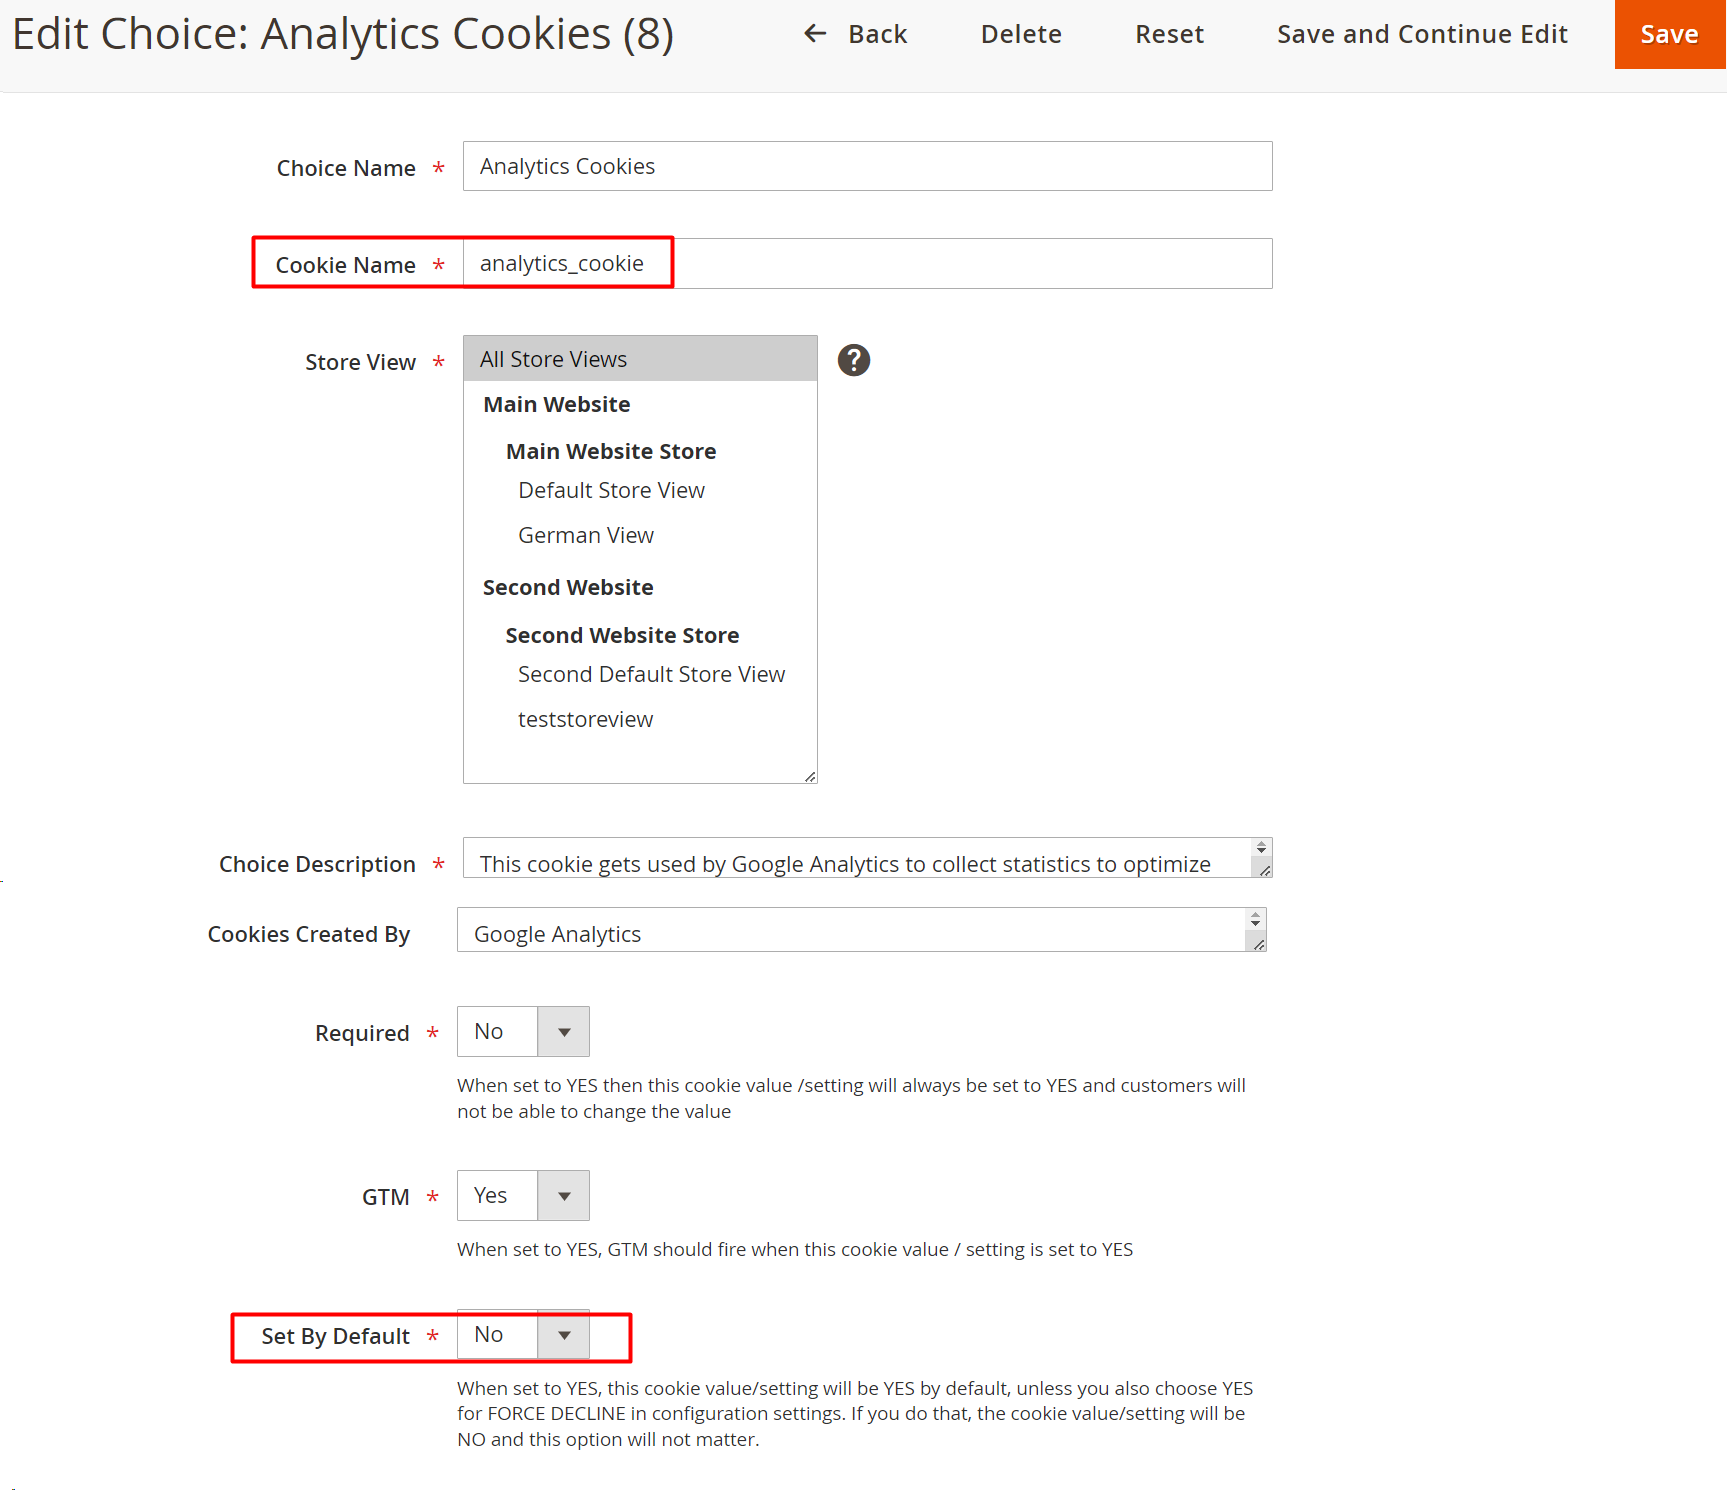
2a. You can do the setup of a new cookie as shown in the below image or you can create your own cookie/s. Please note that “Cookie Name” and “Set by default” are the most important fields as they would be used in the cookie mapping as described in the later steps.
.png)
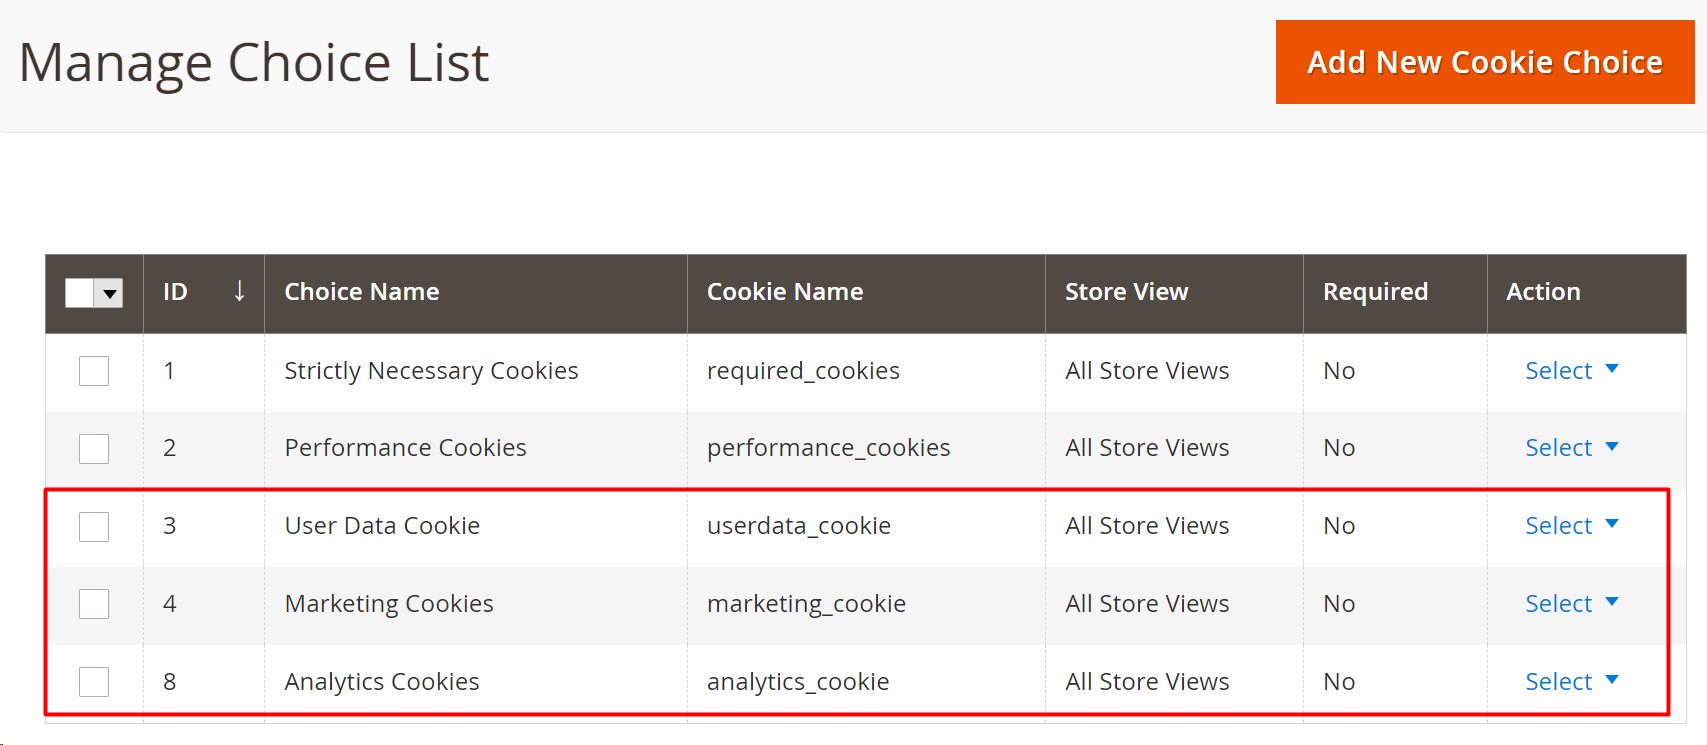
2b. Once you have created a cookie or multiple cookies, your setup should resemble the below image-
.png)
- Now, go to “System”->”Configuration”->“Tracking Base”. Scroll down and you would see the field “Enable Consent Mode”, enable it in order to enable the consent mode. Then, go to “Cookie mapping”, add the “Consent Param” that are given in the description”(personalization_storage, functionality_storage, security_storage are not mandatory for correct consent setup), set the “Default value” of the consent parameter as “granted” or “denied” based on the “Set by default” (step 2a) value of the cookie. Use the “Cookie Name” that you used while creating the cookies. For example- analytics_storage, if you want to do mapping of this consent param with Analytics cookie then in the field “Cookie name” add “analytics_cookie” because this cookie name was used when you were creating cookies (step 2a). While creating the cookie (in this case Analytics cookie), if the value of “Set by default” is set to “No” then while doing the mapping the “Default value” of the consent param (in this case analytics_storage) that is associated with that cookie should be set to “denied” or vice versa.
.png)
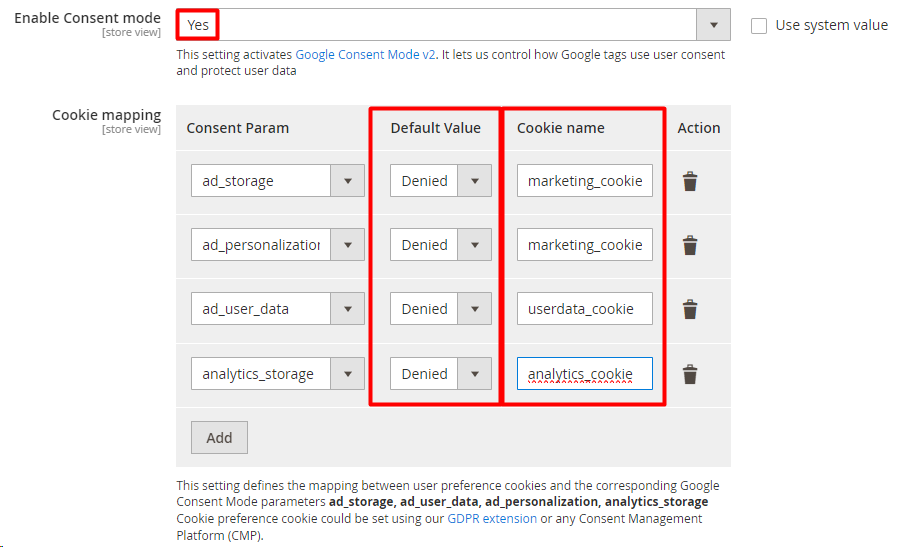
On Magento’s end consent mode setup is complete.
In GTM
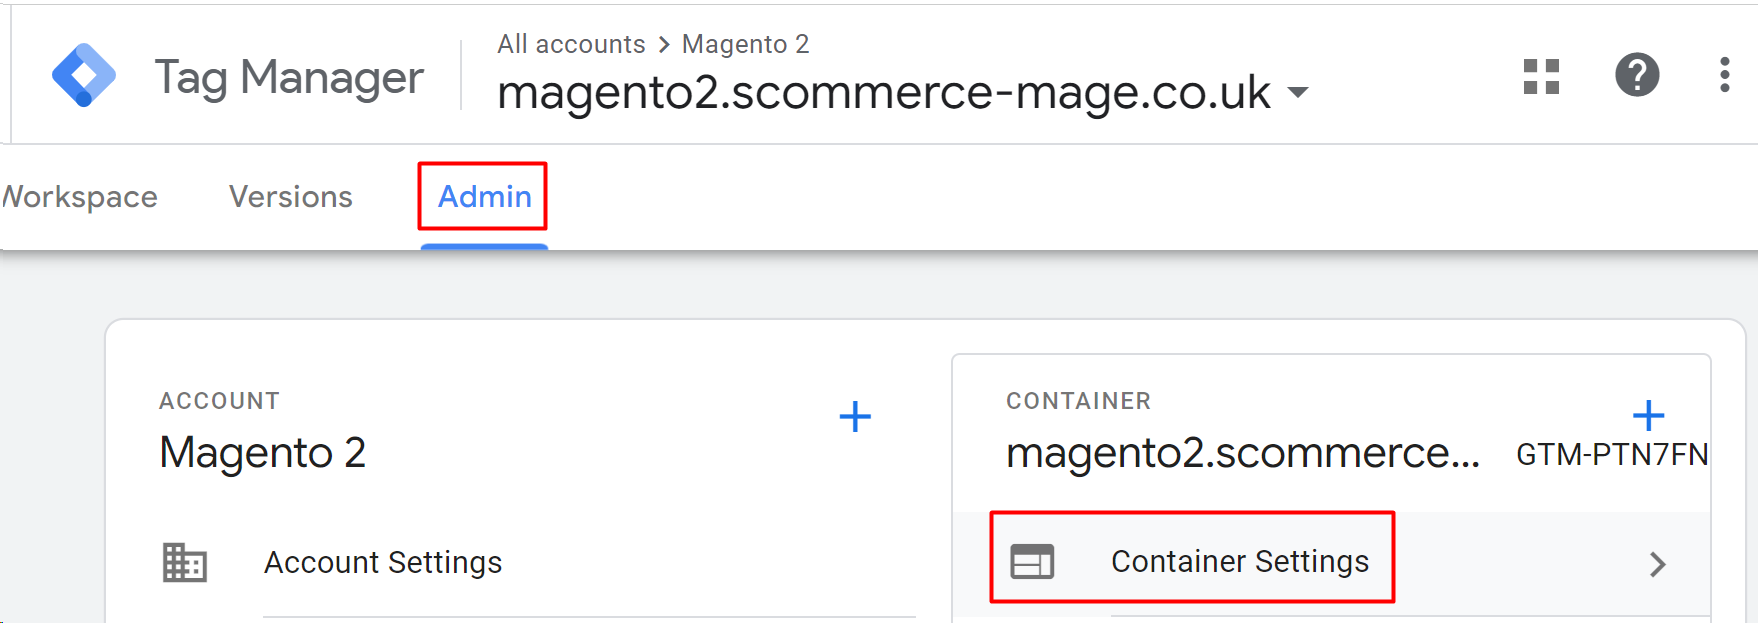
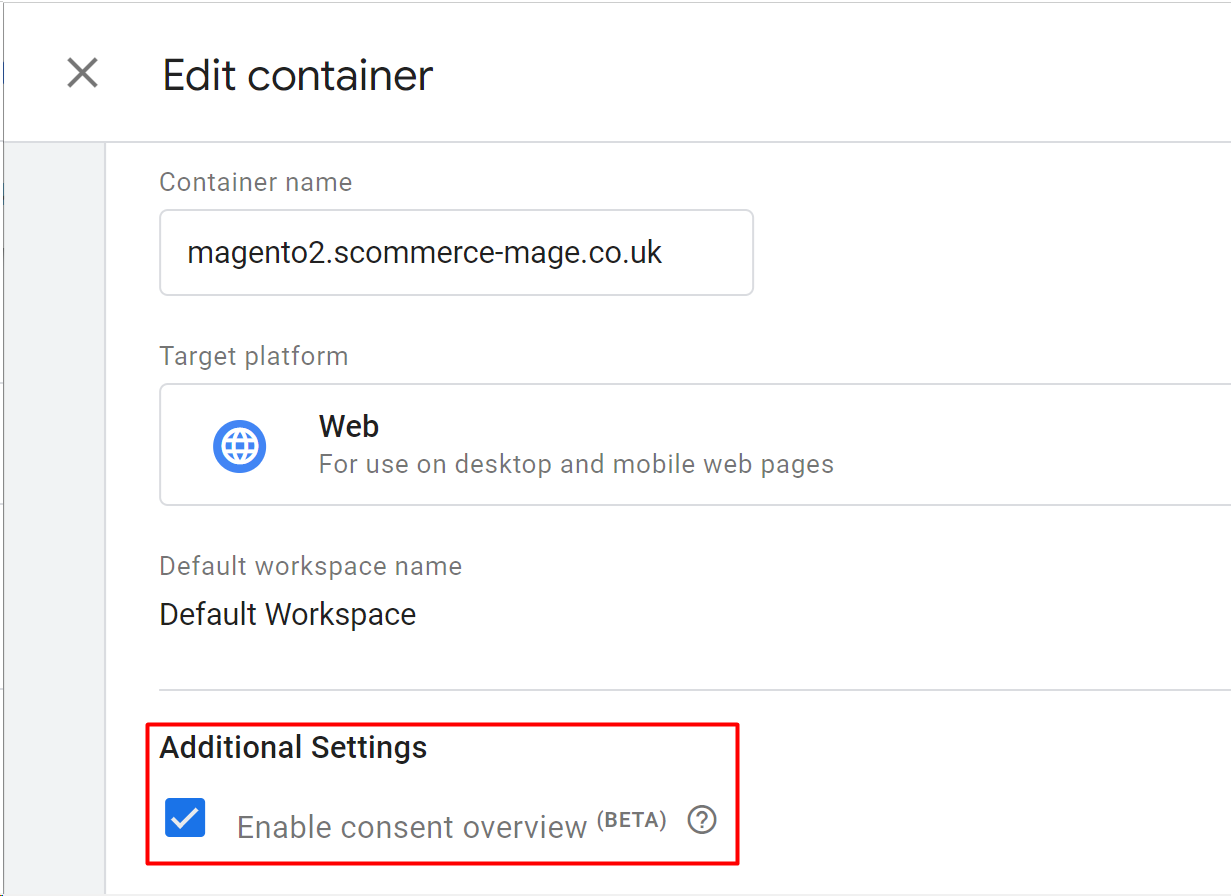
- Open the container that is connected with our GTM module, go to “Admin”->“Container Settings” and enable consent overview present in the additional settings.
.png)
%20(1).png)
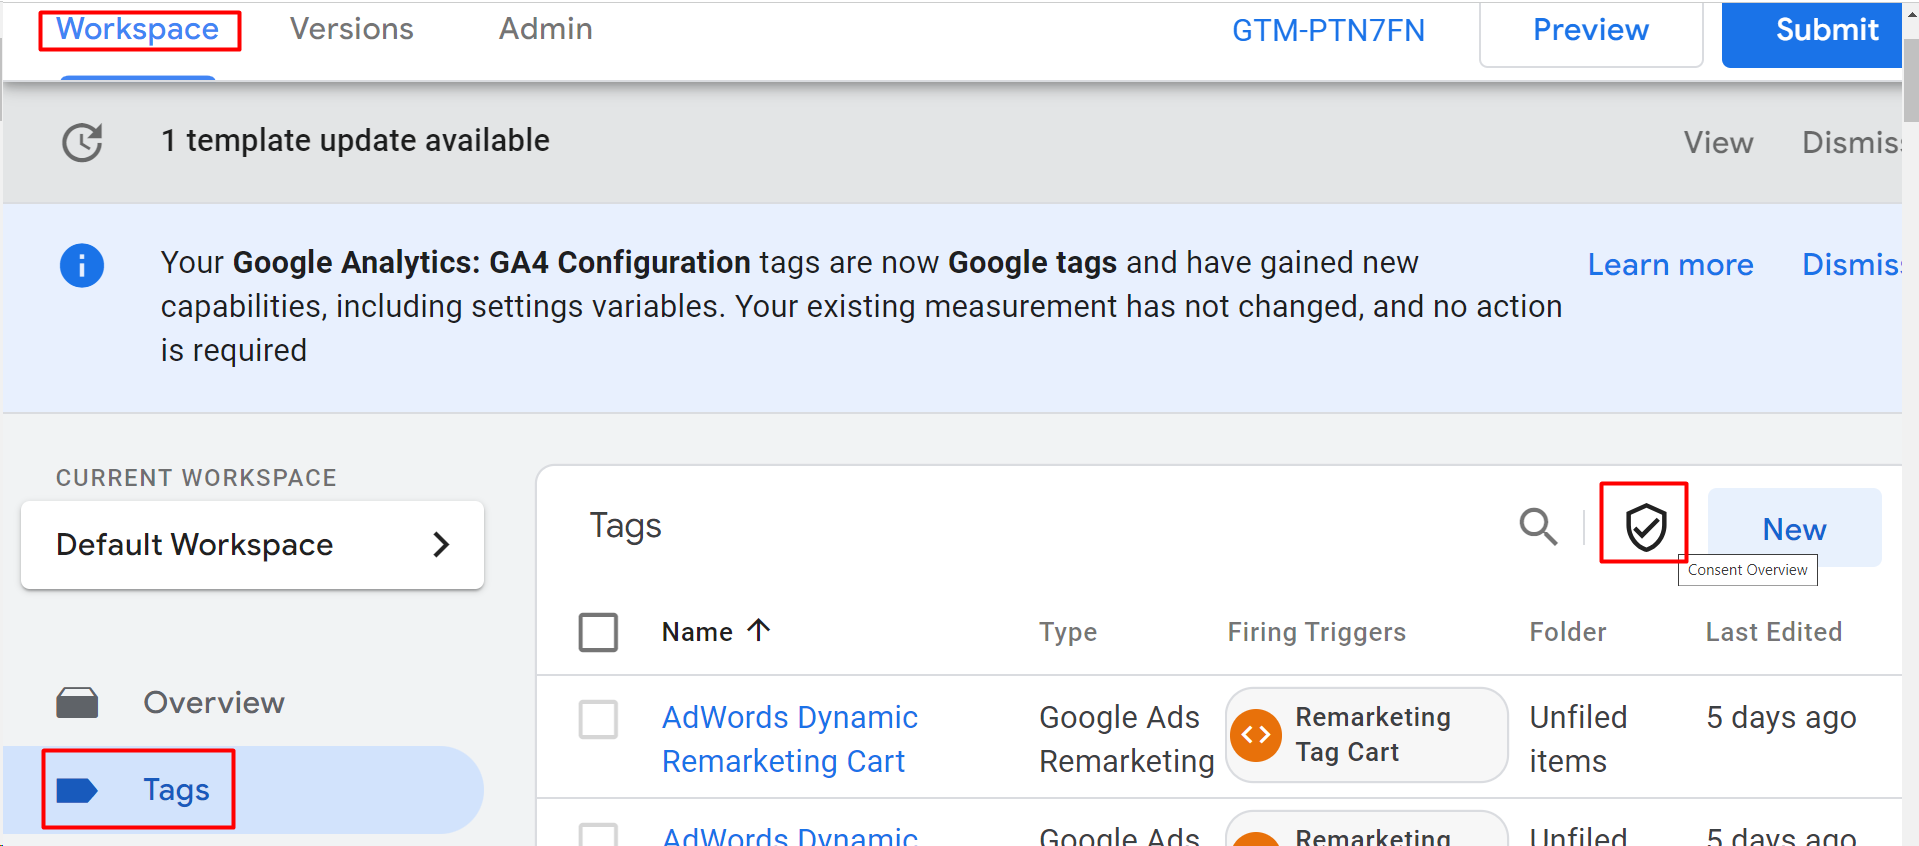
- Go to “Workspace”->”Tags” -> click on “Consent Overview” (shield) and set up consent for each tag. Make sure to select “No additional consent required” for Tags that already have “Built-In Consent”. These tags are generally Google related tags.
%20(1).png)
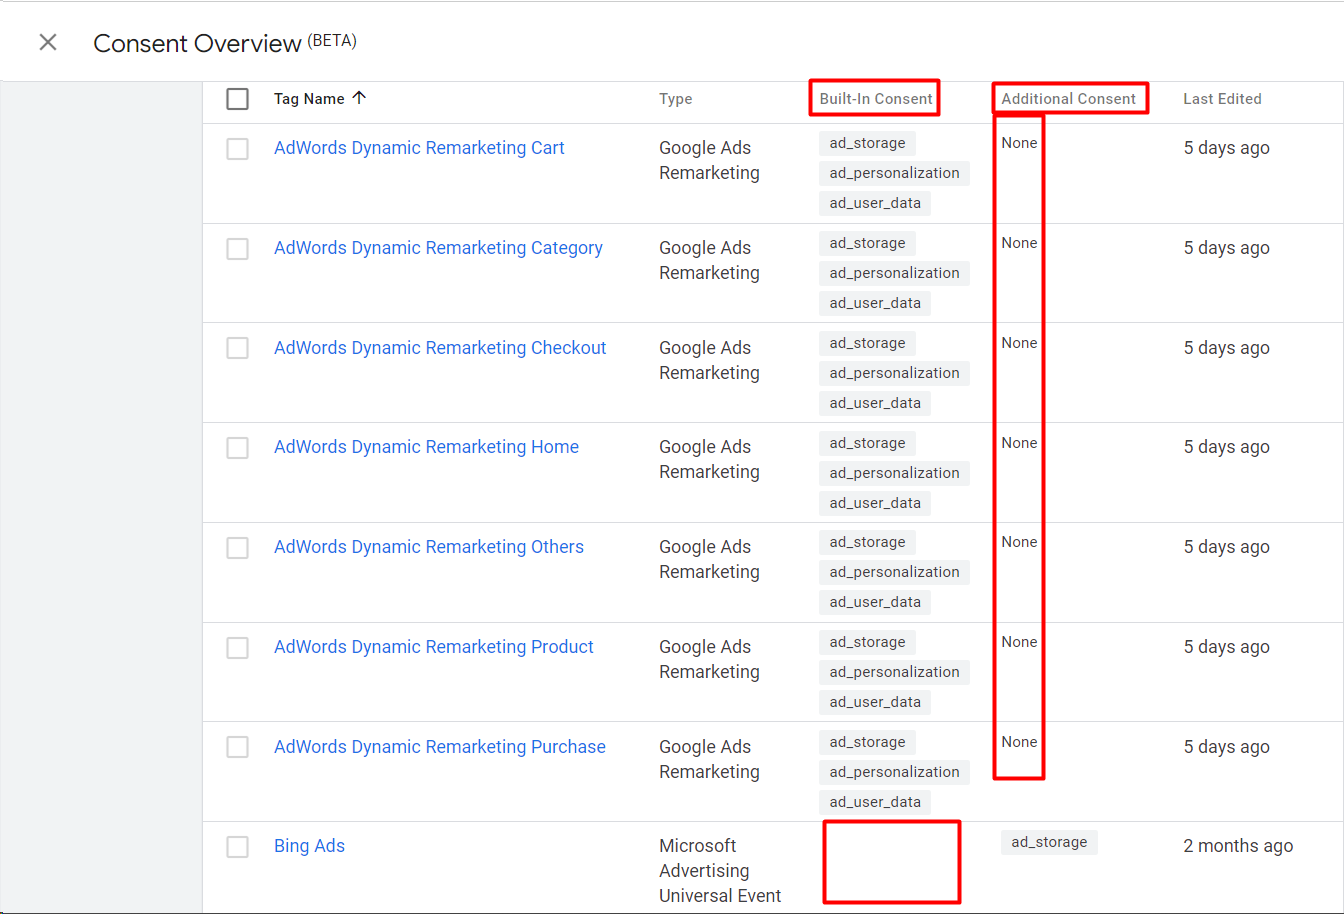
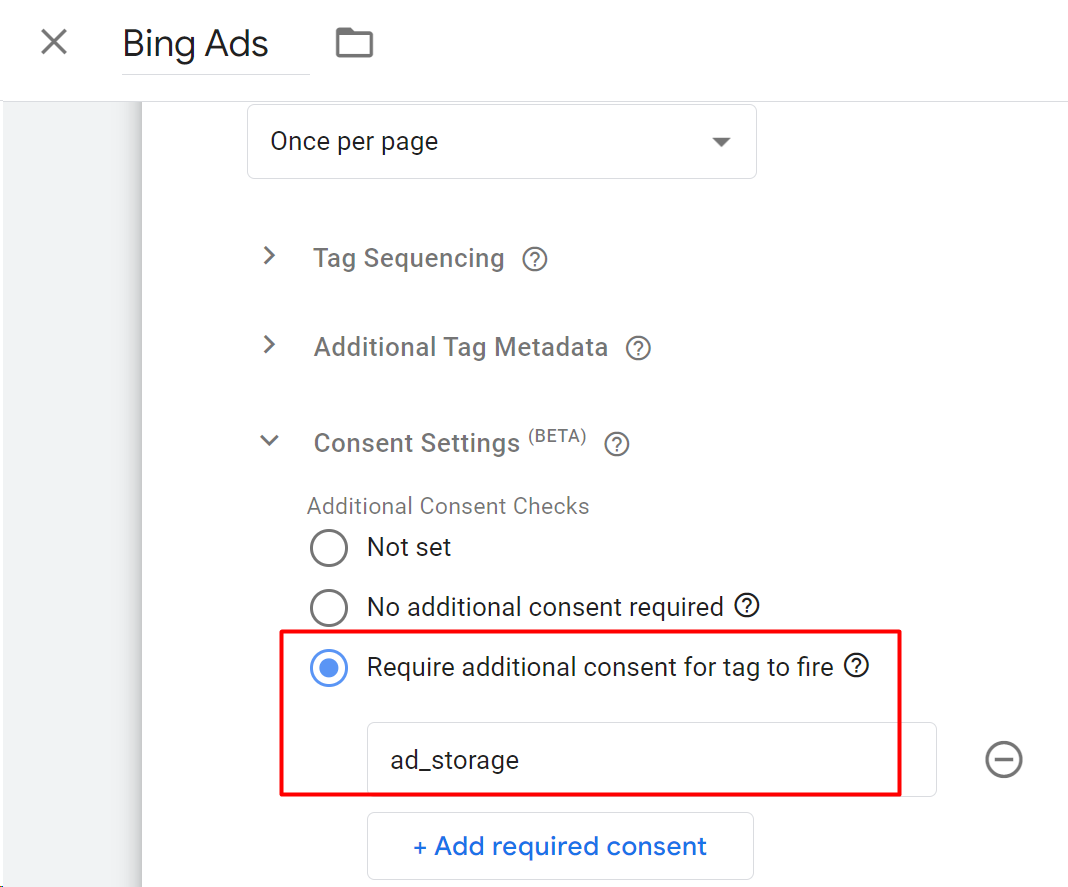
2a. In order to add “Additional Consent”, click on the tag name and go to ”Consent Settings” and choose “Require additional consent for tag to fire” and add the consent param that you want as “Additional Consent”. If cookies related to the consent parameter that is chosen as an additional consent are not accepted then that tag would not fire.
%20(1).png)
On GTM’s end consent mode setup is complete.
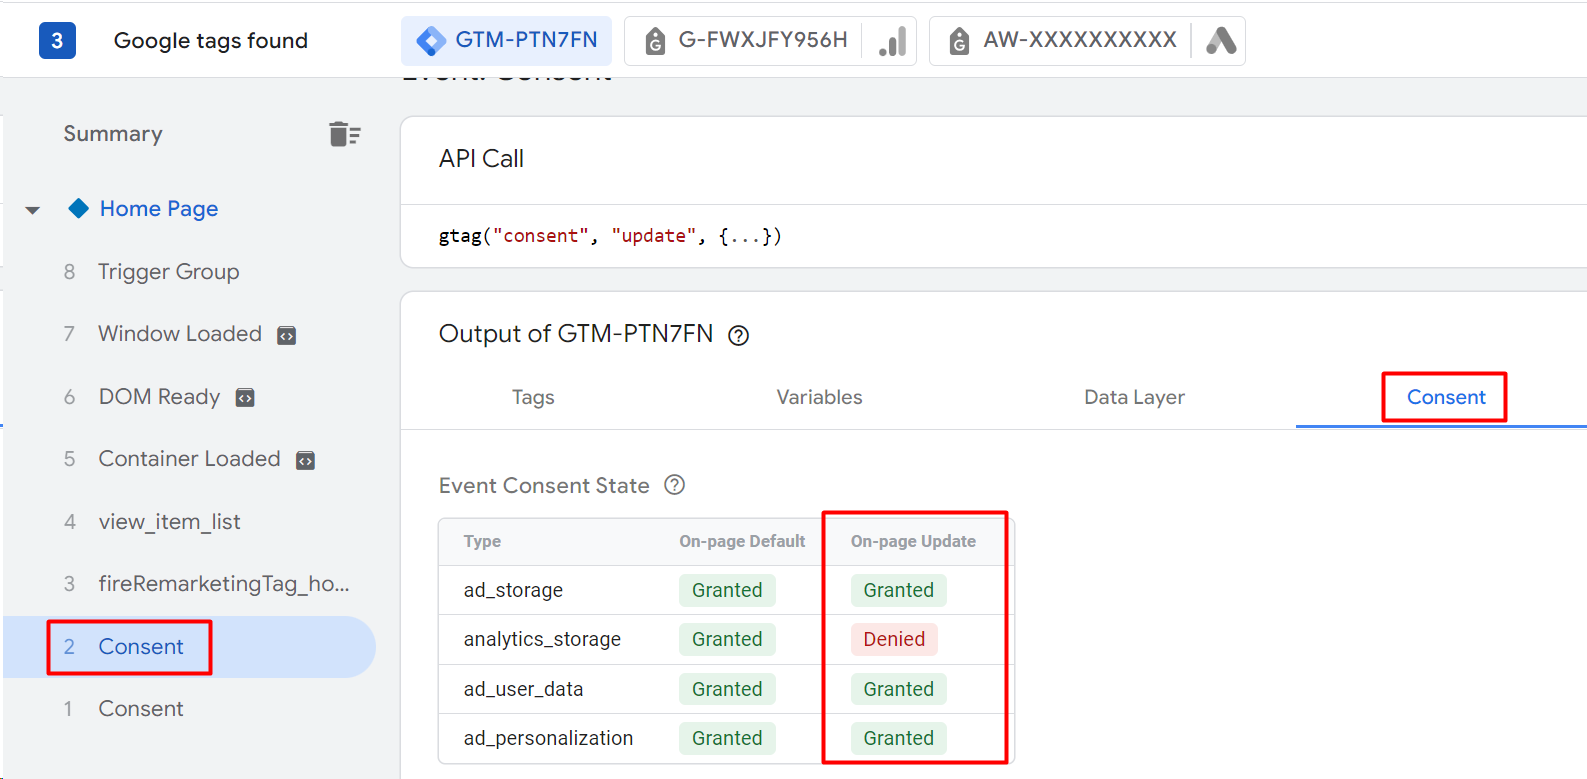
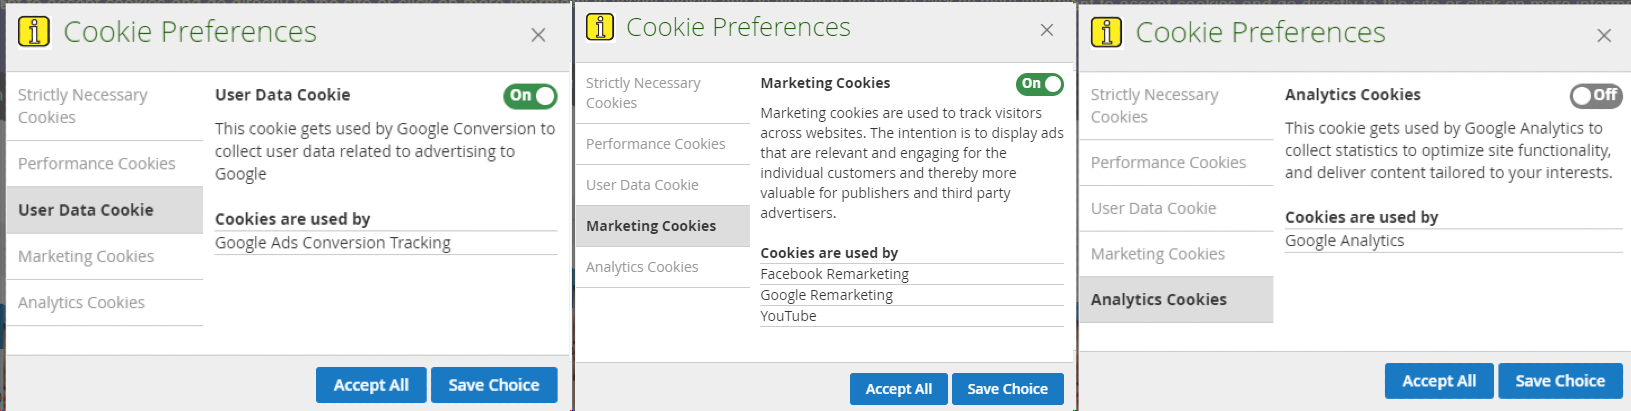
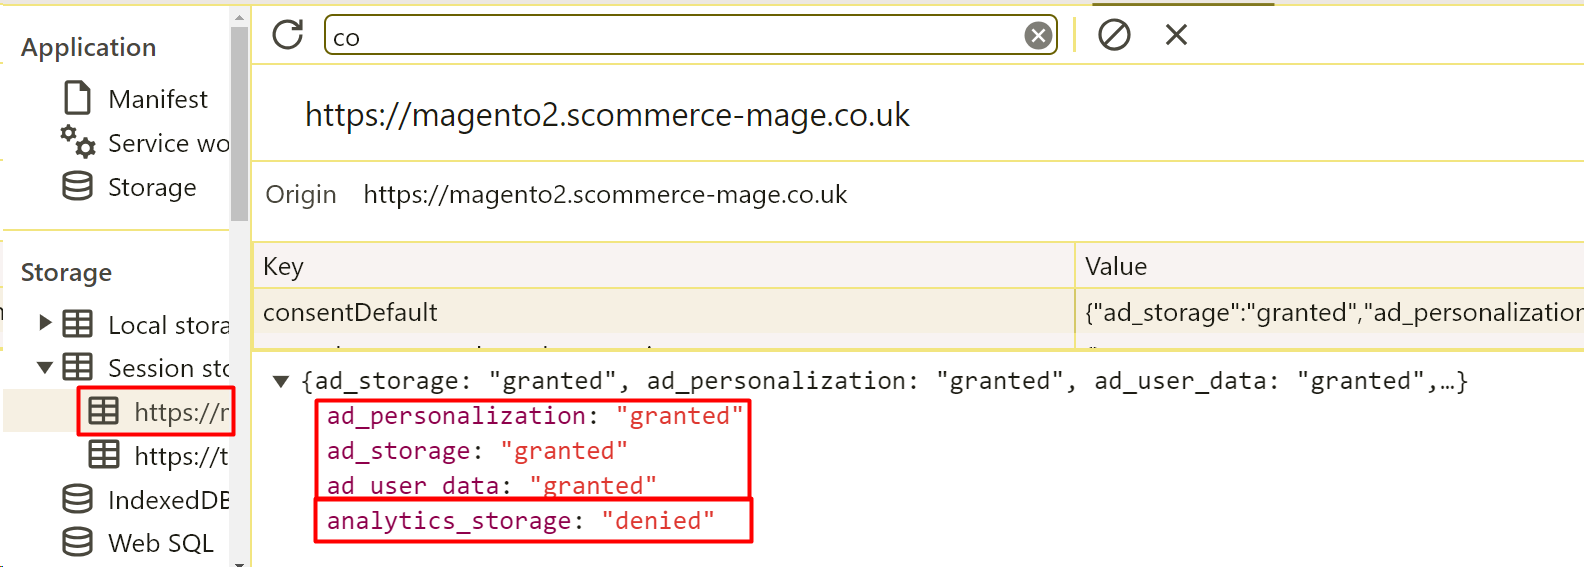
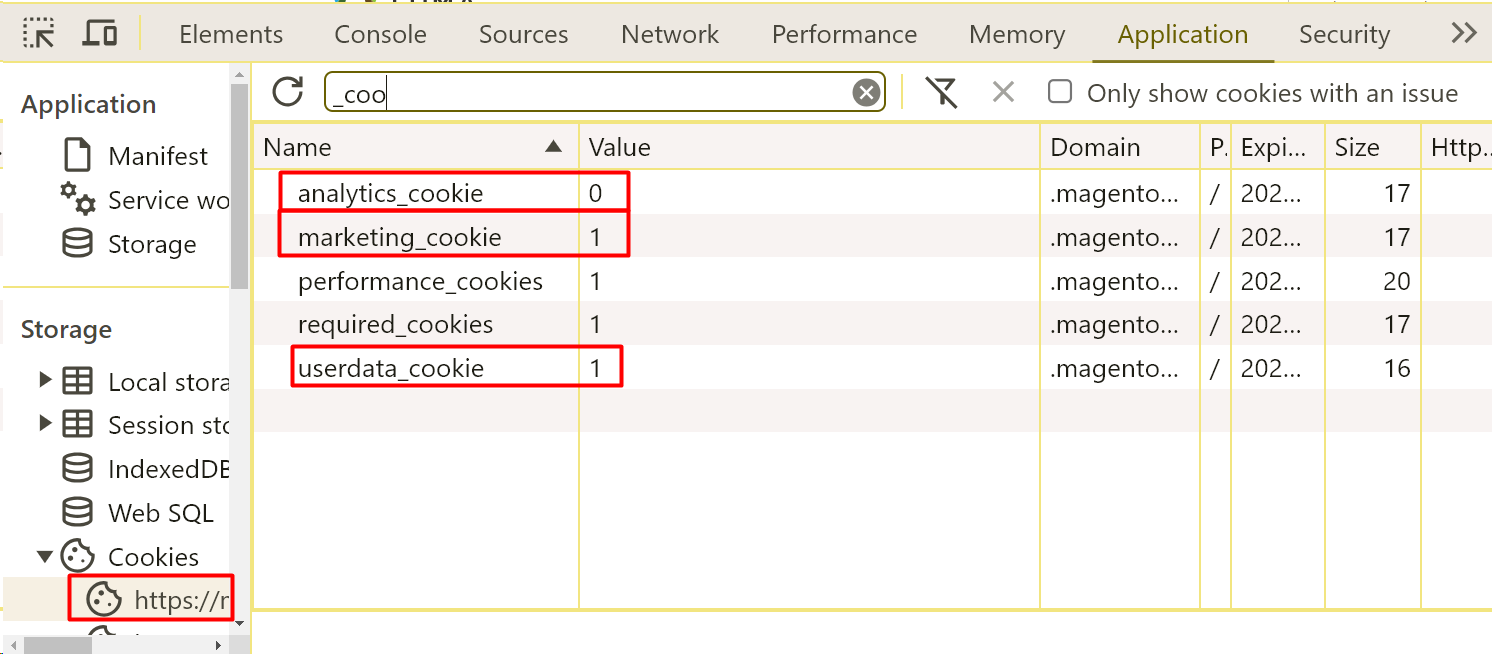
Verification
- In order to verify whether the consent mode is working as per the configuration you have set or not, you can preview your changes and compare them with the frontend as shown in the below images. All the values should be the same.
%20(1).png)

%20(1).png)
%20(1).png)
%20(1).png)