
Magento 2 missing orders or transactions in Google Analytics (GA)
Installation and User Guide for Magento 2 Google Analytics Synchronization Extension
Table of Contents
- Installation
- Installation via app/code
- Installation via Composer
- Configuration Settings for Google Analytics Synchronization
- General Settings
- GA4
- Select Store View
- Verify/Test Synced Transactions
- GA4 Sync Log grid
- GA4 Sync Log File
- Google Analytics 4 Real Time Reports
- Google Analytics 4 Custom Reports
- Order Tracking Information
- Create Project in Google Developer Console for GA Reporting API
- Getting View ID (Universal Analytics)
- Getting Property ID (GA4)
- Command to run the Synch Manually
Installation
- Installation via app/code: Upload the content of the module to your root folder. This will not overwrite the existing Magento folder or files, only the new contents will be added. After the successful upload of the package, run below commands on Magento 2 root directory.
- Installation via Composer: Please follow the guide provided in the below link to complete the installation via composer.
Configuration Settings for Google Analytics Synchronization
Go to Admin > Stores > Configuration > Scommerce Configuration > Google Analytics Synchronization
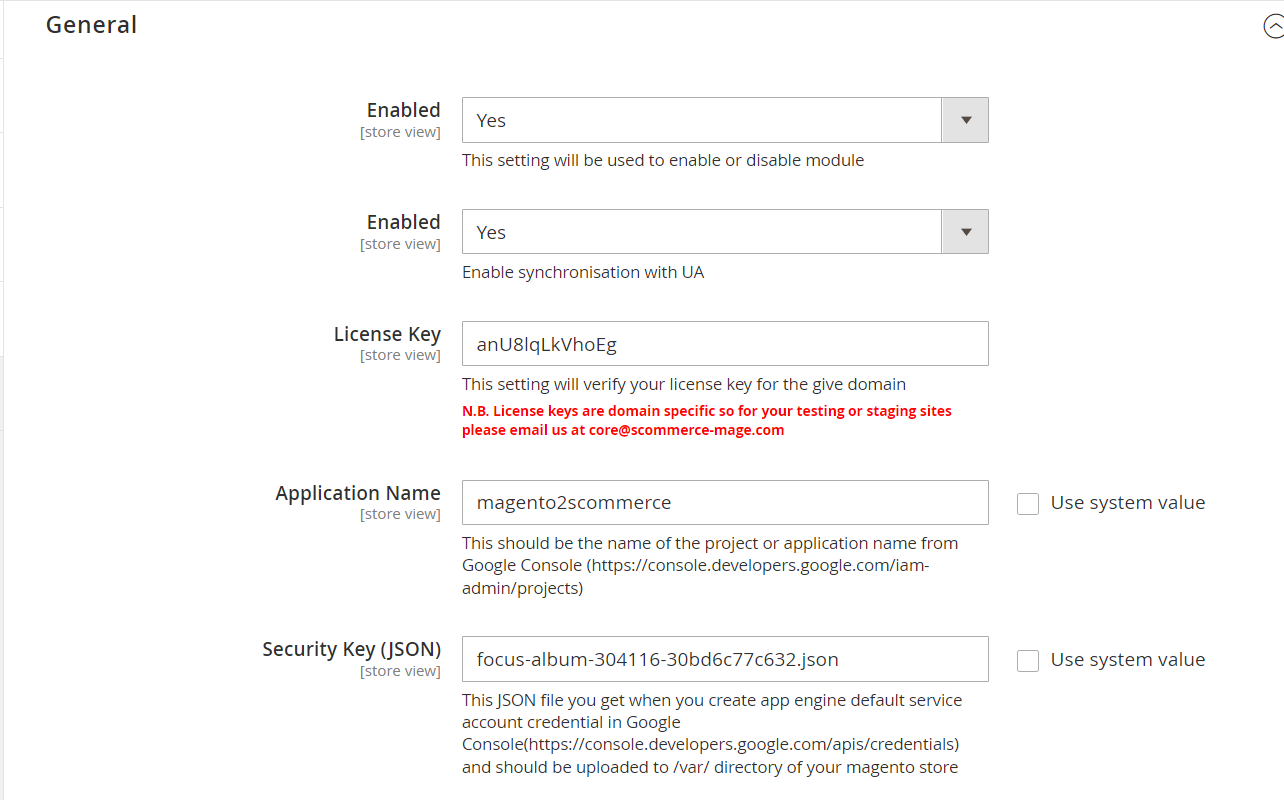
General Settings
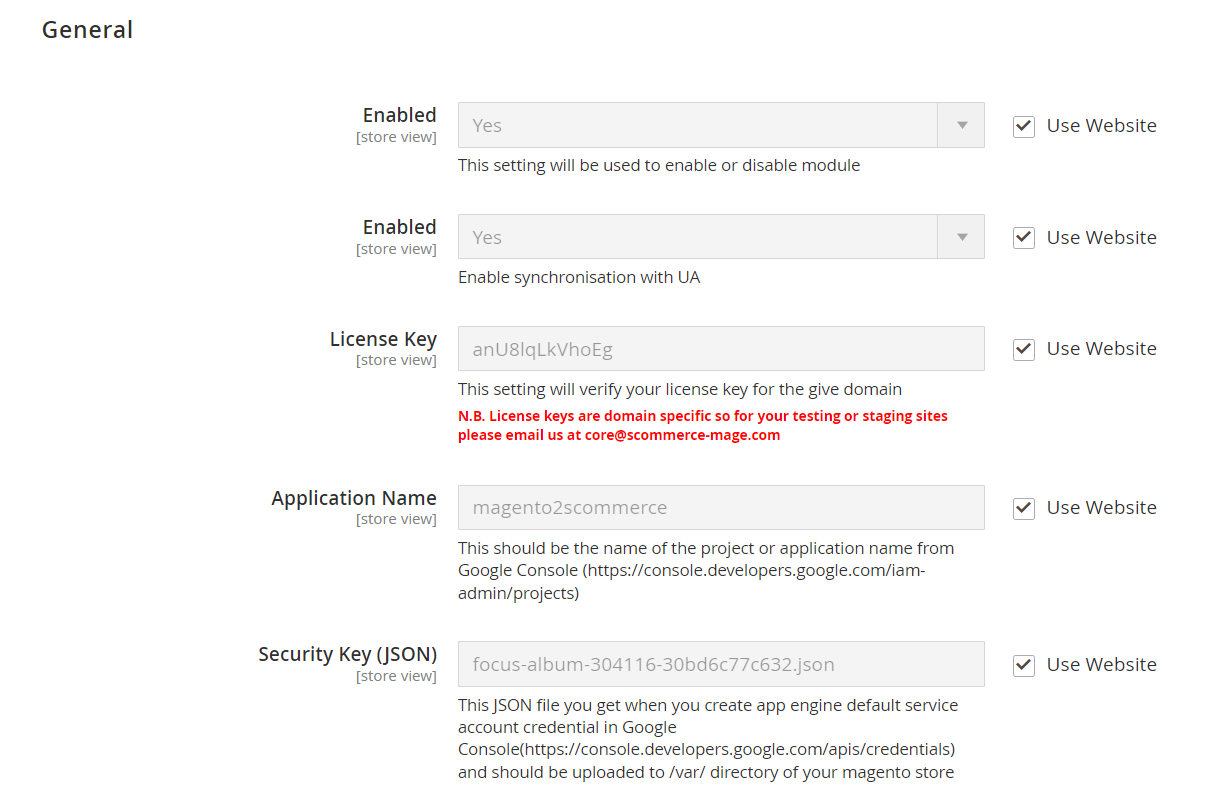
- Enabled – Select "Yes" or "No" to enable or disable the module.
- Enabled – Select "Yes" or "No" to enable or disable synchronization with UA(Universal Analytics).
- License Key – Please add the license for the extension which is provided in the order confirmation email. Please note license keys are site URL specific. If you require license keys for dev/staging sites then please email us at support@scommerce-mage.com.
- Application Name – It is the project name that you get from Google console. ( https://console.developers.google.com/ ) Click here for more information
- Security key (JSON) – Security key JSON file can be obtained from Google Console under account credentials. Click here for more information
- Google View id – View Id can be obtained from Google Analytics. Go to Admin>View Settings>View ID.
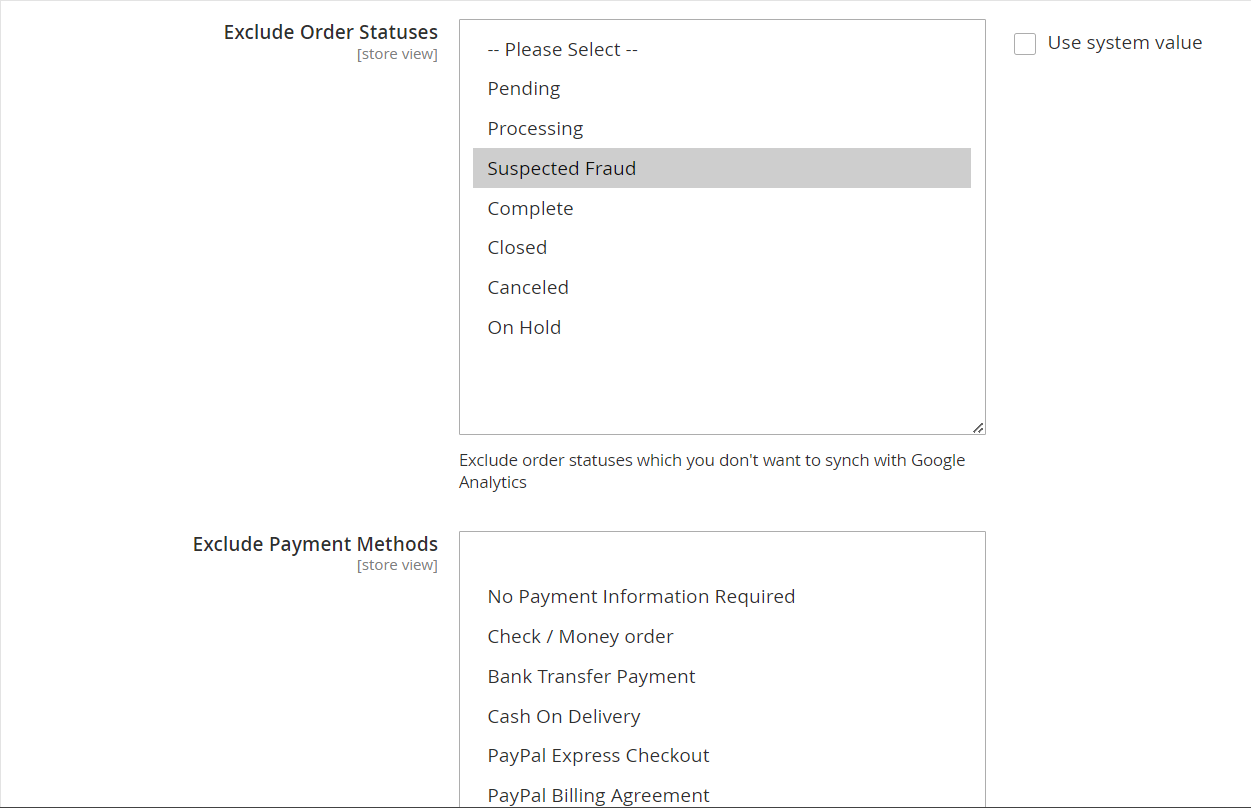
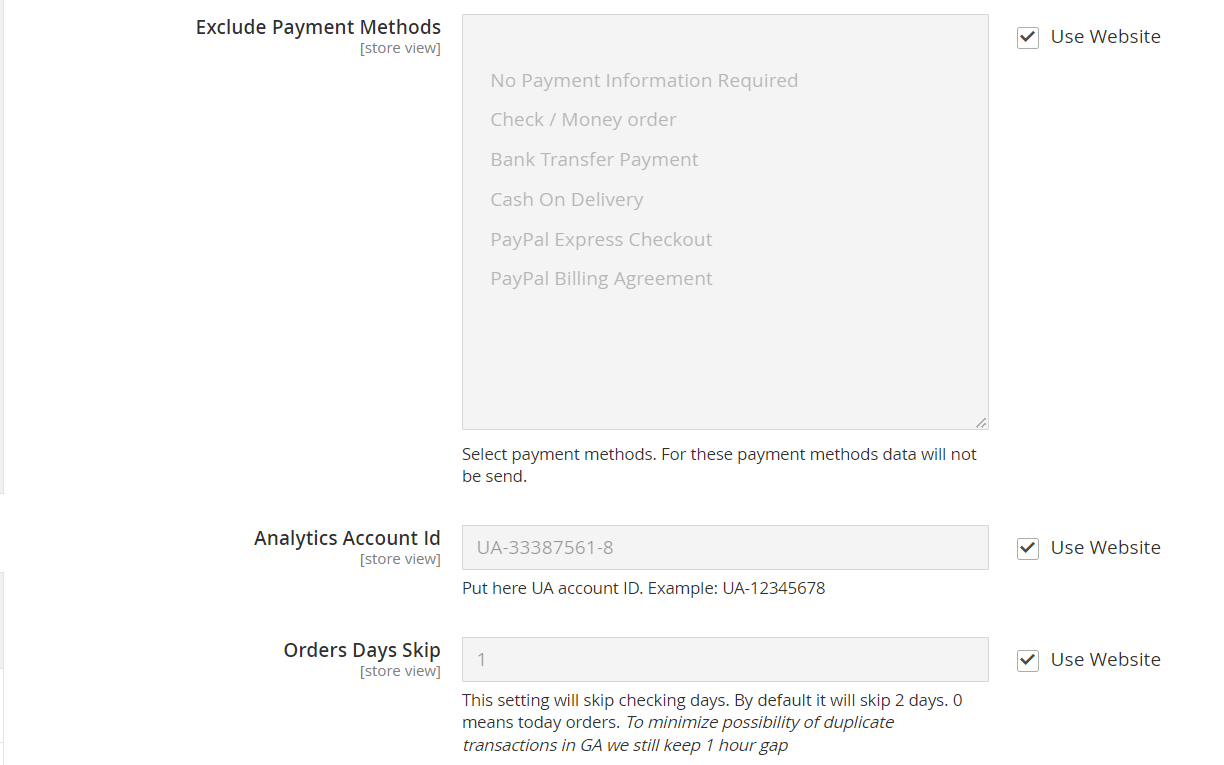
- Exclude order statuses – You can choose to exclude certain order statues from sync. These orders won't be synced with Google Analytics.
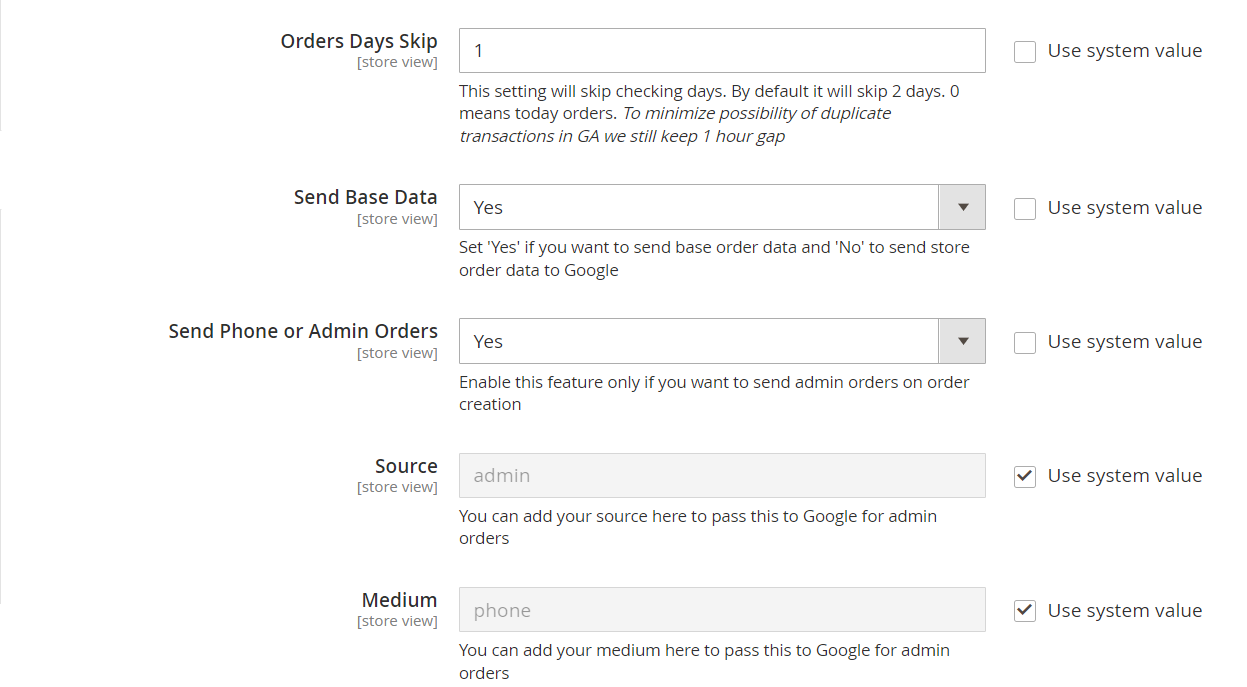
- Orders day Skip – Enter the number of days you want to skip checking. For eg:- Suppose if you enter 2 then orders from 2days ago will be synced today.
- Skip Hours- This setting works in conjunction with Order days skip" setting. When Order days skip is set to 0 then you can add hours here to allow number of hours to skip before considering transaction has been missing and sending it to GA. Default value is 4 and we will recommend to keep it that way because original transaction can take longer to appear in Google Analytics.
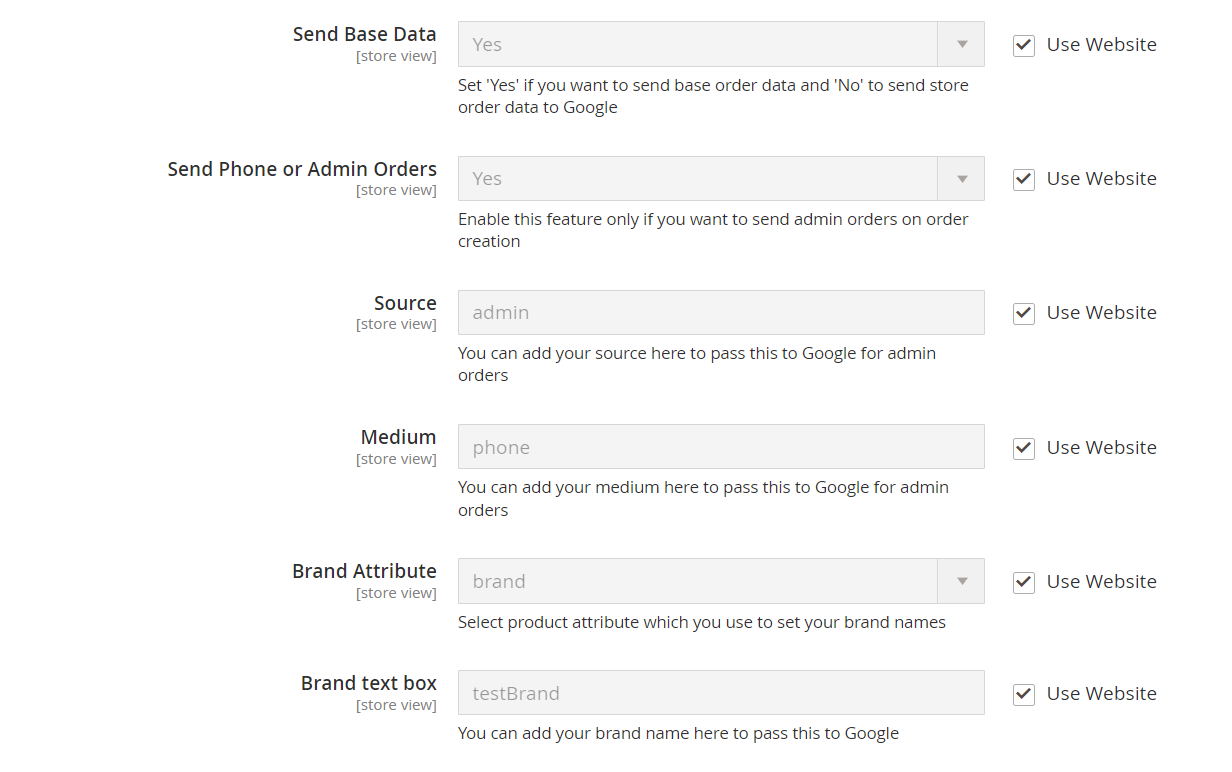
- Send Base Data – Select whether you want to send base order data or store order data.
- Send Phone or Admin Orders – Enabling this option will also sync orders placed from admin panel and phone
- Source – Pass a source to Google for admin orders
- Medium – Pass a medium to Google for admin orders
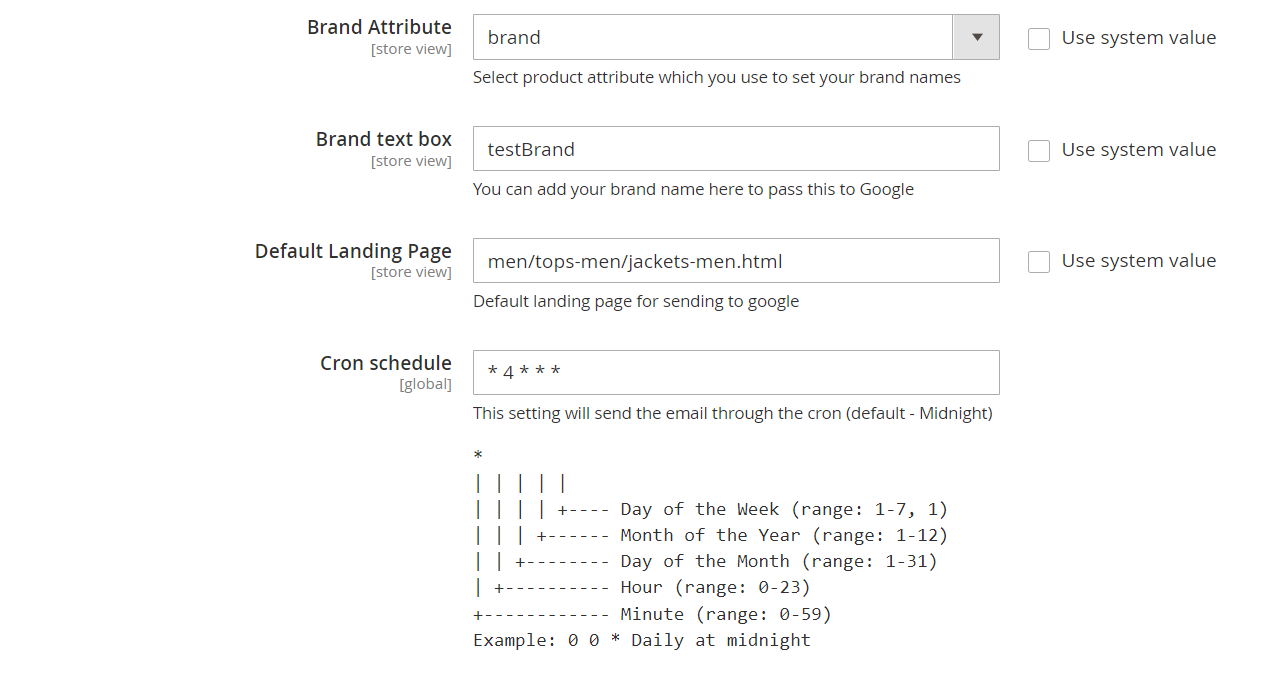
- Brand Attribute – Select a brand attribute to send with brand names
- Brand Text box – Input brand name to send to Google
- Default Landing Page - This setting allows you to set default landing page value which shows in Google Analytics in case landing page is not available to sent as part of missing transaction.
- Cron Schedule – Schedule specific cron time to run the sync automatically.
- Debugging – Enabling debugging will generate a detailed log report in /var/log directory
- Test Mode- This setting allows you to check missing transactions before we send the transactions to GA. It helps in validating the data before it gets posted to Google Analytics

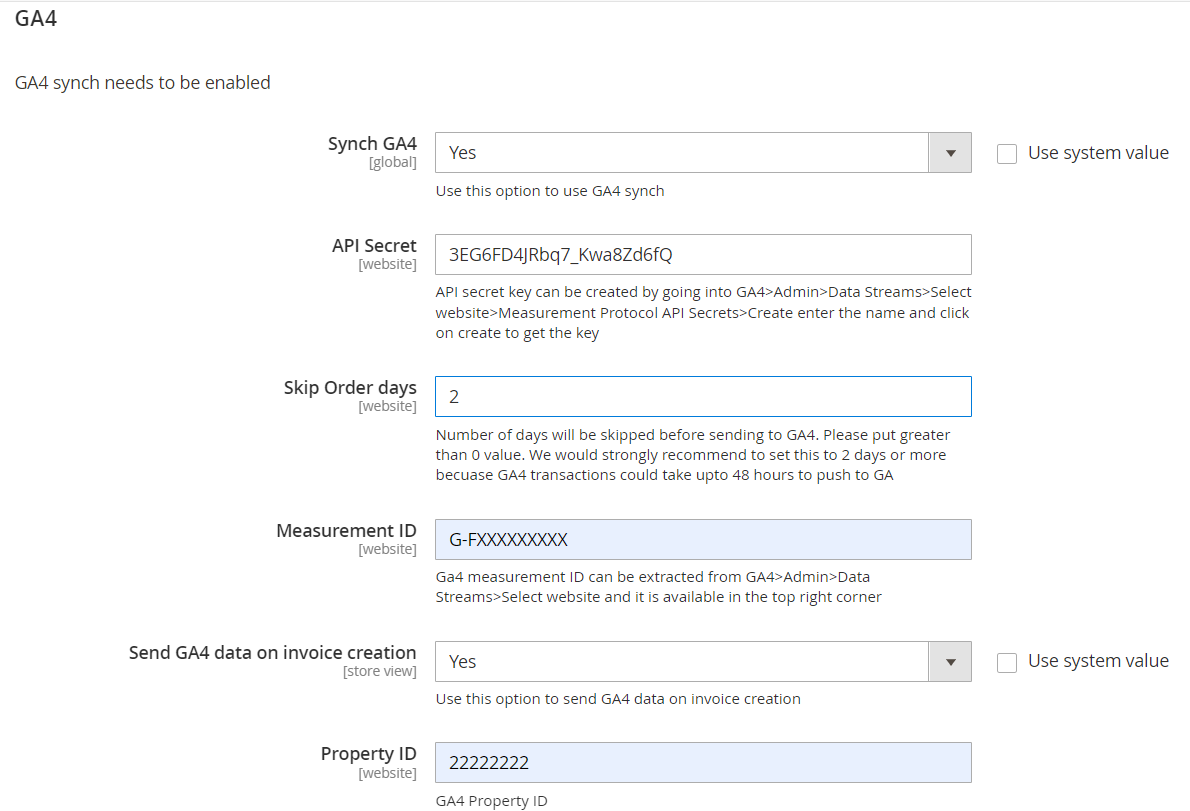
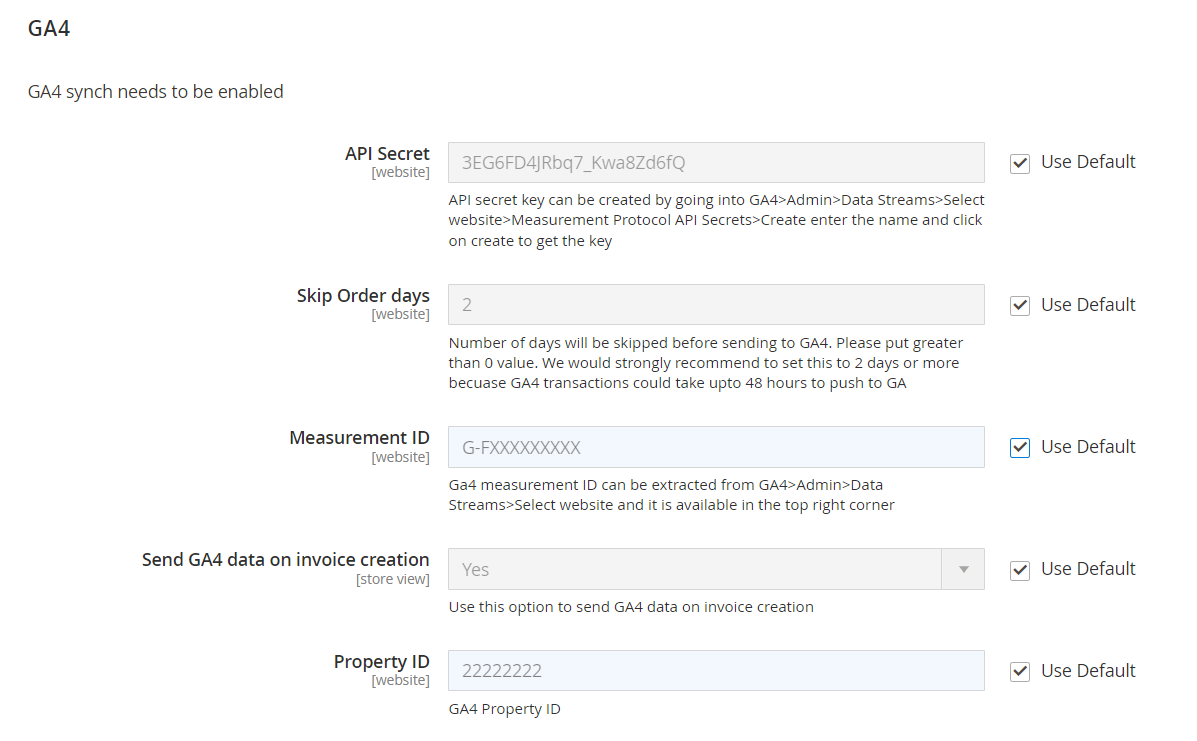
GA4
- Synch GA4 – Select "Yes" or "No" to enable or disable the GA4 sync.
- API Secret – Enter the API secret key here. API secret key can be created by going into GA4>Admin>Data Streams>Select website>Measurement Protocol API Secrets>Create enter the name and click on create to get the key.
- Skip Order days – Enter the number of days that will be skipped before sending to GA4. Please put greater than 0 value. This is done to avoid duplicate transactions. For eg:- Suppose if you enter 2 then orders from 2days ago will be synced today.
- Measurement ID – Enter the measurement ID of your GA4 property. Ga4 measurement ID can be extracted from GA4>Admin>Data Streams>Select website and it is available in the top right corner.
- Property ID – Enter the property ID of GA4. GA4>Admin>Property Settings>Property ID
Select Store View
- Enabled – Select "Yes" or "No" to enable or disable the module.
- Enabled – Select "Yes" or "No" to enable or disable synchronization with UA(Universal Analytics).
- License Key – Please add the license for the extension which is provided in the order confirmation email. Please note license keys are site URL specific. If you require license keys for dev/staging sites then please email us at support@scommerce-mage.com
- Application Name – It is the project name that you get from Google console. ( https://console.developers.google.com/) Click here for more information
- Security key (JSON) – Security key JSON file can be obtained from Google Console under account credentials. Click here for more information
- Google View id – View Id can be obtained from Google Analytics. Go to Admin>View Settings>View ID.
- Exclude order statuses – You can choose to exclude certain order statues from sync. These orders won't be synced with Google Analytics.
- Analytics Account Id – It is your Google Analytics account ID.
- Orders day Skip – Enter the number of days you want to skip checking. For eg:- Suppose if you enter 2 then orders from 2 days ago will be synced today.
- Skip Hours- This setting works in conjunction with Order days skip" setting. When Order days skip is set to 0 then you can add hours here to allow number of hours to skip before considering transaction has been missing and sending it to GA. Default value is 4 and we will recommend to keep it that way because original transaction can take longer to appear in Google Analytics.
- Send Base Data – Select whether you want to send base order data or store order data.
- Send Phone or Admin Orders – Enabling this option will also sync orders placed from admin panel and phone
- Source – Pass a source to Google for admin orders
- Medium – Pass a medium to Google for admin orders
- Brand Attribute – Select a brand attribute to send with brand names
- Brand Text box – Input brand name to send to Google
- Default Landing Page - This setting allows you to set default landing page value which shows in Google Analytics in case landing page is not available to sent as part of missing transaction.

GA4
- Synch GA4 – Select "Yes" or "No" to enable or disable the GA4 sync.
- API Secret – Enter the API secret key here. API secret key can be created by going into GA4>Admin>Data Streams>Select website>Measurement Protocol API Secrets>Create enter the name and click on create to get the key.
- Skip Order days – Enter the number of days that will be skipped before sending to GA4. Please put greater than 0 value. This is done to avoid duplicate transactions. For eg:- Suppose if you enter 2 then orders from 2days ago will be synced today.
- Measurement ID – Enter the measurement ID of your GA4 property. Ga4 measurement ID can be extracted from GA4>Admin>Data Streams>Select website and it is available in the top right corner.
- Property ID – Enter the property ID of GA4. GA4>Admin>Property Settings>Property ID
Verify/Test Synced Transactions
The synced transactions can be verified in two ways. Either checking the GA Sync logs or by checking the Real time reports in GA4 (as it takes 24 to48 hrs for GA4 to attribute data to reports realtime is the quickest way to verify).
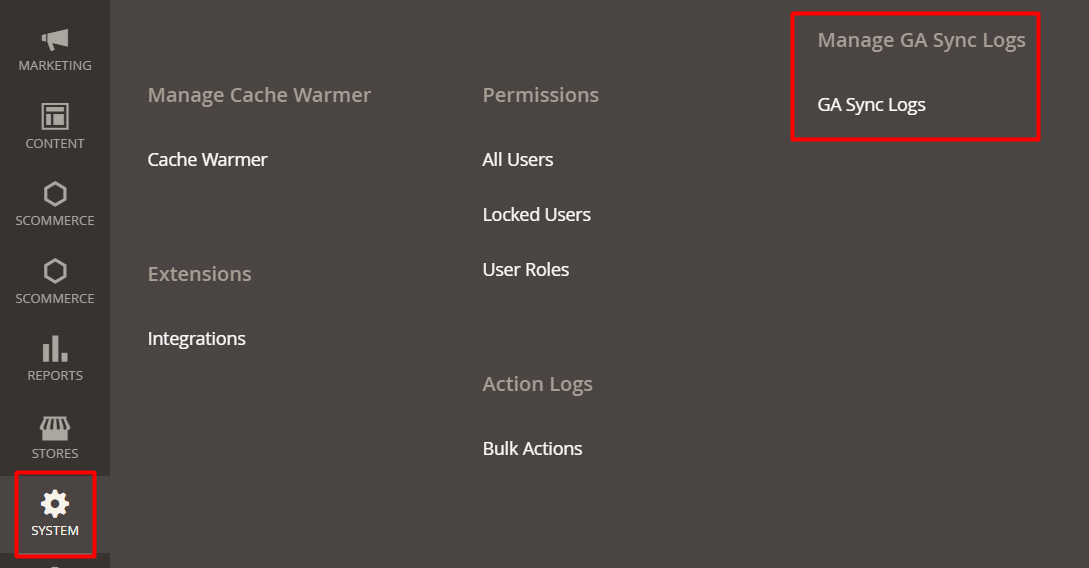
- GA Sync Log Grid: Go to System> Manage GA Sync Logs> GA Sync Logs
After clicking on "GA Sync Logs", user would see the generated logs in the Sync Log Grid.
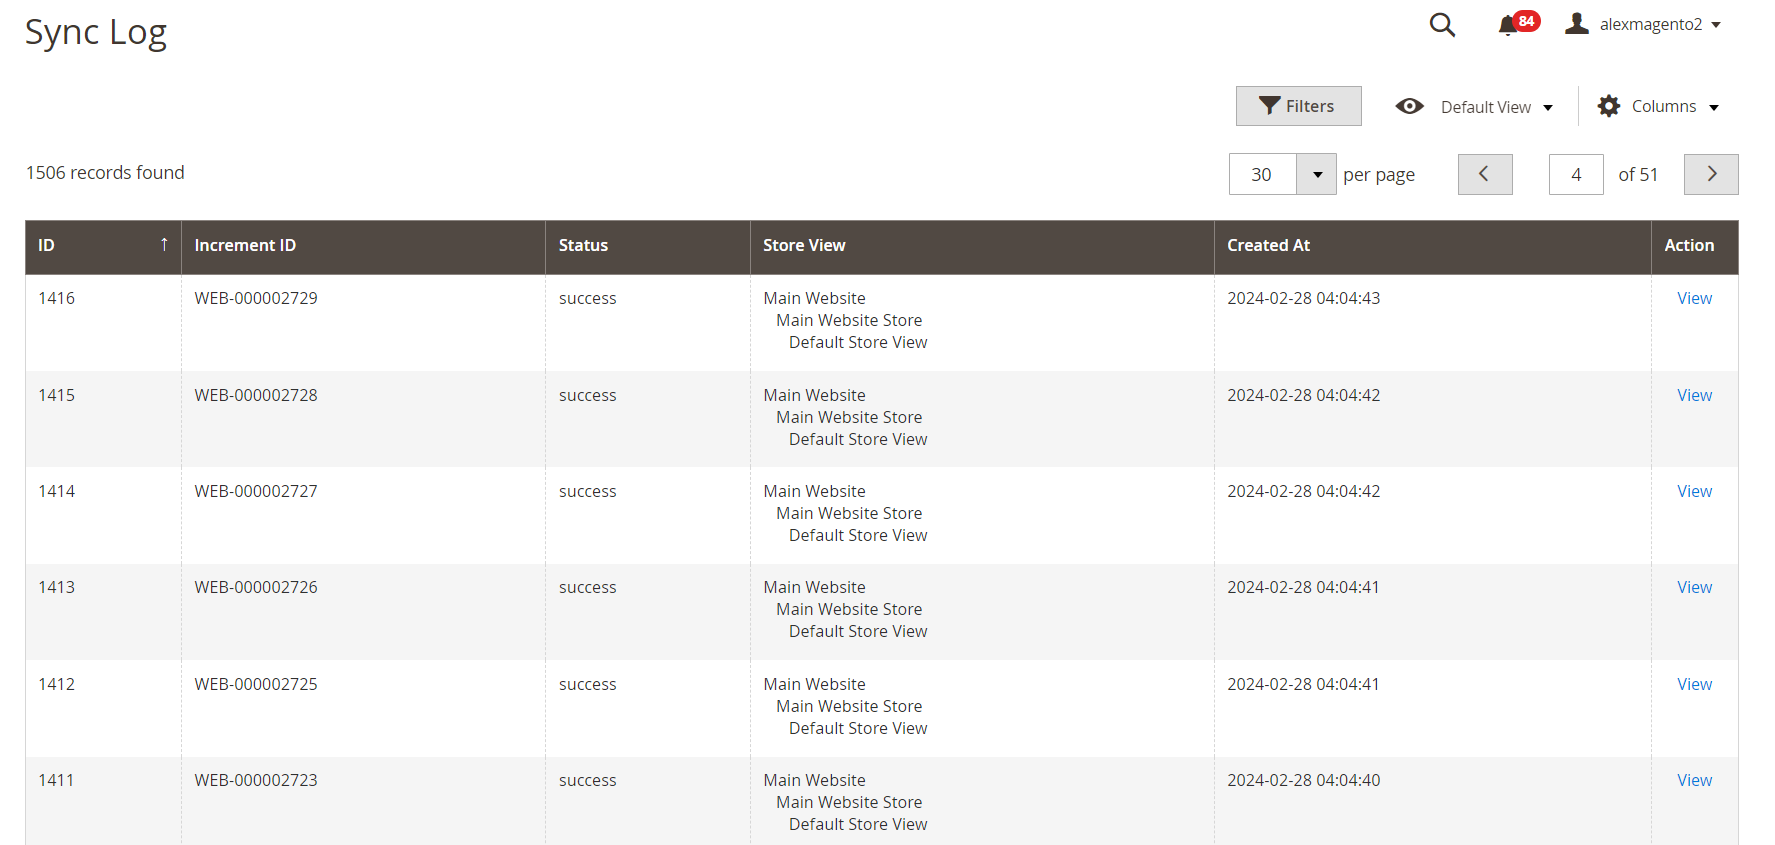
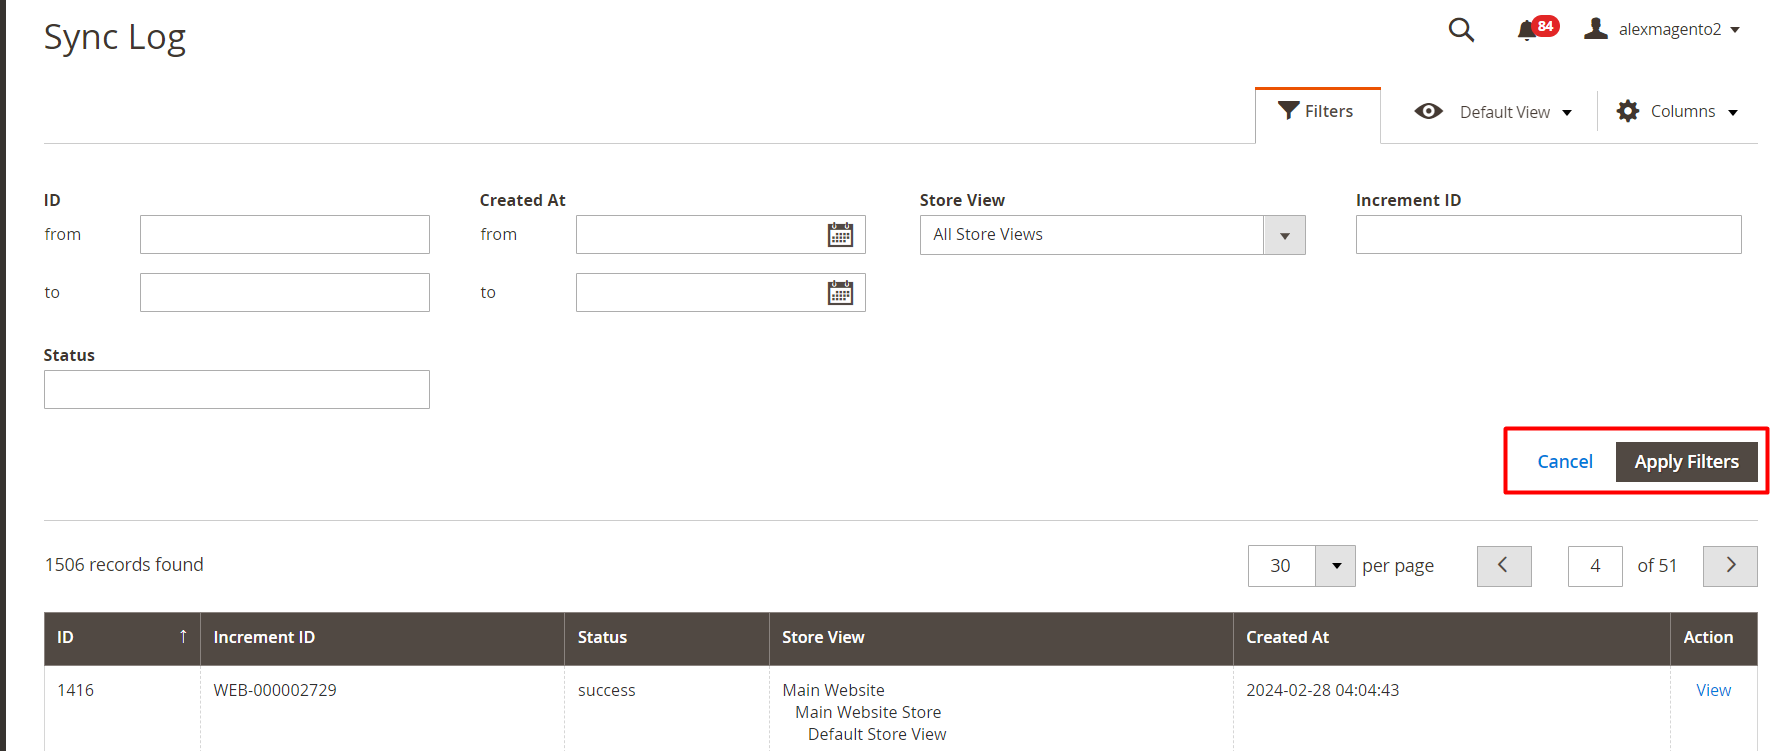
User can also use filters to check a particular log in the grid.
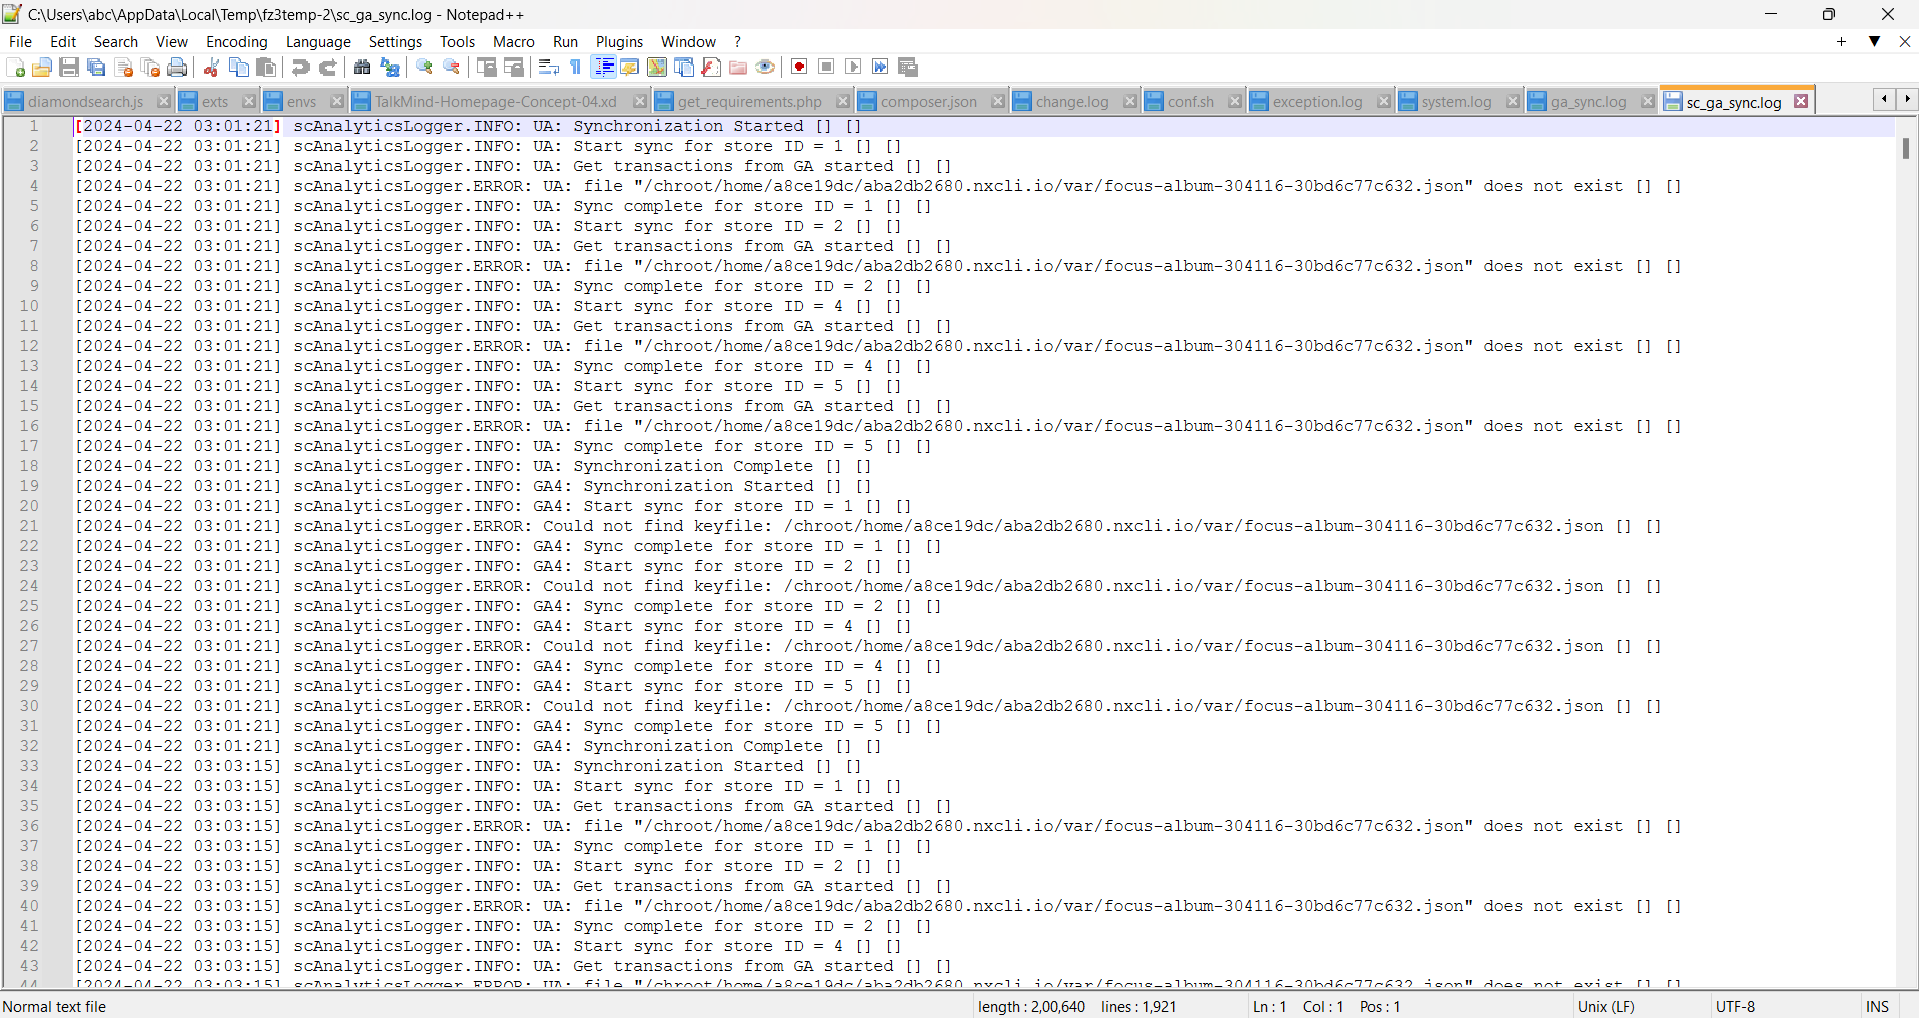
- GA4 Sync Log File: The GA Sync logs can be viewed by going into your server>Magento installation directory>Var>log>ga_sync.log.
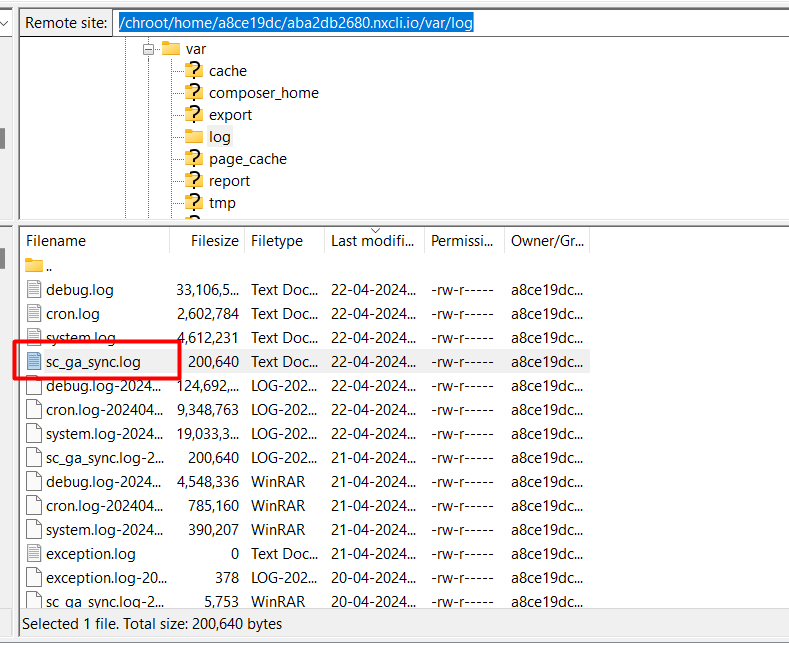
After downloading/viewing the file, user can check the logs. This file contains details of each synced transaction alongwith the order data that was sent, please refer to the image below:-
Google Analytics 4 Real Time Reports
Go to your Google Analytics 4 Property then from left menu click on reports:
Next, select realtime from the left menu and under the event name column you can find the purchase event by clicking on that you can verify the transaction ID that was sent through the sync module.
Google Analytics 4 Custom Reports
You can create a transaction report in GA4 using custom reports to verify the transactions received. For more information, please Click Here
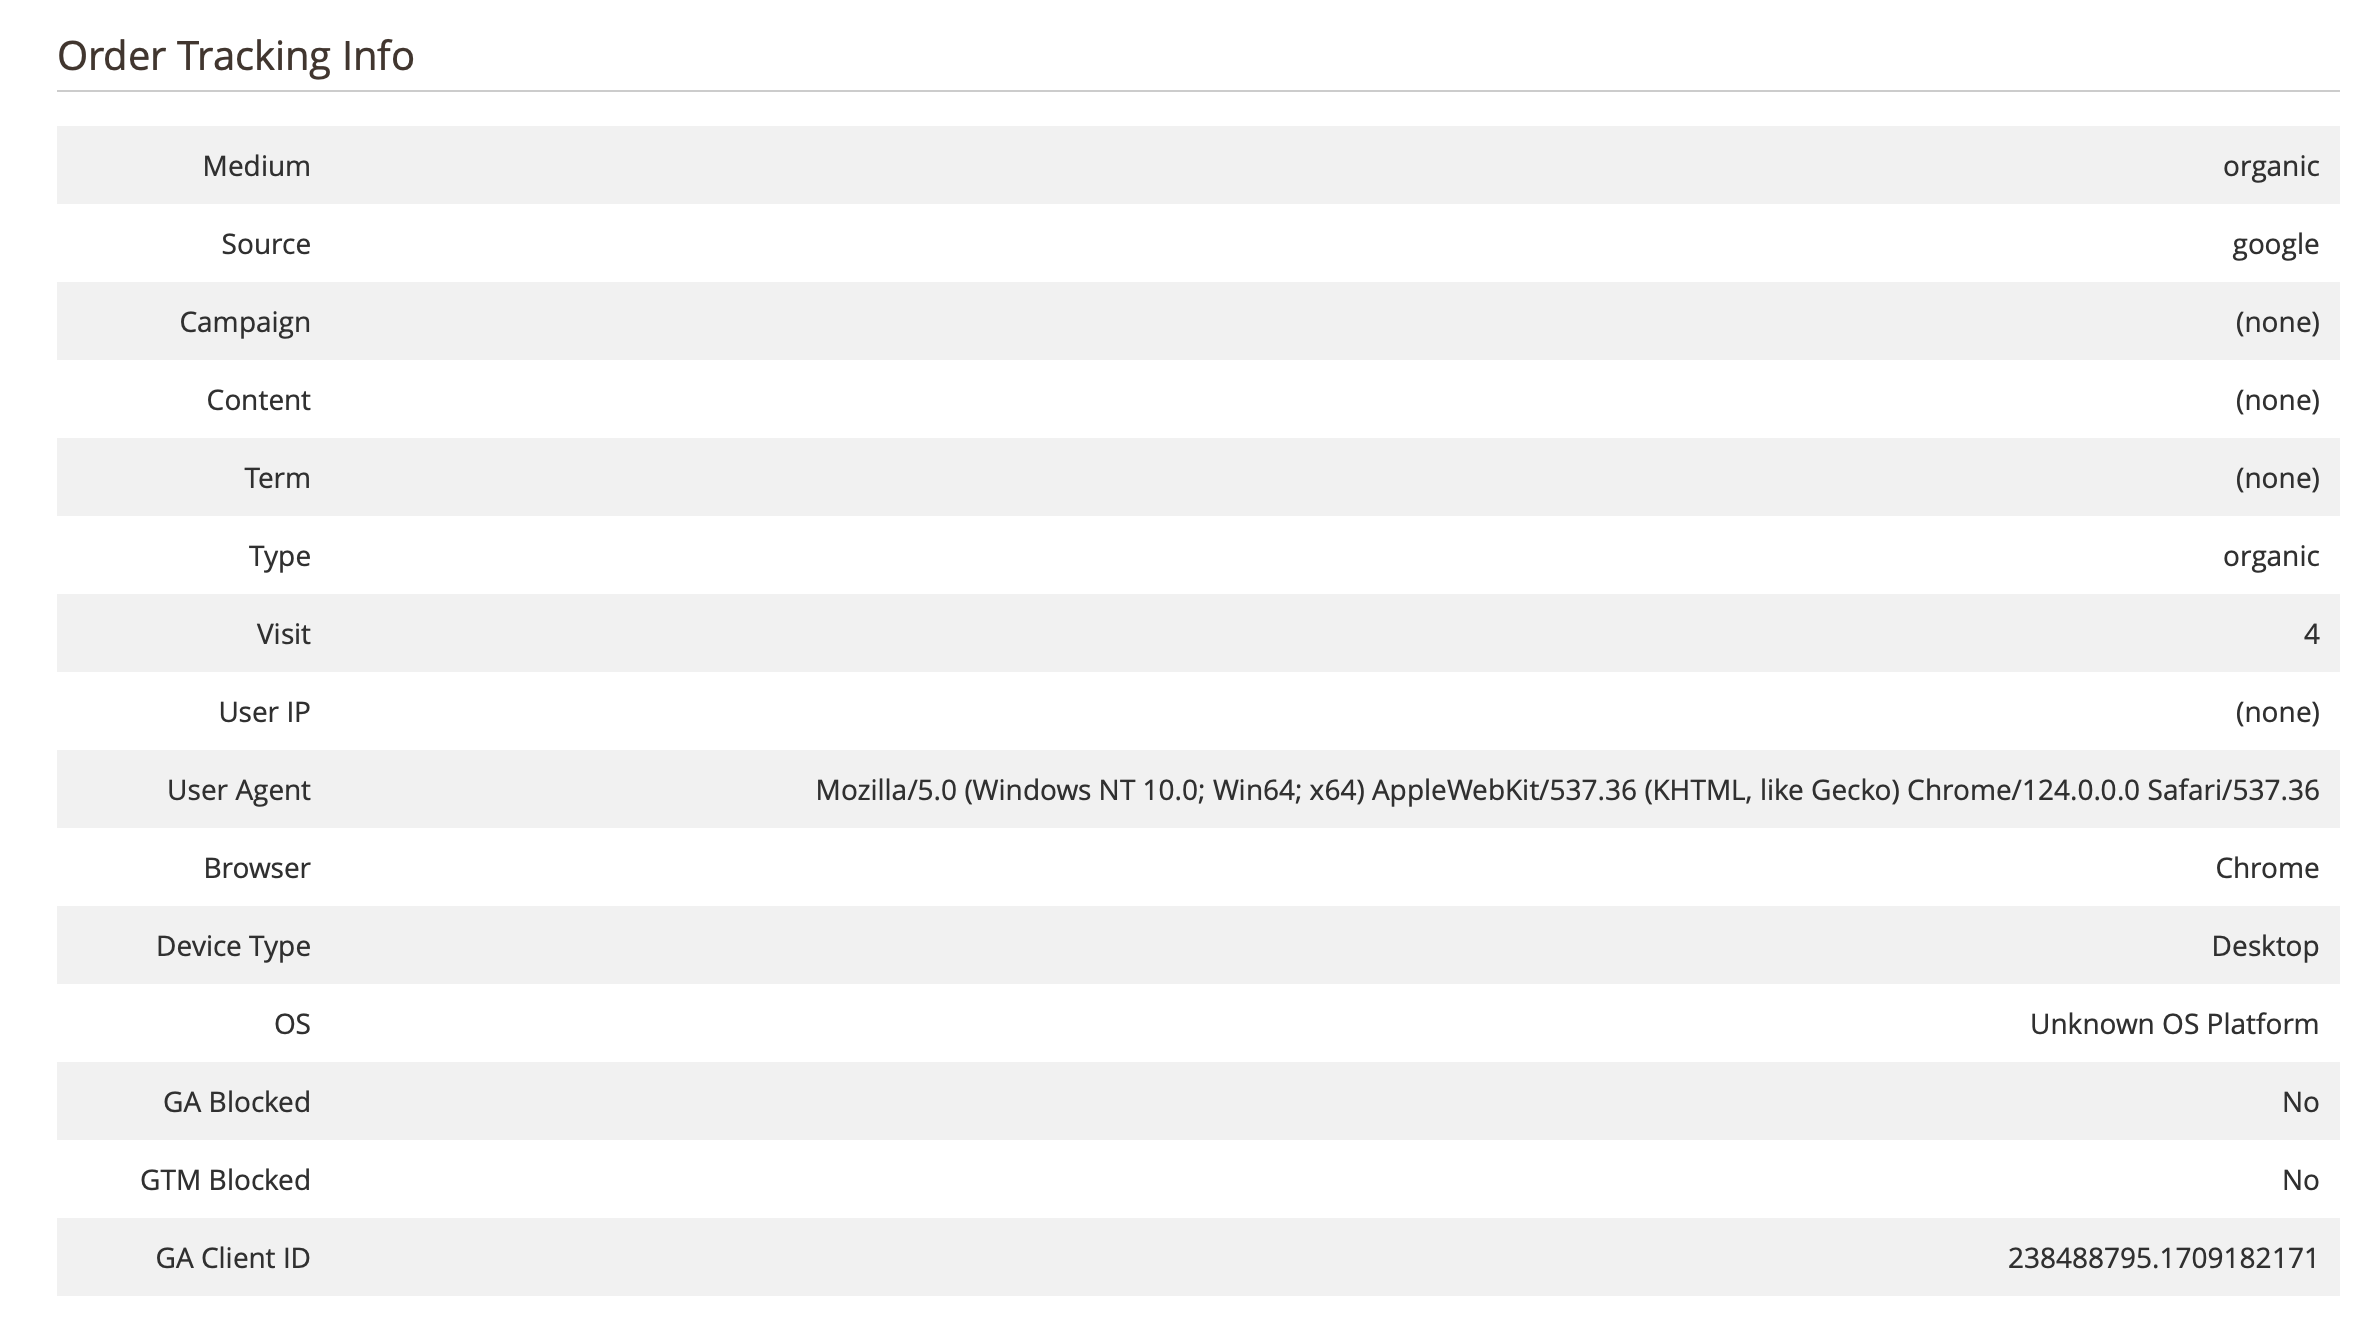
Order Tracking Information
The order tracking info is captured against each order which is later used to sync the transactions to GA4 attributing them to correct sessions and dates to improve report accuracy. The order tracking info can be viewed by going into Admin>Sales>Order>Edit any order. Please refer to the screengrab below.
Create Project in Google Developer Console for GA Reporting API
Please follow the steps below to create project in Google developer console for GA reporting API and to obtain "application name" and "security key JSON File": -
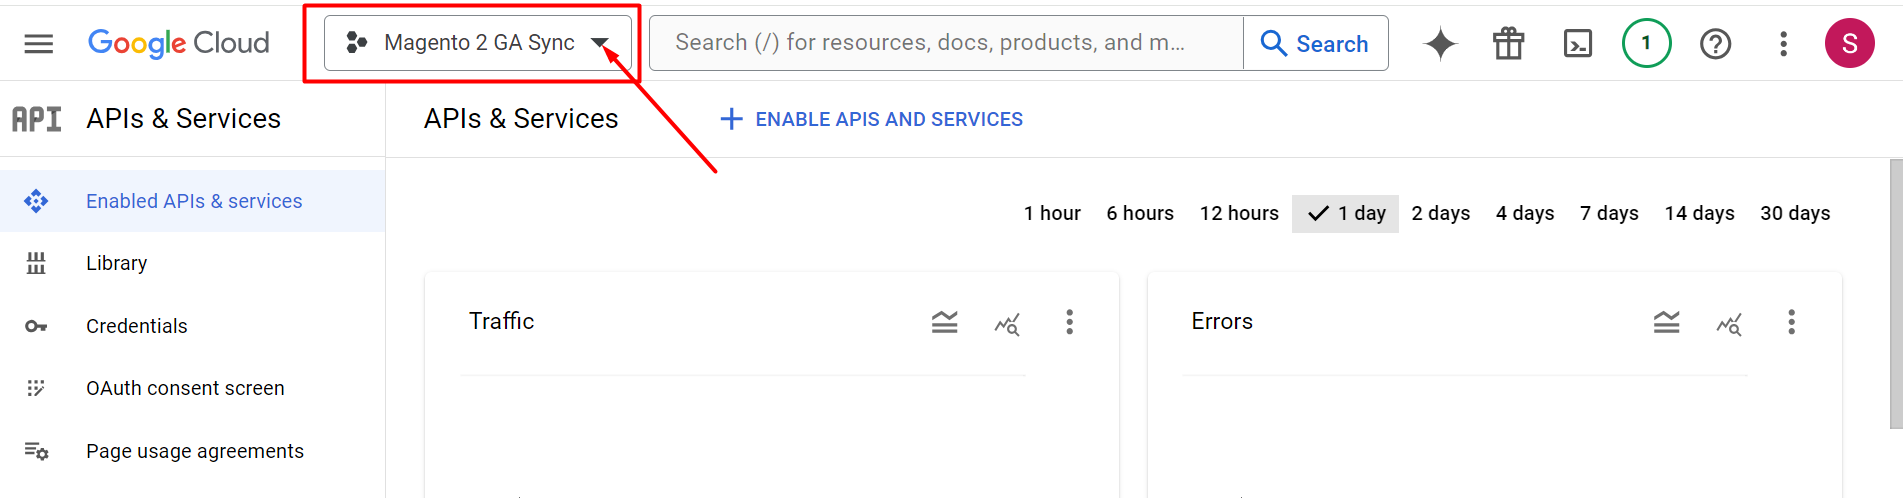
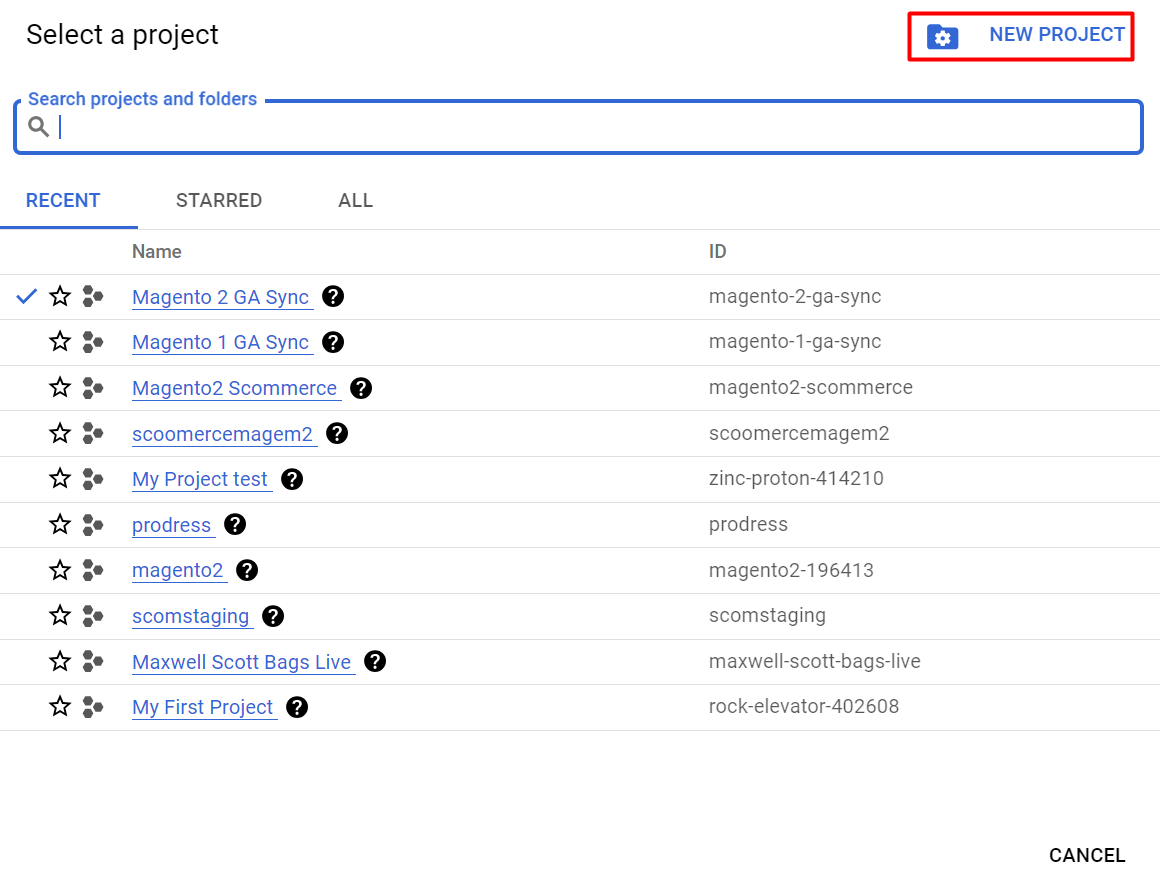
Go to https://console.developers.google.com/. Click on the dropdown on the left as shown in the image below and a popup will appear on your screen.
Click on New Project
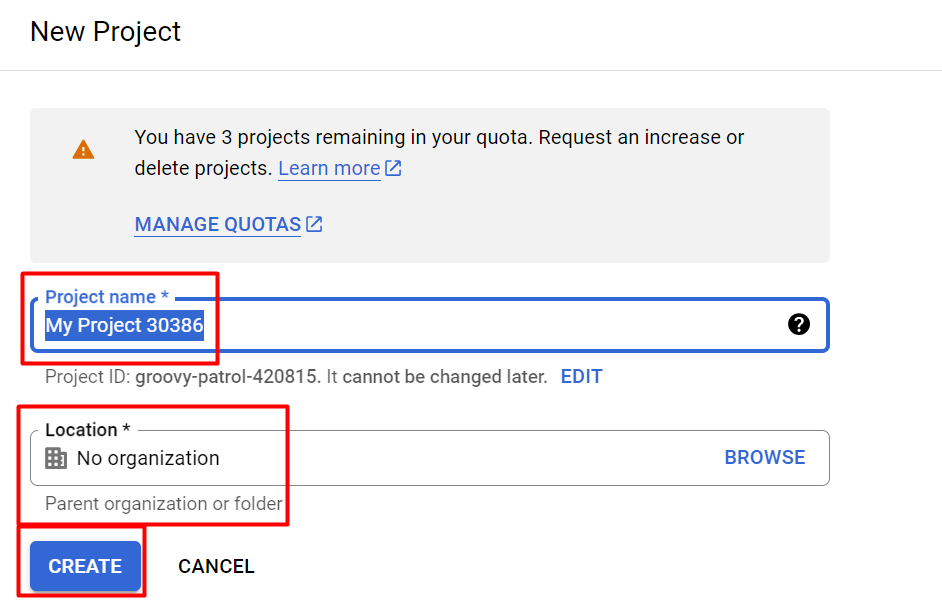
Enter your project name and Location then click on create.
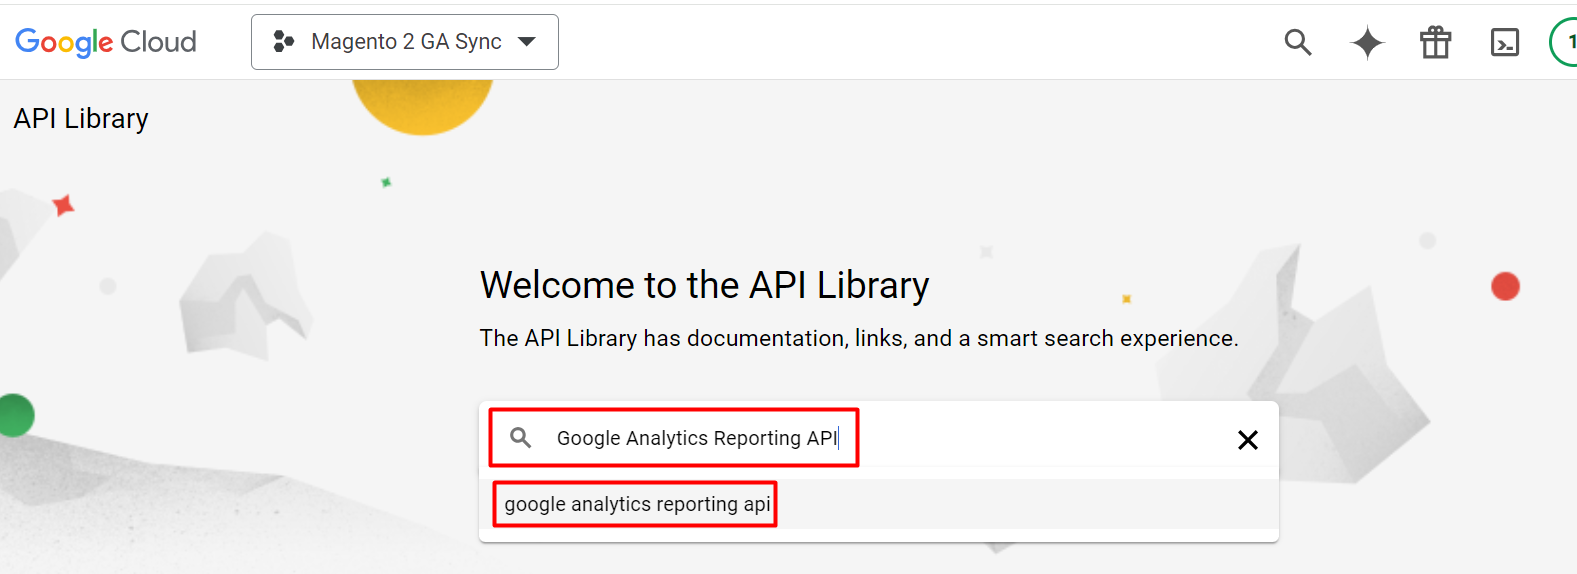
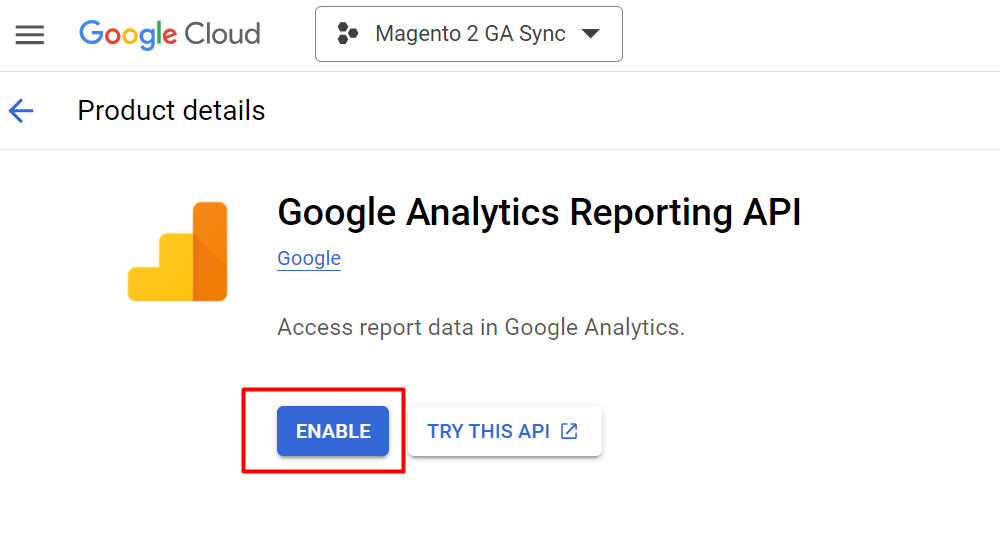
Click on Enable APIS and SERVICES

In the next window search for Google Analytics Reporting API, this API gets used for GA4 along with Analytics Data API
Click on Enable to enable the API
Similarly enable the below API's as well:-
- Google Analytics API (Used to access UA data)
- Google Analytics Data API (Used to access GA4 report Data) https://developers.google.com/analytics/devguides/reporting/data/v1?hl=en_US
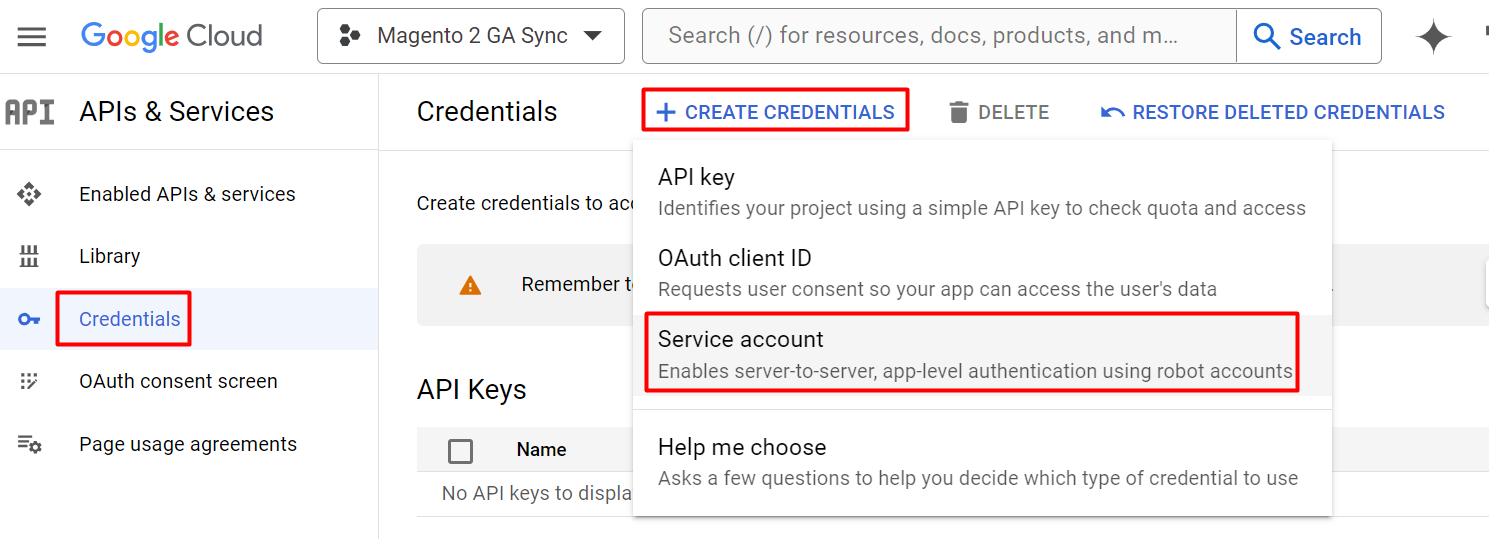
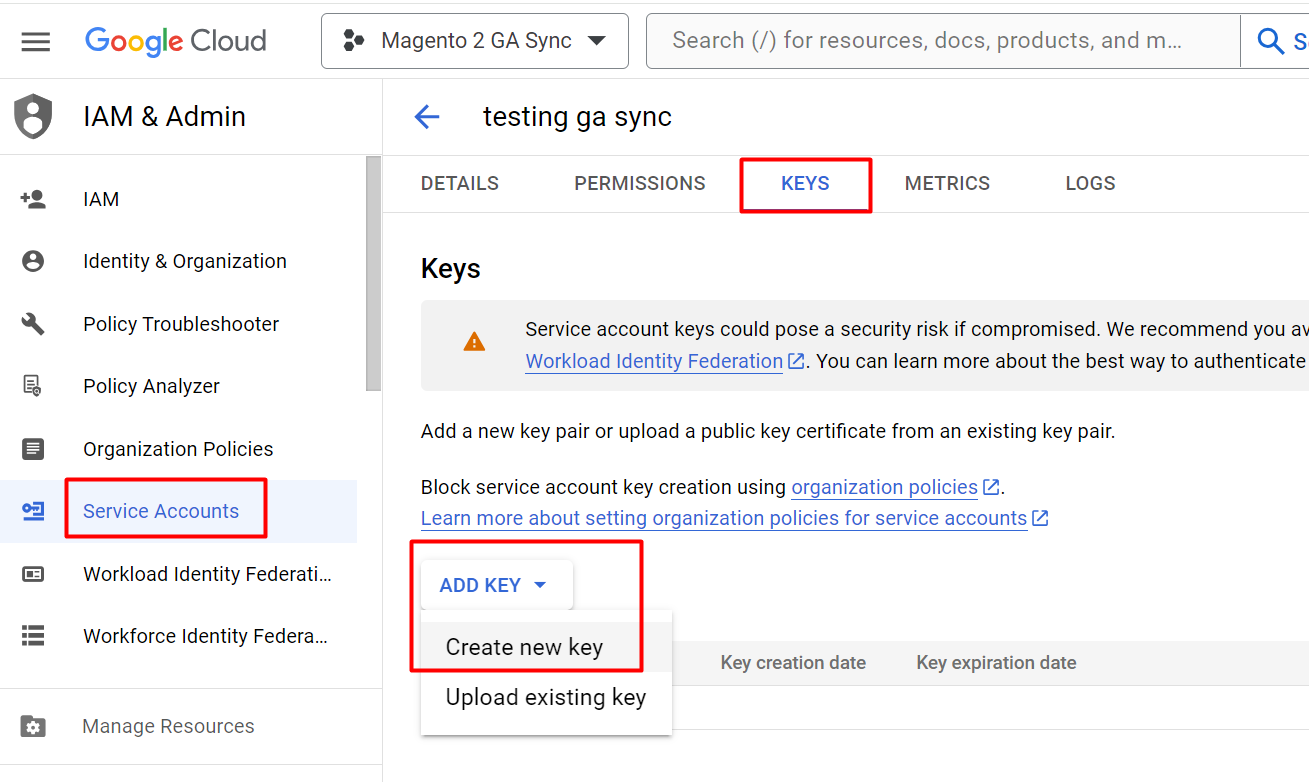
Click on Credentials from the left window then click on Create Credentials and choose service account.
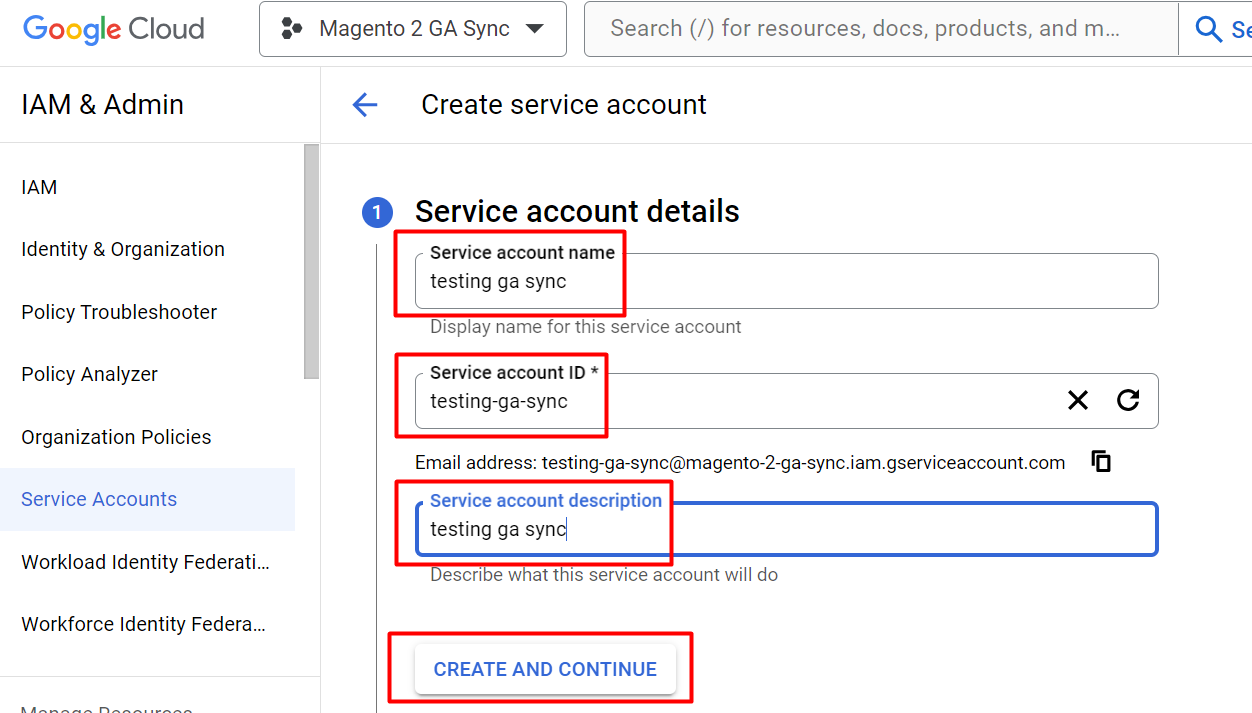
In the next window, fill in your service account name and description then click on Create. An email will be automatically created as per your name. We need to add this email in google analytics. We will do it in the steps down below. Your service name will be your Application Name that you will enter in the configuration.
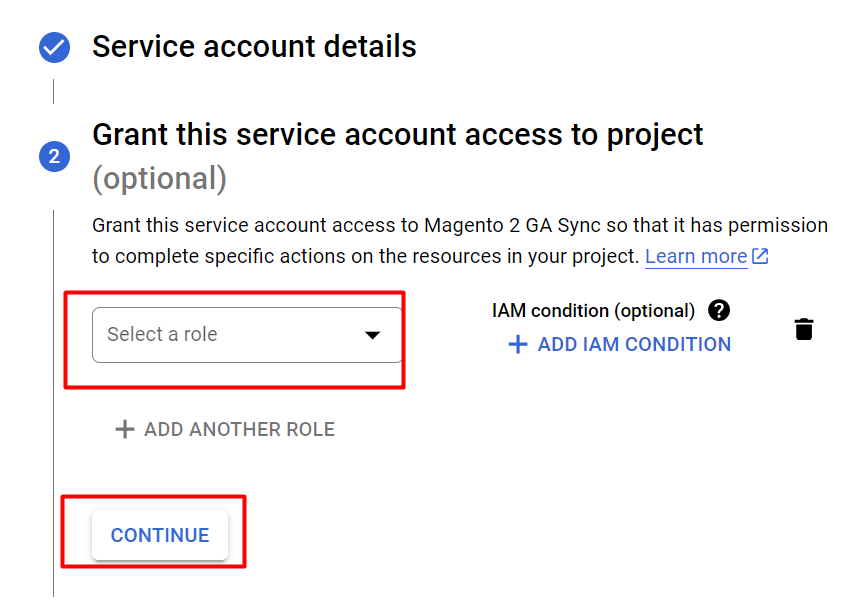
Click on continue without selecting a role.
- Click Continue again without any selection
- Click on Create Key from the image above and select json your key file will be downloaded. Place this key file in the VAR directory of your website. Copy the exact name with extension ".json" and input it into security Key in the configuration.
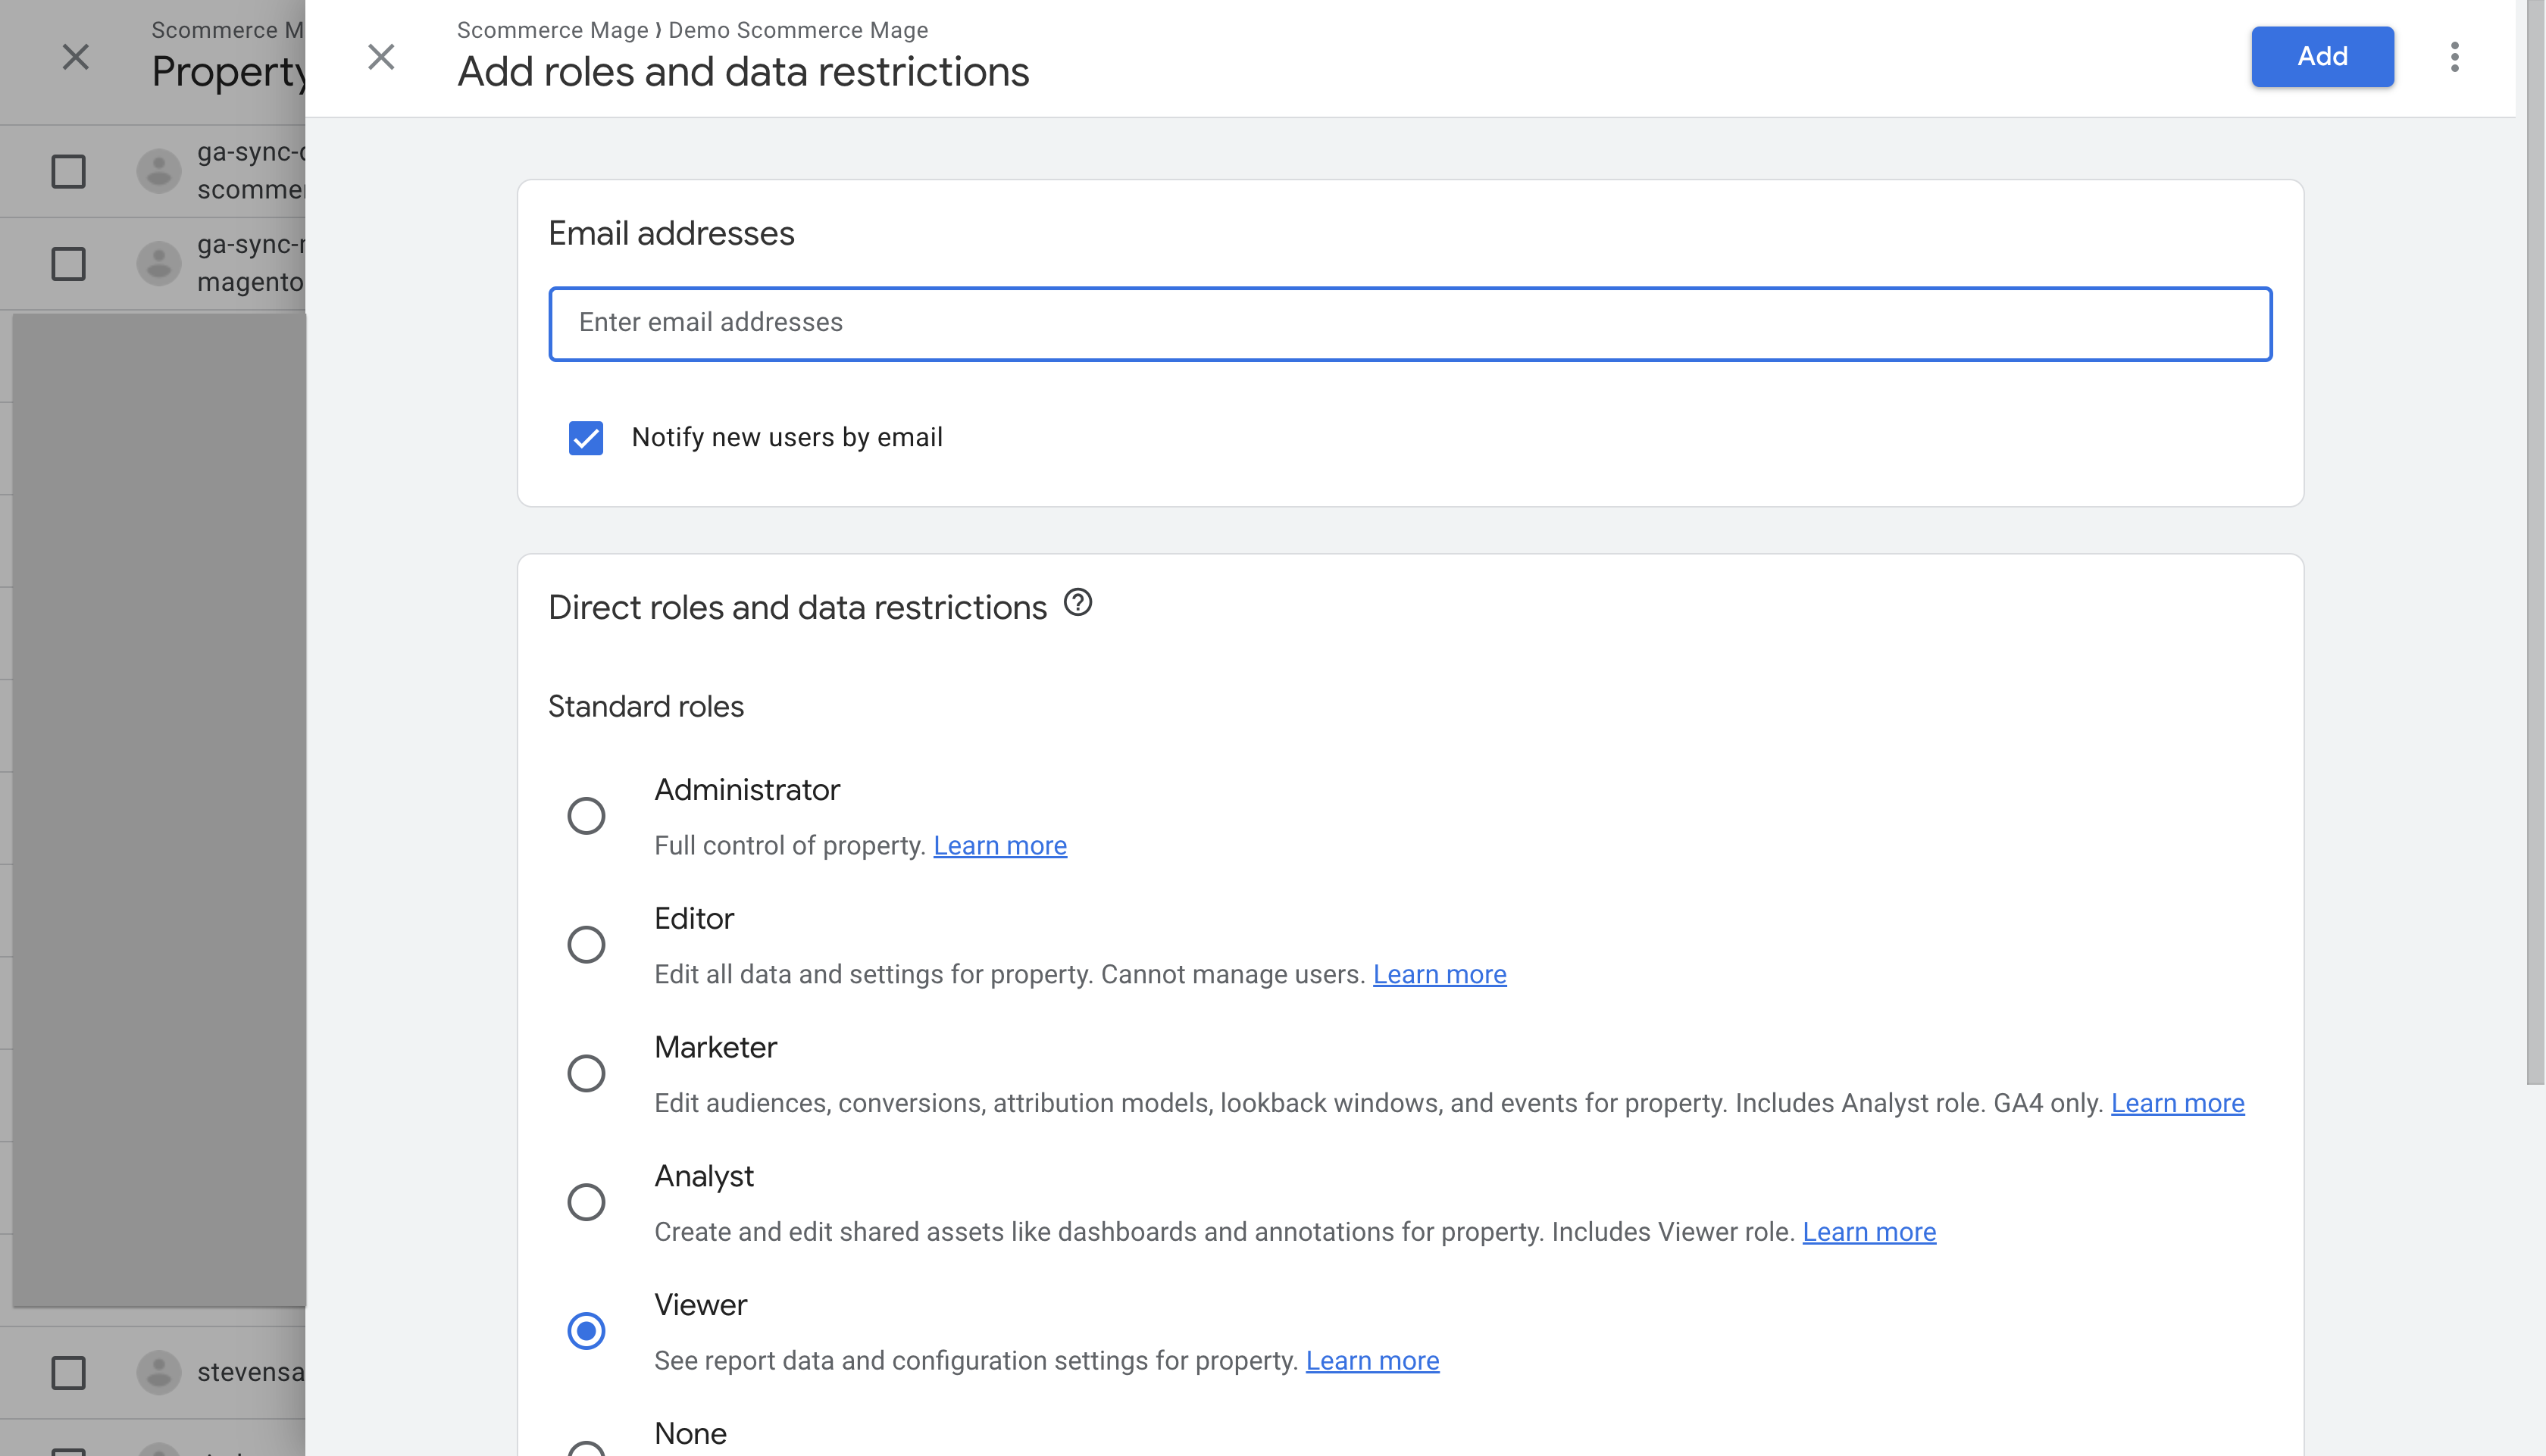
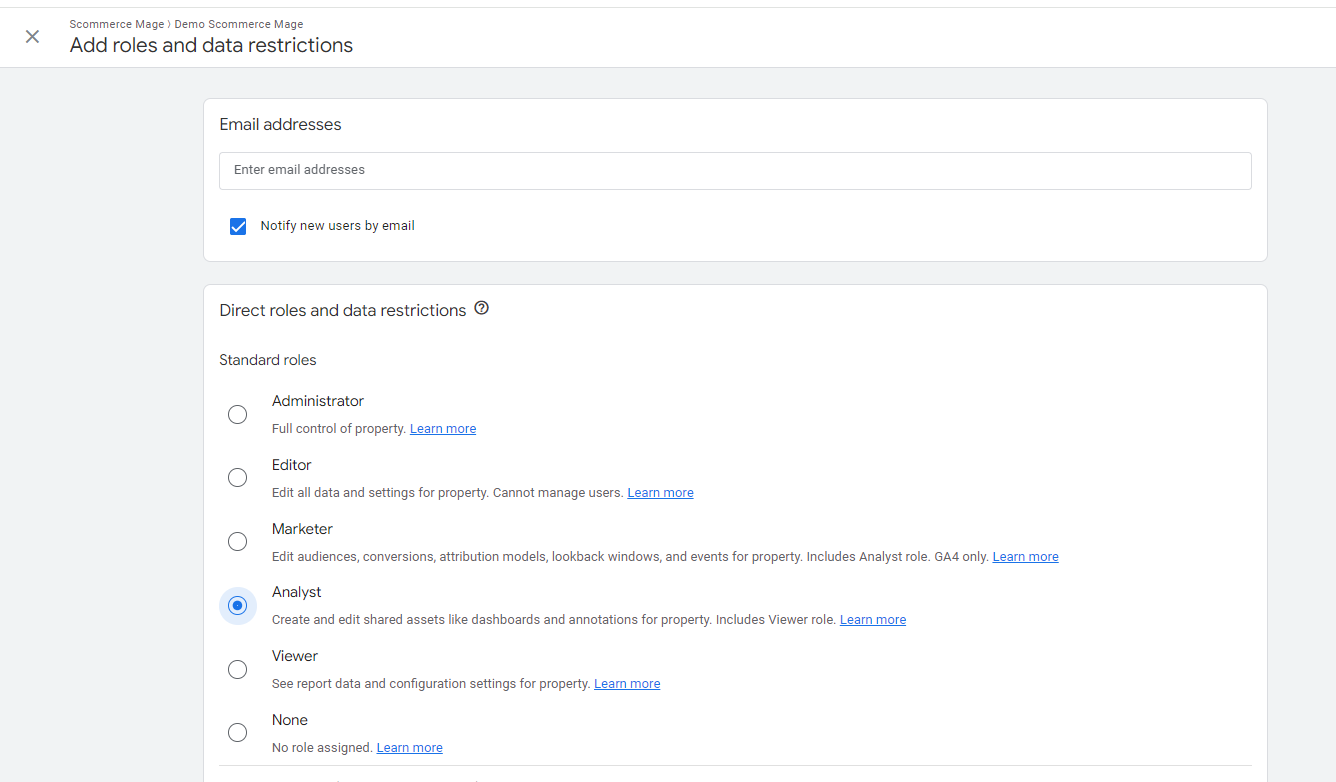
- Login to your GA4 account. Go to Admin -> Property -> Property Access Management. Add the email we got in the steps above with "Viewer" or "Analyst" permissions.
- Login to your Universal Analytics account. Go to Admin > User Management. Add the email we got in the steps above with "Viewer" or "Analyst" permissions.
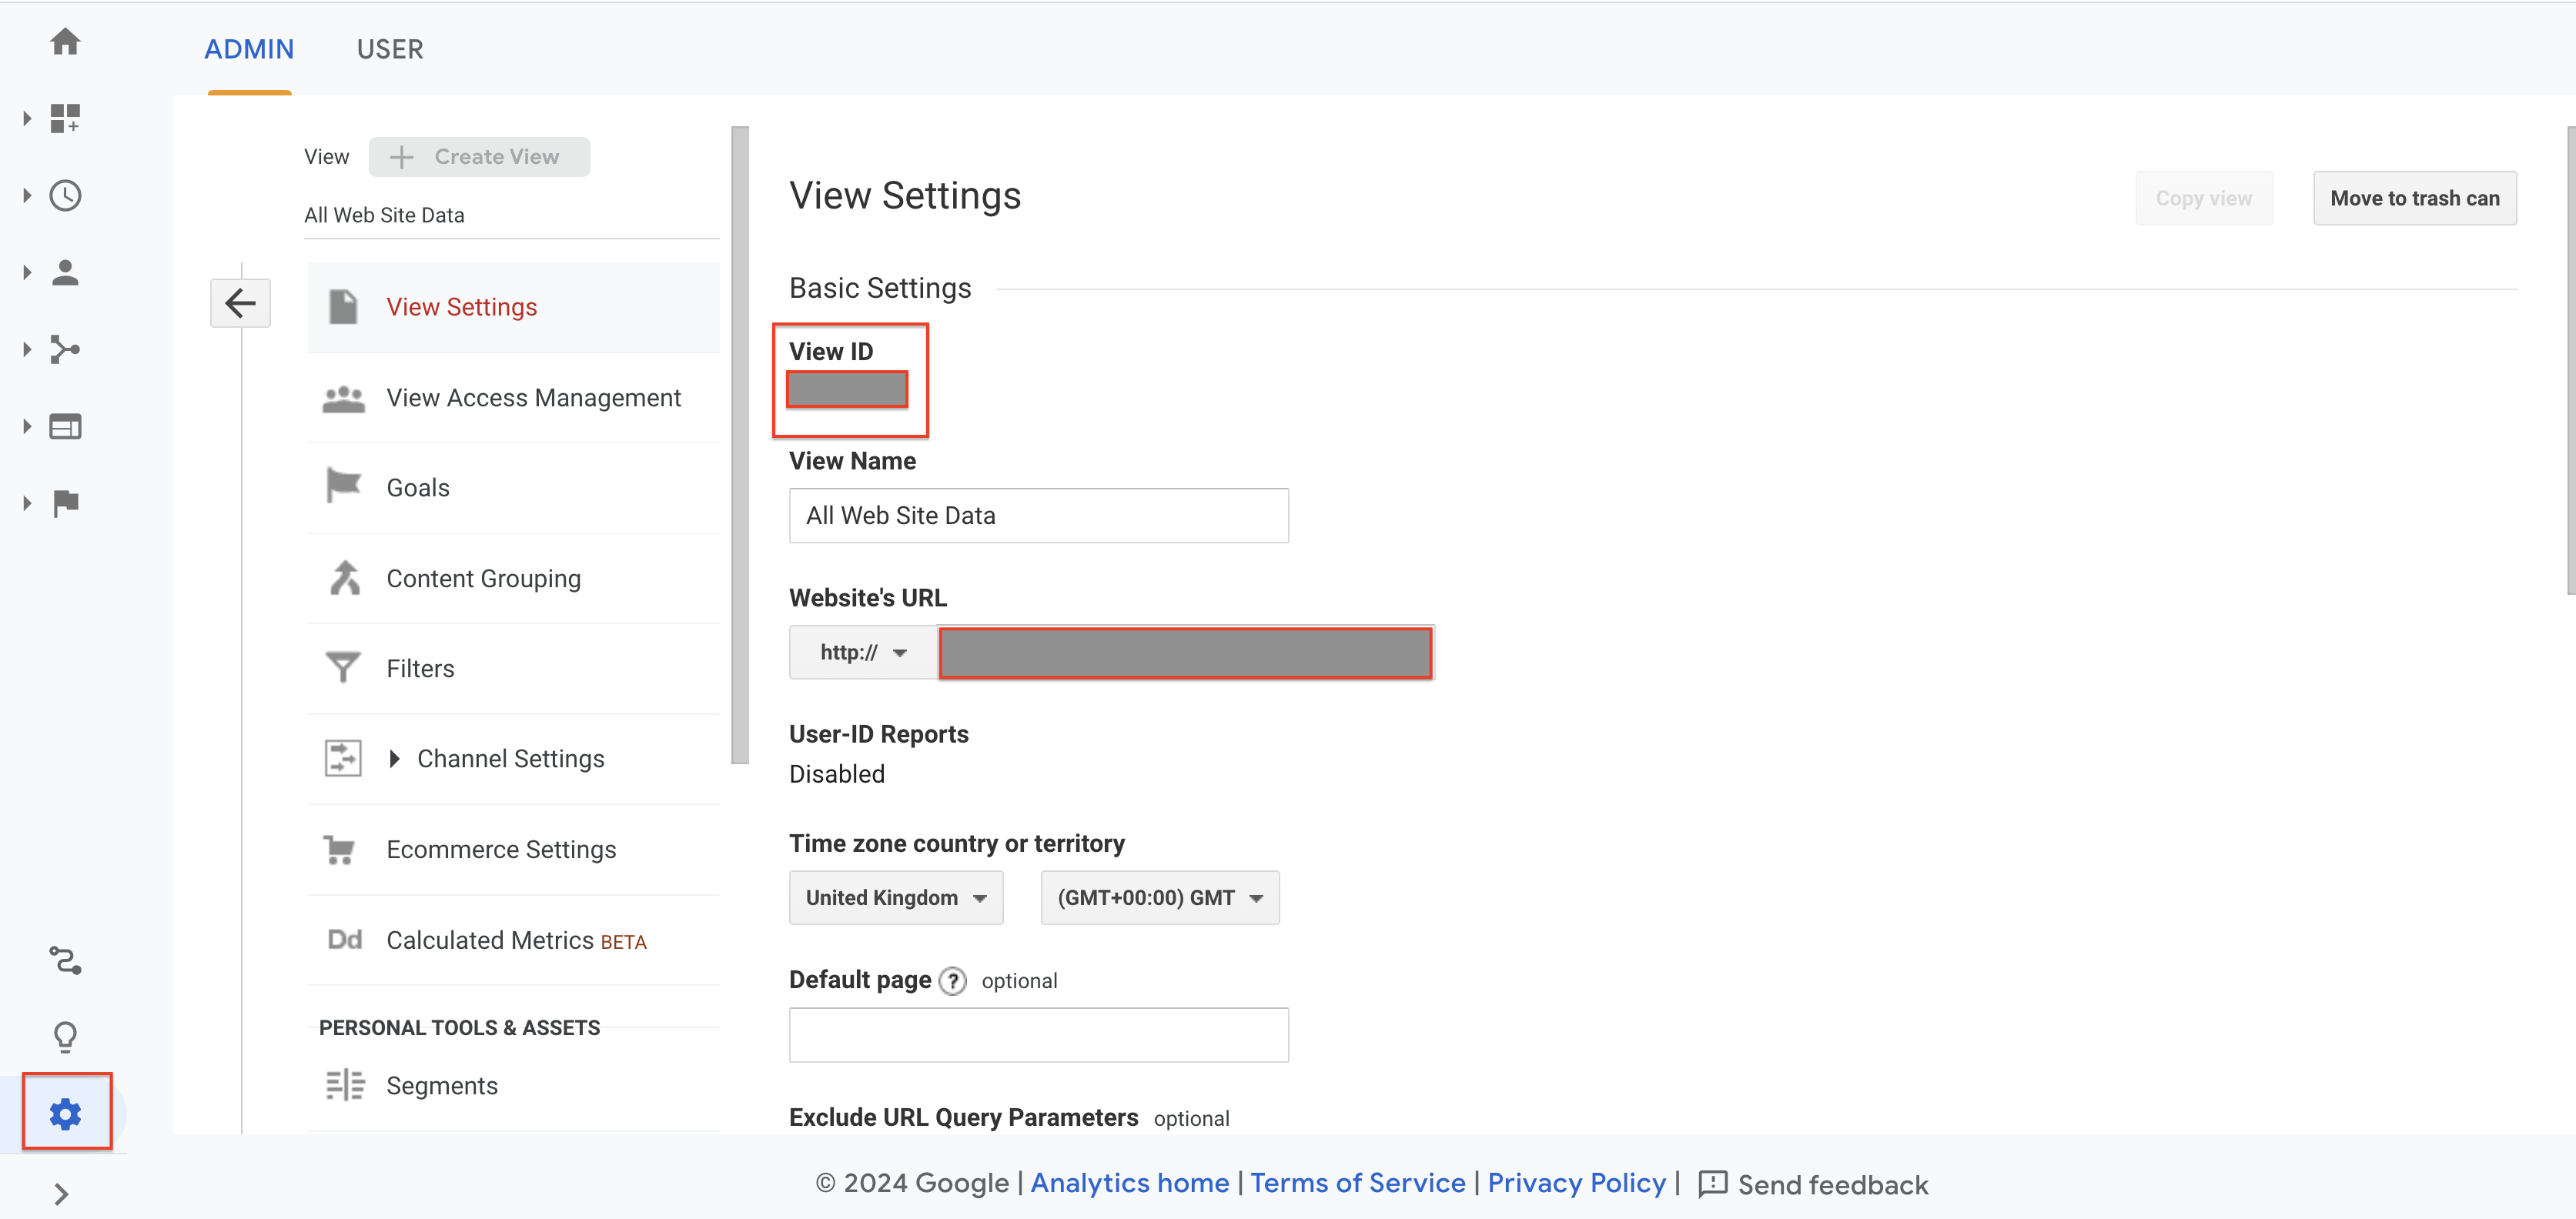
Getting View ID (Universal Analytics)
Login to Your Google Analytics account and go to Admin>View Settings. You will be able to see your view Id there. You need to input this into the configuration as well.
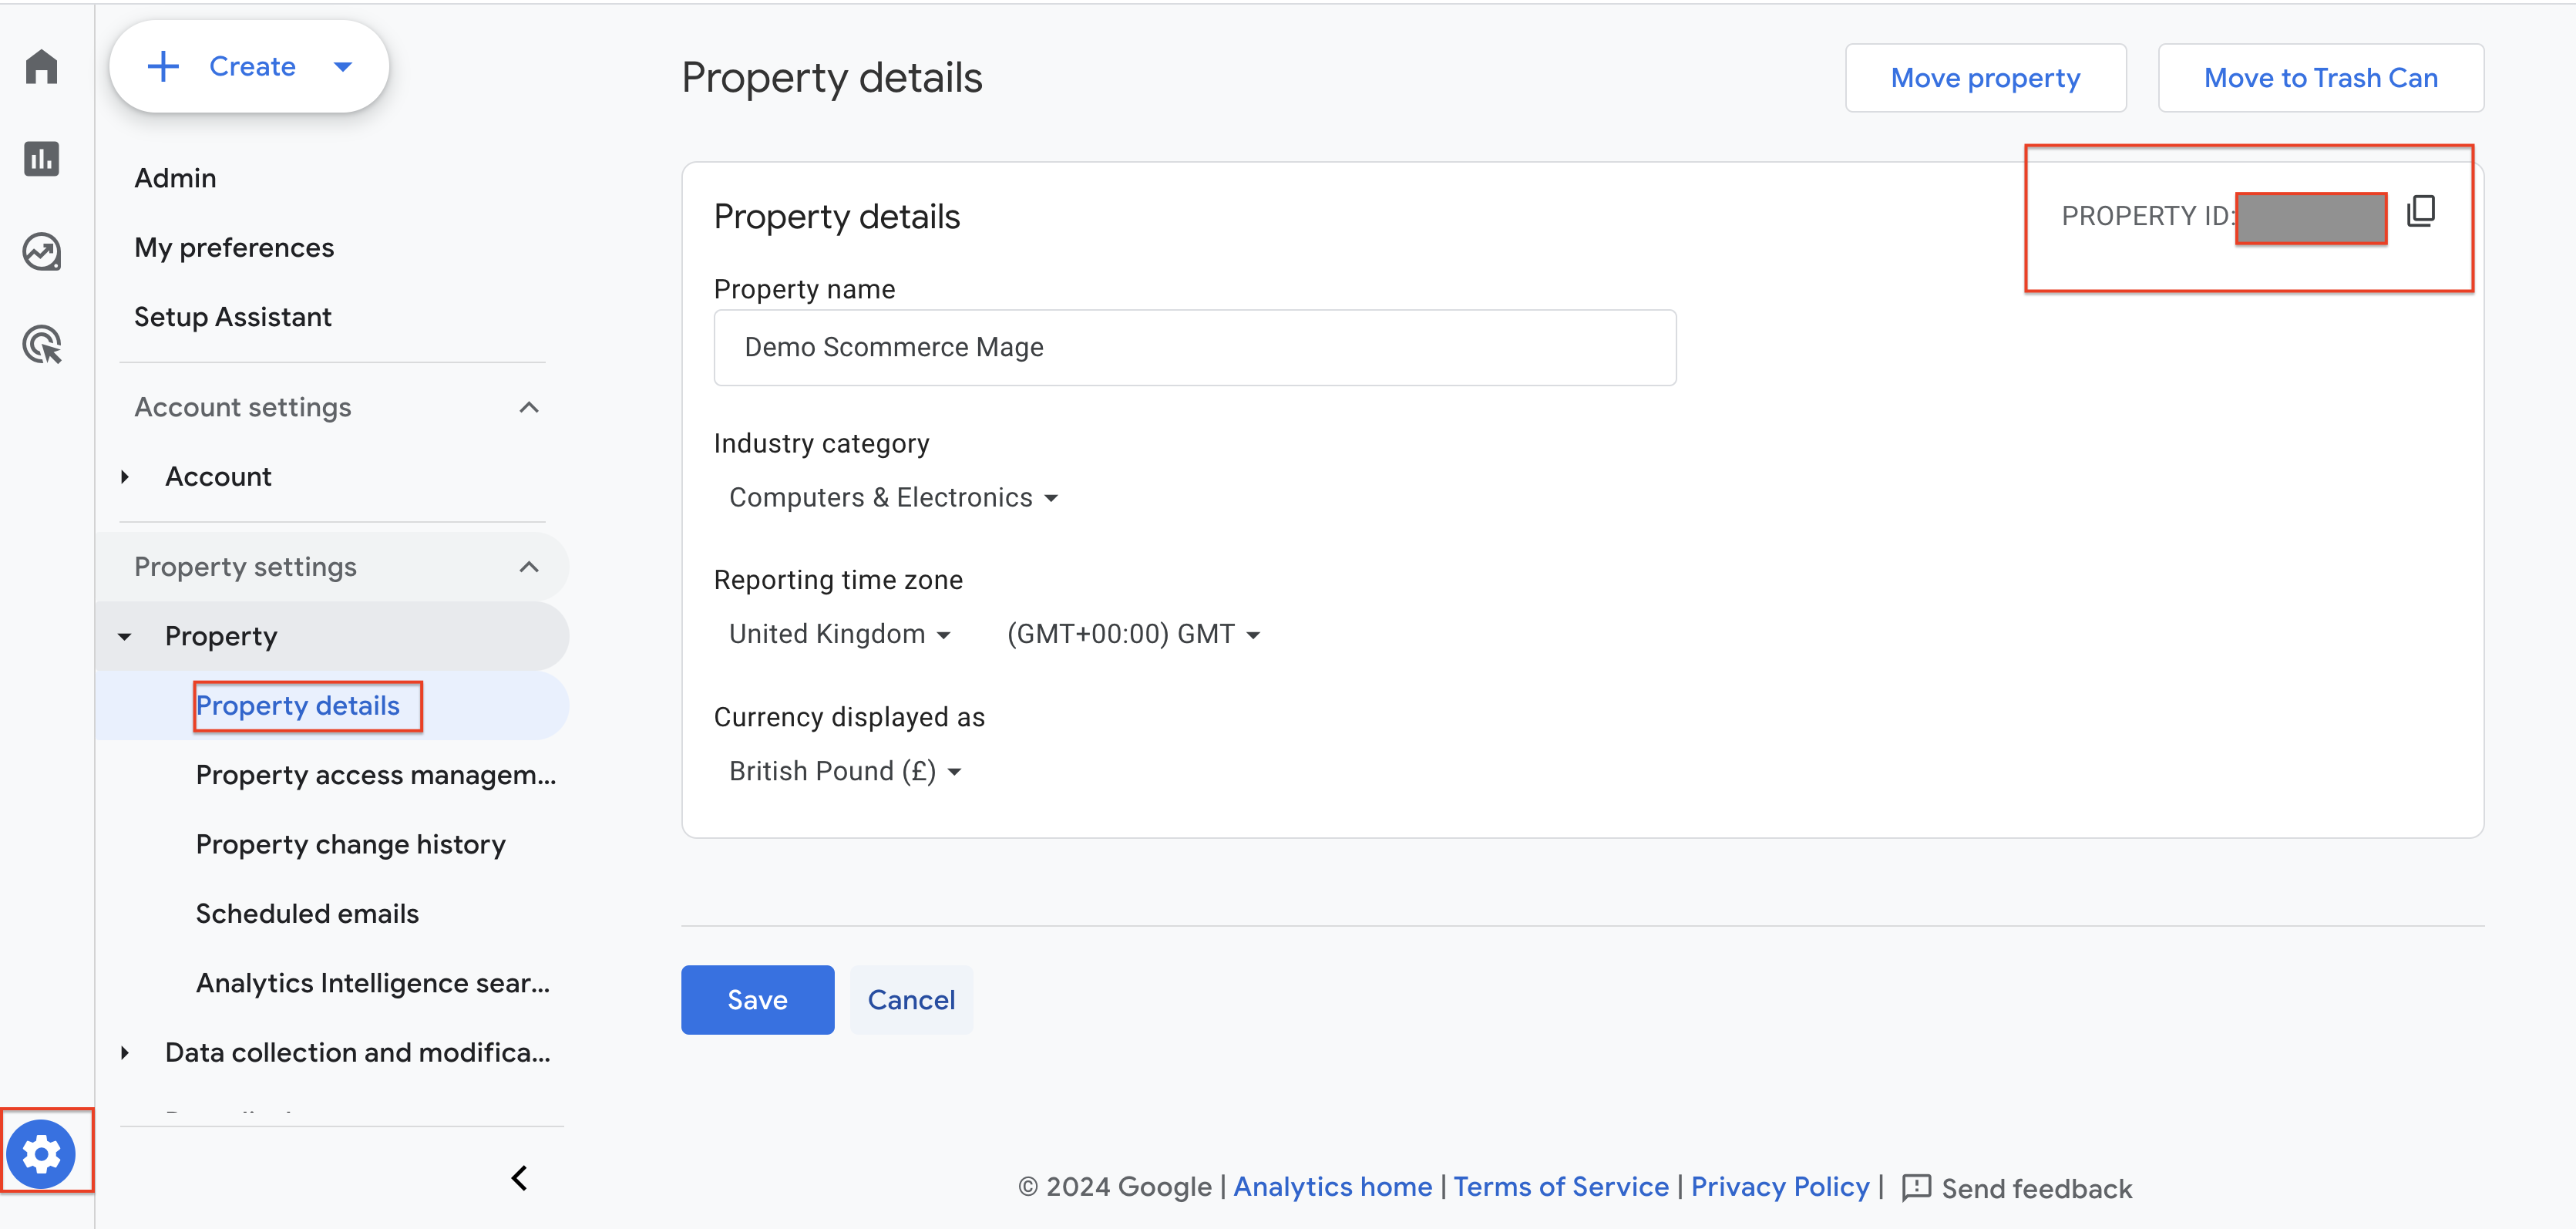
Getting Property ID (GA4)
Command to run the Synch Manually
php bin/magento scommerce:analyticssync:synchronize
If you have a question related to this extension please check out our FAQ Section first. If you can't find the answer you are looking for then please contact support@scommerce-mage.com.