Magento 1 / OpenMage GA4 Google Tag Manager (GTM)
Installation and User Guide for Magento 1 / OpenMage GA4 Google Tag Manager (GTM)
Table of Contents
- Installation
- Disable Compilation Mode
- Upload Package
- Clear Caches
- Configuration Settings for Google Tag Manager Pro Tracking
- General Settings
- Query String Parameter Cookies
- JSONs provided with extension package
- Google Analytics 4
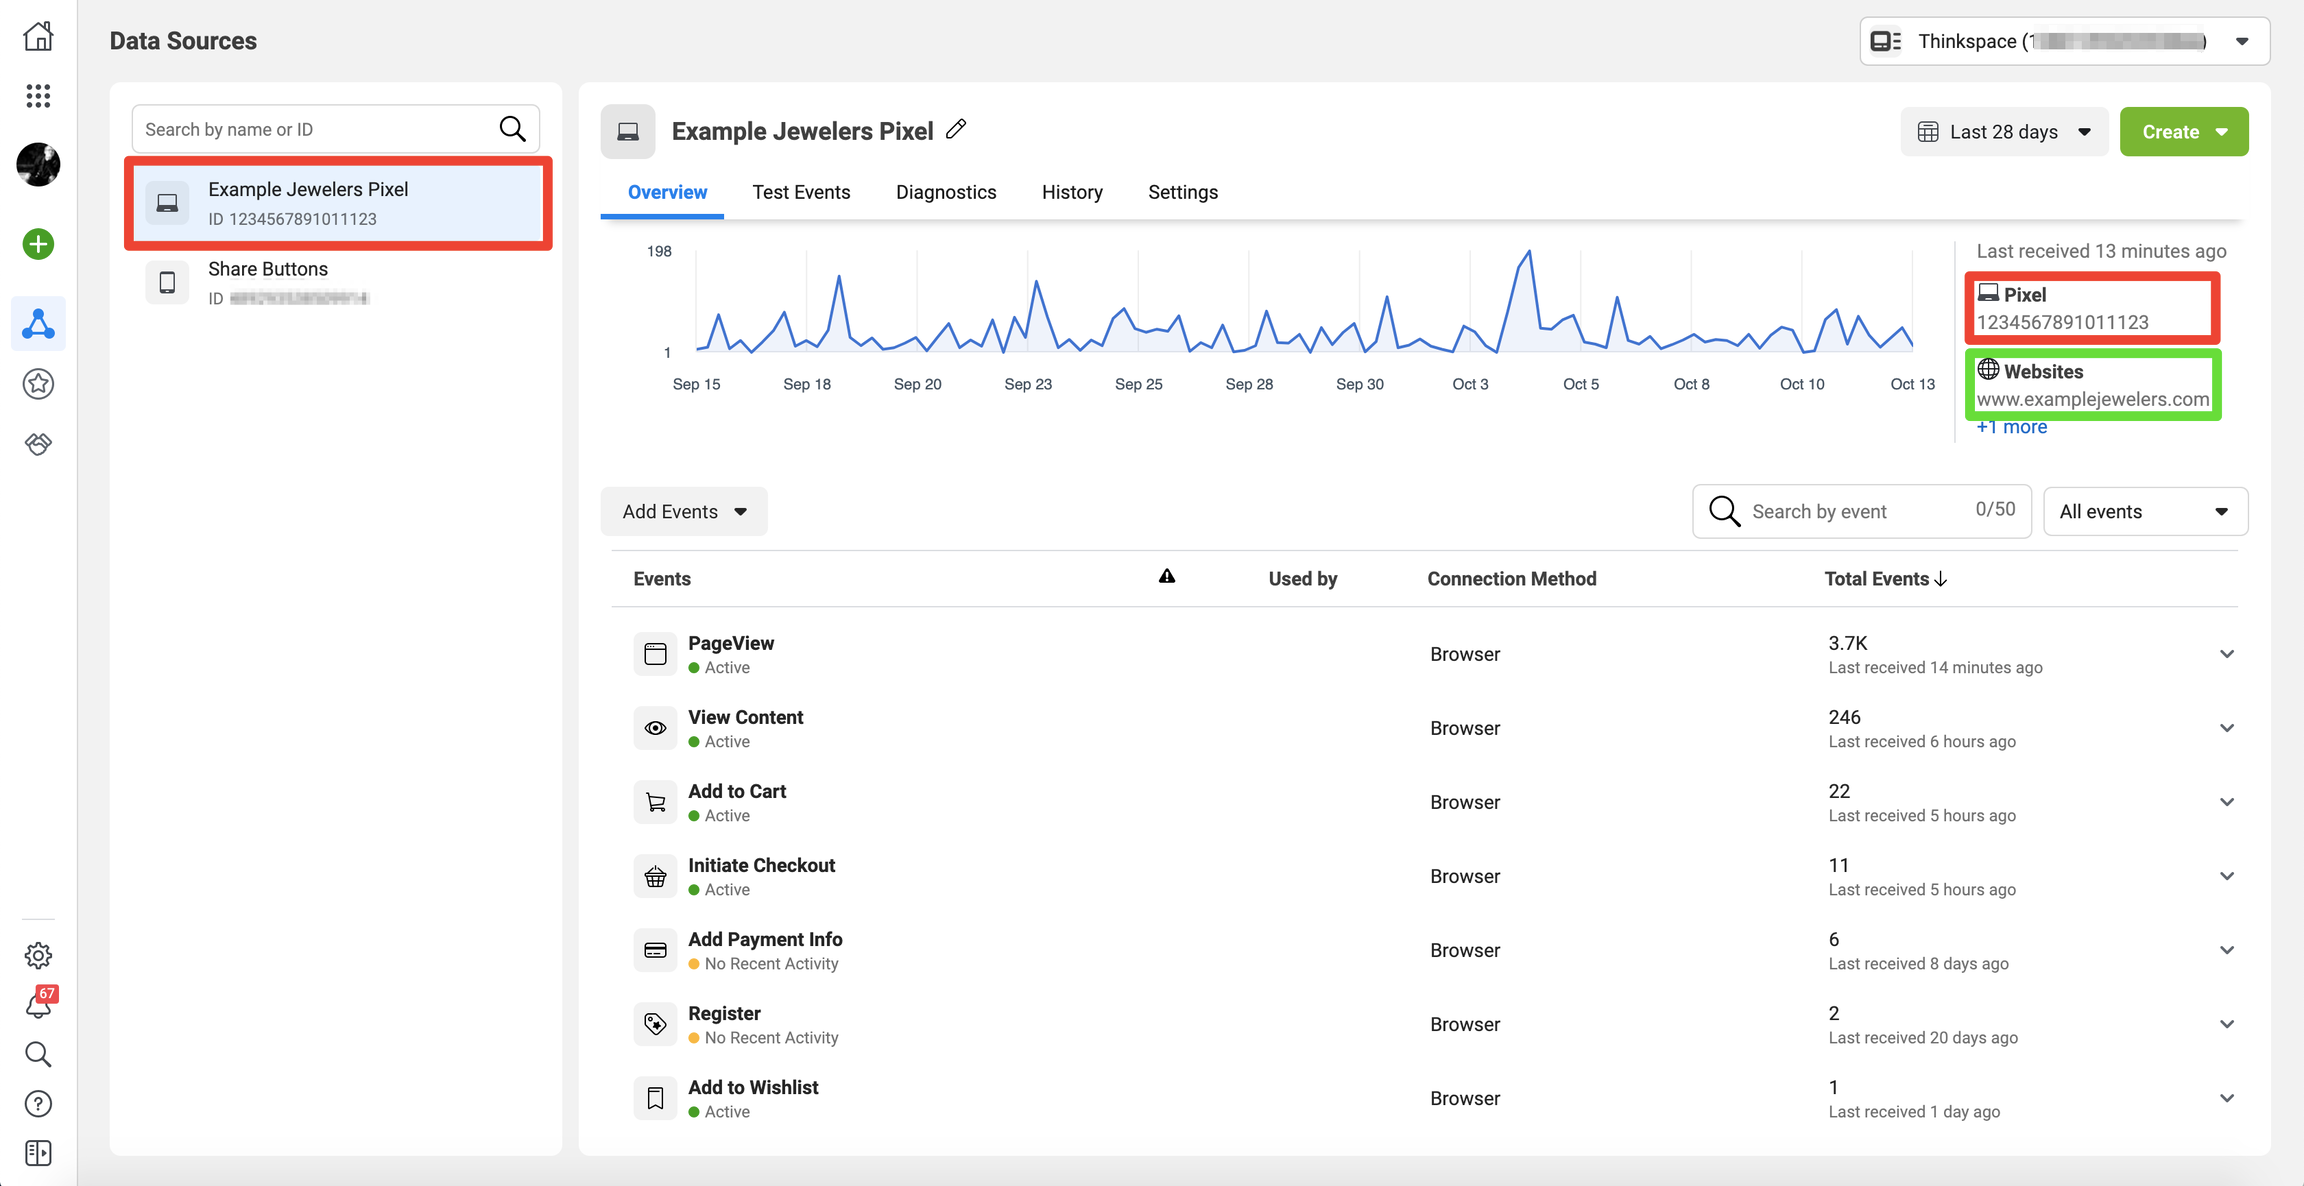
- Facebook Pixel Tracking
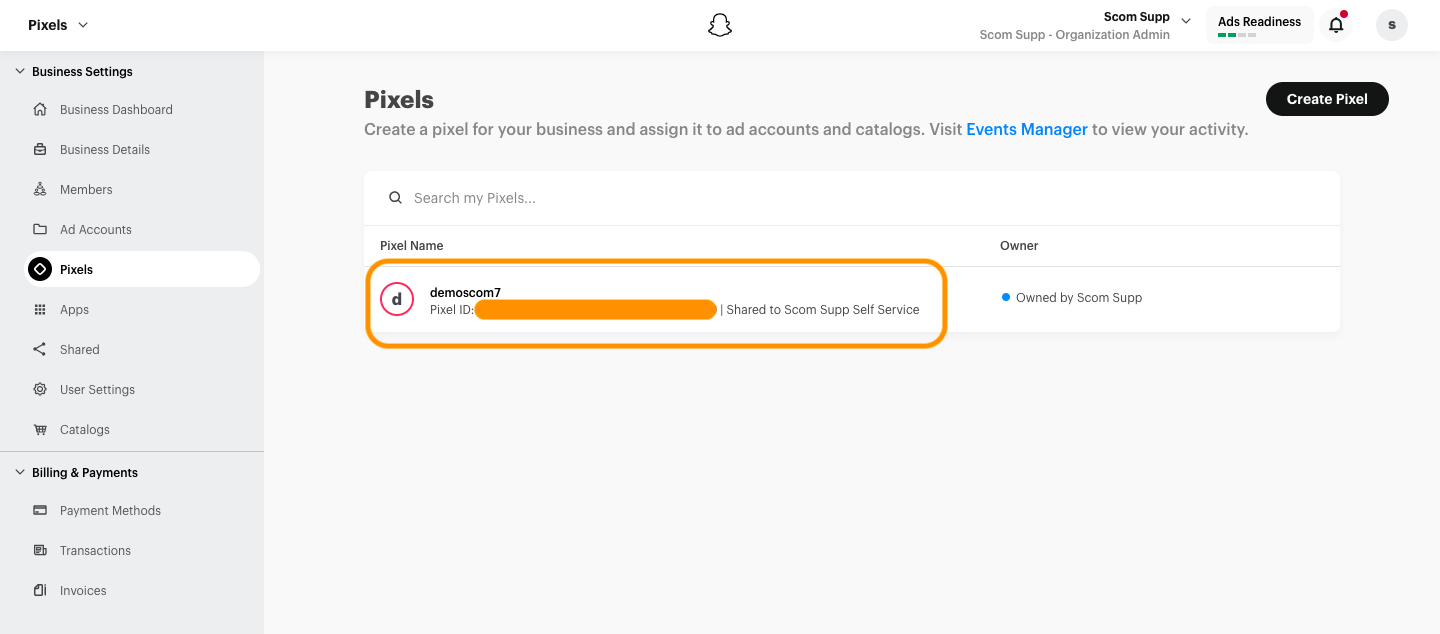
- Snapchat Pixel Tracking
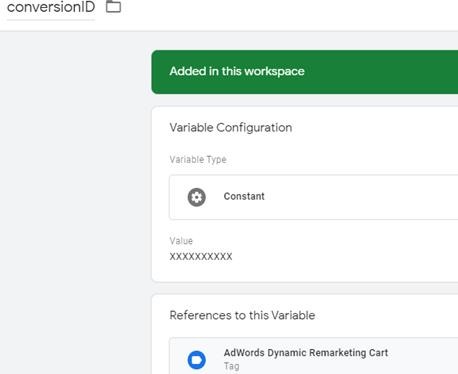
- Adwords Dynamic Remarketing
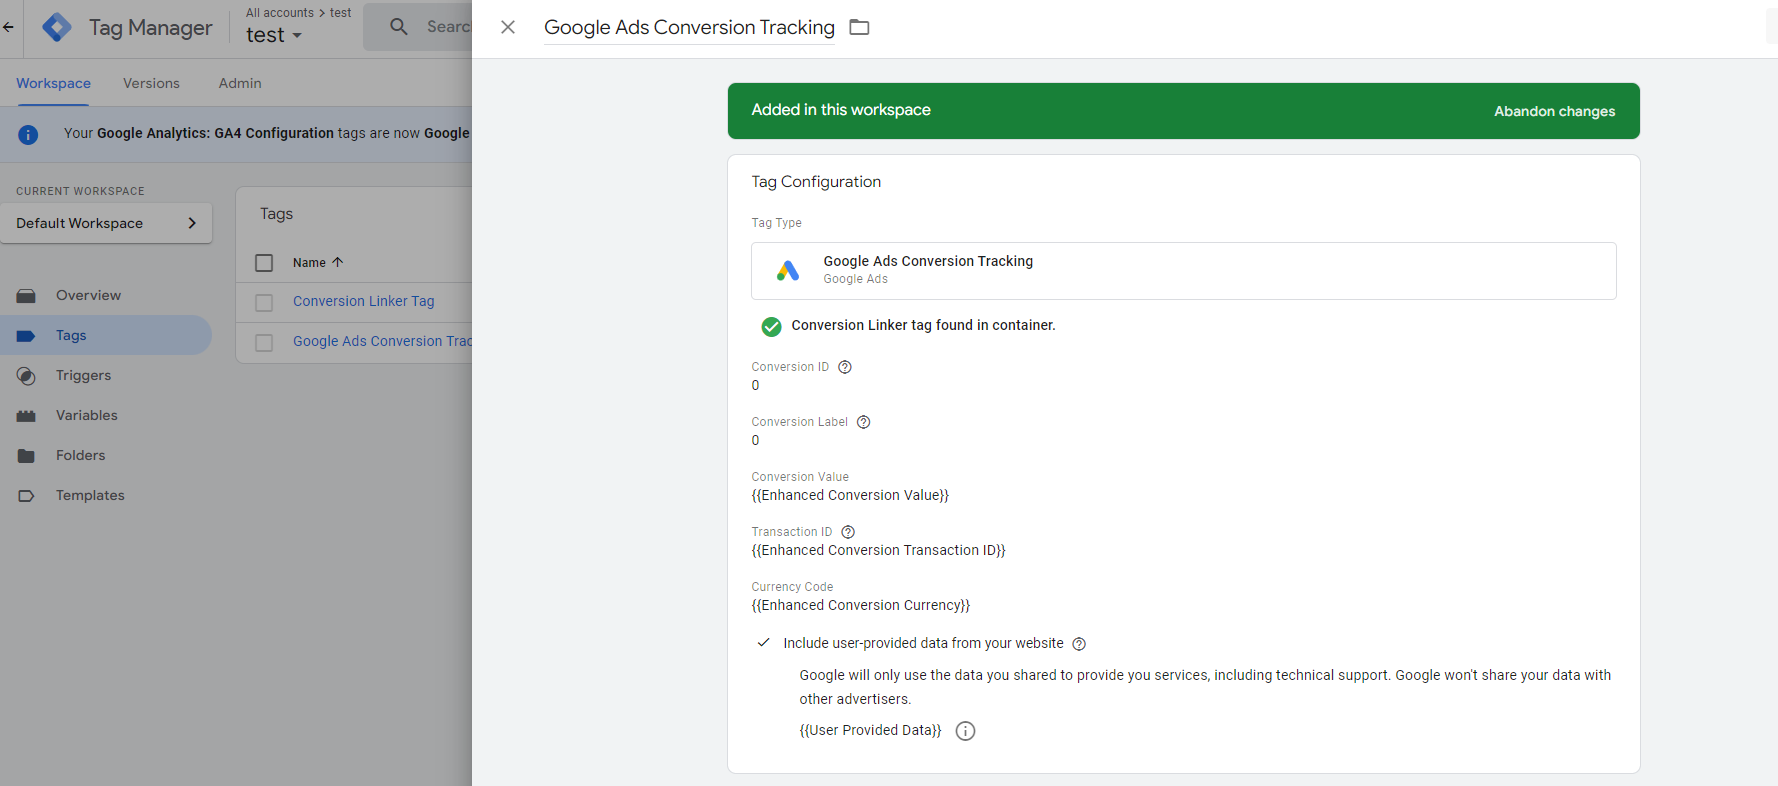
- Google Ads Enhanced Conversion Tracking with Javascript variable
- Google Ads Enhanced Conversion Tracking with Data layer
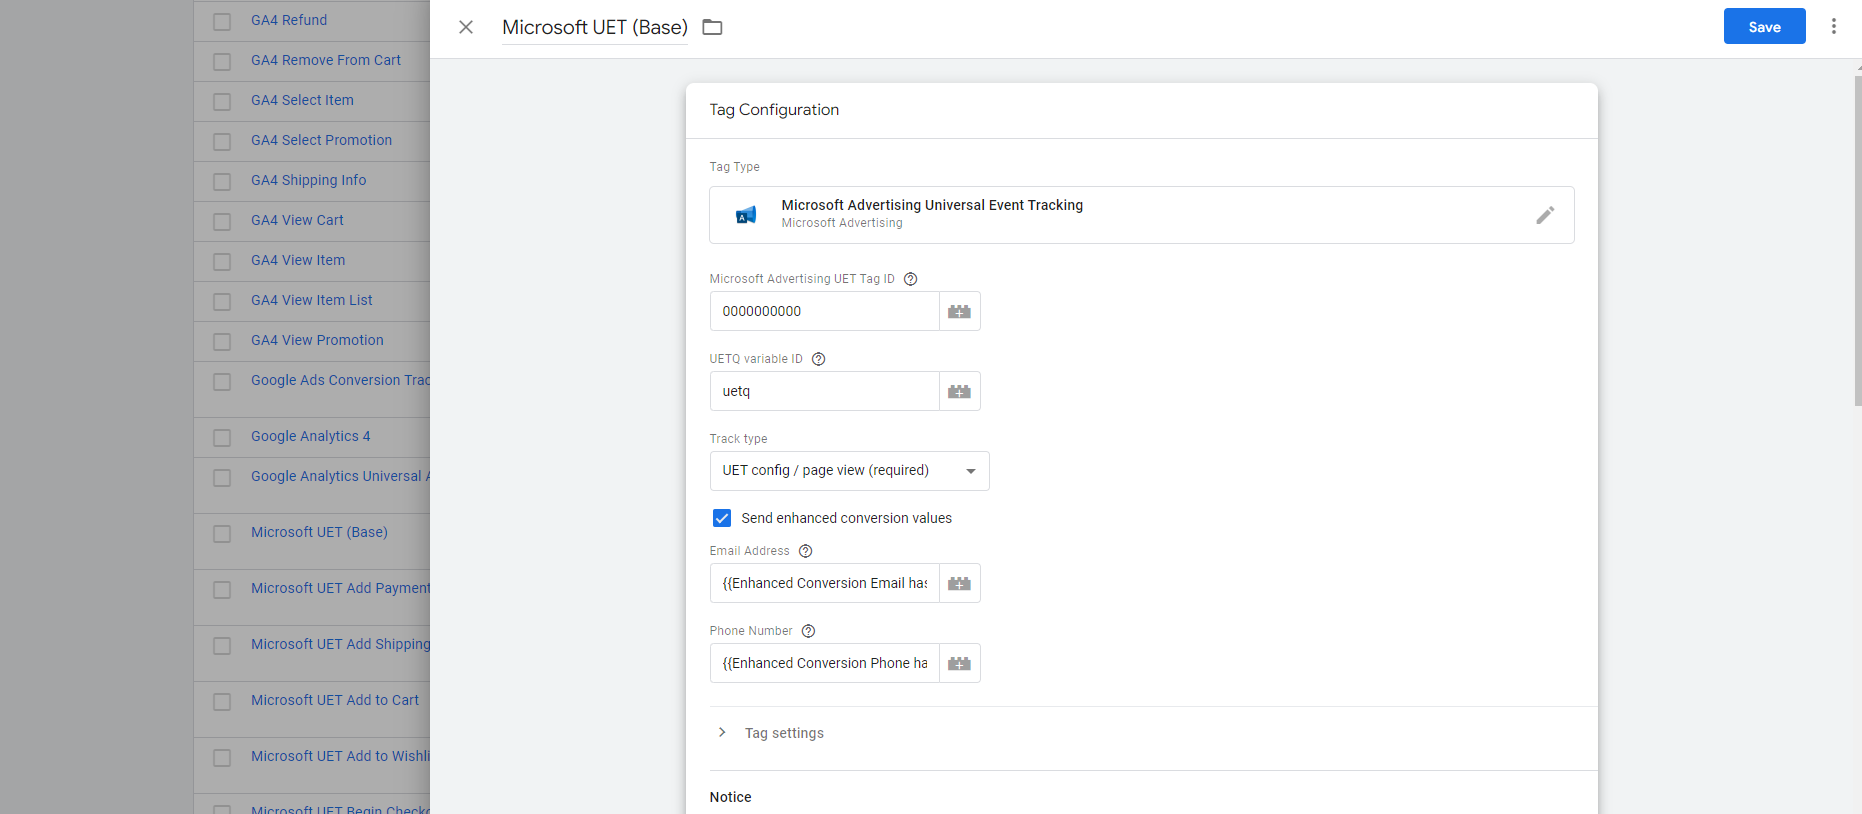
- Microsoft UET Tracking (Bing Ads Tracking)
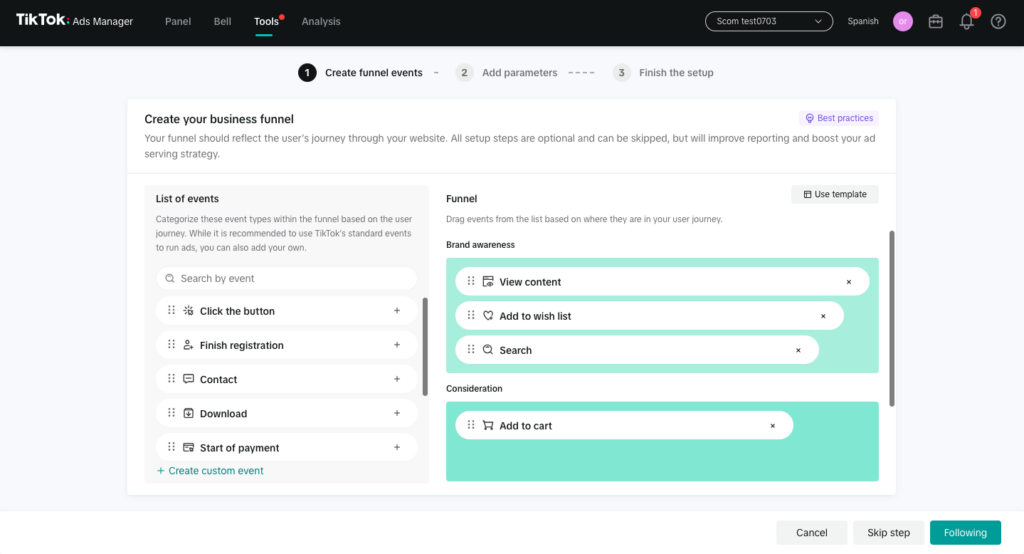
- Tiktok Pixel Tracking
- Twitter(X) Pixel Tracking
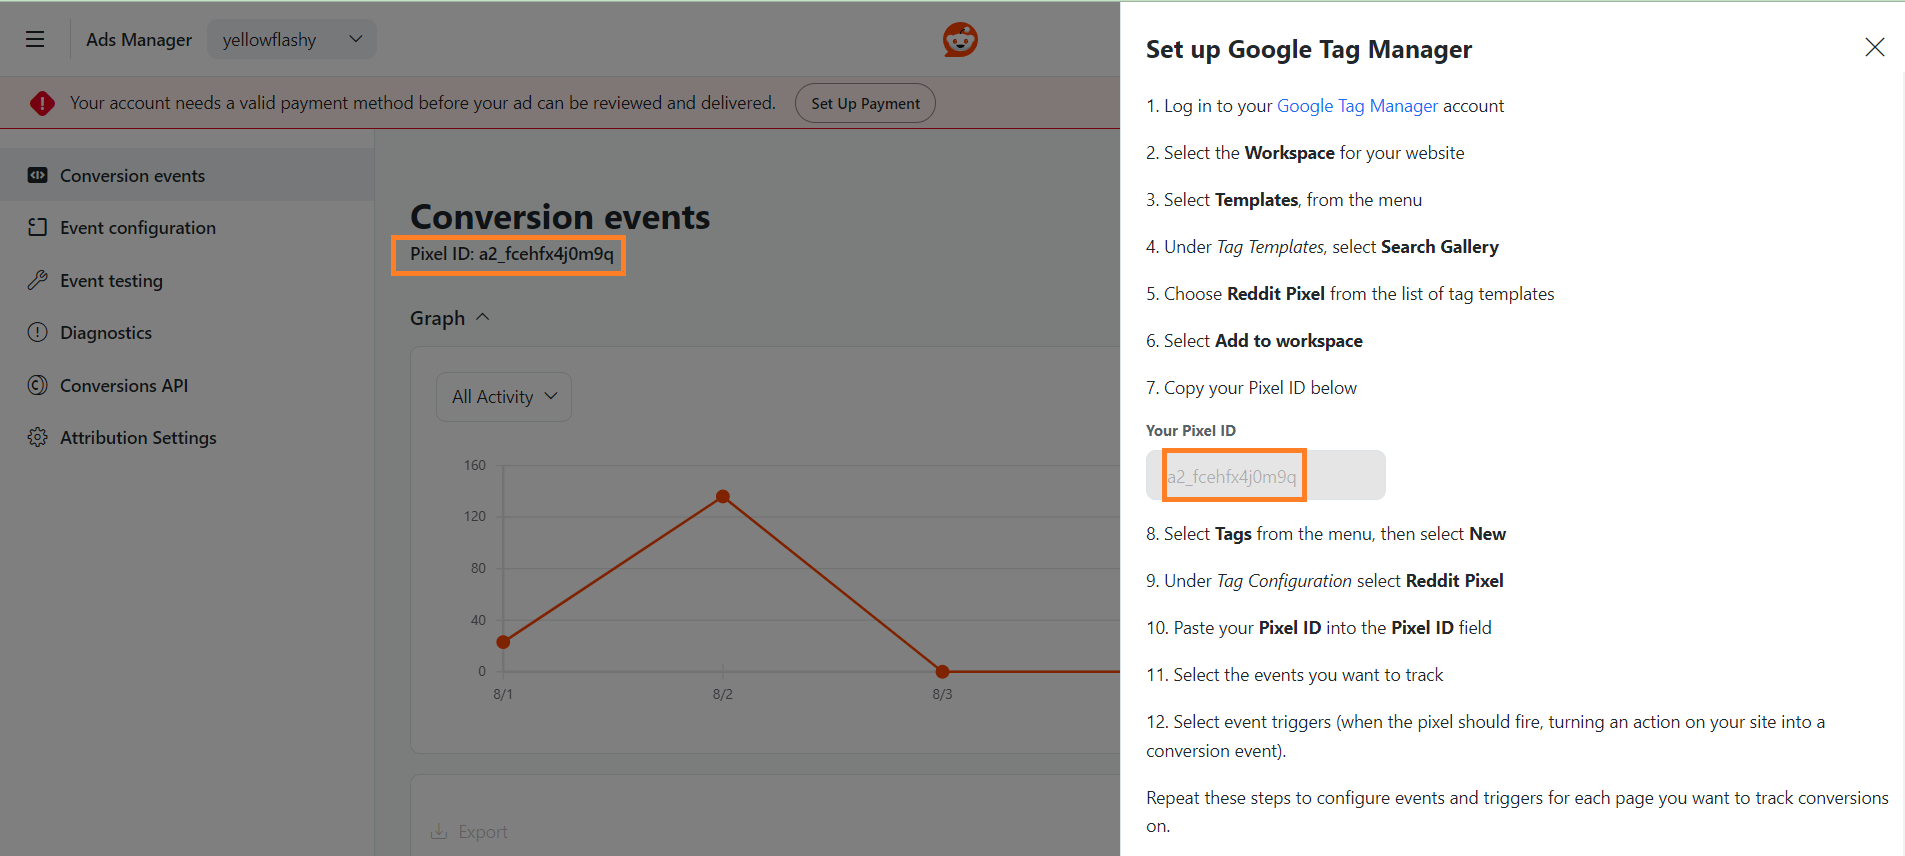
- Reddit Pixel Tracking
- Importing JSONs into GTM
- Setting variable information in GTM
- Publishing Tags in GTM
- Set up Google Analytics 4
- AJAX Add to Basket or Remove from Basket
- AJAX Add to Basket
- AJAX Remove from Basket
- Set Primary Categories
- Upgrading the Module From 0.0.35 and Below
- Query String Parameter Cookies
Installation
- Disable Compilation Mode: To check that this is disabled, go to System>Tools > Compilation. If the compiler status is 'Disabled', you are ready to go. If not, simply click the 'Disable' button on the right hand side of the screen.
- Upload Package: Upload the content of the module to your root folder. This will not overwrite the existing Magento folder or files, only the new contents will be added.
- Clear Caches: This can be done from the admin console by navigating to the cache management page (System > Cache Management), selecting all caches, clicking 'refresh' from the drop-down menu, and submitting the change.
Configuration Settings for Google Tag Manager Pro Tracking
Go to Admin > Stores > Configuration > Scommerce Configuration > Google Tag Manager Pro Tracking
General Settings
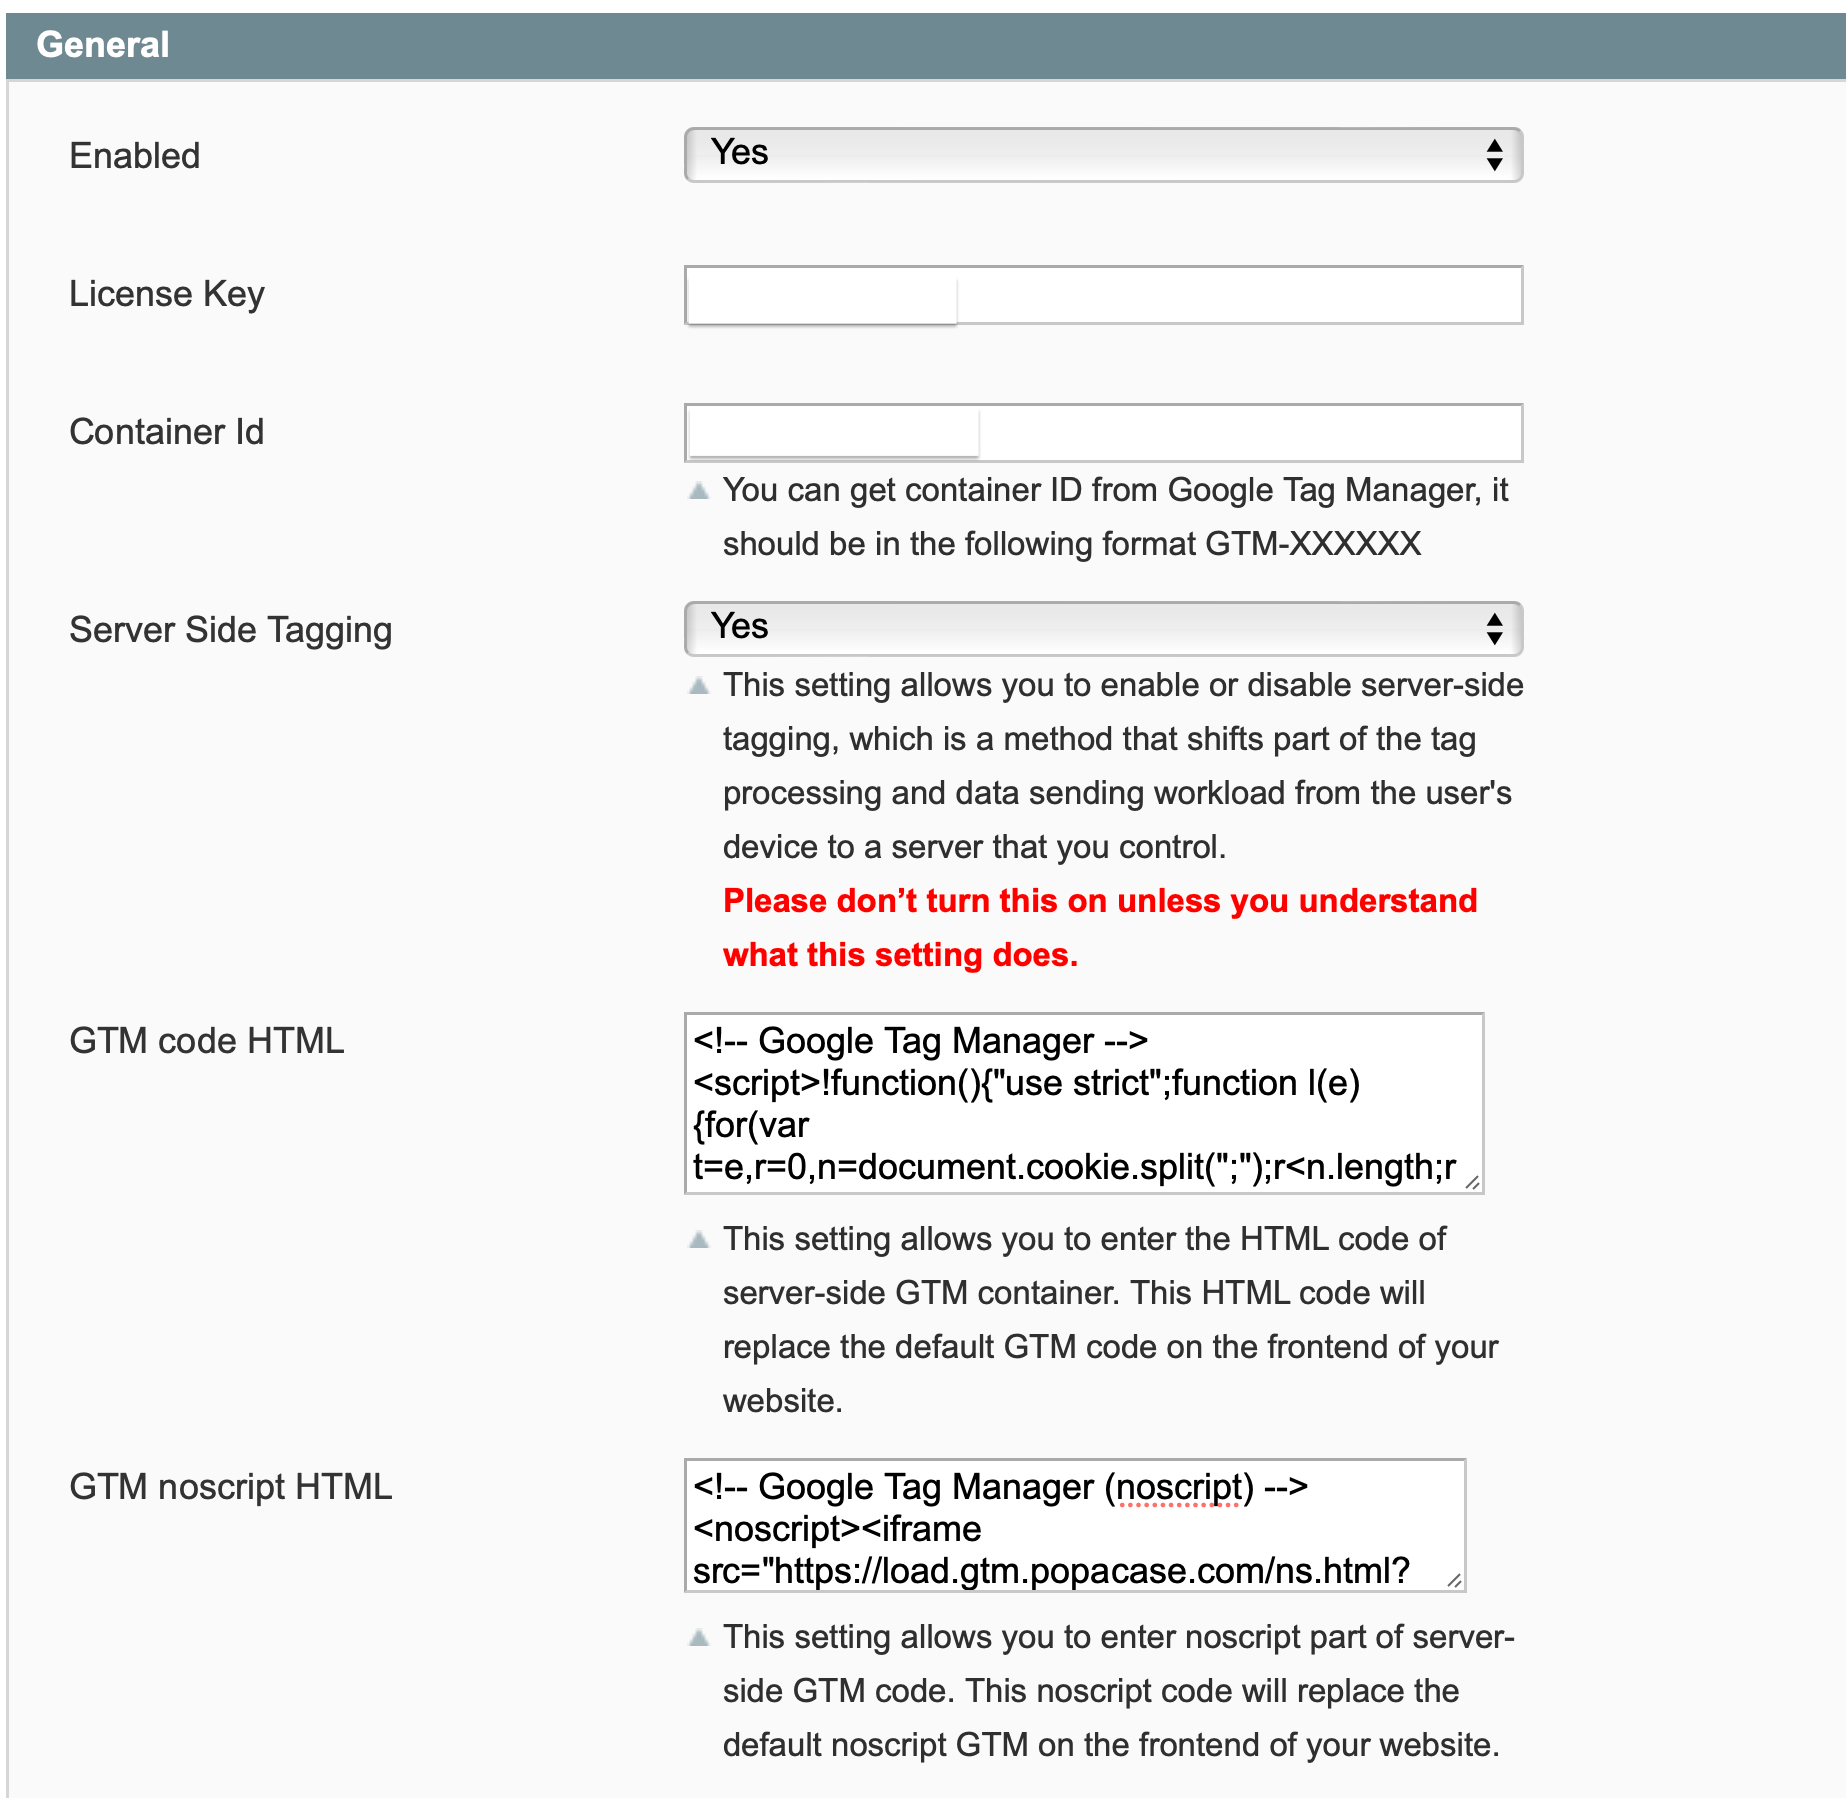
- Enabled – Select “Yes” or “No” to enable or disable the module.
- License Key – Please add the license for the extension which is provided in the order confirmation email. Please note license keys are site URL specific. If you require license keys for dev/staging sites then please email us at support@scommerce-mage.com
- Container Id – Enter your Google Tag Manager Container Id.
- Server Side Tagging - This setting allows you to enable or disable server-side tagging, which is a method that shifts part of the tag processing and data sending workload from the user's device to a server that you control.
Please don’t turn this on unless you understand what this setting does.
- GTM code HTML - This setting allows you to enter the HTML code of server-side GTM container. This HTML code will replace the default GTM code on the frontend of your website.
- GTM noscript HTML - This setting allows you to enter noscript part of server-side GTM code. This noscript code will replace the default noscript GTM on the frontend of your website.
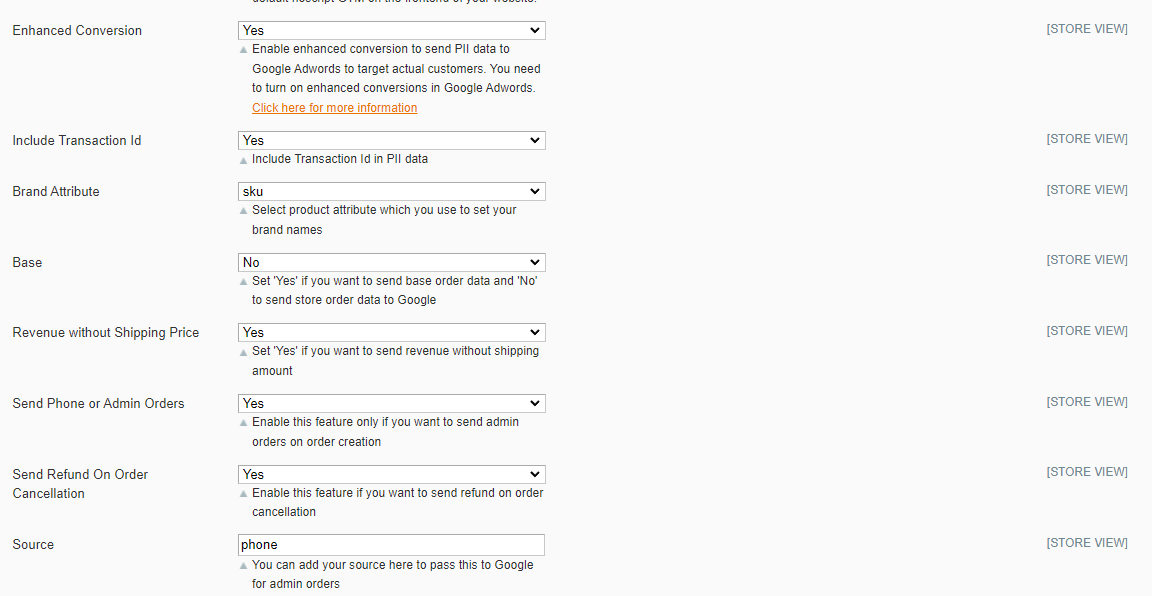
- Enhanced Conversion – Set “yes” to enable the enhanced conversion and send PII data with the tag. Please make sure enhanced conversion is enabled in Google Ads before using this setting.
- Brand Attribute – Select brand attribute to send brand information to Google Analytics.
- Brand text box – If you don’t have brand attribute and you want to send default brand name to Google Analytics then you can enter here.
- Base – Set “Yes” if you want to send base order data and ‘No’ to send store order data to Google. Set this to “Yes” always unless you have multi- store/currency is enabled and you want to send different currency data to Google.
without
Shipping- Price –
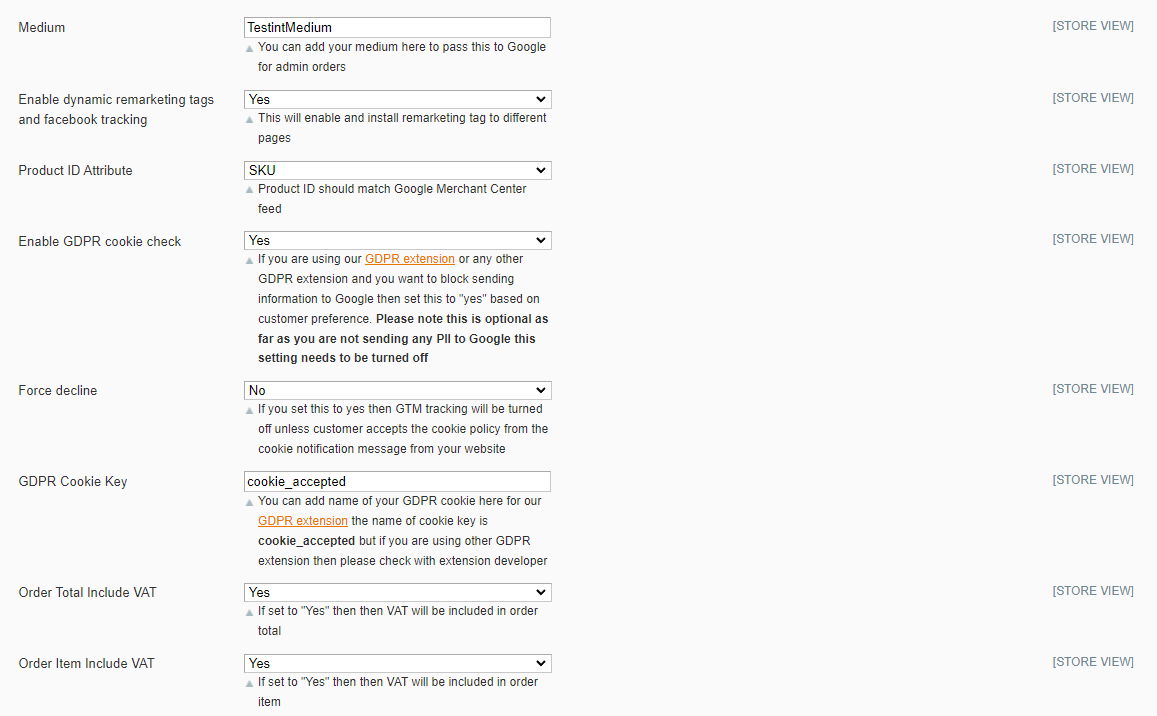
Order Total Include VAT – If set to “Yes” then VAT will be included in order total.
Order Item Include VAT – If set to “Yes” then VAT will be included in order item.
- Overwriting the existing container will remove all your existing tags, triggers, and variables, and will replace them with those in the imported container. A new container version will be created before the import.
- Merging containers will let you keep your existing tags, triggers, and variables, and just add in the new ones. If you choose to Merge the new container with your existing container, you’ll have to then decide whether you want to overwrite conflicting tags or rename conflicting tags.
Overwrite – If a variable, tag, or trigger in the new container has the same name but the contents are different, overwrite the old one with the new one.
Rename – If a variable, tag, or trigger in the new container has the same name but the contents are different, keep the old one and rename the new one.
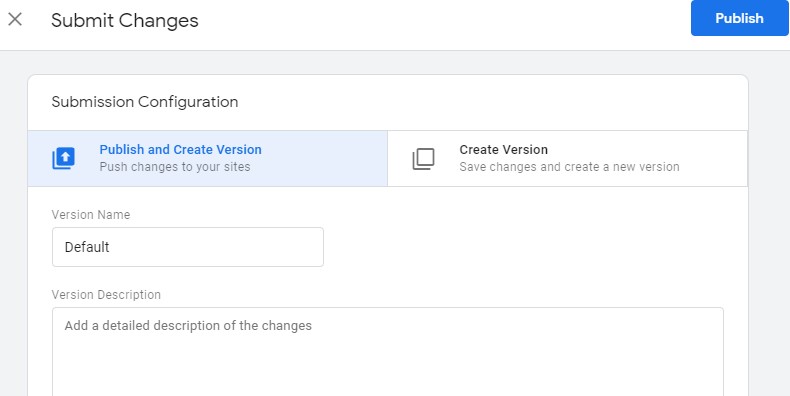
Click Continue. You’ll see a preview of changes, showing how many tags, triggers, and variables will be added, modified, or deleted. You can also click the link to View Detailed Changes to see which tags, triggers, and variables are being added, modified, or deleted.


-
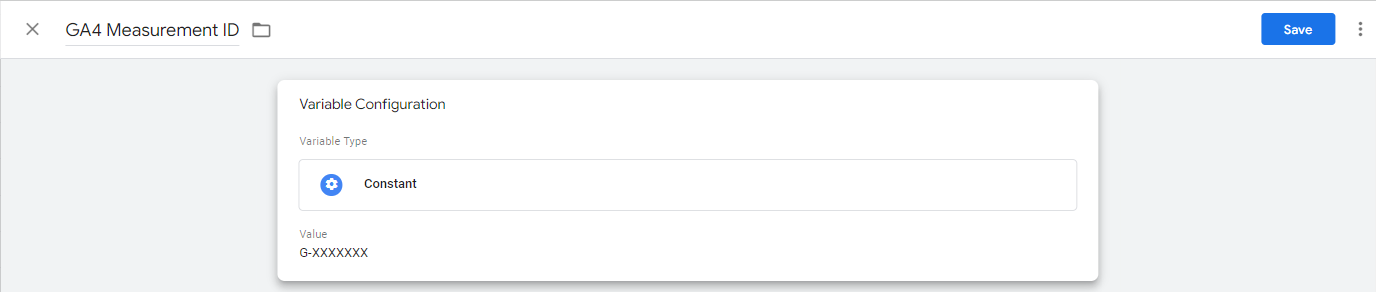
To create a new configuration tag in GTM. Please look at the image below: -
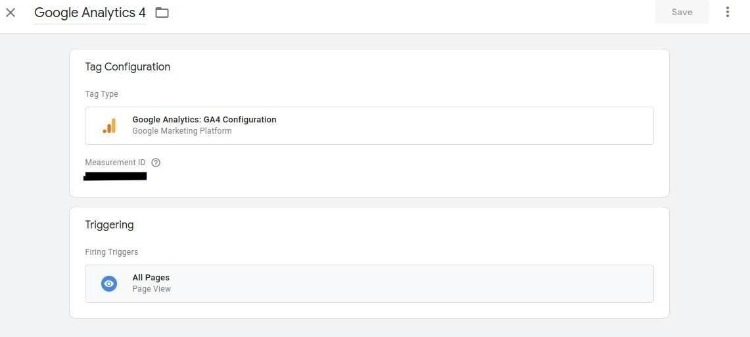
-
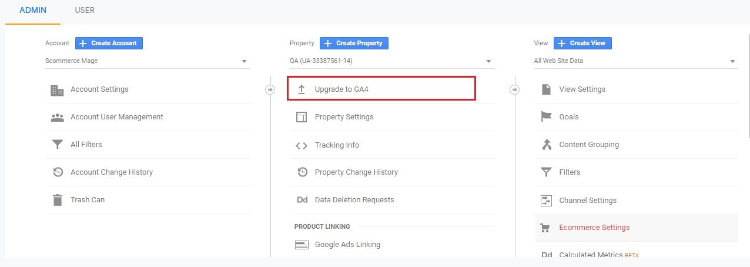
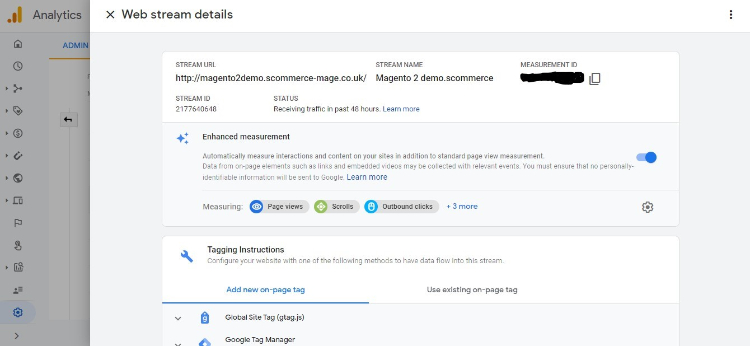
To get the measurement id you need to go to your GA4 view. Go to the admin settings and then data streams. Click on the website url coloured in blue and a popup should open.
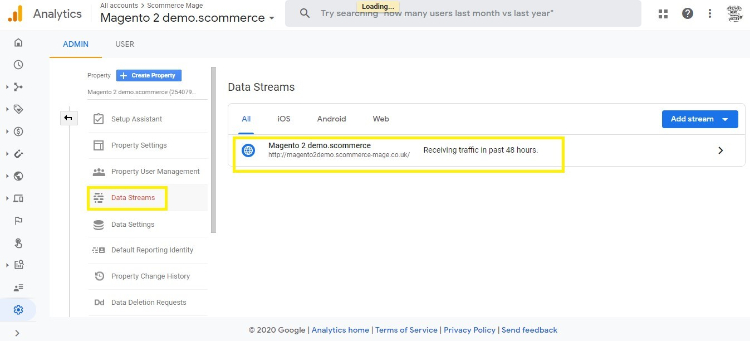
-
You will see the Measurement ID listed on the top right corner of this page.
-
Now for the final step import our Google Analytics 4 JSON file in your GTM to get all the configurations for GA4. Once done you will see data flowing into Google Analytics 4. Learn more about Google Analytics 4
- AJAX Add to Basket or Remove from Basket
- Add the following two functions in your ajax add to basket js file:
- AJAX Add to Basket
function gaAddToCart() {
	jQuery.cookie.json = true;
	var productToBasket = jQuery.cookie("productToBasket");
	var productlist = jQuery.cookie("productlist");
	if (productToBasket != undefined) {
		manipulationOfCart(productToBasket, 'add', productlist);
		jQuery.removeCookie("productToBasket", {
			path: '/',
			domain: '.' + document.domain
		});
	}
}- AJAX Remove from Basket
function gaRemoveFromCart() {
	jQuery.cookie.json = true;
	var productOutBasket = jQuery.cookie("productOutBasket");
	if (productOutBasket != undefined) {
		manipulationOfCart(productOutBasket, 'remove', '');
		jQuery.removeCookie("productOutBasket", {
			path: '/',
			domain: '.' + document.domain
		});
	}
}- Set Primary Categories
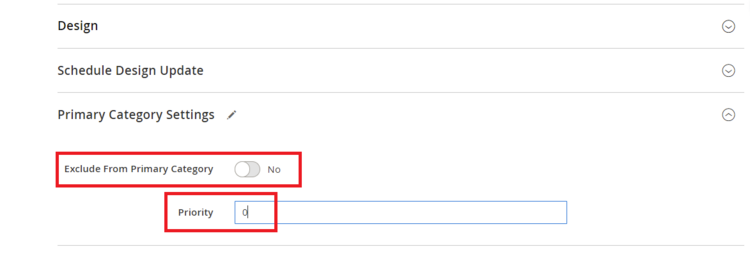
- You can use a script provided with the extension to automatically add primary categories for products. Admin can exclude certain categories from primary category and also prioritise one category over the other to be picked as the primary category.
- Go to Admin>Catalog>Categories select a category then scroll down to find the option "Primary Category Settings". Here click on "Exclude From Primary Category" to exclude this category from primary category or enter the priority 0 being the highes. The highest priority category will be picked first for the primary category.

- To automatically assign primary category for all products run the command given below by going into the root directory of your store.
scommerce:seo-base:set-primary-category- N.B - If you are using older version then run the script provided in the extension folder at the path Data/SetPrimaryCategoryM2.php from ssh
- Upgrading the Module From 0.0.35 and Below
- If you are using an older version of the extension(0.0.35 and below) where a common data layer is used to populate data to both UA and GA4 then upon updating to the latest version you need to make the following changes in GTM.
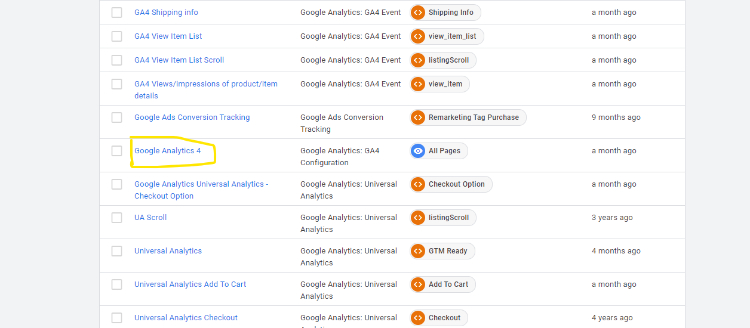
- Remove these Tags, Triggers and Variables from GTM container
- TAGS
-
Google Analytics 4
-
GA4 Views/impressions of product/item details
-
GA4 View Item List Scroll
-
GA4 View Item List
-
GA4 Shipping info
-
GA4 Remove a product from a shopping cart
-
GA4 Refunds
-
GA4 Purchases
-
GA4 Promotion views/impressions
-
GA4 Promotion clicks
-
GA4 Product/Item List Clicks
-
GA4 Payment info
-
GA4 Begin Checkout
-
GA4 Add a product to a shopping cart
-
- Variables
- Ecommerce-detail-products
- Ecommerce-product-detail-value
- Ecommerce-checkout-products
- Ecommerce-checkout-option
- Ecommerce-remove-products
- Ecommerce-refund-products
- Purchase-affiliation
- Purchase-tax
- Purchase-shipping
- ecommerce-promoView-promotions
- ecommerce-promoClick-promotions
- Ecommerce-click-products
- ecommerce-product-click-list-name
- Triggers
- View_item
- View_item_list
- Shipping Info
- removeFromCart
- Refund
- Purchase
- View_promotion
- promotionClick
- productClick
- Payment_info
- addToCart
- Now follow the steps below to import the latest GA4 settings for GTM
- Step 1:- Acquire the latest GA4 JSON file provided with the module.
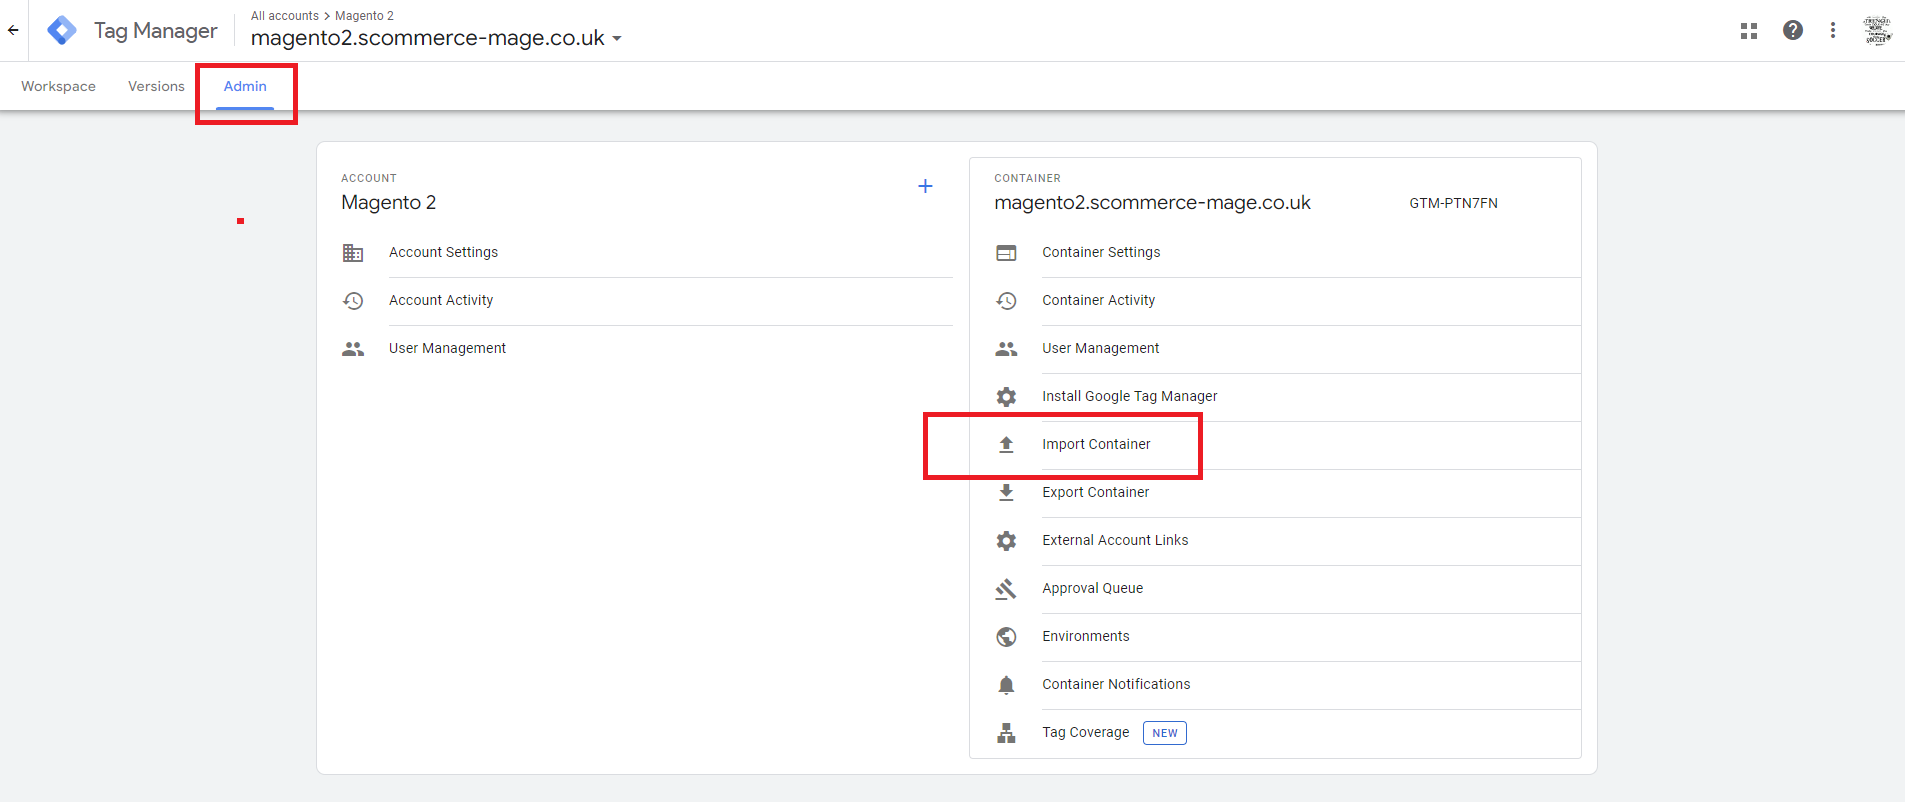
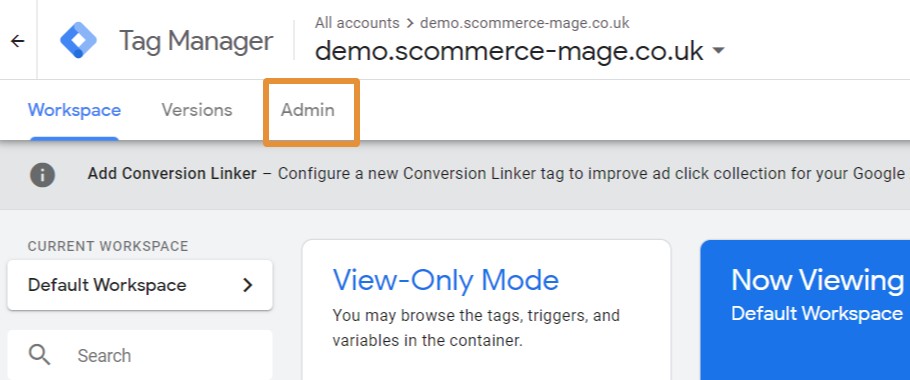
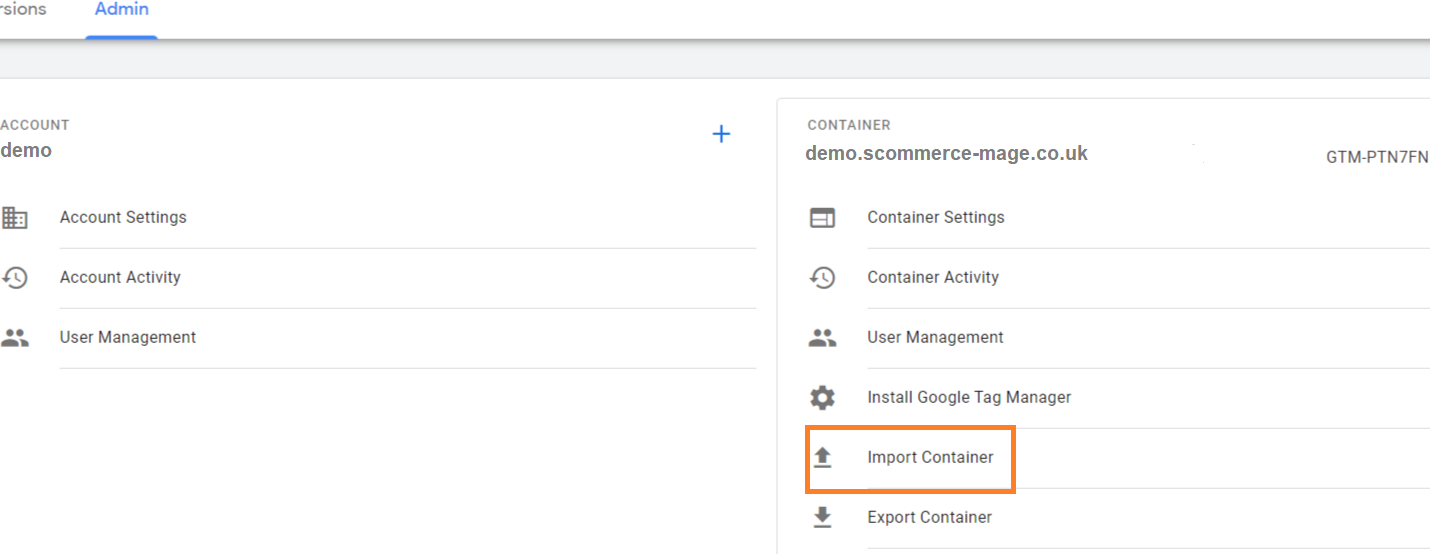
- Step 2:- Go to your GTM container then click on admin>Import Container.

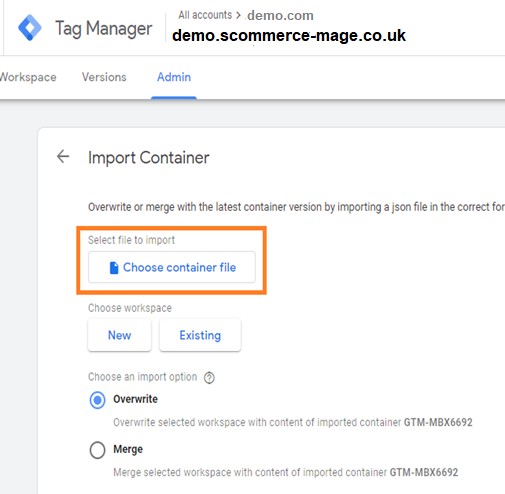
- Step 3:- Click on Choose container file and choose the JSON file acquired in step 1 then select the workspace new/existing. Also select Merge>Rename conflicting tags, triggers, and variables so that no crucial setting is lost.
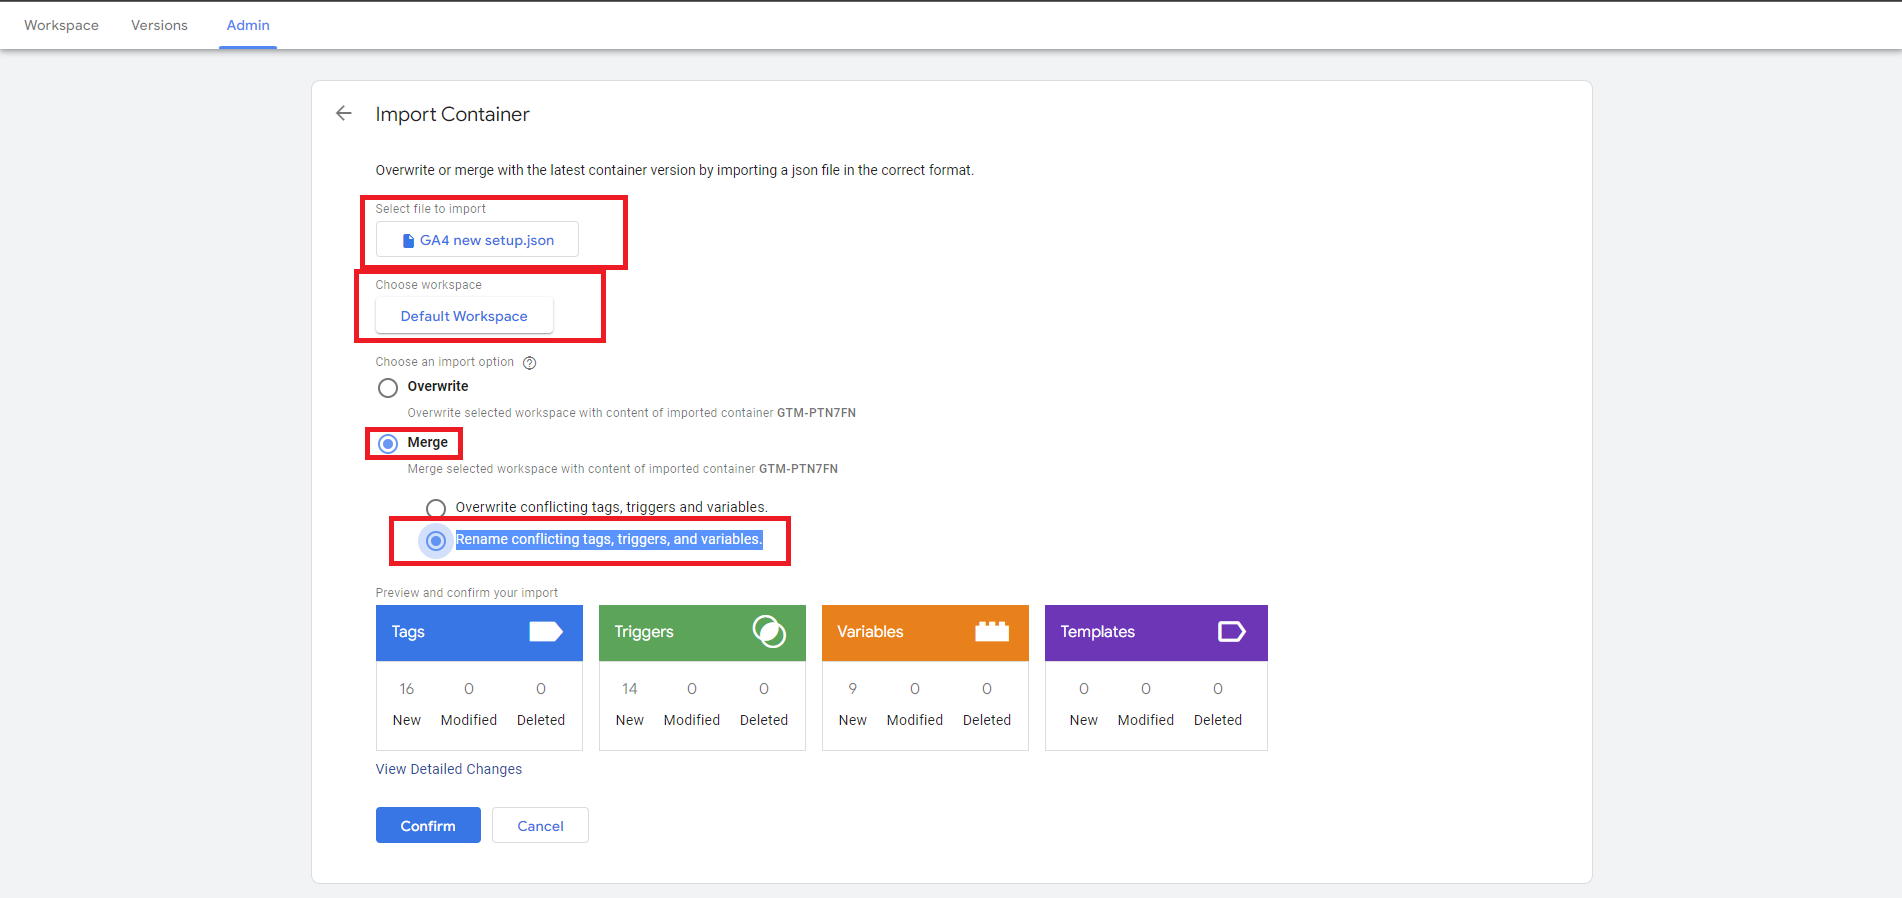
- Step 4:- Lastly, click confirm to finish the import. Once it's done you will have the latest tags, triggers and variables for GA4 in your GTM.
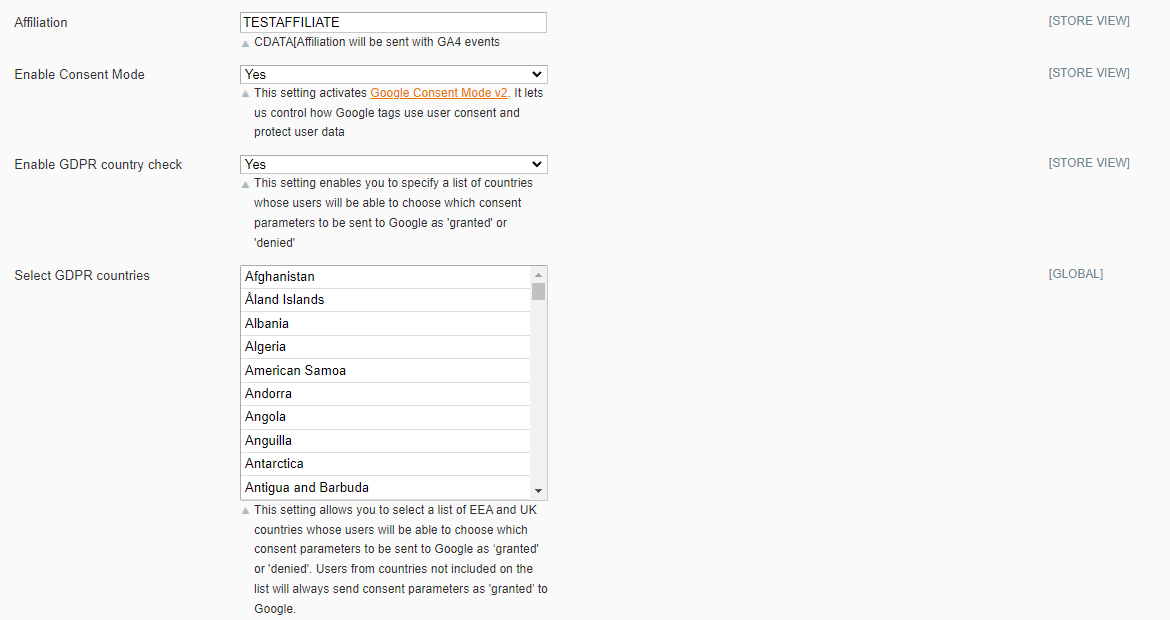
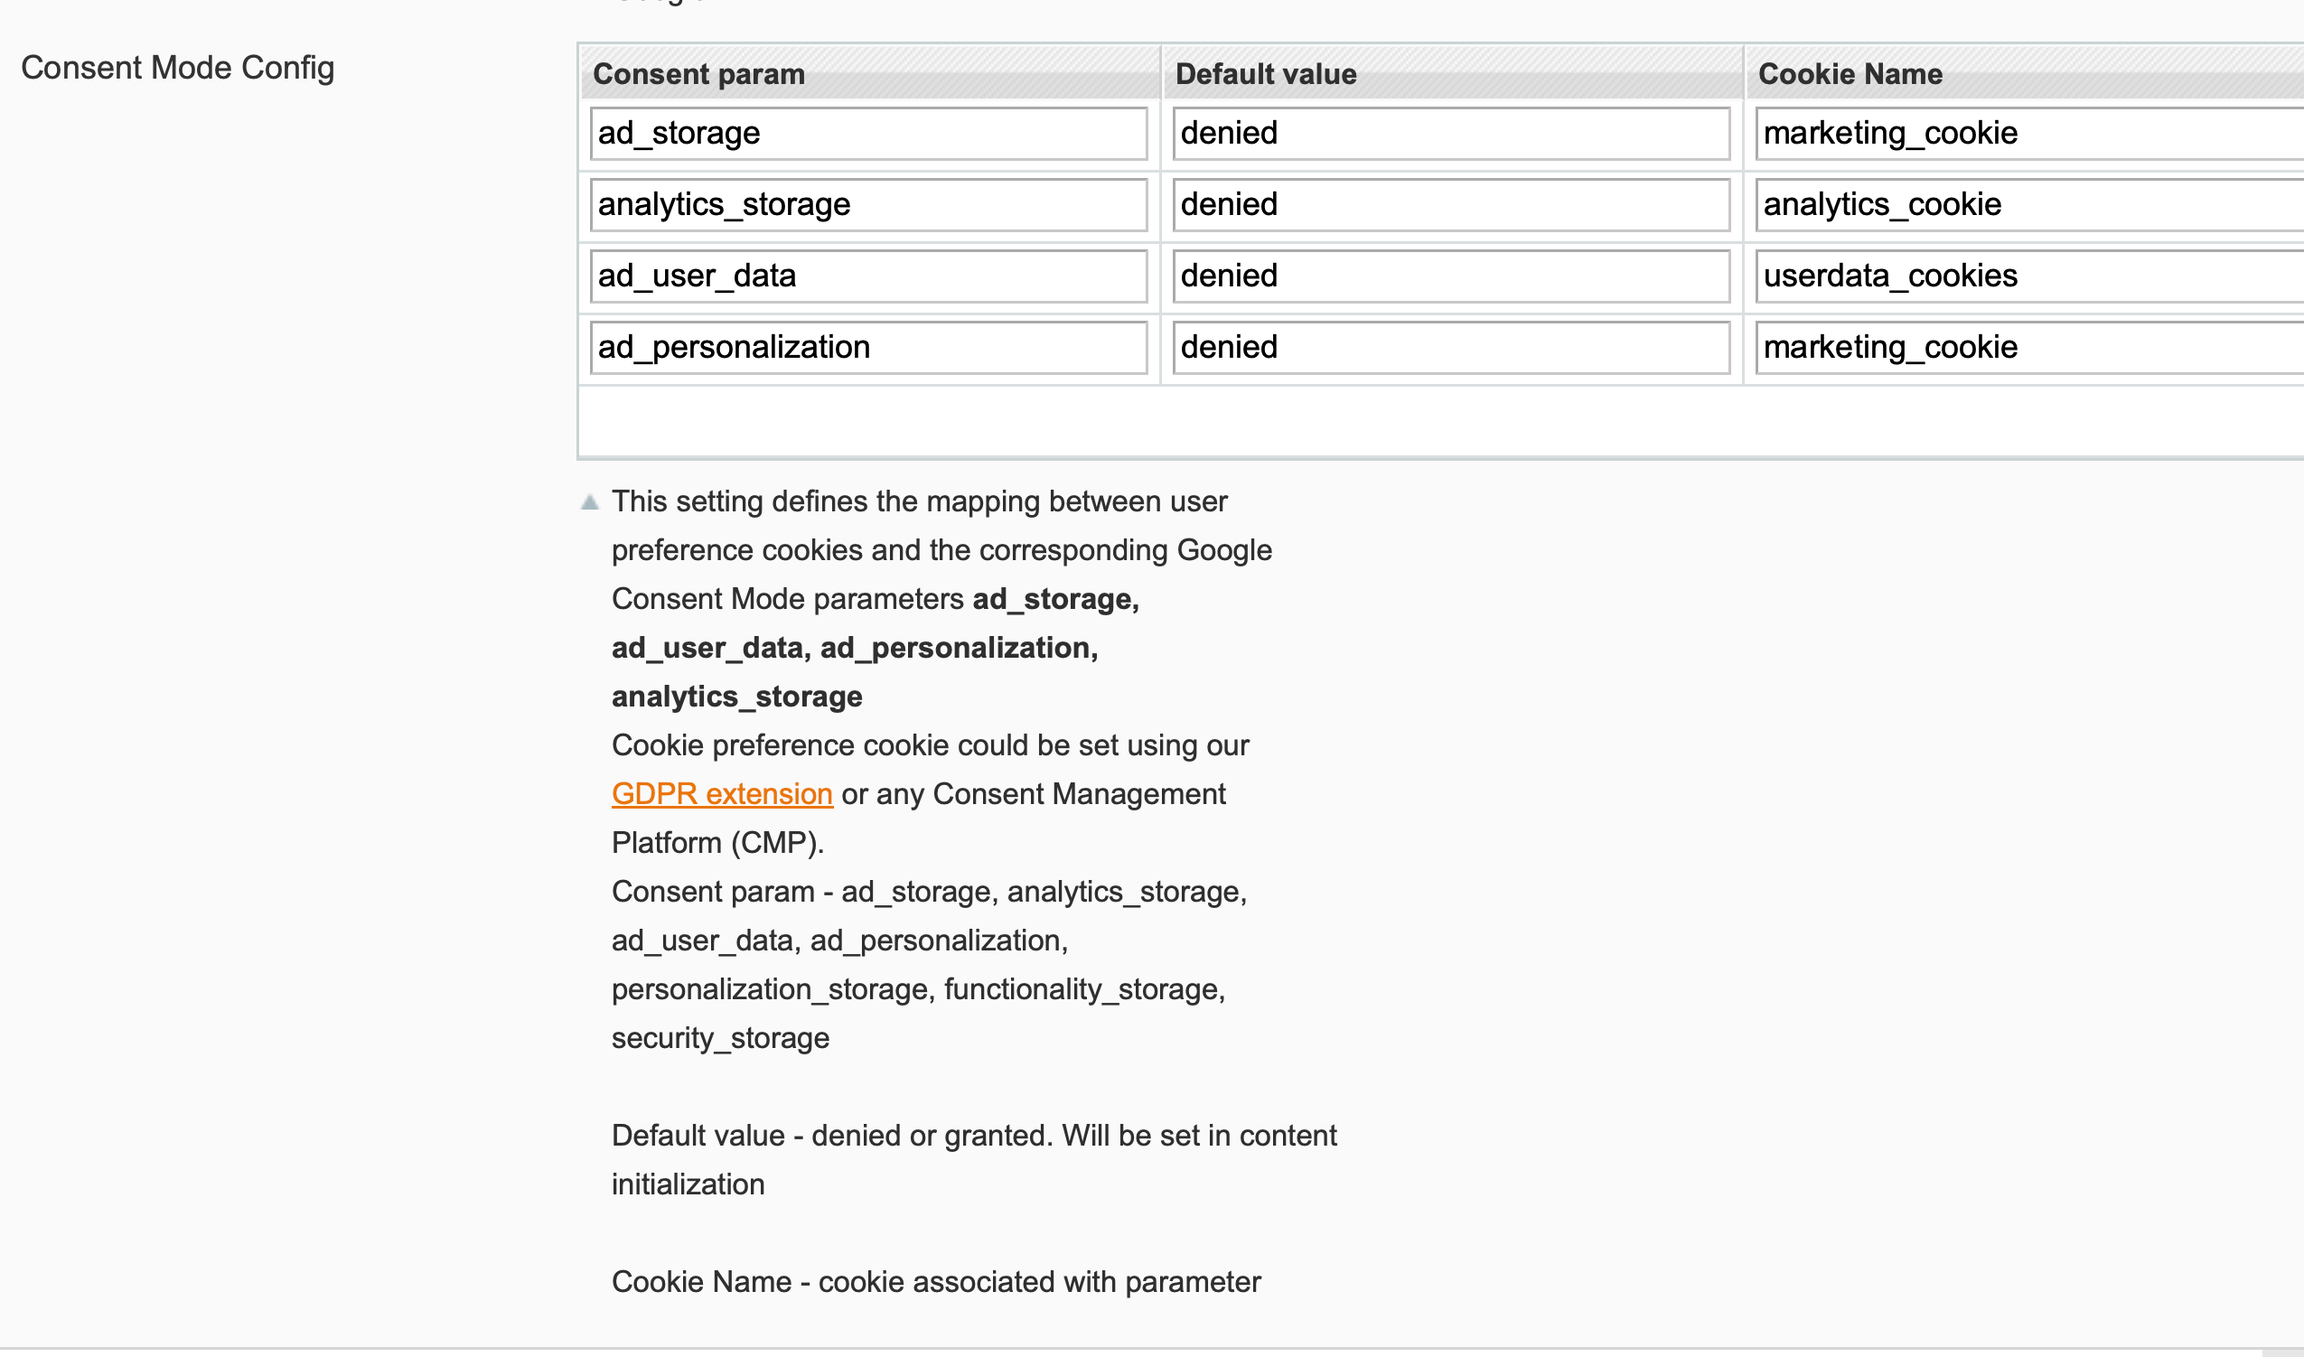
- Set up Consent Mode V2 with GTM
- Please follow the below guide to set up consent mode v2 with GTM, also you would need to have both GTM and GDPR modules to complete this setup.
- GDPR:- https://www.scommerce-mage.com/magento1-gdpr-compliance.html
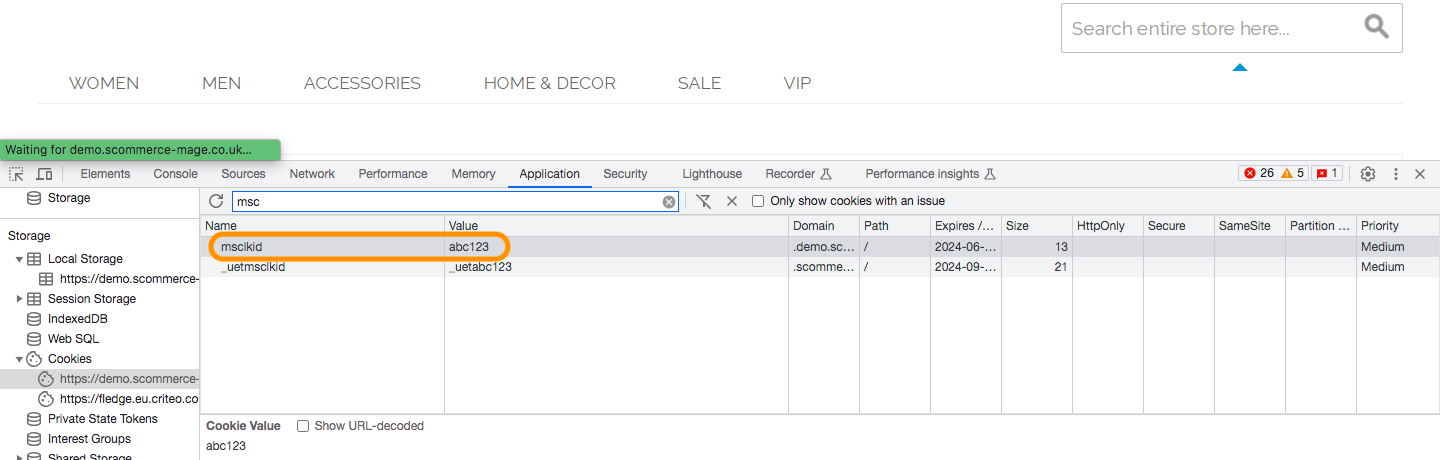
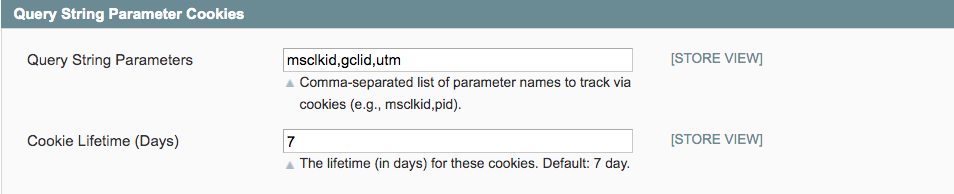
- Query String Parameter Cookies
- Cookies from query Params configuration can be used to create new cookie parameters which can be stored in the users browser as per the valid time configured. for eg:- We have created a "msclkid"cookie in the configuration. Now if the cookie parameter is passwed with the URL then that cookie will be created in the browser.

- If you have a question related to this extension please check out our FAQ Section. If you can't find the answer you are looking for then please contact support@scommerce-mage.com.