
Magento 1 Google Global Site Tag (gtag.js)
Installation and User Guide for Magento 1 Google Global Site Tag (gtag.js)
Table of Contents
- Installation
- Disable Compilation Mode
- Upload Package
- Clear Caches
- Configuration Settings for Google Global Site Tag
- General Settings
- Admin Transactions Tracking
- Backend Order Tracking in Google Analytics
- Backend Order Tracking - Source/Medium
- Google Analytics Checkout Behaviour
- Google Analytics Shopping Behaviour
- Google Analytics Sales Performance
- Front-end Site view
- Home Page with Tags
- Gtag.js Code
- Gtag.js Brand Name
Installation
- Disable Compilation Mode: To check that this is disabled, go to System >Tools> Compilation. If the compiler status is 'Disabled', you are ready to go. If not, simply click the 'Disable' button on the right hand side of the screen.
- Upload Package: Upload the content of the module to your root folder. This will not overwrite the existing Magento folder or files, only the new contents will be added.
- Clear Caches: This can be done from the admin console by navigating to the cache management page (System > Cache Management), selecting all caches, clicking 'refresh' from the drop-down menu, and submitting the change.
Configuration Settings for Google Global Site Tag
Go to Admin > Stores > Configuration > Scommerce Configuration > Google Global Site Tag
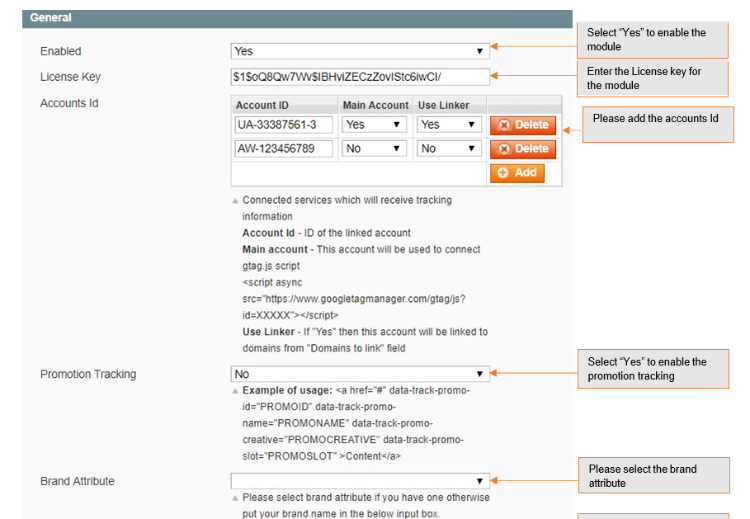
General Settings
- Enabled - Select "Yes" or "No" to enable or disable the module.
- License Key - Please add the license for the extension which is provided in the order confirmation email. Please note license keys are site URL specific. If you require license keys for dev/staging sites then please email us at support@scommerce-mage.com.
- Accounts Id - You can add multiple account id. It can be analysis, adwords.
- Main Account - Select "Yes" to set your main analytics id as an account id. This account will be used to connect gtag.js.
- Use Linker - If this is enabled (set to "Yes") then this account will be linked to domains from "Domains to link" field, which is specified below.
- Action - You can delete your account.
- Promotion Tracking - Here is the format to set up the promotion tracking:
<a href='#' data-track-promo-id="PROMOID" data-track-promo-name="PROMONAME" data-track-promo-creative="PROMOCREATIVE" data-track-promo-position="PROMOPOSITION">Content</a> - Brand Attribute - Please select brand attribute, if you have one otherwise put your brand name in the below input box.
- Brand Text Box - Enter your brand name. Set brand name if there is no brand name with the product.
- Enhanced Ecommerce Enabled - Select "Yes" to enable this module. Please make sure this feature is enabled in Google Analytics first before enabling in Magento.
- Send Base Data - Set "Yes" if you want to send base order data and "No" to send store order data to Google.
- Enable Google Optimize - Select "Yes" to enable the module, or "No" to disable it.
- Enable Linker - If this is enabled then you can set linker properties, which is specified below e.g. Domain to link, Decorate Forms.
- Dynamic Remarketing Enabled - If set to "Yes" then this will enable and install remarketing tag to different pages.
- Dynamic Remarketing other sites - Set "Yes" to enable other site variables (https://developers.google.com/adwords-remarketing-tag/parameters#other) instead of retail site variables.

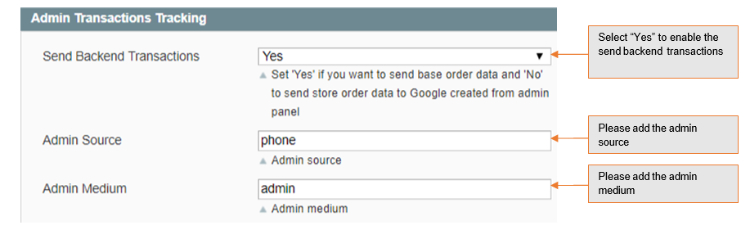
Admin Transactions Tracking
-
Send Backend Transactions - Set "Yes" if you want to send base order data and "No" to send store order data to Google created from admin panel.
-
Admin Source - Please add the Campaign source for backend orders.
-
Admin Medium - Please define the Campaign Medium for Backend Orders.
-
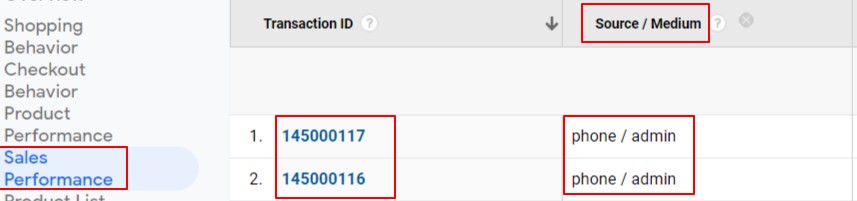
Backend Order Tracking in Google Analytics - You can track admin orders by selecting "Yes" for "Admin Transactions Tracking" from Admin > Stores > Configuration > Scommerce Configuration > Global Site Tag (gtag.js) > Admin Transactions Tracking - "Yes". In the below Image you can see the tracked admin orders in Google Analytics.

-
Backend Order Tracking - Source/Medium - To add campaign Source and Medium for backend orders go to Admin > Stores > Configuration > Scommerce Configuration > Global Site Tag (gtag.js) > Admin Transactions Tracking - "phone" > Admin Medium - "admin".
-
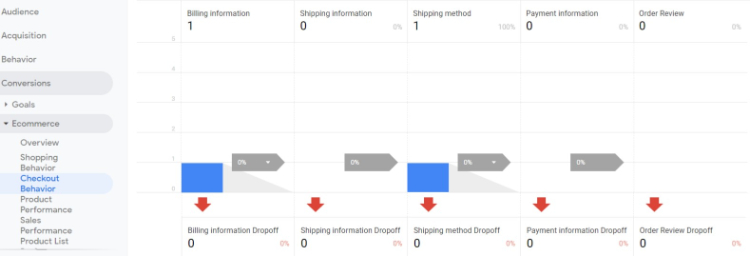
Google Analytics Checkout Behaviour - You can view the checkout behaviour in GA tool under Conversions > Ecommerce > Checkout Behaviour.
-
Google Analytics Shopping Behaviour - You can view the shopping behaviour with all sessions, product views, add to cart and checkout details in GA tool under Conversions > Ecommerce > Shopping Behaviour.
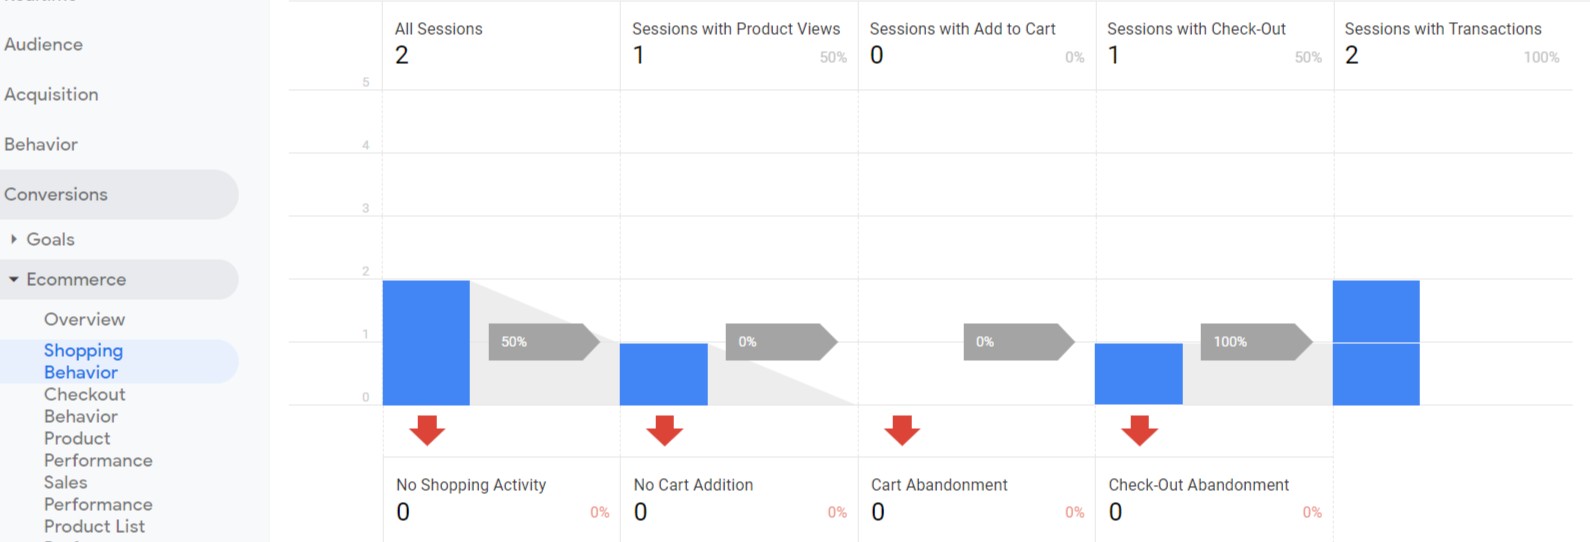
-
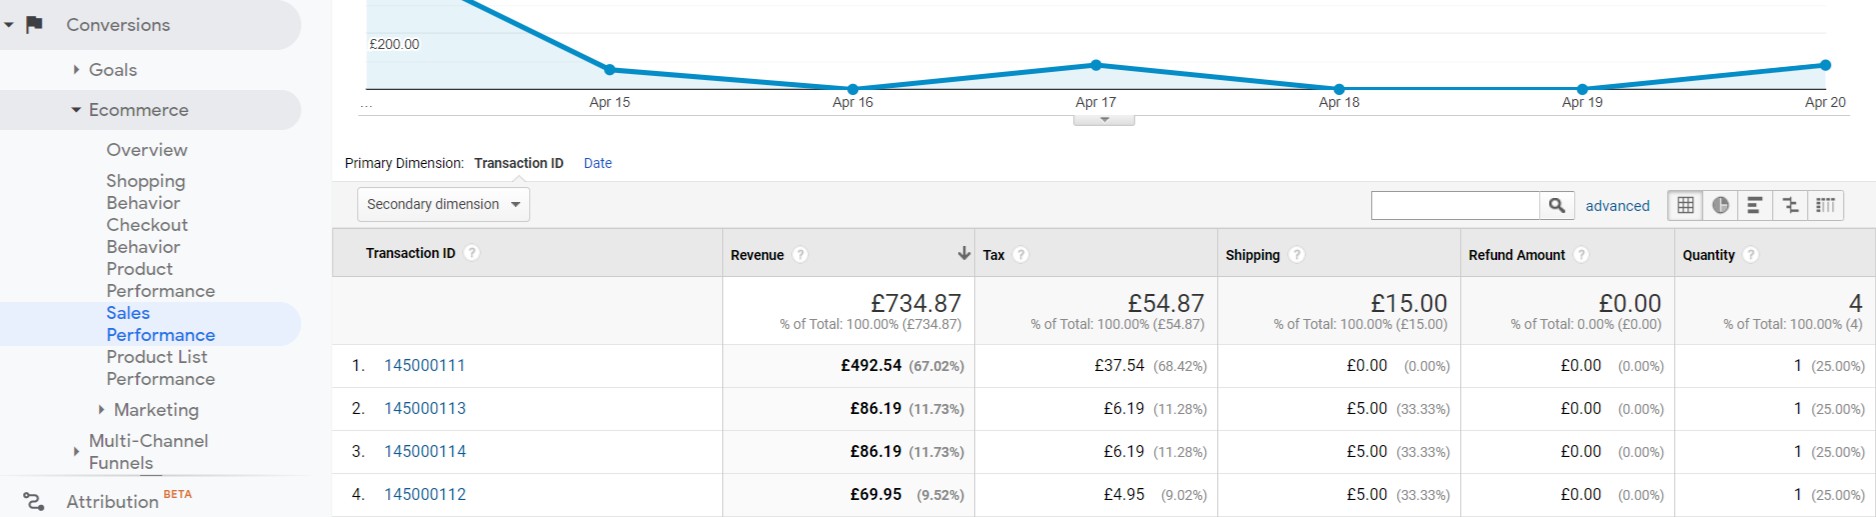
Google Analytics Sales Performance - You can view the shopping behaviour with all sessions, product views, add to cart and checkout details in GA tool under Conversions > Ecommerce > Sales Performance.
Front-end Site view

-
Gtag.js Code - You can see the UA and AW tracking id's added from Admin > Stores > Configuration > Scommerce Configuration > Global Site Tag (gtag.js) > Account Id > Click on "Add Account" - UA - 33387561-3, AW - 123456789.
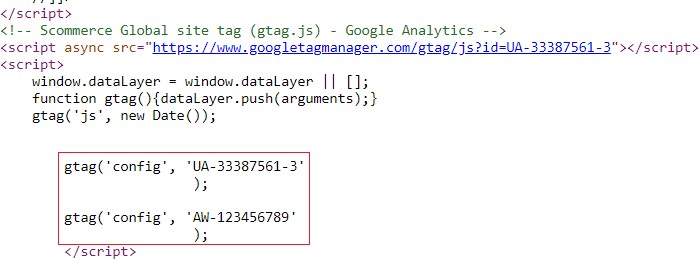
-
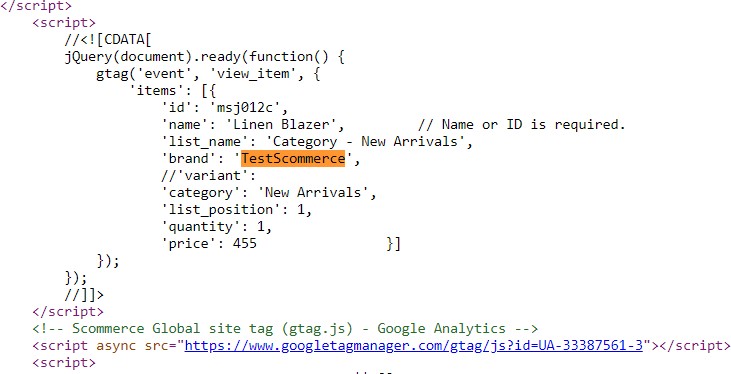
Gtag.js Brand Name - You can add brand name from Admin > Stores > Configuration > Scommerce Configuration > Global Site Tag (gtag.js) > Brand name - "TestScommerce"
If you have a question related to this extension please check out our FAQ Section first. If you can't find the answer you are looking for then please contact support@scommerce-mage.com.