
Magento 2 Product Shelf Life
Installation and User Guide for Magento 2 Product Shelf life Extension
Table of Contents
- Installation
- Installation via app/code
- Installation via Composer
- Configuration Settings for Product Shelf Life Expiration
- General Settings
- Batch Settings
- Product Batches Grid
- Add Sources at Product Level
- Add New Product Batch
- Un-Associate / Delete Product Batch
- Product Batches at Product Level
- Add Specific Batch to Product
- Select Batches During Shipment
- Batch Details on the Order View Page
- Deleting or Un- Associating a Product Batch
- Deleting
- Un-Associating
- Batch Report
- Import / Export Product Batches
- Batch Expiration Email Notification
- API - Application Programming Interface
- Authentication Token
- Creating a Batch using API
- Retrieve all Batches using API
- Retrieve Date of Batch using ID 1 Using API
- Delete Batch with ID 1 Using API
Installation
-
Installation via app/code: Upload the content of the module to your root folder. This will not overwrite the existing Magento folder or files, only the new contents will be added. After the successful upload of the package, run below commands on Magento 2 root directory.
php bin/magento setup:upgrade php bin/magento setup:di:compile php bin/magento setup:static-content:deploy -
Installation via Composer: Please follow the guide provided in the below link to complete the installation via composer.
Configuration Settings for Product Shelf Life Expiration
Go to Admin > Stores > Configuration > Scommerce Configuration > Product Shelf Life Expiration
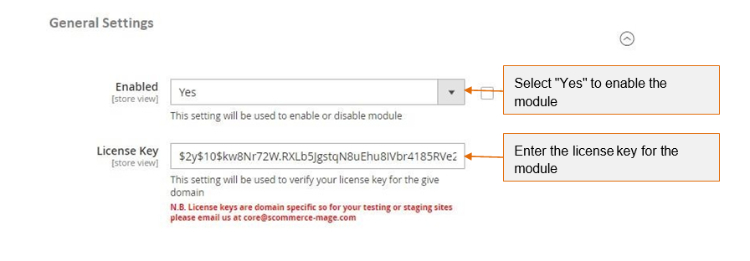
General Settings
- Enabled - Select "Yes" or "No" to enable or disable the module.
- License Key –Please add the license for the extension which is provided in the order confirmation email. Please note license keys are site URL specific. If you require license keys for dev/staging sites then please email us at support@scommerce-mage.com.
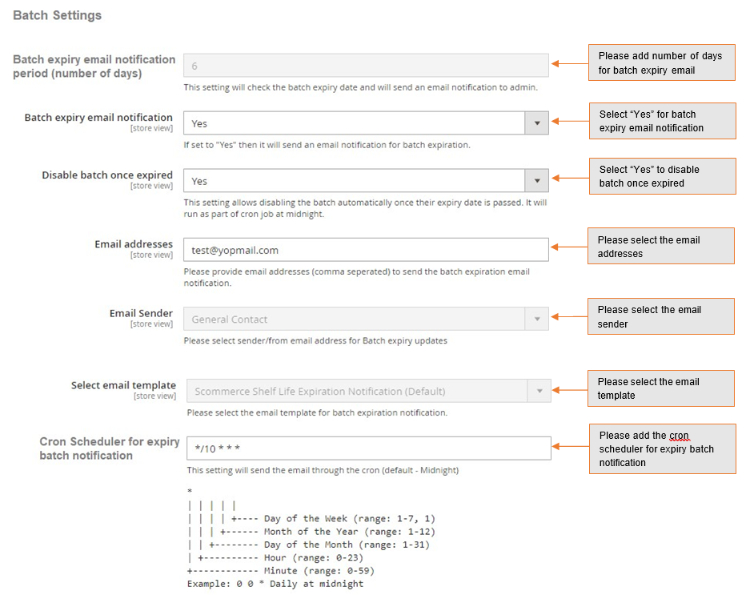
Batch Settings
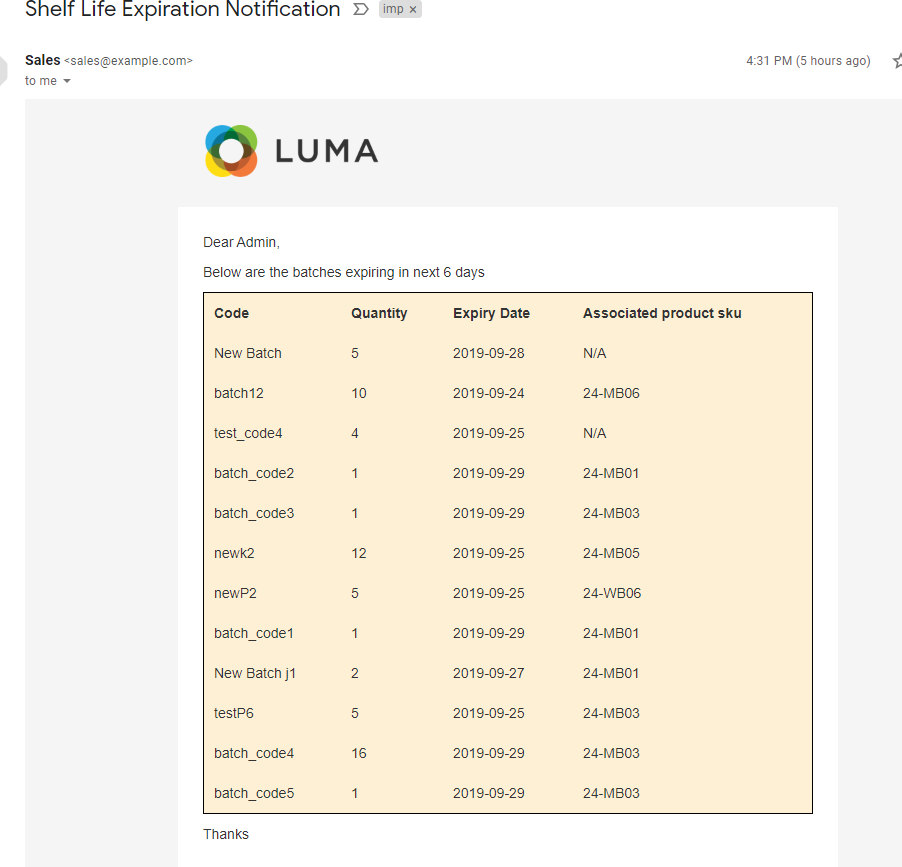
- Batch expiry email notification period (number of days) - Please define batch expiry email notification period. This setting will check the batch expiry date and will send an email notification to the admin for the same.
- Batch expiry email notification (Yes/No) - Please select "Yes" or "No" to "Enable" or "Disable" the email notification regarding batch expiration.
- Disable batch once expired - Please select "Yes" or "No" to disable the batch. It disables the batch automatically once their expiry date is passed and runs as part of cron job at midnight.
- Email Addresses - Please provide email addresses (comma separated) to send the batch expiration email notification.
- Email Sender – Please select sender/ from email addresses for Batch expiry updated.
- Select Email Template -Please select the email template for batch expiry email notification.
- Cron Scheduler for expiry batch notification - This setting will be used to send the email through the cron.
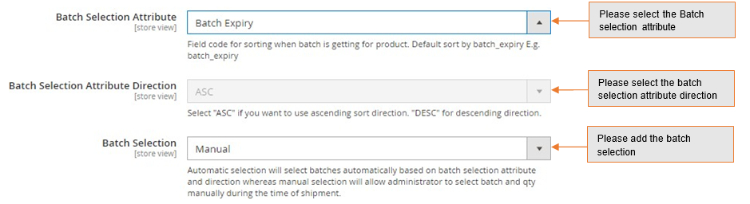
- Batch Selection Attribute – This setting will determine how batches are selected automatically.
- Batch Selection Attribute Direction – As per the batch selection attribute you can choose the direction for example Ascending(ASC) or Descending(DSC).
- Batch Selection – You can choose to select batches automatically based on batch selection attribute or you can set it to Manual. When Manual you will be able to select batches during shipment.
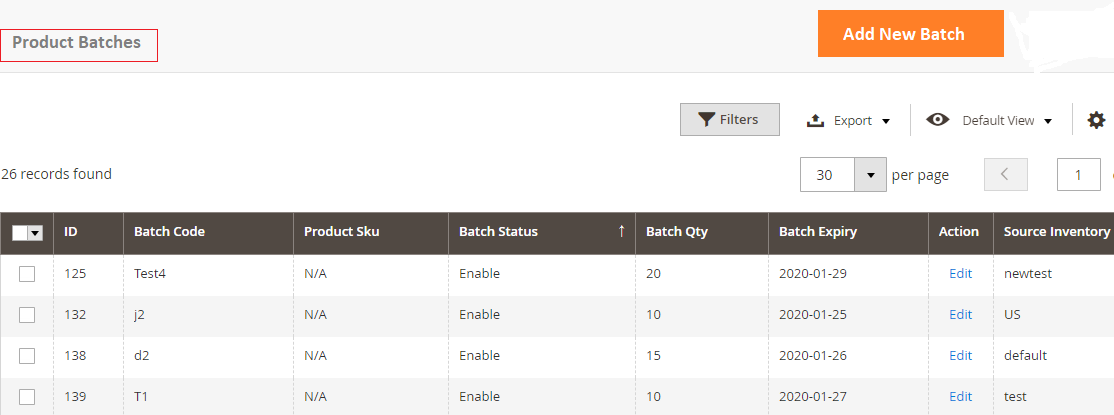
Product Batches Grid
You can create and manage product batches from, Admin> Product Batches. This grid will have all the details about batches like ID, Batch Code, Product SKU, Batch Status, Batch Qty, Batch Expiry, Action/Edit and Source Inventory.
-
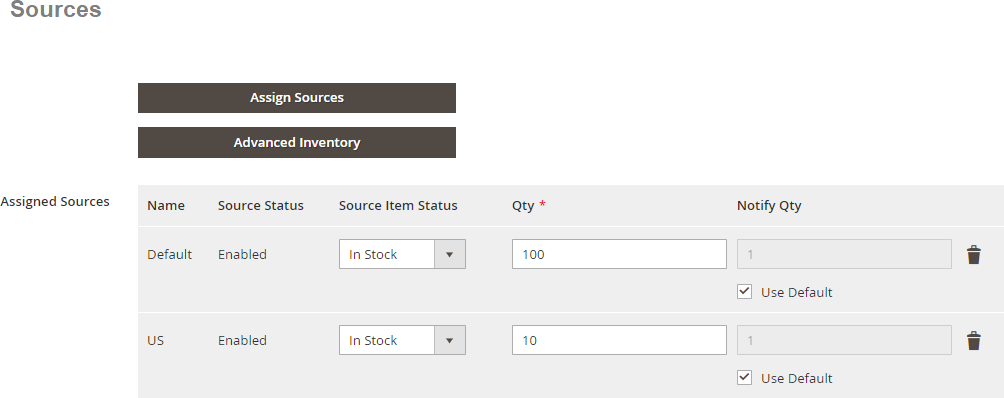
Add Sources at Product Level -You can add product source from Admin > Catalog > Select Products > Click "Assign Sources"> Select "Source"> Click "Done" .
-
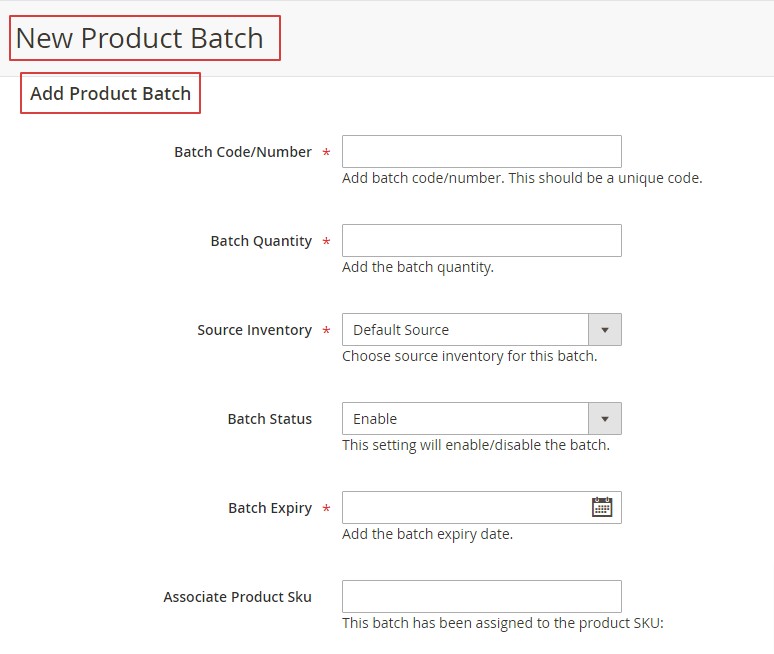
Add New Product Batch -To create new product batch, go to Admin > Product Batches>click 'Add New Batch'. It will take you to the new product batch page and by providing all the required details; you can create the new batch.
-
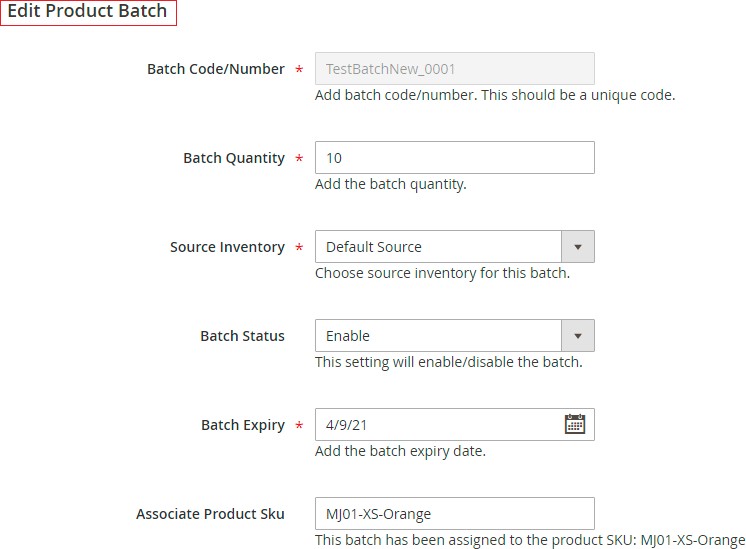
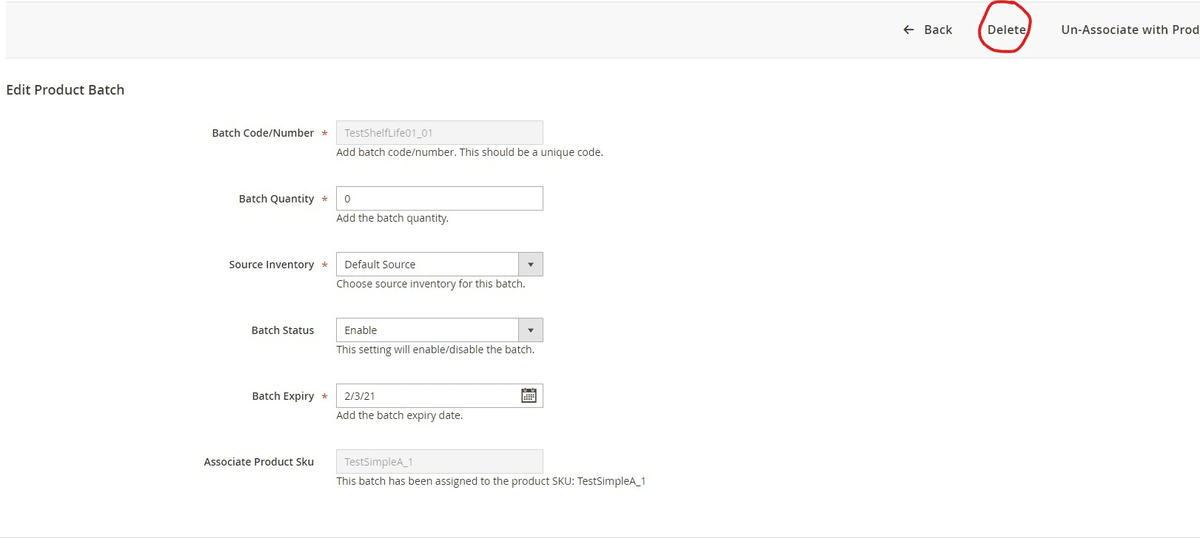
Un-Associate / Delete Product Batch -Toun-associate and delete product batch, go toAdmin > Product Batches> Select Batch > Edit >Click "Un-Associate with Product'' and for Delete click on "Delete" button.
Product Batches at Product Level
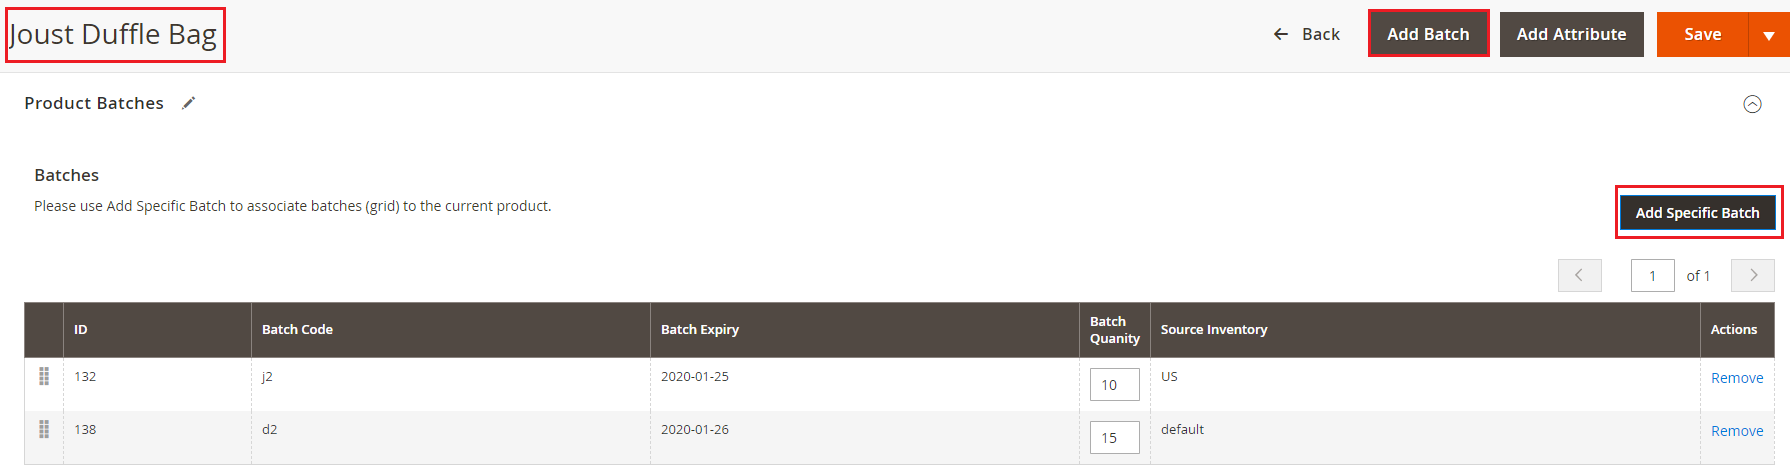
When user enables the module then Product Batches section appears at, Admin>Catalog>Product>Select Product>Edit>Product Batches. From this section, users can add new batch or can associate specific existing batch to a product.
Add Specific Batch to Product
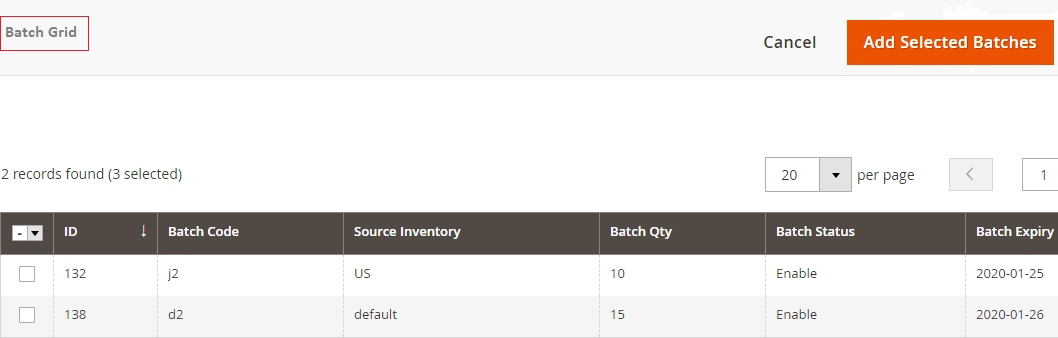
You can also add specific batches to a product from, Admin > Catalog > Product > Select Product >Edit >Product Batches >Click"Add Specific Batch". It redirects to Batch Grid and by selecting batch ID you can associate active batches to a product.
-
Select Batches During Shipment -To select the batch during shipment make sure Batch Selection is set to manual in the configuration then navigate to Admin> Sales > Order > Select Order > View>Generate Invoice>Click on Ship. When you scroll down on the page you will see the option to select the batches manually. The product quantity will be deducted from the selected batch. Please refer to the image below:-

-
Batch Details on the Order View Page -To view theproduct batch related details, go to Admin > Sales > Order > Select Order > View.

Deleting or Un- Associating a Product Batch
- Deleting: -To delete a product batch, go to Catalog>Product Batches then select the product batch that you want to delete. From Action coloumn click Edit. Here you will see the option to delete the Product batch.
Note:- If an order has been shipped then you won't be able to delete that product batch. You will see an error.
- Un-Associating:- To Un-Associate a product batch, go to Catalog>Product Batches then select the product batch that you want to delete. From Action column click Edit. Here you will see the option to Un-Associate the Product batch.
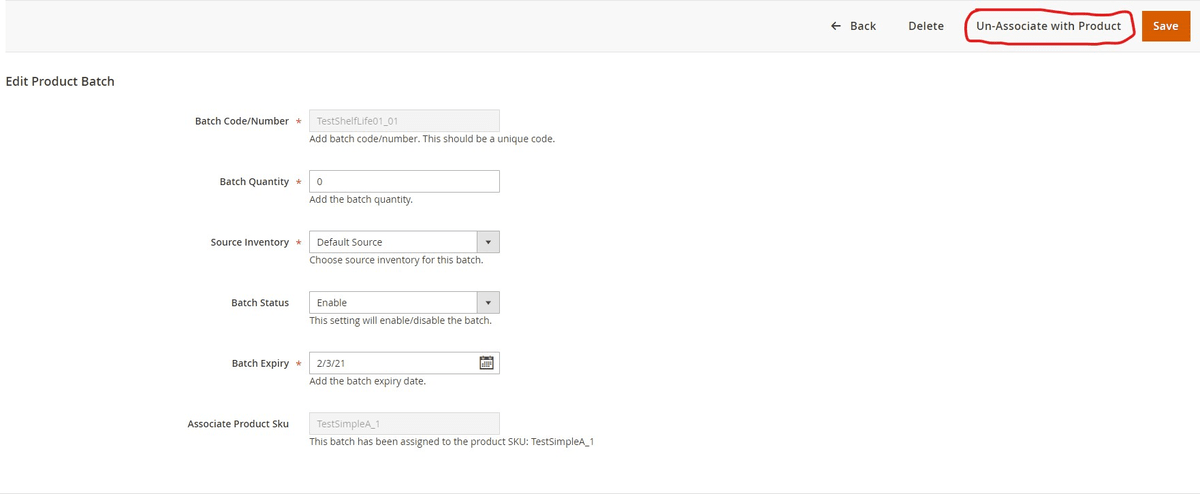
Note:- If an order has been shipped then you won't be able to delete that product batch. You will see an error.
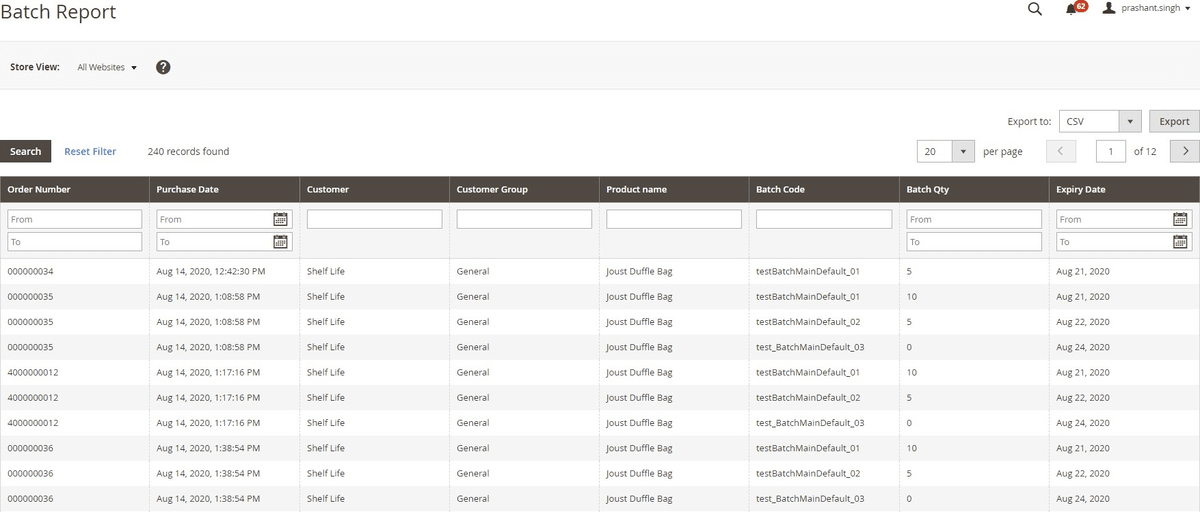
- Batch Report:- To view the detailed batch report go to your admin panel then Reports>Sales>Batches. Here you can see all the orders associated with a product batch with the following information:-
- Order Number
- Purchase Date
- Customer
- Customer Group
- Product Name
- Batch code
- Batch Quantity
- Expiry Date
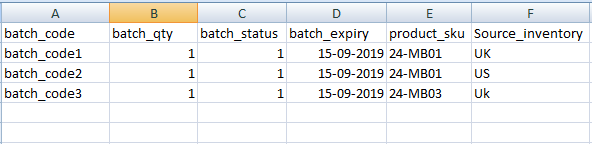
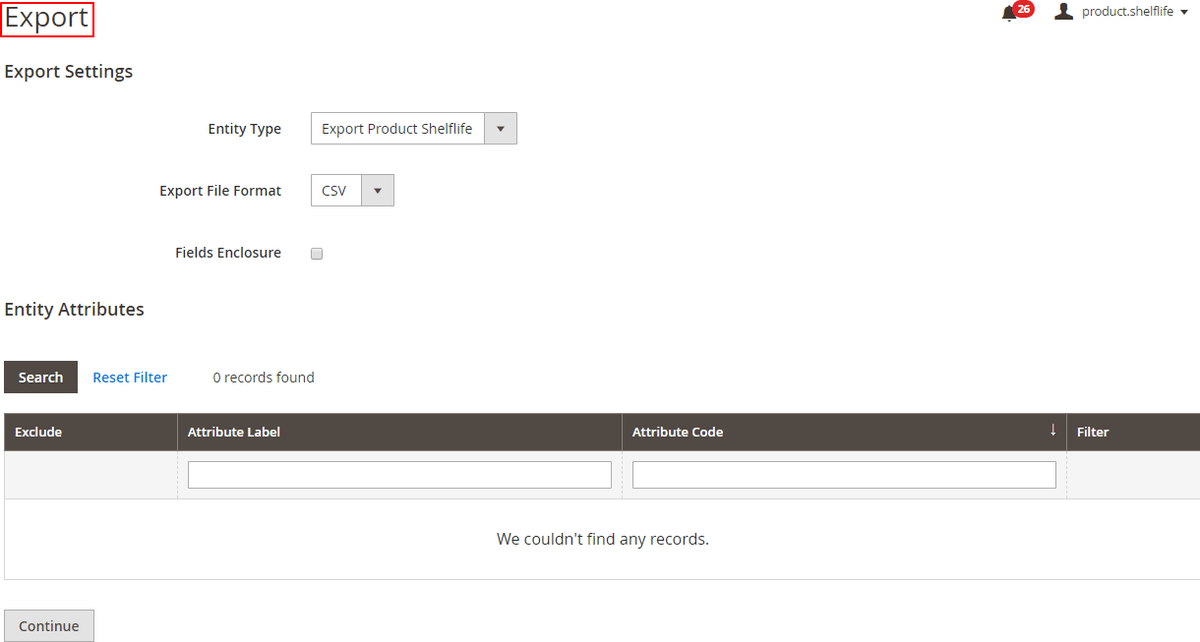
Import / Export Product Batches
To import and export product batches, go to Admin > System >Import / Export.
- Import - It updates the stock quantity and disables the batches if they are expired.
- Export-It exports the batches in the selected file format, e.g. CSV.
Import Settings
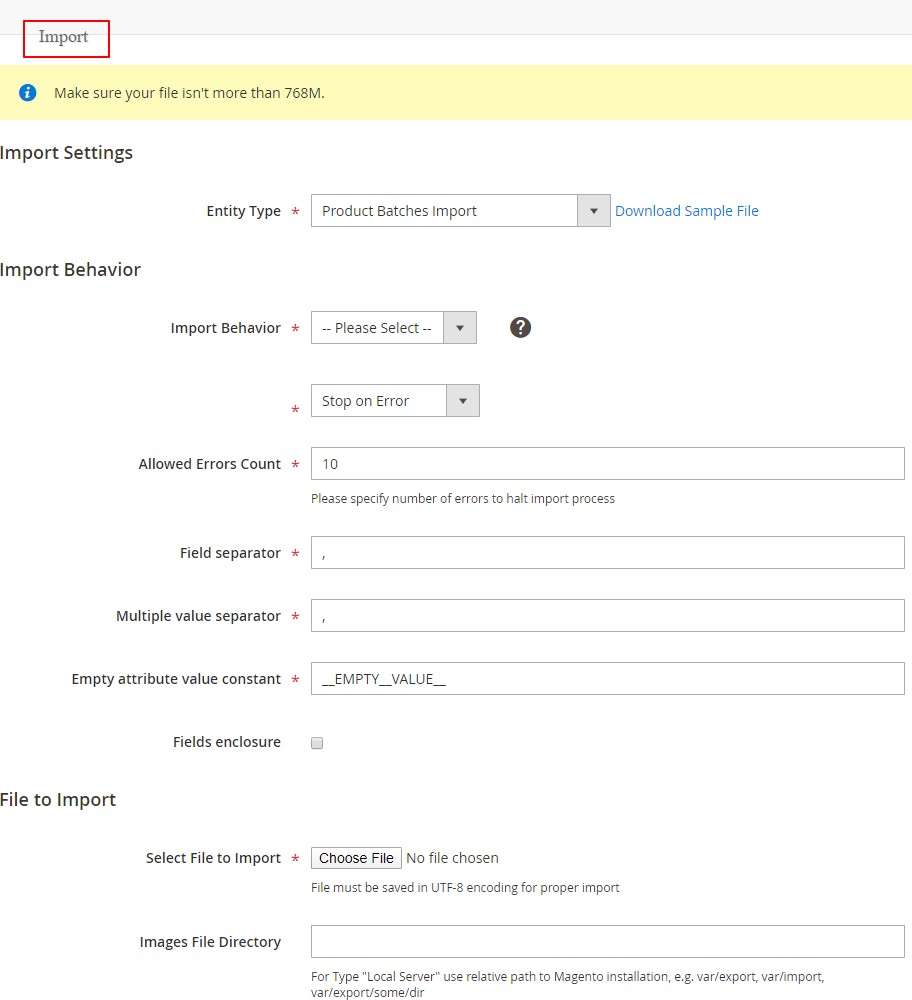
CSV File Format for Import - CSV file will have batch_code, batch_qty, batch_status, batch_expiry, product_sku and source_inventory.
Export Settings
- Batch Expiration Email Notification - When you select "Yes" for "Batch expiry email notification"from Admin > Stores > Configuration > Scommerce Configuration > Product Shelf Life Expiration > Batch Settings, then it sends an email notification for batch expiration.
API - Application Programming Interface
Authentication Token
auth_token can be received using the following: -
You would need credentials to your store with admin rights Parameters:-.Admin credentials
- Username
- Password
POST URL:- http://baseurl/index.php/rest/V1/integration/admin/token Content-Type: application/json
{
"username": "admin", "password": "admin"
}
Creating a Batch using API
Parameters:-
POSTURL:-http://baseurl/index.php/rest/V1/productbatches/createbatch Content-Type: application/json
{
"batch_code": "batchcode_001", "batch_qty": "10",
"batch_status": "1",
"batch_expiry": "2020-12-06", "product_sku": "MH0001"
}
Retrieve all Batches using API
Parameters:-
GET URL:-http://baseurl/index.php/rest/V1/productbatches/getcollection Content-Type: application/json
Retrieve Date of Batch using ID 1 Using API: -
Parameters: -
GET URL:-http://baseurl/index.php/rest/V1/productbatches/getbatch?batchId=1 Content-Type: application/json
Delete Batch with ID 1 Using API: -
Parameters: -
PUT URL: - http://baseurl/index.php/rest/V1/productbatches/deletebatch Content-Type: application/json
{
"batchId": 1
}
If you have a question related to this extension please check out our FAQ Section first. If you can't find the answer you are looking for then please contact support@scommerce-mage.com.