
Magento 2 Advanced SEO Suite
Installation and User Guide for Magento 2 Advanced SEO Suite
Table of Contents
- Installation
- Installation via app/code
- Installation via Composer
- Configuration Settings for SEO Base
- General Settings
- Configuration Settings for SEO Sitemap Exclusion
- General Settings
- Exclude Categories from Sitemap
- Exclude Products from Sitemap
- Exclude CMS Pages from Sitemap
- How to Generate Sitemap
- Add new Sitemap
- Magento Out of the Box Functionality to set the Category Path
- Google Sitemap XML
- Product Link in Sitemap XML
- Category Link in Sitemap XML
- CMS Pages Link in Sitemap XML
- Configuration Settings for Catalog URL
- General Settings
- Configuration Path to Set Up Primary Category
- Front-end Site View
- Product Page Unique URL
- Configuration Settings for Canonical Tags
- General Settings
- Category Canonical Tag
- Product Canonical Tag
- CMS Canonical Tag
- No Index No Follow
- Product Setup for Canonical URL
- Category Setup for Canonical URL
- CMS Setup for Canonical URL
- Front-end Site View
- Canonical Tag on the Category Page
- Canonical Tag on the Product Page
- Canonical Tag on the CMS Page
- Configuration Settings for Rich Snippets
- General Settings
- Rich Snippets General Settings
- Twitter Card Settings
- Facebook Open Graph Settings
- Facebook Open Graph Settings
- Pinterest Rich Pins Settings
- Structured Data / Markup Code of Front-end Page(s) in Structured Data Testing Tool
- Home Page Markup Code
- Category Page Markup Code
- Product Page Markup Code
- Twitter, Facebook Open Graph Social Sharing Code
- Twitter Card
- Facebook Open Graph
- Increased and Optimized Page Ranking in Search Results
- Configuration Settings for Hreflang
- General Settings
- Language and Country Settings
- Front-end Site view
- Hreflang Tag on the Home Page
- Hreflang Tag on the Category Page
- Hreflang Tag on the Product Page
- Hreflang Tag on the CMS Page
- Configuration Settings for Cross Linking
- Cross Links Grid
- Add New Cross Link.
- Build External Link to Any Website
- Alert Message for Inactive Product / Category
- Set Primary Categories
- Front-end Site View
- Cross Link on Category Page
- Category Page Cross Link Redirecting on External Link
- Cross Link on Product Page
- Product Page Cross Link Redirecting on Internal Link
- Cross Link on CMS Page
Installation
-
Installation via app/code: Upload the content of the module to your root folder. This will not overwrite the existing Magento folder or files, only the new contents will be added. After the successful upload of the package, run below commands on Magento 2 root directory.
php bin/magento setup:upgrade php bin/magento setup:di:compile php bin/magento setup:static-content:deploy -
Installation via Composer: Please follow the guide provided in the below link to complete the installation via composer.
Configuration Settings for SEO Base
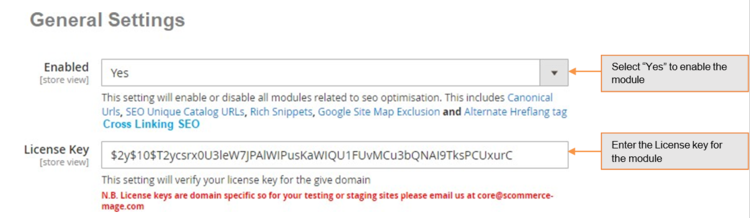
Go to Admin > Stores > Configuration > Scommerce Configuration > SEO Base
General Settings
- Enabled - Select "Yes" or "No" to enable or disable the module.
- License Key – Please add the license for the extension which is provided in the order confirmation email. Please note license keys are site URL specific. If you require license keys for dev/staging sites then please email us at support@scommerce-mage.com.
Configuration Settings for SEO Sitemap Exclusion
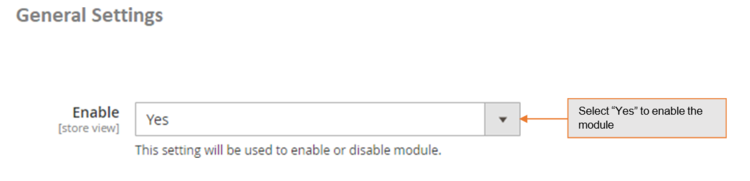
Go to Admin > Stores > Configuration > Scommerce Configuration > SEO Sitemap
General Settings
-
Enable - Select "Yes" or "No" to enable or disable the module.
-
Exclude Categories from Sitemap – To include or exclude categories, go to Admin > Catalog > Manage Categories > Select category (you want to exclude from site map) > General > Exclude from Sitemap: Set to "Yes/No"
-
Exclude Products from Sitemap – To exclude products from sitemap, go to Admin > Catalog > Manage Products > Select product (you want to exclude from sitemap) > General > Exclude from Sitemap: Set to "Yes/No".
-
Exclude CMS Pages from Sitemap – To exclude CMS pages from sitemap, go to Admin > CMS > Pages > Select CMS Page (you want to exclude from site map) > General > Exclude from Sitemap: Set to "Yes/No"

-
How to Generate Sitemap – To generate the site map from the admin panel go to, Admin > Marketing > Sitemap > Click ''Generate Sitemap''.
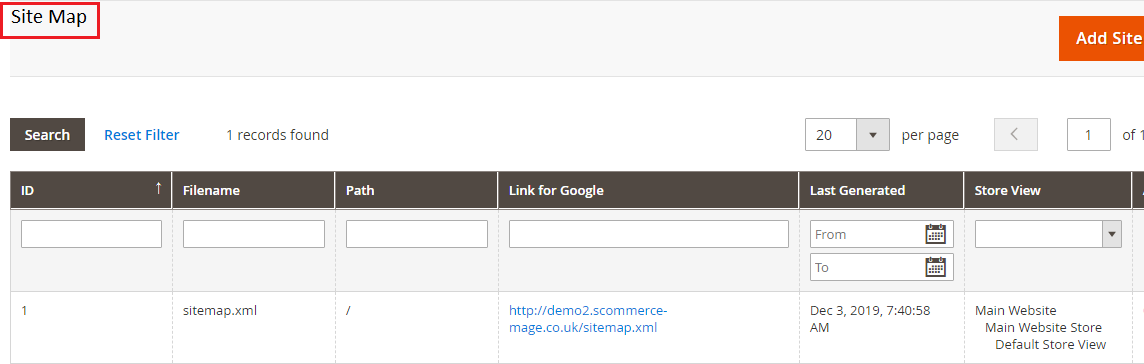
-
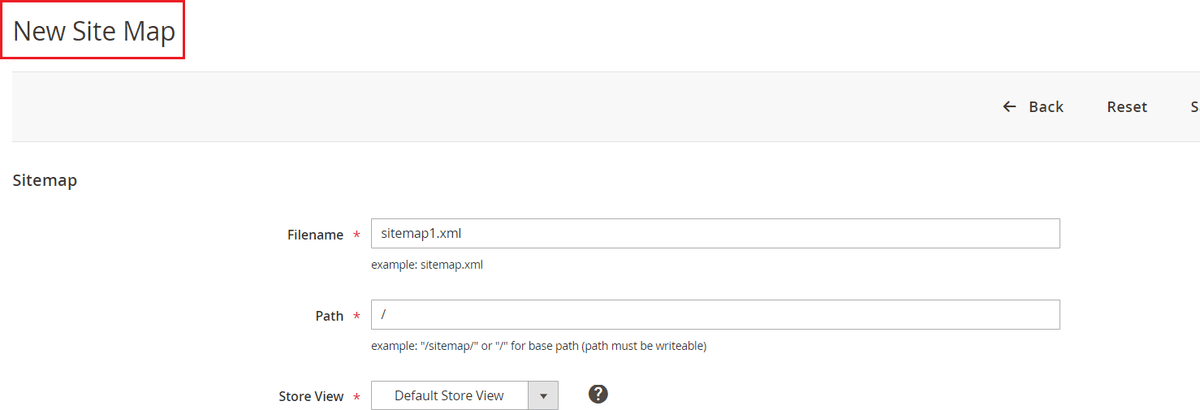
Add new Sitemap - You can create new site map from, Admin > Marketing > Sitemap > Click ''Add Sitemap'', it redirects to New Site Map page and by providing all the required details you can create Site Map.
-
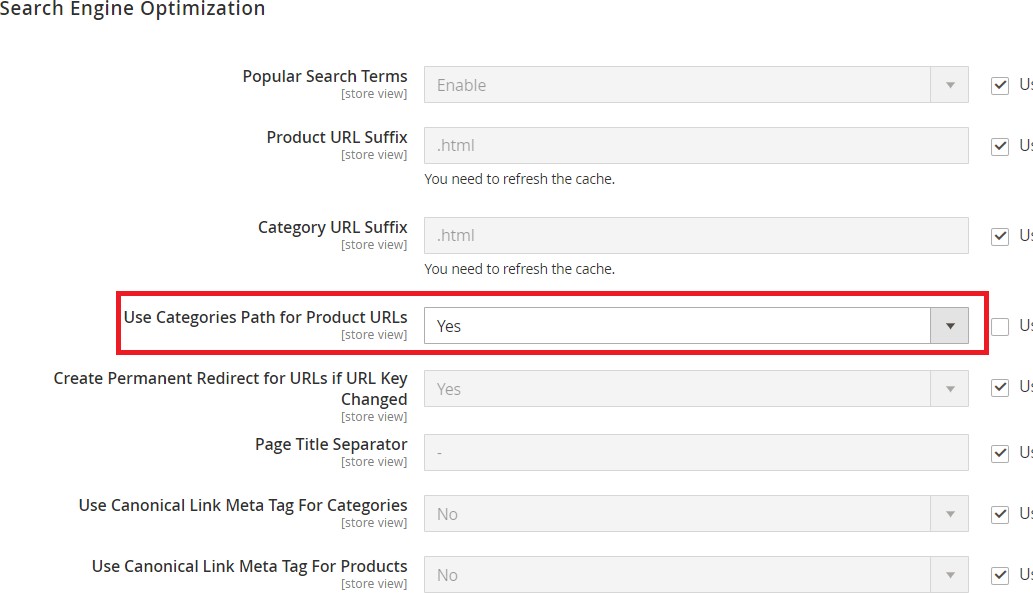
Magento Out of the Box Functionality to set the Category Path - To include category path in product URLs in sitemap.xml, go to Admin > System > Configuration > Catalog > Catalog > Search Engine Optimizations > Use Categories Path for Product URLs: Set to "yes".
Google Sitemap XML
Google site map shows all the included Products, Categories, and CMS Pages links in the sitemap.xml.
-
Category Link in Sitemap XML - You can see the category link in the Google Sitemap XML.

-
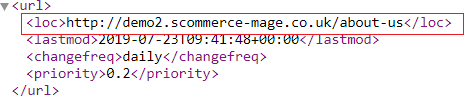
CMS Pages Link in Sitemap XML - In the below screen grab you can see the about-us page link in the Google Sitemap XML.
-
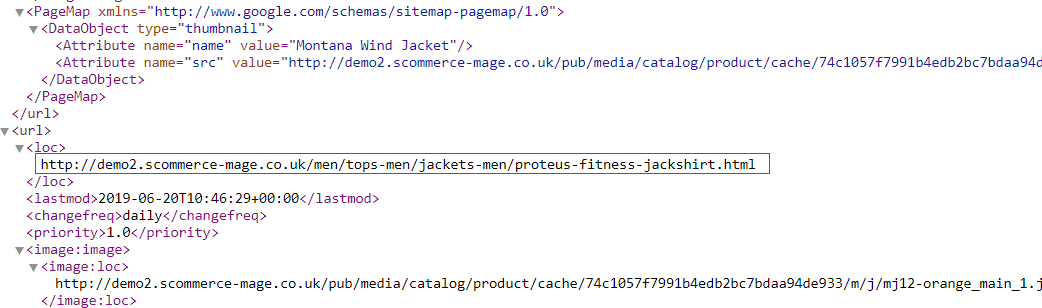
Product Link in Sitemap XML - You can see the product link in the Google Sitemap XML.
Configuration Settings for Catalog URL
Go to Admin > Stores > Configuration > Scommerce Configuration > Catalog URL
General Settings
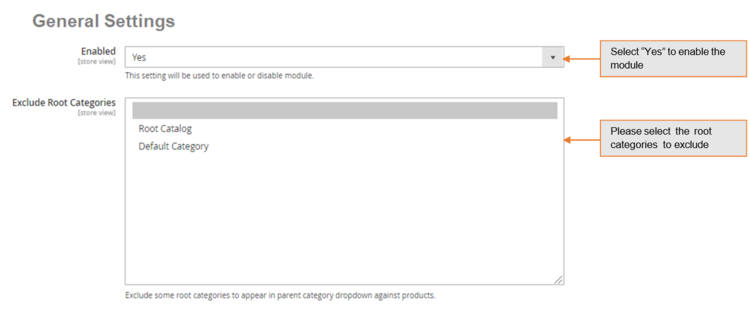
- Enabled - Select "Yes" or "No" to enable or disable the module.
- Exclude Root Categories – Exclude some root categories to appear as primary category dropdown against products.
Configuration Path to Set Up Primary Category
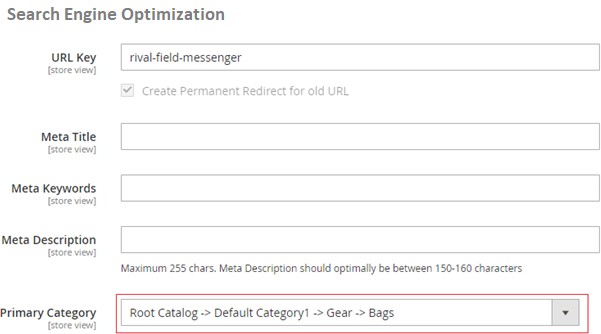
Go to Admin > Catalog > Select Product > Search Engine Optimization > Primary Category . The drop down will show all the categories selected for the product from where you can select the primary category of the product.
Front-end Site View
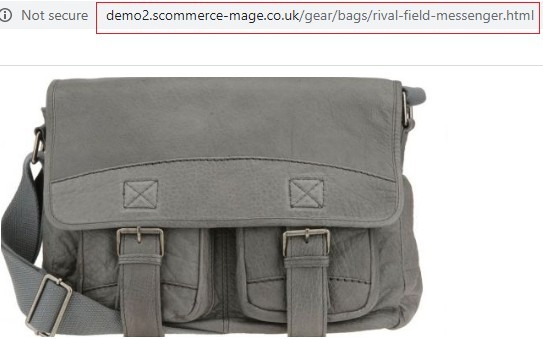
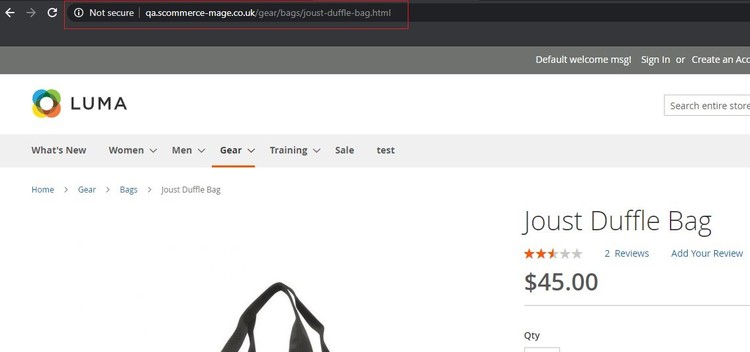
- Product Page Unique URL - You can assign primary category to any product from Admin > Catalog > Select Product > Search Engine Optimization > Primary Category. In the below image you can see the assigned category of product Rival Field Messenger is "Gear->Bags".
Configuration Settings for Canonical Tags
Go to Admin > Stores > Configuration > Scommerce Configuration > Canonical Tags
General Settings
- Enable - Select "Yes" or "No" to enable or disable the module.

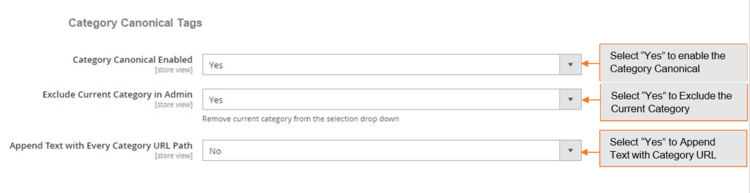
Category Canonical Tag
- Category Canonical Enable – Set it to yes, if you want canonical tag on category pages.
- Exclude Current Category in Admin – Set it to "Yes", if you don't want the same category to appear in the drop-down selection while choosing canonical category for a category.
- Append Text with Every Category URL Path – Set it to yes, if you want to append text with overridden canonical url as well. This setting is useful when you have pagination/filtered navigation/sorting on your site.
Product Canonical Tag
- Product Canonical Enable – Set it to yes, if you want canonical tag on product pages.

CMS Canonical Tag
- CMS Canonical Enable – Set it to "yes", if you want canonical tag on CMS pages.

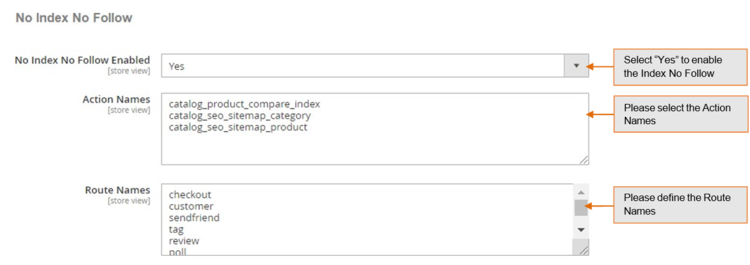
No Index No Follow
- No Index No Follow Enabled – Set it to yes, if you want to add no index, no follow in the head section.
- Action names – Add action names here to add no index, no follow in the head section for specific page. New route name needs to be added in next line.
- Route names – Add route name here to add no index, no follow in the head section for list of pages.
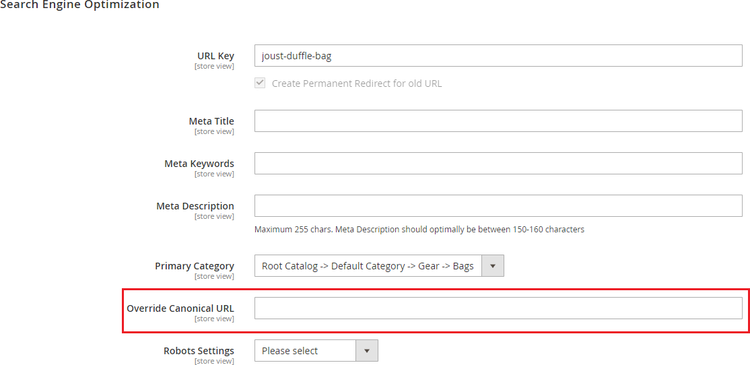
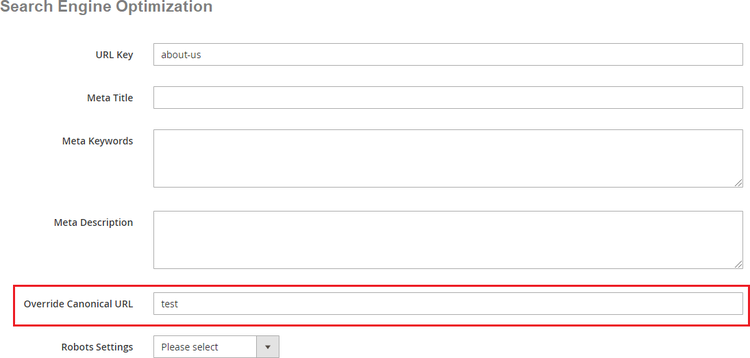
Product Setup for Canonical URL
Go to Admin > Catalog > Products > Select Product (for which you want to set Canonical URL) > Search Engine Optimization Tab
- Primary Category – Select primary category to be included in the canonical URL tag.
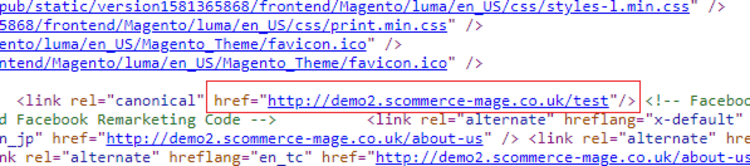
- Override Canonical URL – Enter text here to be used as canonical tag URL.
- Robot Settings – Select the robot settings from dropdown.
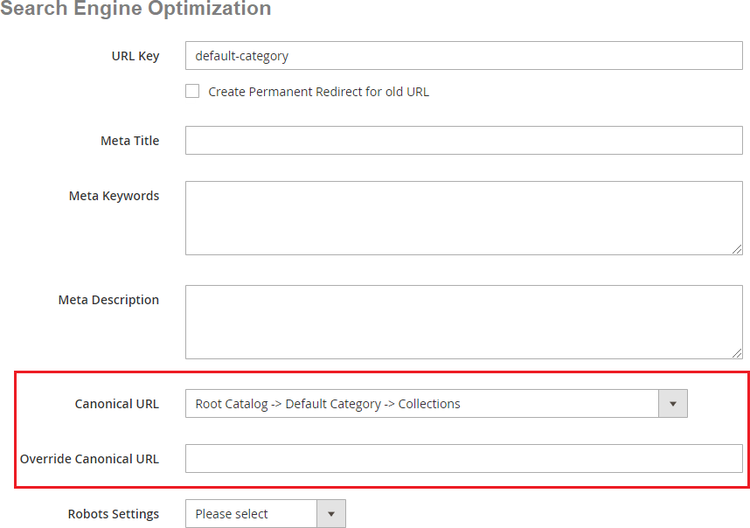
Category Setup for Canonical URL
Go to Admin > Catalog > Category > select category (for which you want to set canonical URL) > Search Engine Optimization Tab.
- Canonical URL – Select primary category to be included in canonical URL tag.
- Override Canonical Tag – Enter text here to be used as canonical tag URL.
- Robot Settings – Select the robot settings from dropdown.
CMS Setup for Canonical URL
Go to Admin > Content > Pages > Choose page (for which you want to set canonical URL) > Search Engine Optimization Tab
- Override Canonical URL – Enter text here to be used as canonical tag URL.
- Robot Settings – Select the robot settings from dropdown.
Front-end Site View
-
Canonical Tag on the Category Page - You can enable canonical tag on the category page from Admin > Stores > Configuration > Scommerce Configuration > Canonical Tags > Category Canonical Enable - Select "Yes".

-
Canonical Tag on the Product Page - To add canonical tag on the product page, go to Admin > Stores > Configuration > Scommerce Configuration > Canonical Tags > Product Canonical Enable - Select "Yes".

-
Canonical Tag on the CMS Page - You can add canonical tag on the CMS page from Admin > Stores > Configuration > Scommerce Configuration > Canonical Tags > CMS Canonical Enable - Select "Yes".
Configuration Settings for Rich Snippets
Go to Admin > Stores > Configuration > Scommerce Configuration > Rich Snippet
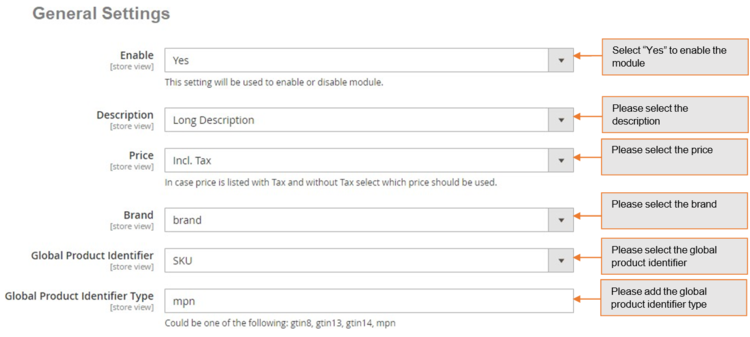
General Settings
- Enable - Select "Yes" or "No" to enable or disable the module.
- Description – Select description/short description from the drop down.
- Price – Select Price from the drop down. In case price is listed with tax and without tax select which price should be used.
- Brand – Select brand from the drop down.
- Global Product Identifier – Select product identifier from the drop-down list.
- Global Identifier Type – Select product identifier type from the drop-down list. It could be one of the following: gtin8, gtin13, gtin14, mpn.
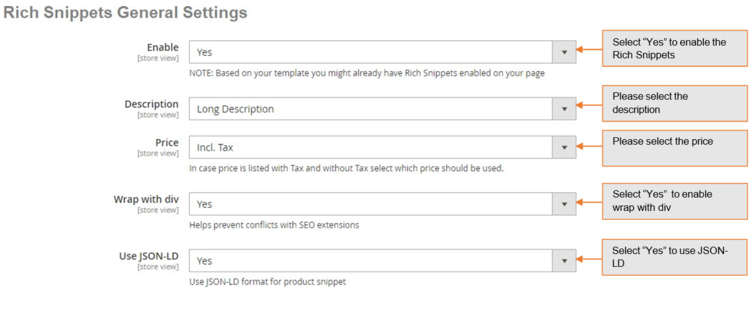
Rich Snippets General Settings
- Enable - Select "Yes" or "No" to enable or disable the module.
- Description – Select description/short description from the drop-down.
- Price – Select price from the drop down. In case price is listed with tax and without tax select which price should be used.
- Wrap with div – Select "Yes/No". It helps prevent conflicts with SEO extensions.
- Use JSON-LD – Select "Yes/No" use JSON-LD format for product snippet.
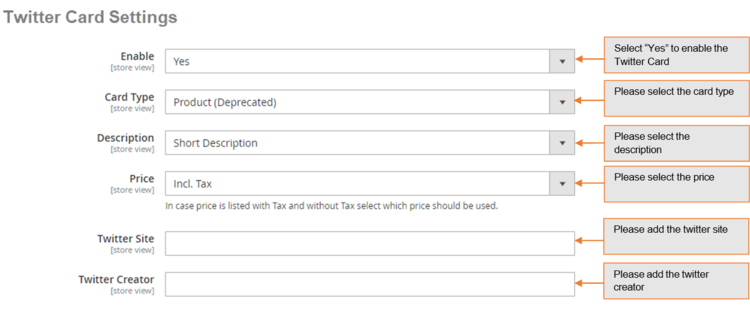
Twitter Card Settings
- Enable - Select "Yes" or "No" to enable or disable the module.
- Card Type – Select the card type.
- Description - Select description/short description from the drop down.
- Price – Select price from the drop down. In case price is listed with tax and without tax select which price should be used.
- Twitter Site – Set Twitter site name (@ username for the website used in the card footer)
- Twitter Creator – Set Twitter creator name (@username for the content creator / author)
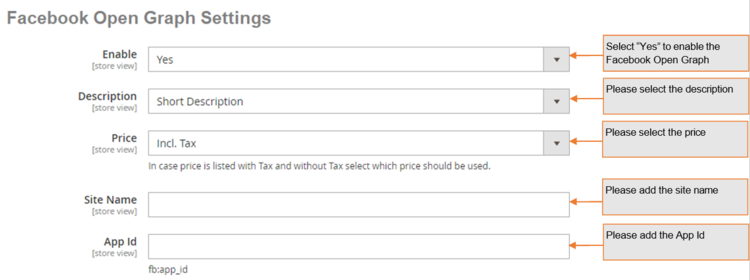
Facebook Open Graph Settings
Facebook Open Graph Settings
- Enable – Set "Yes" to enable.
- Description – Select description/short description from the drop down.
- Price – Select price from the drop down. In case price is listed with tax and without tax select which price should be used.
- Site Name – Set Facebook site name.
- App ID – Set Facebook App ID.
Pinterest Rich Pins Settings
- Enable – Set "Yes" to enable Pinterest Rich Pins . It uses same tags as Facebook open graph, make sure Facebook Open graph is enabled as well.

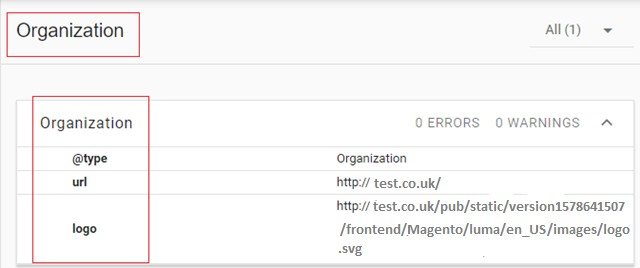
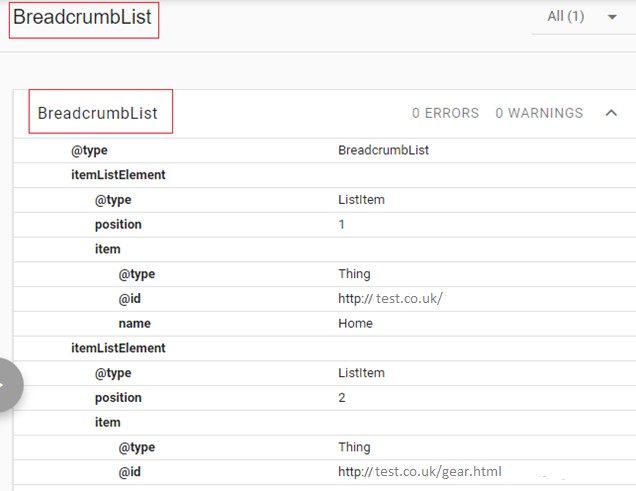
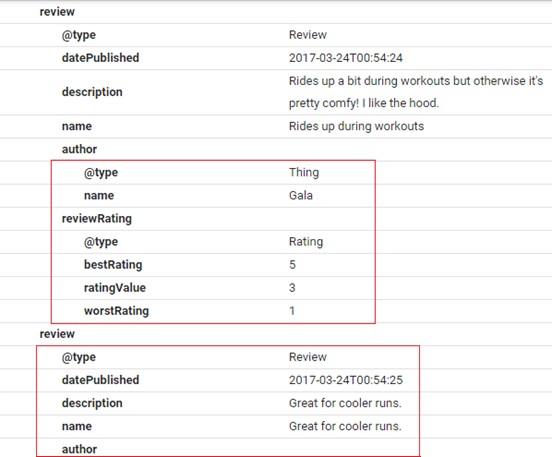
Structured Data / Markup Code of Front-end Page(s) in Structured Data Testing Tool
-
Home Page Markup Code - You can add structured data/markup code on home page from, Admin > Stores > Configuration > Scommerce Configuration > Rich Snippet > Enable - Select "Yes". To test structured data, go to Structured Data Testing Tool > Provide Home Page URL > Click "Run Test" button.
-
Category Page Markup Code - You can add markup code, breadcrumbs on category page from, Admin > Stores > Configuration > Scommerce Configuration > Rich Snippet > Enable - Select "Yes".
-
Product Page Markup Code - To add structured data markup code on product page, set "Enable" to "Yes" from, Admin > Stores > Configuration > Scommerce Configuration > Rich Snippet.
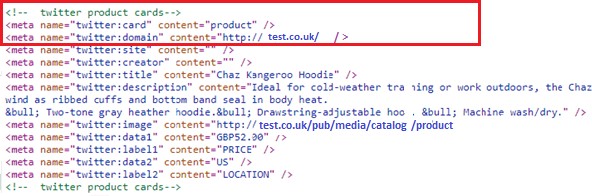
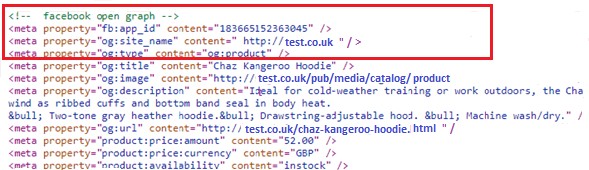
Twitter, Facebook Open Graph Social Sharing Code
-
Twitter Card - You can enable Twitter Card from, Admin > Stores > Configuration > Scommerce Configuration > Rich Snippet >Twitter Card Settings > Enable - "Yes".
-
Facebook Open Graph - Enable Facebook Open Graph from, Admin > Stores > Configuration > Scommerce Configuration > Rich Snippet >Twitter Card Settings > Enable - "Yes".
-
Increased and Optimized Page Ranking in Search Results - In the below image you can see the increased and optimized page ranking in search results.

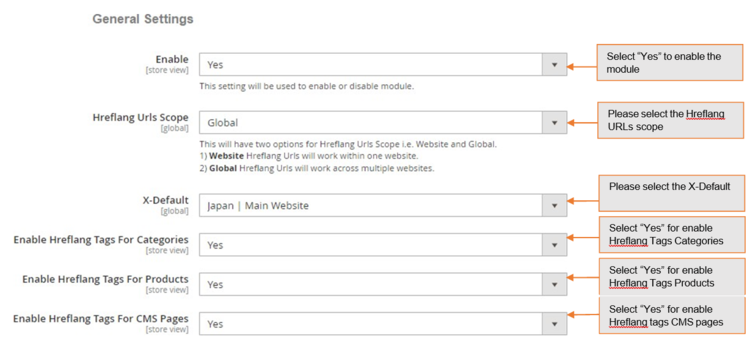
Configuration Settings for Hreflang
Go to Admin > Stores > Configuration > Scommerce Configuration > Hreflang
General Settings
- Enable - Select "Yes" or "No" to enable or disable the module.
- Href UrLS Scope – Select options from the list.
- Website Hreflang URLs: It will work within one website.
- Global Hreflang URLs: This will work across multiple websites.
- X-Default – Select default store view.
- Enable Hreflang Tags for Categories – Select "Yes/No". If set to "Yes" then it will enable Hreflang Tags for the categories.
- Enable Hreflang Tags for Products – Select "Yes/No". If set to "Yes" then it will enable Hreflang Tags for the products.
- Enable Hreflang Tags for CMS Pages – Select "Yes/No". If set to "Yes" then it will enable Hreflang Tags for the CMS Pages.
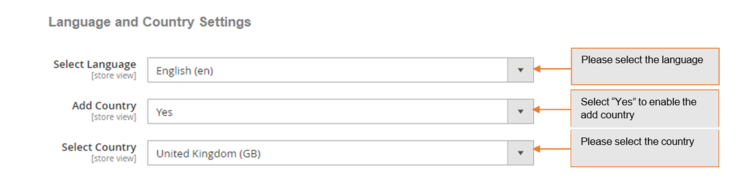
Language and Country Settings
- Select Language – Select Local or Custom languages from the drop down list.
- Add Country – Select "Yes/No". If set to "Yes" then only the "Select Country" option will be visible.
- Select Country – Select country from the drop-down list.
Front-end Site view
-
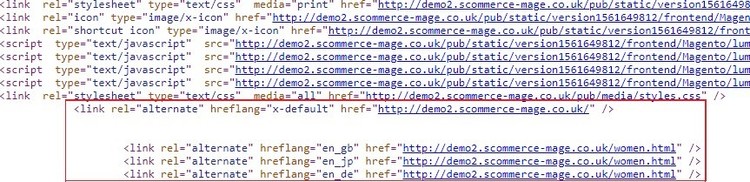
Hreflang Tag on the Home Page - You can enable hreflang on the home page by selecting "Yes" for " Hreflang Tags For CMS Pages " from Admin > Stores > Configuration > Scommerce Configuration > Hreflang > General Settings > Enable - Select "Yes " > Enable Hreflang Tags For CMS Pages.

-
Hreflang Tag on the Category Page - To enable hreflang on the category page, go to Admin > Stores > Configuration > Scommerce Configuration > Hreflang > General Settings > Enable - Select "Yes " > Enable Hreflang Tags For Categories - "Yes".
-
Hreflang Tag on the Product Page - You can enable hreflang on the product page by selecting "Yes" for " Hreflang Tags For Products " from Admin > Stores > Configuration > Scommerce Configuration > Hreflang > General Settings > Enable - Select "Yes " > Enable Hreflang Tags For Products.

-
Hreflang Tag on the CMS Page - Enable hreflang on the CMS Pages From Admin > Stores > Configuration > Scommerce Configuration > Hreflang > General Settings > Enable - Select "Yes " > Enable Hreflang Tags For CMS Pages - "Yes".

Configuration Settings for Cross Linking
Go to Admin > Stores > Configuration > Scommerce Configuration > Cross Linking
-
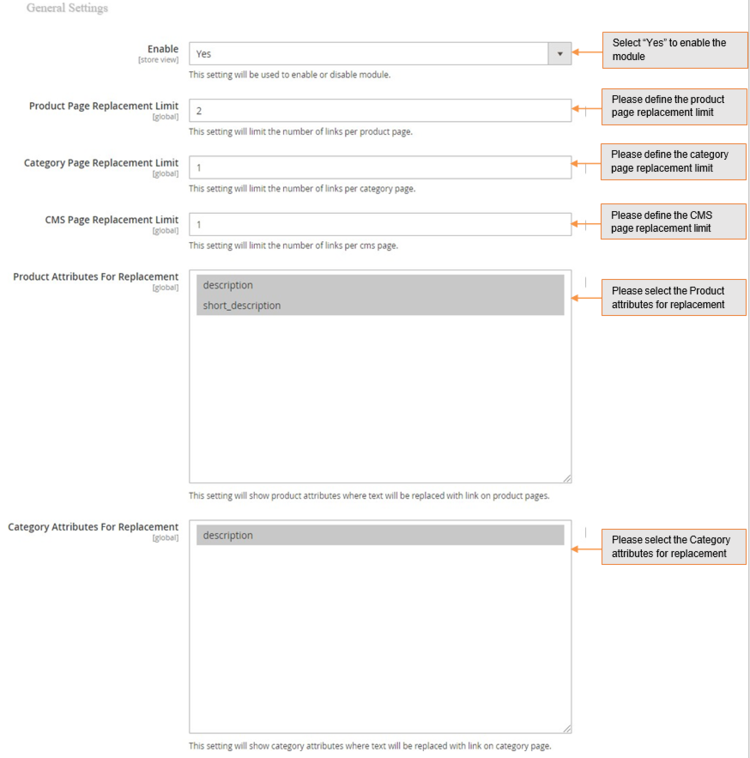
Enabled – Select "Yes" or "No" to enable or disable the module.
-
Product Page Replacement Limit – Please define the replacement limit per product page. It determines how many keywords will be replaced on the given page.
-
Category Page Replacement Limit – Please define the replacement limit per category page. It determines how many keywords will be replaced on the given page.
-
CMS Page Replacement Limit – Please define the CMS page replacement limit. It determines how many keywords will be replaced on the given page.
-
Product Attributes for Replacement – Please select the product attributes where text will be replaced with link on product pages.
-
Category Attribute for Replacement – Please select the category attributes where text will be replaced with link on category page.
-
Cross Links Grid - You can manage and create new cross links from Admin > Marketing > SEO Cross Linking > Cross Links. This grid will have ID, Title, Status, Store View, Target, Replacement Limit, Priority, Nofollow, Action.

-
Add New Cross Link - To add new cross link, go to Admin > Marketing > SEO Cross Linking > Cross Links > Click on "Add New Link" button. It redirects on "Add New Cross Link" page and by providing all the general information you can create a new cross link.
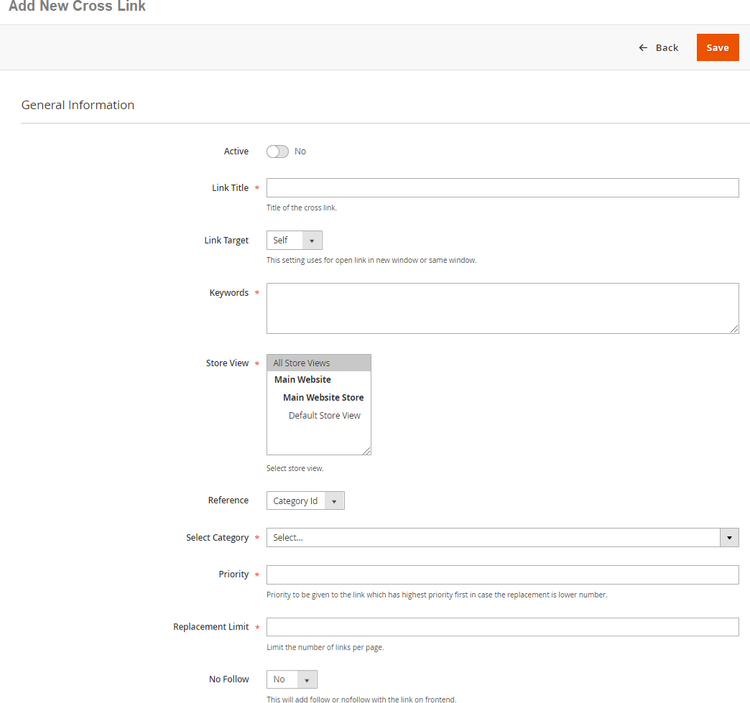
This will have the following general information:-
- Active - Dropdown with 'YES' or 'NO' options
- Link Title - Title of the link
- Link Target - Dropdown with options self or blank
- Keywords - Keywords can be entered with line breaks and wildcard % anywhere with the keyword for example %phone% (iPhone7)
- Store View - Multi-select with options All Store Views, Default Store View
- Reference - Dropdown with options, Product ID, Category ID or Custom Url
- Reference Resource - This will show either category tree or product grid with filters or css grid with filters to choose category or product ID
- Priority - Priority to be given to the link which has highest priority first in case the replacement is lower number
- Replacement limit - Limit the number of links per page
- No Follow - This will add follow or nofollow with the link on frontend
- Build External Link to Any Website - You can set external link to any website from Admin > Marketing > SEO Cross Linking > Cross Links >Reference - Custom Url > Custom Url - Provide External Link.
- Alert Message for Inactive Product / Category - It shows an alert / warning message when you disable the category or product from Admin > Catalog > Category / Product > Select Category / Product > Disable > Save.
- Alert Message for Inactive Category
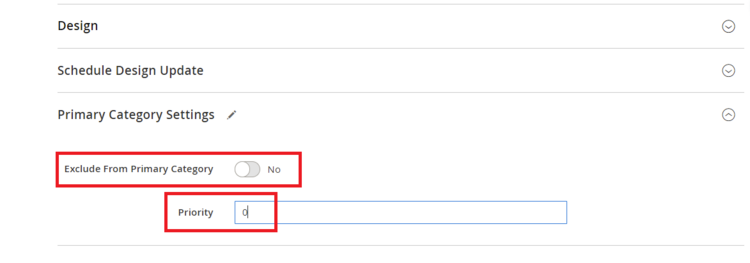
Set Primary Categories
You can use a script provided with the extension to automatically add primary categories for products. Admin can exclude certain categories from primary category and also prioritise one category over the other to be picked as the primary category.
Go to Admin>Catalog>Categories select a category then scroll down to find the option "Primary Category Settings". Here click on "Exclude From Primary Category" to exclude this category from primary category or enter the priority 0 being the highes. The highest priority category will be picked first for the primary category.
To automatically assingn primary category for all products run the command given below by going into the root directory of your store.
scommerce:seo-base:set-primary-categoryN.B - If you are using older version then run the script provided in the extension folder at the path Data/SetPrimaryCategoryM2.php from ssh
Front-end Site view
-
Cross Link on Category Page - You can define the replacement limit for category page from Admin > Stores > Configuration > Scommerce Configuration > Cross Linking > Category Page Replacement Limit - 1. It determines how many keywords will be replaced on the given page and to define cross link, go to Admin > Marketing > SEO Cross Linking > Cross Links > Select Link > Replacement Limit -1.
-
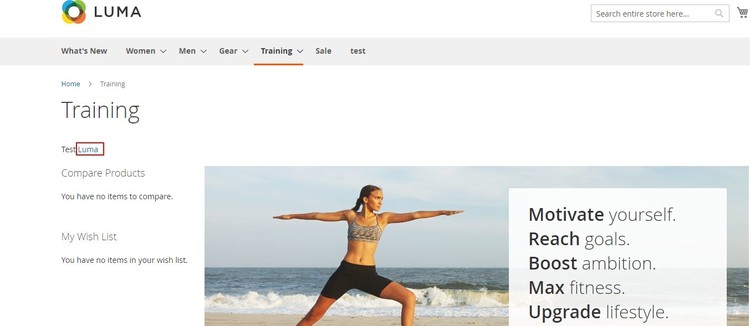
Category Page Cross Link Redirecting on External Link - Click on the cross link "Luma" will redirect to external link.
-
Cross Link on Product Page - You can define replacement limit for cross link from Admin > Marketing > SEO Cross Linking > Cross Links > Select Link > Replacement Limit - 2. Individual Cross link limit determines how many times the link will be replaced on the given page.
-
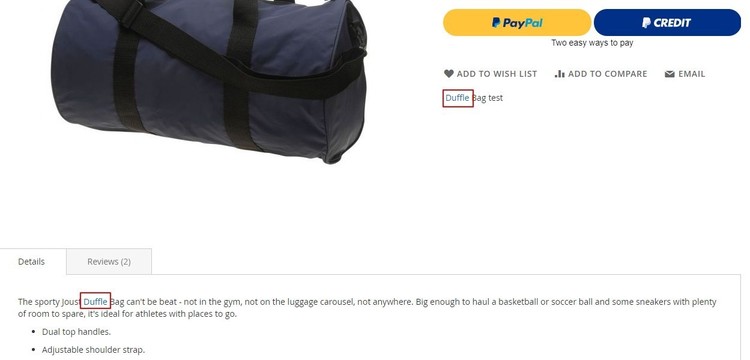
Product Page Cross Link Redirecting on Internal Link - Click on the cross link "Duffle" will redirect to defined internal link.
-
Cross Link on CMS Page - You can set replacement limit for cross link from Admin > Marketing > SEO Cross Linking > Cross Links > Select Link > Replacement Limit - 1. Individual Cross link limit determines how many times the link will be replaced on the given page.

If you have a question related to this extension please check out our FAQ section first. If you can't find the answer you are looking for then please contact support@scommerce-mage.com.