
Magento 2 Advanced Store Locator
Installation and User Guide for Magento 2 Advanced Store Locator
Table of Contents
- Installation
- Installation via app/code
- Installation via Composer
- Configuration Settings for Advanced Store Locator
- General Settings
- Store Locator Region Management (Admin)
- Accessing Region Management
- Creating a New Region
- Editing Existing Regions
- Deleting a Region
- Store Management & Region Association (Admin)
- Accessing Store Management
- Creating a New Store
- Editing Existing Stores
- Deleting a Store
- Store List Display on Frontend (Customer)
- Viewing Stores Within a Selected Region
- Viewing All Stores (Without Region Selection)
- Store Detail View (Customer)
- Accessing Store Detail View
- Understanding the Layout
- Detailed Store Information
Installation
- Installation via app/code: Upload the content of the module to your root folder. This will not overwrite the existing Magento folder or files, only the new contents will be added. After the successful upload of the package, run below commands on Magento 2 root directory.
php bin/magento setup:upgrade
php bin/magento setup:di:compile
php bin/magento setup:static-content:deploy- Installation via Composer: Please follow the guide provided in the below link to complete the installation via composer.
Configuration Settings for Advanced Store Locator
Go to Admin > Stores > Configuration > Scommerce Configuration > Store Locator
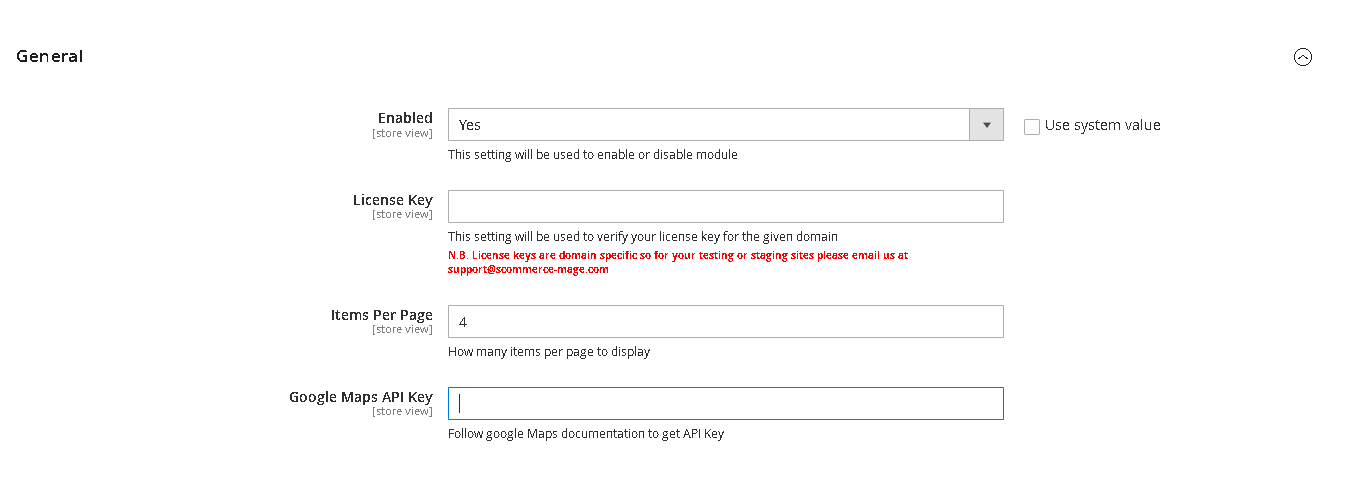
General Settings
- Enabled - Select “Yes” or “No” to enable or disable the module.
- License Key - Please add the license for the extension which is provided in the order confirmation email. Please note license keys are site URL specific. Please go to Admin > Stores > Configuration > Scommerce Configuration > Core and click on "Verify" to verify the license key.
- Items Per Page - Add the number of items to be displayed per page
- Enabled - Enter the Google Maps API key to fetch the map for each store
Store Locator Region Management (Admin)
This section outlines how administrators can create, edit, and delete regions to categorize your store locations effectively.
1.1. Accessing Region Management
To begin managing your store locator regions:

1.2. Creating a New Region
Follow these steps to add a new region to your store locator:
-
On the Store Regions grid page, click the Add New Region button in the top-right corner.
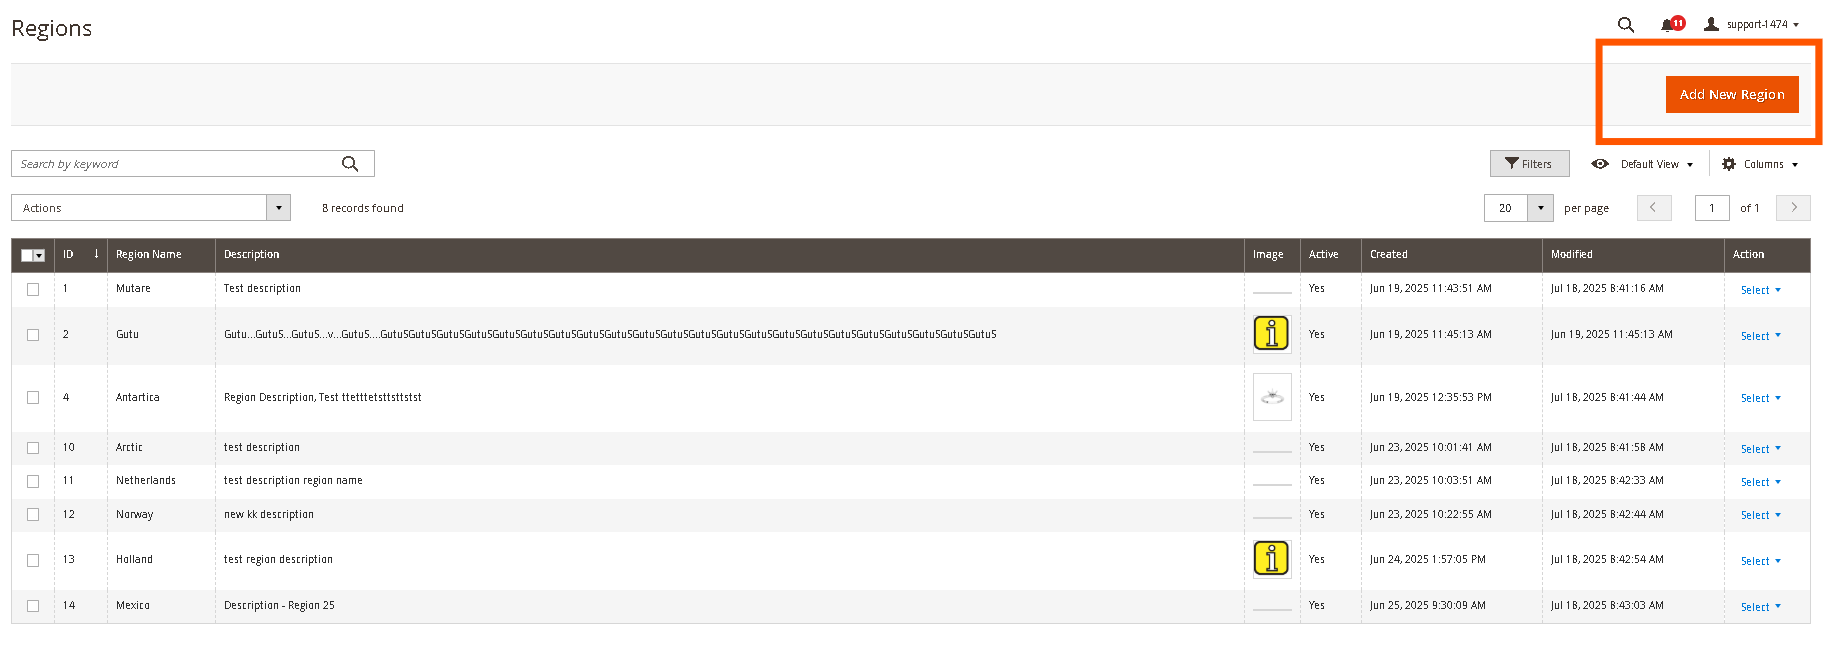
-
You will be redirected to the New Region page. Fill in the following details:
- Active: Toggle to activate or deactivate the region.
- Region Name: Enter a unique name for your region (e.g., "North America," "Europe," "Asia Pacific"). This field is required.
- Description: (Optional) Provide a brief description for the region. This can be used for internal reference.
- Region Image: (Optional) Upload an image to represent the region. This might be displayed on the frontend depending on your theme and future enhancements.
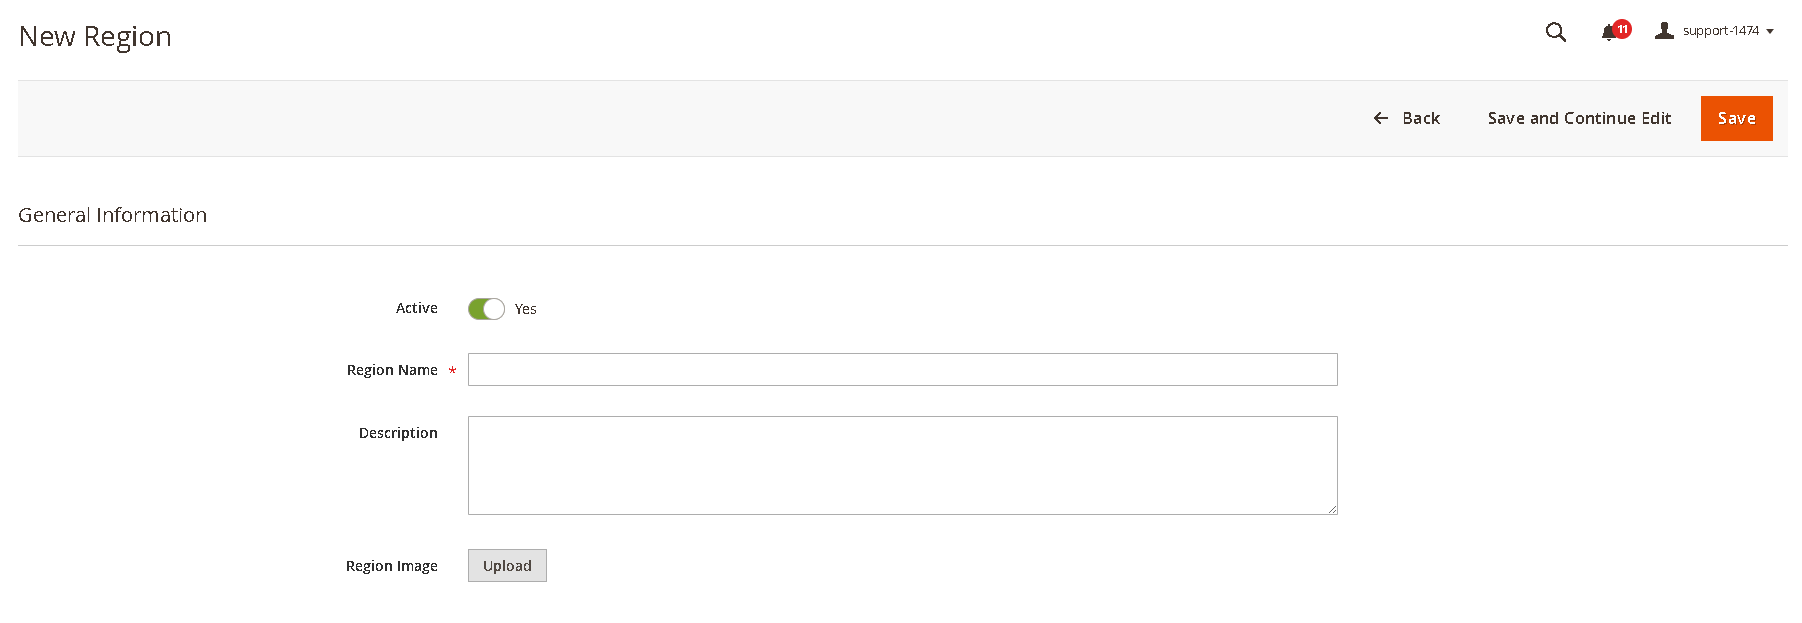
-
Click Save Region to create the new region. A success message will appear, and you will be redirected back to the Region Management grid.
1.3. Editing Existing Regions
To view or modify details of an existing region:
-
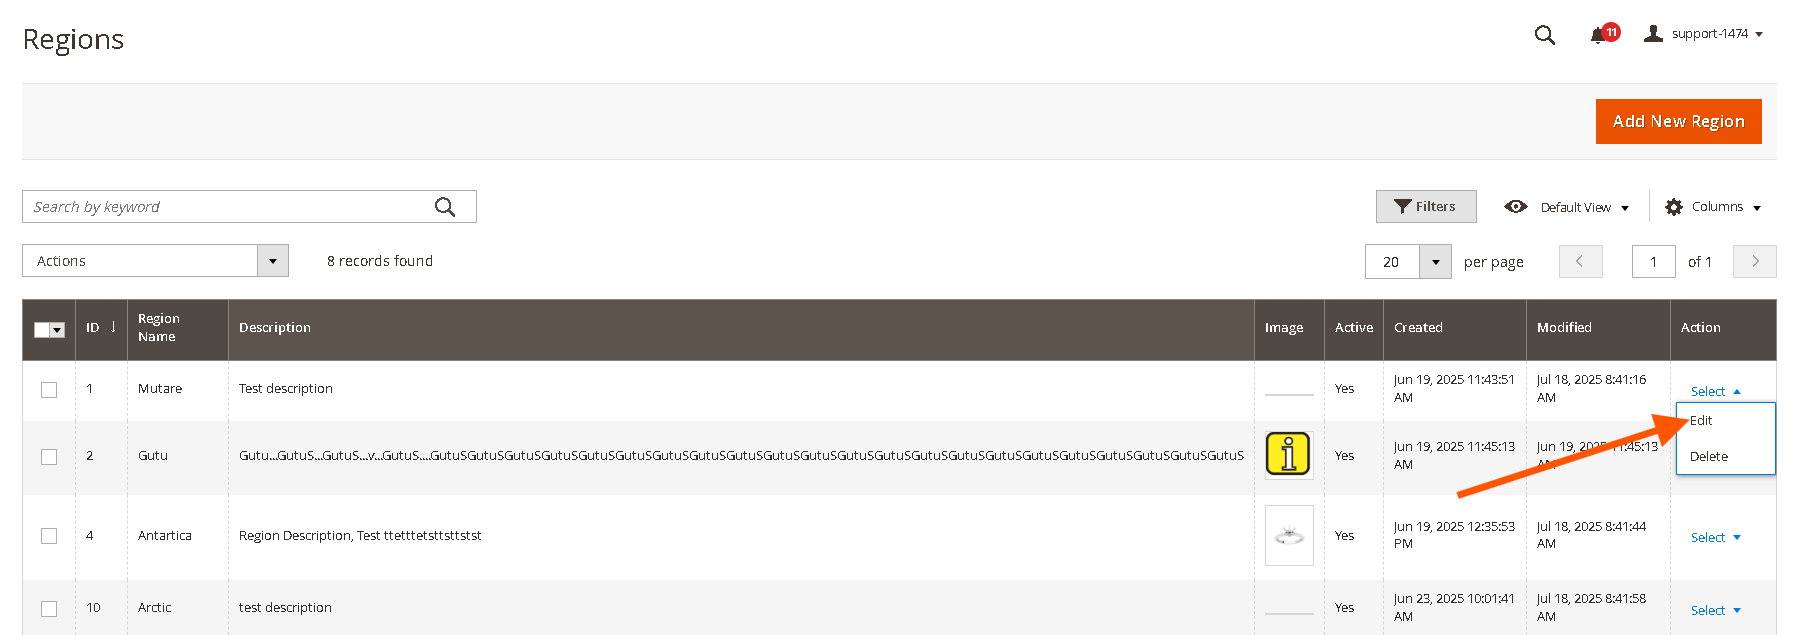
From the Region Management grid, locate the region you wish to edit.
-
In the Actions column for that region, click Edit.
- Clicking Edit will open the region details page where you can modify any of the fields (Region Name, Description, Image).
-
After making any changes, click Save Region to apply your updates.
1.4. Deleting a Region
You can remove regions from your system, provided no stores are currently assigned to them:
-
From the Region Management grid, locate the region you wish to delete.
-
In the Actions column for that region, click Delete.
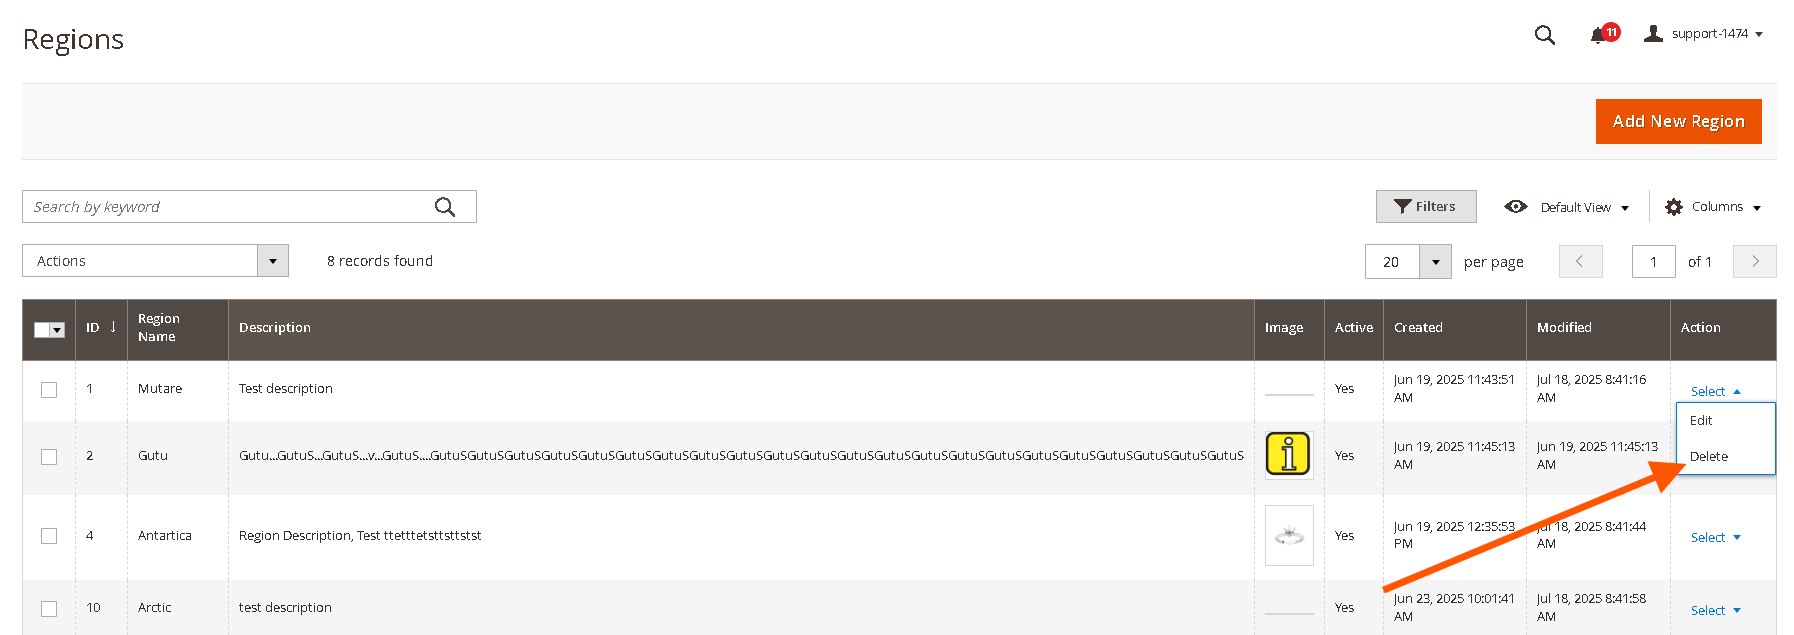
-
Alternatively you can also edit the region and then use the "Delete" button at the top.
-
A confirmation pop-up will appear. Click OK to confirm the deletion.
-
Important: A region can only be deleted if no stores are associated with it. If stores are assigned, you will need to reassign or delete those stores first.
-
Once a region is successfully deleted, it will be removed from the grid and will no longer appear as an option for store categorization or on the front-end store locator navigation.
-
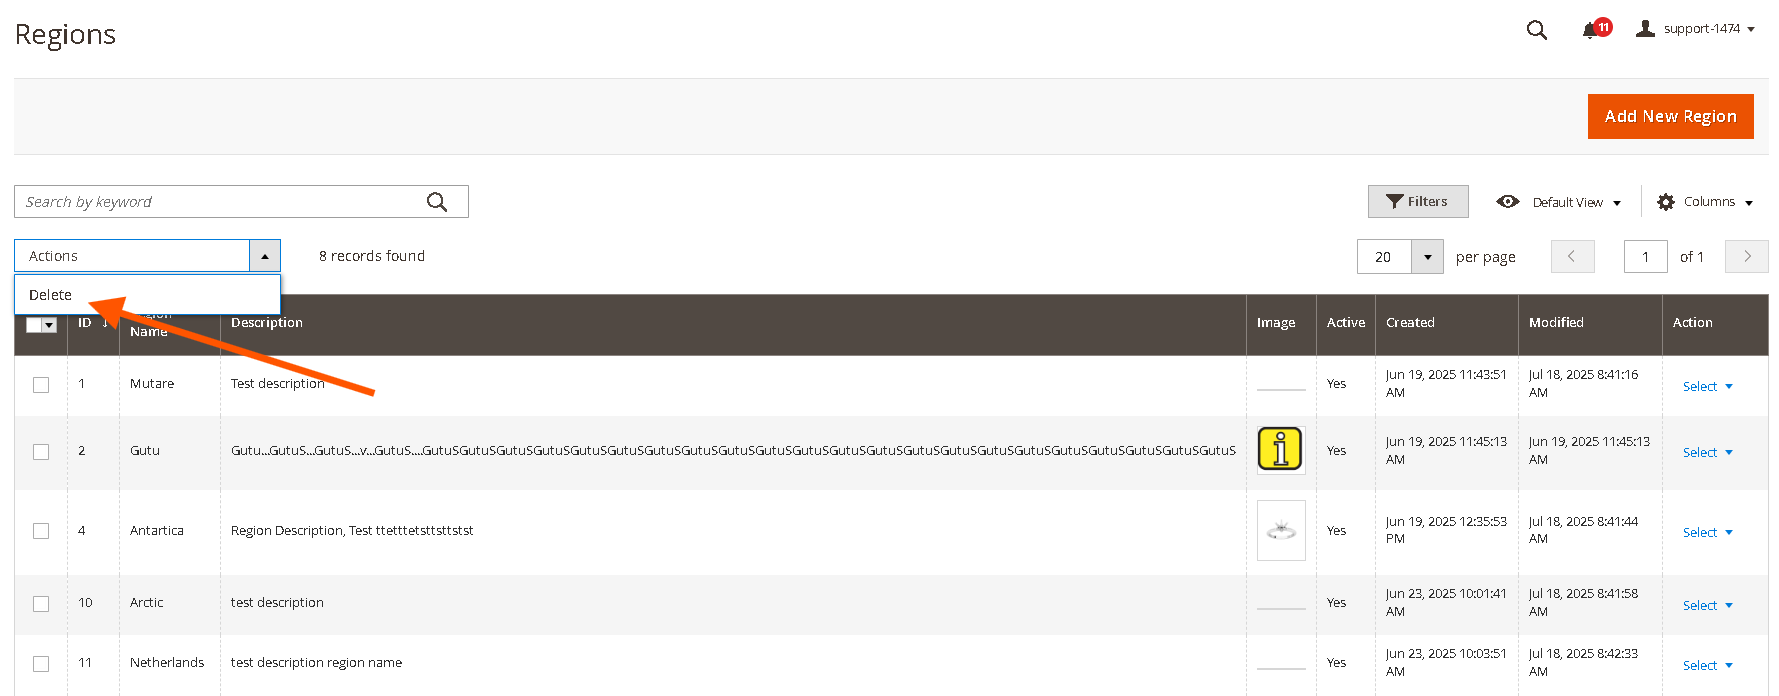
You can also Mass delete regions using following steps:
- Select checkboxes next to messages.
- From the Actions dropdown, choose "Delete".
- Confirm by clicking "OK" in the popup.

1.5. Mass Action to Activate/Deactivate/Delete Regions
Go to Admin>Stores>Scommerce Store Locator>Store Regions select the regions that you want to Deactivate/Activate/Delete. Next click on the mast action button and then select the action as shown below:-
1.6. Import Regions
Go to Admin>System>Data Transfer>Import.
From the Entity Type dropdown select "Scommerce Store Locator Regions"
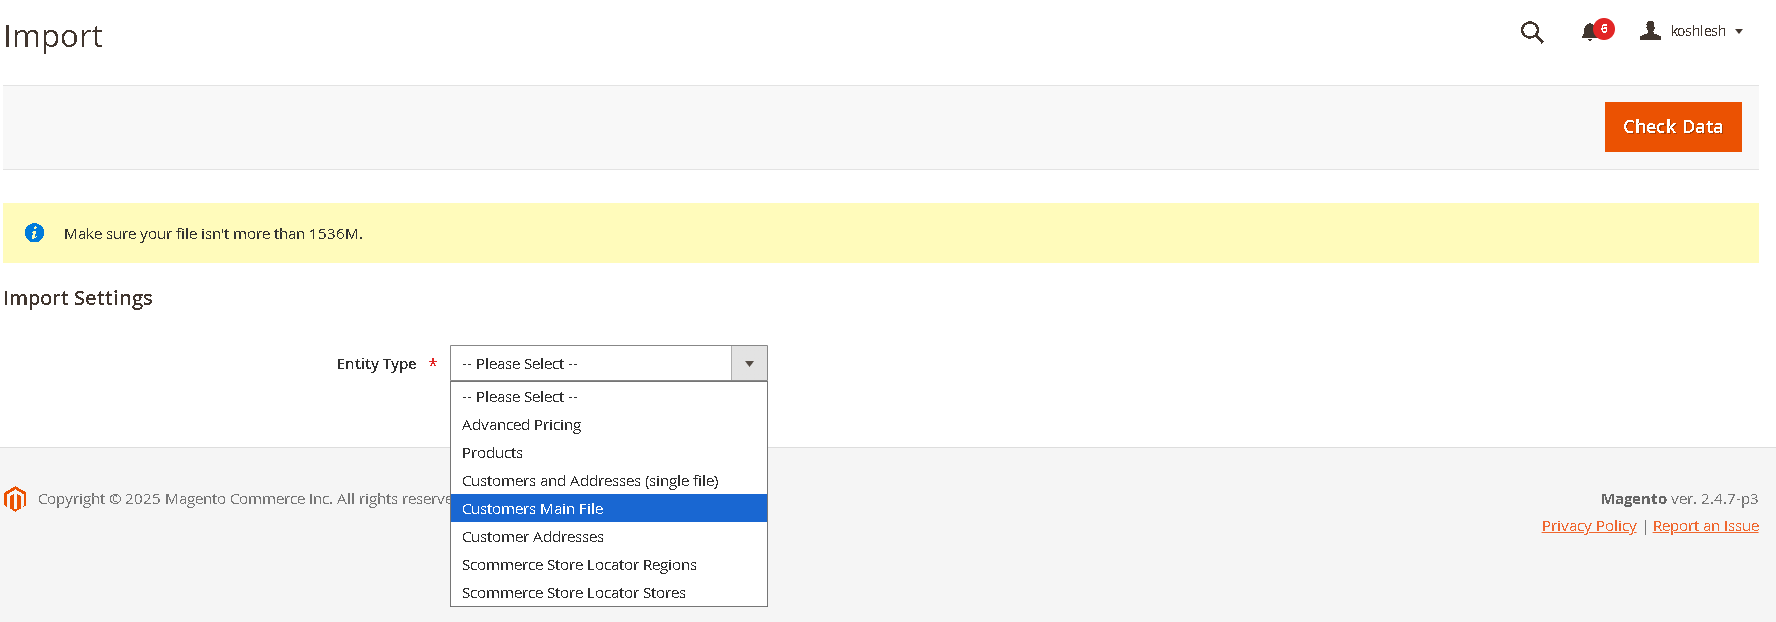
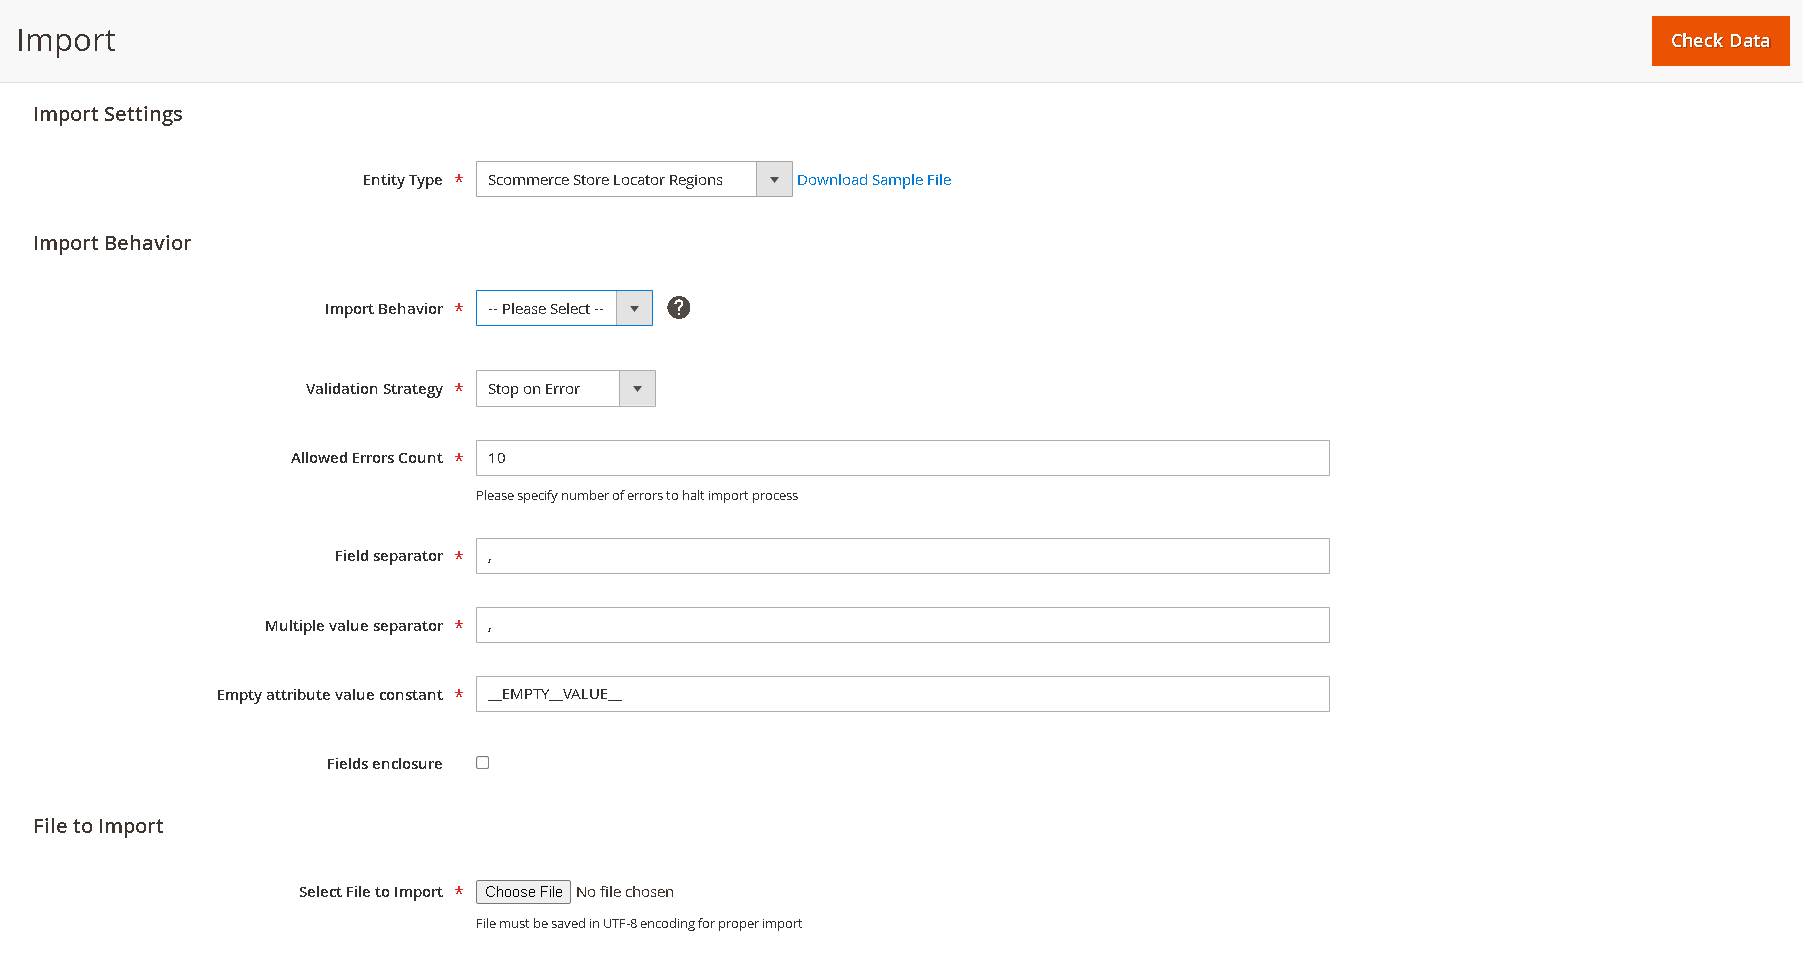
select the import file and other settings as needed then
// Sample Import File

Name,Description, Image
Greater London,"The metropolitan area surrounding London, known for its diverse neighborhoods and vibrant commercial activity.", “greater-london.jpg“
West Midlands,"A central region in England known for its industrial heritage and growing retail hubs.", “west-midland.jpg“
North West,"Encompasses major cities like Manchester and Liverpool, with a mix of urban and suburban retail locations.", “north-west.jpg“
2. Store Management & Region Association (Admin)
This section describes how administrators can create, manage, and associate individual store locations with the regions you've defined.
2.1. Accessing Store Management
To manage your store locations:

2.2. Creating a New Store
Follow these steps to add a new store location:
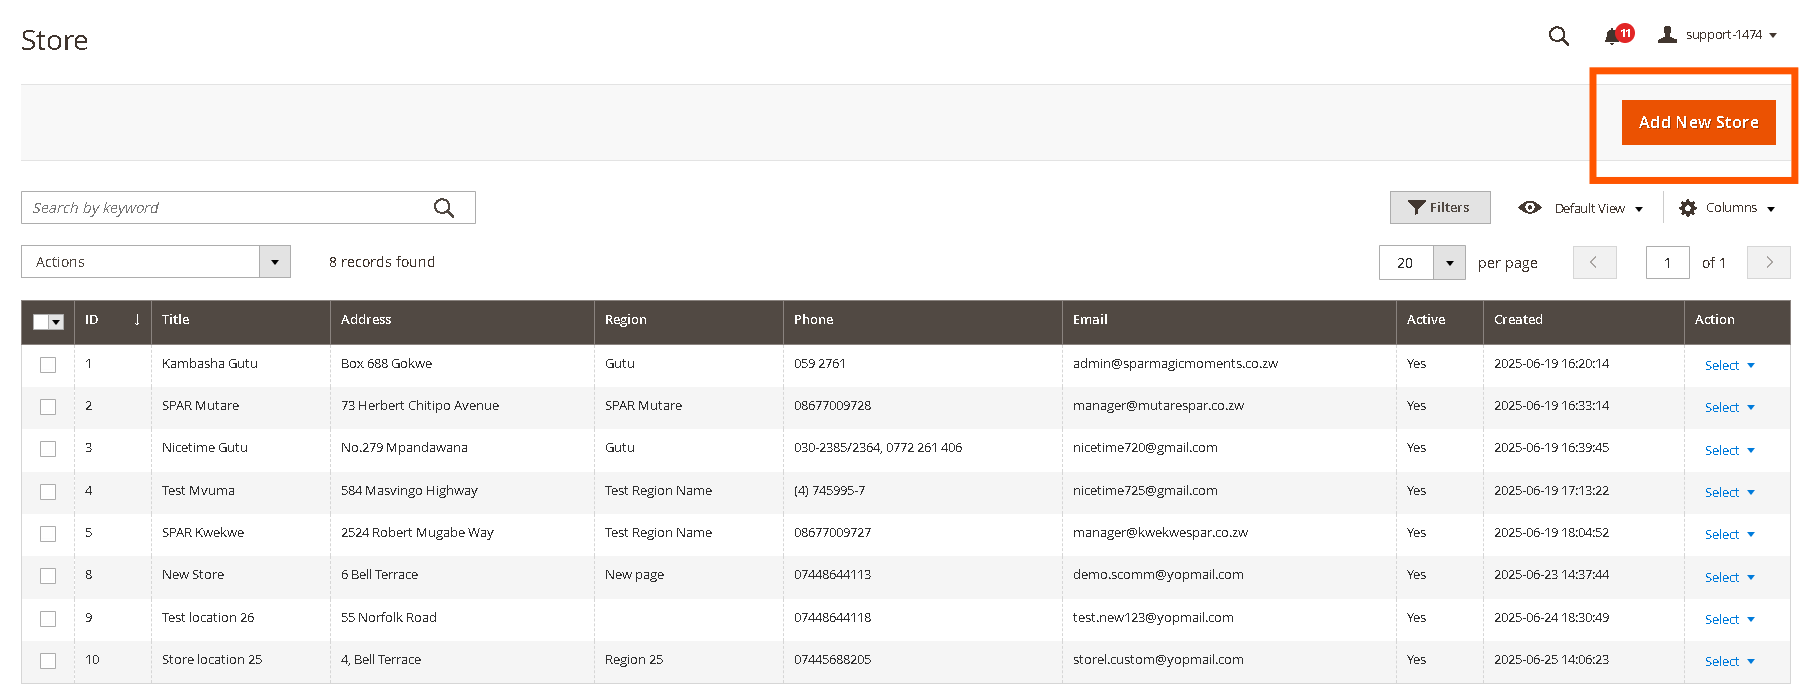
-
On the Store Locations grid page, click the Add New Store button in the top-right corner.
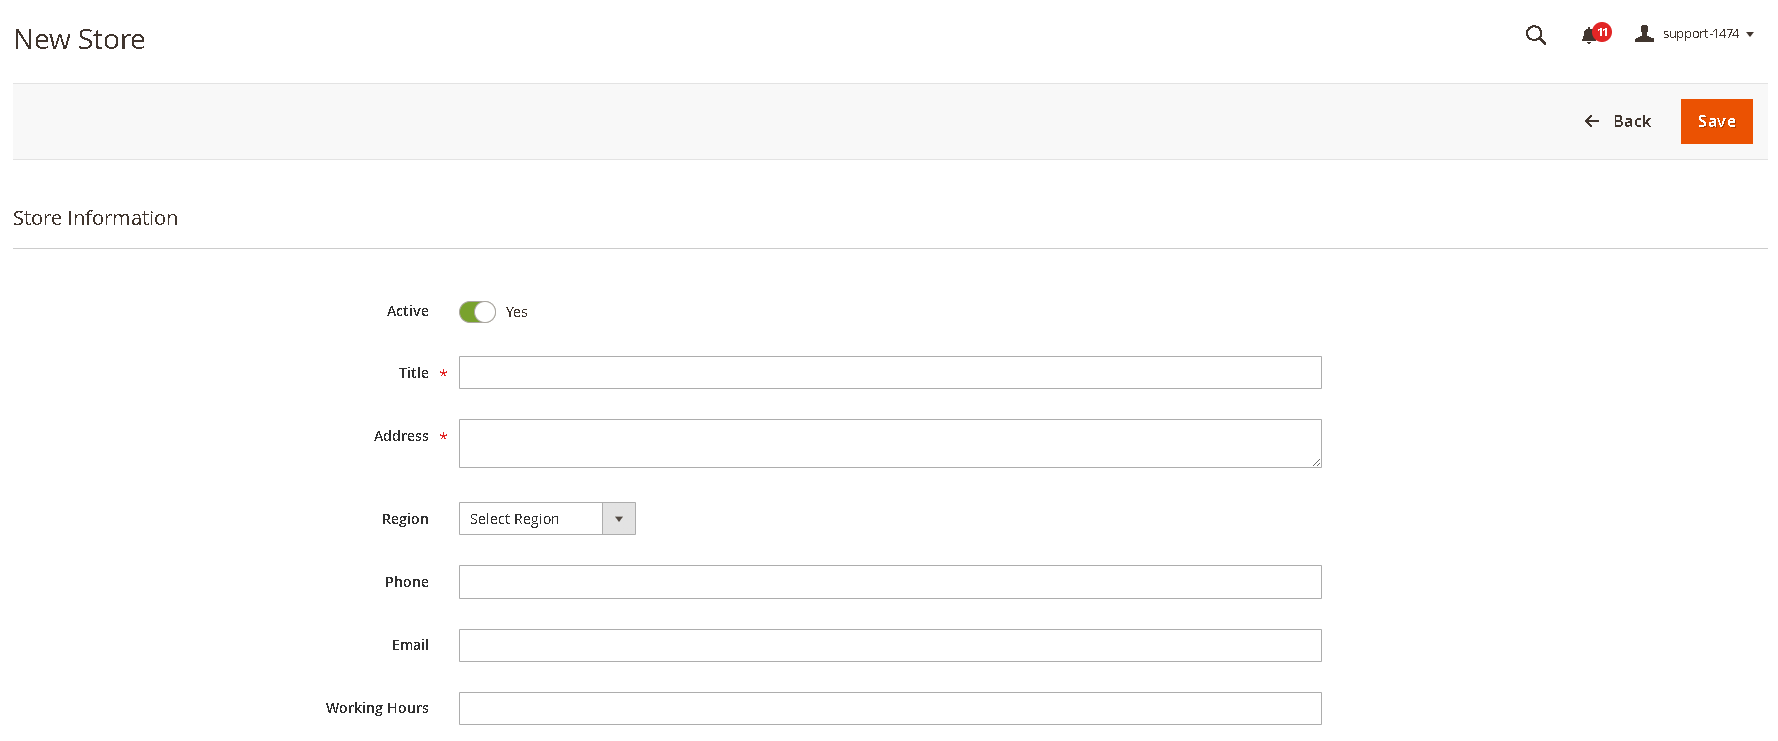
-
You will be redirected to the New Store page. Fill in the following details:
- Active: Toggle to activate or deactivate the region.
- Store Title: (Required) Enter the name of the store (e.g., "Main Street Branch").
- Store Address: (Required) Provide the full physical address of the store. This will be used for the Google Map display on the frontend.
- Region Selection: (Optional) Select an existing region from the dropdown menu to associate this store with. This dropdown will populate with regions created in the "Region Management" section.
- Phone: (Optional) Enter the store's contact number.
- Email: (Optional) Provide the store's email address.
- Working Hours: (Optional) Describe the store's operating hours (e.g., "Mon-Fri: 9 AM - 6 PM, Sat: 10 AM - 4 PM").
- Days Open: (Optional) List the days the store is open (e.g., "Monday - Saturday").
- Description: (Optional) Any other relevant information about the store (e.g., "Free Parking Available," "Wheelchair Accessible" , "Short Description").
- Latitude: Enter lattitude of the store location
- Longitude: Enter longitude of the store location
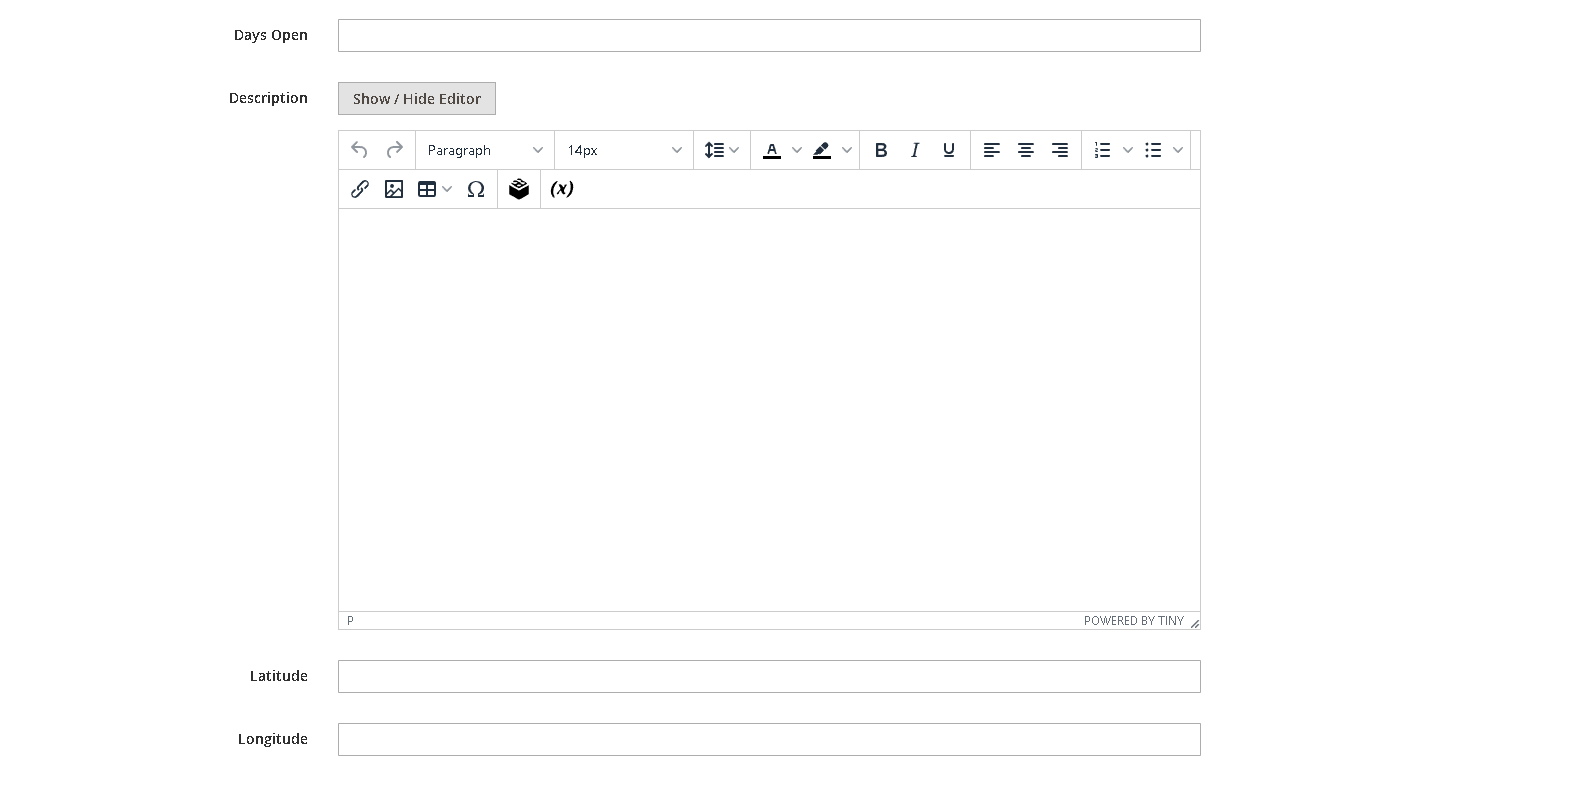
-
Click Save Store to create the new store. A success message will appear, and you will be redirected back to the Store Management grid.
2.3. Editing Existing Stores
To modify details of an existing store, including its assigned region:
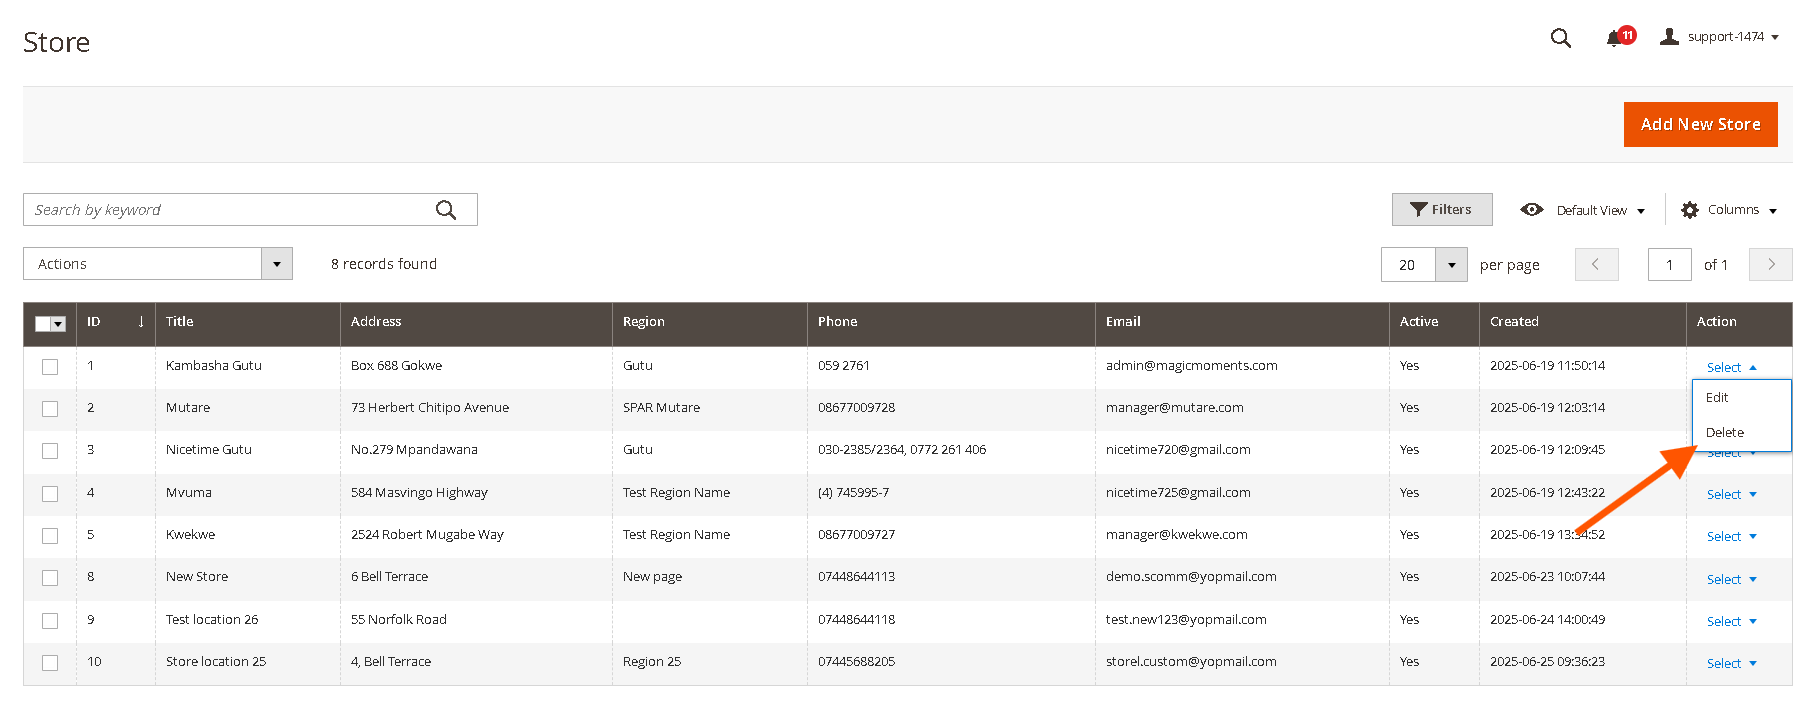
- From the Store Locations grid, locate the store you wish to edit. The grid displays ID, Title, Address, Region, Phone, Email, Active, Created, and Actions.
- In the Actions column for that store, click Edit
- Clicking Edit will open the store details page where you can modify any of the fields, including the Region Selection.
- Clicking View will open the store details page in a read-only mode.
- After making any changes, click Save Store to apply your updates.

2.4. Deleting a Store
To remove a store location from your system:
-
From the Store Management grid, locate the store you wish to delete.
-
In the Actions column for that store, click Delete.
-
Alternatively you can also edit the store and then use the "Delete" button at the top.
-
A confirmation pop-up will appear. Click OK to confirm the deletion.
-
Once a store is successfully deleted, it will be removed from the grid and will no longer appear on the front-end Store Locator. Deleting a store only removes that specific store and does not affect other stores within the same region.
-
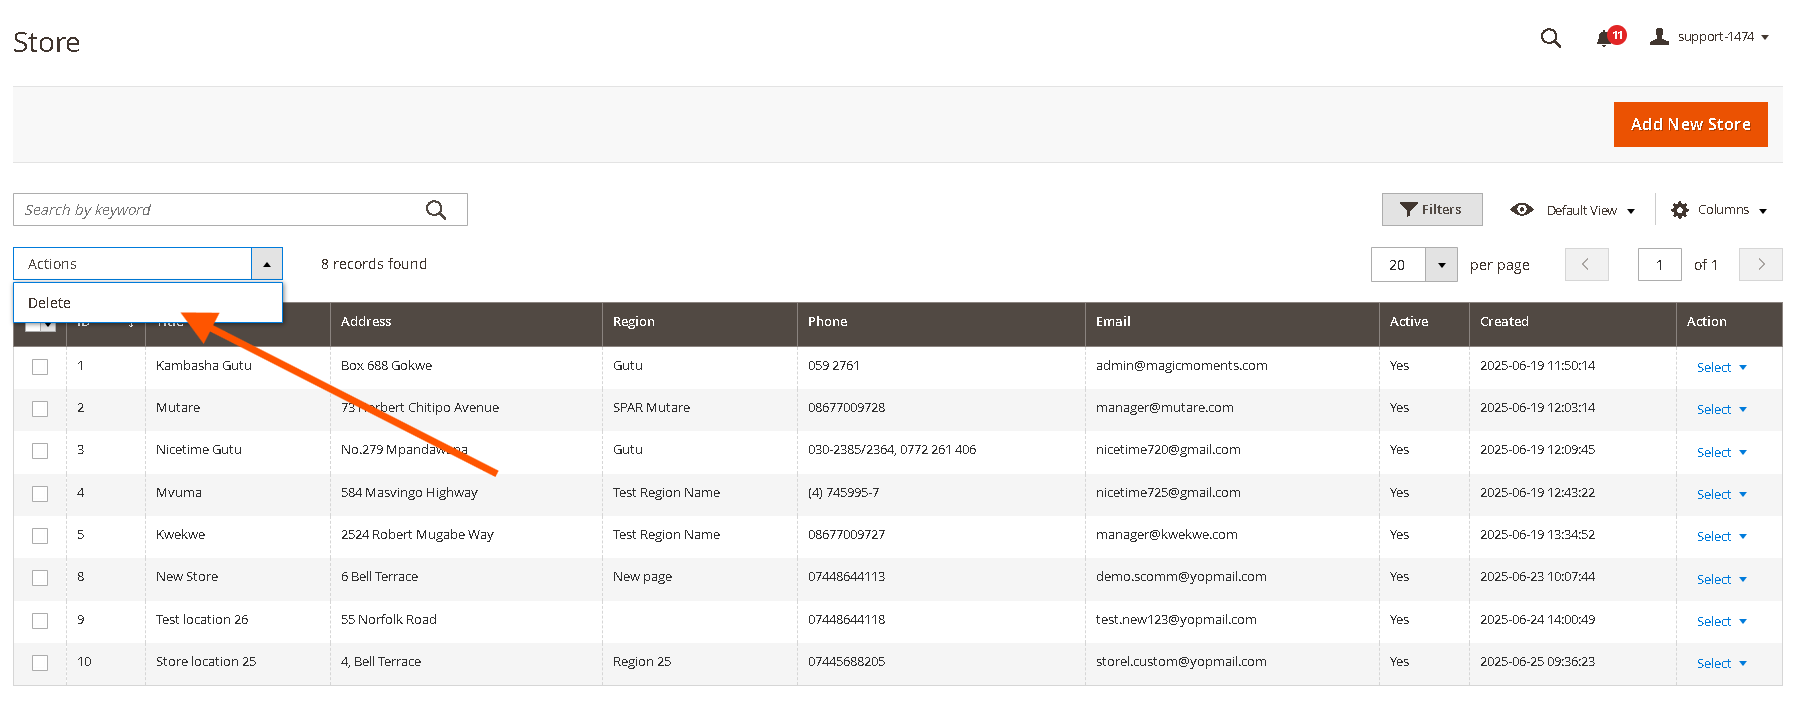
You can also Mass delete regions using following steps:
- Select checkboxes next to messages.
- From the Actions dropdown, choose "Delete".
- Confirm by clicking "OK" in the popup.
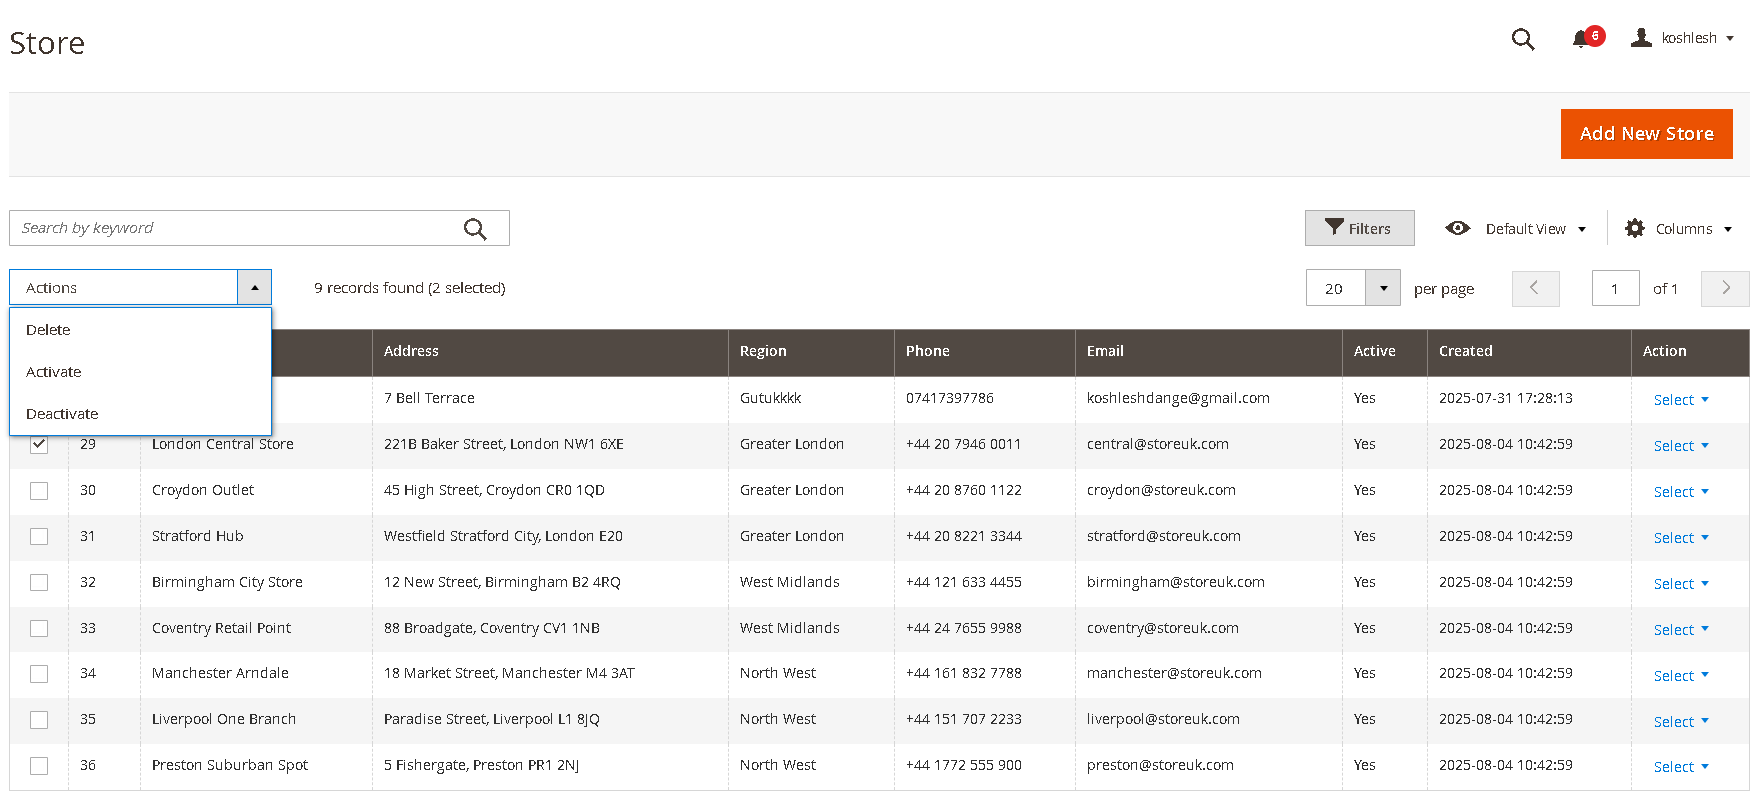
2.5. Mass Action to Activate/Deactivate/Delete Store Locations
Go to Admin>Stores>Scommerce Store Locator>Store Locations select the stores that you want to Deactivate/Activate/Delete. Next click on the mast action button and then select the action as shown below:-
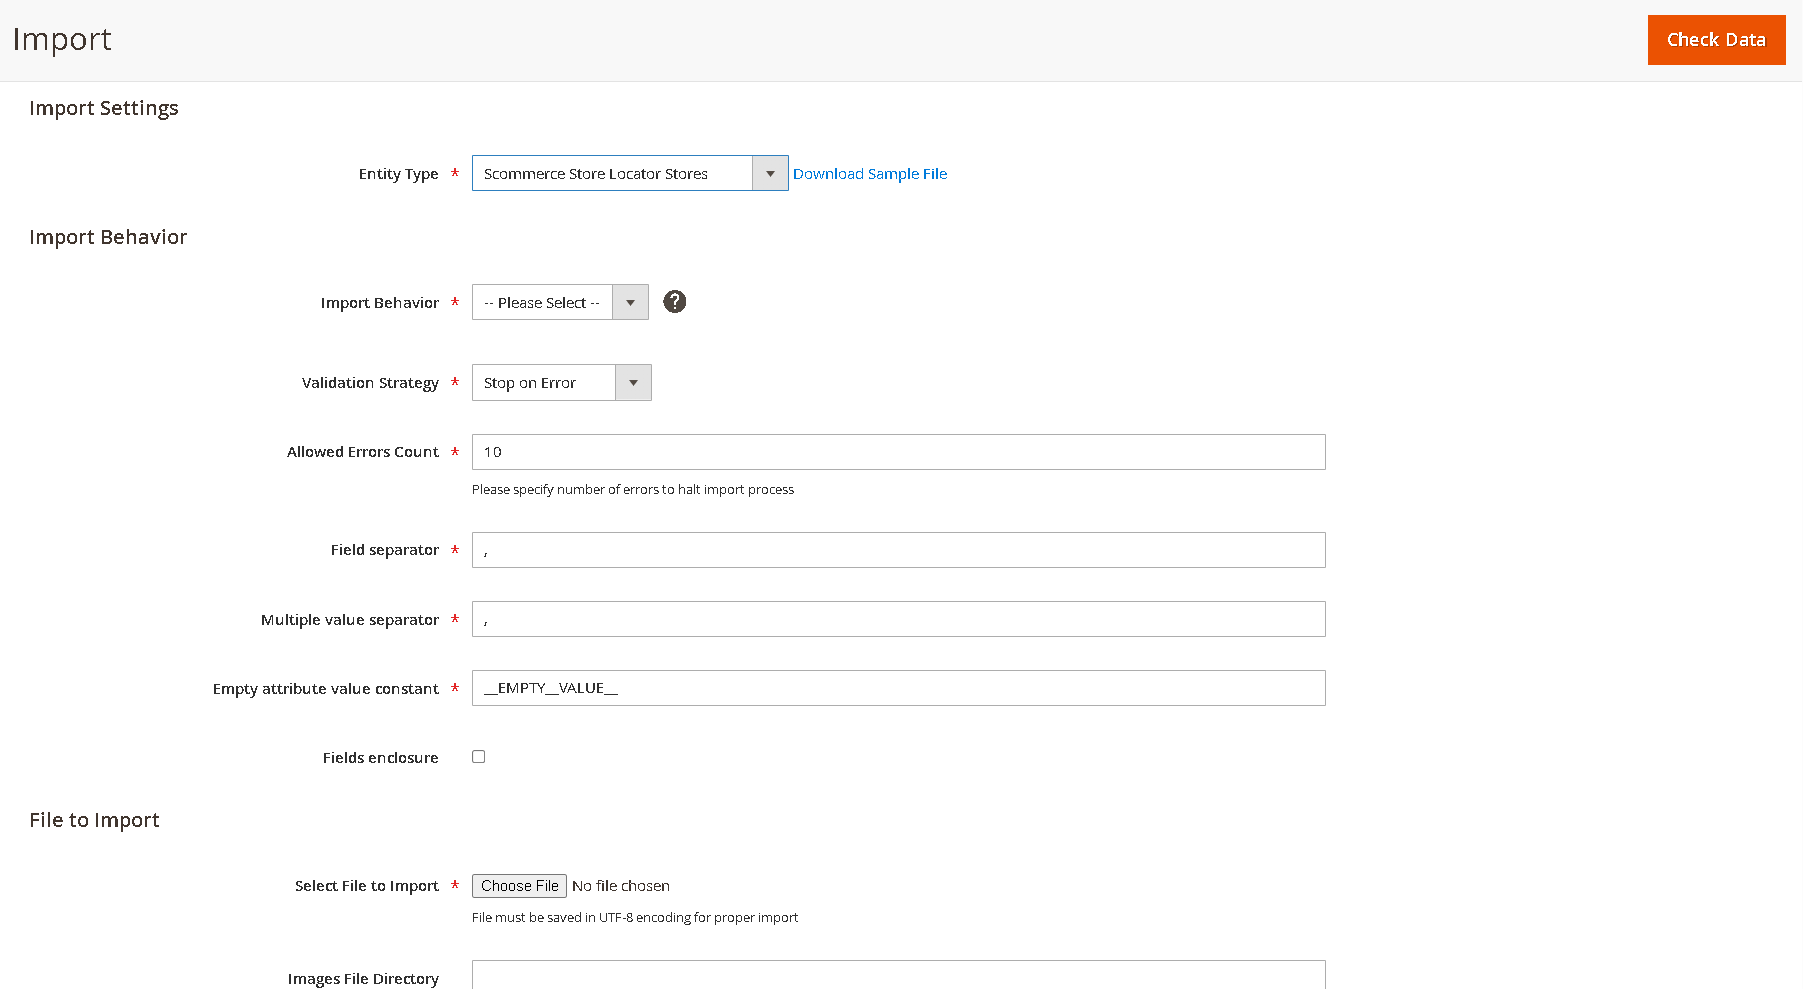
2.6. Import Stores
Go to Admin>System>Data Transfer>Import.
From the Entity Type dropdown select "Scommerce Store Locator Stores"
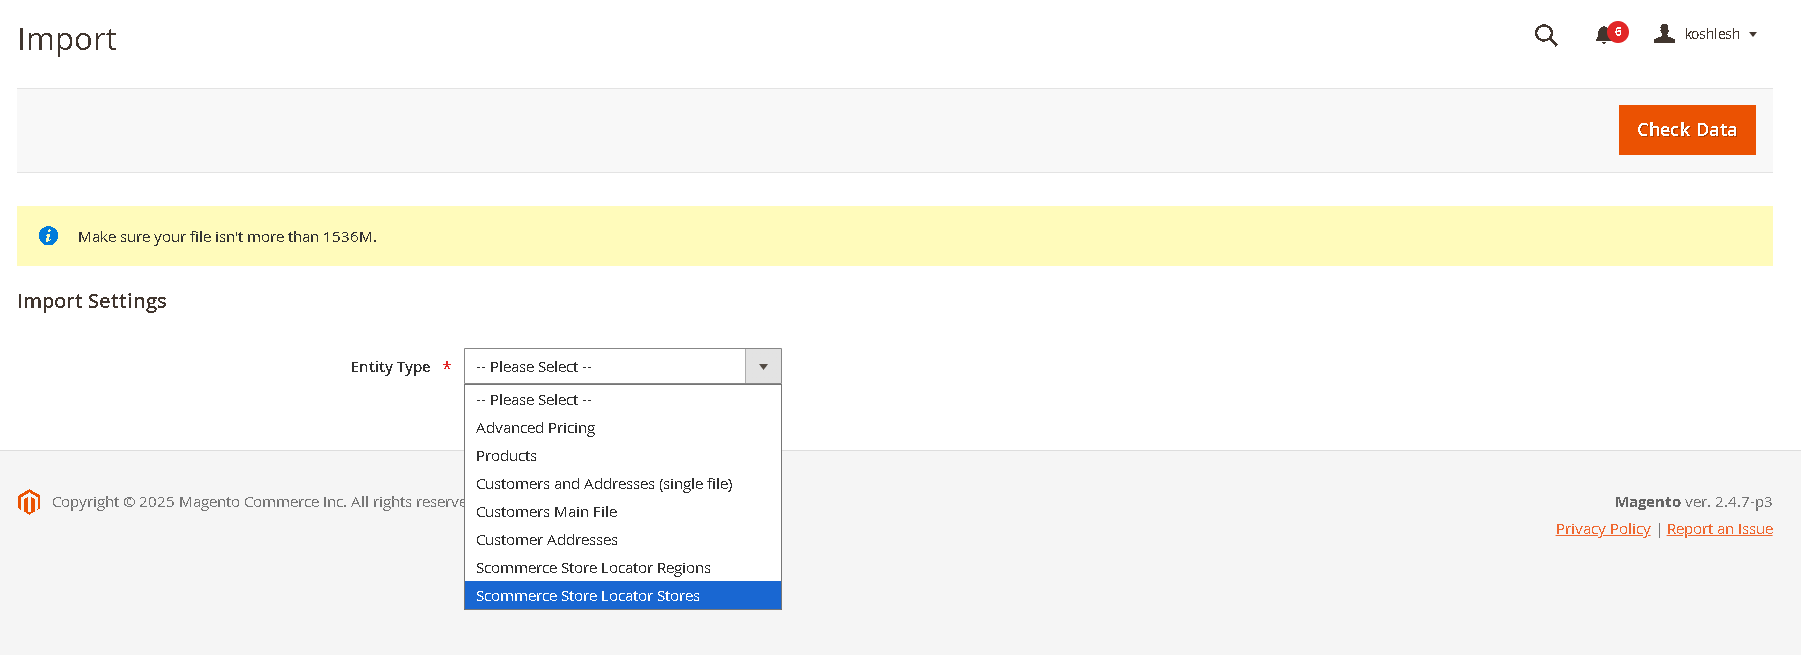
select the import file and other settings as needed then
// Sample Import File

Name,Address,Description,Region,Email,Phone,Working Hours,Longitude,Latitude,Days Open
London Central Store,"221B Baker Street, London NW1 6XE","Flagship store near Regent's Park",Greater London,central@storeuk.com,+44 20 7946 0011,"Mon–Sat: 9am–7pm",-0.1586,51.5237,"Monday–Saturday"
Croydon Outlet,"45 High Street, Croydon CR0 1QD","Discount outlet with parking",Greater London,croydon@storeuk.com,+44 20 8760 1122,"Mon–Fri: 10am–6pm",-0.1004,51.3762,"Monday–Friday"
Stratford Hub,"Westfield Stratford City, London E20","Modern store in shopping centre",Greater London,stratford@storeuk.com,+44 20 8221 3344,"Daily: 10am–8pm",-0.0064,51.5430,"All week"
Birmingham City Store,"12 New Street, Birmingham B2 4RQ","High-traffic location near Bullring",West Midlands,birmingham@storeuk.com,+44 121 633 4455,"Mon–Sat: 9am–6pm",-1.8998,52.4797,"Monday–Saturday"
Coventry Retail Point,"88 Broadgate, Coventry CV1 1NB","Family-friendly store with café",West Midlands,coventry@storeuk.com,+44 24 7655 9988,"Tue–Sun: 10am–5pm",-1.5105,52.4081,"Tuesday–Sunday"
Manchester Arndale,"18 Market Street, Manchester M4 3AT","Located in the heart of the city",North West,manchester@storeuk.com,+44 161 832 7788,"Daily: 9am–8pm",-2.2417,53.4839,"All week"
Liverpool One Branch,"Paradise Street, Liverpool L1 8JQ","Stylish store with seasonal offers",North West,liverpool@storeuk.com,+44 151 707 2233,"Mon–Sat: 10am–7pm",-2.9840,53.4045,"Monday–Saturday"
Preston Suburban Spot,"5 Fishergate, Preston PR1 2NJ","Quiet location with easy access",North West,preston@storeuk.com,+44 1772 555 900,"Wed–Sun: 11am–5pm",-2.7034,53.7590,"Wednesday–Sunday"
3. Store List Display on Frontend (Customer)
This section describes how customers will interact with the Store Locator on your website's front-end.
3.1. Viewing Stores Within a Selected Region
Customers can easily find stores by filtering them by region:
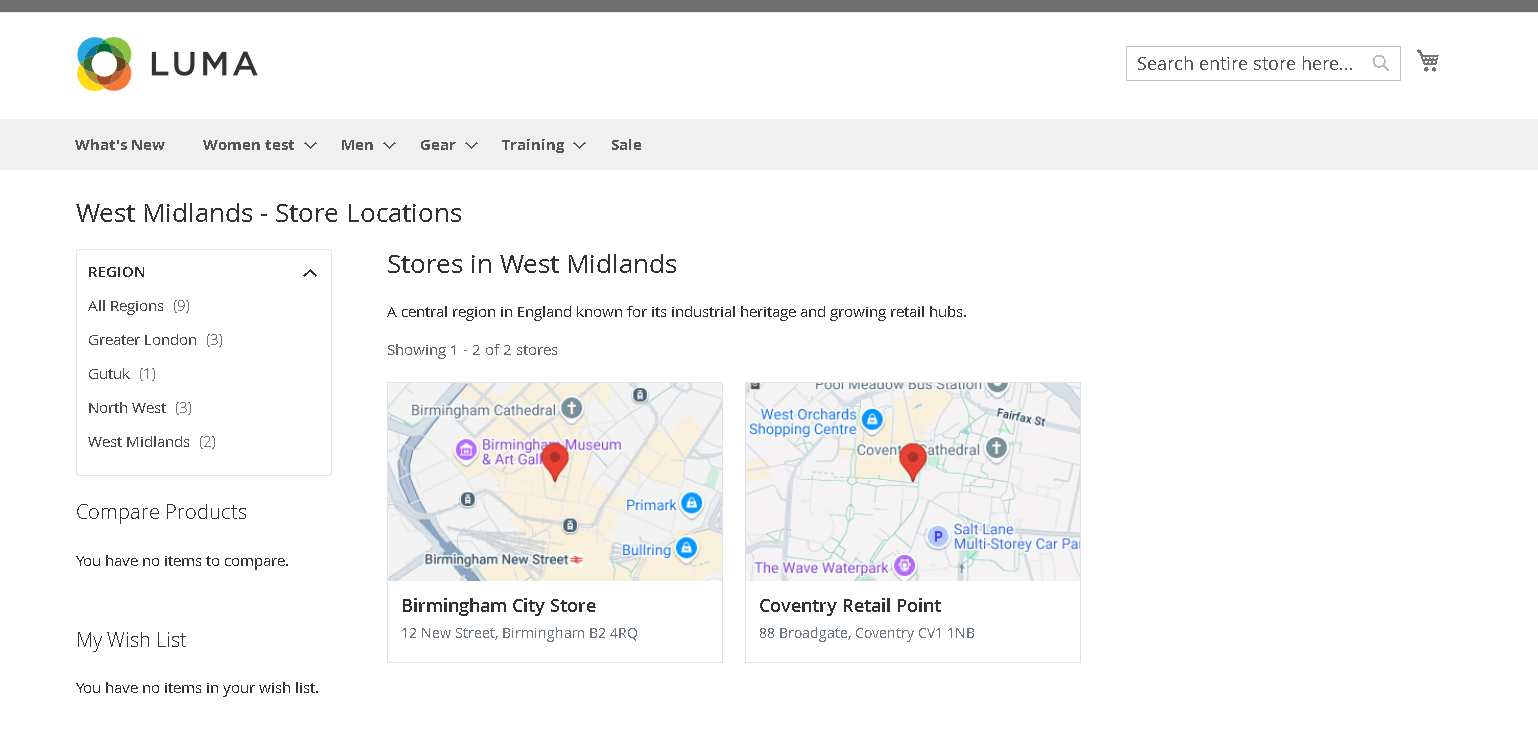
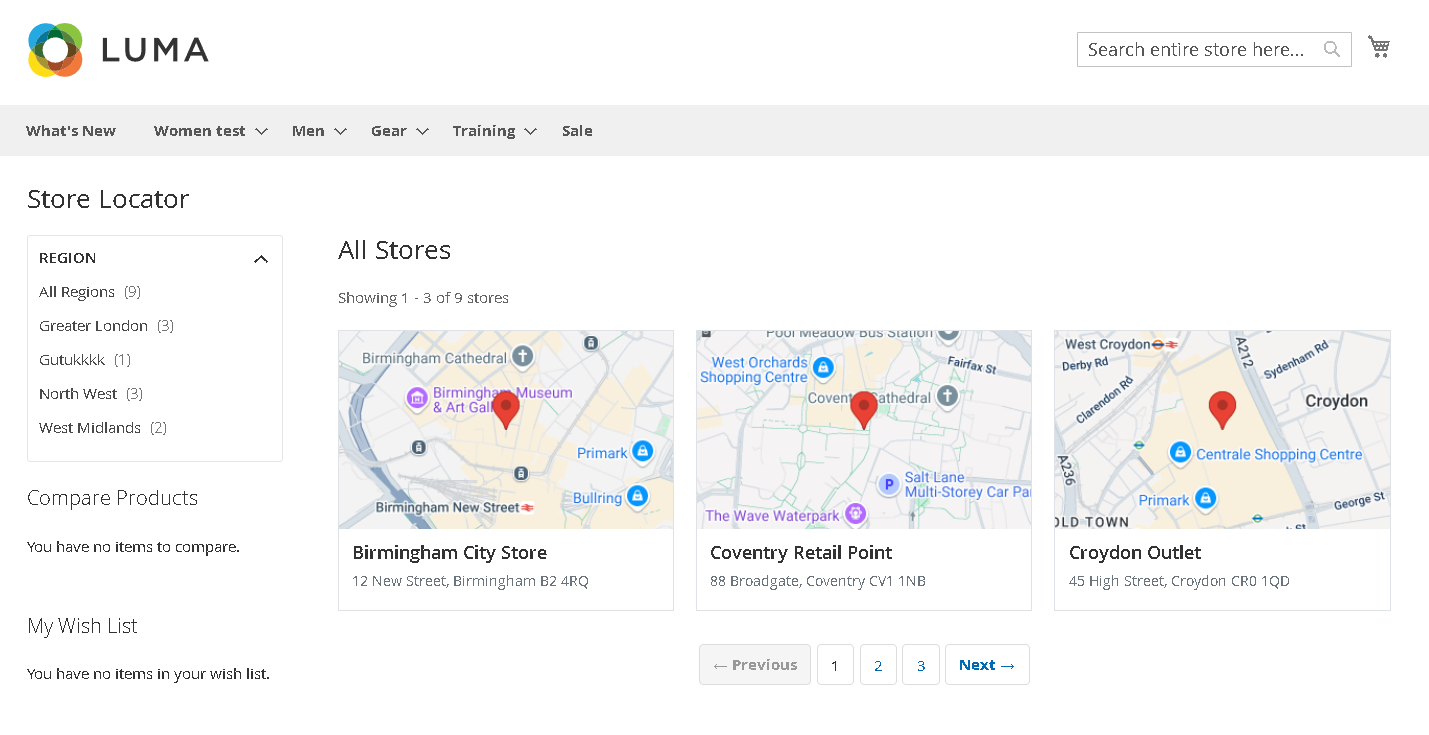
3.2. Viewing All Stores (Without Region Selection)
The Store Locator also allows customers to view all stores without initially filtering by region:
4. Store Detail View (Customer)
This workflow describes how customers can access and view detailed information for a specific store.
4.1. Accessing Store Detail View
- From any store list display (either filtered by region or showing all stores), click on the name of a specific store or an associated "View Details" link.
4.2. Understanding the Layout
- Region List Visibility: The presence of the region list on the left-hand navigation on the store detail page is determined by a configuration setting in the admin panel. Your administrator will decide whether this list is shown or hidden.
- Layout Adaptation:
- If no stores in the system have an associated region, the store detail page will automatically be full width.
- If at least one store is linked to a region, the available regions will be displayed in the left-hand navigation based on the aforementioned configuration.
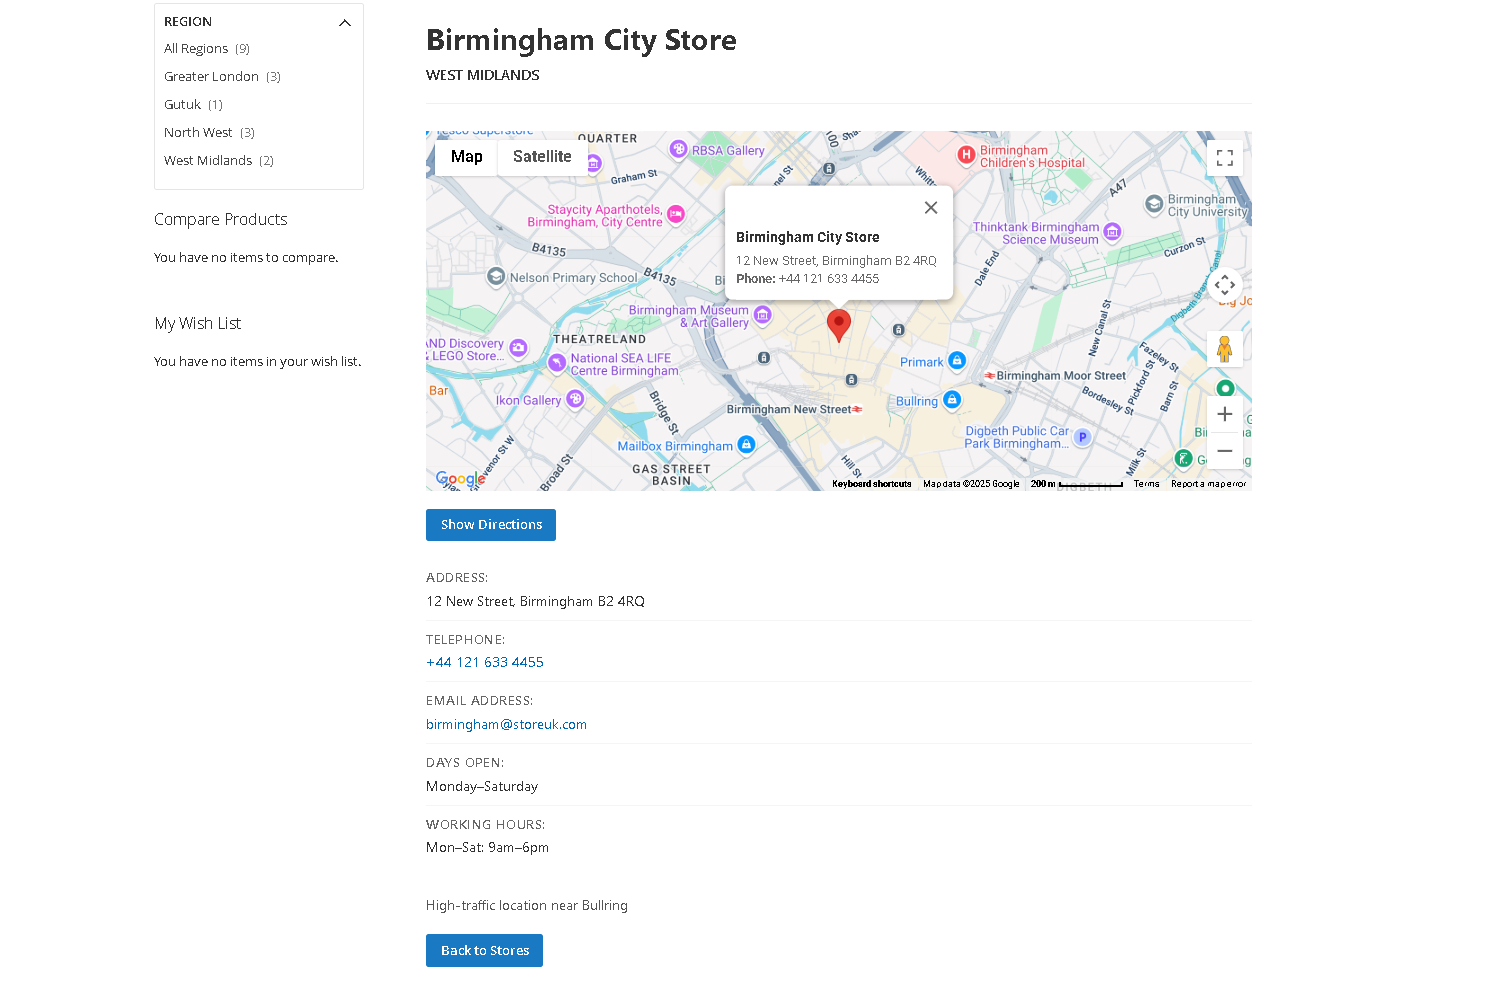
4.3. Detailed Store Information
The store detail view provides comprehensive information about the selected store, including:
- Large Google Map: A larger, more prominent Google Map showing the precise location of the store based on its address.
- Show Directions: Clicking on this button takes you to the map (link) where people can view the directions to the store.
- Store Name and Full Address: Clearly displayed for easy identification.
- Telephone Number: For direct contact.
- Email: For direct email communication.
- Days Open: The specific days the store is open.
- Working Hours: Detailed operating hours.
- Additional Store Details: Any extra information provided by the admin.
- Region: (If applicable) The region to which the store is assigned, providing geographical context.
- Back Button: A button to go back to the list of stores page.
4.4. Navigating Back
To return to the store listing:
- Click the "Back to Stores" link or button. This will navigate you back to the previous store listing page, whether it was filtered by region or showing all stores.
If you have a question related to this extension please check out our FAQ Section first. If you can't find the answer you are looking for then please contact support@scommerce-mage.com.